Aop相关BeanDefinition注册
org.springframework.aop.config.ConfigBeanDefinitionParser
注册AspectJAwareAdvisorAutoProxyCreator 的 BeanDefinition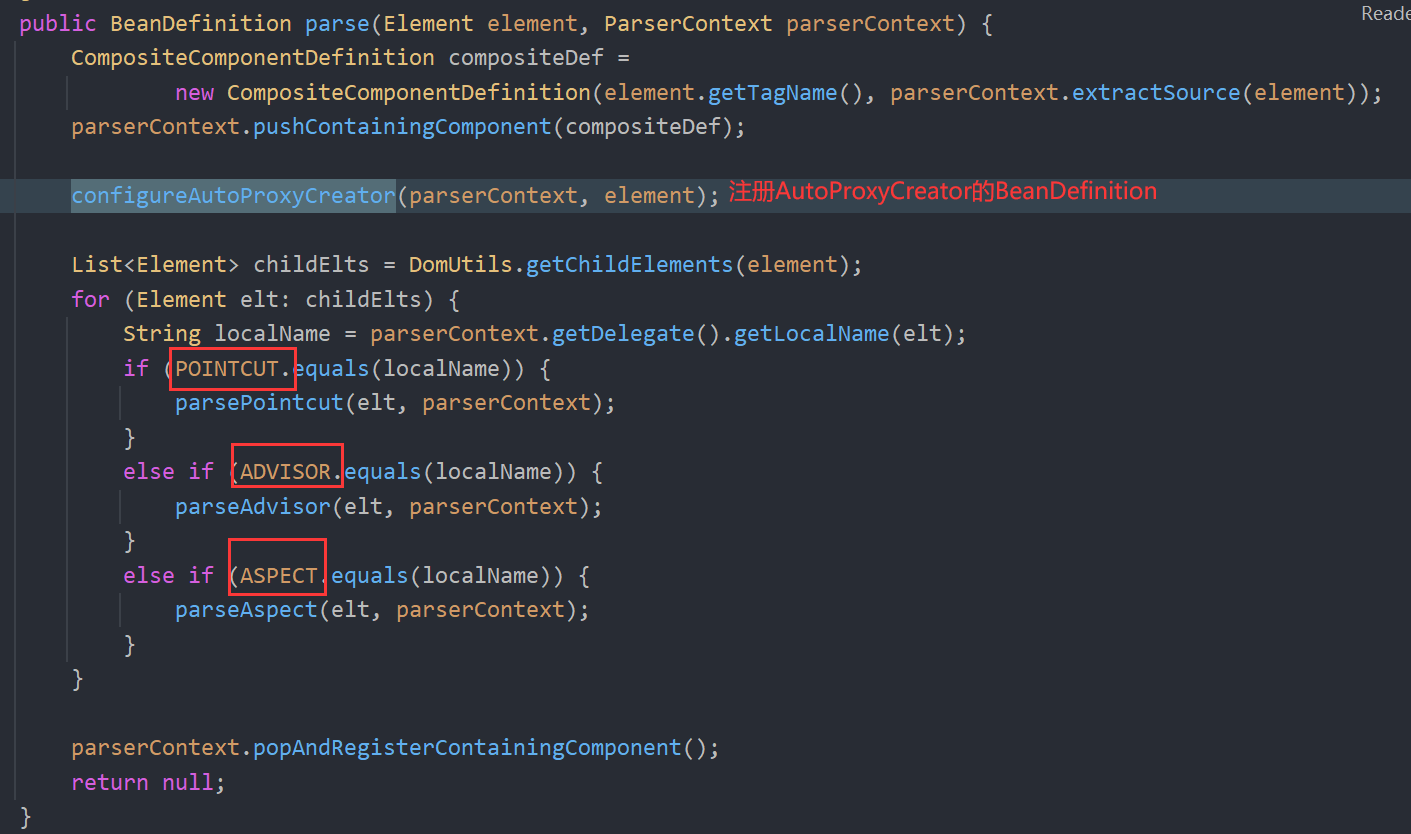

parseAspect()解析出Aspect代理的BeanDefinition。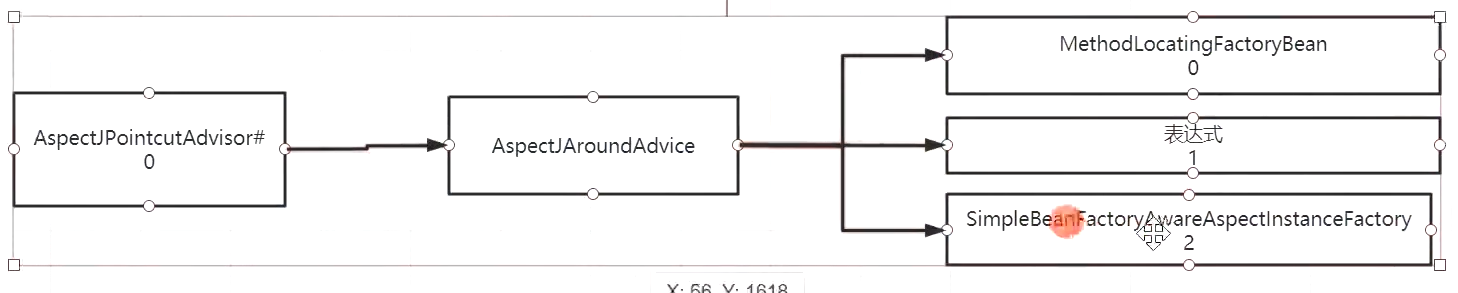
AbstractAutoProxyCreator
postProcessBeforeInstantiation

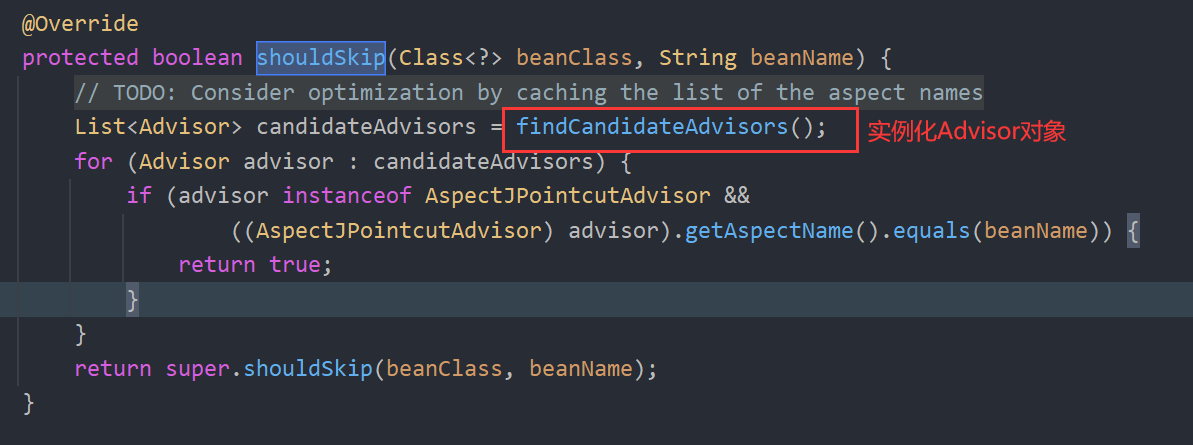
shouldSkip()
AspectJAwareAdvisorAutoProxyCreator#shouldSkip()
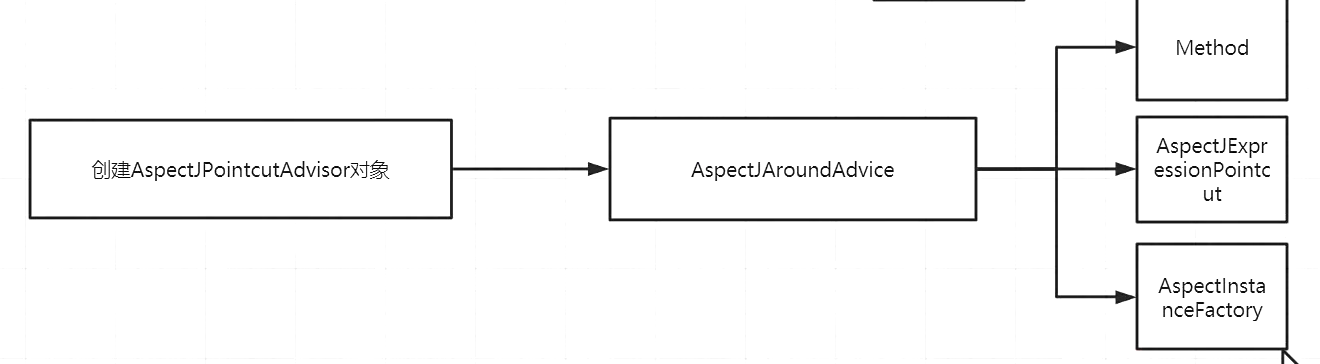
从容器中找到Advisor添加:
创建Advisor过程会存放一个cache:
创建Advisor过程:

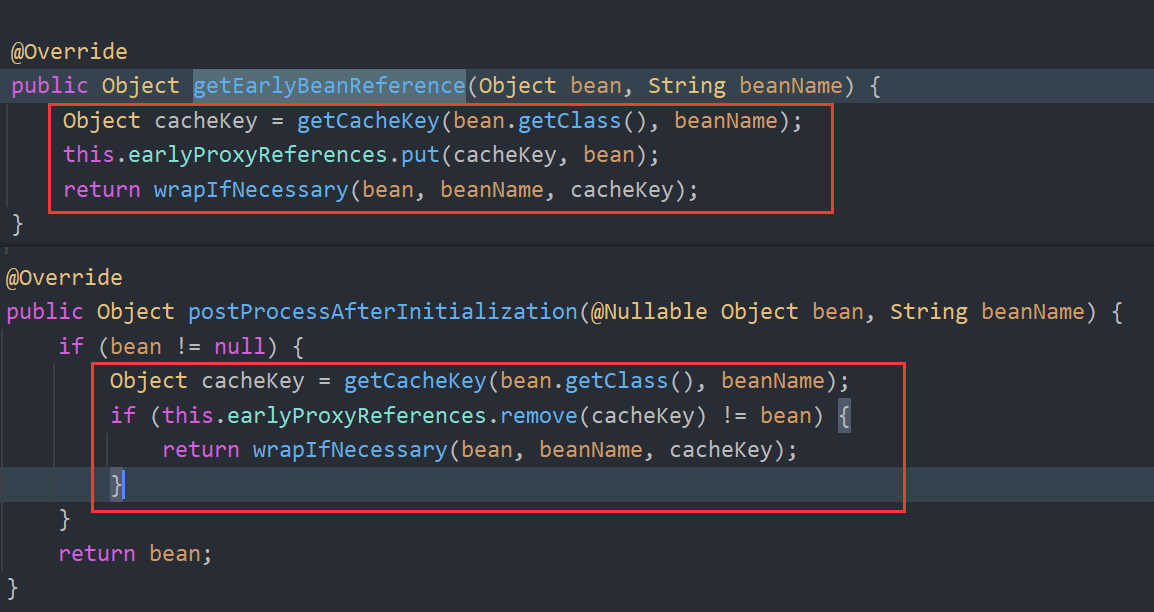
getEarlyBeanReference
——-
AOP原理
- @EnableAspectJAutoProxy 中有 @Import(AspectJAutoProxyRegistrar.class)
- class AspectJAutoProxyRegistrar implements ImportBeanDefinitionRegistrar
- ImportBeanDefinitionRegistrar 注入AnnotationAwareAspectJAutoProxyCreator
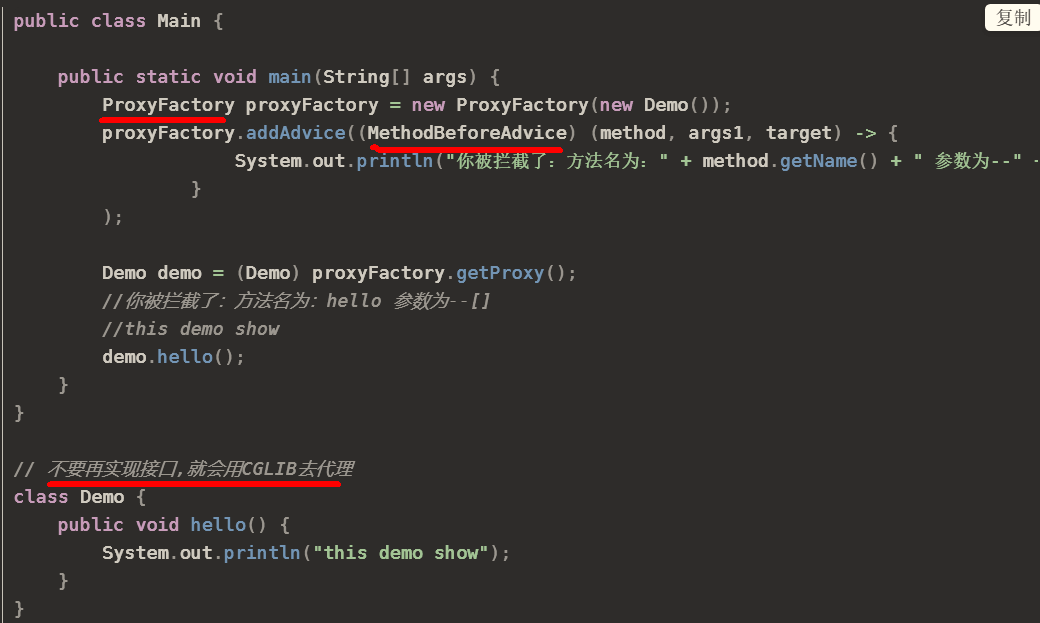
手动的话通过ProxyFactoryBean手动注册代理,麻烦,AutoProxyCreator自动注入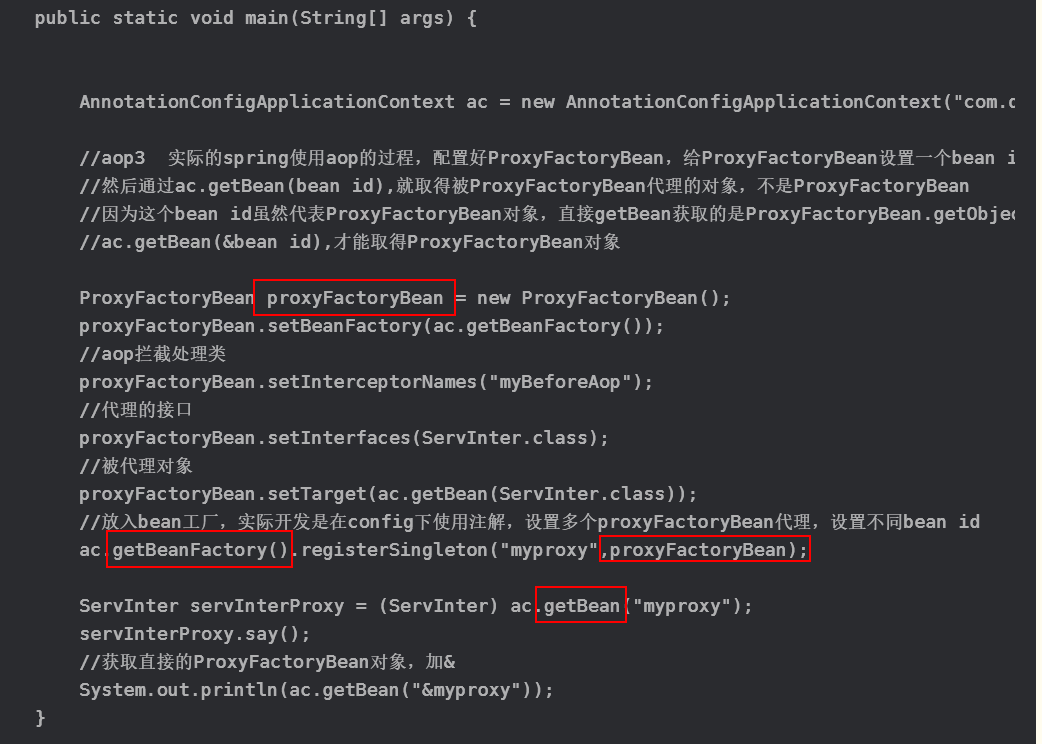

AbstractAutoProxyCreator 实现了 SmartInstantiationAwareBeanPostProcessor
AbstractAutoProxyCreator中的postProcessBeforeInstantiation()和postProcessAfterInitializatio()
- postProcessBeforeInstantiation中如果获取到自定义的TargetSource则直接创建代理对象,创建代理对象之前先调用getAdvicesAndAdvisorsForBean获取拦截对象Advisors,然后调用createProxy创建代理对象。
- 如果没有自定义TargetSource,则走到postProcessAfterInitialization方法创建代理,逻辑跟上面一样,唯一不同的是创建了个默认的TargetSource (SingletonTargetSource)
在对象实例化前(postProcessBeforeInstantiation)的扩展中,主要对配置了customTargetSourceCreators属性的情况进行处理,而默认的处理都是在初始化后(postProcessAfterInitialization)扩展里执行的。
Spring源码阅读-AOP实现核心类AbstractAutoProxyCreator - 程小员的个人页面 - OSCHINA
TargetSource
// 首先定义一个被代理的目标类public class TargetBean {// 此方法演示使用public void show() {System.out.println("show");}}// 接下来是创建代理对象的过程public class AOPDemo {public static void main(String[] args) {TargetBean target = new TargetBean();TargetSource targetSource = new SingletonTargetSource(target);// 使用SpringAOP框架的代理工厂直接创建代理对象TargetBean proxy = (TargetBean) ProxyFactory.getProxy(targetSource);// 这里会在控制台打印:com.lixin.aopdemo.TargetBean$$EnhancerBySpringCGLIB$$767606b3System.out.println(proxy.getClass().getName());}}
实现自定义的TargetSource
public class Apple {private int id;public Apple(int id) {this.id = id;}public void eat() {System.out.println("eat apple, id: " + id);}}
public class AppleTargetSource implements TargetSource {private Apple apple1;private Apple apple2;public AppleTargetSource() {this.apple1 = new Apple(1);this.apple2 = new Apple(2);}@Overridepublic Class < ?>getTargetClass() {return Apple.class;}@Overridepublic boolean isStatic() {return false;}@Overridepublic Object getTarget() throws Exception {ThreadLocalRandom random = ThreadLocalRandom.current();int index = random.nextInt(2);return index % 2 == 0 ? apple1: apple2;}@Overridepublic void releaseTarget(Object target) throws Exception {}}
<?xml version="1.0" encoding="UTF-8"?><beans xmlns="http://www.springframework.org/schema/beans"xmlns:xsi="http://www.w3.org/2001/XMLSchema-instance" xmlns:aop="http://www.springframework.org/schema/aop"xsi:schemaLocation="http://www.springframework.org/schema/beans http://www.springframework.org/schema/beans/spring-beans.xsd http://www.springframework.org/schema/aop http://www.springframework.org/schema/aop/spring-aop.xsd"><bean id="targetSource" class="chapter7.eg10.AppleTargetSource"/><aop:aspectj-autoproxy/></beans>
public class CustomTargetSourceApp {public static void main(String[] args) throws Exception {ApplicationContext context = new ClassPathXmlApplicationContext("chapter7/eg10/applicationContext.xml");TargetSource targetSource = (TargetSource) context.getBean("targetSource");for (int i = 0; i < 10; i++) {Apple apple = (Apple) targetSource.getTarget();apple.eat();}}}
Spring Aop之Target Source详解_java_lw_yang的博客-CSDN博客
官方文档:
一般自定义target source都是 prototype的
37. Classic Spring AOP Usage
@Aspect在哪被找到的?
AbstractAutoProxyCreator#postProcessBeforeInstantiation 虽然大部分代理都不是这里创建的,但这里 shouldSkip(beanClass, beanName) 【比较隐蔽】会记录有@Aspect注解名字的bean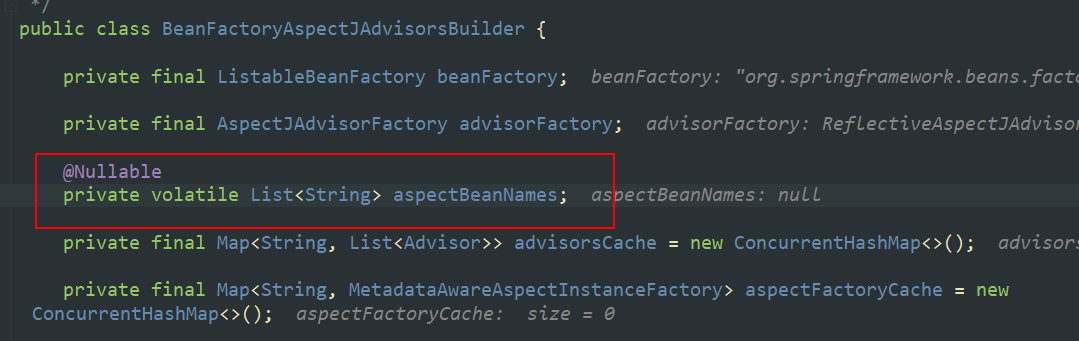
AnnotationAwareAspectJAutoProxyCreator会持有BeanFactoryAspectJAdvisorsBuilder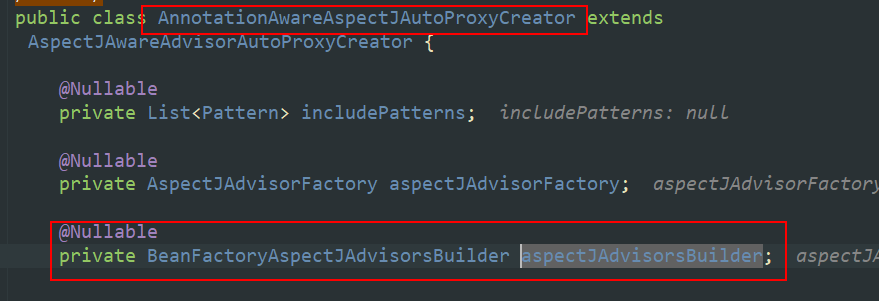
// 这个很重要,在Bean实例化之前,先给一个机会,看看缓存里有木有,有就直接返回得了// 简单的说:其主要目的在于如果用户使用了自定义的TargetSource对象,则直接使用该对象生成目标对象,而不会使用Spring的默认逻辑生成目标对象// (并且这里会判断各个切面逻辑是否可以应用到当前bean上)@Overridepublic Object postProcessBeforeInstantiation(Class < ?>beanClass, String beanName) throws BeansException {Object cacheKey = getCacheKey(beanClass, beanName);// beanName无效或者targetSourcedBeans里不包含此Beanif (!StringUtils.hasLength(beanName) || !this.targetSourcedBeans.contains(beanName)) {//advisedBeans:已经被通知了的(被代理了的)Bean~~~~ 如果在这里面 也返回nullif (this.advisedBeans.containsKey(cacheKey)) {return null;}// isInfrastructureClass:Advice、Pointcut、Advisor、AopInfrastructureBean的子类,表示是框架所属的Bean// shouldSkip:默认都是返回false的。AspectJAwareAdvisorAutoProxyCreator重写此方法:只要存在一个Advisor ((AspectJPointcutAdvisor) advisor).getAspectName().equals(beanName)成立 就返回trueif (isInfrastructureClass(beanClass) || shouldSkip(beanClass, beanName)) {// 所以这里会把我们所有的Advice、Pointcut、Advisor、AopInfrastructureBean等Bean都装进来this.advisedBeans.put(cacheKey, Boolean.FALSE);return null;}}//到这,只有在TargetSource中没有进行缓存,并且应该被切面逻辑环绕,但是目前还未生成代理对象的bean才会通过此方法// Create proxy here if we have a custom TargetSource.// 如果我们有TargetSourceCreator,这里就会创建一个代理对象// getCustomTargetSource逻辑:存在TargetSourceCreator 并且 beanFactory.containsBean(beanName) 然后遍历所有的TargetSourceCreator,调用getTargetSource谁先创建不为null就终止TargetSource targetSource = getCustomTargetSource(beanClass, beanName);// 若创建好了这个代理对象,继续进一步的操作:::if (targetSource != null) {if (StringUtils.hasLength(beanName)) {// 缓存起来this.targetSourcedBeans.add(beanName);}//getAdvicesAndAdvisorsForBean:方法判断当前bean是否需要进行代理,若需要则返回满足条件的Advice或者Advisor集合// 这个方法由子类实现,AbstractAdvisorAutoProxyCreator和BeanNameAutoProxyCreator 代表中两种不同的代理方式Object[] specificInterceptors = getAdvicesAndAdvisorsForBean(beanClass, beanName, targetSource);// 顾名思义,就是根据目标对象创建代理对象的核心逻辑了 下面详解Object proxy = createProxy(beanClass, beanName, specificInterceptors, targetSource);// 把创建好的代理 缓存~~~this.proxyTypes.put(cacheKey, proxy.getClass());return proxy;}return null;}
【小家Spring】Spring AOP的核心类:AbstractAdvisorAutoProxy自动代理创建器深度剖析(AnnotationAwareAspectJAutoProxyCreator)_YourBatman-CSDN博客
AOP代理对象如何被创建的
JdkDynamicAopProxy
// 真正创建JDK动态代理实例的地方 @Override public Object getProxy(@Nullable ClassLoader classLoader) {
if (logger.isDebugEnabled()) {
logger.debug(“Creating JDK dynamic proxy: target source is “ + this.advised.getTargetSource());
}// 这部很重要,就是去找接口 我们看到最终代理的接口就是这里返回的所有接口们(除了我们自己的接口,还有Spring默认的一些接口) 大致过程如下://1、获取目标对象自己实现的接口们(最终肯定都会被代理的)//2、是否添加`SpringProxy`这个接口:目标对象实现对就不添加了,没实现过就添加true//3、是否新增`Adviced`接口,注意不是Advice通知接口。 实现过就不实现了,没实现过并且advised.isOpaque()=false就添加(默认是会添加的)//4、是否新增DecoratingProxy接口。传入的参数decoratingProxy为true,并且没实现过就添加(显然这里,首次进来是会添加的)//5、代理类的接口一共是目标对象的接口+上面三个接口SpringProxy、Advised、DecoratingProxy(SpringProxy是个标记接口而已,其余的接口都有对应的方法的)//DecoratingProxy 这个接口Spring4.3后才提供Class < ?>[] proxiedInterfaces = AopProxyUtils.completeProxiedInterfaces(this.advised, true);findDefinedEqualsAndHashCodeMethods(proxiedInterfaces);// 第三个参数传的this,处理器就是自己嘛 到此一个代理对象就此new出来啦return Proxy.newProxyInstance(classLoader, proxiedInterfaces, this);
}
【小家Spring】详解Spring AOP的底层代理JdkDynamicAopProxy和ObjenesisCglibAopProxy的源码分析(介绍CGLIB使用中的坑)_java_BAT的乌托邦-CSDN博客
CglibAopProxyObjenesisCglibAopProxy
@within和@target的区别
Spring—@within和@target的区别_demon7552003的小本本-CSDN博客
AopContext.currentProxy()
使用AopContext.currentProxy() 需要@EnableAspectJAutoProxy(exposeProxy = true)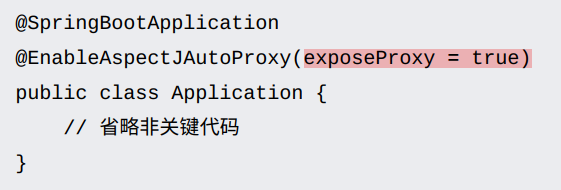
AOP执行顺序
多个Aspect情况
同一个Aspect,不同类型增强
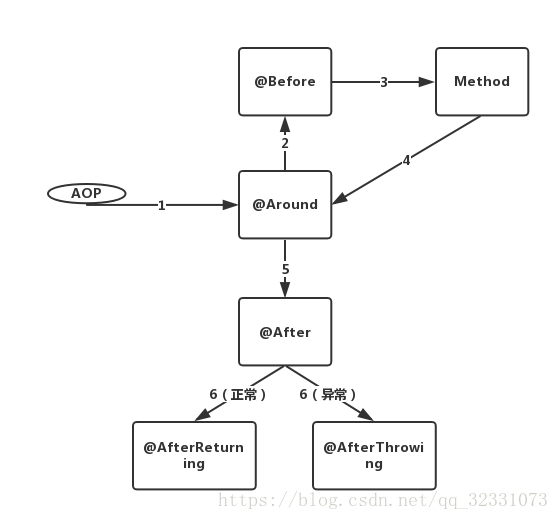
同一个Aspect,同种类型的增强
按方法名排序
- 方法名长度短的优先
- 长度相同按ASCII码,ASCII小的优先。

若有收获,就点个赞吧
0 人点赞
