- 创建型
- 简单工厂模式
- 工厂模式
- 抽象工厂模式
- 单例模式
- 为什么枚举能够实现单例 ?
- 建造者模式
- 原型模式
- 结构型
- 代理模式
- 适配器模式
- 桥梁模式
- 装饰模式
- 门面模式
- 组合模式
- 享元模式
- 行为型
| 线程安全 | 并发性能好 | 可以延迟加载 | 序列化/反序列化安全 | 能抵御反射攻击 |
|---|---|---|---|---|
| 饿汉式 | Y | Y | ||
| 懒汉式-不加锁 | Y | Y | ||
| 懒汉式-加锁 | Y | Y | ||
| 双重检查 Double Check | Y | Y | Y | |
| 静态内部类 | Y | Y | Y | |
| 枚举 | Y | Y | Y |
懒汉式:第一次使用的时候才进行加载
// 非线程安全public class Singleton {private Singleton(){}private static Singleton singleton;public static Singleton getSingleton(){if (singleton == null){singleton = new Singleton();}return singleton;}}// 加锁线程安全,但是每次获取都会加锁判断public class Singleton {private Singleton(){}private static Singleton singleton;public static synchronized Singleton getSingleton(){if (singleton == null){singleton = new Singleton();}return singleton;}}
饿汉式:
- 在类加载时就完成了初始化,所以类加载较慢,但获取对象的速度快。
通过类加载机制保证单例,但是如果代码中有其它方式导致类加载(反射、反序列化),就不满足单例
public class Singleton {public static Singleton singleton = new Singleton();private Singleton(){}public static getSingleton() {return singleton;}}
双重校验(double check)
- 第一次校验 singleton 是否为空,是为了提高代码执行效率。单例模式只创建一次,后面调用就不用加锁直接返回已创建的实例。
- 第二次校验 singleton 是否为空,是防止二次创建实例。线程 A 、线程 B 同时进入第一个判断之后,线程 B 拿到锁创建了实例,然后线程 A 拿到锁之后如果不加以判断,就会再次创建实例。
singleton 用 volatile 修饰是为了防止 JVM 指令重排序。singleton = new Singleton() 分为以下 3 步,步骤 3 可能在步骤 2 之前执行,此时另外的线程发现 singleton 不为 null,直接跳过第一个判断,返回未初始化完全的对象就会出问题。
- 满足延迟加载:Singleton 类被装载了,instance 不一定被初始化,只有通过显式调用 getInstance 方法时,才会显式装载 SingletonHolder 类。对于类的初始化,虚拟机规范则严格规定了有且只有四种情况必须立即对类进行初始化,遇到 new、getStatic、putStatic 或 invokeStatic 这 4 条字节码指令时,如果类没有进行过初始化,则需要先触发其初始化。生成这4条指令最常见的 java 代码场景是:
1)使用 new 关键字实例化对象
2)读取一个类的静态字段(被final修饰、已在编译期把结果放在常量池的静态字段除外)
3)设置一个类的静态字段(被final修饰、已在编译期把结果放在常量池的静态字段除外)
4)调用一个类的静态方法 - 执行类的初始化期间,JVM 会获取一个锁,同步多个线程对同一个类的初始化,所以可以保证线程安全
这种方式只适用于静态域的情况,静态内部类只能访问外部类的静态成员变量。
public class Singleton {private Singleton (){}private static class SingletonHolder {private static final Singleton INSTANCE = new Singleton();}public static final Singleton getSingleton(){return SingletonHolder.INSTANCE;}}
枚举
public enum Singleton {INSTANCE;public void doSomeThing() {}}
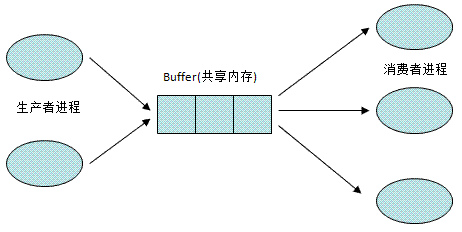
生产者与消费者
Synchronize 关键字实现
public class TestA {// 定义共享资源区class Resource{private int currCount = 0;private int maxCount = 3;private Object object = new Object();// 存数据之前先拿到对象锁public void put() throws Exception{synchronized (object){while (currCount >= maxCount){try {object.wait();} catch (InterruptedException e) {e.printStackTrace();}}currCount++;System.out.println(Thread.currentThread().getName() + " put:"+currCount);object.notify();}}public void take() throws Exception{synchronized (object){while (currCount == 0){try {object.wait();} catch (InterruptedException e) {e.printStackTrace();}}currCount--;System.out.println(Thread.currentThread().getName() + " take:"+currCount);object.notify();}}}// 生产者,传入资源实例 存数据class Producer implements Runnable{private Resource resource;public Producer(Resource resource){this.resource = resource;}@Overridepublic void run() {while (true){try {sleep(1000);resource.put();} catch (Exception e) {e.printStackTrace();}}}}// 消费者,传入资源实例 取数据class Consumer implements Runnable{private Resource resource;public Consumer(Resource resource){this.resource = resource;}@Overridepublic void run() {while (true){try {sleep(1000);resource.take();} catch (Exception e) {e.printStackTrace();}}}}public static void main(String[] args) {TestA testA = new TestA();Resource resource = testA.new Resource();// 定义 3 个生产者, 1 个消费者new Thread(testA.new Producer(resource)).start();new Thread(testA.new Producer(resource)).start();new Thread(testA.new Producer(resource)).start();new Thread(testA.new Consumer(resource)).start();}}
Lock、Condition
与前面 synchronize 实现相比,主要区别就是 lock 需要在 finally 代码块中主动释放锁。
public class TestB {// 定义共享资源区class Resource{private int currCount = 0;private int maxCount = 3;private Lock lock = new ReentrantLock();private Condition condition = lock.newCondition();public void put() throws Exception{lock.lock();try {while (currCount >= maxCount){condition.await();}currCount++;System.out.println(Thread.currentThread().getName() + " put:"+currCount);condition.signal();}catch (Exception e){e.printStackTrace();}finally {lock.unlock();}}public void take() throws Exception{lock.lock();try {while (currCount == 0){condition.await();}currCount--;System.out.println(Thread.currentThread().getName() + " take:"+currCount);condition.signal();}catch (Exception e){e.printStackTrace();}finally {lock.unlock();}}}...定义生产者、消费者、main 方法与上面一样,不再赘述。}
BlockingQueue
阻塞队列无需额外的关键字或者方法进行控制,它的底层实现逻辑就是 Lock 方法实现,当数据不满足取或者存的条件时它就会阻塞等待。
public class TestC {// 定义共享资源区class Resource{private BlockingQueue<Integer> queue = new ArrayBlockingQueue<Integer>(3);public void put() throws Exception{queue.put(1);System.out.println(Thread.currentThread().getName()+" put:"+queue.size());}public void take() throws Exception{queue.take();System.out.println(Thread.currentThread().getName()+" take:"+queue.size());}}...定义生产者、消费者、main 方法与上面一样,不再赘述。}
代理模式
正向代理:客户端通过代理服务器访问受限的服务器,此时代理服务器作为客户端的代理,向服务器发起请求。
作用:
- 突破访问限制,通过代理方式访问被封的网站
- 隐藏客户端真实 IP
反向代理:代理服务器接收客户端请求,分发到内部服务器,响应内部服务器的结果给客户端;此时代理服务器是作为内部服务器的代理,客户端不知道真正调用的哪个服务器。
作用:
- 负载均衡,将请求分散到内部的各个服务器中
- 保证内部服务器安全,客户端只知道代理服务器的地址,不知道内部服务器的地址

若有收获,就点个赞吧
0 人点赞
