一、使用fastlane
1、安装 fastlane
使用 macOS 或 Linux Ruby 2.0.0及以上版本
输入终端命令
sudo gem install fastlane --verbose
或者
sudo gem install -n /usr/local/bin fastlane
确保 Xcode 安装了最新版本的 命令行工具
xcode-select --install
如果 fastlane 加载缓慢
gem cleanup
2、使用
进入项目根目录
cd ~/xxx
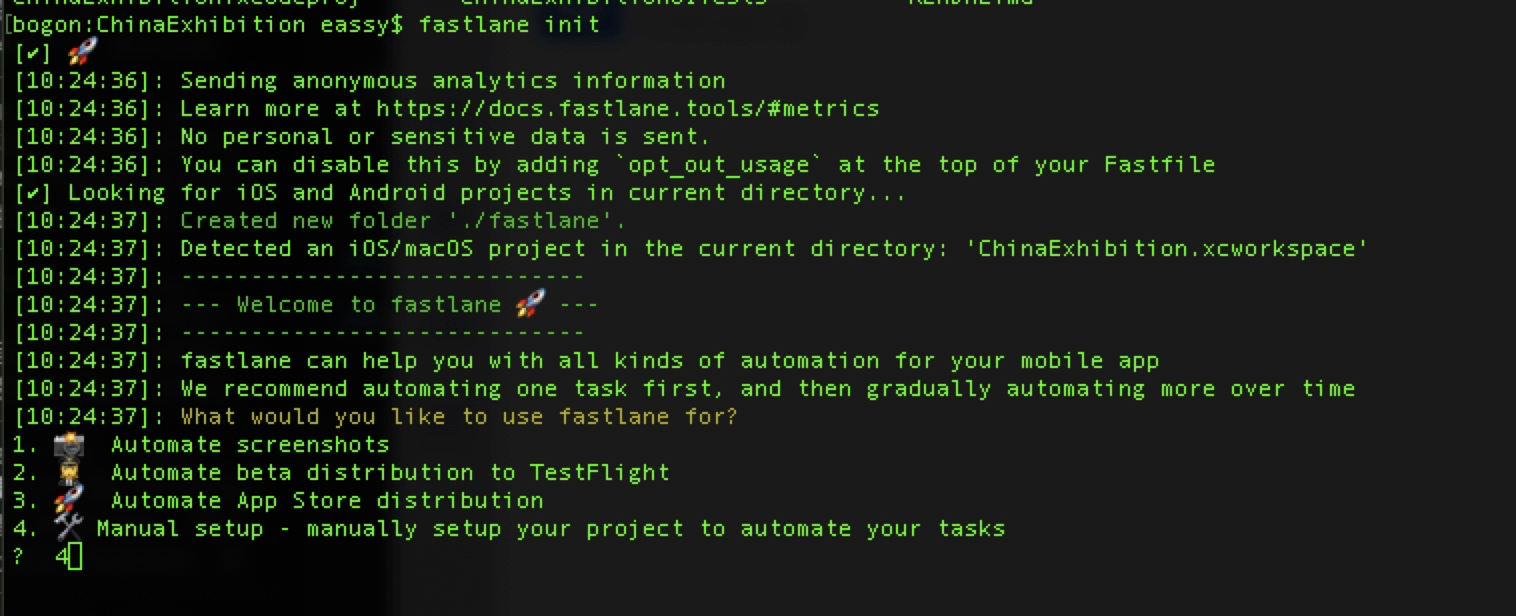
初始化 fastlane
fastlane init
会询问你要安装哪个版本,可以选择手动配置。
各个选项的意思:
- 自动截屏
- 自动 testFlight 配置
- 自动 AppStore 配置
- 手动配置
常见问题
fastlane init 过程中,卡在了 bundle update
- Ruby 源可能被墙了,查看下源,可以替换为国内最新的,确保只有 gems.ruby-china.com
$ gem sources --add https://gems.ruby-china.com/ --remove https://rubygems.org/$ gem sources -lhttps://gems.ruby-china.com
2. 假如 ruby 源没有问题的话,看下工程中的 Gemfile 文件。
source "https://rubygems.org"替换为source "https://gems.ruby-china.com"
替换完成后删除 fastlane 文件夹,执行 bundle update 命令,然后重新执行 fastlane init 命令 。
上一步更换 source 后出现报错
[11:00:10]: You have a local Gemfile, but RubyGems isn't defined as source[11:00:10]: Please update your Gemfile at path `Gemfile` to include[11:00:10]:[11:00:10]: source "https://rubygems.org"[11:00:10]:[11:00:10]: Update your Gemfile, and run `bundle update` afterwards
不用 care ,不会影响打包。
3、根据项目需求配置文件
可以把 fastlane 工作原理理解成具有一个个的操作,每个操作叫做 lane,每个 lane 中又可以有多个操作单元 action,比如打包,创建文件等。这些 action 顺序执行的。主要配置文件在 fastlane/Fastfile 中配置。
针对 iOS 打包,可以根据需求配置多个 lane,比如
- lane ad-hoc
- lane distribution
每个 lane 可以配置多个 action,如打包 gym,截图,上传 fir。最简单的流程只有 gym 这一步。
例如我们想打一个 ad-hoc 包,环境为 Debug,Fastfile 中这样写:
lane:adHoc do # 1 adHoc 代表这次操作的名称# add actions here: https://docs.fastlane.tools/actionsgym(workspace: "ChinaExhibition.xcworkspace", # 项目 workspace 名称configuration: "Debug", # 项目 Build Configuration Debug,还是Releasescheme: "ChinaExhibition", # schemesilent: true, # 编译时隐藏不必要的信息clean: true,output_directory: "/Users/eassy/Documents/MaoCu/打包存储", # ipa 输出 目录output_name: "ChinaExhibition.ipa", # ipa 输出名称export_method: "ad-hoc", # 打包类型export_options:{provisioningProfiles:{"com.huizhan.huizhan2c" => "huizhan2cAdHoc" # 指定证书}},export_xcargs: "-allowProvisioningUpdates", # 允许访问证书权限build_path: "/Users/eassy/Documents/MaoCu/打包存储/ChinaExhibition/" # .xcarchive 文件储存位置)end
有个坑,这里我们使用手动证书管理。首先把证书跟.p12 文件安装到电脑上,然后指定 provisioningProfiles 文件的时候,文件后缀 .mobildprovision 是不能带上的,否则一直验证不通过。
export_options:{provisioningProfiles:{"com.huizhan.huizhan2c" => "huizhan2cAdHoc" # 指定证书}},
4、上传到 fir
打包 action ok 后,添加上传 fir 的action,需要安装插件
fastlane add_plugin fir_cli
然后编辑我们的 lane adHoc,在 gym() 后面添加
fir_cli api_token: "YOUR FIR API TOKEN", changelog: "Hello fir.im"
token 从 fir 获得。
5、配合 jenkins 进行完整流程打包
大体流程如下:
- Jenkins 指定分支进行 git pull 。
- Jenkins 进行 cocoapods 的安装。
- Jenkins 指定版本号,之后会传递给 fastlane 。
- fastlane 根据传递过来的版本号,进行 buildNumber 的自增,和 version 的确定。
- fastlane 根据版本号和项目名,创建文件夹。
- fastlane 打包,并将文件存储到第 5 步创建的文件夹下面。
- 上传到 fir 平台或者 AppStore 。
下面从第四步开始,首先要编写我们的 Fastlane 文件,完整的文件在附件中
1). Fastlane 文件编写
要有几个环境变量:
- 工程名
- scheme 名称
- workspace 名称
- fir 的 token key
- ipa 存储的位置
platform :ios dodesc "paqu lane"# 几个环境变量,新建工程 Fastlane 需要进行更改APP_NAME = 'ChinaExhibition'SCHEME_NAME = 'ChinaExhibition'WORKSPACE_NAME = 'ChinaExhibition.xcworkspace'FIR_TOKEN = '337872c92b4b71f50c6c45f8ff2f950a'SAVE_PATH = '/Users/eassy/Documents/MaoCu/打包存储' # ipa 和 build 文件保存地址
2). 从 jenkins 传递过来 version 并设置
传递给某个指定的 lane
# fastlane [lane] key:value key:value# 比如传递参数为 version, 具体值为 5.2.0 给 lane adHoc_debug:fastlane adHoc_debug version:"5.2.0"
Fastlane 文件中这样接收:
lane: adHoc_debug do |options|buildVersion = options[:version]increment_version_number(version_number: "#{buildVersion}")end
3).自定义 action,更改版本号和 build number
自定义 action update_buildnumber_version ,里面使用已发布的 action increment_version_number 和 increment_build_number 来设置 version 和 build number 。
并且将 build number 返回出去,提供给下一步使用。
version = params[:version]# 确定 version 版本号other_action.increment_version_number(version_number: version)# 确定 build number 当前日期,加上今天第几次打包,比如今天是 2020.8.31,第一次打包,build number 为 2020083101,第二次打包就是 2020083102currentTime = Time.new.strftime("%Y%m%d")build = other_action.get_build_number()if build.include?"#{currentTime}"lastStr = build[build.length-2..build.length-1]lastNumber = lastStr.to_ilastNumber = lastNumber + 1lastStr = lastNumber.to_sif lastNumber < 10lastStr = lastStr.insert(0,"0")endbuild = "#{currentTime}#{lastStr}"elsebuild = "#{currentTime}01"endputs("******************| 更新 build #{build} |******************")other_action.increment_build_number(build_number:"#{build}")puts("******************| 更新 build 结束 |*******************")return build
4).创建文件夹,用来保存待会编译出的包
自定义 action create_finder ,创建一个文件夹,供保存使用。
# 根据输入的 version 创建文件夹 项目名 + version + build numberprojVersion = params[:version] # 版本号projName = params[:projName] # 项目名projBuild = params[:buildNumber]savePath = params[:savePath]path = "#{savePath}/#{projName}-#{projVersion}-#{projBuild}"command = "mkdir #{path}"Actions.sh(command)return path
5).调用 gym 打包
具体代码在上面有写
6).上传到 fir
使用插件 fir_cli 来完成
# FIR_TOKEN 要改成具体值fir_cli api_token: FIR_TOKEN, changelog:"fir 更新 文案"
二、使用shell命令
以下是shell自动打包脚本,可以结合jenkins做自动化打包部署。
# !/bin/bash# ===============================项目自定义部分(自定义好下列参数后再执行该脚本)============================= ## 计时SECONDS=0# 是否编译工作空间 (例:若是用Cocopods管理的.xcworkspace项目,赋值true;用Xcode默认创建的.xcodeproj,赋值false)is_workspace="true"# 指定项目的scheme名称# (注意: 因为shell定义变量时,=号两边不能留空格,若scheme_name与info_plist_name有空格,脚本运行会失败,暂时还没有解决方法,知道的还请指教!)scheme_name="LFDFundProject"# 工程中Target对应的配置plist文件名称, Xcode默认的配置文件为Info.plistinfo_plist_name="Info"# 指定要打包编译的方式 : Release,Debug...build_configuration="Release"web_upload="http://10.58.84.183:5001/upload"# ===============================自动打包部分(无特殊情况不用修改)============================= ## 导出ipa所需要的plist文件路径ExportOptionsPlistPath="./AutopackagedScripts/AdHocExportOptionsPlist.plist"# 返回上一级目录,进入项目工程目录cd ..# 获取项目名称project_name=`find . -name *.xcodeproj | awk -F "[/.]" '{print $(NF-1)}'`# 获取版本号,内部版本号,bundleIDinfo_plist_path="Fund/$info_plist_name.plist"#获取plist信息bundle_version=`/usr/libexec/PlistBuddy -c "Print CFBundleShortVersionString" $info_plist_path`bundle_build_version=`/usr/libexec/PlistBuddy -c "Print CFBundleVersion" $info_plist_path`bundle_identifier=`/usr/libexec/PlistBuddy -c "Print CFBundleIdentifier" $info_plist_path`bundle_displayName=`/usr/libexec/PlistBuddy -c "Print CFBundleDisplayName" $info_plist_path`# 指定输出ipa路径export_path="./build"# 指定输出归档文件地址export_archive_path="$export_path/$scheme_name.xcarchive"# 指定输出ipa地址export_ipa_path="$export_path"#设定时间ipa_date=`date +%m%d%H%M`# 指定输出ipa名称 : scheme_name + bundle_versionipa_name="$bundle_displayName-$ipa_date-UAT"echo "\033[32m************************* 移除旧的构建项目 ************************* \033[0m"if [ -d "$export_path" ] ; thenecho $export_pathelsemkdir -pv $export_pathfi# 删除旧.xcarchive文件rm -rf $export_path/$scheme_name.xcarchive# 删除旧包rm -rf $export_path/*.ipaecho "\033[32m************************* 切换到UAT环境 ************************* \033[0m"#切换环境configPlist="Classes/Config/config.plist"modify_uat=`/usr/libexec/PlistBuddy -c 'Set :environment:uat "YES"' $configPlist`modify_dev=`/usr/libexec/PlistBuddy -c 'Set :environment:dev "NO"' $configPlist`modify_pro=`/usr/libexec/PlistBuddy -c 'Set :environment:pro "NO"' $configPlist`echo "\033[32m************************* 开始构建项目 ************************* \033[0m"# 判断编译的项目类型是workspace还是projectif $is_workspace ; then# 编译前清理工程xcodebuild clean -workspace ${project_name}.xcworkspace \-scheme ${scheme_name} \-configuration ${build_configuration}xcodebuild archive -workspace ${project_name}.xcworkspace \-scheme ${scheme_name} \-configuration ${build_configuration} \-archivePath ${export_archive_path}else# 编译前清理工程xcodebuild clean -project ${project_name}.xcodeproj \-scheme ${scheme_name} \-configuration ${build_configuration}xcodebuild archive -project ${project_name}.xcodeproj \-scheme ${scheme_name} \-configuration ${build_configuration} \-archivePath ${export_archive_path}fi# 检查是否构建成功if [ -d "$export_archive_path" ] ; thenecho "\033[32;1m项目构建成功 🚀 🚀 🚀 \033[0m"elseecho "\033[31;1m项目构建失败 😢 😢 😢 \033[0m"exit 1fiecho "\033[32m************************* 开始导出ipa文件 ************************* \033[0m"xcodebuild -exportArchive \-archivePath ${export_archive_path} \-exportPath ${export_ipa_path} \-exportOptionsPlist ${ExportOptionsPlistPath}mv $export_ipa_path/$scheme_name.ipa $export_ipa_path/${ipa_name}.ipa# 检查文件是否存在if [ -f "$export_ipa_path/$ipa_name.ipa" ] ; thenecho "\033[32;1m导出 ${ipa_name}.ipa 包成功 🎉 🎉 🎉 \033[0m"#open $export_pathelseecho "\033[31;1m导出 ${ipa_name}.ipa 包失败 😢 😢 😢 \033[0m"exit 1fiecho "\033[32m************************* 上传文件 ************************* \033[0m"#进入文件目录cd $export_ipa_path#上传文件到web服务器fileName=${ipa_name}.ipaecho $fileNamestatus=`curl -F "file=@$fileName" $web_upload`echo "\033[32;1m $status \033[0m"# 输出打包总用时echo "\033[36;1m使用PPAutoPackageScript打包总用时: ${SECONDS}s \033[0m"

