- Spark 单value算子
- Spark key-value类型算子总结(图解和源码)
Spark 单value算子
1. map算子(改变结构就用map)
先看map函数
/*** Return a new RDD by applying a function to all elements of this RDD.*/def map[U: ClassTag](f: T => U): RDD[U] = withScope {val cleanF = sc.clean(f)new MapPartitionsRDD[U, T](this, (context, pid, iter) => iter.map(cleanF))}
功能说明
参数f是一个函数,它可以接收一个参数。当某个RDD执行map方法时,会遍历该RDD中的每一个数据项,并依次应用f函数,从而产生一个新的RDD。即,这个新RDD中的每一个元素都是原来RDD中每一个元素依次应用f函数而得到的。
代码演示
// 创建SparkConfval conf: SparkConf = new SparkConf()// 创建SparkContext,该对象是提交Spark App的入口val sc: SparkContext = new SparkContext(conf)// 参数(数据源,分区数(可选) )val rdd: RDD[Int] = sc.makeRDD(1 to 4,2)// map操作 元素乘以2val mapRdd: RDD[Int] = rdd.map(_*2)mapRdd.collect().foreach(println)结果:2468
关于分区
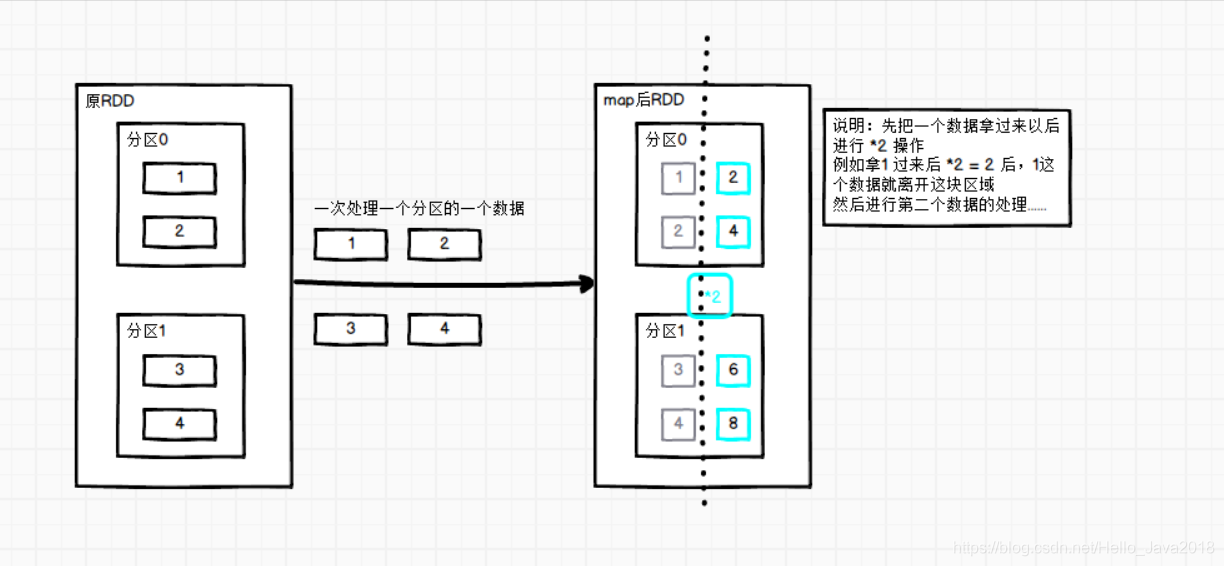
图片中的说明:
先把一个数据拿过来以后进行 2 操作
例如拿1 过来后 2 = 2 后,1这个数据就离开这块区域
然后进行第二个数据的处理…
注意:map的分区数和RDD的分区数一致(看下面源码)
def map[U: ClassTag](f: T => U): RDD[U] = withScope {val cleanF = sc.clean(f)new MapPartitionsRDD[U, T](this, (context, pid, iter) => iter.map(cleanF))}往下走override def getPartitions: Array[Partition] = firstParent[T].partitions再往下走firstParent/** Returns the first parent RDD */protected[spark] def firstParent[U: ClassTag]: RDD[U] = {dependencies.head.rdd.asInstanceOf[RDD[U]]}主要的是:firstParent[T].partitions 这里
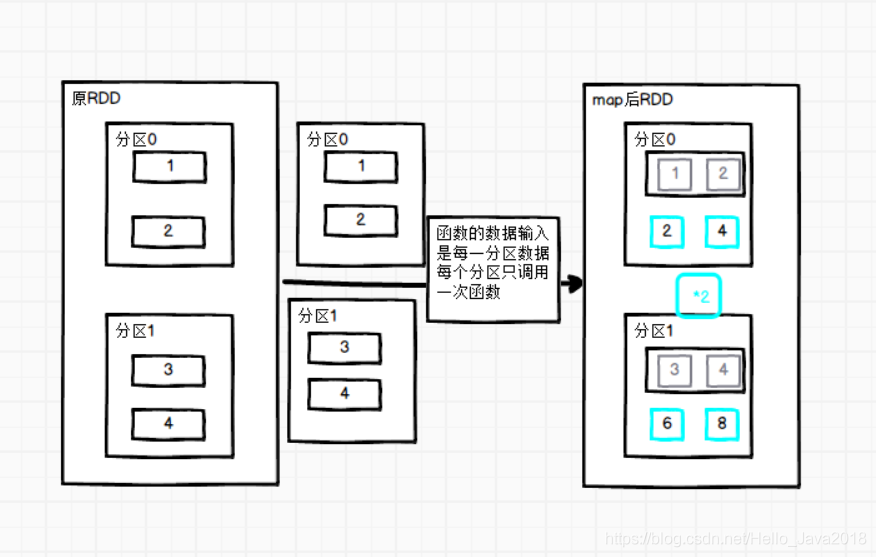
2. mapPartitions() 以分区为单位执行Map
先看mapPartitions函数
def mapPartitions[U: ClassTag](f: Iterator[T] => Iterator[U],preservesPartitioning: Boolean = false): RDD[U] = withScope {val cleanedF = sc.clean(f)new MapPartitionsRDD(this,(context: TaskContext, index: Int, iter: Iterator[T]) => cleanedF(iter),preservesPartitioning)}
功能说明
f: Iterator[T] => Iterator[U]:f函数把每个分区的数据分别放入到迭代器中(批处理)
preservesPartitioning: Boolean = false :是否保留RDD的分区信息
功能:一次处理一个分区数据
代码演示
// 前面代码省略,直接从数据源开始val rdd: RDD[Int] = sc.makeRDD(1 to 4,2)val mapRdd = rdd.mapPartitions(_.map(_*2))mapRdd.collect().foreach(println)结果:2468
关于分区
分区说明
每一个分区的数据会先到内存空间,然后才进行逻辑操作,整个分区操作完之后,拿到分区的数据才会释放掉。
从性能方面讲:批处理效率高
从内存方面:需要内存空间较大
3. mapPartitionsWithIndex()带分区号
先看mapPartitionsWithIndex函数
def mapPartitionsWithIndex[U: ClassTag](// Int表示分区编号f: (Int, Iterator[T]) => Iterator[U],preservesPartitioning: Boolean = false): RDD[U]
功能说明
f: (Int, Iterator[T]) => Iterator[U]:f函数把每个分区的数据分别放入到迭代器中(批处理)并且加上分区号
preservesPartitioning: Boolean = false :是否保留RDD的分区信息
功能:比mapPartitions多一个整数参数表示分区号
代码演示
val rdd: RDD[Int] = sc.makeRDD(1 to 4, 2)val mapRdd = rdd.mapPartitionsWithIndex((index, items) => {items.map((index, _))})// 打印修改后的RDD中数据mapRdd.collect().foreach(println)结果:(0,1)(0,2)(1,3)(1,4)
4. flatMap()扁平化
先看flatMap函数
def flatMap[U: ClassTag](f: T => TraversableOnce[U]): RDD[U] = withScope {val cleanF = sc.clean(f)new MapPartitionsRDD[U, T](this, (context, pid, iter) => iter.flatMap(cleanF))}
功能说明

与map操作类似,将RDD中的每一个元素通过应用f函数依次转换为新的元素,并封装到RDD中。
区别:在flatMap操作中,f函数的返回值是一个集合,并且会将每一个该集合中的元素拆分出来放到新的RDD中。
代码演示
val listRDD=sc.makeRDD(List(List(1,2),List(3,4),List(5,6),List(7)), 2)val mapRdd: RDD[Int]= listRDD.flatMap(item=>item)// 打印修改后的RDD中数据mapRdd.collect().foreach(println)结果:1234567
5. glom()分区转换数组
先看glom函数
def glom(): RDD[Array[T]] = withScope {new MapPartitionsRDD[Array[T], T](this, (context, pid, iter) => Iterator(iter.toArray))}
功能说明
该操作将RDD中每一个分区变成一个数组,并放置在新的RDD中,数组中元素的类型与原分区中元素类型一致。
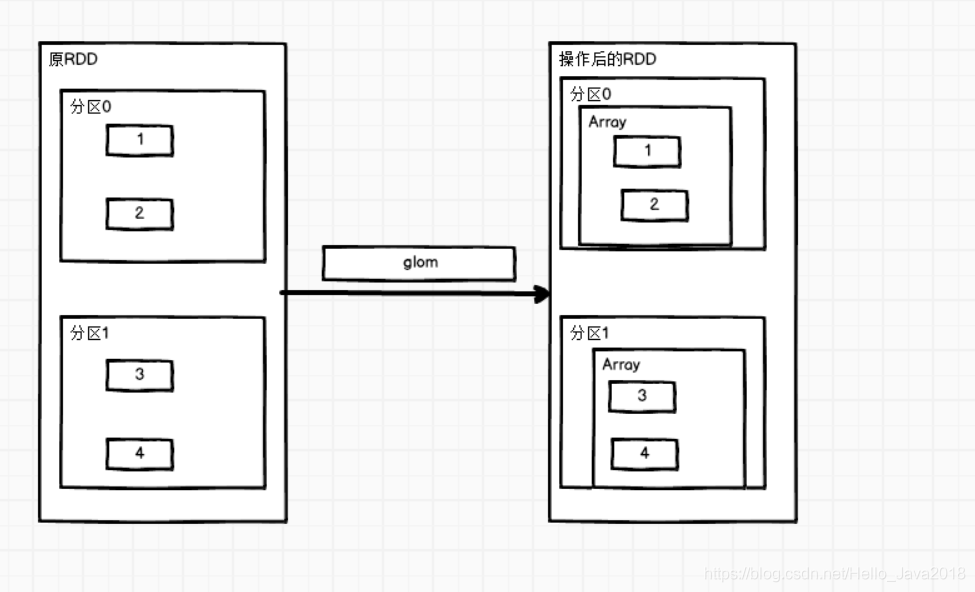
代码演示(求两个分区中的最大值)
val sc: SparkContext = new SparkContext(conf)val rdd = sc.makeRDD(1 to 4, 2)val mapRdd = rdd.glom().map(_.max)// 打印修改后的RDD中数据mapRdd.collect().foreach(println)结果:24
6. groupBy()分组
先看groupBy函数
def groupBy[K](f: T => K)(implicit kt: ClassTag[K]): RDD[(K, Iterable[T])] = withScope {groupBy[K](f, defaultPartitioner(this))}
功能说明
分组,按照传入函数的返回值进行分组。将相同的key对应的值放入一个迭代器。
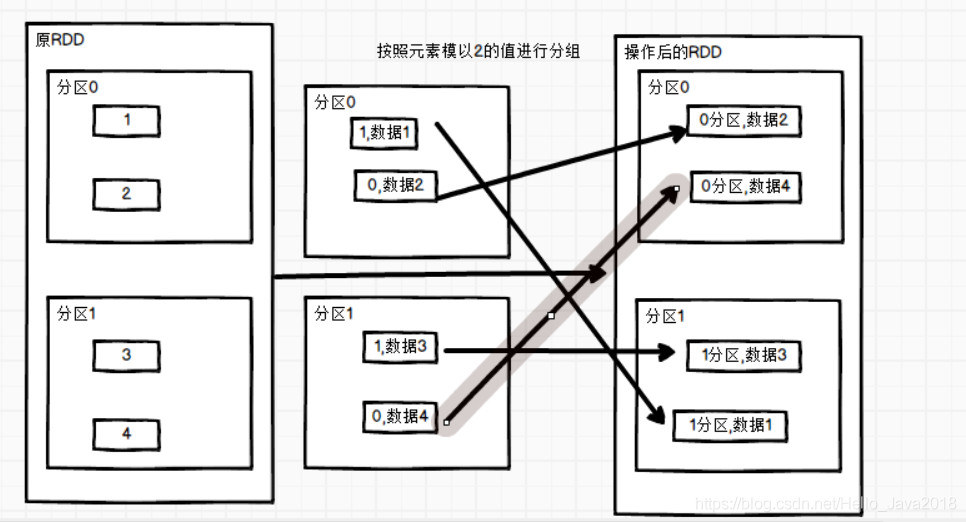
代码演示 (按照元素模以2的值进行分组)
val rdd = sc.makeRDD(1 to 4,2)val mapRdd: RDD[(Int, Iterable[Int])] = rdd.groupBy(_ % 2)// 打印修改后的RDD中数据mapRdd.collect().foreach(println)结果:(0,CompactBuffer(2, 4))(1,CompactBuffer(1, 3))
7. sample()采样
先看sample函数
def sample(withReplacement: Boolean,fraction: Double,seed: Long = Utils.random.nextLong): RDD[T]
功能说明
withReplacement: true为有放回的抽样,false为无放回的抽样。
fraction表示:以指定的随机种子随机抽样出数量为fraction的数据。
seed表示:指定随机数生成器种子。
两个算法介绍:
抽取数据不放回(伯努利算法)val sampleRDD: RDD[Int] = dataRDD.sample(false, 0.5)伯努利算法:又叫0、1分布。例如扔硬币,要么正面,要么反面。具体实现:根据种子和随机算法算出一个数和第二个参数设置几率比较,小于第二个参数要,大于不要第一个参数:抽取的数据是否放回,false:不放回第二个参数:抽取的几率,范围在[0,1]之间,0:全不取;1:全取;第三个参数:随机数种子抽取数据放回(泊松算法)val sampleRDD1: RDD[Int] = dataRDD.sample(true, 2)第一个参数:抽取的数据是否放回,true:放回;false:不放回第二个参数:重复数据的几率,范围大于等于0.表示每一个元素被期望抽取到的次数第三个参数:随机数种子
代码演示
val dataRDD: RDD[Int] = sc.makeRDD(List(1,2,3,4,5,6))val mapRdd: RDD[Int] = dataRDD.sample(false, 0.5)// 打印修改后的RDD中数据mapRdd.collect().foreach(println)结果:356val sc: SparkContext = new SparkContext(conf)val dataRDD: RDD[Int] = sc.makeRDD(List(1,2,3,4,5,6))val mapRdd: RDD[Int] = dataRDD.sample(true, 2)结果:1111133345555566
8. distinct()去重
先看distinct函数
def distinct(numPartitions: Int)(implicit ord: Ordering[T] = null): RDD[T] = withScope {map(x => (x, null)).reduceByKey((x, y) => x, numPartitions).map(_._1)}/*** Return a new RDD containing the distinct elements in this RDD.*/def distinct(): RDD[T] = withScope {distinct(partitions.length)}
功能说明
对内部的元素去重,distinct后会生成与原RDD分区个数不一致的分区数。
上面的函数还可以对去重后的修改分区个数。
代码演示
val sc: SparkContext = new SparkContext(conf)val distinctRdd: RDD[Int] = sc.makeRDD(List(1,2,1,5,2,9,6,1))distinctRdd.distinct(2).collect().foreach(println)结果62195
distinct()实现的源码
def distinct(numPartitions: Int)(implicit ord: Ordering[T] = null): RDD[T] = withScope {map(x => (x, null)).reduceByKey((x, y) => x, numPartitions).map(_._1)}也就是这个玩意:map(x => (x, null)).reduceByKey((x, y) => x, numPartitions).map(_._1)
9. coalesce()合并分区
先看coalesce函数
def coalesce(numPartitions: Int, shuffle: Boolean = false,partitionCoalescer: Option[PartitionCoalescer] = Option.empty)(implicit ord: Ordering[T] = null): RDD[T]
功能说明
功能说明:缩减分区数,用于大数据集过滤后,提高小数据集的执行效率。
默认false不执行shuffle。
代码演示
val rdd: RDD[Int] = sc.makeRDD(Array(1,2,3,4),4)val mapRdd: RDD[Int] = rdd.coalesce(2)mapRdd.mapPartitionsWithIndex{(index,values)=>values.map((index,_))}.collect().foreach(println)结果(0,1)(0,2)(1,3)(1,4)
无shuffle
设置2个分区后的结果:(0,1) (0,2) (1,3) (1,4)设置3个分区后的结果:(0,1) (1,2) (2,3) (2,4)设置4个或者以上(0,1) (1,2) (2,3) (3,4)
设置shuffle
val rdd: RDD[Int] = sc.makeRDD(Array(1,2,3,4),4)val mapRdd: RDD[Int] = rdd.coalesce(2,true)mapRdd.mapPartitionsWithIndex{(index,values)=>values.map((index,_))}.collect().foreach(println)结果(0,1)(0,2)(0,3)(0,4)设置true后开启shuffle设置1 ,2后的结果(0,1) (0,2) (0,3) (0,4)设置3后的结果(0,1) (1,2) (1,3) (2,4)设置4后的结果(3,1) (3,2) (3,3) (3,4)....
源码
for (i <- 0 until maxPartitions) {val rangeStart = ((i.toLong * prev.partitions.length) / maxPartitions).toIntval rangeEnd = (((i.toLong + 1) * prev.partitions.length) / maxPartitions).toInt(rangeStart until rangeEnd).foreach{ j => groupArr(i).partitions += prev.partitions(j) }}解释说明:maxPartitions:传进来的新分区数prev.partitions:之前RDD的分区数分区i开始 = 分区号*前一个分区数 / 新的分区数结束 =( 分区号+1)*前一个分区数 / 新的分区数
10. repartition()重新分区(执行Shuffle)
先看repartition函数
def repartition(numPartitions: Int)(implicit ord: Ordering[T] = null): RDD[T] = withScope {coalesce(numPartitions, shuffle = true)}
功能说明
该操作内部其实执行的是coalesce操作,参数shuffle的默认值为true。无论是将分区数多的RDD转换为分区数少的RDD,还是将分区数少的RDD转换为分区数多的RDD,repartition操作都可以完成,因为无论如何都会经shuffle过程。
代码演示
val rdd: RDD[Int] = sc.makeRDD(Array(1,2,3,4,5,6,7,8),4)val mapRdd: RDD[Int] = rdd.repartition(8)mapRdd.mapPartitionsWithIndex{(index,values) =>values.map((index,_))}.collect().foreach(println)结果(6,1)(6,3)(6,5)(6,7)(7,2)(7,4)(7,6)(7,8)
coalesce和repartition对比与区别
(1)coalesce重新分区,可以选择是否进行shuffle过程。由参数shuffle: Boolean = false/true决定。
(2)repartition实际上是调用的coalesce,进行shuffle。源码如下:
def repartition(numPartitions: Int)(implicit ord: Ordering[T] = null): RDD[T] = withScope {
coalesce(numPartitions, shuffle = true)
}
(3)coalesce一般为缩减分区,如果扩大分区,也不会增加分区总数,意义不大。
(4)repartition扩大分区执行shuffle,可以达到扩大分区的效果。
11. sortBy()排序
先看sortBy函数
def sortBy[K](f: (T) => K,ascending: Boolean = true,numPartitions: Int = this.partitions.length)
功能说明
该操作用于排序数据。在排序之前,可以将数据通过f函数进行处理,之后按照f函数处理的结果进行排序,默认为正序排列。排序后新产生的RDD的分区数与原RDD的分区数一致。
代码演示
val rdd: RDD[Int] = sc.makeRDD(Array(1,2,5,3,6,2))val mapRdd = rdd.sortBy(item=>item) // 默认为true为正序,false为倒序// 打印修改后的RDD中数据mapRdd.collect().foreach(println)结果122356val rdd: RDD[(Int,Int)] = sc.makeRDD(Array((5,2),(5,3),(6,2)))val mapRdd = rdd.sortBy(item=>item) // 默认为true为正序,false为倒序// 打印修改后的RDD中数据mapRdd.collect().foreach(println)结果(5,2)(5,3)(6,2)
Spark key-value类型算子总结(图解和源码)
1. partitionBy()按照K重新分区
先看partitionBy函数
def partitionBy(partitioner: Partitioner): RDD[(K, V)] = self.withScope {if (keyClass.isArray && partitioner.isInstanceOf[HashPartitioner]) {throw new SparkException("HashPartitioner cannot partition array keys.")}if (self.partitioner == Some(partitioner)) {self} else {new ShuffledRDD[K, V, V](self, partitioner)}}
功能说明
将RDD[K,V]中的K按照指定Partitioner重新进行分区。
如果原有的RDD和新的RDD是一致的话就不进行分区,否则会产生Shuffle过程。

代码演示(按HashPartitioner分区)
val rdd: RDD[(Int, String)] = sc.makeRDD(Array((1,"aaa"),(2,"bbb"),(3,"ccc")),3)val mapRdd: RDD[(Int, String)] = rdd.partitionBy(new org.apache.spark.HashPartitioner(2))mapRdd.mapPartitionsWithIndex{(index,values)=>values.map((index,_))}.collect().foreach(println)结果(0,(2,bbb))(1,(1,aaa))(1,(3,ccc))
自定义分区规则
要实现自定义分区器,需要继承org.apache.spark.Partitioner类,并实现下面三个方法。
(1)numPartitions: Int:返回创建出来的分区数。
(2)getPartition(key: Any):
Int:返回给定键的分区编号(0到numPartitions-1)。
(3)equals():Java 判断相等性的标准方法。这个方法的实现非常重要,Spark需要用这个方法来检查你的分区器对象是否和其他分区器实例相同,这样Spark才可以判断两个RDD的分区方式是否相同。
// main方法val rdd: RDD[(Int, String)] = sc.makeRDD(Array((1,"aaa"),(2,"bbb"),(3,"ccc")),3)val mapRdd: RDD[(Int, String)] = rdd.partitionBy(new MyPartition(2))mapRdd.mapPartitionsWithIndex{(index,values)=>values.map((index,_))}.collect().foreach(println)// 主要代码class MyPartition(num:Int) extends Partitioner{override def numPartitions: Int = numoverride def getPartition(key: Any): Int = {if(key.isInstanceOf[Int]){val i: Int = key.asInstanceOf[Int]if(i%2==0){0}else{1}}else{0}}}结果(0,(2,bbb))(1,(1,aaa))(1,(3,ccc))
2. reduceByKey()按照K聚合V
先看reduceByKey函数
def reduceByKey(func: (V, V) => V): RDD[(K, V)] = self.withScope {reduceByKey(defaultPartitioner(self), func)}def reduceByKey(func: (V, V) => V, numPartitions: Int): RDD[(K, V)]
功能说明
该操作可以将RDD[K,V]中的元素按照相同的K对V进行聚合。其存在多种重载形式,还可以设置新RDD的分区数。

代码演示
val rdd = sc.makeRDD(List(("a",1),("b",5),("a",5),("b",2)))val mapRdd: RDD[(String, Int)] = rdd.reduceByKey((v1,v2)=>v1+v2)// 打印修改后的RDD中数据mapRdd.collect().foreach(println)结果(a,6)(b,7)
3. groupByKey()按照K重新分组
先看groupByKey函数
def groupByKey(): RDD[(K, Iterable[V])]def groupByKey(numPartitions: Int): RDD[(K, Iterable[V])] = self.withScope {groupByKey(new HashPartitioner(numPartitions))}
功能说明
groupByKey对每个key进行操作,但只生成一个seq,并不进行聚合。
该操作可以指定分区器或者分区数(默认使用HashPartitioner)。
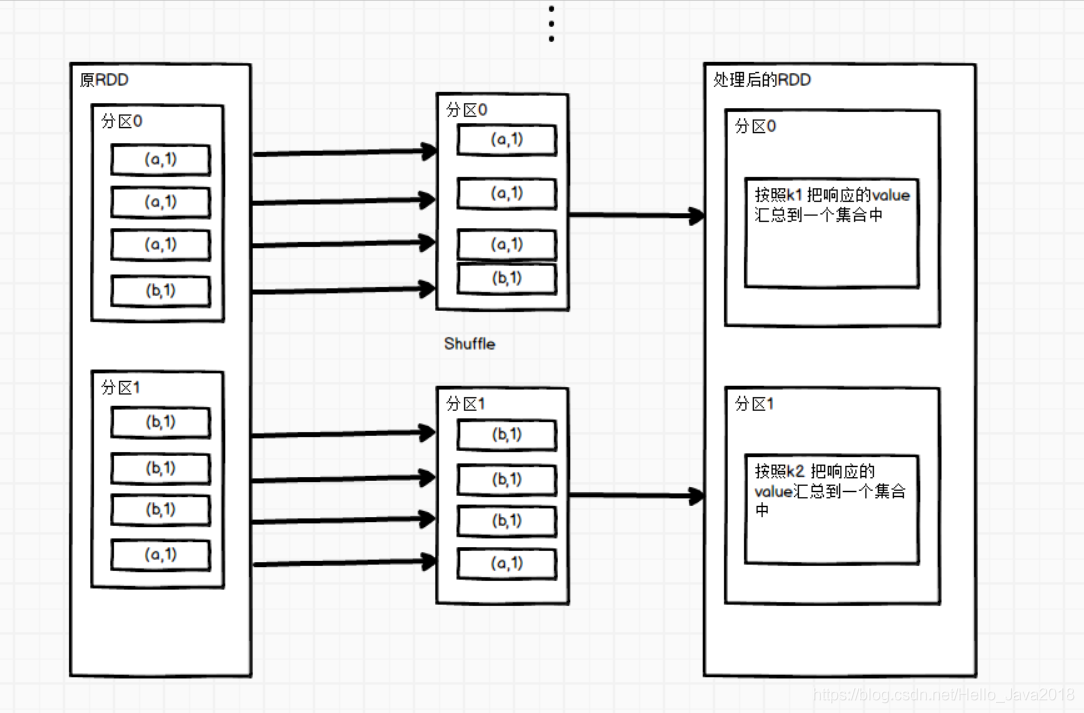
代码演示
val rdd = sc.makeRDD(List(("a",1),("b",5),("a",5),("b",2)))val mapRdd: RDD[(String, Iterable[Int])] = rdd.groupByKey(2)// 打印修改后的RDD中数据mapRdd.mapPartitionsWithIndex{(index,values)=>values.map((index,_))}.collect().foreach(println)结果(0,(b,CompactBuffer(5, 2)))(1,(a,CompactBuffer(1, 5)))
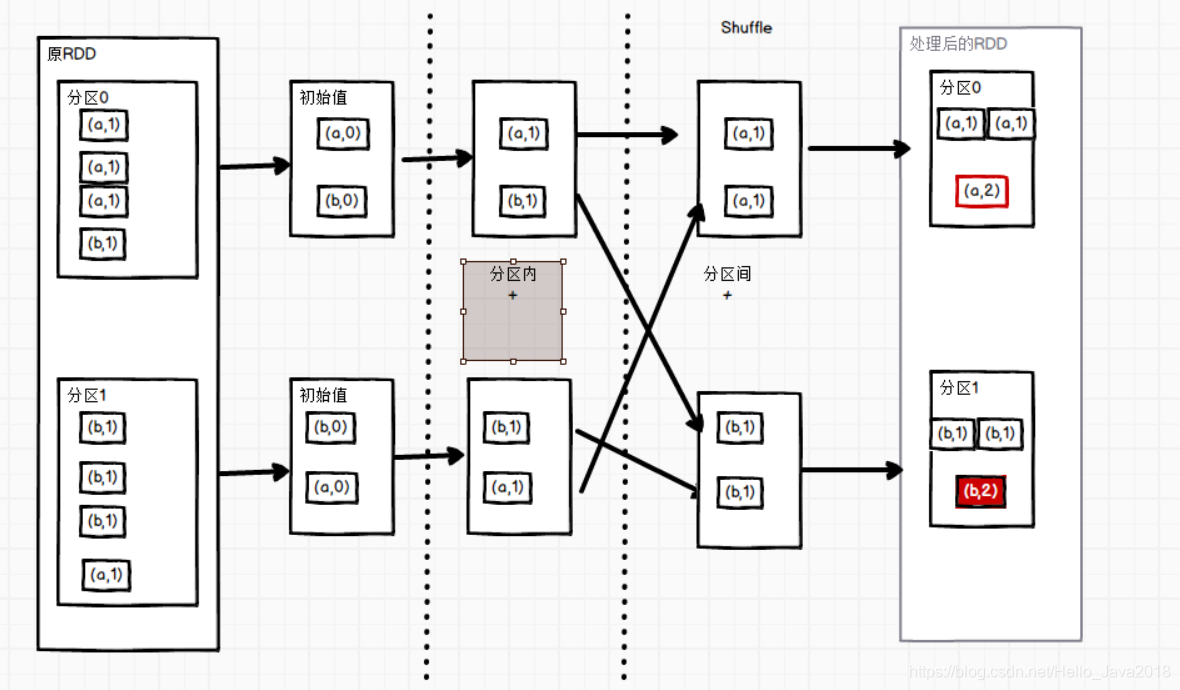
4. aggregateByKey()按照K处理分区内和分区间逻辑
先看aggregateByKey函数
def aggregateByKey[U: ClassTag](zeroValue: U)(seqOp: (U, V) => U,combOp: (U, U) => U): RDD[(K, U)] = self.withScope {aggregateByKey(zeroValue, defaultPartitioner(self))(seqOp, combOp)}
功能说明
1)zeroValue(初始值):给每一个分区中的每一种key一个初始值。
这个初始值的理解:
如何求最大值,所有的值为正数,设置为0,
如果有负值,设置为 负无穷,
这个初始值就是与第一个值进行比较,保证第一次对比下去。
(2)seqOp(分区内):函数用于在每一个分区中用初始值逐步迭代value。
(3)combOp(分区间):函数用于合并每个分区中的结果。
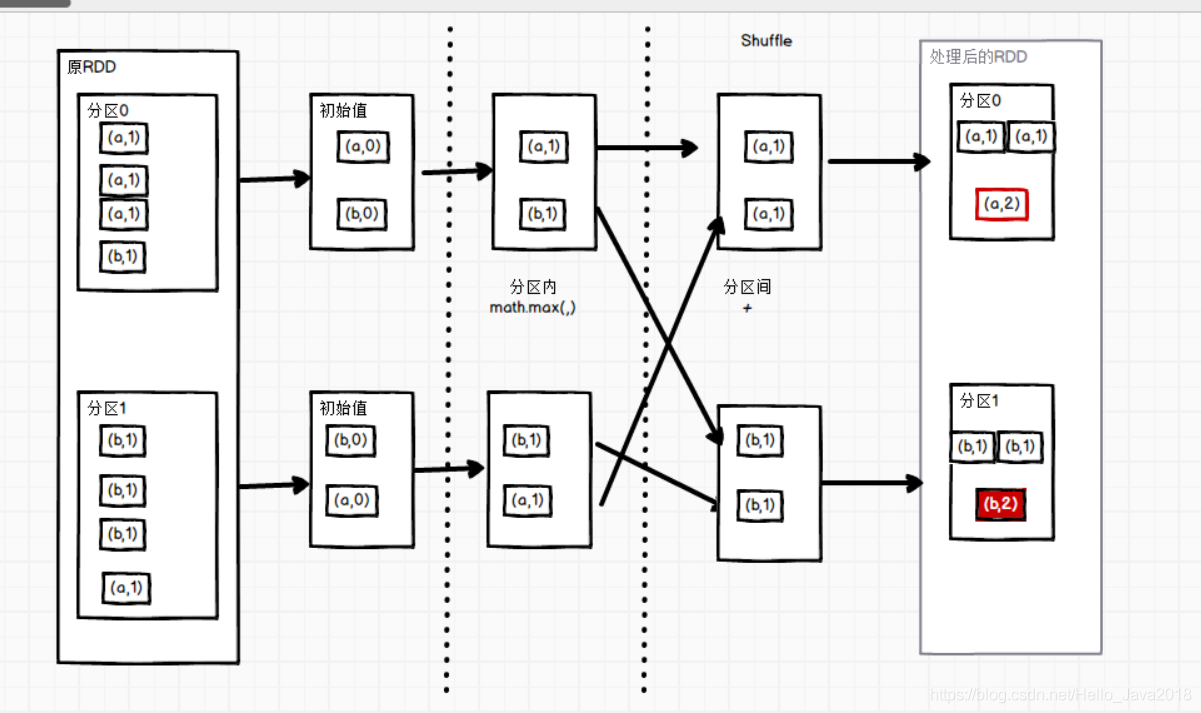
代码演示
val sc: SparkContext = new SparkContext(conf)val rdd: RDD[(String, Int)] = sc.makeRDD(List(("a", 3), ("a", 2), ("c", 4), ("b", 3), ("c", 6), ("c", 8)), 2)val mapRdd: RDD[(String, Int)] = rdd.aggregateByKey(0)(math.max(_,_),_+_)结果(b,3)(a,3)(c,12)
5. foldByKey()分区内和分区间相同的aggregateByKey()
先看foldByKey函数
def aggregateByKey[U: ClassTag](zeroValue: U)(seqOp: (U, V) => U,combOp: (U, U) => U): RDD[(K, U)] = self.withScope {aggregateByKey(zeroValue, defaultPartitioner(self))(seqOp, combOp)}
功能说明
参数zeroValue:是一个初始化值,它可以是任意类型。
参数func:是一个函数,两个输入参数相同。
代码演示
val list = List(("a",1),("a",1),("a",1),("b",1),("b",1),("b",1),("b",1),("a",1))val rdd = sc.makeRDD(list,2)rdd.foldByKey(0)(_+_).collect().foreach(println)结果(b,4)(a,4)
6. combineByKey()转换结构后分区内和分区间操作
先看combineByKey函数
def combineByKey[C](createCombiner: V => C,mergeValue: (C, V) => C,mergeCombiners: (C, C) => C): RDD[(K, C)] = self.withScope {combineByKeyWithClassTag(createCombiner, mergeValue, mergeCombiners)(null)}
功能说明
(1)createCombiner(转换数据的结构): combineByKey()
会遍历分区中的所有元素,因此每个元素的键要么还没有遇到过,要么就和之前的某个元素的键相同。如果这是一个新的元素,combineByKey()会使用一个叫作createCombiner()的函数来创建那个键对应的累加器的初始值。
(2)mergeValue(分区内):
如果这是一个在处理当前分区之前已经遇到的键,它会使用mergeValue()方法将该键的累加器对应的当前值与这个新的值进行合并。
(3)mergeCombiners(分区间):
由于每个分区都是独立处理的,因此对于同一个键可以有多个累加器。如果有两个或者更多的分区都有对应同一个键的累加器,就需要使用用户提供的 mergeCombiners()方法将各个分区的结果进行合并。
针对相同K,将V合并成一个集合
代码演示(计算每个key出现的次数以及可以对应值的总和,再相除得到结果)
val list: List[(String, Int)] = List(("a", 88), ("b", 95), ("a", 91), ("b", 93), ("a", 95), ("b", 98))val input: RDD[(String, Int)] = sc.makeRDD(list, 2)input.combineByKey((_,1),(acc:(Int,Int),v)=>(acc._1+v,acc._2+1),(acc1:(Int,Int),acc2:(Int,Int))=>(acc1._1+acc2._1,acc1._2+acc2._2)).map(item=>item._2._1/item._2._2.toDouble).collect().foreach(println)结果95.3333333333333391.33333333333333
reduceByKey、foldByKey、aggregateByKey、combineByKey对比
reduceByKey的底层源码
def reduceByKey(partitioner: Partitioner, func: (V, V) => V): RDD[(K, V)] = self.withScope {combineByKeyWithClassTag[V]((v: V) => v, func, func, partitioner)}第一个初始值不变,也即不用直接给出初始值,分区内和分区间的函数相同
foldByKey的底层源码
combineByKeyWithClassTag[V]((v: V) =>cleanedFunc(createZero(), v),cleanedFunc,cleanedFunc,partitioner)初始值和分区内和分区间的函数(逻辑)相同
aggregateByKey的底层源码
combineByKeyWithClassTag[U]((v: V) => cleanedSeqOp(createZero(), v),cleanedSeqOp,combOp,partitioner)初始值和分区内处理逻辑一致分区内和分区间的函数(逻辑)不相同
combineByKey的底层源码
def combineByKeyWithClassTag[C](createCombiner: V => C,mergeValue: (C, V) => C,mergeCombiners: (C, C) => C)(implicit ct: ClassTag[C]): RDD[(K, C)] = self.withScope {combineByKeyWithClassTag(createCombiner, mergeValue, mergeCombiners, defaultPartitioner(self))}把第1个值变成特定的结构
7. sortByKey()排序
先看sortByKey函数
def sortByKey(ascending: Boolean = true,numPartitions: Int = self.partitions.length): RDD[(K, V)] = self.withScope{val part = new RangePartitioner(numPartitions, self, ascending)new ShuffledRDD[K, V, V](self, part).setKeyOrdering(if (ascending) ordering else ordering.reverse)}
功能说明
在一个(K,V)的RDD上调用,K必须实现Ordered接口,返回一个按照key进行排序的(K,V)的RDD
ascending: Boolean = true 默认为升序
false为降序
代码演示
val rdd: RDD[(Int, String)] = sc.makeRDD(Array((3,"aa"),(6,"cc"),(2,"bb"),(1,"dd")))val mapRdd: RDD[(Int, String)] = rdd.sortByKey()// 打印修改后的RDD中数据mapRdd.collect().foreach(println)(1,dd)(2,bb)(3,aa)(6,cc)
8. mapValues()只对V进行操作
先看mapValues函数
def mapValues[U](f: V => U): RDD[(K, U)] = self.withScope {val cleanF = self.context.clean(f)new MapPartitionsRDD[(K, U), (K, V)](self,(context, pid, iter) => iter.map { case (k, v) => (k, cleanF(v)) },preservesPartitioning = true)}
功能与代码演示
针对于(K,V)形式的类型只对V进行操作
val rdd: RDD[(Int, String)] = sc.makeRDD(Array((1, "a"), (1, "d"), (2, "b"), (3, "c")))val mapRdd: RDD[(Int, String)] = rdd.mapValues(_+">>>>")// 打印修改后的RDD中数据mapRdd.collect().foreach(println)结果(1,a>>>>)(1,d>>>>)(2,b>>>>)(3,c>>>>)
9. join()连接
先看join函数
def join[W](other: RDD[(K, W)]): RDD[(K, (V, W))] = self.withScope {join(other, defaultPartitioner(self, other))}
功能说明
在类型为(K,V)和(K,W)的RDD上调用,返回一个相同key对应的所有元素对在一起的(K,(V,W))的RDD。
代码演示
val rdd: RDD[(Int, String)] = sc.makeRDD(Array((1, "a"), (2, "b"), (3, "c")))val rdd1: RDD[(Int, Int)] = sc.makeRDD(Array((1, 4), (2, 5), (4, 6)))val mapRdd: RDD[(Int, (String, Int))] = rdd.join(rdd1)// 打印修改后的RDD中数据mapRdd.collect().foreach(println)结果(1,(a,4))(2,(b,5))
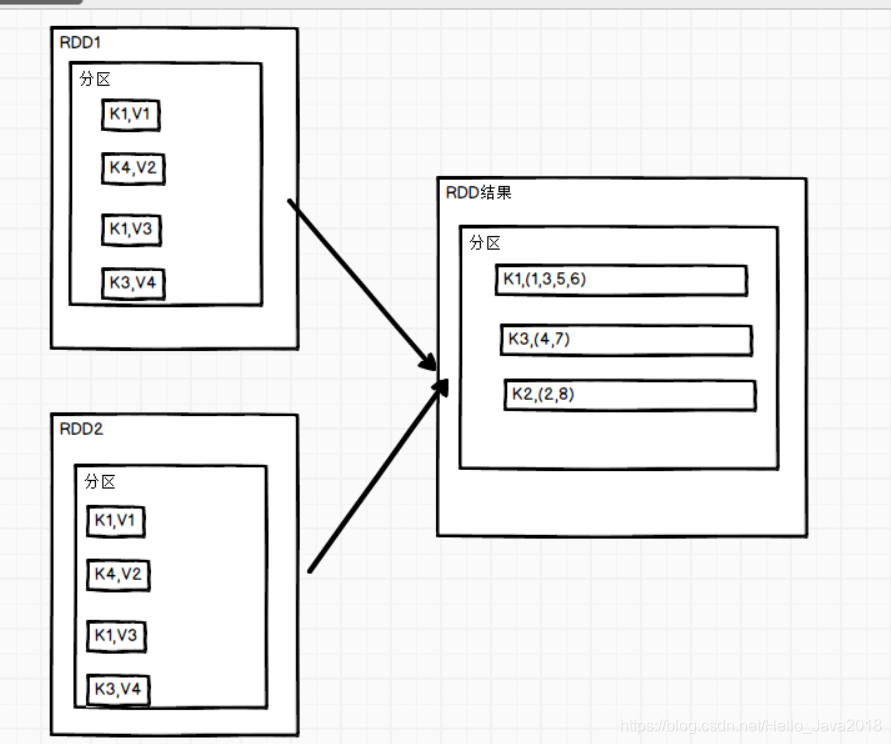
10. cogroup()联合
先看cogroup函数
def cogroup[W](other: RDD[(K, W)]): RDD[(K, (Iterable[V], Iterable[W]))] = self.withScope {cogroup(other, defaultPartitioner(self, other))}
功能说明
在类型为(K,V)和(K,W)的RDD上调用,返回一个(K,(Iterable,Iterable))类型的RDD。
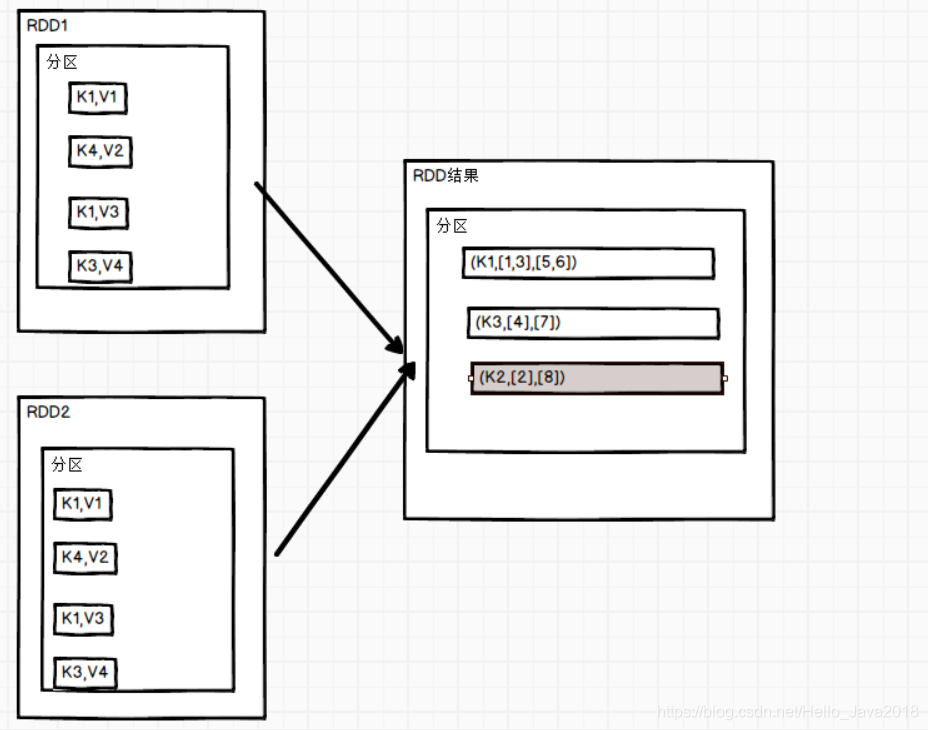
代码演示
val rdd: RDD[(Int, String)] = sc.makeRDD(Array((1,"a"),(1,"b"),(3,"c")))val rdd1: RDD[(Int, Int)] = sc.makeRDD(Array((1,4),(2,5),(3,6)))rdd.cogroup(rdd1).collect().foreach(println)结果(1,(CompactBuffer(a, b),CompactBuffer(4)))(2,(CompactBuffer(),CompactBuffer(5)))(3,(CompactBuffer(c),CompactBuffer(6)))

若有收获,就点个赞吧
0 人点赞
