在本章的第2、3节介绍了使用Alink提供的深度学习组件KerasSequentialClassifier和KerasSequentialRegressor进行分类和回归模型的训练、预测。
实际应用中,经常需要使用TensorFlow或着PyTorch训练好的模型,对流式数据、批式数据进行预测。Alink提供了相应的流式、批式和Pipeline组件适配TensorFlow或着PyTorch模型。
本节重点介绍与PyTorch模型相关的操作。
25.5.1 生成PyTorch模型
本节所需的PyTorch模型文件mnist_model_pytorch.pt,已经被放到了OSS上,本节后面的实验会直接从网络读取该模型。https://alink-release.oss-cn-beijing.aliyuncs.com/data-files/mnist_model_pytorch.pt
如果读者有兴趣,可以在PyTorch环境,运行下面代码便可生成PyTorch模型,从而被Alink相关组件使用。注意:PyTorch模型执需要打包为”.pt”文件,便于Alink相关组件导入模型。建议的打包示例代码在下面代码的最后部分。
import torchfrom torchvision import datasetsfrom torchvision.transforms import ToTensortrain_data = datasets.MNIST(root="data",train=True,download=True,transform=ToTensor())train_loader = torch.utils.data.dataloader.DataLoader(dataset=train_data, batch_size=64, shuffle=True)class Net(torch.nn.Module):def __init__(self):super(Net, self).__init__()self.conv1 = torch.nn.Sequential(torch.nn.Conv2d(1, 32, 3, 1, 1),torch.nn.ReLU(),torch.nn.MaxPool2d(2))self.conv2 = torch.nn.Sequential(torch.nn.Conv2d(32, 64, 3, 1, 1),torch.nn.ReLU(),torch.nn.MaxPool2d(2))self.conv3 = torch.nn.Sequential(torch.nn.Conv2d(64, 64, 3, 1, 1),torch.nn.ReLU(),torch.nn.MaxPool2d(2))self.dense = torch.nn.Sequential(torch.nn.Linear(64 * 3 * 3, 128),torch.nn.ReLU(),torch.nn.Linear(128, 10))def forward(self, x):conv1_out = self.conv1(x)conv2_out = self.conv2(conv1_out)conv3_out = self.conv3(conv2_out)res = conv3_out.view(conv3_out.size(0), -1)out = self.dense(res)return outmodel = Net()print(model)optimizer = torch.optim.Adam(model.parameters())loss_func = torch.nn.CrossEntropyLoss()for epoch in range(5):print('epoch {}'.format(epoch + 1))train_loss = 0.train_acc = 0.for batch_x, batch_y in train_loader:batch_x, batch_y = torch.autograd.Variable(batch_x), torch.autograd.Variable(batch_y)out = model(batch_x)loss = loss_func(out, batch_y)train_loss += loss.item()pred = torch.max(out, 1)[1]train_correct = (pred == batch_y).sum()train_acc += train_correct.item()optimizer.zero_grad()loss.backward()optimizer.step()print('Train Loss: {:.6f}, Acc: {:.6f}'.format(train_loss / (len(train_data)), train_acc / (len(train_data))))traced = torch.jit.trace(model, (torch.rand(1, 1, 28, 28)))torch.jit.save(traced, "mnist_model_pytorch.pt")
输出模型及训练信息如下:
Net((conv1): Sequential((0): Conv2d(1, 32, kernel_size=(3, 3), stride=(1, 1), padding=(1, 1))(1): ReLU()(2): MaxPool2d(kernel_size=2, stride=2, padding=0, dilation=1, ceil_mode=False))(conv2): Sequential((0): Conv2d(32, 64, kernel_size=(3, 3), stride=(1, 1), padding=(1, 1))(1): ReLU()(2): MaxPool2d(kernel_size=2, stride=2, padding=0, dilation=1, ceil_mode=False))(conv3): Sequential((0): Conv2d(64, 64, kernel_size=(3, 3), stride=(1, 1), padding=(1, 1))(1): ReLU()(2): MaxPool2d(kernel_size=2, stride=2, padding=0, dilation=1, ceil_mode=False))(dense): Sequential((0): Linear(in_features=576, out_features=128, bias=True)(1): ReLU()(2): Linear(in_features=128, out_features=10, bias=True)))epoch 1Train Loss: 0.003327, Acc: 0.933000epoch 2Train Loss: 0.000876, Acc: 0.982667epoch 3Train Loss: 0.000592, Acc: 0.987783epoch 4Train Loss: 0.000466, Acc: 0.990467epoch 5Train Loss: 0.000403, Acc: 0.991733
25.5.2 批式任务中使用PyTorch模型
使用TorchModelPredictBatchOp组件,可以加载PyTorch模型进行批式预测。关于该组件的详细说明参见Alink文档 https://www.yuque.com/pinshu/alink_doc/torchmodelpredictbatchop .
使用PyTorch模型前,还需要将输入数据列的类型转换为Tensor格式,可以使用VectorToTensorBatchOp组件。具体代码如下所示:
AkSourceBatchOp()\.setFilePath(Chap13_DATA_DIR + Chap13_DENSE_TEST_FILE)\.link(\VectorToTensorBatchOp()\.setTensorDataType("float")\.setTensorShape([1, 1, 28, 28])\.setSelectedCol("vec")\.setOutputCol("tensor")\.setReservedCols(["label"]))\.link(\TorchModelPredictBatchOp()\.setModelPath("https://alink-release.oss-cn-beijing.aliyuncs.com/data-files/mnist_model_pytorch.pt")\.setSelectedCols(["tensor"])\.setOutputSchemaStr("output_1 FLOAT_TENSOR"))\.lazyPrint(3)\.link(\UDFBatchOp()\.setFunc(get_max_index)\.setSelectedCols(["output_1"])\.setOutputCol("pred"))\.lazyPrint(3)\.link(\EvalMultiClassBatchOp()\.setLabelCol("label")\.setPredictionCol("pred")\.lazyPrintMetrics())BatchOperator.execute()
这里用到了一个自定义函数,具体定义如下:
import numpy as np@udf(input_types=[AlinkDataTypes.TENSOR()], result_type=AlinkDataTypes.INT())def get_max_index(tensor: np.ndarray):return tensor.argmax().item()
批式任务的运行结果为: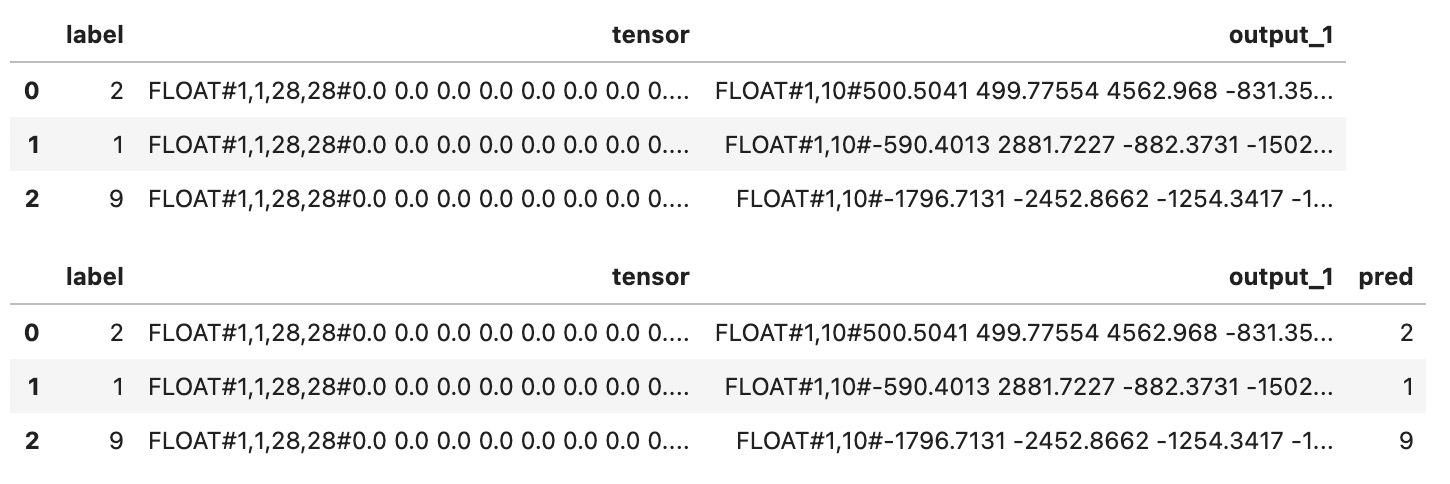
-------------------------------- Metrics: --------------------------------Accuracy:0.9903 Macro F1:0.9902 Micro F1:0.9903 Kappa:0.9892|Pred\Real| 9| 8| 7|...| 2| 1| 0||---------|---|---|----|---|----|----|---|| 9|992| 1| 4|...| 0| 0| 0|| 8| 2|965| 1|...| 0| 1| 1|| 7| 5| 2|1012|...| 2| 0| 1|| ...|...|...| ...|...| ...| ...|...|| 2| 2| 4| 9|...|1030| 3| 2|| 1| 0| 0| 2|...| 0|1128| 0|| 0| 0| 2| 0|...| 0| 0|973|
25.5.3 流式任务中使用PyTorch模型
使用TorchModelPredictStreamOp组件,可以加载PyTorch模型进行批式预测。关于该组件的详细说明参见Alink文档 https://www.yuque.com/pinshu/alink_doc/torchmodelpredictstreamop .
使用PyTorch模型前,还需要将输入数据列的类型转换为Tensor格式,可以使用VectorToTensorStreamOp组件。具体代码如下所示:
AkSourceStreamOp()\.setFilePath(Chap13_DATA_DIR + Chap13_DENSE_TEST_FILE)\.link(\VectorToTensorStreamOp()\.setTensorDataType("float")\.setTensorShape([1, 1, 28, 28]).setSelectedCol("vec")\.setOutputCol("tensor")\.setReservedCols(["label"]))\.link(\TorchModelPredictStreamOp()\.setModelPath("https://alink-release.oss-cn-beijing.aliyuncs.com/data-files/mnist_model_pytorch.pt")\.setSelectedCols(["tensor"])\.setOutputSchemaStr("output_1 FLOAT_TENSOR"))\.link(\UDFStreamOp()\.setFunc(get_max_index)\.setSelectedCols(["output_1"])\.setOutputCol("pred"))\.sample(0.001)\.print()StreamOperator.execute()
运行结果为: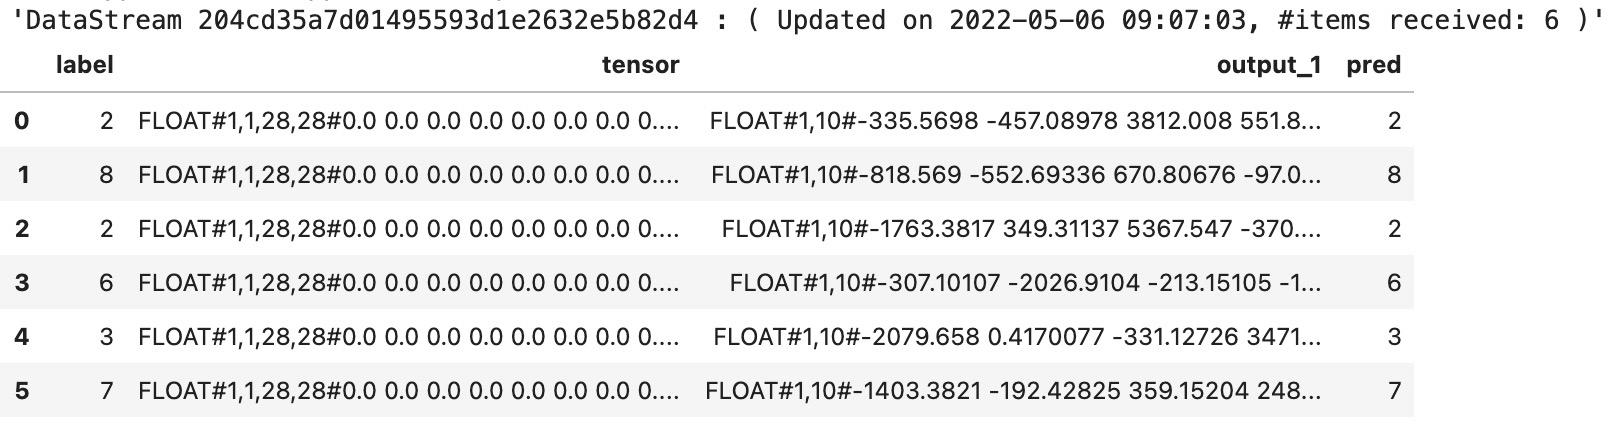
25.5.4 Pipeline中使用PyTorch模型
学习了如何在批式任务和流式任务中使用PyTorch模型,我们很容易在Pipeline中使用PyTorch模型进行预测,只要将其中的批式/流式组件对应到Pipeline组件即可。具体代码如下:
PipelineModel(\VectorToTensor()\.setTensorDataType("float")\.setTensorShape([1, 1, 28, 28])\.setSelectedCol("vec")\.setOutputCol("tensor")\.setReservedCols(["label"]),TorchModelPredictor()\.setModelPath("https://alink-release.oss-cn-beijing.aliyuncs.com/data-files/mnist_model_pytorch.pt")\.setSelectedCols(["tensor"])\.setOutputSchemaStr("output_1 FLOAT_TENSOR")).save(Chap13_DATA_DIR + PIPELINE_PYTORCH_MODEL, True)BatchOperator.execute()PipelineModel\.load(Chap13_DATA_DIR + PIPELINE_PYTORCH_MODEL)\.transform(\AkSourceStreamOp()\.setFilePath(Chap13_DATA_DIR + Chap13_DENSE_TEST_FILE))\.link(\UDFStreamOp()\.setFunc(get_max_index)\.setSelectedCols(["output_1"])\.setOutputCol("pred"))\.sample(0.001)\.print()StreamOperator.execute()
运行结果为: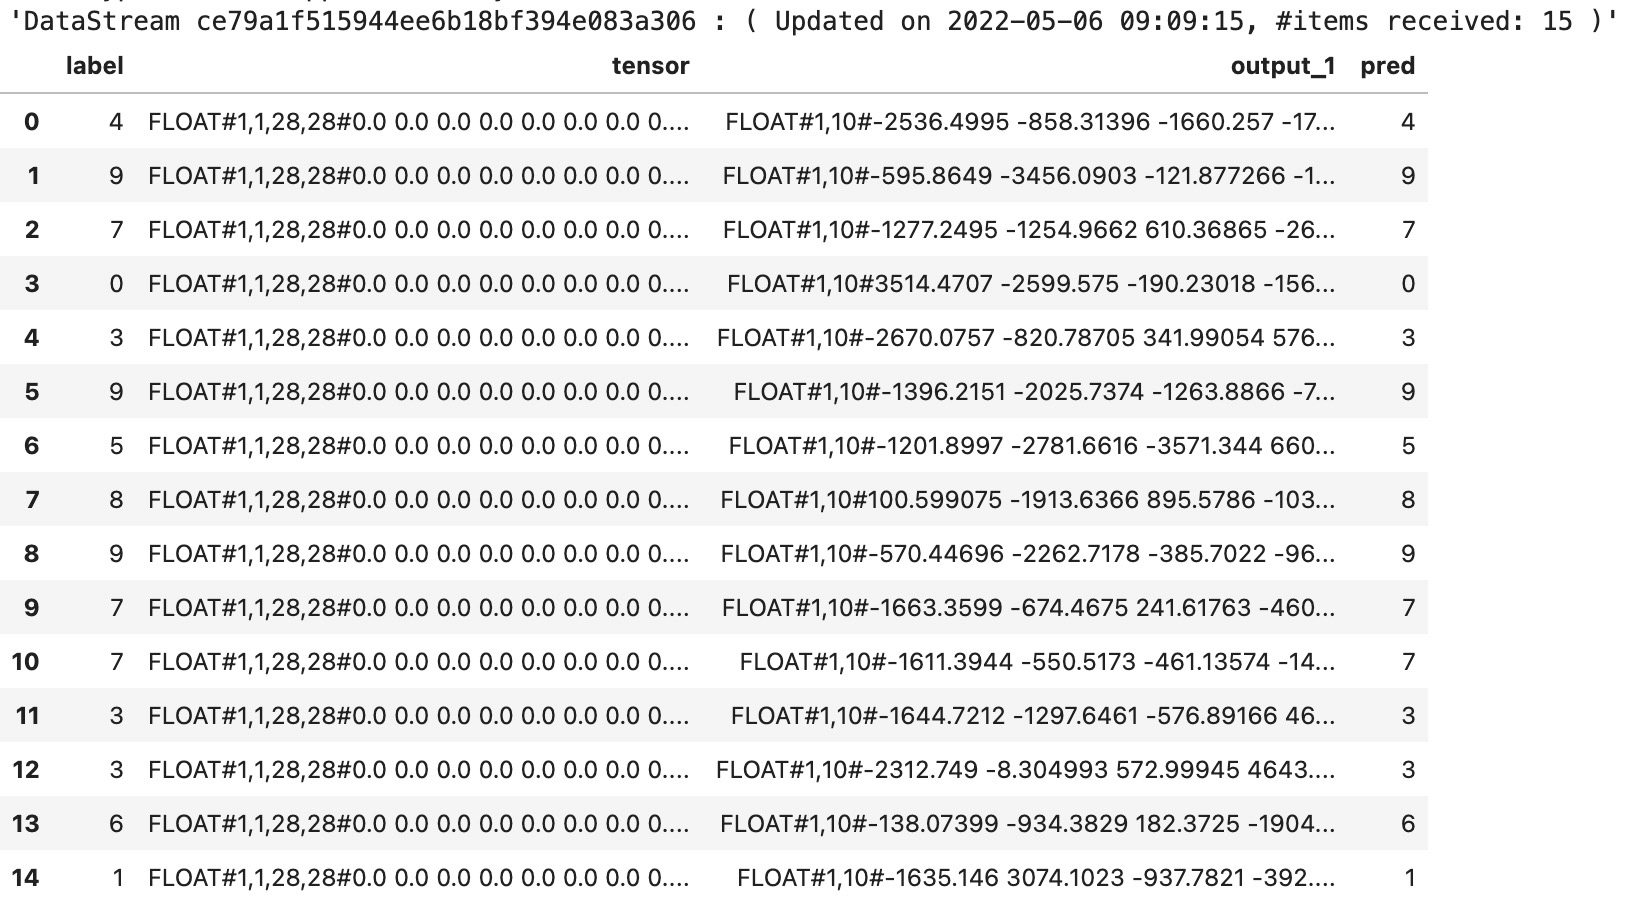
25.5.5 LocalPredictor中使用PyTorch模型
除了通过Alink任务使用PyTorch模型,也可以使用LocalPredictor进行嵌入式预测。示例代码如下,首先从数据集中抽取一行数据,输入数据的SchemaStr为“vec string, label int”;然后通过导入上一节保存的Pipeline模型,并设置输入数据的SchemaStr,得到LocalPredictor类型的实例localPredictor;如果不确定预测结果各列的含义,可以打印输出localPredictor的OutputSchema;使用localPredictor的map方法获得预测结果。
source = AkSourceBatchOp().setFilePath(Chap13_DATA_DIR + Chap13_DENSE_TEST_FILE)print(source.getSchemaStr())df = source.firstN(1).collectToDataframe()row = [df.iat[0,0], df.iat[0,1].item()]localPredictor = LocalPredictor(Chap13_DATA_DIR + PIPELINE_PYTORCH_MODEL, "vec string, label int")print(localPredictor.getOutputSchemaStr())r = localPredictor.map(row)print(str(r[0]) + " | " + str(r[2]))
运行结果为:
vec VARCHAR, label INTlabel INT, tensor ANY<com.alibaba.alink.common.linalg.tensor.FloatTensor>, output_1 ANY<com.alibaba.alink.common.linalg.tensor.FloatTensor>2 | FloatTensor(1,10)[[500.5041 499.77554 4562.968 ... -759.00934 -1826.2468 -2071.0444]]

若有收获,就点个赞吧
0 人点赞
