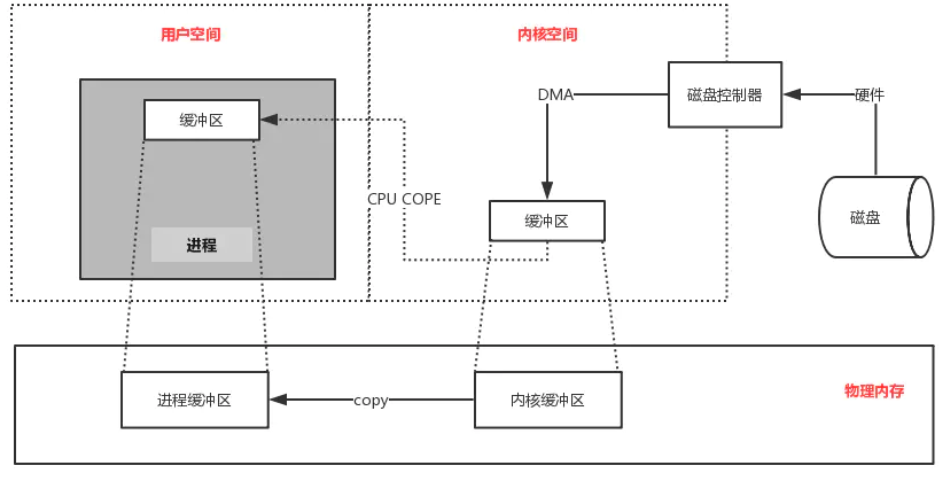
1.基本原理
1.1虚拟内存
每一个进程OS都会让它认为自己独享全部内存,实际上是不可能的,所以OS采用虚拟内存的方法让进程认为自己独享内存。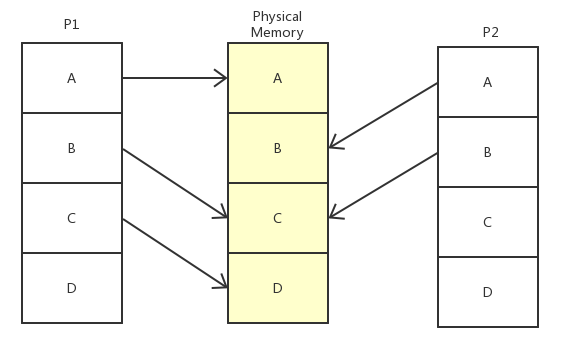
- 如图,进程P1访问实内存地址A、C、D,但对于它自己来说,是连续地址A、B、C,是OS欺骗了它,
- 同样,进程P2访问实内存地址B、C对于它自己来说是A、B
- 虚拟空间对于程序来说(也对于程序员来说)是一段和物理内存相同大小(或自定义,比如JVM自定义堆大小等),连续的地址空间(还没分配内存,所以叫地址空间,预留的空间,还不能读写数据)
- 虚拟内存和物理内存都是划分成同样单位的页,默认1页=4KByte
1.2mmap
mmap是针对于文件的,是让进程在虚拟内存当中读写磁盘文件的一种方式。首先,关于文件读写,我们有传统的IO方式:
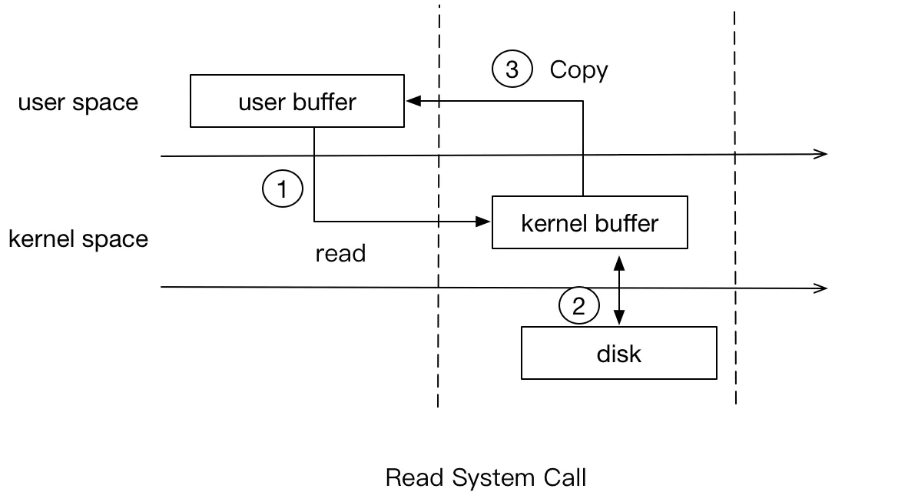
- 用户态读取核态的数据缓存,数据缓存从内存or磁盘读取数据
- 因为用户态是被核态屏蔽的,所以要想读取数据,核态要将数据主动copy给用户态:
其次,看看mmap的方式:
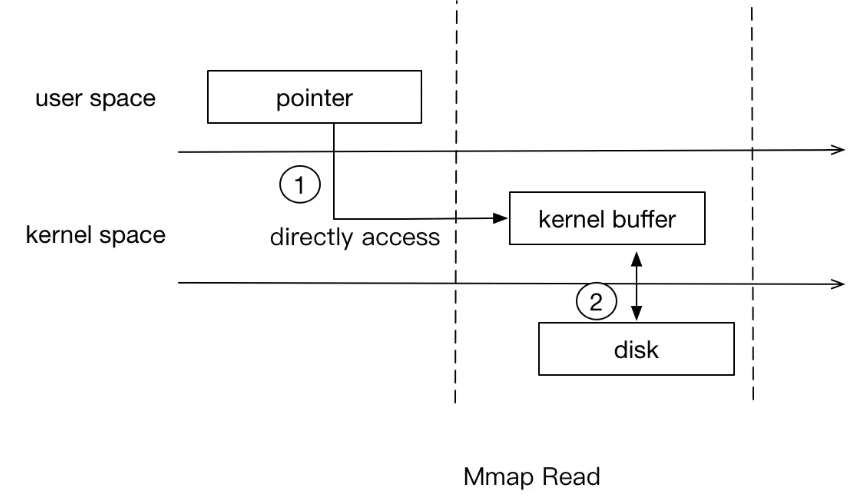
- 用户态通过mmap方法(函数、算法、随便啦)获取到指针(只想文件首部地址,就像字符串的char*一样)
- 将指针(加偏移量)地址传给核态,核态根据将缺页的数据从磁盘读到内存当中
- 指针通过mmap映射到真实内存地址,用户态直接读取器内存相应地址的数据
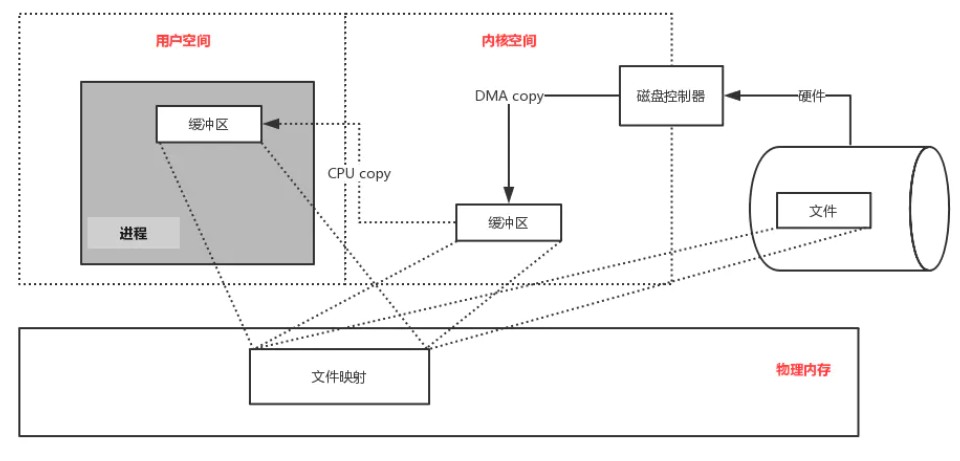
- 也就是说,mmap比传统IO少了内核将数据copy给用户态的过程,全程核态、用户态都根据mmap映射到内存同一位置
2. 实现方式
2.1 C/C++
mmap是Linux内存(虚拟内存)的一种机制,其内核是C++编写,自然C/C++实现就较为简单,因为在 Include/sys/mman.h当中实现了mmap ```cinclude
include
include
include
include
using namespace std;
int main() { int fd = 0; char *ptr = NULL; struct stat buf = {0};
char filePath[]="mmapTestFile";//use io.h open file ususally return 3(means regular read write) or -1(means fail)if ((fd = open(filePath, O_RDWR)) < 0){printf("open file error\n");return -1;}//get file state,file state include meta data of file for example:st_size[file length]if (fstat(fd, &buf) < 0){printf("get file state error:%d\n", errno);close(fd);return -1;}//mmap just like fopen() but return a ptr point the address of file headptr = (char *)mmap(NULL, buf.st_size, PROT_READ|PROT_WRITE, MAP_SHARED, fd, 0);if (ptr == MAP_FAILED){printf("mmap failed\n");close(fd);return -1;}close(fd);printf("length of the file is : %d\n", buf.st_size);printf("the %s content is : %s\n", filePath, ptr);//replace the 3rd char in the file by ptr like use an arrayptr[3] = 'a';printf("the %s new content is : %s\n", filePath, ptr);//munmap just like close()munmap(ptr, buf.st_size);return 0;
}
注释已解释,此处不再赘述<a name="7qjfx"></a>### 2.2 JAVA由于Java本身运行在JVM之上,离OS较远,通常使用第三方库,调用native(by C++)去实现<br />不过,JAVA nio有类似方法<a name="sNhs2"></a>#### 2.2.1 NIO:JDK自带的MappedByteBuffer重中之重:这是JDK的NIO包下FileChannel的一个“实现”,在这里先说明,其实第三方开源库都是基于这个而实现的<br />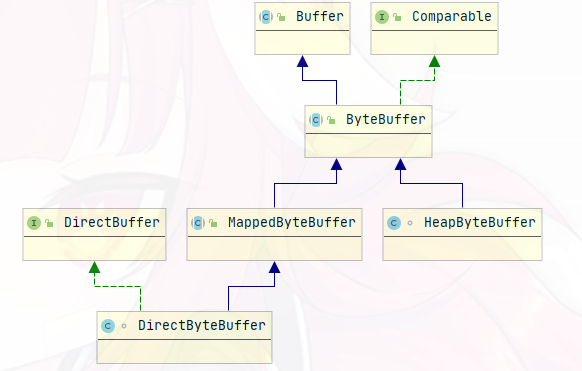<br />可以看出,MappedByteBuffer继承并实现了ByteBuffer-->Buffer,然后再实际使用中,我们真正用到的是DirectBuffer,这是再继承MappedByteBuffer并实现自己的接口的类同时还有个HeapByteBuffer,两者的区别就是:- MappedByteBuffer是FileChannel通过native方法map0实现的,和C一样的mmap,意味着映射地址所在虚拟空间在系统内存里面(JVM之外)- HeapByteBuffer则是类似的操作,但是映射地址所在虚拟空间在JVM内(堆内存)里面实现:```javapublic class FileChannleMap {public final MappedByteBuffer mappedByteBuffer;private final FileChannel fc;@SneakyThrowspublic FileChannleMap(File file, long capacity) {final long fsize = file.length();//File 创建RandomAccessFile,然后创建FileChannelfc = new RandomAccessFile(file, "rw").getChannel();final long l = capacity > 0 ? capacity : fc.size() * 2;//通过FileChannel的map方法就得到了MappedByteBuffer(DirectByteBuffer)mappedByteBuffer = fc.map(FileChannel.MapMode.READ_WRITE, 0, l);//load方法将文件加载到虚拟内存(创建的时候会加载的,如果没出错可以不加这句)mappedByteBuffer.load();}public void writeByte(byte[] bytes) {mappedByteBuffer.rewind();mappedByteBuffer.put(bytes);}public void writeText(String text) {this.writeByte(text.getBytes());}@SneakyThrowspublic String getAll() {mappedByteBuffer.rewind();final byte[] buff = new byte[mappedByteBuffer.limit()];mappedByteBuffer.get(buff);return new String(buff, StandardCharsets.UTF_8);}@SneakyThrowspublic String getPart(int offset, int len) {mappedByteBuffer.rewind();final byte[] buf = new byte[len];mappedByteBuffer.get(buf, offset, len);return new String(buf, StandardCharsets.UTF_8);}public Character getChar(int pos) {return (char) mappedByteBuffer.get(pos);}public void clearAll() {mappedByteBuffer.clear();}@SneakyThrowspublic void close() {mappedByteBuffer.force();if (fc != null && fc.isOpen())fc.close();}}
- API:参见BufferAPI
- 这里所有操作是基于byte的,之后自己再转换成String或其他类型,注意,一个char是2Byte,int是4Byte
- map方法第三个参数非常重要,是你开辟的内存的空间大小,是不可更改的!如果设置不合理很容易发生BufferOutBoundsException(or BufferUnderBoundsException)
- MappedByteBuffer实现的方法和C的mmap基本一致,比如C通过指针的数组操作ptr[i]进行读或写,MappedByteBuffer则有对应方法get(index)、get(&byte[],offset.len),put(byte[])、put(index,byte)、put(byte[],offset,len)
2.2.2 fengzhizi715/bytekit(GitHub)
这个包是对java byte数据类型的一个封装(bytekit-core),同时对MappedByteBuffer一个封装(bytekit-mmap)。
private MmapBuffer buffer = null;private String file;private int position = 0; // current the position for readerpublic MmapBytes(String file,Long mapSize) {this.file = file;this.buffer = new MmapBuffer(file,mapSize);System.out.println("initializer with " + mapSize + " bytes map buffer");}
下面简单介绍下比较有用的几个封装:
扩容
public void remap(Long mapSize) {ByteBuffer byteBuffer = Utils.cloneByteBuffer(buffer.getMappedByteBuffer());buffer.getMappedByteBuffer().clear();free();this.buffer = new MmapBuffer(file,mapSize);try {writeBytes(byteBuffer.array());} catch (Exception e) {e.printStackTrace();}System.out.println("re-map with " + mapSize + " bytes map buffer");}
在上面有说到,初始化内存的空间大小时不可更改的,那如果太小怎么办呢?
这里的扩容和JavaCollections差不多的,通过将Buffer(虚拟内存)拷贝,然后用源文件重新开辟新空间,再将拷贝的数据写进去。释放
private void unmap(MappedByteBuffer mbb) {if (mbb == null) {return;}atry {Class<?> clazz = Class.forName("sun.nio.ch.FileChannelImpl");Method m = clazz.getDeclaredMethod("unmap", MappedByteBuffer.class);m.setAccessible(true);m.invoke(null, mbb);} catch (Throwable e) {e.printStackTrace();}}
在C当中,unmmap可以解除映射,而在JAVA当中,FileChannelImpl将其和map0一样私有封装了起来,所以这里采用反射机制,暴力解除私有限制,调用umap解除映射。
2.2.3 odnoklassniki/one-nio(Github)
