1 基本概念
基本概念
程序(program):是为完成特定任务、用某种语言编写的一组指令的集合。即指一段静态的代码,静态对象。
进程(process):是程序的一次执行过程,或是正在运行的一个程序。是一个动态的过程:有它自身的产生、存在和消亡的过程(生命周期)。如:运行中的QQ,运行中的MP3播放器。
程序是静态的,进程是动态的。进程作为资源分配的单位,系统在运行时会为每个进程分配不同的内存区域。
线程(thread):进程可进一步细化为线程,是CPU动态分配资源去执行一个程序内的代码路径,即一个代码执行路径。线程作为调度和执行的单位,每个线程拥有独立的运行栈和程序计数器(pc),线程切换的开销小。
若一个进程同一时间并行执行多个线程,就是支持多线程的。一个进程中的多个线程共享相同的内存单元/内存地址空间。它们从同一堆中分配对象,可以访问相同的变量和对象。这就使得线程间通信更简便、高效。但多个线程操作共享的系统资源可能就会带来安全的隐患。
一个Java应用程序java.exe,其实至少有三个线程:main()主线程、gc()垃圾回收线程、异常处理线程(然如果发生异常,会影响主线程)。
单核CPU:其实是一种假的多线程,因为在一个时间单元内,也只能执行一个线程的任务。但是因为CPU切换的时间单元特别短,因此感觉不出来。
多核CPU:如果是多核的话程序可以多核并行运行。
线程的优先级
级别:MAX_PRIORITY:10;MIN _PRIORITY:1;NORM_PRIORITY:5
方法:getPriority() :返回线程优先值/setPriority(int newPriority) :改变线程的优先级
说明:线程创建时继承父线程的优先级;低优先级只是获得调度的概率低,并非一定是在高优先级线程之后才被调用
线程的分类
Java中的线程分为两类:一种是守护线程,一种是用户线程。
- 它们在几乎每个方面都是相同的,唯一的区别是判断JVM何时离开。
- 守护线程是用来服务用户线程的,通过在start()方法前调用,thread.setDaemon(true)可以把一个用户线程变成一个守护线程。
- Java垃圾回收就是一个典型的守护线程,若JVM中都是守护线程,当前JVM将退出(即没有要服务的用户线程了,守护进程没有服务的对象了,故整个JVM就会退出)。
2 Thread类的生命周期
参考文章
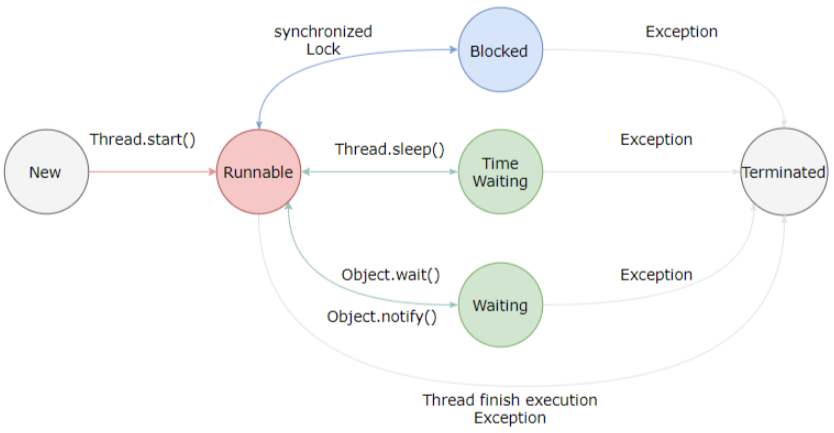
线程状态切换
并发编程—Java线程的6种状态及切换操作系统线程的五种状态
新建(NEW):当一个Thread类或其子类的对象被声明并创建时,新生的线程对象处于新建状态。
就绪(RUNNABLE):处于新建状态的线程被start()后,将进入线程队列等待CPU时间片,此时它已具备了运行的条件,只是没分配到CPU资源。
运行(RUNNING):当就绪的线程被调度并获得CPU资源时,便进入运行状态,run()方法定义了线程的操作和功能。
阻塞(BLOCKED):在某种特殊情况下,被人为挂起或执行输入输出操作时,让出CPU并临时中止自己的执行,进入阻塞状态。 BLOCKED状态包括三种类型状态:等待(wait)、睡眠(sleep)、阻塞(申请资源:I\O、对象的锁);
死亡(DEAD):线程完成了它的全部工作或线程被提前强制性地中止或出现异常导致结束。Java线程的六种状态
六种状态来源佐证:Thread.class类里面的public enum State说明。
新建(New):创建后尚未启动。
可运行(Runnable):可能正在运行,也可能正在等待 CPU 时间片。可运行状态(RUNNABLE)相当于操作系统线程状态中的就绪状态(RUNNABLE)和运行状态(RUNNING)。
阻塞(Blocking):等待获取一个排它锁,如果其线程释放了锁就会结束此状态。什么时候会释放锁?
- 当前线程的同步方法、同步代码块执行结束。
- 当前线程在同步代码块、同步方法中遇到break、return终止了该代码块或该方法的继续执行。
- 当前线程在同步代码块、同步方法中出现了未处理的Error或Exception,导致异常结束。
- 当前线程在同步代码块、同步方法中执行了线程对象的wait()方法,当前线程暂停,并释放锁。
不会释放锁的操作?
- 线程执行同步代码块或同步方法时,程序调用Thread.sleep()、Thread.yield()方法暂停当前线程的执行。
- 线程执行同步代码块时,其他线程调用了该线程的suspend()方法将该线程挂起,该线程不会释放锁(同步监视器)。应尽量避免使用suspend()和resume()来控制线程。
无限期等待(Waiting):等待其它线程显式地唤醒,否则不会被分配 CPU 时间片。
| 进入方法 | 退出方法 |
|---|---|
| 没有设置 Timeout 参数的 Object.wait() 方法 | Object.notify() / Object.notifyAll() |
| 没有设置 Timeout 参数的 Thread.join() 方法 | 被调用的线程执行完毕 |
| LockSupport.park() 方法 | LockSupport.unpark() 方法 |
限期等待(Timed Waiting)
无需等待其它线程显式地唤醒,在一定时间之后会被系统自动唤醒。
调用 Thread.sleep() 方法使线程进入限期等待状态时,常常用“使一个线程睡眠”进行描述。
调用 Object.wait() 方法使线程进入限期等待或者无限期等待时,常常用“挂起一个线程”进行描述。
睡眠和挂起是用来描述行为,而阻塞和等待用来描述状态。
阻塞和等待的区别在于,阻塞是被动的,它是在等待获取一个排它锁。而等待是主动的,通过调用 Thread.sleep() 和 Object.wait() 等方法进入。
| 进入方法 | 退出方法 |
|---|---|
| Thread.sleep() 方法 | 时间结束 |
| 设置了 Timeout 参数的 Object.wait() 方法 | 时间结束 / Object.notify() / Object.notifyAll() |
| 设置了 Timeout 参数的 Thread.join() 方法 | 时间结束 / 被调用的线程执行完毕 |
| LockSupport.parkNanos() 方法 | - |
| LockSupport.parkUntil() 方法 | - |
死亡(Terminated)
可以是线程结束任务之后自己结束,或者产生了异常而结束。
关联与差别
参考文章:Java线程和操作系统线程的关系
green threads vs native threads
- green threads:是一种由运行环境或虚拟机(VM)调度,而不是由本地底层操作系统调度的线程。绿色线程并不依赖底层的系统功能,模拟实现了多线程的运行,这种线程的管理调配发生在用户空间而不是内核空间,所以它们可以在没有原生线程支持的环境中工作。在Java 1.1中,绿色线程(至少在 Solaris 上)是JVM 中使用的唯一一种线程模型。 由于绿色线程和原生线程比起来在使用时有一些限制,随后的 Java 版本中放弃了绿色线程,转而使用native threads。
- native threads:在 Java1.2 之后. Linux中的JVM是基于pthread实现的,即现在的Java中线程的本质,其实就是操作系统中的线程。
现在的Java中线程的本质,其实就是操作系统中的线程,JavaThread与操作系统thread是1对1的关系。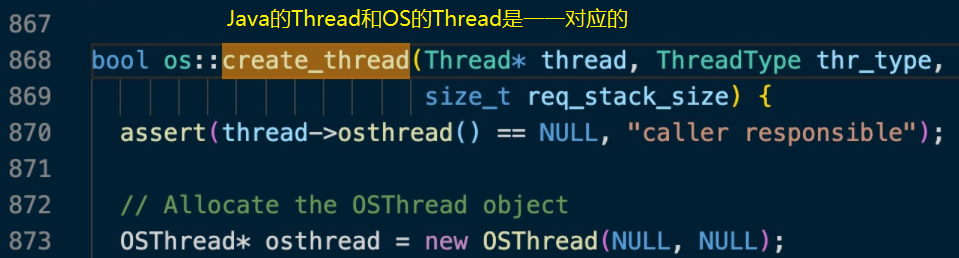
操作系统中的线程除去new和terminated状态,一个线程真实存在的状态,只有:
- ready :表示线程已经被创建,正在等待系统调度分配CPU使用权。
- running:表示线程获得了CPU使用权,正在进行运算。
- waiting:表示线程等待(或者说挂起),让出CPU资源给其他线程使用。
为什么没有new和terminated状态?是因为这两种状态实际上并不存在于线程运行中,所以也没什么实际讨论的意义。
对于Java中的线程状态:
- 无论是Timed Waiting ,Waiting还是Blocked,对应的都是操作系统线程的waiting(等待)状态。
- 而Runnable状态,则对应了操作系统中的ready和running状态。
3 Thread类的常用方法
JavaTM 虚拟机支持多线程执行,线程是用Thread类来表示的。用户创建一个线程的唯一方式是创建一个该类的对象;每个线程都与这样一个对象相关联。在对应的Thread对象上调用start()方法将启动线程。
/*** Thread类的常用方法* 1.start():启动当前线程,执行当前线程的run()* 2.run():通常需要重写Thread类中的此方法,将创建的线程要执行的操作声明在此方法中* 3.currentThread(): 静态方法,返回当前代码执行的线程* 4.getName()/setName():获取当前线程的名字/设置当前线程的名字* 5.yield():暂停当前正在执行的线程,把执行机会让给优先级相同或更高的线程;若队列中没有同优先级的线程,忽略此方法* 6.join():在线程a中调用线程b的join(),此时线程a就进入阻塞状态,直到线程b完全执行完以后,线程a才结束阻塞状态。* 7.sleep(long millitime):让当前线程“睡眠”指定时间的millitime毫秒)。在指定的millitime毫秒时间内,当前线程是阻塞状态的。* 8.isAlive():返回boolean,判断线程是否还活着* stop():已过时。当执行此方法时,强制结束当前线程。* resume():已过时。* suspend():已过时。*/public class MyThread {public static void main(String[] args) throws InterruptedException {Thread subThread=new Thread(){@Overridepublic void run() {super.run();System.out.println(this.getName());int i=0;while (i<10){//yield:暂停当前正在执行的线程,把执行机会让给优先级相同或更高的线程;若队列中没有同优先级的线程,忽略此方法if(i==20)this.yield();i++;System.out.println(this.getName()+i);}}};subThread.setName("子线程subThread");subThread.start();//join:在主线程代码调用子线程的join()方法,即必须等到子线程subThread执行完成了才会继续执行主线程的方法//哪里写代码哪里就被阻塞subThread.join();System.out.println("MainThread");}}
4 创建多线程的四大方式
在Java里面,线程是用Thread类来表示的。用户创建一个线程的唯一方式是创建一个该类的对象。而该类又分为多个构造函数以供创建。在Linux下,new Thread就是调用操作系统的clone方法
new Thread()
使用步骤
- 继承Thread类并重写run()方法。
- 调用Thread类的无参构造函数:
Thread myThread=new MyThread(); - 调用
myThread.start()方法。
特征
- 主进程无法获取线程的运算结果。
- 每个线程都是通过某个特定Thread对象的run()方法来完成操作的,经常把run()方法的主体称为线程体。
- 通过该Thread对象的start()方法来启动这个线程,而非直接调用run()。
```java
//自定义MyThread
class MyThread extends java.lang.Thread {
@Override
public void run() {
} }super.run();System.out.println("ThreadId:" + Thread.currentThread().getId());
//使用MyThread public void threadTest() { MyThread thread = new MyThread(); MyThread thread2 = new MyThread(); thread.start(); thread2.start(); }
//运行结果 ThreadId:55 ThreadId:56
//使用匿名类实现```javanew Thread() {@Overridepublic void run() {System.out.println("AA");}}.start();
new Thread(Runnable)
使用步骤
- 定义子类,实现Runnable接口,子类中重写Runnable接口中的run方法或直接使用匿名对象new Runnable()。
- 通过Thread类的构造函数创建线程对象:
Thread myThread=Thread(Runnable target)。 - 调用Thread类的
myThread.start()方法开启线程:其内部就是调用的Runnable子类接口的run方法。
特点:主进程无法获取线程的运算结果。
代码
public class MyThread {public static void main(String[] args) throws InterruptedException {Runnable runnable = new Runnable() {@Overridepublic void run() {System.out.println("ThreadId:" + Thread.currentThread().getId());}};Thread thread=new Thread(runnable);thread.start();System.out.println("main-ThreadId:" + Thread.currentThread().getId());}}//打印输出main-ThreadId:1ThreadId:12//=========不能仅这么用:这样用的结果就是线程都在主线程里面了=========public static void main(String[] args) throws InterruptedException {Runnable runnable = new Runnable() {@Overridepublic void run() {System.out.println("ThreadId:" + Thread.currentThread().getId());}};runnable.run();System.out.println("Main-ThreadId:" + Thread.currentThread().getId());}//输出的结果ThreadId:1Main-ThreadId:1
new Thread(Callable)
实现Callable
与使用Runnable相比, Callable功能更强大些:
- 相比run()方法,可以有返回值
- 方法可以抛出异常
- 支持泛型的返回值
需要借助FutureTask类,比如获取返回结果 ```java @Test void FutureTaskTest() { //1.0 开启子线程线程=>使用Callable接口 Callable
callable = new Callable() { @Overridepublic String call() throws Exception {System.out.println("subThread be called " + System.currentTimeMillis());Thread.sleep(100);return "子线程";}
}; FutureTask
task = new FutureTask(callable); Thread thread = new Thread(task); thread.start(); //2.0 主线程在futureTask执行完成后将会执行回调 try {
//taskString subThreadReturnValue = task.get();System.out.println(subThreadReturnValue);System.out.println("子线程返回值 " + System.currentTimeMillis());
} catch (InterruptedException e) {
e.printStackTrace();
} catch (ExecutionException e) {
e.printStackTrace();
} }
//输出结果 subThread be called 1643163907580 子线程 子线程返回值 1643163907680
<a name="VZax1"></a>## 使用ThreadPoolExecutor创建<a name="mtaaE"></a>### ThreadPoolExecutor的概念ThreadPoolExecutor即为线程池对象,通过线程池使用线程,性能会更稳定,也可以获取执行结果,并捕获异常。但是,在业务复杂情况下,一个异步调用可能会依赖于另一个异步调用的执行结果。> **ThreadPoolExecutor对象的七大参数**```javaint corePoolSize:核心线程数int maximumPoolSize:线程池最大的线程数workQueue:阻塞队列。如果任务过多,会自动将多余的任务放在队列里面。如果线程有空闲,就会去执行。最大值为Integer.Max。实际项目生产过程中,要使用压力测试查看任务的最大值long keepAliveTime:when the number of threads is greater than the core, this is the maximum time that excess idle threads(多余的线程) will wait for new tasks before terminating(释放的maximumPoolSize-corePoolSize,核心线程数不能释放)。TimeUnit unit:keepAliveTime的单位ThreadFactory threadFactory:线程的创建工厂RejectedExecutionHandler handler:如果队列满,按照指定的拒绝策略。ThreadPoolExecutor内部有实现4个拒绝策略,默认为AbortPolicy策略:CallerRunsPolicy:由调用execute方法提交任务的线程来执行这个任务AbortPolicy:抛出异常RejectedExecutionException拒绝提交任务DiscardPolicy:直接抛弃任务,不做任何处理DiscardOldestPolicy:去除任务队列中的第一个任务,重新提交
ThreadPoolExecutor的工作顺序
核心线程->阻塞队列->max线程->Reject->only core(keepAliveTime):正式工->加班deadline->临时工->做不了->没任务(fired)
- 核心线程先执行任务:线程池创建,准备好core数量的核心线程,准备接受任务。
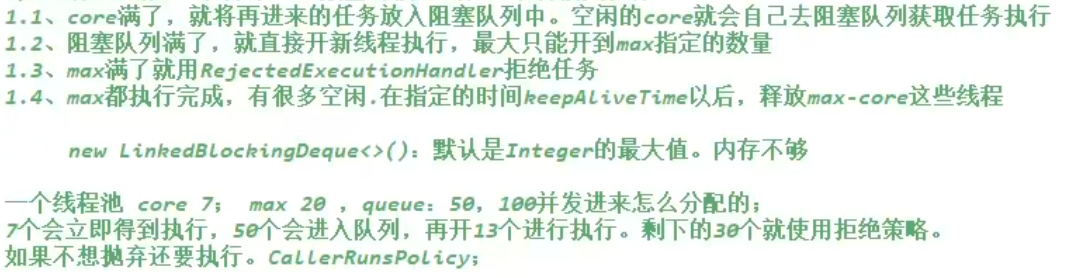
- 阻塞队列装等待任务:核心线程满了,就将再进来的任务放入阻塞队列中。空闲的core就会自己去阻塞队列获取任务执行。
- 阻塞队列感觉装不下了,再开辟新线程至Max:请求书>阻塞队列了,就直接开新线程执行,最大只能开到max指定的数量。
- 阻塞队列再满了就Reject:开了max之后,阻塞队列还是满了就用RejectedExecutionHandler拒绝任务拒绝执行。
- 非核心空闲任务指定时间内销毁:在指定的时间keepAliveTime以后,释放max-core这些线程。
例子:
gulimall:threadpool:corePoolSize: 5maxPoolSize: 10linkedBlockDequeCapactiy: 200//其他参数暂时不予显示代表的含义是:核心线程5个,最大线程10个,阻塞队列200个。1、假如一下子进来了50个任务请求,因为没有达到阻塞队列的200上限,则是一直使用5个核心线程处理,多余的45(50-5)个任务进入阻塞队列排队等候被执行。2、此时又进来了750个任务,此时任务数已经达到阻塞队列最长的200个(放不进了),这是则再开辟新线程:最大开辟线程数为10个,阻塞队列200个任务,多余590(800-10-200)个的任务则使用默认为AbortPolicy策略抛出异常处理。3、多余开辟的5(10-5)个线程将会在指定时间keepAliveTime内销毁。
Q:使用线程为什么必须使用线程池里面的?
A:根据阿里巴巴手册:线程资源必须通过线程池提供,不允许在应用中自行显式创建线程。使用线程池的好处是减少在创建和销毁线程上所消耗的时间以及系统资源的开销,解决资源不足的问题,如果不使用线程池,有可能造成系统创建大量同类线程而导致消耗完内存或者“过度切换”的问题
Q:为什么创建线程池不用Executors中提供的方法?
A:线程池不允许使用Executors去创建,而是通过ThreadPoolExecutor(如Spring+new ThreadPoolExecutor或单例new ThreadPoolExecutor)的方式,这样的处理方式让写的同学更加明确线程池的运行规则,规避资源耗尽的风险。
同时Executors返回的线程池对象有如下弊端:
- FixedThreadPool和SingleThreadPool:运行的请求队列长度为:Integer.MAX_VALUE,可能会堆积大量的请求,从而导致OOM。
- CacheThreadPool和ScheduledThreadPool:运行的请求队列长度为:Integer.MAX_VALUE,线程数上限太大导致OOM。
Q:线程池的合理参数
生产环境中主要要配置的是corePoolSize、maximumPoolSize、workQueue。
| CPU密集型 | IO密集型 | |
|---|---|---|
| maximum PoolSize |
CPU密集的意思是该任务需要大量的运算,而没有阻塞,CPU一直全速运行,CPU密集任务只有在真正的多核CPU上才可能得到加速(通过多线程),而在单核CPU上,无论你开几个模拟的多线程该任务都不可能得到加速,因为CPU总的运算能力就那些。CPU密集型任务配置尽可能少的线程数量。 一般公式:maximumPoolSize=maxCPU核数 + 1个线程数 如2核心的CPU最大就使用3个线程(其中1个线程负责上下文调度) |
IO密集型,即该任务需要大量的IO操作,即大量的阻塞,在单线程上运行IO密集型的任务会导致浪费大量的CPU运算能力花费在等待上,所以IO密集型任务中使用多线程可以大大的加速程序的运行,即使在单核CPU上,这种加速主要就是利用了被浪费掉的阻塞时间。IO密集时,由于任务线程并不是一直在执行任务,大部分线程都被阻塞,故需要多配置线程数。 一般参考公式:maximumPoolSize=CPU核数 / (1 - 阻塞系数) 阻塞系数在0.8 ~ 0.9左右 如:8核CPU:8/ (1 - 0.9) = 80个线程数。 更精确的公式如下: 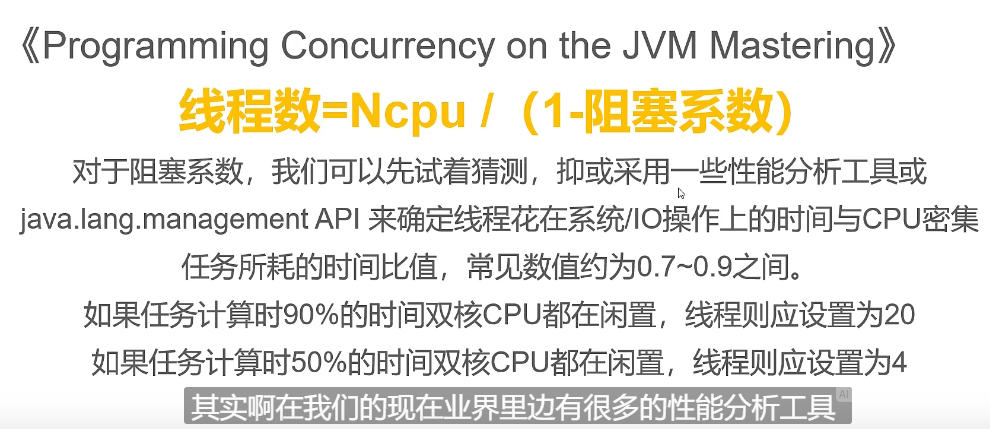 |
| corePoolSize | corePoolSize=maximumPoolSize*20% | |
| workQueue | 默认为Integer.Max,不允许使用该值。而是要在满足业务的前提下做压测,尽量减少队列积压。 |
使用ThreadPoolExecutor
方式一:通过Spring+new ThreadPoolExecutor()
步骤1:核心类(往Spring框架中加入ThreadPoolExecutor对象)
package com.efly.gulimall.product.config;import com.efly.gulimall.product.entity.MyThreadPoolProperties;import org.springframework.boot.context.properties.EnableConfigurationProperties;import org.springframework.context.annotation.Bean;import org.springframework.context.annotation.Configuration;import java.util.concurrent.Executors;import java.util.concurrent.LinkedBlockingDeque;import java.util.concurrent.ThreadPoolExecutor;import java.util.concurrent.TimeUnit;@Configuration@EnableConfigurationProperties(MyThreadPoolProperties.class)public class MyThreadPoolConfiguration {/**MyThreadPoolProperties已经注入到Spring框架了,所以此处参数可以直接用,Spring框架会从其内部拿到该对象* */@Beanpublic ThreadPoolExecutor myThreadPoolExecutor(MyThreadPoolProperties properties) {ThreadPoolExecutor threadPoolExecutor = new ThreadPoolExecutor(properties.getCorePoolSize(),properties.getMaxPoolSize(),properties.getKeepAliveTime(),TimeUnit.HOURS,new LinkedBlockingDeque<>(properties.getLinkedBlockDequeCapactiy()),Executors.defaultThreadFactory(),new ThreadPoolExecutor.AbortPolicy());return threadPoolExecutor;}}
步骤2:核心类需要引入的yaml的配置文件
@ConfigurationProperties一定要搭配@Component或@EnableConfigurationProperties才能生效。
package com.efly.gulimall.product.entity;import lombok.Data;import org.springframework.boot.context.properties.ConfigurationProperties;@ConfigurationProperties(prefix = "gulimall.threadpool")@Datapublic class MyThreadPoolProperties {private Integer corePoolSize;private Integer maxPoolSize;private Integer keepAliveTime;private Integer linkedBlockDequeCapactiy;}
其对应的yaml文件
gulimall:threadpool:corePoolSize: 5maxPoolSize: 10linkedBlockDequeCapactiy: 200keepAliveTime: 2
步骤3:实际编码开始使用上面的线程池对象
@Autowiredprivate ThreadPoolExecutor executor;void contextLoads() {Runnable runnable=new Runnable() {@Overridepublic void run() {System.out.println("Runnable");}};/*execute:Executes the given task sometime in the future. The task may execute in a new thread or in an existing pooled thread.* 里面最核心的代码:* Worker(Runnable firstTask) {* setState(-1); // inhibit interrupts until runWorker* this.firstTask = firstTask;* this.thread = getThreadFactory().newThread(this);* }*/executor.execute(runnable);}
方式二:通过Executor提供的方法(不推荐)
执行器 ( Executors) 类有许多静态工厂方法用来构建线程池,该类的作用类似于 Arrays之于Array,Collections之于Collection,即Executors之于Executor 。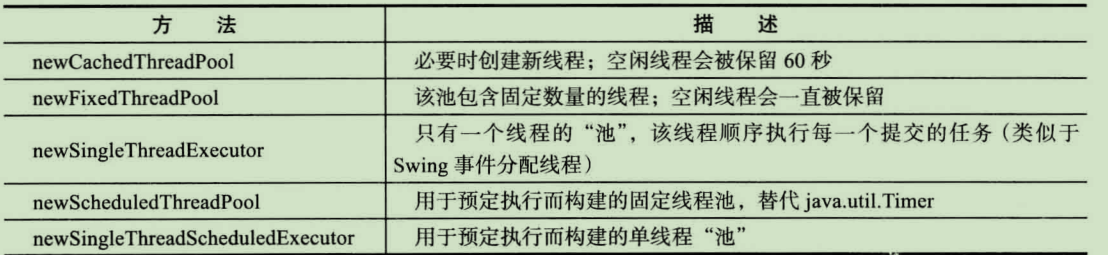
实际使用(核心方法: ExecutorService threadPool = Executors.newFixedThreadPool(5); threadPool.execute()
package com.fly.ecoco10;import java.util.concurrent.ExecutorService;import java.util.concurrent.Executors;public class MyThreadPoolDemo {public static void main(String[] args) {// Array Arrays(辅助工具类)// Collection Collections(辅助工具类)// Executor Executors(辅助工具类)// 一池5个处理线程(用池化技术,一定要记得关闭)ExecutorService threadPool = Executors.newFixedThreadPool(5);//模拟10个用户来办理业务,每个用户就是一个来自外部请求线程try {//循环十次,模拟业务办理,让5个线程处理这10个请求for (int i = 0; i < 10; i++) {final int tempInt = i;threadPool.execute(() -> {System.out.println(Thread.currentThread().getName() + "\t 给用户:" + tempInt + " 办理业务");});}} catch (Exception e) {e.printStackTrace();} finally {threadPool.shutdown();}}}
内部源码
//上面两个方法其内部的源码public static ExecutorService newFixedThreadPool(int nThreads) {return new ThreadPoolExecutor(nThreads, nThreads,0L, TimeUnit.MILLISECONDS,new LinkedBlockingQueue<Runnable>());}public static ExecutorService newSingleThreadExecutor() {return new FinalizableDelegatedExecutorService(new ThreadPoolExecutor(1, 1,0L, TimeUnit.MILLISECONDS,new LinkedBlockingQueue<Runnable>()));}
10 ThreadLocal
怎么使用
1、ThreadLocal类概述
- ThreadLocal并不解决线程间共享数据的问题,其专门适用于变量在不同线程间进行隔离且在同一个线程内不同方法间共享数据的场景。
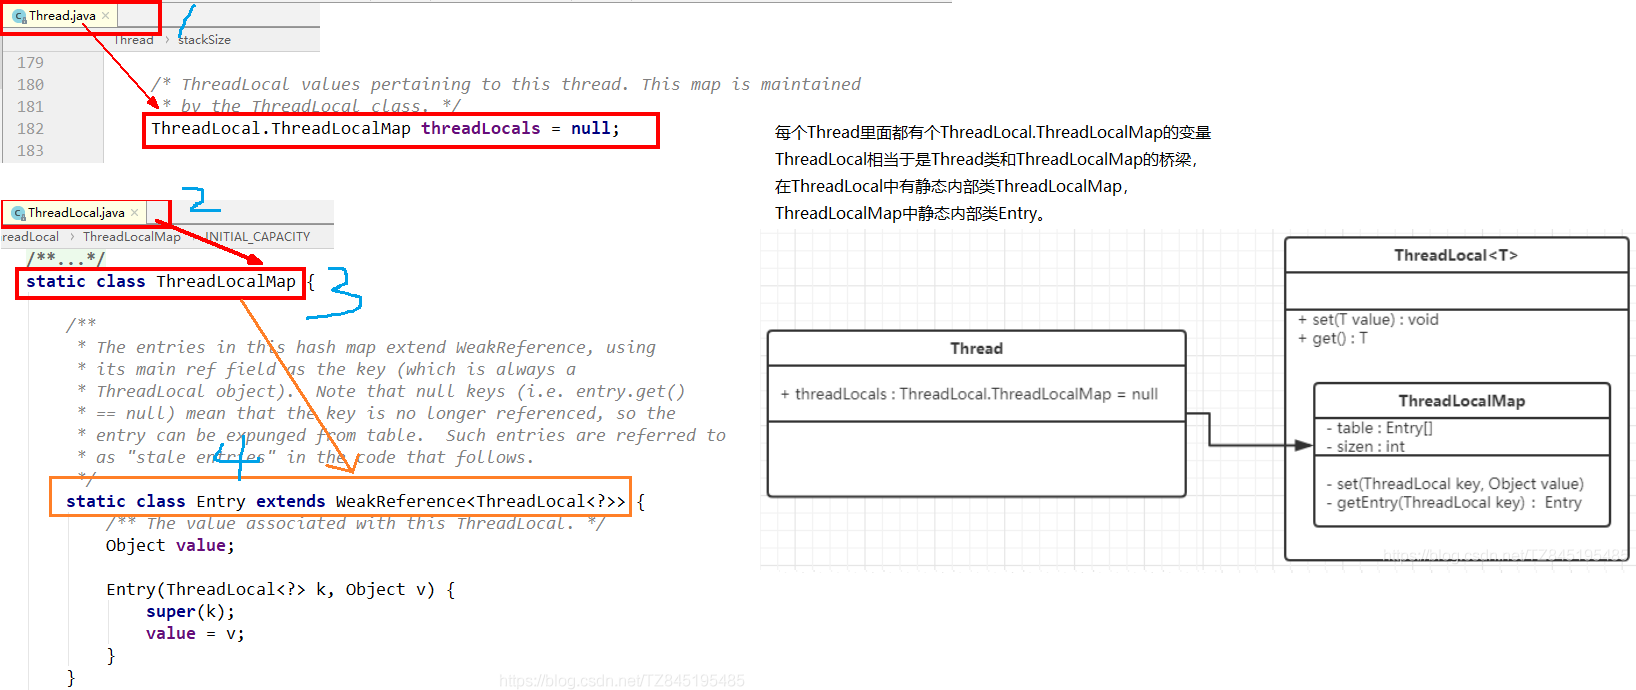
- 其通过隐式的在不同线程内创建独立实例副本避免了实例线程安全的问题。每个线程持有一个只属于自己的专属Map并维护了ThreadLocal对象与具体实例的映射,该Map由于只被持有它的线程访问,故不存在线程安全以及锁的问题:每个Thread线程内部都有一个
ThreadLocal.ThreadLocalMap对象,ThreadLocalMap内部结构是一个Entry[]数组,每个Entry存储了<ThreadLocal,value>值。ThreadLocalMap的Entry对于ThreadLocal的引用为弱引用,避免了TheadlLocal对象无法被回收的问题,但是ThreadLocal对象在使用之后还是需要调用remove()方法进行回收。 - 在线程A调用
实例化的ThreadLoacl对象的set方法,可以确保数据是设置线程A里面的,后续只要是在线程A里面,即可直接使用threadLocalObj.get方法直接读取value使用。
2、ThreadLocal类的方法介绍
构造方法:new ThreadLocal()
实例方法: T get() 、 set(T value) 、void remove()
静态方法: static ThreadLocal withInitial(Supplier<? extends S> supplier)
//ThreadLocal实例通常总是以静态字段初始化如下static ThreadLocal<Long> threadLocalUser = new ThreadLocal<>();//设置值threadLocalUser.set(10L);//get值threadLocalUser.get();//remove值threadLocalUser.remove();
- 特别注意ThreadLocal一定要在finally中清除。
这是因为当前线程执行完相关代码后,很可能会被重新放入线程池中,如果ThreadLocal没有被清除,该线程执行其他代码时,会把上一次的状态带进去。
try {threadLocalUser.set(user);...} finally {threadLocalUser.remove();}
为了保证能释放ThreadLocal关联的实例,我们可以通过AutoCloseable接口配合try (resource) {…}结构,让编译器自动为我们关闭。
package com.efly.gulimall.product.config;public class UserContext implements AutoCloseable {static final ThreadLocal<String> ctx = new ThreadLocal<>();public UserContext(String user) {ctx.set(user);}public static String currentUser() {return ctx.get();}@Overridepublic void close() {ctx.remove();}}##使用处##public class test{@ResponseBody@RequestMapping("/test")public void test() throws UnsupportedEncodingException, InterruptedException {try (UserContext ctx = new UserContext("Bob")) {// 可任意调用UserContext.currentUser():String currentUser = UserContext.currentUser();System.out.println(currentUser);} // 在此自动调用UserContext.close()方法释放ThreadLocal关联对象}}//效果Bob
代码演示
package juc;import java.util.concurrent.CountDownLatch;import java.util.concurrent.TimeUnit;public class ThreadLocalDemo {//配置了多个ThreadLocal对象static ThreadLocal<Integer> threadLocalOne = ThreadLocal.withInitial(() -> 0);static ThreadLocal<Long> threadLocalTwo = ThreadLocal.withInitial(() -> 0L);static CountDownLatch countDownLatch = new CountDownLatch(2);public static void main(String[] args) {//线程1Thread threadOne = new Thread(() -> {try {threadLocalOne.set(10);threadLocalTwo.set(100L);} catch (Exception ex) {throw ex;} finally {countDownLatch.countDown();}});threadOne.start();//线程2Thread threadTwo = new Thread(() -> {try {threadLocalOne.set(20);threadLocalTwo.set(200L);} catch (Exception ex) {throw ex;} finally {countDownLatch.countDown();}});threadTwo.start();//主线程在等待try {countDownLatch.await(100, TimeUnit.MILLISECONDS);} catch (InterruptedException e) {e.printStackTrace();}System.out.println(threadLocalOne.get());System.out.println(threadLocalTwo.get());//记得removethreadLocalOne.remove();threadLocalTwo.remove();}}//输出结果00
ThreadLocal内存泄露的问题
两个问题:
- 为什么ThreadLocalMap内部存储数据的Entry存储Key时会使用弱引用?
- 既然已经有弱引用了,为什么还需要手动remove()?
首先看源码
static class ThreadLocalMap {static class Entry extends WeakReference<ThreadLocal<?>> {Object value;Entry(ThreadLocal<?> k, Object v) {super(k);value = v;}}}
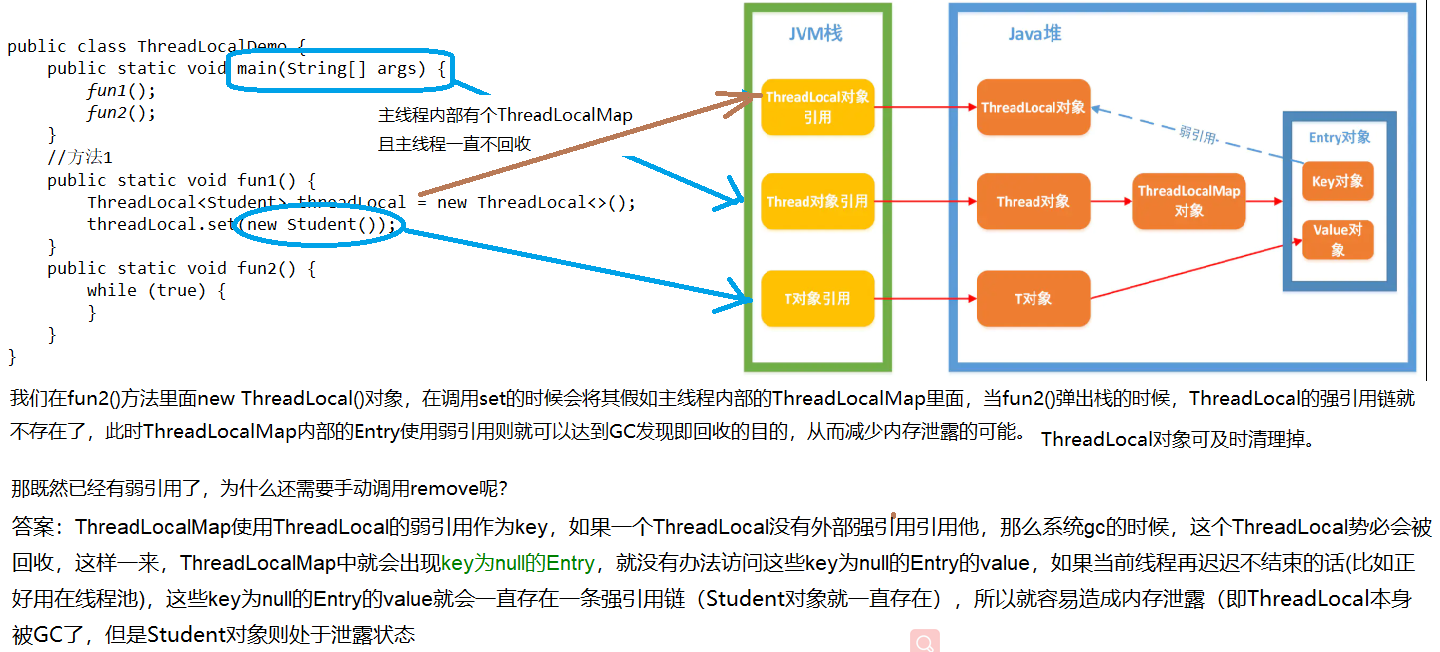
概述:虽然弱引用,保证了key指向的ThreadLocal对象能被及时回收,但是v指向的value对象是需要ThreadLocalMap调用get、set时发现key为null时才会去回收整个entry、value,因此弱引用不能100%保证内存不泄露。我们要在不使用某个ThreadLocal对象后,手动调用remoev方法来删除它,尤其是在线程池中,不仅仅是内存泄露的问题,因为线程池中的线程是重复使用的,意味着这个线程的ThreadLocalMap对象也是重复使用的,如果我们不手动调用remove方法,那么后面的线程就有可能获取到上个线程遗留下来的value值,造成bug。
阿里规范: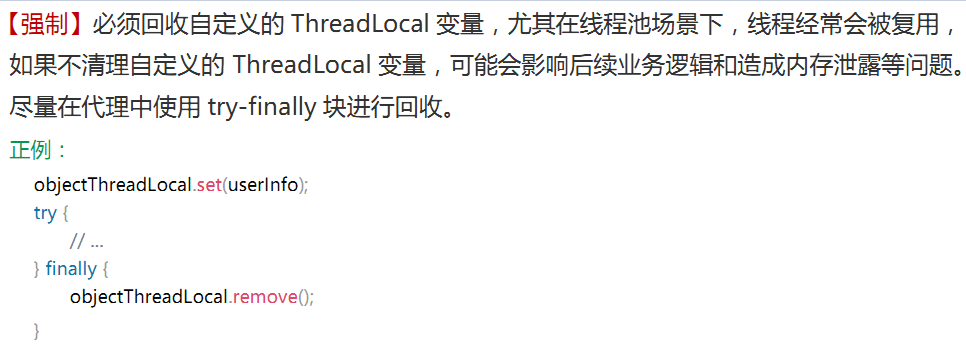
源码分析
类的层级关系:Thread、ThreadLocal和ThreadLocalMap之间的关系
源码逻辑分析
源码细解
背景:每个Thread线程类内部都有维护了自己的threadLocals变量,该变量是ThreadLocal.ThreadLocalMap类型的
package java.lang;public class Thread implements Runnable {private static native void registerNatives();static {registerNatives();}ThreadLocal.ThreadLocalMap threadLocals = null;}
使用ThreadLocal类:ThreadLocal实例通常总是以静态字段初始化如下
static ThreadLocal<Long> threadLocalUser = new ThreadLocal<>();threadLocalUser.set(10L);threadLocalUser.get();
set、get、remove源码分析
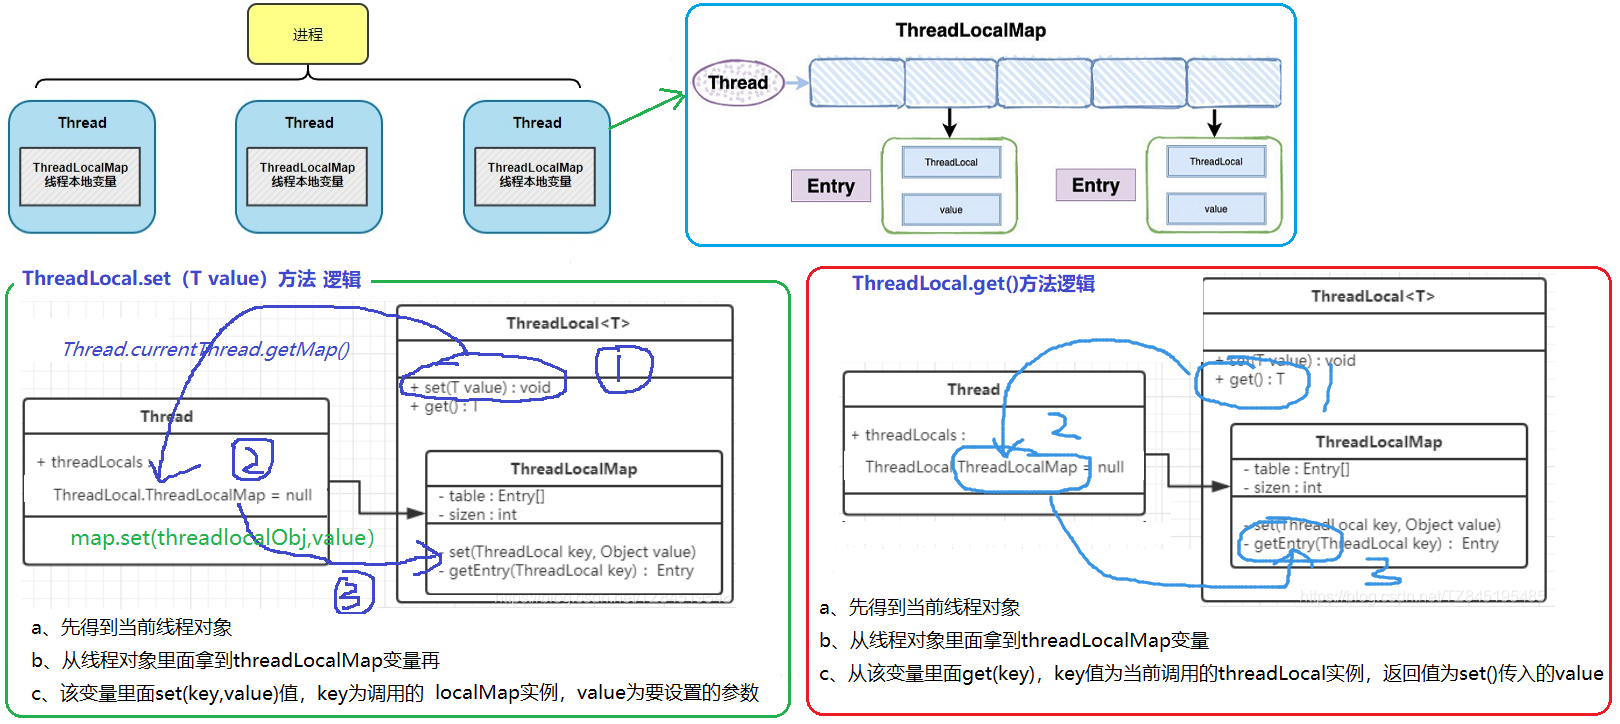
- 每个线程Thread对象内部都有一个ThreadLocalMap对象,该Map对象内部有个Entry[]数据,每个Entry的Key是ThreadLocal实例,value是threadLocal.set(value)方法的参数。
- set(T value)方法: Thread->ThreadLocalMap->Entries
- get()方法:ThreadLocal->得到CurrentThread->ThreadLocalMap.Entries[ThreadLocal,value]->Entry
public class ThreadLocal
//根据线程得到该线程的ThreadLocalMapThreadLocalMap getMap(Thread t) {return t.threadLocals;}public T get() {Thread t = Thread.currentThread();ThreadLocalMap map = getMap(t);if (map != null) {ThreadLocalMap.Entry e = map.getEntry(this);if (e != null) {@SuppressWarnings("unchecked")T result = (T)e.value;return result;}}return setInitialValue();}public void remove() {ThreadLocalMap m = getMap(Thread.currentThread());if (m != null)m.remove(this);}private void remove(ThreadLocal<?> key) {Entry[] tab = table;int len = tab.length;int i = key.threadLocalHashCode & (len-1);for (Entry e = tab[i];e != null;e = tab[i = nextIndex(i, len)]) {if (e.get() == key) {e.clear(); //内部的方法://this.referent = null;expungeStaleEntry(i);return;}}}
}
ThreadLocalMap数据结构:ThreadLocalMap是ThreadLocal的内部类,内部用Entry来进行存储数据,ThreadLocalMap内部的的Entry<k,v>的key即为为ThreadLocal对象,value为调用set设置的值。```javapackage java.lang;public class ThreadLocal<T> {static class ThreadLocalMap {//真正的数据存在Entry<k,v>数组里面,Entry的key即ThreaLocal的实例,v即为threadLocal.set(value)设置的value。private Entry[] table;static class Entry extends WeakReference<ThreadLocal<?>> {Object value;Entry(ThreadLocal<?> k, Object v) {super(k);value = v;}}}}
使用案例
结合登录拦截器的案例
###1.0 拦截器 ###package com.efly.gulimall.product.interceptor;import com.efly.gulimall.product.model.StudentVO;import org.springframework.web.servlet.HandlerInterceptor;import javax.servlet.http.HttpServletRequest;import javax.servlet.http.HttpServletResponse;//存入public class LoginInterceptor implements HandlerInterceptor {public static ThreadLocal<StudentVO> threadLocalUser = new ThreadLocal<>();@Overridepublic boolean preHandle(HttpServletRequest request,HttpServletResponse response,Object handler) throws Exception {StudentVO value = new StudentVO();value.setAge(23);threadLocalUser.set(value);return true;}}###2.0 使用 ###@RequestMapping("/testThreadLocal1")public void testThreadLocal1() {StudentVO studentVO = LoginInterceptor.threadLocalUser.get();System.out.println(studentVO);//使用后一定要remove,否则线程复用的时候数据会污染LoginInterceptor.threadLocalUser.remove();testThreadLocal2();}//被调用方法,public void testThreadLocal2() {//如果上面threadLocalUser.remove(),则拿到的值将是nullStudentVO studentVO = LoginInterceptor.threadLocalUser.get();System.out.println(studentVO);}
应用:优雅的RequestContextHolder
RequestContextHolder是指持有当前线程上下文的Request/Response容器。其核心就是类内部有两个私有静态变量private static ThreadLocal<RequestAttributes>。
RequestContextHolder的应用场景:
- 通常在Service层是没有request和response对象的,如果想要在Service层使用Request对象,直接从Controlller传过来的话太粗暴,我们可以使用SpringMVC提供的RequestContextHolder。
- 用线程池执行任务时非主线程是没有请求数据的,可以通过该方法设置线程中的request数据。RequestContextHolder.setRequestAttributes(attributes) ```xml
#####################################################源码解析
public abstract class RequestContextHolder {
//1.0 内部ThreadLocal变量
private static final ThreadLocal
//2.0 设置值(往ThreadLocal对象里面设置值,即等于往当前Thread里面设置值)public static void setRequestAttributes(@Nullable RequestAttributes attributes, boolean inheritable) {if (attributes == null) {resetRequestAttributes();} else if (inheritable) {inheritableRequestAttributesHolder.set(attributes);requestAttributesHolder.remove();} else {requestAttributesHolder.set(attributes);inheritableRequestAttributesHolder.remove();}}//3.0 读取值:getRequestAttributes()方法,相当于直接获取ThreadLocal里面的值,这样就保证了每一次获取到的Request是该请求的request.@Nullablepublic static RequestAttributes getRequestAttributes() {RequestAttributes attributes = (RequestAttributes)requestAttributesHolder.get();if (attributes == null) {attributes = (RequestAttributes)inheritableRequestAttributesHolder.get();}return attributes;}
}
#####################################################日常使用
//1.0 设值:从主线程里面读取到RequestAttributes对象,然后将其设置到子线程里面。
RequestAttributes attributes = RequestContextHolder.getRequestAttributes();
CompletableFuture
//2.0 读值 ServletRequestAttributes requestAttributes = (ServletRequestAttributes) RequestContextHolder.getRequestAttributes(); if (requestAttributes != null) { HttpServletRequest request = requestAttributes.getRequest(); //还可以拿到Response //HttpServletResponse response = requestAttributes.getResponse(); }
使用案例:自定义FeignConfig,解决Feign远程调用丢失的问题(在Config方法类里面拿到Controller控制层里面的Request对象,并做封装再分发)```xmlpackage com.efly.gulimall.product.config;import feign.RequestInterceptor;import feign.RequestTemplate;import org.springframework.context.annotation.Bean;import org.springframework.context.annotation.Configuration;import org.springframework.web.context.request.RequestContextHolder;import org.springframework.web.context.request.ServletRequestAttributes;import javax.servlet.http.HttpServletRequest;@Configurationpublic class MyFeignConfig {@Beanpublic RequestInterceptor requestInterceptor() {return new RequestInterceptor() {@Overridepublic void apply(RequestTemplate template) {//1. 使用RequestContextHolder拿到当前线程的Request(直接从当前Thread.currentThread里拿即可,而不用通过传递的方式)ServletRequestAttributes requestAttributes = (ServletRequestAttributes) RequestContextHolder.getRequestAttributes();if (requestAttributes != null) {HttpServletRequest request = requestAttributes.getRequest();//还可以拿到Response//HttpServletResponse response = requestAttributes.getResponse();if (request != null) {//2. 将老请求得到cookie信息放到feign请求上String cookie = request.getHeader("Cookie");template.header("Cookie", cookie);}}}};}}

若有收获,就点个赞吧
0 人点赞
