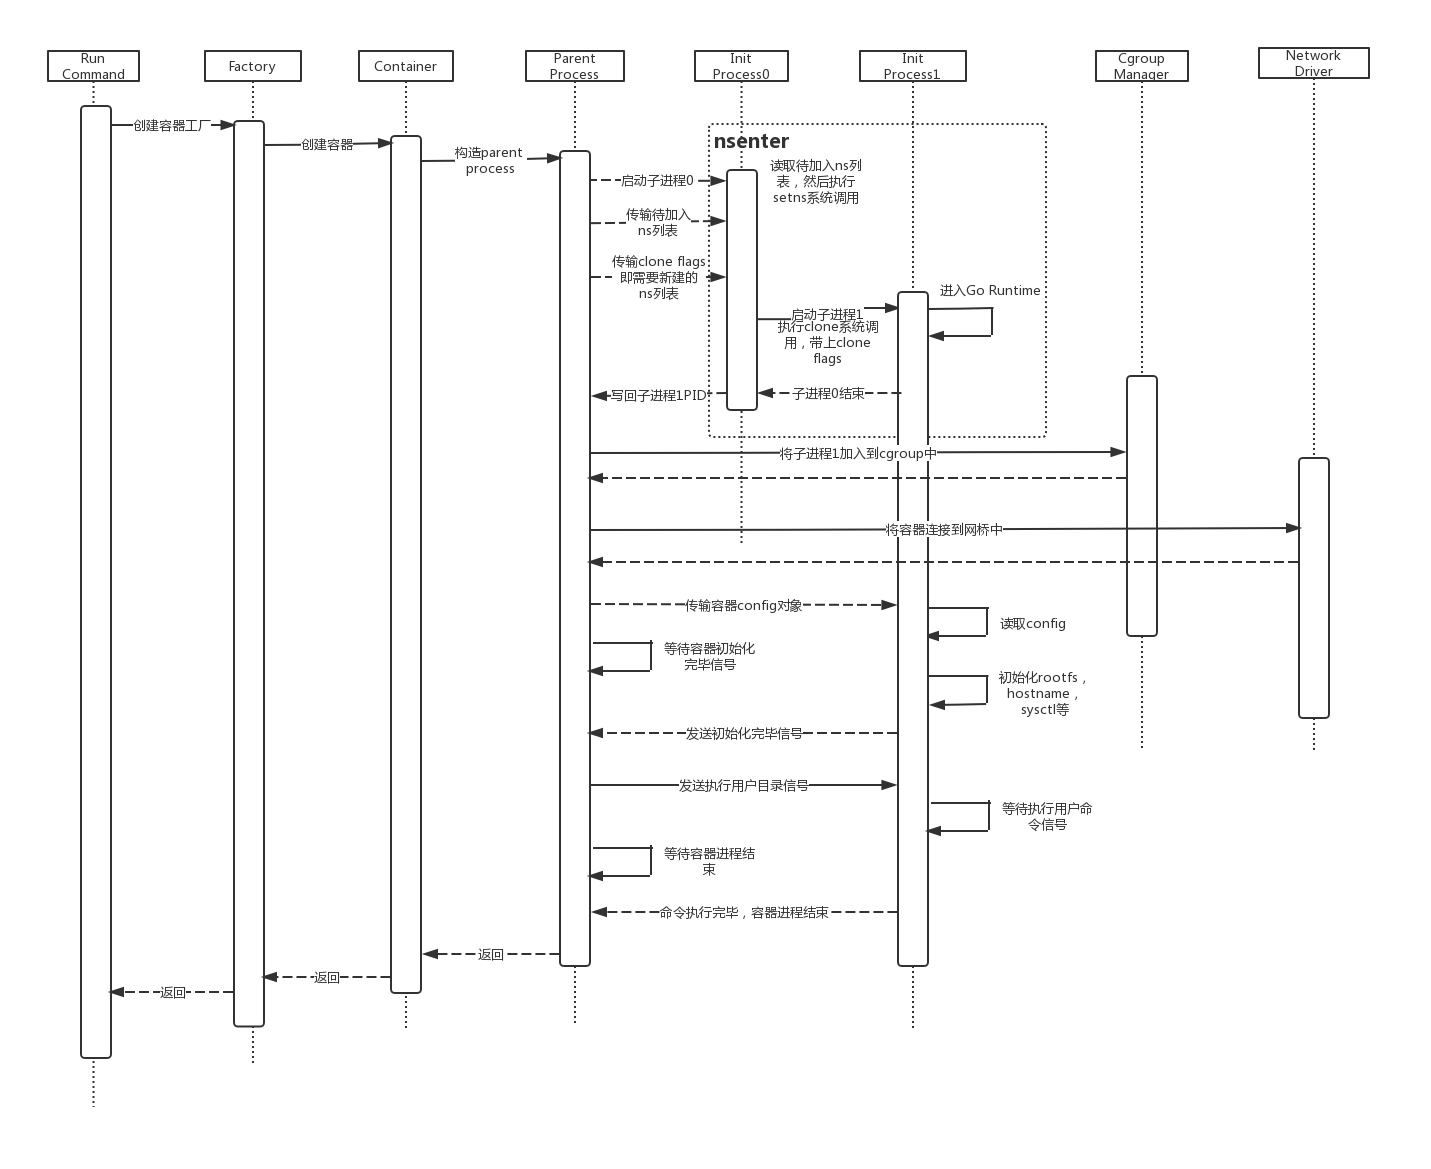
整体流程
parent process模块设计与实现
当用户使用capsule run $container_id命令时,便启动了parent process,即capsule进程,它将作为容器进程的父进程。parent process模块主要负责容器的部分初始化工作与容器进程的监控。该模块由Factory、Container、ParentProcess三大类组成。
Factory创建Container,Container在启动时会依赖于不同的ParentProcess完成不同的初始化过程,创建容器会使用init类型的ParentProcess,创建新的Namespace;而进入容器执行命令时会使用exec类型的ParentProcess,进入已有的Namespace。
类图: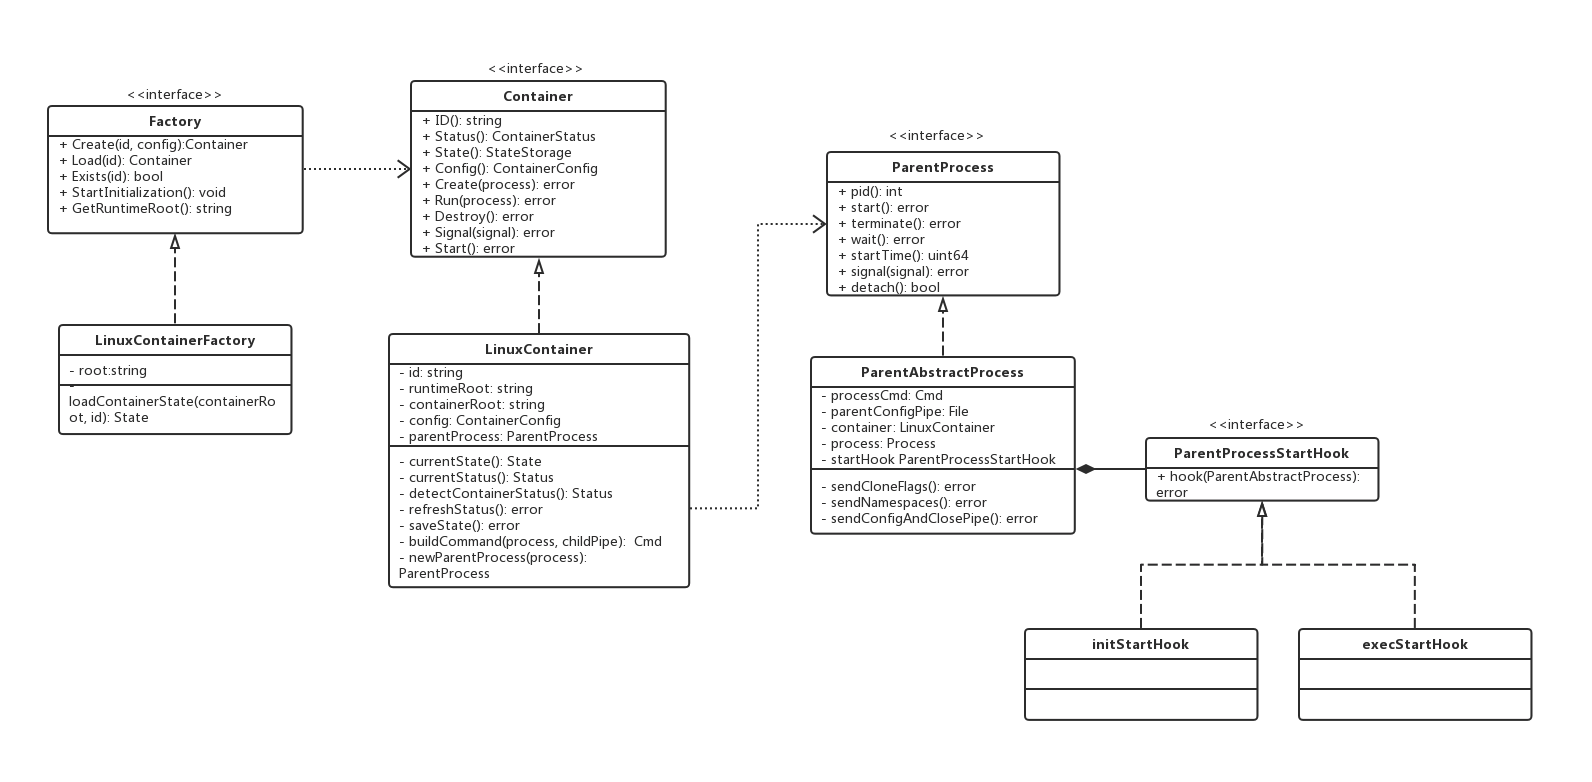
我们将启动容器的函数作为程序入口来分析整个模块。
该模块设计的主要类:
| 分类 | 类 |
|---|---|
| 工厂接口 | Factory |
| 工厂实现 | LinuxContainerFactory |
| 容器接口 | Container |
| 容器实现 | LinuxContainer |
| 容器实现所依赖的父进程接口 | ParentProcess |
| 容器实现所依赖的父进程抽象实现 | ParentAbstractProcess |
| 用于启动容器的父进程实现 | initStartHook |
启动容器的整个过程大概可以分为三步:
- 1) 创建容器
- 2) 创建Process
- 3) 启动容器,运行Process
该函数中传入的参数有:
- runtimeRoot:Capsule运行时文件的根目录,默认值为/var/run/capsule
- id:容器ID
- bundle:容器config.json配置文件的存放路径
- spec:config.json转成的对象
- network:容器所连接的网络名称
- portMappings:容器的端口映射,用于将容器内部端口映射到宿主机的端口
这些便是启动容器所必需的所有参数。
func CreateOrRunContainer(runtimeRoot string, id string, bundle string, spec *specs.Spec, action ContainerAction, detach bool, network string, portMappings []string) error {logrus.Infof("create or run container: %s, action: %s", id, action)container, err := CreateContainer(runtimeRoot, id, bundle, spec, network, portMappings)if err != nil {return err}// 将specs.Process转为libcapsule.Processprocess, err := newProcess(id, spec.Process, true, detach)logrus.Infof("new init process complete, libcapsule.Process: %#v", process)if err != nil {return err}var containerErr errorswitch action {case ContainerActCreate:// 如果是create,那么不管是否是terminal,都不会删除容器containerErr = container.Create(process)case ContainerActRun:// c.run == c.start + c.exec [+ c.destroy]containerErr = container.Run(process)}if containerErr != nil {return handleContainerCreateOrRunErr(container, containerErr)}// 如果是Run命令运行容器吗,并且是前台运行,那么Run结束,即为容器进程结束,则删除容器if action == ContainerActRun && !detach {if err := container.Destroy(); err != nil {return err}}return nil}
创建容器
创建容器,这里创建了一个新的容器工厂,使用容器工厂来创建容器:
func CreateContainer(runtimeRoot string, id string, bundle string, spec *specs.Spec, network string, portMappings []string) (libcapsule.Container, error) {logrus.Infof("creating container: %s", id)if id == "" {return nil, fmt.Errorf("container id cannot be empty")}// 1、将spec转为容器configconfig, err := specutil.CreateContainerConfig(bundle, spec, network, portMappings)logrus.Infof("convert complete, config: %#v", config)if err != nil {return nil, err}// 2、创建容器工厂factory, err := libcapsule.NewFactory(runtimeRoot, true)if err != nil {return nil, err}// 3、创建容器container, err := factory.Create(id, config)if err != nil {return nil, err}return container, nil}
容器工厂创建容器的实现如下:
首先将容器的运行时目录创建出来,这里会检测ID是否重复,然后构造LinuxContainer对象。
func (factory *LinuxContainerFactory) Create(id string, config *configs.ContainerConfig) (Container, error) {logrus.Infof("container factory creating container: %s", id)containerRoot := filepath.Join(factory.root, constant.ContainerDir, id)// 如果该目录已经存在(err == nil),则报错;如果有其他错误(忽略目录不存在的错,我们希望目录不存在),则报错if _, err := os.Stat(containerRoot); err == nil {return nil, exception.NewGenericError(fmt.Errorf("container with id exists: %v", id), exception.ContainerIdExistsError)} else if !os.IsNotExist(err) {return nil, exception.NewGenericError(err, exception.ContainerLoadError)}logrus.Infof("mkdir root: %s", containerRoot)if err := os.MkdirAll(containerRoot, 0644); err != nil {return nil, exception.NewGenericError(err, exception.ContainerRootCreateError)}container := &LinuxContainer{id: id,runtimeRoot: factory.root,containerRoot: containerRoot,config: *config,cgroupManager: cgroups.NewCroupManager(id, make(map[string]string)),}container.statusBehavior = &StoppedStatusBehavior{c: container}logrus.Infof("create container complete, container: %#v", container)return container, nil}
创建Process
这里我们将spec中Process对象转为内部Process对象。
注意,如果是启动容器,那么init为true;如果是进入容器执行命令,则init为false。
func newProcess(id string, p *specs.Process, init, detach bool) (*libcapsule.Process, error) {logrus.Infof("converting specs.Process to libcapsule.Process")libcapsuleProcess := &libcapsule.Process{ID: id,Args: p.Args,Env: p.Env,Cwd: p.Cwd,Init: init,Detach: detach,}return libcapsuleProcess, nil}
启动容器
Run方法其实指的是在容器里运行一个进程,这个进程有可能是init进程,即容器的第一个进程,启动这个进程代表启动容器;这个进程也有可能是exec进程,即进入容器执行用户所指定的命令。无论是哪种进程,都会调用LinuxContainer的create方法(容器会阻塞在执行用户命令之前),而如果是init进程,那么会调用LinuxContainer的start方法(唤醒容器,执行用户命令)。
func (c *LinuxContainer) Run(process *Process) error {c.mutex.Lock()defer c.mutex.Unlock()if err := c.create(process); err != nil {return err}if process.Init {if err := c.start(); err != nil {return err}}return nil}
Step1: 容器create
create方法的实现如下,分为三步:
- 1) 创建ParentProcess
- 2) 启动ParentProcess
- 3) 如果是init进程,那么更新容器状态,并持久化容器状态
func (c *LinuxContainer) create(process *Process) error {logrus.Infof("LinuxContainer starting...")// 1、创建parent configparent, err := c.newParentProcess(process)if err != nil {return exception.NewGenericErrorWithContext(err, exception.ParentProcessCreateError, "creating new parent process")}logrus.Infof("new parent process complete, parent config: %#v", parent)// 2、启动parent config,直至child表示自己初始化完毕,等待执行命令if err := parent.start(); err != nil {// 启动失败,则杀掉init process,如果是已经停止,则忽略。logrus.Warnf("parent process init/exec failed, killing init/exec process...")if err := c.ignoreTerminateErrors(parent.terminate()); err != nil {logrus.Warn(err)}return exception.NewGenericErrorWithContext(err, exception.ParentProcessStartError, "starting container process")}if process.Init {// 3、更新容器状态c.createdTime = time.Now()c.statusBehavior = &CreatedStatusBehavior{c: c,}// 4、持久化容器状态if err = c.saveState(); err != nil {return err}// 5、创建标记文件,表示Createdif err := c.createFlagFile(); err != nil {return err}}logrus.Infof("create/exec container complete!")return nil}
1、创建ParentProcess的过程如下:
这个需要构造一个Command对象,即容器init进程。父子进程间通过socket pair双向通信,
下面会将Command加入一系列环境变量,如:
- config pipe:socket pair的一端,交给子进程使用
- initializer type:枚举值,取值范围为init或exec,前者表示子进程是容器init进程,创建容器;后者表示子进程是容器exec进程,进入容器执行命令
助理这里是构造了ParentAbstractProcess类型的ParentProcess实现赋给了LinuxContainer,其中startHook是一个函数,这里函数的实现是initStartHook,即用来启动容器的hook。这里是使用到了一个模板方法模式,因为Go支持函数类型,所以持有一个函数类型的变量即可实现多态。
func (c *LinuxContainer) newParentProcess(process *Process) (ParentProcess, error) {logrus.Infof("new parent process...")logrus.Infof("creating pipes...")// socket pair 双方都可以既写又读,而pipe只能一个写,一个读parentConfigPipe, childConfigPipe, err := util.NewSocketPair("init")if err != nil {return nil, err}logrus.Infof("create config pipe complete, childConfigPipe: %#v, configPipe: %#v", childConfigPipe, parentConfigPipe)cmd, err := c.buildCommand(process, parentConfigPipe)if err != nil {return nil, err}if process.Init {cmd.Env = append(cmd.Env, fmt.Sprintf("%s=%s", constant.EnvInitializerType, string(InitInitializer)))logrus.Infof("build command complete, command: %#v", cmd)logrus.Infof("new parent init process...")namepaces := make(map[configs.NamespaceType]string)for _, ns := range c.config.Namespaces {if ns.Path != "" {namepaces[ns.Type] = ns.Path}}initProcess := &ParentAbstractProcess{processCmd: cmd,parentConfigPipe: childConfigPipe,container: c,process: process,cloneFlags: c.config.Namespaces.CloneFlagsOfEmptyPath(),namespacePathMap: namepaces,startHook: initStartHook,}// exec process不会赋到container.parentProcess,因为它的pid,startTime返回的都是exec process的,而非nochild process(反映的是init process的)c.parentProcess = initProcessreturn initProcess, nil} else {// ...}}
buildCommand构造了一个Command对象,它会执行本进程的init命令,类似于执行了capsule init命令,自己调用(另一个进程中的)自己。
func (c *LinuxContainer) buildCommand(process *Process, childConfigPipe *os.File) (*exec.Cmd, error) {// 将factory runtime root作为参数传给init/exec进程cmd := exec.Command(constant.ContainerInitCmd, "--root", c.runtimeRoot, constant.ContainerInitArgs)cmd.Dir = c.config.Rootfscmd.ExtraFiles = append(cmd.ExtraFiles, childConfigPipe)cmd.Env = append(cmd.Env,fmt.Sprintf(constant.EnvConfigPipe+"=%d", constant.DefaultStdFdCount+len(cmd.ExtraFiles)-1),)// 这里cmd是指init进程,init进程后面还会启动一个进入go runtime的进程,而init进程并不会进入,所以进程的stdin等置为os的cmd.Stdin = os.Stdincmd.Stdout = os.Stdoutcmd.Stderr = os.Stderrreturn cmd, nil}
2、启动ParentProcess
启动的步骤可以分为5步:
- 1) 启动Command,即子进程
- 2) 传输需要加入的Namespace列表
- 3) 传输需要新建的CloneFlags(同样对应Namespace列表,只是将每个NS的编号使用按位与合并起来)
- 4) 从子进程中读到子进程创建的init-1进程的PID,稍后在nsenter模块实现中会解释为什么init0进程需要再创建一个init1进程。
- 5) 启动start hook
func (p *ParentAbstractProcess) start() error {logrus.Infof("ParentAbstractProcess starting...")if err := p.processCmd.Start(); err != nil {return exception.NewGenericErrorWithContext(err, exception.CmdStartError, "starting init/exec process command")}logrus.Infof("INIT/EXEC PROCESS STARTED, PID: %d", p.pid())if err := p.sendNamespaces(); err != nil {return exception.NewGenericErrorWithContext(err, exception.PipeError, "sending namespacePathMap to init/exec process")}if err := p.sendCloneFlags(); err != nil {return exception.NewGenericErrorWithContext(err, exception.PipeError, "sending clone flags to init/exec process")}childPid, err := util.ReadIntFromFile(p.parentConfigPipe)logrus.Infof("read child pid from parent pipe: %d", childPid)if err != nil {return exception.NewGenericErrorWithContext(err, exception.PipeError, "reading child pid")}process, err := os.FindProcess(childPid)if err != nil {return err}logrus.Infof("find new child process: %#v", process)p.processCmd.Process = processreturn p.startHook(p)}
init类型的startHook的实现如下:
- 1) 对应cgroup模块,将容器加入到cgroup中,应用容器的资源限制配置
- 2) 对应network模块,初始化容器网络
- 3) 向子进程传输容器配置信息
4) 等待容器子进程发送来的ready信号,表示容器已经初始化完毕,等待执行用户命令
func initStartHook(p *ParentAbstractProcess) error {// 将pid加入到cgroup set中if err := p.container.cgroupManager.JoinCgroupSet(p.pid()); err != nil {return exception.NewGenericErrorWithContext(err, exception.CgroupsError, "applying cgroup configuration for process")}// 设置cgroup configif err := p.container.cgroupManager.SetConfig(p.container.config.Cgroup); err != nil {return exception.NewGenericErrorWithContext(err, exception.CgroupsError, "setting cgroup config for procHooks process")}// 创建网络接口if err := createNetworkInterfaces(p); err != nil {return exception.NewGenericErrorWithContext(err, exception.NetworkError, "creating network interfaces")}// init process会在启动后阻塞,直至收到configif err := p.sendConfigAndClosePipe(); err != nil {return exception.NewGenericErrorWithContext(err, exception.PipeError, "sending config to init process")}// 等待init process到达在初始化之后,执行命令之前的状态// 使用SIGUSR1信号logrus.Info("start waiting init process ready(SIGUSR1) or fail(SIGCHLD) signal...")sig := util.WaitSignal(syscall.SIGUSR1, syscall.SIGCHLD)if sig == syscall.SIGUSR1 {logrus.Info("received SIGUSR1 signal")} else if sig == syscall.SIGCHLD {logrus.Errorf("received SIGCHLD signal")return fmt.Errorf("init process init failed")}return nil}
Step2: 容器start
向容器进程发送开始执行用户命令的信号。
如果是前台运行的进程,那么父进程会在此阻塞,监控容器状态,直至容器进程结束,然后执行清理工作。
func (c *LinuxContainer) start() error {logrus.Infof("container starting...")logrus.Infof("send SIGUSR2 to child process...")if err := c.parentProcess.signal(syscall.SIGUSR2); err != nil {return err}// 这里不好判断是否是之前在运行的是否是init process,索性就 有就删,没有就算了if err := c.deleteFlagFileIfExists(); err != nil {return err}logrus.Infof("refreshing container status...")if err := c.refreshStatus(); err != nil {return err}// 对于前台进程来说,这里必须wait,否则在仅有容器进程存活情况下,它在输入任何命令后立即退出,并且ssh进程退出/登录用户注销if !c.parentProcess.detach() {logrus.Infof("wait child process exit...")if err := c.parentProcess.wait(); err != nil {return exception.NewGenericErrorWithContext(err, exception.ParentProcessWaitError, "waiting child process exit")}logrus.Infof("child process exited")}return nil}
cgroups模块设计与实现
容器最重要的两个特性是资源隔离与资源限制,资源隔离是由nsenter模块实现的,稍后会进行介绍,而cgroups模块负责实现的资源限制。
在容器启动时是通过这两步实现的:
- 1) 将容器进程的PID加入到cgroup set中,即JoinCgroupSet
- 2) 设置cgroup config,即SetConfig
这两步的实现的核心是cgroupManager。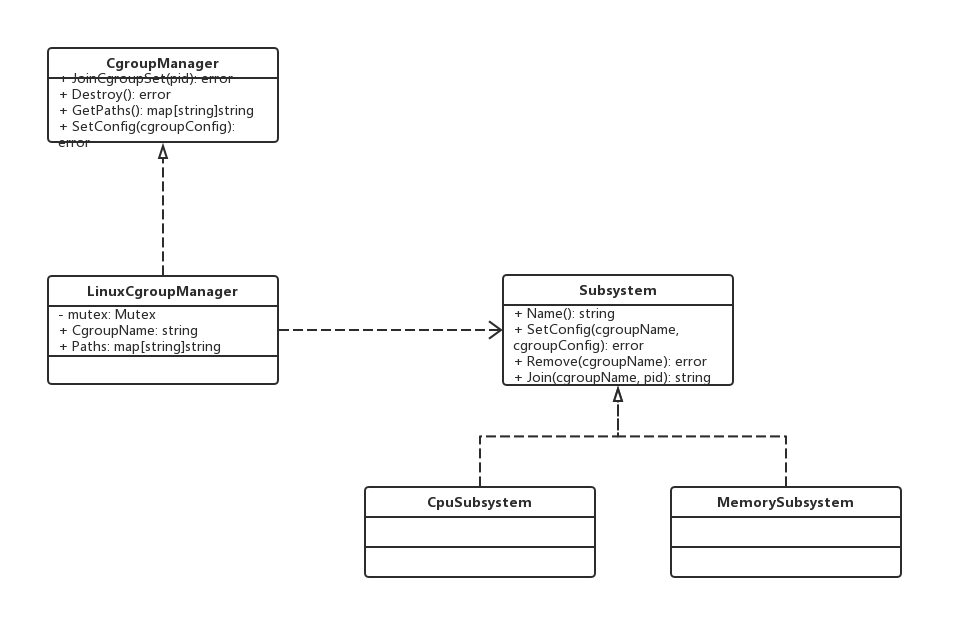
简言之,CgroupManager的实现是将容器作为hierachy上的一个节点,挂在每个subsystem上,具体如何配置取决于每个subsys自己的逻辑。具体实现细节如下: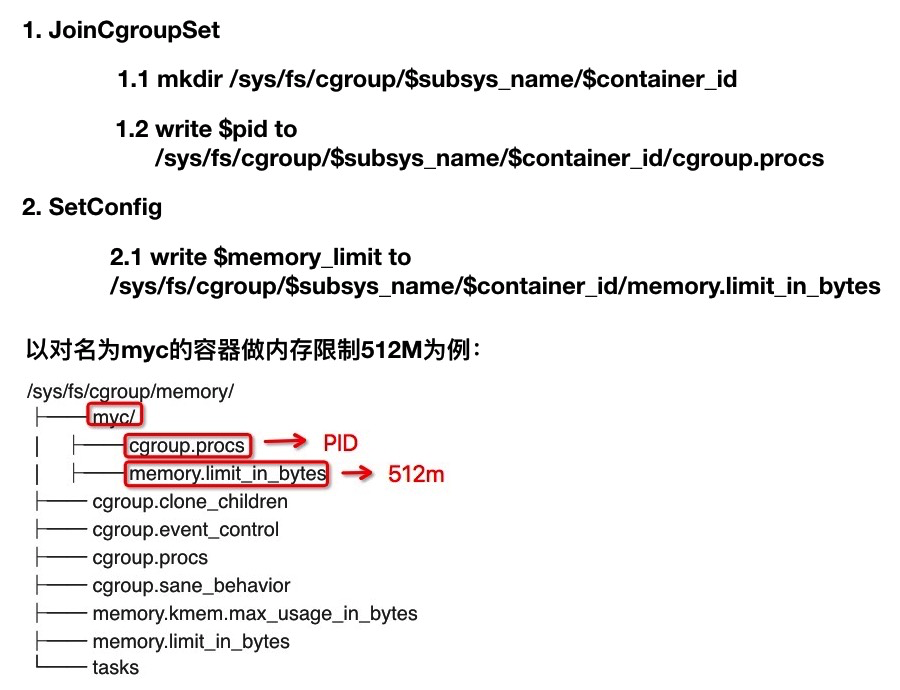
network模块设计与实现
在Docker中容器网络有着四种实现,分别是
- host模式,与宿主机共享同一网络
- container模式,与某些容器共享同一网络
- none模式,不使用网络
- bridge模式,网桥模式,每个容器独享网络空间,并通过网桥连接到宿主机
网络模块有着几个重要概念,分别是NetworkDriver、Network、Endpoint和IPAM。
| 类/接口名 | 描述 |
|---|---|
| NetworkDriver | 提供了一类容器网络接口,目前仅有Bridge一种实现,后续可以继续扩展 |
| Network | 对应一个网段的网络,Endpoint指的是连接到一个网络上的端口,与容器一一对应 |
| IPAM, IP Adress Management | IP分配器,从一个网段中随机分配一个IP给到Endpoint |
网络模块的类图如下图所示: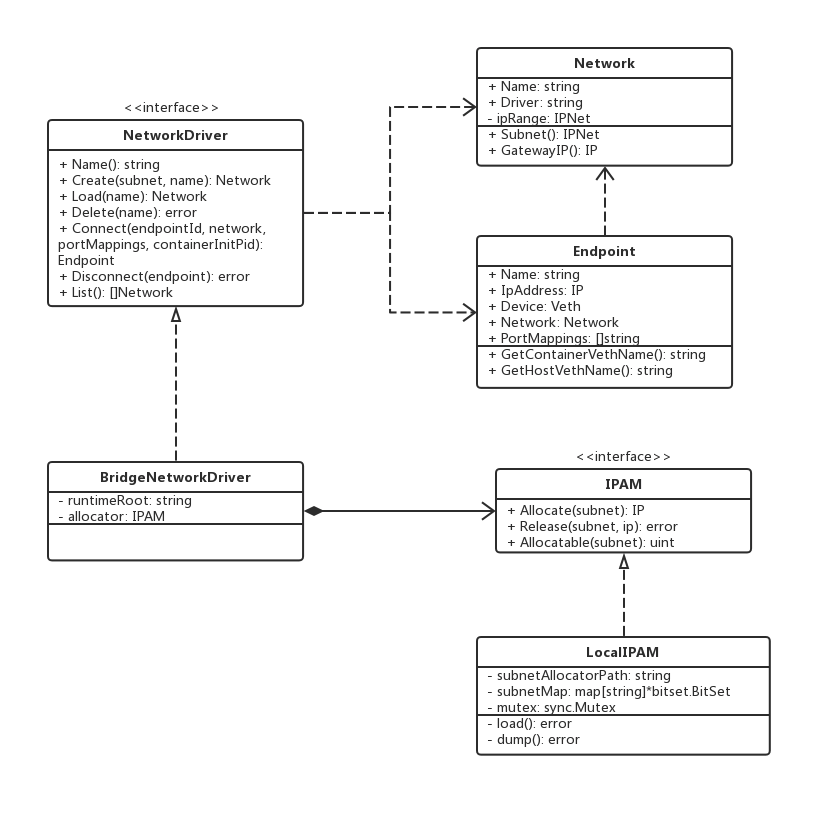
在parent process模块中,在容器进程启动后,会拿到容器init 进程的PID,并且创建一个新的Network Namespace,然后就可以在parent process中构造一个新的Endpoint,将Endpoint连接到指定的Network上。
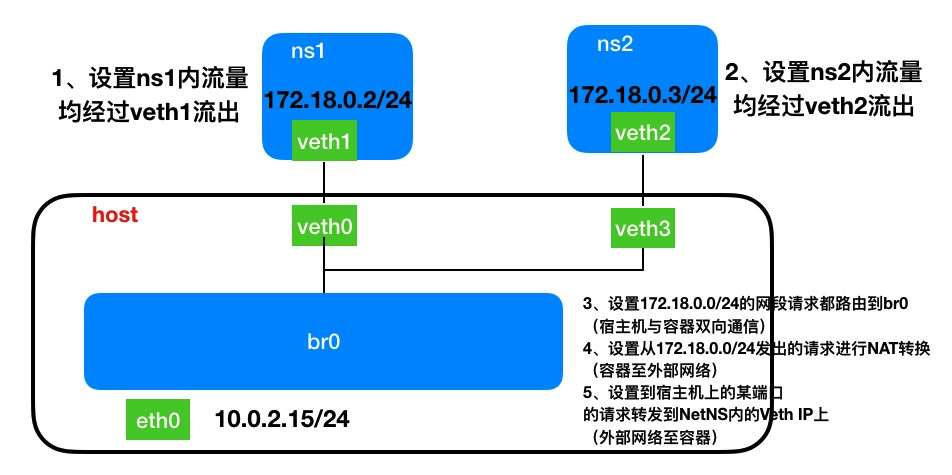
在Capsule中,我们会在启动容器时先创建一个网桥capsule_bridge0(类似于Docker中的docker0),每个容器独享一个Network Namespace,然后将每个容器的Net NS都连接到网桥上,以实现容器间、容器与宿主机间,以及基于SNAT、DNAT技术实现容器与外部网络间的网络通信。
capsule_bridge0所对应的网段为192.168.1.0/24。
创建一个容器网络可以分为以下步骤:
- 1) [初始化]创建一个网桥,为其分配网关地址,并配置路由,将对192.168.1.0/24的网络请求均路由到网桥上。
- 2) [初始化]设置SNAT规则,将来自192.168.1.0/24的网络请求进行源地址的转换,转为除网桥外的网络设备的地址(通常为eth0)。这一步可以使容器的网络请求可以发送到外部网络。
- 3) 创建一个容器,与此同时会创建一个新的Network Namespace。
- 4) 创建一个veth pair,将一端连接到网桥上,将另一端移动到Net NS中。
- 5) 为Net NS中的veth一端分配IP地址,并配置路由,将所有网络请求均路由到veth一端上。
- 6) 设置DNAT规则,根据端口映射规则,将目的地址为192.168.1.0/24的指定端口的网络请求进行目的地址转换,转为容器veth一端的对应端口。这一步可以使外部网络的网络请求发送到容器中。
nsenter模块设计与实现
nsenter模块由C语言编写而成,始于parent process启动子进程(执行的是capsule init命令),终于容器init process进入Go Runtime,执行init process模块。
nsenter模块负责两件事:
- 1) 将一个进程加入到已有Namespace
- 2) 创建新的Namespace,并将一个进程加入其中
我们在init命令的实现中使用Go的import _ "github.com/songxinjianqwe/capsule/libcapsule/nsenter"触发nsenter模块的调用。
Go与C间的互相调用基于Cgo技术实现,这里需要解释为什么这部分需要使用C而不是Go来实现:加入已有Namespace需要使用setns系统调用,而这个系统调用在Linux Manual上被描述为:
A process may not be reassociated with a new mount namespace if it is multithreaded.
即多线程环境下无法使用setns进入一个已有的mount namespace。
Cgo代码实现如下,下面的init函数将在Go代码执行前被调用。
/*#cgo CFLAGS: -Wall#include <stdio.h>extern void nsexec();// __attribute__((constructor)):在main函数之前执行某个函数// https://stackoverflow.com/questions/25704661/calling-setns-from-go-returns-einval-for-mnt-namespace// https://lists.linux-foundation.org/pipermail/containers/2013-January/031565.html__attribute__((constructor)) void init(void) {nsexec();}*/import "C"
nsexec函数实现如下:
init-0进程,即capsule init命令启动的进程,会读取已经存在、待加入的Namespace列表,然后使用setns系统调用来进入NS;然后会使用clone系统调用,来创建init-1进程,同时创建需要新建的Namespace,然后将init-1进程的PID写回给parent process,随后退出。
init-1进程会回到Go Runtime,然后执行init process模块。
这里需要解释下为什么需要再创建一个init-1进程:对于PID Namespace,是无法通过setns来进入新的Namespace。这是因为PID对用户态的函数而言是一个固定值,不存在更换PID Namespace的情况,因此我们想进入一个已有的NS,就需要在父进程中setns,然后clone出子进程,子进程就可以加入已有的PID Namespace了。
void nsexec() {// init和exec都会进入此段代码const char* config_pipe_env = getenv(ENV_CONFIG_PIPE);if (!config_pipe_env) {return;}printf("%s read config pipe env: %s\n", LOG_PREFIX, config_pipe_env);int config_pipe_fd = atoi(config_pipe_env);if (config_pipe_fd <= 0) {printf("%s converting config pipe to int failed\n", LOG_PREFIX);exit(ERROR);}printf("%s config pipe fd: %d\n", LOG_PREFIX, config_pipe_fd);jmp_buf env;int status;switch(setjmp(env)) {case JUMP_PARENT:status = join_namespaces(config_pipe_fd);if (status != 0) {exit(status);}// 最后让child进入go runtime,因为自己setns后无法进入新的PID NS,只有child才能.status = clone_child(config_pipe_fd, &env);exit(status);case JUMP_CHILD:printf("%s JUMP_CHILD succeeded\n", LOG_PREFIX);return;}}
下图以时序图的方式来描述了主进程与init进程间的交互关系: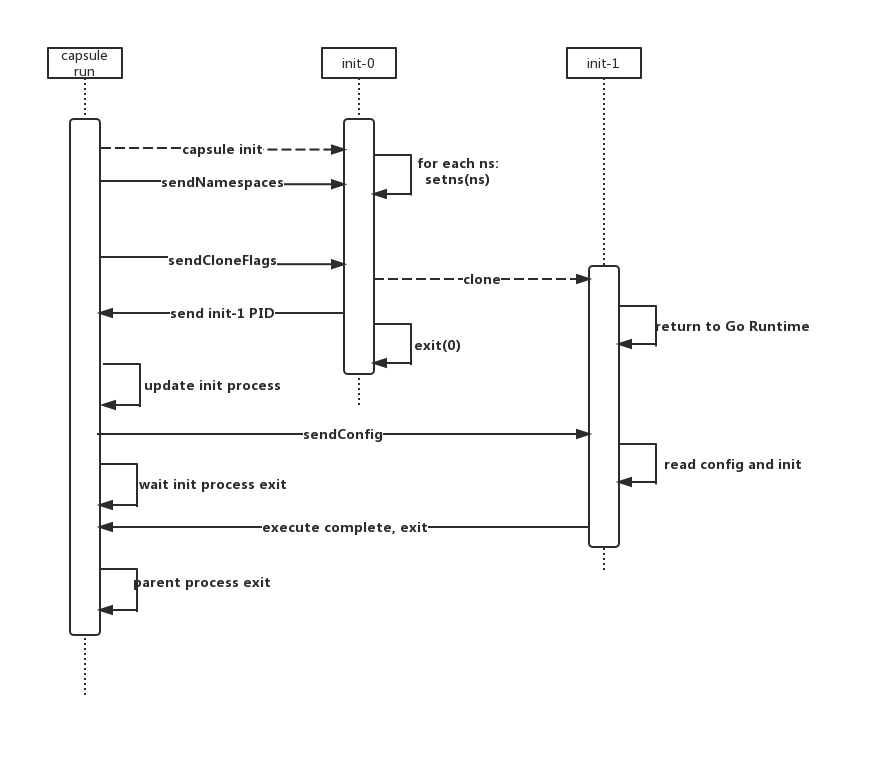
init process模块设计与实现
容器init进程在执行完nsenter模块后,就返回到Go Runtime中,执行init process模块。
该模块会使用Initializer来执行Standard初始化,即容器进程初始化,或者Exec初始化,即进入已经存在的容器,执行用户指定的新的命令。这取决于parent process设置的环境变量_LIBCAPSULE_INITIALIZER_TYPE的取值是init还是exec。
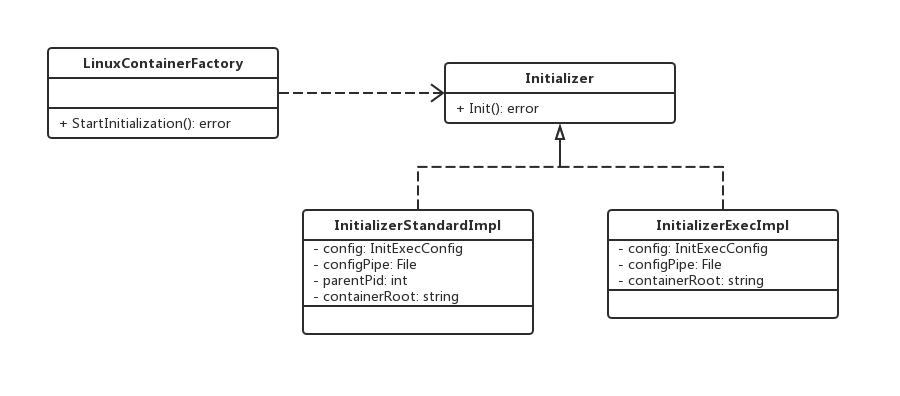
以standard实现为例:
我们会做以下步骤来进行容器的初始化:
- 1) 输出重定向,对于后台运行的进程,需要将输出重定向到文件中,而非直接打印出来,方便后续使用
capsule log命令来查询 - 2) 初始化rootfs,包括挂载,创建设备,以及基于pivot_root系统调用来将指定目录来作为容器进程的rootfs
- 3) 初始化hostname
- 4) 初始化sysctl系统变量
- 5) 向parent process发送一个容器进程初始化完毕的信号
- 6) 等待parent process的信号
- 7) 在接收到parent process的开始执行用户命令的信号后,执行用户命令
func (initializer *InitializerStandardImpl) Init() (err error) {logrus.WithField("init", true).Infof("InitializerStandardImpl Init()")// 如果后台运行,则将stdout输出到日志文件中if initializer.config.ProcessConfig.Detach {logrus.Infof("detach -> replace stdout to log file")// 输出重定向// /var/run/capsule/containers/$container_id/container.loglogFile, err := os.OpenFile(filepath.Join(initializer.containerRoot, constant.ContainerInitLogFilename), os.O_WRONLY|os.O_CREATE|os.O_SYNC, 0644)if err != nil {return err}if err := syscall.Dup2(int(logFile.Fd()), 1); err != nil {return err}if err := syscall.Dup2(int(logFile.Fd()), 2); err != nil {return err}}// 初始化rootfsif err = initializer.setUpRootfs(); err != nil {return exception.NewGenericErrorWithContext(err, exception.RootfsError, "init process/prepare rootfs")}// 如果有设置Mount的Namespace,则设置rootfs与mount为read only(如果需要的话)if initializer.config.ContainerConfig.Namespaces.Contains(configs.NEWNS) {if err := initializer.SetRootfsReadOnlyIfSpecified(); err != nil {return err}}// 初始化hostnameif hostname := initializer.config.ContainerConfig.Hostname; hostname != "" {logrus.WithField("init", true).Infof("init process/setting hostname: %s", hostname)if err = unix.Sethostname([]byte(hostname)); err != nil {return exception.NewGenericErrorWithContext(err, exception.HostnameError, "init process/set hostname")}}// 初始化sysctl环境变量for key, value := range initializer.config.ContainerConfig.Sysctl {if err = writeSystemProperty(key, value); err != nil {return exception.NewGenericErrorWithContext(err, exception.SysctlError, fmt.Sprintf("init process/write sysctl key %s", key))}}// look path 可以在系统的PATH里面寻找命令的绝对路径name, err := exec.LookPath(initializer.config.ProcessConfig.Args[0])if err != nil {return exception.NewGenericErrorWithContext(err, exception.LookPathError, "init process/look path cmd")}// child --------------> parent// 告诉parent,init process已经初始化完毕,马上要执行命令了if err := util.SyncSignal(initializer.parentPid, syscall.SIGUSR1); err != nil {return exception.NewGenericErrorWithContext(err, exception.SignalError, "init process/sync parent ready")}// child <-------------- parent// 等待parent给一个继续执行命令,即exec的信号util.WaitSignal(syscall.SIGUSR2)if err := syscall.Exec(name, initializer.config.ProcessConfig.Args, os.Environ()); err != nil {return exception.NewGenericErrorWithContext(err, exception.SyscallExecuteCmdError, "start init process")}return nil}
image模块设计与实现
镜像模块是对Docker镜像的简化,去掉了镜像构建与远程仓库相关的内容,仅保留了导入本地镜像,管理本地镜像,基于本地镜像运行容器的功能。
Union FS中有着将文件系统堆叠起来形成联合文件系统的能力,而镜像模块利用Union FS,将镜像本身作为read-only layer,将一个新的临时目录作为read-write layer,联合后形成init layer,作为rootfs供容器使用。
镜像的存储功能完全基于文件的方式实现,实现细节如下:
/sys/fs/cgroup/memory/
├── myc/
│ ├── cgroup.procs
│ ├── memory.limit_in_bytes
├── cgroup.clone_children
├── cgroup.event_control
├── cgroup.procs
├── cgroup.sane_behavior
├── memory.kmem.max_usage_in_bytes
├── memory.limit_in_bytes
└── tasks
- repositories.json中以键值对的形式存储了镜像名与镜像layer_id之间的映射关系。
- layers目录下存储镜像内容,子目录名为layer_id,子目录的内容为layer的内容
- mounts目录下存储容器与layer的映射关系,子目录名为container_id,子目录下固定存放三个文件read_only、read_write和init
在创建一个新的容器myc后,会在mounts目录下创建同名目录,并固定创建三个文件,read_only文件存储了镜像layer_id,read_write文件存储了一个刚创建的layer的layer_id,init文件存储了基于aufs(Union FS的一种实现)将刚才两个layer堆叠起来的layer_id。容器在运行时所用到的rootfs目录便是init layer。
在容器被删除后,我们会取消堆叠(umount),然后删除read_write layer,此时容器对rootfs的一些修改操作将被清除,read_only layer的内容不会被修改,始终保持导入镜像时的状态。
相关的实现均由ImageService完成,接口定义如下:
type ImageService interface {Create(id string, tarPath string) errorDelete(id string) errorList() ([]Image, error)Get(id string) (Image, error)Run(imageRunArgs *ImageRunArgs) errorDestroy(container libcapsule.Container) error}
以基于镜像启动容器为例来分析代码实现:
该功能分为以下步骤实现:
- 1) 检测容器ID是否已经存在
- 2) 创建bundle目录,即config.json所在的目录(在OCI标准中是由用户准备的)
- 3) 准备/etc/hosts,我们会将hosts文件通过挂载的方式放到rootfs中。这里还实现了link功能,类似于Docker中的link,即容器间的关联,我们可以指定一个hosts解析,将所依赖容器的IP映射为用户自己指定的别名。比如Web应用依赖于DB应用,但不清楚DB应用分配的IP地址,此时可以使用link,通过域名解析的方式来简化用户操作,只需要指定一个别名即可使Web应用连接到DB应用。用法类似于—link $related_container_id:alias。
- 4) 准备/etc/resolv.conf,这是dns服务实现的关键,我们会将nameserver的地址写入其中
- 5) 准备volume,volume简言之就是使用容器的mount功能实现的,将宿主机的目录mount到容器rootfs目录,这样就可以实现容器对rootfs的修改不至于在容器销毁后被全部清除
- 6) 准备rootfs,即Union FS的堆叠操作
- 7) 准备spec,即根据用户在命令行中提供的参数,生成一份config.json,写到bundle目录下
- 8) 运行容器
9) 如果是前台运行的容器,那么在容器销毁后,将运行时文件删除,即mounts和containers目录下对应的容器子目录
func (service *imageService) Run(imageRunArgs *ImageRunArgs) (err error) {// 1. 检查是否已经存在该容器if exists := service.factory.Exists(imageRunArgs.ContainerId); exists {return exception.NewGenericError(fmt.Errorf("container already exists: %s", imageRunArgs.ContainerId), exception.ContainerIdExistsError)}// 2. 创建bundle目录// /var/run/capsule/images/containers/$container_idbundle := filepath.Join(service.imageRoot, constant.ImageContainersDir, imageRunArgs.ContainerId)if _, err := os.Stat(bundle); err != nil && !os.IsNotExist(err) {return exception.NewGenericError(err, exception.ContainerIdExistsError)}if err := os.MkdirAll(bundle, 0644); err != nil {return exception.NewGenericError(err, exception.BundleCreateError)}defer func() {if err != nil {logrus.Warnf("imageService#Run failed, clean data")if cleanErr := service.cleanContainer(imageRunArgs.ContainerId); cleanErr != nil {logrus.Warnf(cleanErr.Error())}}}()var rootfsPath stringvar spec *specs.Spec// 3. 准备/etc/hosts,会在/var/run/capsule/images/containers/$container_id下创建一个hostshostsMount, err := service.prepareHosts(imageRunArgs.ContainerId, imageRunArgs.Links)if err != nil {return err}// 4. 准备/etc/resolv.conf,会在/var/run/capsule/images/containers/$container_id下创建一个resolv.confdnsMount, err := service.prepareDns(imageRunArgs.ContainerId)if err != nil {return err}// 5. 准备volumevolumeMounts, err := service.prepareVolumes(imageRunArgs.Volumes)if err != nil {return err}// 6. 准备rootfsif rootfsPath, err = service.prepareUnionFs(imageRunArgs.ContainerId, imageRunArgs.ImageId); err != nil {return err}// 7. 准备specspecMounts := []specs.Mount{hostsMount, dnsMount}specMounts = append(specMounts, volumeMounts...)if spec, err = service.prepareSpec(rootfsPath, bundle, imageRunArgs, specMounts); err != nil {return err}// 8. 运行容器,如果运行出错,或者前台运行正常退出,则清理if err = facade.CreateOrRunContainer(service.factory.GetRuntimeRoot(), imageRunArgs.ContainerId, bundle, spec, facade.ContainerActRun, imageRunArgs.Detach, imageRunArgs.Network, imageRunArgs.PortMappings); err != nil {if cleanErr := service.cleanContainer(imageRunArgs.ContainerId); cleanErr != nil {logrus.Warnf(cleanErr.Error())}return err}if !imageRunArgs.Detach {if cleanErr := service.cleanContainer(imageRunArgs.ContainerId); cleanErr != nil {logrus.Warnf(cleanErr.Error())}}return nil}
使用Capsule运行Web应用
下面进入实战环节,使用Capsule来运行一个基于Spring Boot的Web应用+MySQL+Redis的服务器集群。
Web应用的名称为capsule-demo-app。
Step0 准备镜像
首先我们需要在Docker中pull下mysql和redis镜像,然后使用docker export命令导出镜像为tar包。
capsule-demo-app的Dockerfile为:
FROM java:8VOLUME /tmpADD capsule-demo-app.jar app.jarEXPOSE 8080ENTRYPOINT [ "sh", "-c", "java -jar /app.jar"]
同样也要导出tar包,此时我们会有三个tar包。
Step1 导入镜像
capsule image create $image_name $tar_path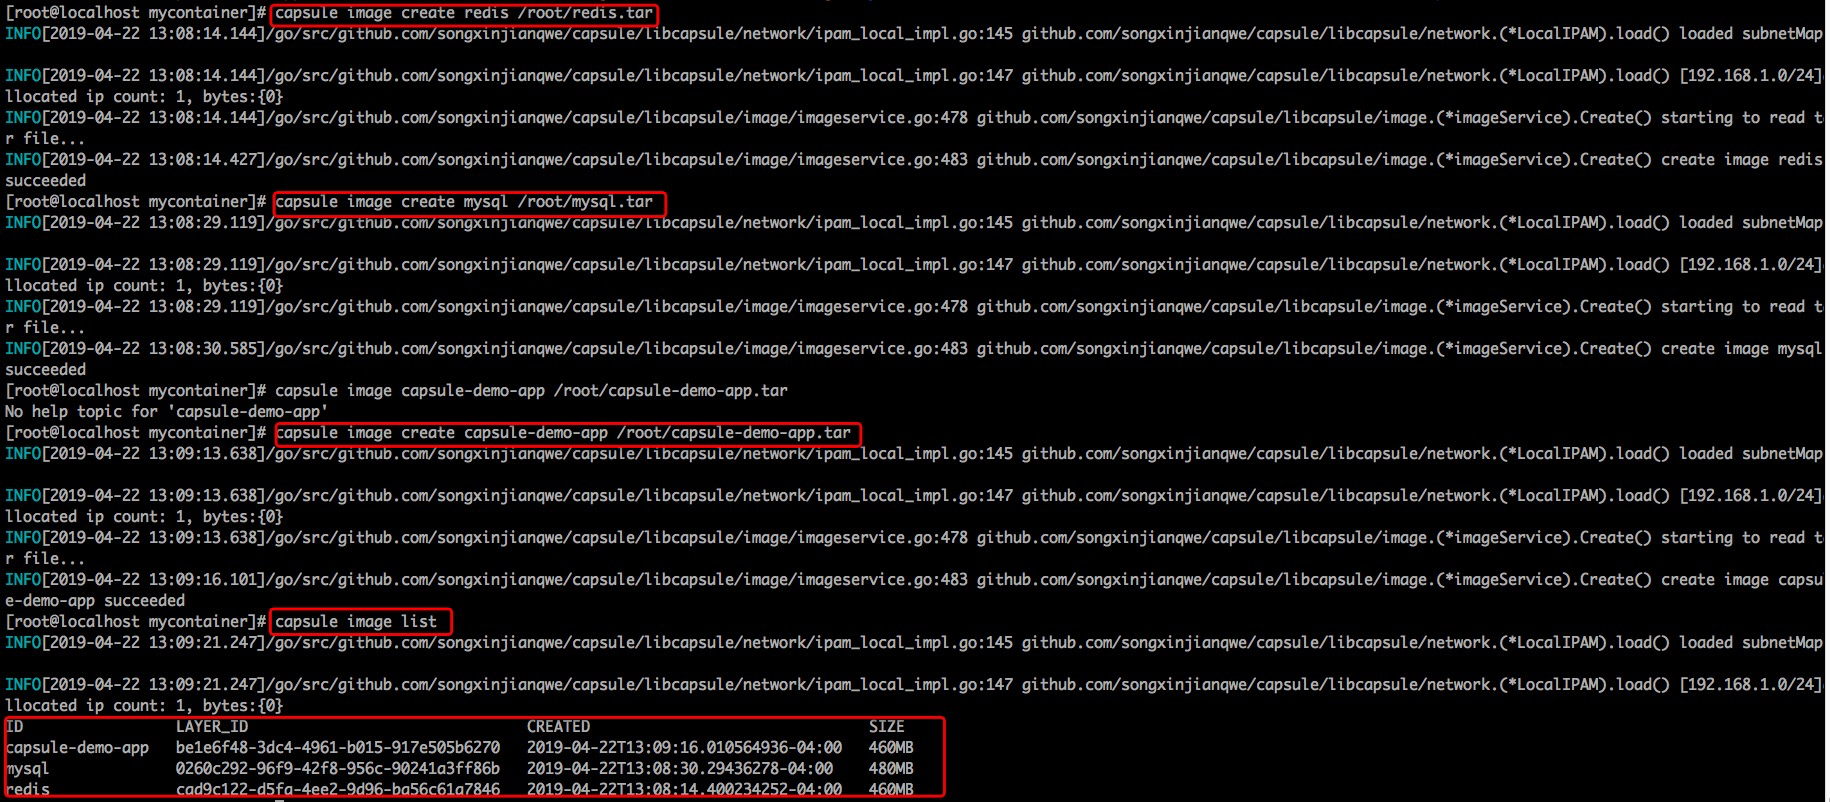
Step2 启动Redis
首先我们需要知道Dockerfile中有CMD或者ENTRYPOINT这样的语句用来指定启动时的命令,capsule为了简化没有做这一步,对capsule来说镜像==rootfs。启动命令需要自己输入。
通过阅读Redis的Dockerfile,可以拿到启动命令,大概就是运行一个脚本,在同目录下可以读到这个docker-entrypoint.sh脚本代码。
因为capsule没有实现user namespace,容器中只能用root权限,所以我们需要手动修改脚本内容,将脚本代码中chown相关的代码去掉,否则运行时会报错权限不足。
然后使用capsule image runc redis /usr/local/bin/docker-entrypoint.sh redis-server --id redis -p 6379:6379 -d来启动redis容器。
我们分析一下这条命令:
- capsule image runc是根据镜像来启动容器的命令
- redis是镜像名
- /usr/local/bin/docker-entrypoint.sh redis-server是启动命令
- id即容器名,需要唯一,这里是redis
- p是port的缩写,指定端口映射,即将容器内的6379端口映射到宿主机的6379端口
- d是detach的缩写,指定后台运行
启动之后如果没有报错,则使用capsule image list命令来查看已经启动的容器。
如果STATUS是Running,则说明容器启动成功。
可以进入redis容器,使用redis-cli来检测是否真正OK,比如命令capsule exec redis bash。
Step3 启动MySQL
类似于Redis,同样需要修改脚本文件。
使用这条命令来启动mysql容器:capsule image runc mysql "/usr/local/bin/docker-entrypoint.sh mysqld --user=root" -id=mysql -v /root/mysql/logs:/logs -v /root/mysql/data:/var/lib/mysql -p 3306:3306 -d
我们分析一下这条命令:
- capsule image runc是根据镜像来启动容器的命令
- mysql是镜像名
- “/usr/local/bin/docker-entrypoint.sh mysqld —user=root”是启动命令,因为命令中也包含参数,所以用引号引起来,capsule中对于args数组长度为1的进行了特殊处理,如果包含空格则split后再赋值给args
- id即容器名,需要唯一,这里是mysql
- v是volume的缩写,指定volume可以使得容器在销毁后仍然在宿主机上保存部分文件,对于mysql这种需要持久化存储的应用来说volume是必要的,当然宿主机上的目录需要我们先行创建好。
- p是port的缩写,指定端口映射,即将容器内的6379端口映射到宿主机的6379端口
- d是detach的缩写,指定后台运行
启动之后我们需要进入mysql容器中,创建一个名为demo的数据库schema,并且将外部访问权限由仅本机修改为任意host。
Step4 启动Web应用
capsule image runc capsule-demo-app "java -jar /app.jar" -id capsule-demo-container -e "SPRING_PROFILES_ACTIVE=prod" -p 8080:8080 -d -link mysql:mysql-container -link redis:redis-container
这里使用link来指定连接的mysql和redis服务器。
如果遇到问题可以使用capsule log $container_name的方式来打印容器的stdout日志。

若有收获,就点个赞吧
0 人点赞
