A Simplified OCI(Open Containers Initiative) Implementation, just like runC


https://github.com/songxinjianqwe/capsule
Project Structure
Capsule是一个CLI工具,提供了对容器的CRUD操作。
CLI与C-S架构主要的区别是CLI仅支持创建在本机中运行的容器,而C-S架构可以创建远程容器。
Docker是一个C-S架构的软件,而Docker底层依赖于runC,runC是实现了OCI标准的CLI软件,Docker以可执行程序的方式来调用runC管理容器。Capsule实现了部分OCI标准,主体与runC类似,架构与实现方面部分参考了runC,尽可能简化其逻辑,只保留了容器核心技术的运用(如namespaces, cgroups, pivot root, network, image等)。
除了OCI标准外,Capsule也实现了容器网络与镜像管理的功能,这部分其实应该放在另一个软件中实现,但由于时间有限,暂时放到本项目中实现。
Features
由Capsule创建的容器可以提供一下功能:
- namespace 支持, 包括 uts, pid, mount, network,暂不支持user ns
- control group(linux cgroups) 支持,目前仅支持cpu与memory的控制
- 支持运行在用户提供的root fs上
- 容器网络, 包括容器间网络、容器与宿主机间网络、容器与外部网络
- 丰富的容器CLI命令支持, 包括
list,state,create,run,start,kill,delete,exec,ps,logandspec. - 镜像管理,包括镜像导入(由Docker导出的镜像),以类似于Docker CLI的方式运行容器(即不需要提供OCI标准的config.json)
Install
Step0 go get “github.com/songxinjianqwe/capsule
Step1 开启宿主机的ip forward
所谓转发即当主机拥有多于一块的网卡时,其中一块收到数据包,根据数据包的目的ip地址将包发往本机另一网卡,该网卡根据路由表继续发送数据包。这通常就是路由器所要实现的功能。
bridge收到来自容器的请求时,根据数据包的目的IP(比如目的IP为公网IP,则匹配到默认路由default,默认路由到eth0),将数据包转发到eth0,bridge和eth0不需要直连。
vi /usr/lib/sysctl.d/50-default.conf #命令(编辑配置文件)net.ipv4.ip_forward=1 # 设置转发sysctl –p
Step2 安装iptables
CentOS7默认的防火墙不是iptables,而是firewalle.
#先检查是否安装了iptablesservice iptables status#安装iptablesyum install -y iptables#安装iptables-servicesyum install -y iptables-services#停止firewalld服务systemctl stop firewalld#禁用firewalld服务systemctl mask firewalld#启用iptablessystemctl enable iptables.servicesystemctl start iptables.servicesystemctl status iptables.service
#查看iptables现有规则iptables -L -n# 注意删掉REJCECT规则,否则在ping的时候会出现Destination Host Prohibited# 比如说刚装好之后可能是这样的,注意把INPUT的第5条和FORWARD的第1条删掉[root@localhost mycontainer]# iptables -L -n --line-numberChain INPUT (policy ACCEPT)num target prot opt source destination1 ACCEPT all -- 0.0.0.0/0 0.0.0.0/0 state RELATED,ESTABLISHED2 ACCEPT icmp -- 0.0.0.0/0 0.0.0.0/03 ACCEPT all -- 0.0.0.0/0 0.0.0.0/04 ACCEPT tcp -- 0.0.0.0/0 0.0.0.0/0 state NEW tcp dpt:225 REJECT all -- 0.0.0.0/0 0.0.0.0/0 reject-with icmp-host-prohibitedChain FORWARD (policy ACCEPT)num target prot opt source destination1 REJECT all -- 0.0.0.0/0 0.0.0.0/0 reject-with icmp-host-prohibitedChain OUTPUT (policy ACCEPT)num target prot opt source destination
QuickStart
以符合OCI规范的方式运行容器
首先需要了解一下OCI规范,此处可以参考runC的README。
简单来说运行一个容器分为三步:
- 准备一个rootfs,可以使用docker export导出
- 准备一个config.json,以配置文件的方式来配置容器运行参数
- 使用命令行工具
Step0 准备镜像
我们需要一个具有一些工具(如ifconfig, stress, gcc, iptables等)的镜像,这里提供一个示例Dockerfile来打镜像:
FROM centosADD stress-1.0.4.tar.gz /tmp/RUN yum install -y gcc automake autoconf libtool make net-tools.x86_64 iptables-services nmap-ncat.x86_64 && cd /tmp/stress-1.0.4 && ./configure && make && make install
使用docker build来构造镜像。
使用docker export $(docker create $image_name) -o centos_with_utilities.tar来导出镜像。
这样我们就得到了一个tar文件,这个文件解压后就是rootfs。
- 创建一个目录,作为容器的bundle目录。
将tar文件解压到该目录下的rootfs目录,
tar -xvf centos_with_utilities.tar -C $container_dir/rootfs/Step1 准备config.json
进入该目录,然后运行
capsule spec,可以生成一个示例的config.json。
这里提供一个示例config.json,其中args就是容器运行的命令,比如这里就是sh:
{"ociVersion": "1.0.1-dev","process": {"user": {"uid": 0,"gid": 0},"args": ["sh"],"env": ["PATH=/usr/local/sbin:/usr/local/bin:/usr/sbin:/usr/bin:/sbin:/bin","TERM=xterm"],"cwd": "/"},"root": {"path": "rootfs","readonly": true},"hostname": "capsule","mounts": [{"destination": "/proc","type": "proc","source": "proc"},{"destination": "/dev","type": "tmpfs","source": "tmpfs","options": ["nosuid","strictatime","mode=755","size=65536k"]},{"destination": "/dev/pts","type": "devpts","source": "devpts","options": ["nosuid","noexec","newinstance","ptmxmode=0666","mode=0620","gid=5"]},{"destination": "/dev/shm","type": "tmpfs","source": "shm","options": ["nosuid","noexec","nodev","mode=1777","size=65536k"]},{"destination": "/dev/mqueue","type": "mqueue","source": "mqueue","options": ["nosuid","noexec","nodev"]},{"destination": "/sys","type": "sysfs","source": "sysfs","options": ["nosuid","noexec","nodev","ro"]}],"linux": {"resources": {"devices": [{"allow": false,"access": "rwm"}],"memory": {"limit": 104857600},"cpu": {"shares": 512}},"namespaces": [{"type": "pid"},{"type": "uts"},{"type": "ipc"},{"type": "network"},{"type": "mount"}]}}
Step2 运行容器
保证当前目录下有一个config.json和一个rootfs目录(当然rootfs目录也可以放在别的地方,注意修改config.json中的root.path的值)。
在当前目录下运行capsule run $container_name,这样就可以运行起一个容器了。注意$container_name是一个唯一的id。
capsule list可以查看所有容器;capsule state $container_name可以查看该容器的详细信息。
以镜像的方式运行容器
Step0 准备镜像
Step1 导入镜像
capsule image create $image_name $tar_path
将该镜像纳入到capsule管理,注意image_name也是一个唯一的id。capsule image list可以查看所有镜像。
Step2 运行容器
capsule image run $image_name $args --name $container_name
比如说capsule image run centos sh --name centos_container
Usage
全局参数
capsule —root $root_dir
可以指定运行时文件的根目录,可选参数,默认值为 /var/run/capsule
create
将有容器的config.json所在的目录称为bundle。
可以在bundle下使用capsule create $container_name来创建一个容器,容器会进入Created状态,也可以在任意目录,但要加入bundle参数,指明config.json的所在目录。
容器目前有三种状态,分别是:
- Created:在create命令执行后会进入的状态,容器的init process会阻塞在执行用户指定命令之前,等待start命令唤醒自己。
- Running:在start命令唤醒后会进入的状态,容器会执行用户指定命令。
- Stopped:容器启动失败或用户指定的命令执行完毕或被容器init process被kill后会进入的状态。
参数:
| Name | Short Name | Type | Usage | Default Value |
|---|---|---|---|---|
| bundle | b | string | path to the root of the bundle directory, defaults to the current directory | $cwd |
| network | net | string | network connected by container | capsule_bridge0(类似于docker0) |
| port | p | string array | port mappings, example: host port:container port | [] |
start
capsule start $container_name可以启动一个Created状态的容器。
无参数,注意start的话默认情况下是前台运行的。
run
run = create + start + destroy(对于前台运行的容器来说)
可以在bundle下使用capsule run $container_name来创建一个容器,容器会进入Created状态,也可以在任意目录,但要加入bundle参数,指明config.json的所在目录。
不指定-d或者-d false时容器为前台运行,当退出时容器随之退出并将自己销毁;指定-d时会以后台方式运行,可以使用capsule list或者capsule state来查看该容器状态。
参数:
| Name | Short Name | Type | Usage | Default Value |
|---|---|---|---|---|
| bundle | b | string | path to the root of the bundle directory, defaults to the current directory | $cwd |
| network | net | string | network connected by container | capsule_bridge0(类似于docker0) |
| port | p | string array | port mappings, example: host port:container port | [] |
| detach | d | bool | detach from the container’s process | false |
list
列出所有容器,已经被销毁的容器不会被显示。(Docker可以用docker ps -a来展示已经被销毁的容器,这里做了简化,已经被销毁的不再记录)。
示例:capsule list
ID PID STATUS IP BUNDLE CREATED
capsule-demo-container 6995 Running 192.168.1.4 /var/run/capsule/images/containers/capsule-demo-container 2019-04-22T14:15:27.69530294-04:00
mysql 6877 Running 192.168.1.3 /var/run/capsule/images/containers/mysql 2019-04-22T14:07:31.989435108-04:00
redis 2689 Running 192.168.1.2 /var/run/capsule/images/containers/redis 2019-04-22T13:38:46.534200797-04:00
kill
可以对一个Created或Running状态的容器执行kill命令。capsule kill $container_name [$signal]
这里$signal可以不填,默认是SIGTERM,也可以使用其他信号,如SIGKILL等。
其实就是对容器init process发送一个信号。
log
可以查看一个容器的stdout和stderr日志。capsule log $container_name
也可以查看某一次后台运行的exec的日志:capsule log $container_name -exec $exec_id
$exec_id是在exec -d执行后控制台打印出来的UUID。
ps
可以查看一个容器的进程信息,等同于capsule exec $container_name pscapsule ps $container_name
delete
删除一个容器,如果想删除一个Created或Running的容器,需要加-f参数。capsule delete [-f] $container_name
加-f相当于 capsule kill $container_name SIGKILL 再capsule delete $container_name
spec
在当前目录下生成一个示例spec,类似于下面的样子:
一般情况下只需要关心:
- args:目录
- env:环境变量
- hostname:主机名
- mounts:挂载
- cpu:linux.cpu.shares是容器所占用cpu的比例,默认为1024,即全部占用。
- memory:linux.memory.limit是容器最多使用的内存大小,单位是byte。
{"ociVersion": "1.0.1-dev","process": {"user": {"uid": 0,"gid": 0},"args": ["sleep", "24h"],"env": ["PATH=/usr/local/sbin:/usr/local/bin:/usr/sbin:/usr/bin:/sbin:/bin","TERM=xterm"],"cwd": "/"},"root": {"path": "rootfs","readonly": true},"hostname": "capsule","mounts": [{"destination": "/proc","type": "proc","source": "proc"},{"destination": "/dev","type": "tmpfs","source": "tmpfs","options": ["nosuid","strictatime","mode=755","size=65536k"]},{"destination": "/dev/pts","type": "devpts","source": "devpts","options": ["nosuid","noexec","newinstance","ptmxmode=0666","mode=0620","gid=5"]},{"destination": "/dev/shm","type": "tmpfs","source": "shm","options": ["nosuid","noexec","nodev","mode=1777","size=65536k"]},{"destination": "/dev/mqueue","type": "mqueue","source": "mqueue","options": ["nosuid","noexec","nodev"]},{"destination": "/sys","type": "sysfs","source": "sysfs","options": ["nosuid","noexec","nodev","ro"]}],"linux": {"resources": {"devices": [{"allow": false,"access": "rwm"}],"memory": {"limit": 104857600},"cpu": {"shares": 512}},"namespaces": [{"type": "pid"},{"type": "uts"},{"type": "ipc"},{"type": "network"},{"type": "mount"}]}}
state
查看某个容器的信息capsule state $container_name [-d]
如果希望查看详细信息,可以加-d参数,可以查看更为详细的信息。
exec
进入一个Created或Running的容器中执行命令。capsule exec $container_name $args [-e $env] [-cwd $cwd] [-d]
指定-d可以以后台方式来运行此进程。
network
network是一个二级命令,下面包含create, delete, list, show四个子命令。
网络通常会有一个driver参数,指定网络的驱动类型,理论上可以支持多种驱动,目前仅支持网桥,即bridge。
create
创建一个网络,一般情况是创建一个指定网段的网桥。capsule network create $network_name -driver bridge -subnet $subnet
subnet是一个网段,比如说192.168.1.0/24,在创建容器时可以使用-network $network_name来将该容器的IP地址的分配范围指定为该网络的网段。
delete
删除一个网络。capsule network delete $network_name -driver bridge
list
列出所有的网络,注意,如果没有创建任何网段,当第一次创建容器时会自动创建一个名为capsule_bridge0,网段为192.168.1.0/24的网桥,类似于Docker的docker0。capsule network list
show
显示一个网络的详细信息capsule network show $container_name
image
image同样是个二级目录,下面包含create, delete, list, get, runc, destroyc6个子命令。
create
创建一个镜像capsule image create $image_name $tar_path
delete
删除一个镜像
capsule image delete $image_name
list
get
显示一个镜像的信息。capsule image get $image_name
runc
以镜像方式来启动一个容器,类似于Docker。
capsule image run $image_name command
-id $container_name
[-d]
[-workdir $workdir]
[-hostname $hostname]
[-env $k=$v]
[-cpushare $cpushare]
[-memory $memory_limit]
下面是spec里没有的,由capsule负责做的配置信息
[-link $container_name:$container_alias]
[-volume $host_dir/$container_dir:$host_dir]
[-network $network_name]
[-port $host_port:$container_host]
[-label $k=$v]
| Name | Short Name | Type | Usage | Default Value |
|---|---|---|---|---|
| detach | d | bool | 是否以后台方式启动 | false |
| id | string | 容器名称,必填,唯一 | ||
| cwd | string | 容器启动后所处的工作目录 | / | |
| env | e | string array | 环境变量 | [] |
| hostname | h | string | 主机名 | $container_name |
| cpushare | c | int64 | cpu比例 | 1024 |
| memory | m | uint64 | 最大内存 | 0,即无限制 |
| network | net | string | 网络名称 | capsule_bridge0 |
| port | p | string array | 端口映射,host_port:container_port | [] |
| label | l | string array | 容器标签 | [] |
| volume | v | string array | 数据卷,container_dir或者host_dir:container_dir | [] |
| link | string array | 容器间的连接,container_id:alias | [] |
destroyc
类似于capsule delete,实际上是capsule delete + 清理容器与镜像间的关联数据。capsule image destroyc $container_name [-f]
使用capsule来运行capsule-demo-app SpringBoot应用+MySQL+Redis
这里提到的capsule-demo-app参见这个github仓库。
Step0 准备镜像
首先我们需要在Docker中pull下mysql和redis镜像,然后使用docker export命令导出镜像为tar包。
capsule-demo-app的Dockerfile为:
FROM java:8VOLUME /tmpADD capsule-demo-app.jar app.jarEXPOSE 8080ENTRYPOINT [ "sh", "-c", "java -jar /app.jar"]
同样也要导出tar包,此时我们会有三个tar包。
Step1 导入镜像
capsule image create $image_name $tar_path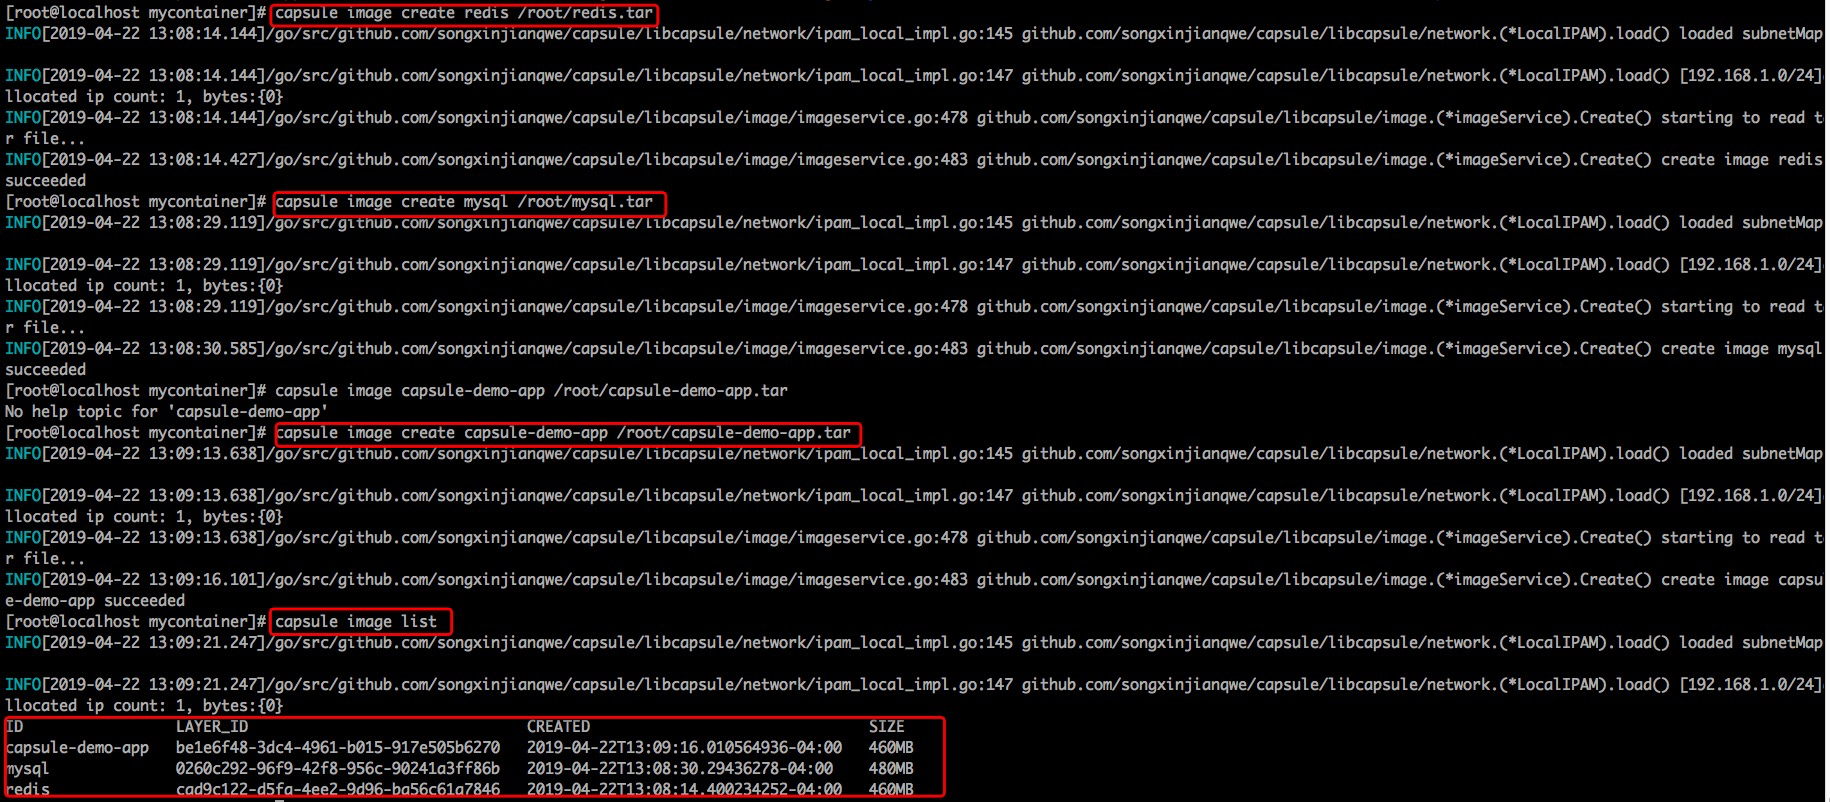
Step2 启动Redis
首先我们需要知道Dockerfile中有CMD或者ENTRYPOINT这样的语句用来指定启动时的命令,capsule为了简化没有做这一步,对capsule来说镜像==rootfs。启动命令需要自己输入。
通过阅读Redis的Dockerfile,可以拿到启动命令,大概就是运行一个脚本,在同目录下可以读到这个docker-entrypoint.sh脚本代码。
因为capsule没有实现user namespace,容器中只能用root权限,所以我们需要手动修改脚本内容,将下图中红框部分的代码去掉,否则运行时会报错。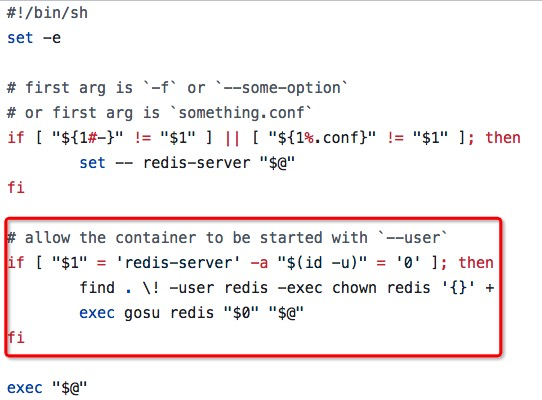
这里需要手动修改脚本,通过capsule image list 命令可以看到每个镜像对应的layer id。
在/var/run/capsule/images/layers/$layer_id下可以看到rootfs,然后修改该脚本文件: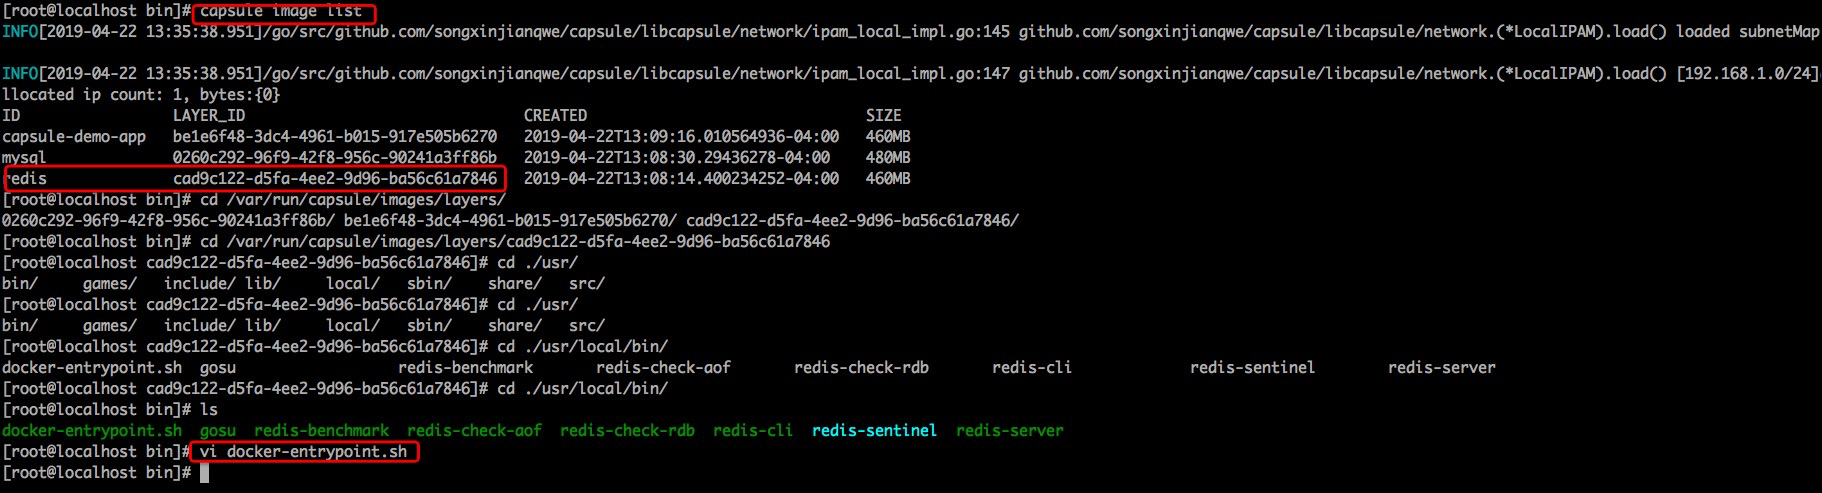
然后使用capsule image runc redis /usr/local/bin/docker-entrypoint.sh redis-server --id redis -p 6379:6379 -d来启动redis容器。
我们分析一下这条命令:
- capsule image runc是根据镜像来启动容器的命令
- redis是镜像名
- /usr/local/bin/docker-entrypoint.sh redis-server是启动命令
- id即容器名,需要唯一,这里是redis
- p是port的缩写,指定端口映射,即将容器内的6379端口映射到宿主机的6379端口
- d是detach的缩写,指定后台运行
启动之后如果没有报错,则使用capsule image list命令来查看已经启动的容器。
如果STATUS是Running,则说明容器启动成功。
可以进入容器来使用redis-cli来检测是否真正OK。
capsule exec redis bash
redis-cli
127.0.0.1:6379> keys
(empty list or set)
127.0.0.1:6379> set k1 v1
OK
127.0.0.1:6379> get k1
“v1”
127.0.0.1:6379> keys
1) “k1”
127.0.0.1:6379> del k1
(integer) 1
127.0.0.1:6379> keys *
(empty list or set)
127.0.0.1:6379> exit
exit
Step3 启动MySQL
类似于Redis,同样需要修改脚本文件。
将红框部分的代码删掉,否则启动时会报错error: exec: “/usr/local/bin/docker-entrypoint.sh”: stat /usr/local/bin/docker-entrypoint.sh: permission denied。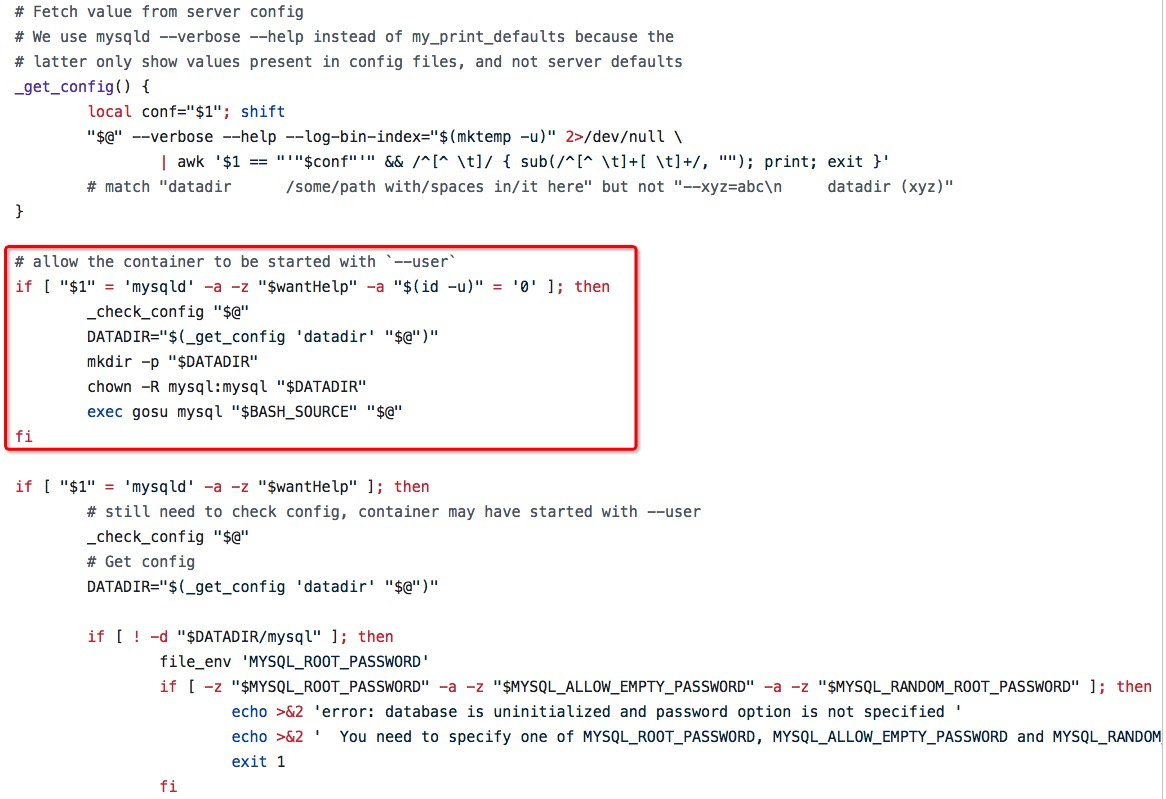
使用这条命令来启动mysql容器:capsule image runc mysql "/usr/local/bin/docker-entrypoint.sh mysqld --user=root" -id=mysql -v /root/mysql/logs:/logs -v /root/mysql/data:/var/lib/mysql -p 3306:3306 -d
我们分析一下这条命令:
- capsule image runc是根据镜像来启动容器的命令
- mysql是镜像名
- “/usr/local/bin/docker-entrypoint.sh mysqld —user=root”是启动命令,因为命令中也包含参数,所以用引号引起来,capsule中对于args数组长度为1的进行了特殊处理,如果包含空格则split后再赋值给args
- id即容器名,需要唯一,这里是mysql
- v是volume的缩写,指定volume可以使得容器在销毁后仍然在宿主机上保存部分文件,对于mysql这种需要持久化存储的应用来说volume是必要的,当然宿主机上的目录需要我们先行创建好。
- p是port的缩写,指定端口映射,即将容器内的6379端口映射到宿主机的6379端口
- d是detach的缩写,指定后台运行
启动之后我们需要进入容器中,创建一个名为demo的数据库schema,并且将外部访问权限由仅本机修改为任意host。
capsule exec mysql bash
mysql -uroot -p
密码为空,直接回车即可
> show databases;
> create database demo;
> use mysql;
> update user set host=’%’ where user=’root’;
> flush privileges;
> exit
Step4 启动Web应用
capsule image runc capsule-demo-app "java -jar /app.jar" -id capsule-demo-container -e "SPRING_PROFILES_ACTIVE=prod" -p 8080:8080 -d -link mysql:mysql-container -link redis:redis-container
这里使用link来指定连接的mysql和redis服务器。
如果遇到问题可以使用capsule log $container_name的方式来打印容器的stdout日志。
这个Web应用对外暴露了三个HTTP接口:
| HTTP Method | Path | Body | Description |
|---|---|---|---|
| GET | /users | 获得所有用户的信息 | |
| GET | /users/$userId | 获得该用户的信息,会使用Redis缓存 | |
| POST | /users | { “id”: “tom”, “nickName”: “tom” } |
添加一个用户 |

若有收获,就点个赞吧
0 人点赞
