备份问题
- typecho admin 页面有备份选项;
- 也可自己手动在服务器 /var/www/html/ 下备份 /usr/目录 保存主题和个人用户数据;
- 数据库备份:typecho 数据库
以下转载于:https://blog.csdn.net/yangxjsun/article/details/82177297
LAMP 环境的搭建
LAMP = Linux + Apache + MySQL + PHP
这里 Linux 选择的是 CentOS7 64 位,使用KVM虚拟机安装的CentOS7进行演示, 安装过程使用yum, yum源是安装好CentOS7之后自带的,也可以选择epel源,163源等,在安装MySQL时需要先安装MySQL源(后面会说到),过程中需要联网安装并且需要root权限。准备好这些,主要的就是后三者的安装和使用了。
安装Apache的httpd服务
安装httpd
[root@centos7 ~]# yum install httpd
启动httpd服务
[roo@centos7 ~]# systemctl start httpd
查看httpd服务状态
[root@centos7 ~]# systemctl status httpd
看到 Active: active (running) 说明httpd服务已经起来了
- 让httpd服务开机启动 这样当服务器主机重启之后httpd服务会自动开启
[root@centos7 ~]# systemctl enable httpd
这里稍作解释,可以看到上面三个命令都是systemctl命令,systemctl命令是系统服务管理器指令,从centos7开始使用,它实际上将 service 和 chkconfig 这两个命令组合到一起。所以本文特别强调是基于centos7,但是对centos6系统上的操作也具有一定的参考价值,因为只要对命令稍作修改就可以了,思路是一样的。
好了,httpd服务开启意味着我们应该可以通过访问主机IP或者解析到该IP的域名来访问Apache提供的测试页面了,但是别着急,还有一座大山等着我们,那就是防火墙。
防火墙问题
查看防火墙状态,在CentOS7上,防火墙的服务叫firewalld.service,在使用时可以不加“.service”, httpd也是同样的道理。
同样看到Active: active (running) 说明防火墙是开启的,而Active: inactive (dead) 则表明防火墙处于关闭状态,一般情况下,建议防火墙是开着的,因为对于服务器来说,防火墙对防止外来攻击起到了不可忽视的作用,但是这里防火墙会阻挡http访问,下面提供解决方案。[root@centos7 ~]# systemctl status firewalld.service
解决一:给防火墙增加规则来放行http以及https(为以后做准备)
添加成功后会看到success的提示。注意,一定要加–permanent选项,这样这条规则会在防火墙重启之后依然生效。[root@centos7 ~]# firewall-cmd --permanent --add-service=http[root@centos7 ~]# firewall-cmd --permanent --add-service=https
解决二:那就是简单粗暴的关闭防火墙服务(*不建议)
[root@centos7 ~]# systemctl stop firewalld.service
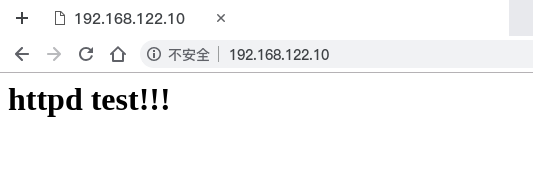
解决了防火墙的问题就可以试着访问一下了。如果不出意外的话应该看到这个界面:

默认的网站根目录为/var/www/html/ ,也可以编写一个简单的index.html放在该目录下,并试着访问ip。
[root@centos7 ~]# cd /var/www/html/[root@centos7 html]# ls[root@centos7 html]# vim index.html<h1>httpd test!!!</h1>[root@centos7 html]# systemctl restart httpd
访问你服务器的ip地址:
至此,Apache 基本搞定了。
安装和配置MySQL
这里选择安装MySQL5.7,也可以到官网下载最新或者选择合适的版本。
下载MySQL源rpm安装包
[root@centos7 ~]# cd[root@centos7 ~]# mkdir mysql[root@centos7 ~]# cd mysql/[root@centos7 mysql]# wget http://dev.mysql.com/get/mysql57-community-release-el7-8.noarch.rpm
安装MySQL源
[root@centos7 mysql]# rpm -ivh mysql57-community-release-el7-8.noarch.rpm
或者执行
[root@centos7 mysql]# yum localinstall mysql57-community-release-el7-8.noarch.rpm
检查MySQL源是否安装成功
[root@centos7 mysql]# yum repolist enabled |grep mysql
如下图所示表名安装成功
安装mysql-community-server
安装慢参考:https://blog.csdn.net/qq_42376889/article/details/105537454
将mysql-community-server依赖的几个包从镜像地址下载到yum cache 缓存文件夹
[root@centos7 ~]# yum install mysql-community-server
- 启动mysqld服务
[root@centos7 ~]# systemctl start mysqld
- 检查mysqld服务是否启动
[root@centos7 ~]# systemctl status mysqld
mysqld开机启动
[root@centos7 ~]# systemctl enable mysqld
修改root本地登录密码
mysql安装完成之后,在/var/log/mysqld.log文件中给root生成了一个默认密码。
通过下面的方式找到root默认密码,然后登录mysql进行修改:
```shell [root@centos7 ~]# grep ‘temporary password’ /var/log/mysqld.log
)T%pKgipG5kZ
- 登录mysql```shell[root@centos7 ~]# mysql -uroot -pmysql> ALTER USER root@localhost IDENTIFIED BY 'Test123.';或者mysql> set password for 'root'@'localhost'=password('Test123.');
注意:mysql5.7默认安装了密码安全检查插件(validate_password),默认密码检查策略要求密码必须包含:大小写字母、数字和特殊符号,并且长度不能少于8位。否则会提示ERROR 1819 (HY000): Your password does not satisfy the current policy requirements错误。
既然要搭建博客,那博客的一些数据就要存在数据库中,在typecho搭建时需要指定数据库和数据库用户,所以接下来:
为typecho博客创建数据库
为typecho创建一个数据库,这里数据库名为typecho。
mysql> create database typecho;
创建一个普通用户并 赋予其typecho数据库的所有表的权限:(可省略,使用root用户 *不推荐)
mysql> grant all privileges on typecho.* to typcho@localhost identified by 'Test123/';mysql> flush privileges;
检查是否创建成功
看到typecho数据库那么数据库安装和配置部分就已经完成了。mysql> exitBye[root@centos7 ~]# mysql -utypecho -pmysql> show databases;mysql> exit
设置可以远程连接
mysql> use mysqlmysql> GRANT ALL PRIVILEGES ON *.* TO 'root'@'%' IDENTIFIED BY 'Test123.' WITH GRANT OPTION;mysql> flush privileges;
安装 PHP
安装PHP, CentOS7上默认是php5.4版本
[root@centos7 ~]# yum install php
安装php的mysql驱动
[root@centos7 ~]# yum install php-mysql
同时,我们还可以安装php的其他一些常用插件,可以用yum search命令列出所有
在这里挑选部分安装[root@centos7 ~]# yum search php-
[root@centos7 ~]# yum -y install php-gd php-ldap php-odbc php-pear php-xml php-xmlrpc php-mbstring php-snmp php-soap curl curl-devel
测试PHP是否安装成功
[root@centos7 ~]# cd /var/www/html/[root@centos7 html]# vim info.php<?phpphpinfo();?>[root@centos7 html]# systemctl restart httpd
浏览器访问 http://{你的IP}/info.php
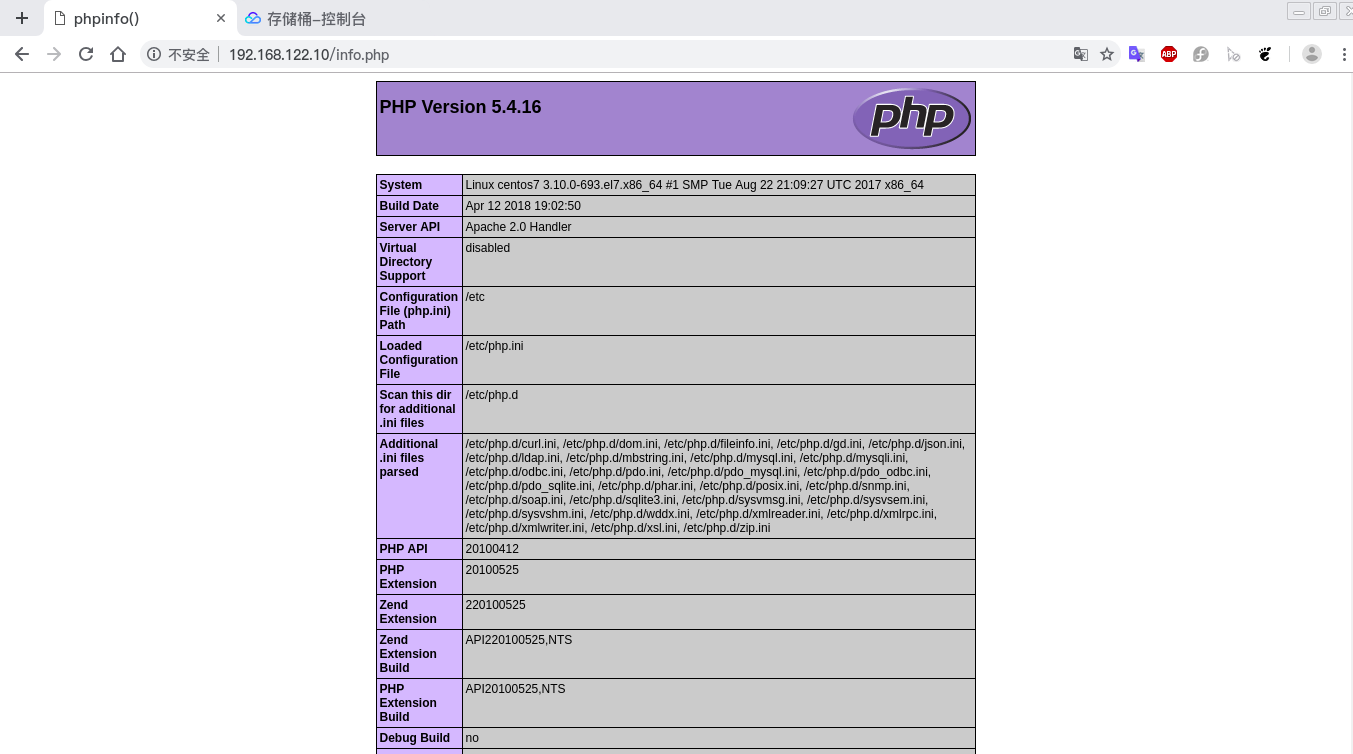
如图表示PHP安装成功。
至此,整个LAMP框架已经搭建好了,最后一步就是typecho的安装了。
安装 Typecho
到typecho官网下载复制下载链接,使用wget下载到服务器。
[root@centos7 ~]# mkdir typecho[root@centos7 ~]# cd typecho/[root@centos7 typecho]# wget http://typecho.org/downloads/1.1-17.10.30-release.tar.gz[root@centos7 typecho]# ls1.1-17.10.30-release.tar.gz
解压
[root@centos7 typecho]# tar -xzvf 1.1-17.10.30-release.tar.gz[root@centos7 typecho]# ls1.1-17.10.30-release.tar.gz build
解压完之后有一个build目录,将该目录下所有文件拷贝到网站根目录/var/www/html/,之前先删除或网站根目录下的两个测试文件
```shell [root@centos7 ~]# cd /var/www/html/ [root@centos7 html]# ls index.html info.php
[root@centos7 html]# mv index.html index.html.bak [root@centos7 html]# mv info.php info.php.bak [root@centos7 html]# cd [root@centos7 ~]# cd typecho/ [root@centos7 typecho]# cp -R build/* /var/www/html/
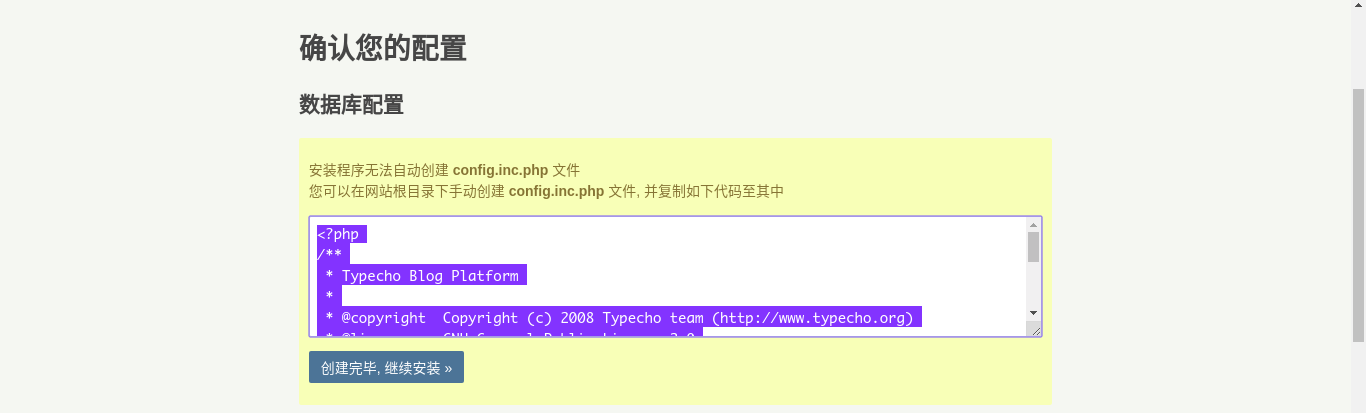
然后就可以访问网站IP了- 下一步。接下来就是可视化的安装了,下面是截图:- 输入数据库用户名和数据库密码(这里是配置mysql的时候为typecho创建的新用户或root用户)- 管理员账号密码设置,用户登录后台admin页面- 开始安装- 这里需要手动创建 config.inc.php,把提供的数据库配置复制并新建配置文件。```shell[root@centos7 ~]# cd /var/www/html/[root@centos7 html]# lsadmin index.php install LICENSE.txt varindex.html.bak info.php.bak install.php usr[root@centos7 html]# vim config.inc.php<?php/*** Typecho Blog Platform** @copyright Copyright (c) 2008 Typecho team (http://www.typecho.org)* @license GNU General Public License 2.0* @version $Id$*//** 定义根目录 */define('__TYPECHO_ROOT_DIR__', dirname(__FILE__));/** 定义插件目录(相对路径) */define('__TYPECHO_PLUGIN_DIR__', '/usr/plugins');/** 定义模板目录(相对路径) */define('__TYPECHO_THEME_DIR__', '/usr/themes');/** 后台路径(相对路径) */define('__TYPECHO_ADMIN_DIR__', '/admin/');/** 设置包含路径 */@set_include_path(get_include_path() . PATH_SEPARATOR .__TYPECHO_ROOT_DIR__ . '/var' . PATH_SEPARATOR .__TYPECHO_ROOT_DIR__ . __TYPECHO_PLUGIN_DIR__);/** 载入API支持 */require_once 'Typecho/Common.php';/** 载入Response支持 */require_once 'Typecho/Response.php';/** 载入配置支持 */require_once 'Typecho/Config.php';/** 载入异常支持 */require_once 'Typecho/Exception.php';/** 载入插件支持 */require_once 'Typecho/Plugin.php';/** 载入国际化支持 */require_once 'Typecho/I18n.php';/** 载入数据库支持 */require_once 'Typecho/Db.php';/** 载入路由器支持 */require_once 'Typecho/Router.php';/** 程序初始化 */Typecho_Common::init();/** 定义数据库参数 */$db = new Typecho_Db('Mysql', 'typecho_');$db->addServer(array ('host' => 'localhost','user' => 'typecho','password' => 'Test123/','charset' => 'utf8','port' => '3306','database' => 'typecho',), Typecho_Db::READ | Typecho_Db::WRITE);Typecho_Db::set($db);
- 继续
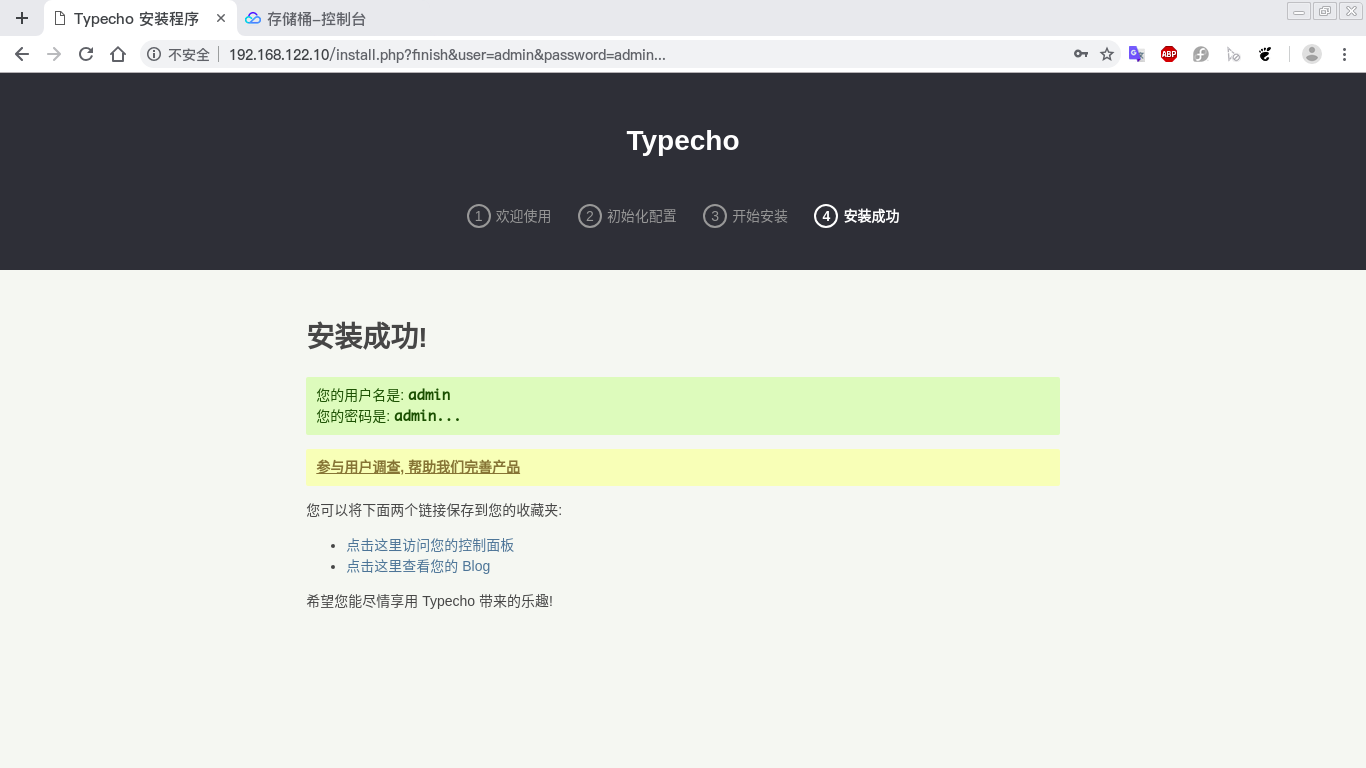
至此,Typecho 安装成功!
分别访问
blog 首页:{服务器ip}
后台管理页面:{服务器ip}/admin

若有收获,就点个赞吧
0 人点赞
