Shiro 概念介绍
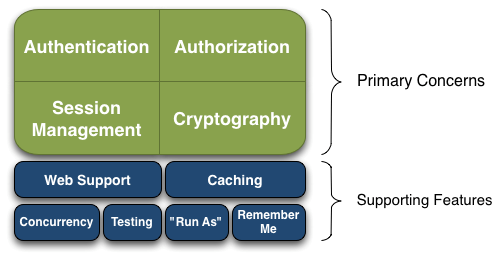
Authentication(认证), Authorization(授权), Session Management(会话管理), Cryptography(加密)被 Shiro 框架的开发团队称之为应用安全的四大基石。那么就让我们来看看它们吧:
- Authentication(认证):用户身份识别,通常被称为用户“登录”
- Authorization(授权):访问控制。比如某个用户是否具有某个操作的使用权限。
- Session Management(会话管理):特定于用户的会话管理,甚至在非web 或 EJB 应用程序。
- Cryptography(加密):在对数据源使用加密算法加密的同时,保证易于使用。
还有其他的功能来支持和加强这些不同应用环境下安全领域的关注点。特别是对以下的功能支持:
- Web Support(Web支持):Shiro 提供的 web 支持 api ,可以很轻松的保护 web 应用程序的安全。
- Caching(缓存):缓存是 Apache Shiro 保证安全操作快速、高效的重要手段。
- Concurrency(并发):Apache Shiro 支持多线程应用程序的并发特性。
- Testing(测试):支持单元测试和集成测试,确保代码和预想的一样安全。
- “Run As”:这个功能允许用户假设另一个用户的身份(在许可的前提下)。
- “Remember Me”:跨 session 记录用户的身份,只有在强制需要时才需要登录。
记住一点,Shiro 不会去维护用户、维护权限;这些需要我们自己去设计 / 提供;然后通过相应的接口注入给 Shiro 即可。
在概念层,Shiro 架构包含三个主要的理念:Subject,SecurityManager和 Realm。下面的图展示了这些组件如何相互作用,我们将在下面依次对其进行描述。
- Subject:当前用户,Subject 可以是一个人,但也可以是第三方服务、守护进程帐户、时钟守护任务或者其它–当前和软件交互的任何事件。
- SecurityManager:管理所有Subject,SecurityManager 是 Shiro 架构的核心,配合内部安全组件共同组成安全伞。
- Realms:用于进行权限信息的验证,我们自己实现。Realm 本质上是一个特定的安全 DAO:它封装与数据源连接的细节,得到 Shiro 所需的相关的数据。在配置 Shiro 的时候,你必须指定至少一个 Realm 来实现认证(authentication)和/或授权(authorization)。
我们需要实现Realms的Authentication 和 Authorization。其中 Authentication 是用来验证用户身份,Authorization 是授权访问控制,用于对用户进行的操作授权,证明该用户是否允许进行当前操作,如访问某个链接,某个资源文件等。
拦截器-ShiroFilter
ShiroFilter 是整个 Shiro 的入口点,用于拦截需要安全控制的请求进行处理。
Shiro 对 Servlet 容器的 FilterChain 进行了代理,即 ShiroFilter 在继续 Servlet 容器的 Filter 链的执行之前,通过 ProxiedFilterChain 对 Servlet 容器的 FilterChain 进行了代理。
使用 Shiro 的第一个配置就是创建拦截器,这里可以自定义哪些请求必须通过认证才能访问,哪些请求可以匿名访问。
- anon: 无需认证即可访问
- authc: 必须认证之后才能访问
- user: 必须拥有记住我功能才能访问
- perms: 拥有某个资源权限才能访问
- roles: 拥有某个角色权限才能访问
设置顺序依次是:roles -> perms -> authc
/*** Shiro 过滤器** @return*/@Beanpublic ShiroFilterFactoryBean shiroFilterFactoryBean() {log.info("shiro request filter");ShiroFilterFactoryBean shiroFilterBean = new ShiroFilterFactoryBean();// 关联 DefaultWebSecurityManagershiroFilterBean.setSecurityManager(securityManager());// 添加 shiro 的内置过滤器/*anon: 无需认证即可访问authc: 必须认证之后才能访问user: 必须拥有记住我功能才能访问perms: 拥有某个资源权限才能访问roles: 拥有某个角色权限才能访问*/Map<String, String> filterMap = new LinkedHashMap<>();// 给请求设置权限/角色// 角色设置要在权限之前filterMap.put("/user/**", "roles[admin]");filterMap.put("/user/add", "perms[user:add]");filterMap.put("/user/update", "perms[user:update]");// 认证请求写在授权下面filterMap.put("/**", "authc");shiroFilterBean.setFilterChainDefinitionMap(filterMap);// 设置登录请求地址shiroFilterBean.setLoginUrl("/login");// 登录成功后要跳转的链接shiroFilterBean.setSuccessUrl("/index");//未授权请求;shiroFilterBean.setUnauthorizedUrl("/401.html");return shiroFilterBean;}
登录-身份认证
Shiro 身份认证逻辑定义在 AuthorizingRealm#doGetAuthenticationInfo 接口方法内,需要开发者实现该接口方法构建 AuthenticationInfo 对象来实现身份认证逻辑。
用户的登录逻辑如下:
- 通过 SecurityUtils 得到 Subject,其会自动绑定到当前线程;如果在 web 环境在请求结束时需要解除绑定;
- 获取身份验证的 Token,如用户名 / 密码;
- 调用 subject.login 方法进行登录,其会自动委托给 SecurityManager.login 方法进行登录;
退出可以调用 subject.logout 退出,其会自动委托给 SecurityManager.logout 方法退出。
身份认证错误异常: AuthenticationException 或其子类,
- DisabledAccountException(禁用的帐号);
- LockedAccountException(锁定的帐号);
- UnknownAccountException(错误的帐号);
- ExcessiveAttemptsException(登录失败次数过多);
- IncorrectCredentialsException (错误的凭证);
- ExpiredCredentialsException(过期的凭证);
具体请查看其继承关系;对于页面的错误消息展示,最好使用如 “用户名 / 密码错误” 而不是 “用户名错误”/“密码错误”,防止一些恶意用户非法扫描帐号库;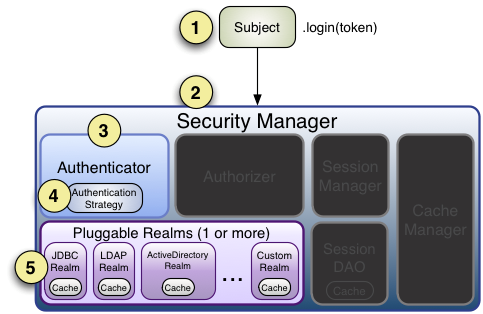
- 首先调用
Subject.login(token)进行登录,其会自动委托给Security Manager.login(this, token)进行认证; SecurityManager会委托给Authenticator进行身份验证;Authenticator才是真正的身份验证者,Authenticator会根据Realm的数量来分别执行不同认证流程;- 以单个
Realm为例,Authenticator会调用doSingleRealmAuthentication(reaml, token)来调用我们自己定义的Realm.doGetAuthenticationInfo(token) 方法; - 通过自定义的
Realm获取AuthenticationInfo对象,介绍参数:principal:用户信息,会设置到 Subject 对象中,用于授权等操作使用;credentials:密码信息,会与AuthenticationToken中的密码进行匹配完成认证;
- 如果获取
AuthenticationInfo时返回 null,会抛出 UnknownAccountException,意思是用户名错误; - 获取
AuthenticationInfo后调用assertCredentialsMatch(token, info)来进行密码的认证;
也就是说,Shiro 认证只会对密码进行匹配,对于账户的相关错误信息需要我们根据 token 查询数据库抛出异常或返回不正常的 **AuthenticationInfo** 对象声明。
说明:
其中 AuthenticationToken 是从网页前端得到的用户认证信息,AuthenticationInfo 是我们从数据库中查询出来的用户信息。
/*** 认证** @param authenticationToken 用户输入的认证信息* @return AuthenticationInfo 传递 principal(用户信息) credential(密码) 盐值等信息用于密码认证* @throws AuthenticationException e*/@Overrideprotected AuthenticationInfo doGetAuthenticationInfo(AuthenticationToken authenticationToken) throws AuthenticationException {log.info("执行认证~~~");UsernamePasswordToken token = (UsernamePasswordToken) authenticationToken;// 查询数据库SysUser user = userService.selectByUsername(token.getUsername());// 判断用户名if (Objects.isNull(user)) {// 如果返回 AuthenticationInfo 为空 会抛出异常 UnknownAccountException,表示用户名信息错误return null;}// shiro 进行密码认证, 第一个参数 principal(缓存对象)在授权时可以从 principals 集合中得到// return new SimpleAuthenticationInfo(user, user.getPassword(), "");/*传递账号和密码:参数1:缓存对象, 授权时可以通过参数PrincipalCollection得到参数2:明文密码, 用户输入的密码参数3:字节salt, 加密盐值参数4:当前DefinitionRealm名称*/return new SimpleAuthenticationInfo(user, user.getPassword(), ByteSource.Util.bytes(user.getSalt()), getName());}
对密码进行hash加密需要设置密码匹配器:DigestsUtil 为生成盐值和密文的工具类。
/*** 构造函数,指定密码匹配方式等*/public UserRealm() {// 指定密码匹配方式为sha1HashedCredentialsMatcher matcher = new HashedCredentialsMatcher(DigestsUtil.SHA1);// 指定密码迭代次数matcher.setHashIterations(DigestsUtil.ITERATIONS);// 使用父亲方法使匹配方式生效setCredentialsMatcher(matcher);}
public class DigestsUtil {public static final String SHA1 = "SHA-1";public static final Integer ITERATIONS = 512;/*** @param input 需要散列字符串* @param salt 盐字符串* @return* @Description sha1方法*/public static String sha1(String input, String salt) {return new SimpleHash(SHA1, input, salt, ITERATIONS).toString();}/*** @return* @Description 随机获得salt字符串*/public static String generateSalt() {SecureRandomNumberGenerator randomNumberGenerator = new SecureRandomNumberGenerator();return randomNumberGenerator.nextBytes().toHex();}/*** @param* @return* @Description 生成密码字符密文和salt密文*/public static Map<String, String> encryptPassword(String passwordPlain) {Map<String, String> map = new HashMap<>();String salt = generateSalt();String password = sha1(passwordPlain, salt);map.put("salt", salt);map.put("password", password);return map;}public static void main(String[] args) {// 生成密码123456的盐值和加密密文Map<String, String> stringStringMap = encryptPassword("123456");// password=ac9e5a212f96f614bd2f07e292a78bc4f144dd3e// salt=97b189201c85cd7994fbb5f04814f110System.out.println(stringStringMap);}}
授权
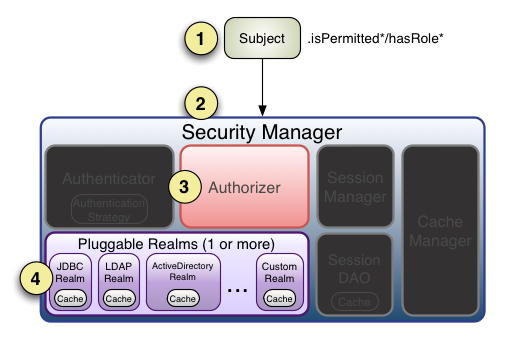
- 首先调用Subject.isPermitted/hasRole接口,其会委托给SecurityManager。
2、SecurityManager接着会委托给内部组件Authorizer;
3、Authorizer再将其请求委托给我们的Realm去做;Realm才是真正干活的;
4、Realm将用户请求的参数封装成权限对象。再从我们重写的doGetAuthorizationInfo方法中获取从数据库中查询到的权限集合。
5、Realm将用户传入的权限对象,与从数据库中查出来的权限对象,进行一一对比。如果用户传入的权限对象在从数据库中查出来的权限对象中,则返回true,否则返回false。
进行授权操作的前提:用户必须通过认证。
/*** 授权** @param principals 用户凭证信息,包装了doGetAuthenticationInfo 方法返回对象的第一个参数* 可以通过 getPrimaryPrincipal() 得到他* @return*/@Overrideprotected AuthorizationInfo doGetAuthorizationInfo(PrincipalCollection principals) {log.info("执行授权~~~");SimpleAuthorizationInfo info = new SimpleAuthorizationInfo();// 获取登陆用户信息SysUser user = (SysUser) principals.getPrimaryPrincipal();// 从数据库查询角色和权限List<String> roles = userService.selectRoles(user);List<String> permissions = userService.selectPermissions(user);// 构建角色权限校验info.addRoles(roles);info.addStringPermissions(permissions);return info;}

若有收获,就点个赞吧
0 人点赞
