一、Sqoop中的增量导入(Job模式)
1、删除我们sqoop中的lib下的hive-exec-xxx.jar
这个jar包之前是解决 mysql导入数据到hive ,缺少 HiveConf 的解决方案。
2、通过环境变量解决
思路:既然这两个jar包(hive-exec.jar hive-common.jar)影响到了我们,直接不要导入了,更改环境变量解决:
/etc/profile
export HADOOP_CLASSPATH=$HADOOP_CLASSPATH:$HIVE_HOME/lib/*
测试两个问题是否解决:
1、mysql 导入 hive 是否还报错?
2、创建job任务是否报错?
sqoop job --create jjoobb -- import --connect jdbc:mysql://bigdata01:3306/qfdb \--username root \--password 123456 \--table u2 \--delete-target-dir \--target-dir '/sqoopdata/u3' \-m 1
3、回归正题,我们希望通过job任务,实现自动的增量导入(不需要维护last-value)
sqoop import --connect jdbc:mysql://bigdata01:3306/qfdb \--username root \--password 123456 \--table sales_order \--driver com.mysql.jdbc.Driver \--target-dir hdfs://bigdata01:9820/sqoopdata/sales_order2/dt=2022 \--split-by orderId \-m 1 \--check-column orderId \--incremental append \--last-value 0 \--fields-terminated-by '\t'
sqoop job --create auto_import -- import --connect jdbc:mysql://bigdata01:3306/qfdb \--username root \--password 123456 \--table sales_order \--driver com.mysql.jdbc.Driver \--target-dir hdfs://bigdata01:9820/sqoopdata/sales_order2/dt=2023 \--split-by orderId \-m 1 \--check-column orderId \--incremental append \--last-value 0 \--fields-terminated-by '\t'
sqoop job --exec auto_import执行完,查看数据,是全量导入新增mysql数据,再次执行这个job任务,发现数据是增量导入,而是不需要我们指定last_value,它内部进行了记录。
导入数据的时候,可以指定hdfs的存储格式
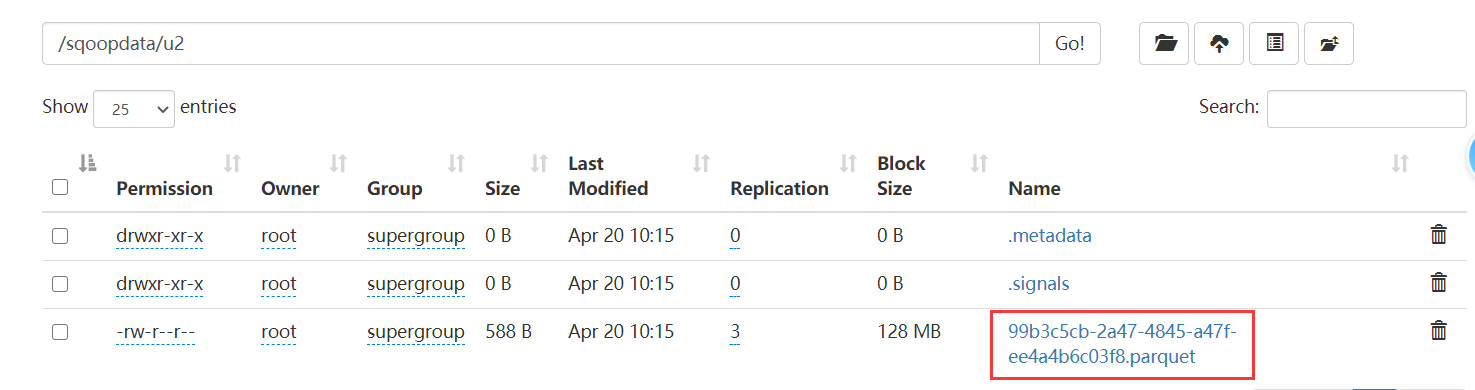
比如:mysql的数据,导入到hdfs时候,指定数据类型是parquet 格式:
sqoop import --connect jdbc:mysql://192.168.32.100:3306/qfdb \--username root \--password 123456 \--table u2 \--delete-target-dir \--target-dir 'hdfs://bigdata01:9820/sqoopdata/u2' \-m 1 \--fields-terminated-by '\t' \--null-string '\\N' \--null-non-string '0' \--as-parquetfile
二、Export 导出(从Hive导出到mysql)
步骤:
1、Hive中的有表有数据
create table if not exists par(`id` int,`age` int)row format delimited fields terminated by '\t'stored as parquetlocation '/sqoopdata/u2/';
因为我们的 hdfs中 /sqoopdata/u2 文件夹下已经有数据了,并且是parquet类型的,刚好跟hive表中的u2是一样的,所以u2表有数据了。
2、mysql中的有表
CREATE TABLE `par` (`id` int(11) NOT NULL DEFAULT '0',`age` int(1) DEFAULT NULL,PRIMARY KEY (`id`)) ENGINE=InnoDB DEFAULT CHARSET=utf8;
3、编写hive到mysql的导出语句:
sqoop export \--connect jdbc:mysql://bigdata01:3306/qfdb \--username root \--password 123456 \--table par \--hcatalog-database qfdb \--hcatalog-table par \-m 1
三、Flume的概念
介绍两个网站:
中文版的:https://flume.liyifeng.org/?flag=fromDoc#
英文版的:https://flume.apache.org/
Flume可以干什么?
比如:有一些日志文件,你需要进行分析,将这些日志文件,手动的提交到hdfs,hive进行分析。比如:监听某个文件夹,只要有新数据,就抽取出来,上传到hdfs上。Flume 就是 水管。一般使用在数据采集方面。Flume是一个数据采集工具,由cloudera公司开发,目前捐献给了apache,只有linux版本

Flume的体系结构: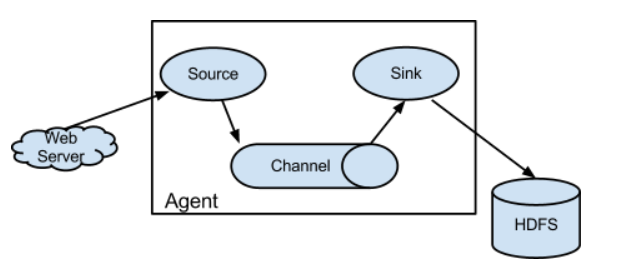
Agent是Flume的基本单位,代表一个水管。这个水管由三部分组成:Source: 对接水源Channel: 用于存储和流动,理解为水管本身。Sink: 代表下沉的数据的地方。其他概念:Event:一个数据单元,消息头和消息体组成。(Event 就代表一条数据)- selector:选择器,作用于source端,然后决定数据发往哪个目标。- interceptor:拦截器,flume允许使用拦截器拦截数据。允许使用拦截器链,作用于source和sink阶段。
四、Flume的安装
1、上传,解压,重命名
1、上传到 /home/soft 下面2、解压 tar -xvf apache-flume-1.9.0-bin.tar.gz -C /usr/local3、进入 /usr/local 修改名字 mv apache-flume-1.9.0-bin flume
2、配置环境变量 /etc/profile
export FLUME_HOME=/usr/local/flumeexport PATH=$PATH:$JAVA_HOME/bin:$HADOOP_HOME/sbin:$HADOOP_HOME/bin:$ZOOKEEPER_HOME/bin:$HIVE_HOME/bin:$SQOOP_HOME/bin:$FLUME_HOME/bin在path路径后面追加: $FLUME_HOME/bin然后刷新一下 source /etc/profile
3、修改flume-env.sh
进入 flume的家目录下的 conf下复制一份配置文件并修改名字:cp flume-env.sh.template flume-env.sh修改 flume-env.sh 的jdk路径:添加:export JAVA_HOME=/usr/local/jdk
4、验证环境
flume-ng version
 w
w
五、Flume的数据模型
六、关于Flume的配置的介绍
定义:
# list the sources, sinks and channels for the agent<Agent>.sources = <Source><Agent>.channels = <Channel1> <Channel2><Agent>.sinks = <Sink># set channel for source<Agent>.sources.<Source>.channels = <Channel1> <Channel2> ...# set channel for sink<Agent>.sinks.<Sink>.channel = <Channel1><Agent> 此处是agent的名字,随意命名 a1<Agent>.sources.<Source>.channels source可以对接多个channel,所以此处是复数。<Agent>.sinks.<Sink>.channel 后面只能跟一个,跟上面的sources对接的不一样。
案例:
# list the sources, sinks and channels for the agentagent_foo.sources = avro-appserver-src-1agent_foo.channels = mem-channel-1agent_foo.sinks = hdfs-sink-1# set channel for sourceagent_foo.sources.avro-appserver-src-1.channels = mem-channel-1# set channel for sinkagent_foo.sinks.hdfs-sink-1.channel = mem-channel-1
1、先定义三个组件的名字2、每个组件分别使用哪些配置3、每一个组件需要对接起来。source ---> channelsink --> channelsource 和 sink 没关系,不需要产生关联
七、Source 以及 Sink的常用类型
常见的source源:1)avro2) exec3) spooling directory4) Taildir5) Kafka6) syslog常见的channel:memory、kafka 、file常见的sink:hdfs、hive、hbase、logger、avro、file Roll、ES
八、实战
1、Avro+Memory+Logger
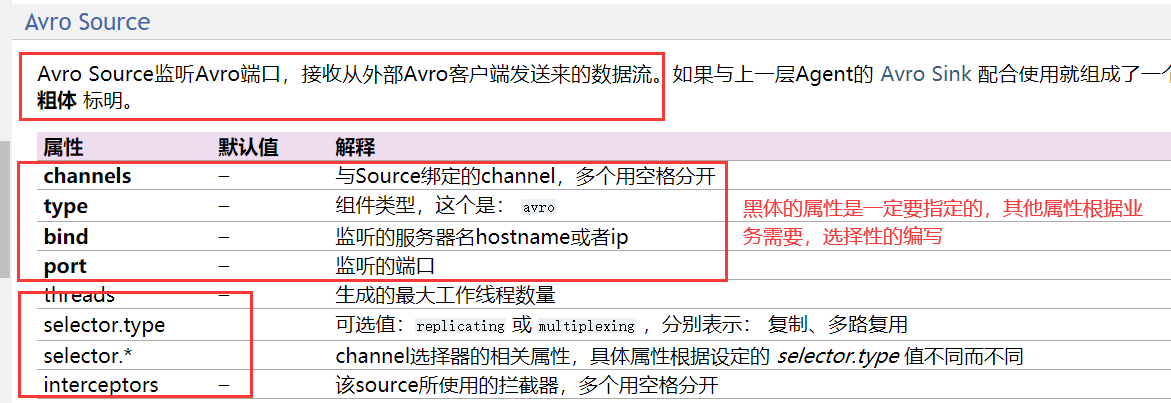
#声明名字a1.sources = r1a1.channels = c1#声明source的四个属性a1.sources.r1.type = avroa1.sources.r1.channels = c1a1.sources.r1.bind = localhosta1.sources.r1.port = 4141
看看channel 中的memory
a1.channels.c1.type = memory#剩余这两个都是非必须的a1.channels.c1.capacity = 10000a1.channels.c1.transactionCapacity = 10000
查看sink中的logger:
a1.sinks.k1.type = loggera1.sinks.k1.channel = c1
汇总出来的整体的任务就是:
步骤:
1、先定义三个组件的名字
2、每一个组件的属性指定一遍
3、三个组件进行拼接
a1.sources = r1
a1.channels = c1
a1.sinks = k1

#声明source的四个属性
a1.sources.r1.type = avro

a1.sources.r1.bind = localhost
a1.sources.r1.port = 4141

a1.channels.c1.type = memory
a1.channels.c1.capacity = 10000
a1.channels.c1.transactionCapacity = 10000

a1.sinks.k1.type = logger

a1.sources.r1.channels = c1
a1.sinks.k1.channel = c1
编写对应的文件:
在flume的文件夹下,创建一个文件夹 flumeconf ,然后编写 avro_logger.conf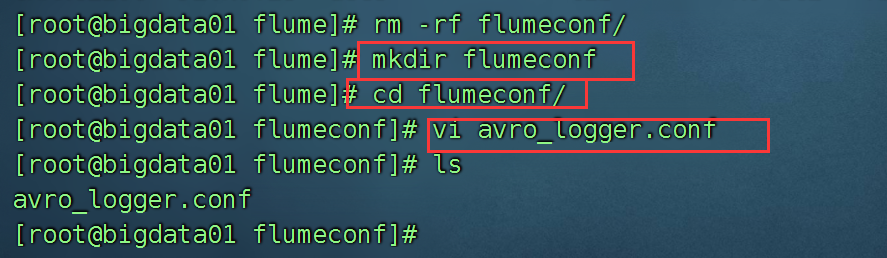
测试我们的脚本,看是否可以传递数据。
flume-ng agent -c /usr/local/flume/conf -f ./avro_logger.conf -n a1 -Dflume.root.logger=INFO,console
-c  后面指定的是flume的配置文件的文件夹
-f  后面跟上你编写的脚本的名字
-n  后面跟上agent 的名字
-Dflume.root.logger=INFO,console
INFO 代表日志输出级别 (debug,info,warn,error)
console 代表的是控制台,也可以选择 File
通过avro-client 给 某个ip的4141端口发送消息。
flume-ng avro-client -c /usr/local/flume/conf/ -H localhost -p 4141 -F ./a.txt

2、Exec + Memory + HDFS
exec当做source,参数:
hdfs当做sink的参数:
编写第一版的文件:exec_hdfs.conf
a1.sources = r1
a1.channels = c1
a1.sinks = k1
#声明source的四个属性
a1.sources.r1.type = exec
a1.sources.r1.command = tail -f /root/flumedata/a.txt
a1.channels.c1.type = memory
a1.channels.c1.capacity = 10000
a1.channels.c1.transactionCapacity = 10000
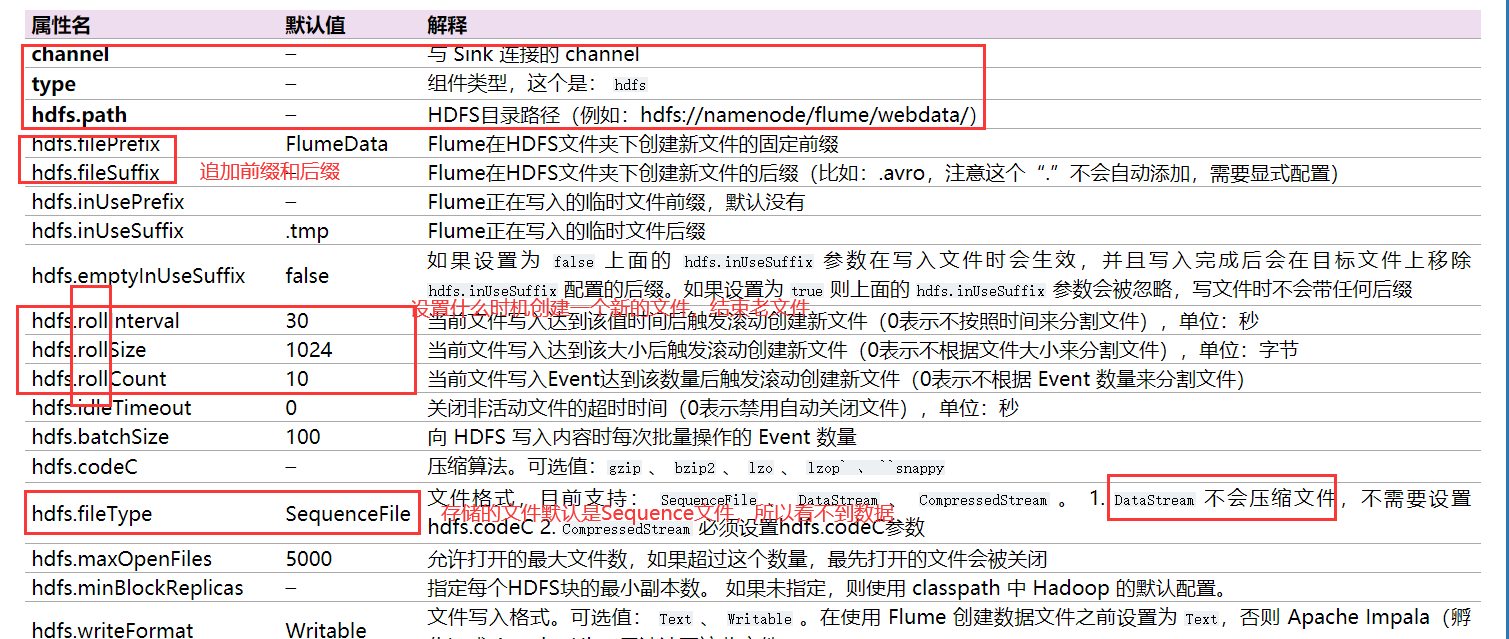
a1.sinks.k1.type = hdfs
a1.sinks.k1.hdfs.path = hdfs://bigdata01:9820/flume/data
a1.sources.r1.channels = c1
a1.sinks.k1.channel = c1
执行命令:
flume-ng agent -c ../conf -f ./exec_hdfs.conf -n a1 -Dflume.root.logger=INFO,console

可以将上面的文件进行一个升级:
#定义各个组件的名字
a1.sources=r1
a1.channels=c1
a1.sinks=k1
a1.sources.r1.type=exec
a1.sources.r1.command=tail -F /root/flumedata/a.txt
a1.channels.c1.type=memory
#通道中可以保存的最大事件数量
a1.channels.c1.capacity=1000
#通道从一个source可以获取的最大事件数量或者每个事务中给一个sink的最大事件数量
a1.channels.c1.transactionCapacity=100
a1.sinks.k1.type=hdfs
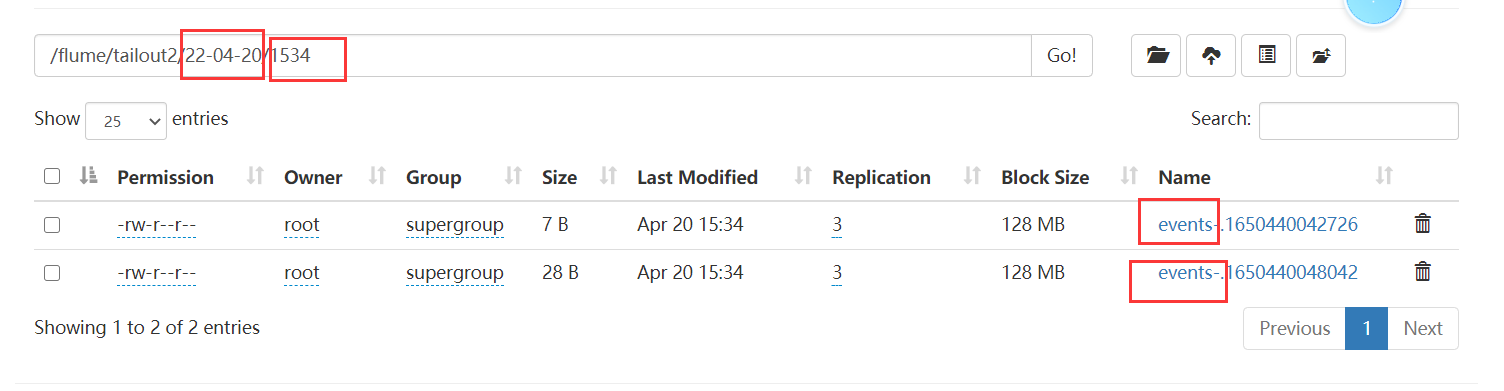
a1.sinks.k1.hdfs.path=hdfs://bigdata01:9820/flume/tailout2/%y-%m-%d/%H%M/
#设置文件的前缀
a1.sinks.k1.hdfs.filePrefix=events-
#时间戳是否四舍五入
a1.sinks.k1.hdfs.round=true
#时间戳舍入的最高位数
a1.sinks.k1.hdfs.roundValue=10
#时间戳舍入的单位
a1.sinks.k1.hdfs.roundUnit=second
#设置滚动的条件(关闭当前文件,开启新文件)---3秒钟滚动一次
a1.sinks.k1.hdfs.rollInterval=3
#设置滚动的条件---20字节
a1.sinks.k1.hdfs.rollSize=20
#设置滚动的条件---5个事件
a1.sinks.k1.hdfs.rollCount=5
#刷新进hdfs的事件数量
a1.sinks.k1.hdfs.batchSize=100
#是否使用本地时间戳(自定义拦截器中)---true是使用本地的
a1.sinks.k1.hdfs.useLocalTimeStamp=true
a1.sinks.k1.hdfs.fileType=DataStream
a1.sources.r1.channels=c1
a1.sinks.k1.channel=c1
执行:
flume-ng agent -c ../conf -f ./exec_hdfs_plus.conf -n a1 -Dflume.root.logger=INFO,console
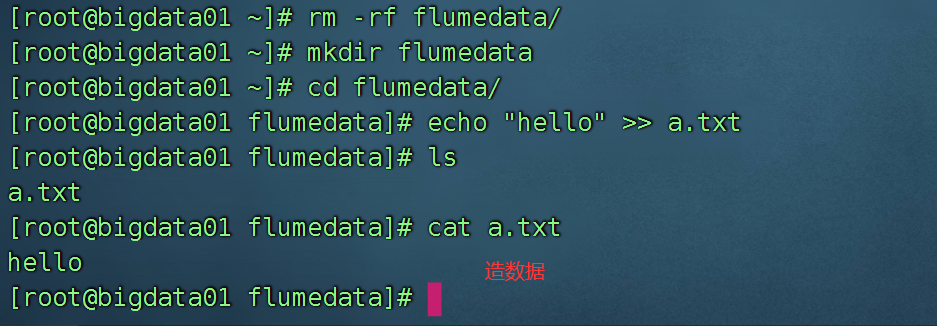
接着不断的向我们的a.txt中输入值:
echo "hello" >> a.txt
3、案例三 Spool +File + HDFS
a1.sources = r1
a1.channels = c1
a1.sinks = k1

a1.sources.r1.type = spooldir
a1.sources.r1.spoolDir = /root/flumedata/input/


a1.channels.c1.type = file
a1.channels.c1.checkpointDir = /root/flumedata/checkpoint
a1.channels.c1.dataDirs = /root/flumedata/data


a1.sinks.k1.type = hdfs
a1.sinks.k1.hdfs.path = hdfs://bigdata01:9820/flume/spooldir
a1.sinks.k1.hdfs.filePrefix =

a1.sinks.k1.hdfs.fileSuffix= .log
a1.sinks.k1.hdfs.rollInterval=60
a1.sinks.k1.hdfs.fileType=DataStream
a1.sinks.k1.hdfs.writeFormat=Text


a1.sources.r1.channels = c1
a1.sinks.k1.channel = c1
运行起来:
flume-ng agent -c ../conf/ -f ./spool_file_hdfs.conf -n a1 -Dflume.root.logger=INFO,console
操作:
监听的是一个文件夹里的数据,我就不断的创建新的文件,flume就将新的文件上传到hdfs.
结果:
思考:如果我将文件夹里面的数据修改了,能上传吗?
a.txt 里面 aaa 追加了一些新的数据,hello world 能上传吗?
结论: spool 这个source源,只能监听文件夹中是否有新的文件需要上传,不会监听哪个文件修改了。所以如果需要监听哪个文件修改了,继续上传,可以选择 tailDir 源。
Taildir Source监控指定的一些文件,并在检测到新的一行数据产生的时候几乎实时地读取它们,如果新的一行数据还没写完,Taildir Source会等到这行写完后再读取。
4、案例四 tailDir + Memory + HDFS
编写conf , taildir_hdfs.conf
a1.sources = r1
a1.channels = c1
a1.sinks = s1

a1.sources.r1.type = TAILDIR
a1.sources.r1.filegroups = f1
a1.sources.r1.filegroups.f1 = /root/flumedata/input/.*log.*


a1.channels.c1.type=memory
a1.channels.c1.capacity=1000
a1.channels.c1.transactionCapacity=100

a1.sinks.s1.type=hdfs
a1.sinks.s1.hdfs.path=hdfs://bigdata01:9820/flume/taildir/
a1.sinks.s1.hdfs.filePrefix=laoyan
a1.sinks.s1.hdfs.fileSuffix=.log
a1.sinks.s1.hdfs.rollInterval=60
a1.sinks.s1.hdfs.fileType=DataStream
a1.sinks.s1.hdfs.writeFormat=Text

a1.sources.r1.channels=c1
a1.sinks.s1.channel=c1
操作:
不断的在a.log 文件中添加新的内容,而不是一直创建新的文件,发现修改过的数据都会上传到hdfs中。
切记:hdfs不要上传大量小文件,每一个小文件都是一个块,块信息会占用150个字节的内存,导致namenode 的内存数据很大,不好。

九、拦截器
flume中有很多个默认的拦截器,也可以自定义拦截器。
在执行过程中,可以有多个拦截器,它们形成一个链条,一 一执行。
常见的拦截器:
1. Timestamp Interceptor :时间戳拦截器,将当前时间戳(毫秒)加入到events header中,key名字为:timestamp,值为当前时间戳。用的不是很多
2. Host Interceptor:主机名拦截器。将运行Flume agent的主机名或者IP地址加入到events header中,key名字为:host(也可自定义)
3. Static Interceptor:静态拦截器,用于在events header中加入一组静态的key和value。
a1.sources = r1
a1.channels = c1
a1.sinks = s1

a1.sources.r1.type=http
a1.sources.r1.bind = bigdata01
a1.sources.r1.port = 6666

a1.sources.r1.interceptors=i1 i2 i3
a1.sources.r1.interceptors.i1.type=timestamp
#如果拦截器中已经有了时间戳,直接替换成现在的
a1.sources.r1.interceptors.i1.preserveExisting=false
a1.sources.r1.interceptors.i2.type=host
a1.sources.r1.interceptors.i2.preserveExisting=false
a1.sources.r1.interceptors.i2.useIP=true
a1.sources.r1.interceptors.i2.hostHeader=hostname
a1.sources.r1.interceptors.i3.type=static
a1.sources.r1.interceptors.i3.preserveExisting=false
a1.sources.r1.interceptors.i3.key=hn
a1.sources.r1.interceptors.i3.value=qianfeng01

a1.channels.c1.type=memory
a1.channels.c1.capacity=1000
a1.channels.c1.transactionCapacity=100

a1.sinks.s1.type=hdfs
a1.sinks.s1.hdfs.path=hdfs://bigdata01:9820/flume/%Y/%m/%d/%H%M
a1.sinks.s1.hdfs.filePrefix=%{hostname}
a1.sinks.s1.hdfs.fileSuffix=.log

a1.sinks.s1.hdfs.rollInterval=60
a1.sinks.s1.hdfs.fileType=DataStream
a1.sinks.s1.hdfs.writeFormat=Text
a1.sinks.s1.hdfs.round=true
a1.sinks.s1.hdfs.roundValue=10
a1.sinks.s1.hdfs.roundUnit=second
a1.sinks.s1.hdfs.useLocalTimeStamp=true

a1.sources.r1.channels=c1
a1.sinks.s1.channel=c1
启动:
flume-ng agent -c ../conf -f ./ts.conf -n a1 -Dflume.root.logger=INFO,console
测试:
curl -X POST -d '[{"headers":{"hn":"qianfeng01","pwd":"123456"},"body":"this is my content qianfeng01"}]' http://bigdata01:6666

若有收获,就点个赞吧
0 人点赞
