一、MySQL的索引
1、索引的概念
你去图书馆借书,一般会先去一台电脑上查询这个书在哪里,然后知道了书的具体位置,再查找。每一个字典都有目录,根据目录可以快速查找到我们想要的单词。索引类似于我们的目录,我们每次查询数据的时候,先从索引中查找,然后再定位数据。索引就是帮我们查找mysql中数据的目录。使用索引查找数据速度显著提升。select * from student where stu_id = 100; // 10s加了索引,stu_id 为索引之后,速度可以提升近10倍。意味着:我们在创建表的时候,在合适的字段上添加索引可以大大提升我们的查询速度。
2、索引的优缺点
优点:
  1、查询速度显著提升。如果不适用索引,查询就是从第一行数据开始查找,直到你的想要的数据全部出现为止。
缺点:
  1、额外占用空间  (字典:目录(20页) 数据 500页)
  2、不要在没必须要的字段上添加索引,浪费空间并且影响了插入修改删除的效率。
3、创建索引的原则
适合使用索引的地方:
1、在经常需要查询的列上,可以添加索引
   // phone 经常性的当做查询的条件,我们可以将phone这个列设置索引。
   select * from student where phone='12232131232';
2、在经常进行连接的列上,可以添加索引 // 可以将emp表中的deptno 设置为索引列
   select * from emp ,dept where emp.deptno= dept.deptno;
3、在进行范围查找的列上,可以添加索引
   select * from student where score between 20 and 30;
4、在经常进行排序的列上,添加索引
    select * from student order by score desc;

总而言之:经常使用到的列就可以设置为索引列。可以提高效率。

不适合使用索引的地方:
1、在不经常使用的搜索列上。
   select * from student where address='河南郑州';
2、对于重复性数据较多的列,不要添加
   select * from student where gender ='male';
3、当一个列经常性的进行修改的话,不适合作为列
  select * from user where money  between 100 and 500;
4、索引的分类
1) 主键索引 所有的主键都是一种索引,天然的。
2) 唯一索引 将一个类设置为unique ,这种设置也是一种索引。
3) 普通索引 表中的普通类,可以设置为普通索引
4) 全文索引 知道有这个索引就行了。
根据索引是否为一列数据,可以分为 单列索引 和 复合索引(联合索引)
5、创建删除索引SQL
1) 创建索引的SQL
create table  sc01 (
   sid int primary key,
   sname varchar(20) ,
   score int,
   index(score)
);

// int 类型不指定 ,长度为11
//  varchar 类型不能不指定长度,否则报错

2)查看索引
show index from sc01;
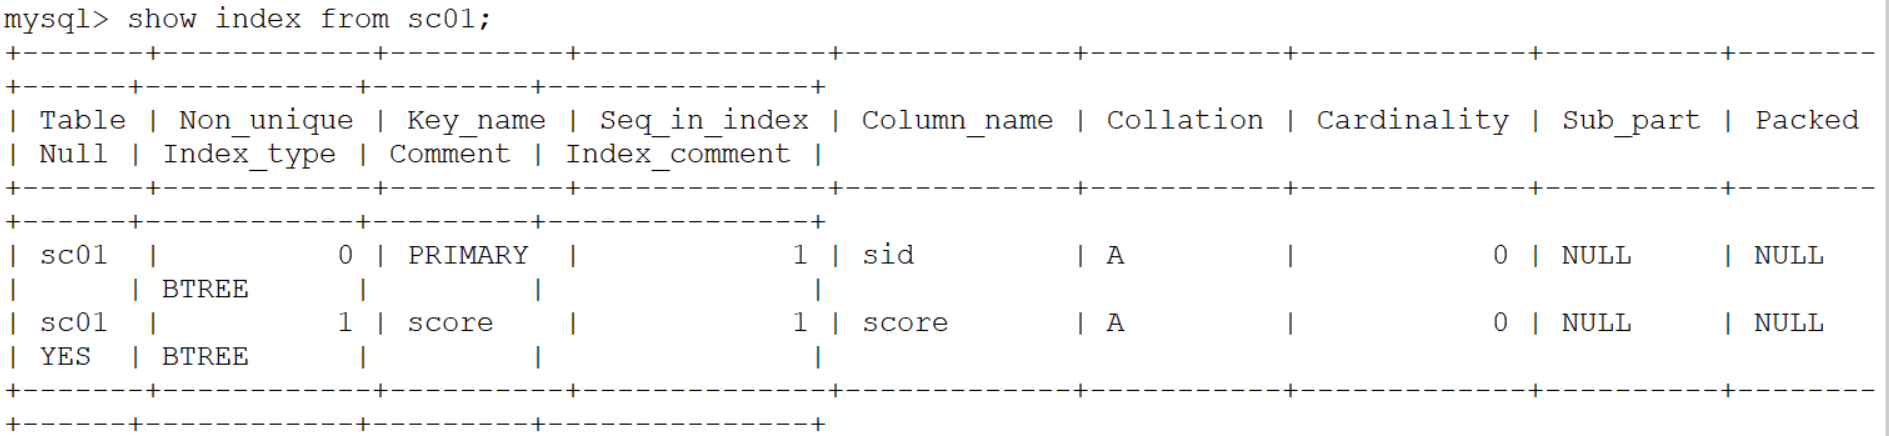
3) 删除索引
alter table sc01 drop primary key;// 删除主键索引
alter table sc01 drop index score;// 删除唯一索引和普通索引都是这一个语句
4) 如果创建表的时候,没有指定索引,能够在后期创建表结束后追加索引呢?
create table  sc02 (
   sid int primary key,
   sname varchar(20) ,
   score int
);

alter table sc02 add primary key (sid);  // 设置主键索引,跟之前添加主键一个样
alter table sc02 add unique(sname); // 设置唯一索引,跟之前添加unique 约束,一个样
alter table sc02 add index idx_score(score); // 创建普通索引,需要给一个索引的名字,索引的名字,一般都是idx_
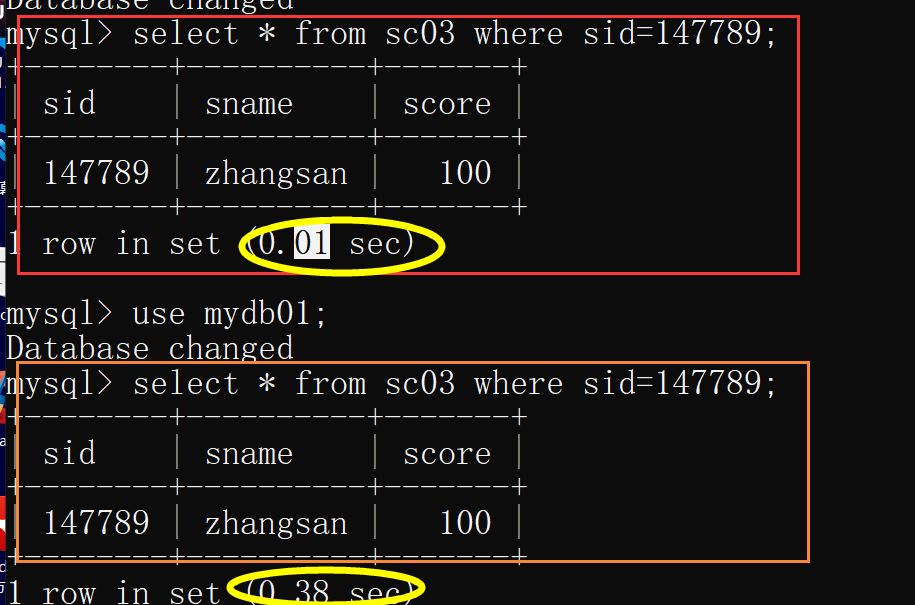
6、索引的效率测试
创建数据,来500000条数据:
create table sc03 (
sid int primary key,
sname varchar(20) ,
score int
);
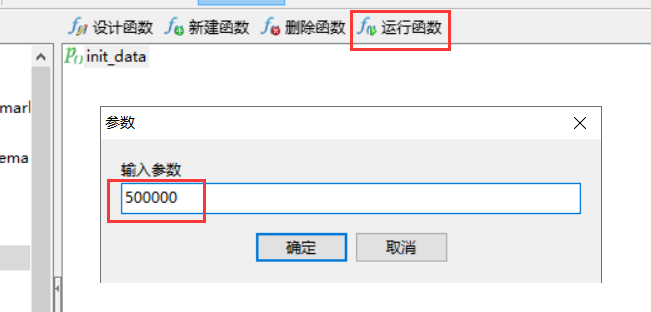
通过存储过程插入想要的条数:
-- 创建存储过程
drop procedure if exists `init_data`;
delimiter ;;
create procedure `init_data` (data_count int)
begin
declare i int default 0;
while i < data_count do
insert into `sc03` values (i, 'zhangsan', round((rand() * 100)));
set i = i + 1;
end while;
end;;
delimiter ;
索引的数据结构:
7、覆盖索引—SQL优化
// 比如我们的score 这个字段是索引字段:
select * from student ;
// 不如下面的写法
select score from student  ;

覆盖索引的概念:
查询的字段刚好是我索引中字段,这样的查询语句会用到覆盖索引这样
我们查询数据的时候会先从索引树中查找,如果你要的数据,在索引树中都可以得到,此时数据库就不会去表中查找了,这种情况我们称之为使用了覆盖索引。

SQL优化有一条建议:不要动不动就查所有字段*, 而是想要什么字段就查什么字段,这样的话有可能使用到覆盖索引。
select sname,score from student;
sname 不是索引字段,score 是索引字段,以上语句不会用到覆盖索引。
8、最佳左前缀法则
也属于SQL优化中的重要部分:
create table  sc03 (
   sid int primary key,
   sname varchar(20) ,
   score int
);
alter table sc add idx_sid_sname (sid,sname) ;// 两个以上字段组成的索引是联合索引。
// 其实我们创建出来了两个索引值:(sid) (sid,sname)

alter table sc add idx_sid_sname_score (sid,sname,score) ;
// 此时其实我创建了三个索引值  (sid)(sid,sname) (sid,sname,score);

select * from sc where sid = 9999 and sname ='zhangsan';// (sid,sname)
// 虽然顺序发生了变化,但是sql语句在执行的时候,会将我们写乱的顺序,进行优化
select * from sc where  sname ='zhangsan' and  sid = 9999 and score=100 ;//(sid,sname,score)
select * from sc where   sid = 9999 and  sname ='zhangsan' and score=100  ;//(sid,sname,score)
select * from sc where   sname ='zhangsan' and score=100  ;// 没有使用到任何的索引

select * from sc where   sid = 9999  and score=100  ;// (sid)
二、JDBC操作(了解)
mysql 是一个服务,Navicat 是 mysql 的客户端,通过命令操作mysql的。
我们的MySQL还可以使用java语言操作mysql。 这样的技术是整个java代码操作mysql 的基础 —>JDBC
操作步骤如下:
1、注册驱动
2、创建数据库连接
3、执行SQL
4、返回结果集
5、关闭连接
实战
第一步,创建一个java工程
第二步:导入mysql的驱动包(java提供了一些技术上的接口,并没有实现这些接口,所有的数据库厂商各自提供接口的实现类)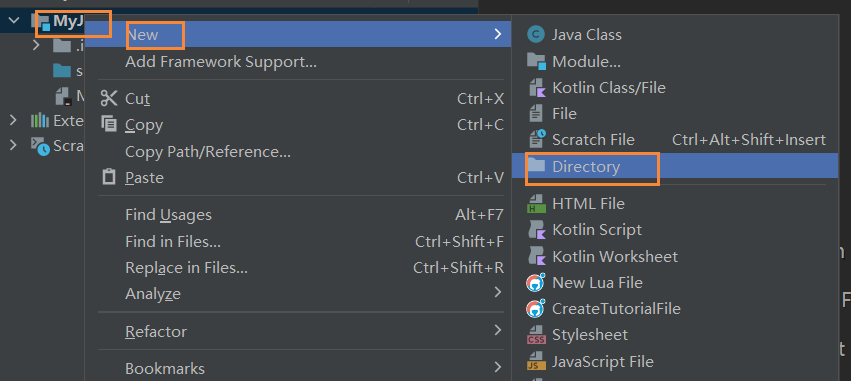
创建一个文件夹lib ,接着将我们的数据库驱动包拷贝进去,右键将lib 整个文件夹放入添加到library 中。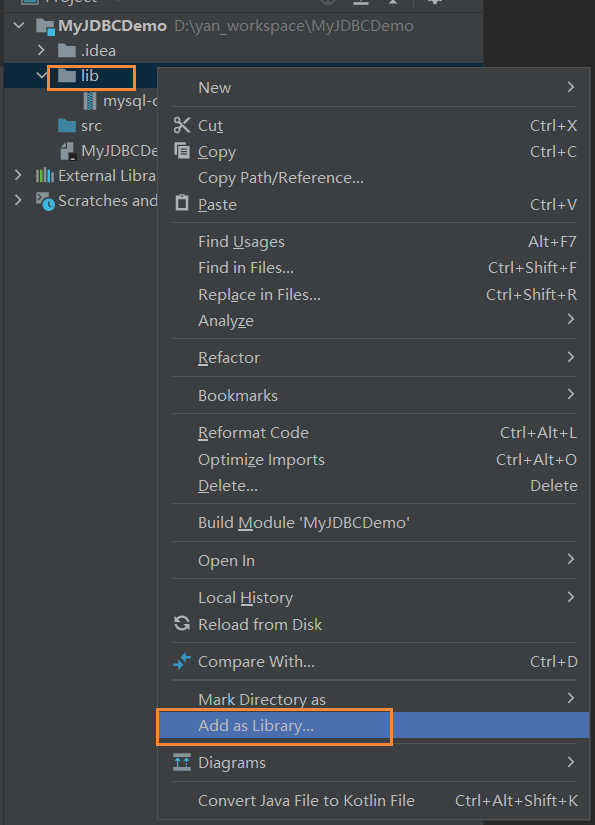
以上操作就称之为 —— 导包
补充:如果想删除项目中的jar包:

第三步:编写代码
package com.qfedu.jdbc;

import java.sql.Connection;
import java.sql.DriverManager;
import java.sql.SQLException;
import java.sql.Statement;

/**
 * @Author laoyan
 * @Description TODO
 * @Date 2022/3/29 11:41
 * @Version 1.0
 */
public class JdbcTest {

    public static void main(String[] args)  {

        /*
            1、注册驱动
            2、创建数据库连接
            3、执行SQL
            4、返回结果集
            5、关闭连接
         */
        Connection connection =null;
        Statement statement = null;
        try {
            //1、注册驱动
            Class.forName("com.mysql.jdbc.Driver");
            //2、创建数据库连接
            connection = DriverManager.getConnection("jdbc:mysql://localhost:3306/mydb01?user=root&password=123456&useUnicode=true&characterEncoding=UTF-8");
            //3、执行插入语句 DML
            String sql = "insert into sc01 values(3,'李四',90)";
            statement = connection.createStatement();
            // 4、返回执行结果
            int num = statement.executeUpdate(sql);// 执行SQL语句
            System.out.println(num>0 ? "插入成功":"插入失败");
        }catch (Exception e){
            e.printStackTrace();
        }finally {
            try {
                // 关闭数据库连接
                if(statement != null){
                    statement.close();
                }
                if(connection != null){
                    connection.close();
                }


            } catch (SQLException e) {
                e.printStackTrace();
            }


        }
    }
}
jdbc:mysql://localhost:3306/mydb01?user=root&password=123456&useUnicode=true&characterEncoding=UTF-8
jdbc:mysql://  这个是协议
 localhost  主机IP
 mydb01  -- 数据库名字
 ?后面的都是参数  各个参数用 & 连接
 user=root   账号
 password=123456  密码
 useUnicode=true&characterEncoding=UTF-8  设置写入时的字符集,解决中文乱码问题 插入数据时的中文乱码
JDBC技术是所有的 可以操作我们数据库的 框架的基础。
企业中可以操作数据库的框架有哪些?DBUtils,JdbcTemplate,Hibernate,MyBatis,MyBatis Plus,JPA 等一堆框架。
通过以上的演示—java代码是可以操作mysql 的。
继续:使用Jdbc查询数据:
package com.qfedu.jdbc;

import java.sql.*;

/**
 * @Author laoyan
 * @Description TODO
 * @Date 2022/3/29 11:41
 * @Version 1.0
 */
public class JdbcTest2 {

    public static void main(String[] args)  {

        /*
            1、注册驱动
            2、创建数据库连接
            3、执行SQL
            4、返回结果集
            5、关闭连接
         */
        Connection connection =null;
        Statement statement = null;
        ResultSet resultSet = null;
        try {
            //1、注册驱动
            Class.forName("com.mysql.jdbc.Driver");
            //2、创建数据库连接
            connection = DriverManager.getConnection("jdbc:mysql://localhost:3306/mydb01?user=root&password=123456&useUnicode=true&characterEncoding=UTF-8");
            //3、执行插入语句 DML
            String sql = "select * from sc01";
            statement = connection.createStatement();
            // 4、返回执行结果
             resultSet = statement.executeQuery(sql);
            while(resultSet.next()){
                String sname = resultSet.getString("sname");
                int score = resultSet.getInt("score");
                System.out.println(sname + "," + score);
            }
        }catch (Exception e){
            e.printStackTrace();
        }finally {
            try {

                if(resultSet != null){
                    resultSet.close();
                }
                // 关闭数据库连接
                if(statement != null){
                    statement.close();
                }
                if(connection != null){
                    connection.close();
                }


            } catch (SQLException e) {
                e.printStackTrace();
            }


        }
    }
}
可以将常用的JDBC操作封装为工具类:
在src下,创建db.properties
driverName=com.mysql.jdbc.Driver
url=jdbc:mysql://localhost:3306/mydb01?useUnicode=true&characterEncoding=UTF-8
userName=root
password=123456
package com.qfedu.jdbc;

import java.io.IOException;
import java.io.InputStream;
import java.sql.*;
import java.util.Properties;

/**
 * @Author laoyan
 * @Description TODO
 * @Date 2022/3/29 14:24
 * @Version 1.0
 */
public class DBUtils {

    private static String driverName;
    private static String url;
    private static String userName;
    private static String password;
    // 静态代码块
    static{
        // IO流  Map中的一员,HashTable 的子类
        Properties properties = new Properties();

        InputStream inputStream = DBUtils.class.getClassLoader().getResourceAsStream("db.properties");
        try {
            properties.load(inputStream);
            // properties 中有值了
            driverName= properties.getProperty("driverName");
            url= properties.getProperty("url");
            userName= properties.getProperty("userName");
            password= properties.getProperty("password");
            /*System.out.println(driverName);
            System.out.println(url);
            System.out.println(userName);
            System.out.println(password);*/
            // 注册驱动
            Class.forName(driverName);
        } catch (Exception e) {
            e.printStackTrace();
        }
    }

    // 获取数据库连接
    public static Connection getConnection(){
         Connection connection = null;
        try {
            connection= DriverManager.getConnection(url, userName, password);
        } catch (SQLException e) {
            e.printStackTrace();
        }
        return connection;
    }

    // 用完之后要关闭数据库连接
    public static void close(ResultSet resultSet, Statement statement,Connection connection){

        try {

            if(resultSet != null){
                resultSet.close();
            }
            // 关闭数据库连接
            if(statement != null){
                statement.close();
            }
            if(connection != null){
                connection.close();
            }

        } catch (SQLException e) {
            e.printStackTrace();
        }
    }

}
测试工具类:
package com.qfedu.jdbc;

import java.sql.Connection;
import java.sql.ResultSet;
import java.sql.SQLException;
import java.sql.Statement;

/**
 * @Author laoyan
 * @Description TODO
 * @Date 2022/3/29 14:41
 * @Version 1.0
 */
public class TestDBUtils {

    public static void main(String[] args) throws SQLException {
        Connection connection = DBUtils.getConnection();
        Statement statement = connection.createStatement();
        ResultSet resultSet = statement.executeQuery("select * from sc01");
        while(resultSet.next()){
            String sname = resultSet.getString("sname");
            int score = resultSet.getInt("score");
            System.out.println(sname + "," + score);
        }
        DBUtils.close(resultSet,statement,connection);
    }
}
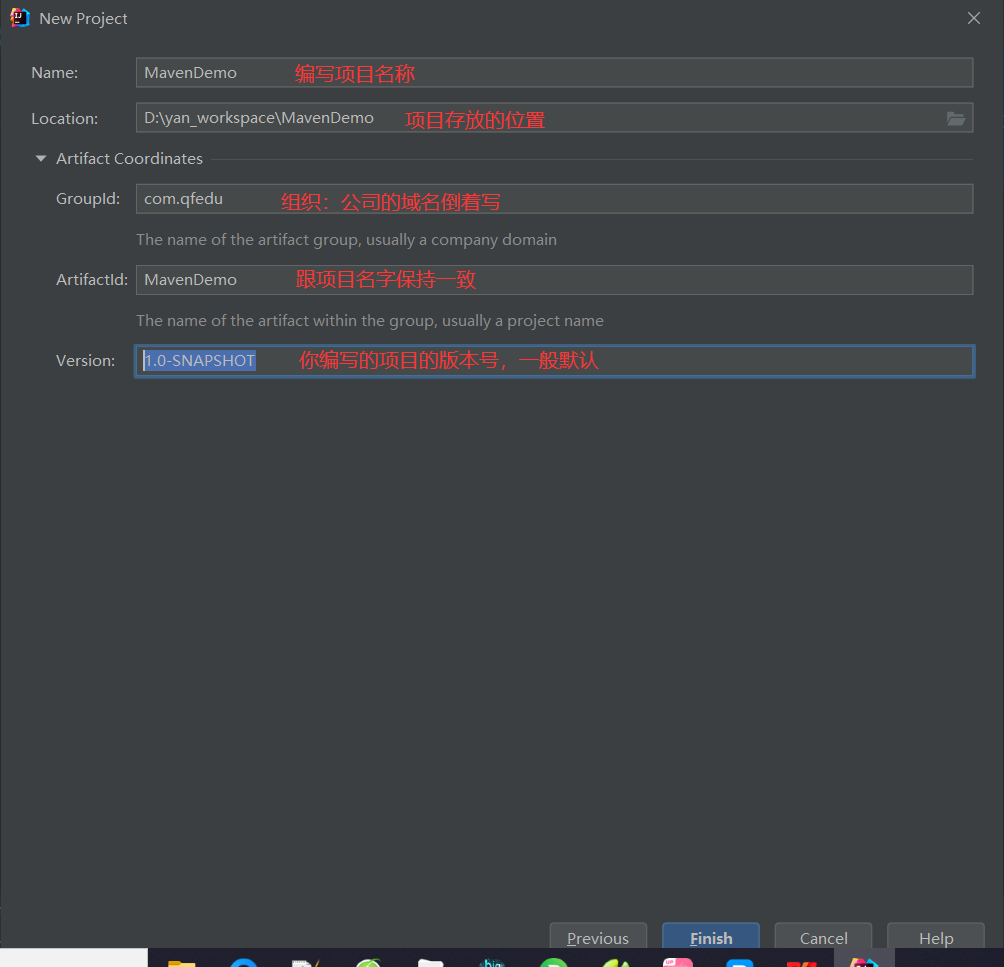
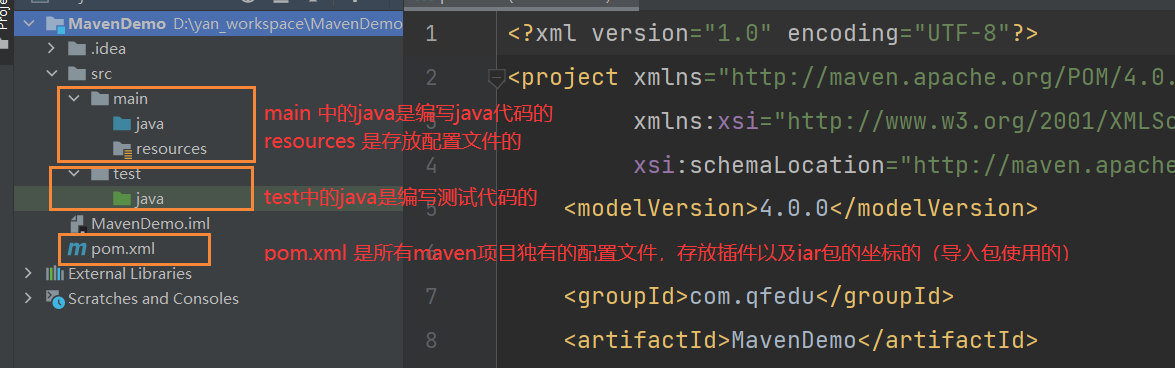
三、Maven(重点)
1、Maven的作用:
1)依赖管理【管理jar包】
2)项目构建 【管理项目的 创建项目,测试项目,打包项目,发布项目,编译项目,清理项目】
2、Maven的使用
https://maven.apache.org/download.cgi
第一步:安装jdk ,确保电脑上已经存在jdk
第二步:下载,解压,解压到非中文路径下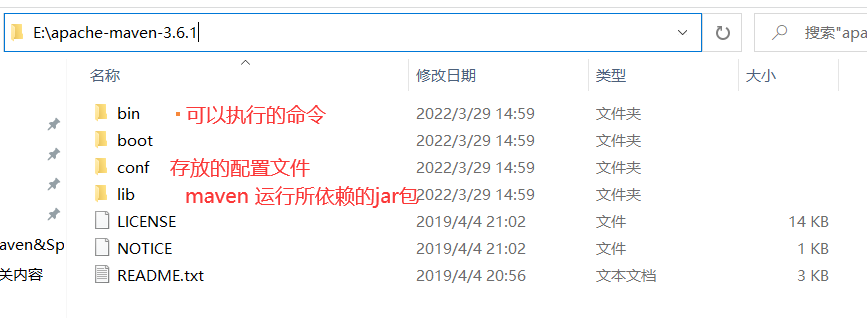
第三步:配置环境变量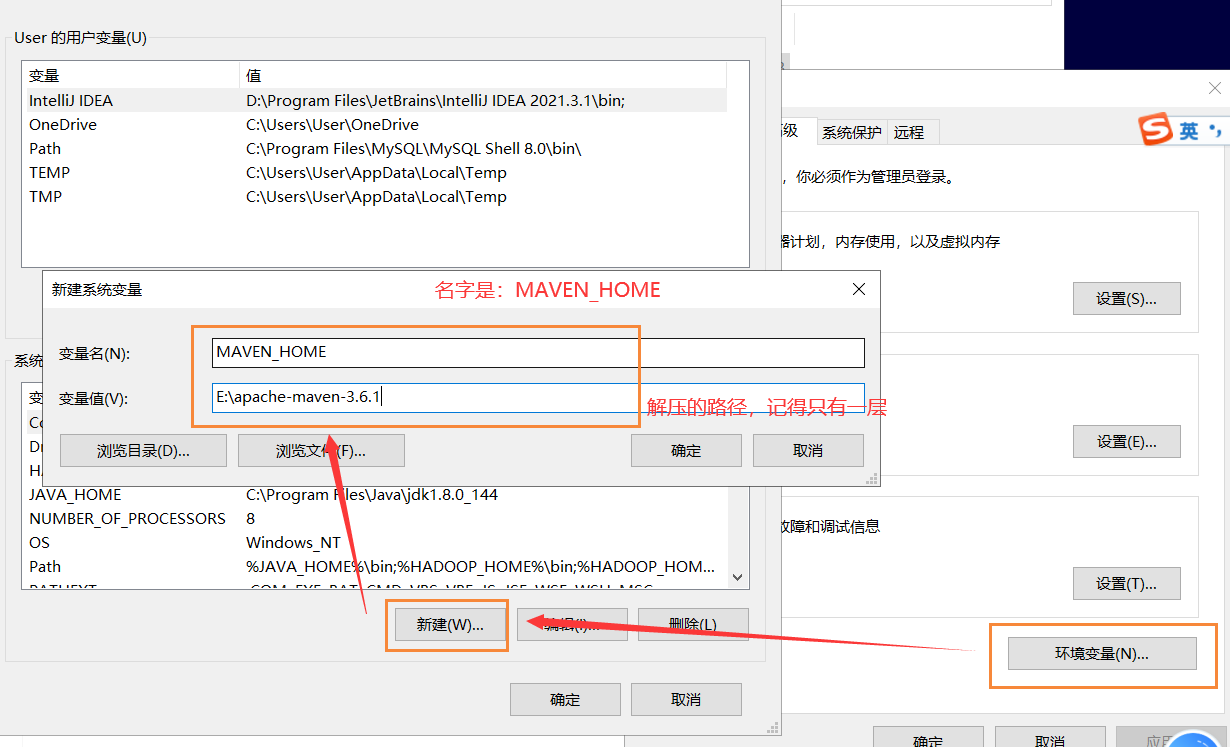
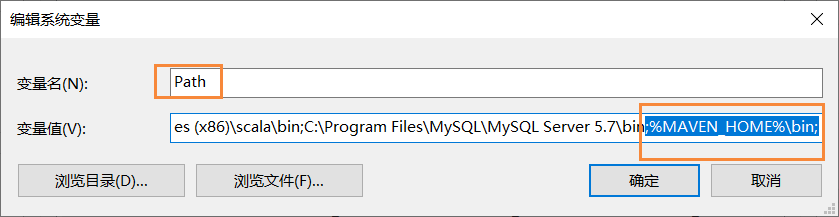
%MAVEN_HOME%\bin;
在cmd黑窗口中,输入 mvn -v 显示如下内容,说明没有问题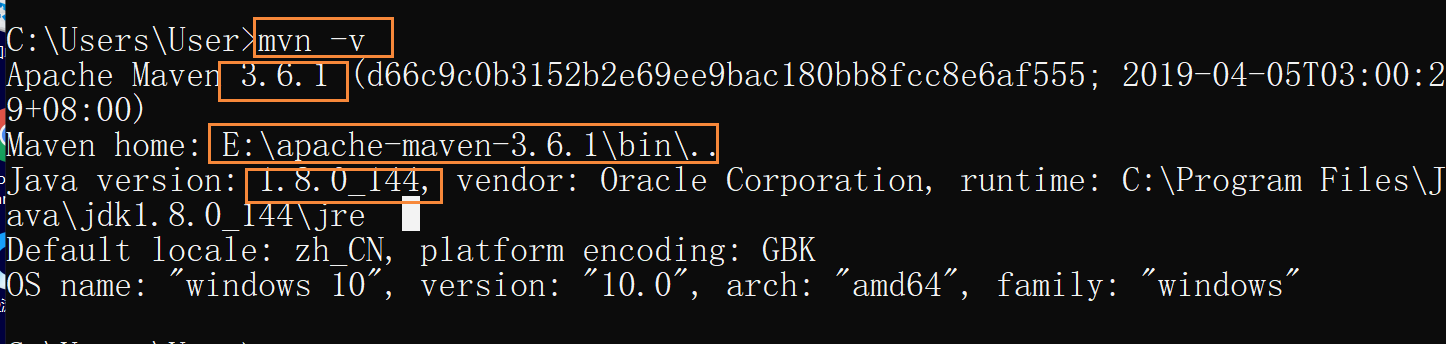
第四步: 新解压的maven,建议把下面的内容重新配置一下:
打开conf 下的 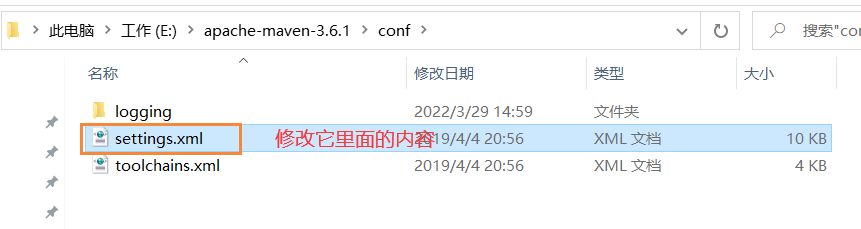
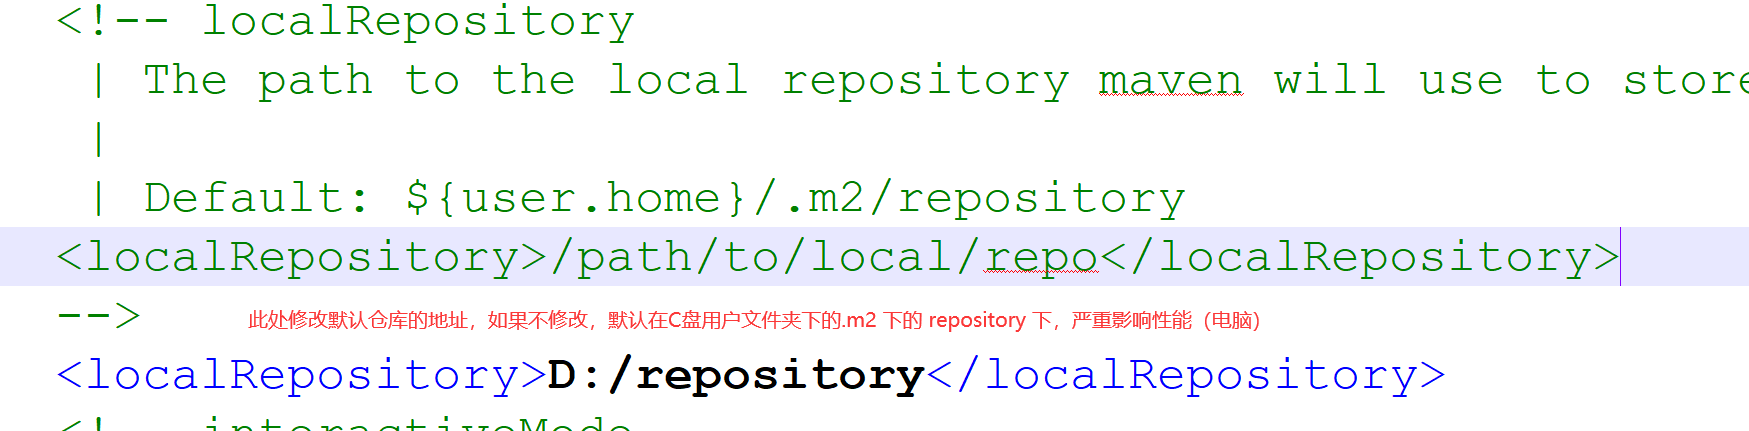
1) 修改默认仓库地址
<localRepository>D:/repository</localRepository>
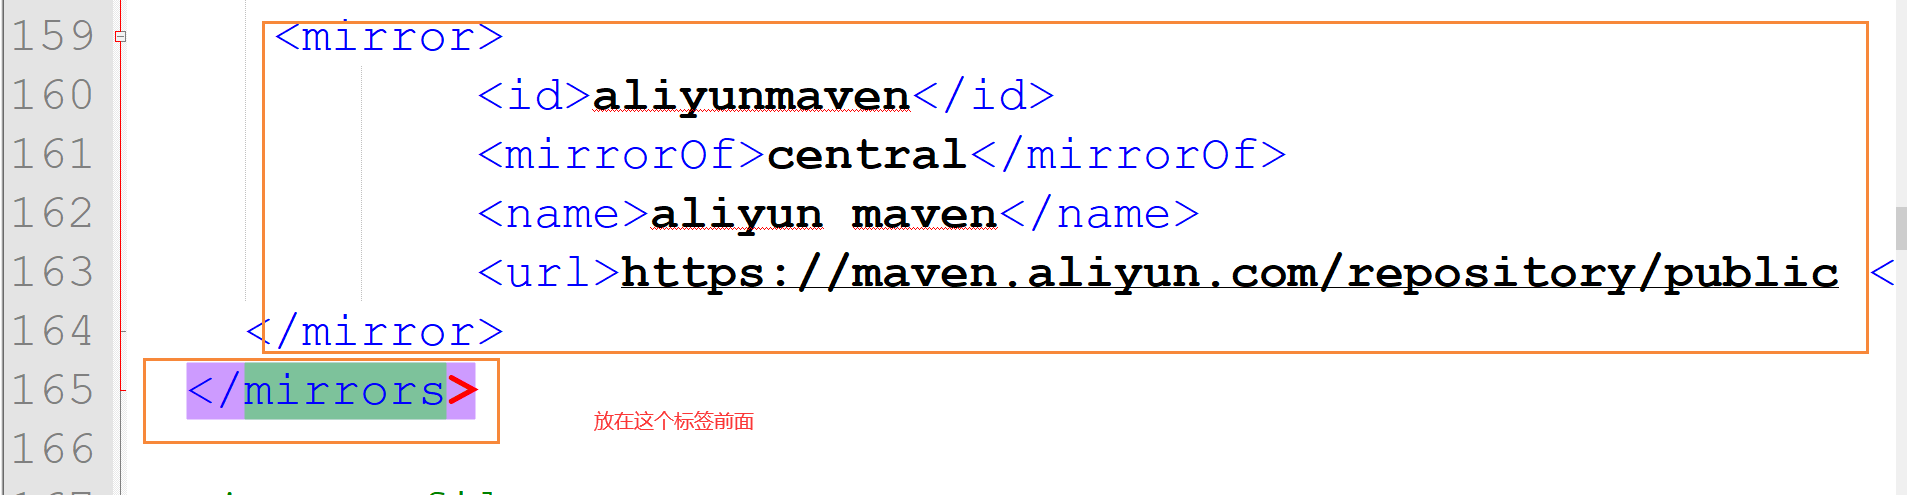
2)修改下载jar包的路径为阿里云镜像,否则去国外的一个网站给你下载jar包,速度慢,老出错
<mirror>
            <id>aliyunmaven</id>
            <mirrorOf>central</mirrorOf>
            <name>aliyun maven</name>
            <url>https://maven.aliyun.com/repository/public </url>
    </mirror>
第五步:IDEA和maven之间的关系
maven是一个单独的软件,可以使用cmd黑窗口通过命令进行操作。
但是我们一般写项目的时候,都喜欢使用idea,在idea中使用maven.
第六步:使用maven创建项目,几乎所有的项目都是maven项目了,所以不会maven啥也干不了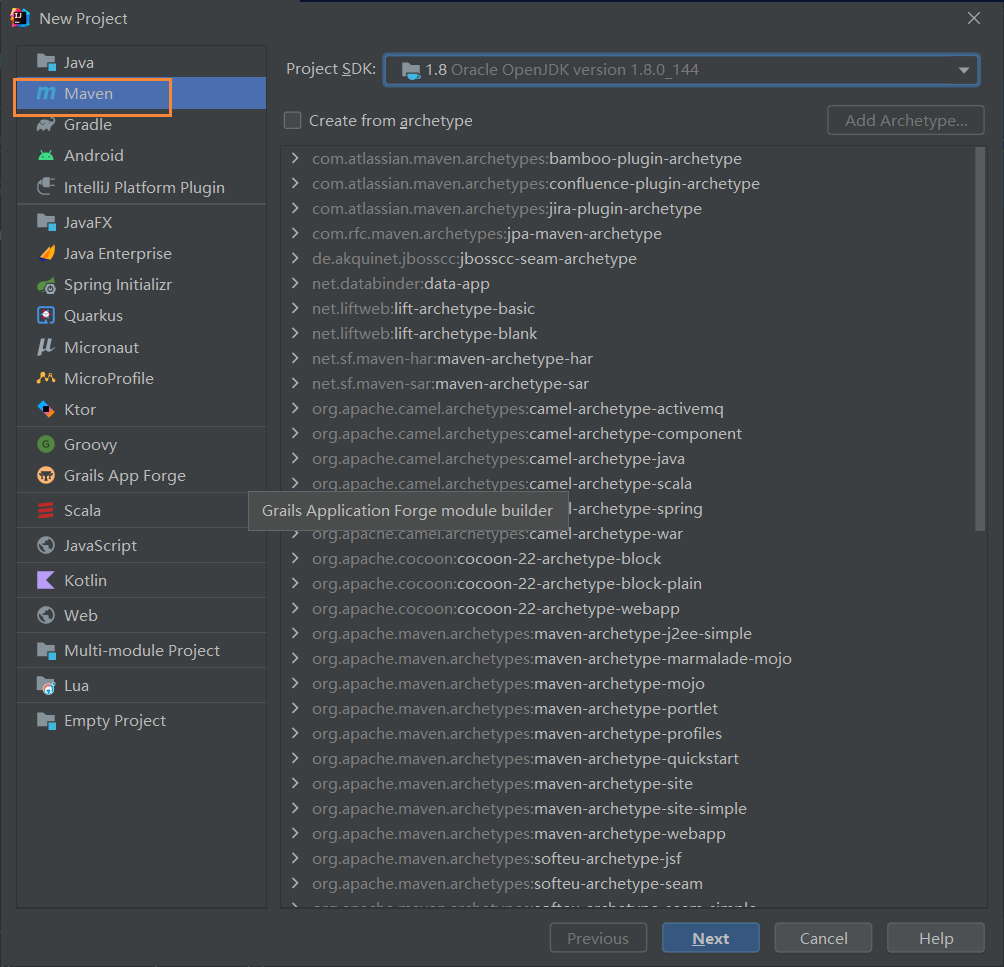
编写jdbc操作:
导入mysql 的驱动包的坐标:
参考如下网站: https://mvnrepository.com/
    <dependencies> <!--此标签中的所有内容都是jar包的坐标-->
        <dependency>
            <groupId>mysql</groupId>
            <artifactId>mysql-connector-java</artifactId>
            <version>5.1.37</version>
        </dependency>
    </dependencies>
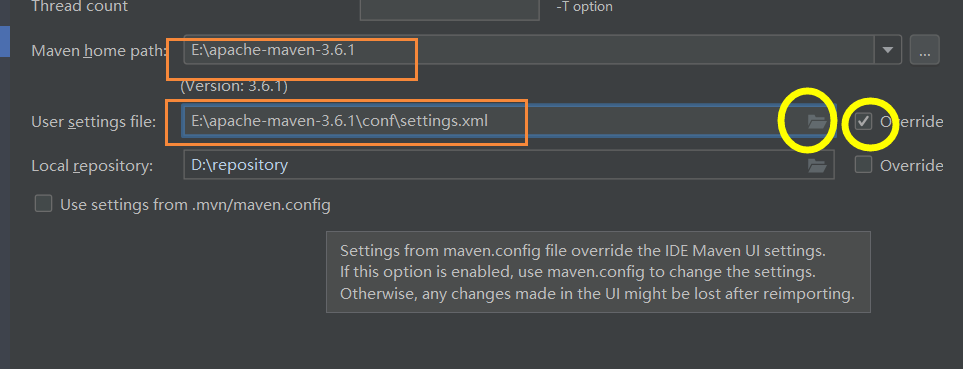
如果发现项目中的maven不是你之前配置的,需要重新配一遍: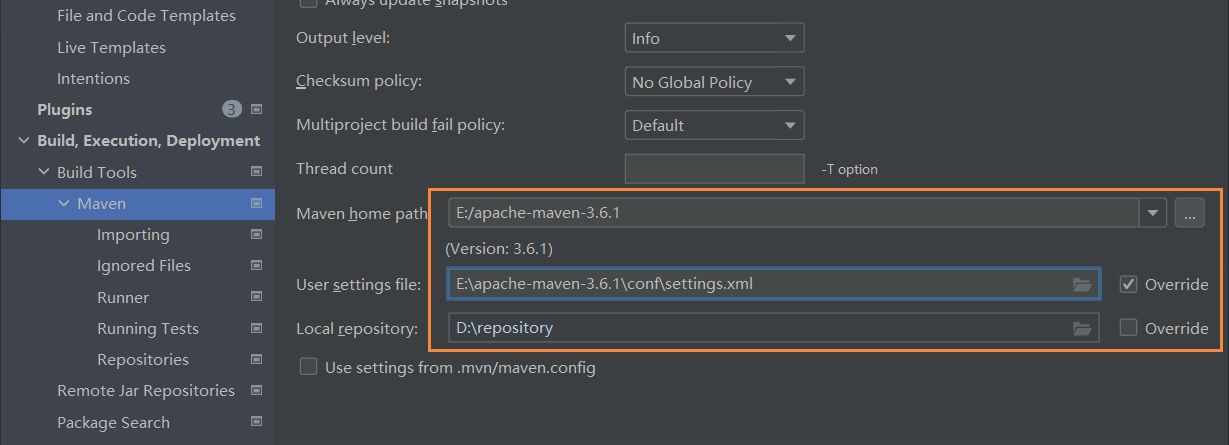
我们会发现配置完之后,又下角有滚动条在滚动,说明maven在帮我下载我需要的jar包,从我配置的阿里云服务器上下载,现在到本地仓库。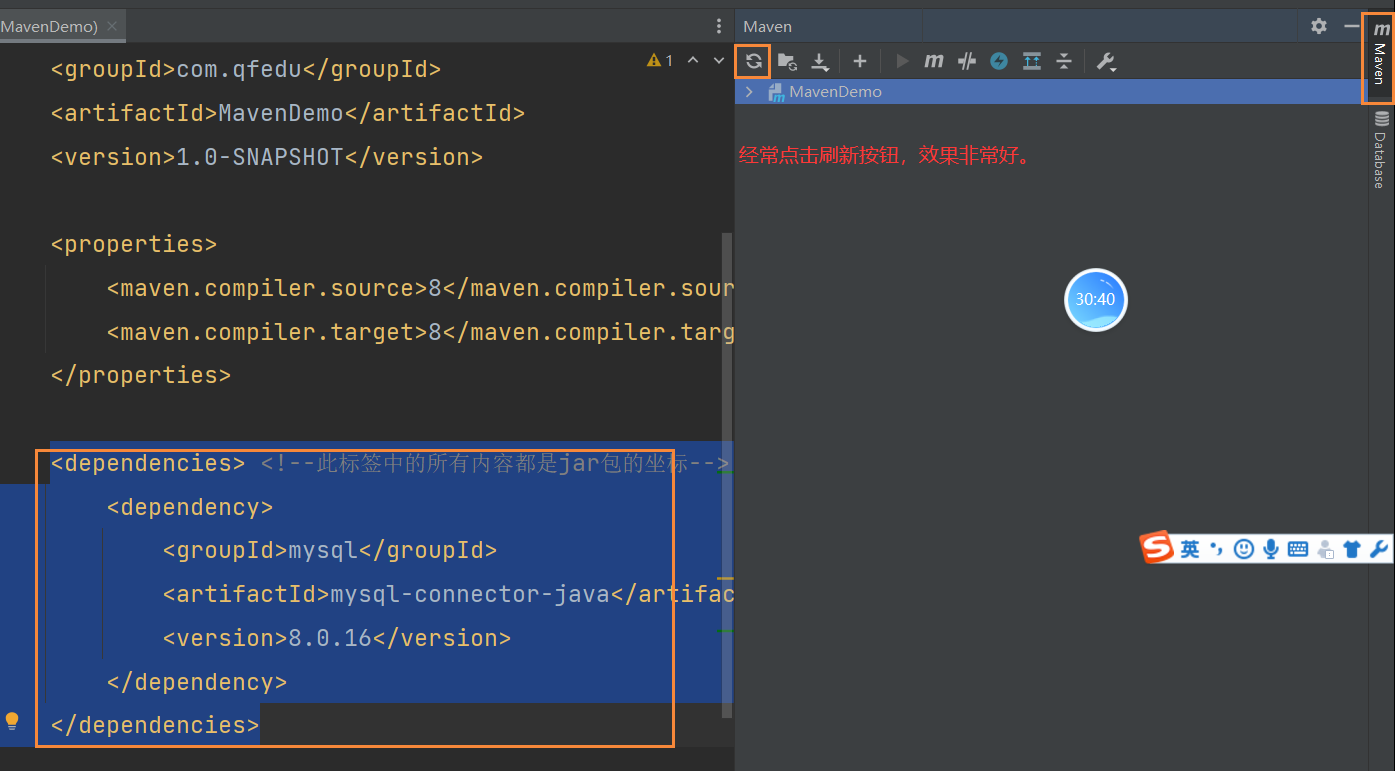

3、Maven的仓库
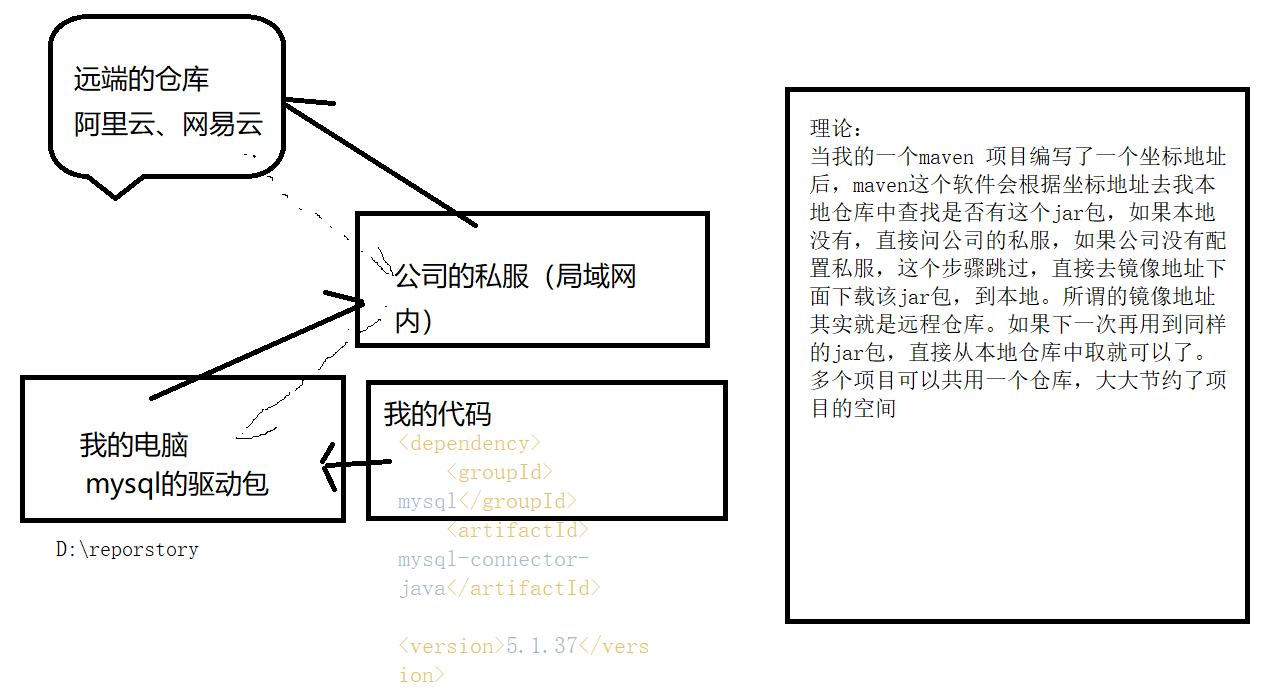
三、SpringBoot
SpringBoot 是由Spring这个组织开发的,一个快速构建web项目的一个框架。
Spring 这个组织非常的强大,java Web  --->  Spring 工程师

Java Web:
SpringMVC   (Struts2)
Spring
MyBatis --> Spring JPA
SpringCLoud  做微服务项目的,直接干 Dubbo  ,阿里出了 SpringCloud Alibaba 替换掉了SpringCloud ,随后将SPringCLoud Alibaba 捐献给了SpringCloud  .

很多开发人员,觉得java太难了,原因是框架之间需要进行很多的配置,导入很多的jar包,不好用。
SpringBoot 是一个组合,将之前的技术,封装起来,变得很简单易用。
1、创建SpringBoot 项目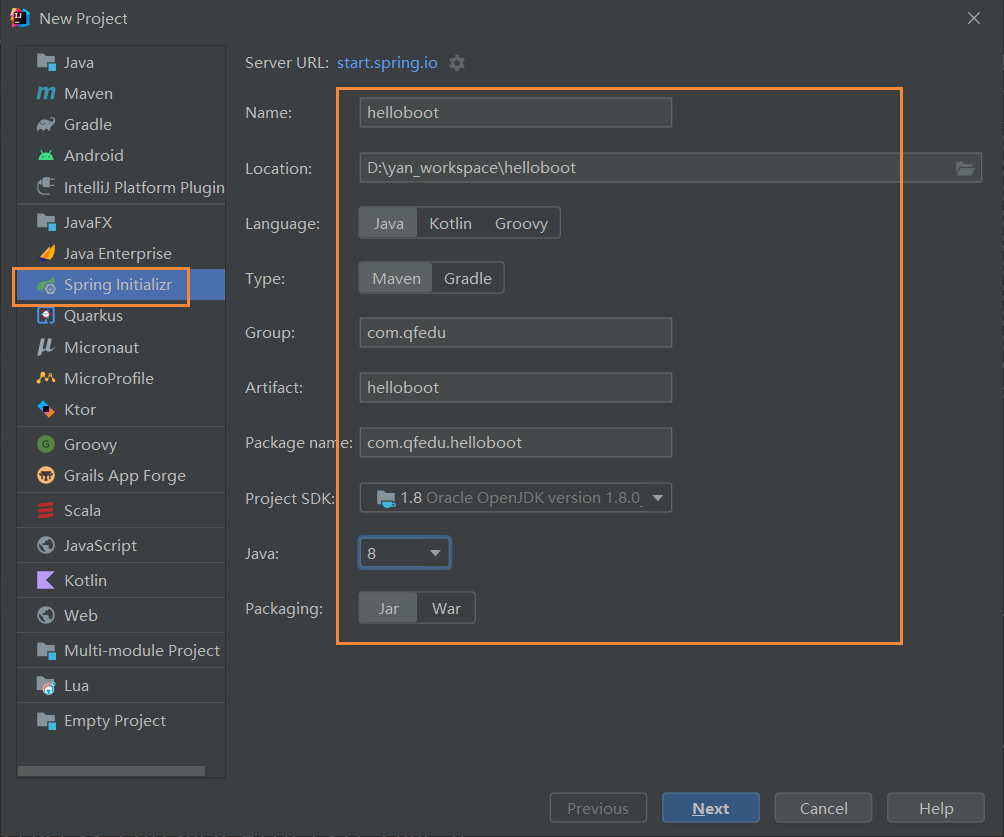
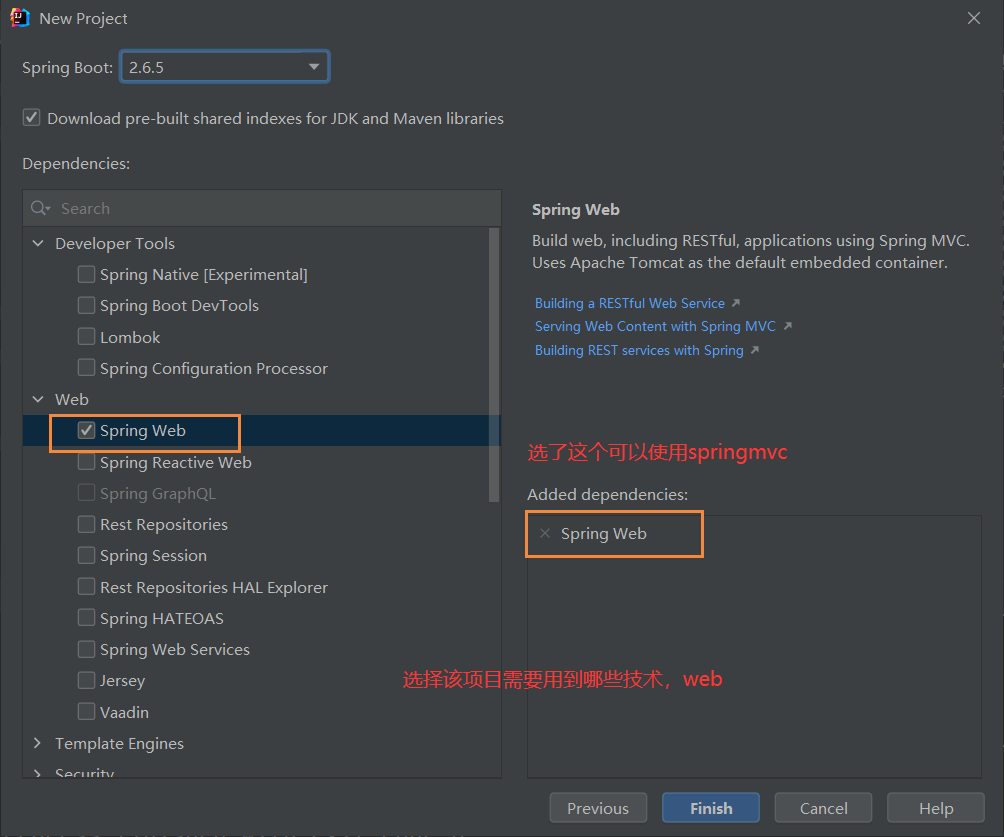
等maven将jar包下载完成后,创建controller 包
在包下面创建一个类:
@RestController
public class HelloController {

    @RequestMapping("/hello")
    public String hello(){
        return "Hello SpringBoot!";
    }
}
由于我的项目8080端口被占用,需要修改:
在resources 文件夹下,application.properties
server.port=8888
启动:
找到入口Main函数: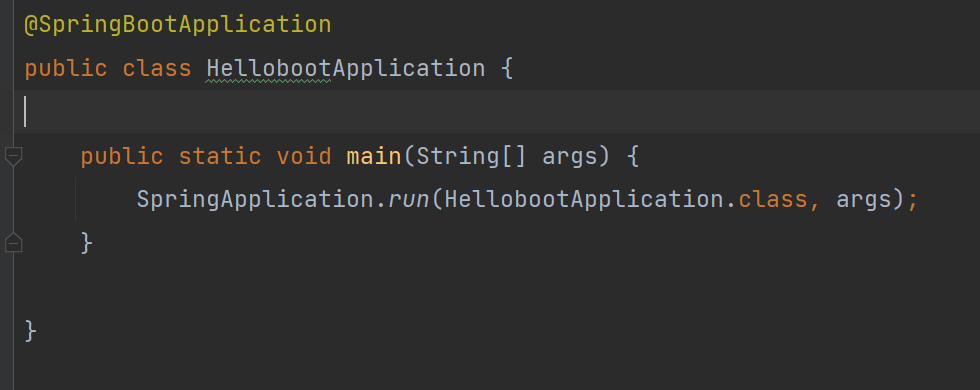
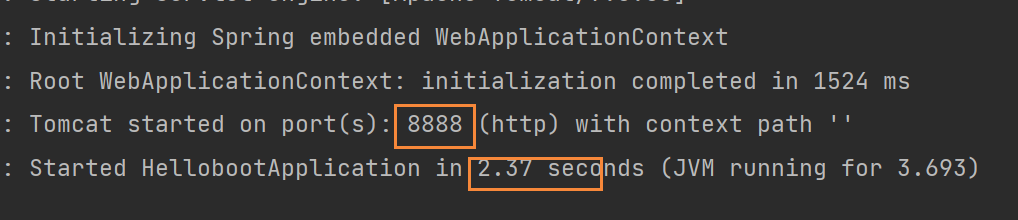
看大以上的图片就说明项目启动成功了。
在浏览器中:输入:http://localhost:8888/hello
返回如下界面,表示成功!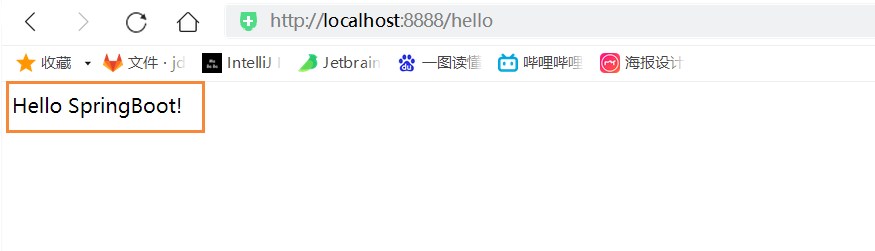
以上的意义:我们可以通过浏览器(用户),去访问我们自己编写的java代码,也就意味着我们可以进行后续的数据库操作。
页面传数据给后台,后台传数据给浏览器都是可以的。
流程是什么?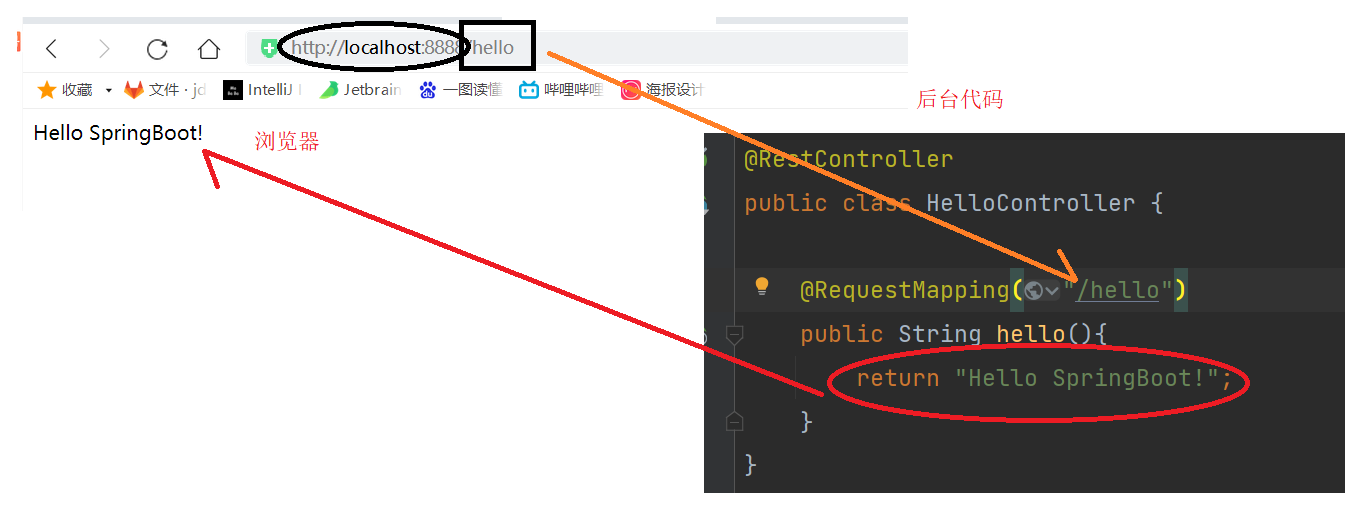
package com.qfedu.helloboot.controller;

import org.springframework.web.bind.annotation.RequestMapping;
import org.springframework.web.bind.annotation.RestController;

/**
 * @Author laoyan
 * @Description TODO
 * @Date 2022/3/29 17:00
 * @Version 1.0
 */
@RestController
// 一个类上写@RestController 就表明这个类是一个控制类,这个类可以被spring容器所实例化
public class HelloController {

    @RequestMapping("/hello") // @RequestMapping  请求的映射,专门用来处理浏览器发送过来的请求的。
    public String hello(){
        return "Hello SpringBoot!";
    }

    @RequestMapping("/login") // @RequestMapping  请求的映射,专门用来处理浏览器发送过来的请求的。
    public String login2222(){
        return "Hello SpringBoot!";
    }
}

若有收获,就点个赞吧
0 人点赞
