常用组件:
EventLoopGroup:
EventLoop本质是一个单线程执行器(维护了一个Selector选择器),内部有run方法处理Channel上的IO事件
EventLoopGroup 是一组EventLoop的抽象,Channel会调用EventLoopGroup的register方法来绑定其中一个EventLoop,后续这个Channel上的IO事件都由此EventLoop来处理(保证IO事件处理线程时的线程安全)
在Netty服务器端编程中,一般都需要提供两个EventLoopGroup用来处理连接请求和客户端业务处理,还可以实现异步任务操作(具体查看【任务队列】章节)
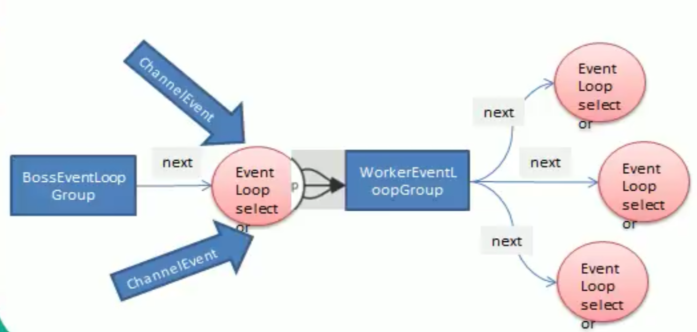
通常一个服务端口即一个ServerSocketChannel对应一个Selector 和一个EventLoop线程。BossEventLoop 负责接收客户端的连接并将SocketChannel交给WorkerEventLoopGroup来进行I/O处理,如下图所示:
BossEventLoopGroup通常是一个单线程的EventLoop, EventLoop维护着一个注册了ServerSocketChannel的Selector实例,BossEventLoop不断轮询Selector将连接事件分离出来通常是OP_ACCEPT事件,然后将接收到的SocketChannel交给WorkerEventLoopGroupWorkerEventLoopGroup 会由next选择其中一个EventLoopGroup来将这个SocketChannel注册到其维护的Selector并对其后续的I/O事件进行处理
常用方法:
public Future<?> shutdownGracefully(); 断开连接,关闭线程(finally使用),通常情况下只能在服务端使用public NioEventLoopGroup() 构造方法,用于创建bossGroup和workGroup
BootStrap系列:
含义:
Bootstrap意思是引导,一个Netty应用通常由一个Bootstrap开始,主要作用是配置整个Netty程序串联各个组件,Netty中Bootstrap类是客户端程序的启动引导类,ServerBootstrap是服务端启动引导类
需要使用sync进行连接、端口绑定,sync意为该操作为异步阻塞执行【案例演示二】
BootStrap常用方法:
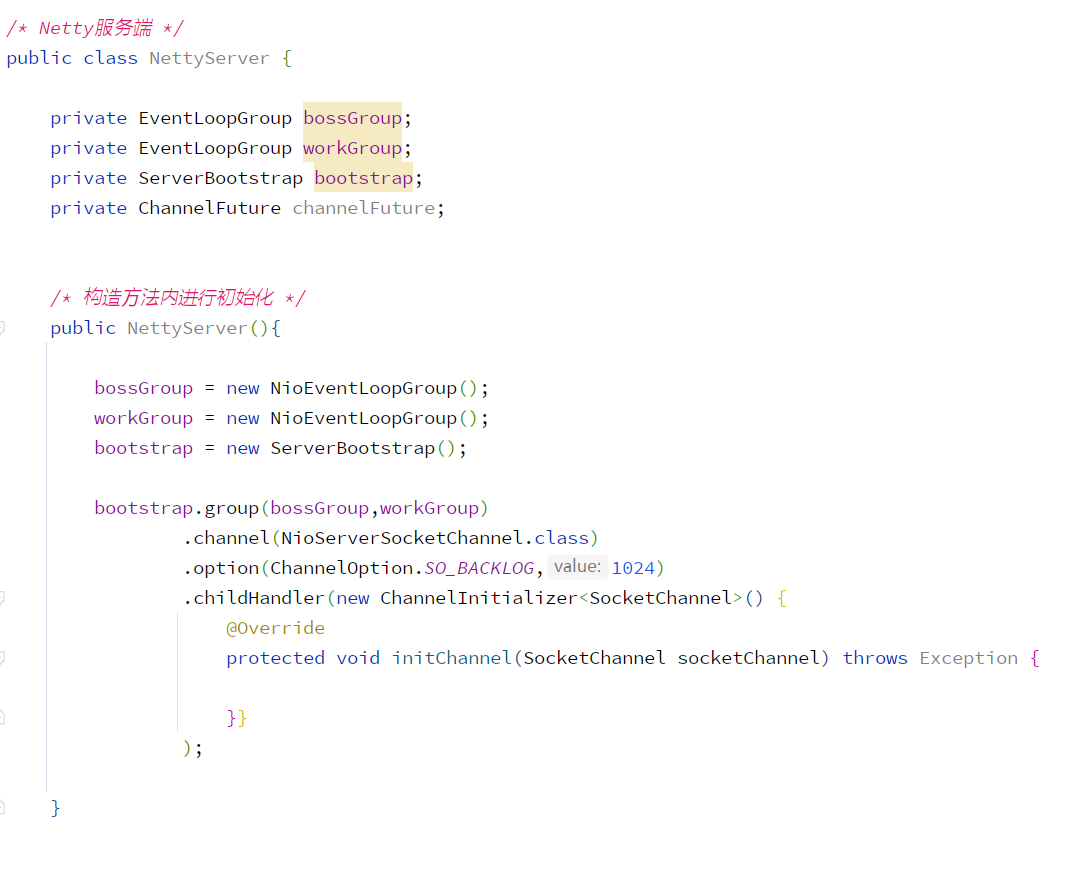
public B group(EventLoopGroup group) 设置一个EventLoopGrouppublic B channel(Class<? extends C> channelClass) 设置服务器端的通道实现类public<T> B option(ChannelOption<T> option, T value) 对ServerChannel添加配置public ChannelFuture connect(String inetHost, int inetPort) 连接客户端
ServerBootStrap常用方法:
public ServerBootstrap group(EventLoopGroup parentGroup, EventLoopGroup childGroup) 用来设置管理连接和实际执行任务的EventLooppublic ServerBootstrap childHandler(ChannelHandler childHandler) 对WprkGroup设置业务处理类Handlerpublic B handler(ChannelHandler handler) 对BossGroup设置Handler(通常不使用)public<T> ServerBootstrap childOption(ChannelOption<T> childOption, T value) 给接收到的通道添加配置public ChannelFuture bind(int inetPort) 绑定端口
Future与ChannelFuture:
Netty 中所有的IO操作都是异步的,不能立刻得知消息是否被正确处理,但是可以过一会等它执行完成或者直接注册一个监听,具体的实现就是通过 Future 和 ChannelFutures,当操作执行成功或失败时监听会自动触发注册的监听事件
常用方法:
ChannelFuture channel() 返回当前正在进行IO操作的通道ChannelFuture sync() 等待异步操作执行完毕
Channel:
是Netty网络通信的组件,能够用于执行网络I/O操作。通过Channel 可获得当前网络连接的通道的状态、
网络连接的配置参数( 例如接收缓冲区大小 ),Channel提供异步的网络I/O操作(如建立连接, 读写,绑定端口), 异步调用意味着任何I/0调用都将立即返回,并且不保证在调用结束时所请求的I/O操作已完成
主要方法:
close() 可以用来关闭channelcloseFuture() 用来处理channel的关闭。sync 方法作用是同步等待channel关闭。addListener 注册监听器,异步等待channel关闭并通知【具体参考异步模型章节】pipeline() 方法添加处理器write() 方法将数据写入writeAndFlush() 方法将数据写入并刷出
不同协议、不同阻塞类型的连接都有不同的Channel与之对应:
NioServerSocketChannel 异步的服务器瑞TCP Socket连接(最常用)NioDatagramChannel 异步的UDP连接NioSctpChannel 异步的客户端Sctp连接NioSctpServerChannel 异步的Sctp服务器端连接,通道涵盖了UDP和TCP网络I/O以及文件I/O
ChannelOption:
Netty 在创建Channel实例后,一般都需要设置ChannelOption参数,具体如下:
ChannelOption.SO BACKLOG对应TCP/IP协议listen函数中的backlog参数,用来初始化服务器可连接队列大小。服务端处理客户端连接请求是顺序处理的,所以同一时间只能处理-一个客户端连接。多个客户端来的时候,服务端将不能处理的客户端连接请求放在队列中等待处理,backlog 参数指定了队列的大小。ChannelOption.SO KEEPALIVE一直保持连接活动状态
s
ChannelPipeLine:
ChannelPipeLine是保存ChannelHandler的List,用于处理或拦截Channel的入站事件和出站操作。通过添加编码器、解码器、自定义事件Handler来实现不同情况下的业务处理,其具体内部结构如下:

Channel和ChannelPipeLine的组成关系
一个Channel包含了一个ChannelPipeline,而ChannelPipeline中又维护了一个由ChannelHandlerContext组成的双向链表,并且每个ChannelHandlerContext中又关联着一个ChannelHandler
入站事件和出站事件在一个双向链表中,入站事件会从链表head往后传递到最后一个入站的handler,出站事件会从链表tail往前传递到最前一个出站的handler,两种类型的handler互不干扰
注意点:
1、在添加编码器与解码器时,其存放的顺序需要放在业务处理Handler之前,具体可参考编码器和解码器
2、添加自定义Handler需要继承 ChannelInboundHandlerAdapter ,具体查看ChannelHandler组件讲解
3、添加多个自定义Handler时,如果需要将上一个自定义handler的数据传递到下一个handler,需要使用super.channelRead(ctx, msg) 或者 ctx.fireChannelRead(msg) 方法,具体参考【案例演示四】
常用方法:
ChannelPipeline addFirst(ChannelHandler... handlers) 把一个业务处理类(handler)添加到链中的第一个位置ChannelPipeline addLast(ChannelHandler... handlers) 把一个业务处理类(handler)添加到链中的最后一个位置
ChannelHandler:
用于处理I/O事件或拦截I/O操作,并将其转发到对应的ChannelPipeline(业务处理链)中的下一个处理程序,分为入站、 出站两种。|所有ChannelHandler被连成一串,就是Pipeline
入站处理器通常是ChannellnboundHandlerAdapter的子类,主要用来读取客户端数据,写回结果
出站处理器通常是ChannelOutboundHandlerAdapter的子类,主要对写回结果进行加工
通过实现子类 ChannelInboundHandlerAdapter 或 SimpleChannelInboundHandler<参数> 来创建自定义 Handler 实现在不同管道事件下的具体业务操作,SimpleChannelInboundHandler可以通过指定参数来指定接收到的消息类型
添加编码器&解码器具体可以参考【编码器与解码器】章节,使用SimpleChannelInboundHandler指定消息类型参考【编码器与解码器】章节的Protobuf案例
常用方法:
void channelRegistered() 通道注册时触发void channelUnregistered() 通道注销时触发void channelActive() 通道就绪(有活动)时触发void channelInactive() 通道非活动时触发void channelRead() 当有读取事件时该方法将被触发void channelReadComplete() 数据读取完毕后触发void exceptionCaught() 处理异常void handlerAdded() handler加入到管道时触发void handlerRemoved() handler从管道移除时触发(可以看做客户端断开连接)
ChannelHandlerContext:
保存Channel相关的所有上下文信息,同时关联一个ChannelHandler 对象(即ChannelHandlerContext中包 含一个具体的事件处理器ChannelHandler,同时ChannelHandlerContext中也绑定了对应的pipeline和Channel的信息,方便对ChannelHandler进行调用)
常用方法:
ChannelFuture close() 关闭通道ChannelOutboundInvoker flush() 刷新ChannelFuture writeAndFlush(Object msg) 将数据写到ChannelPipeline中当前ChannelHandler的下一个ChannelHandler开始处理(出站)
案例演示一:
结合常用组件创建一个HelloWord案例讲解Netty执行流程,源码下载
服务端:
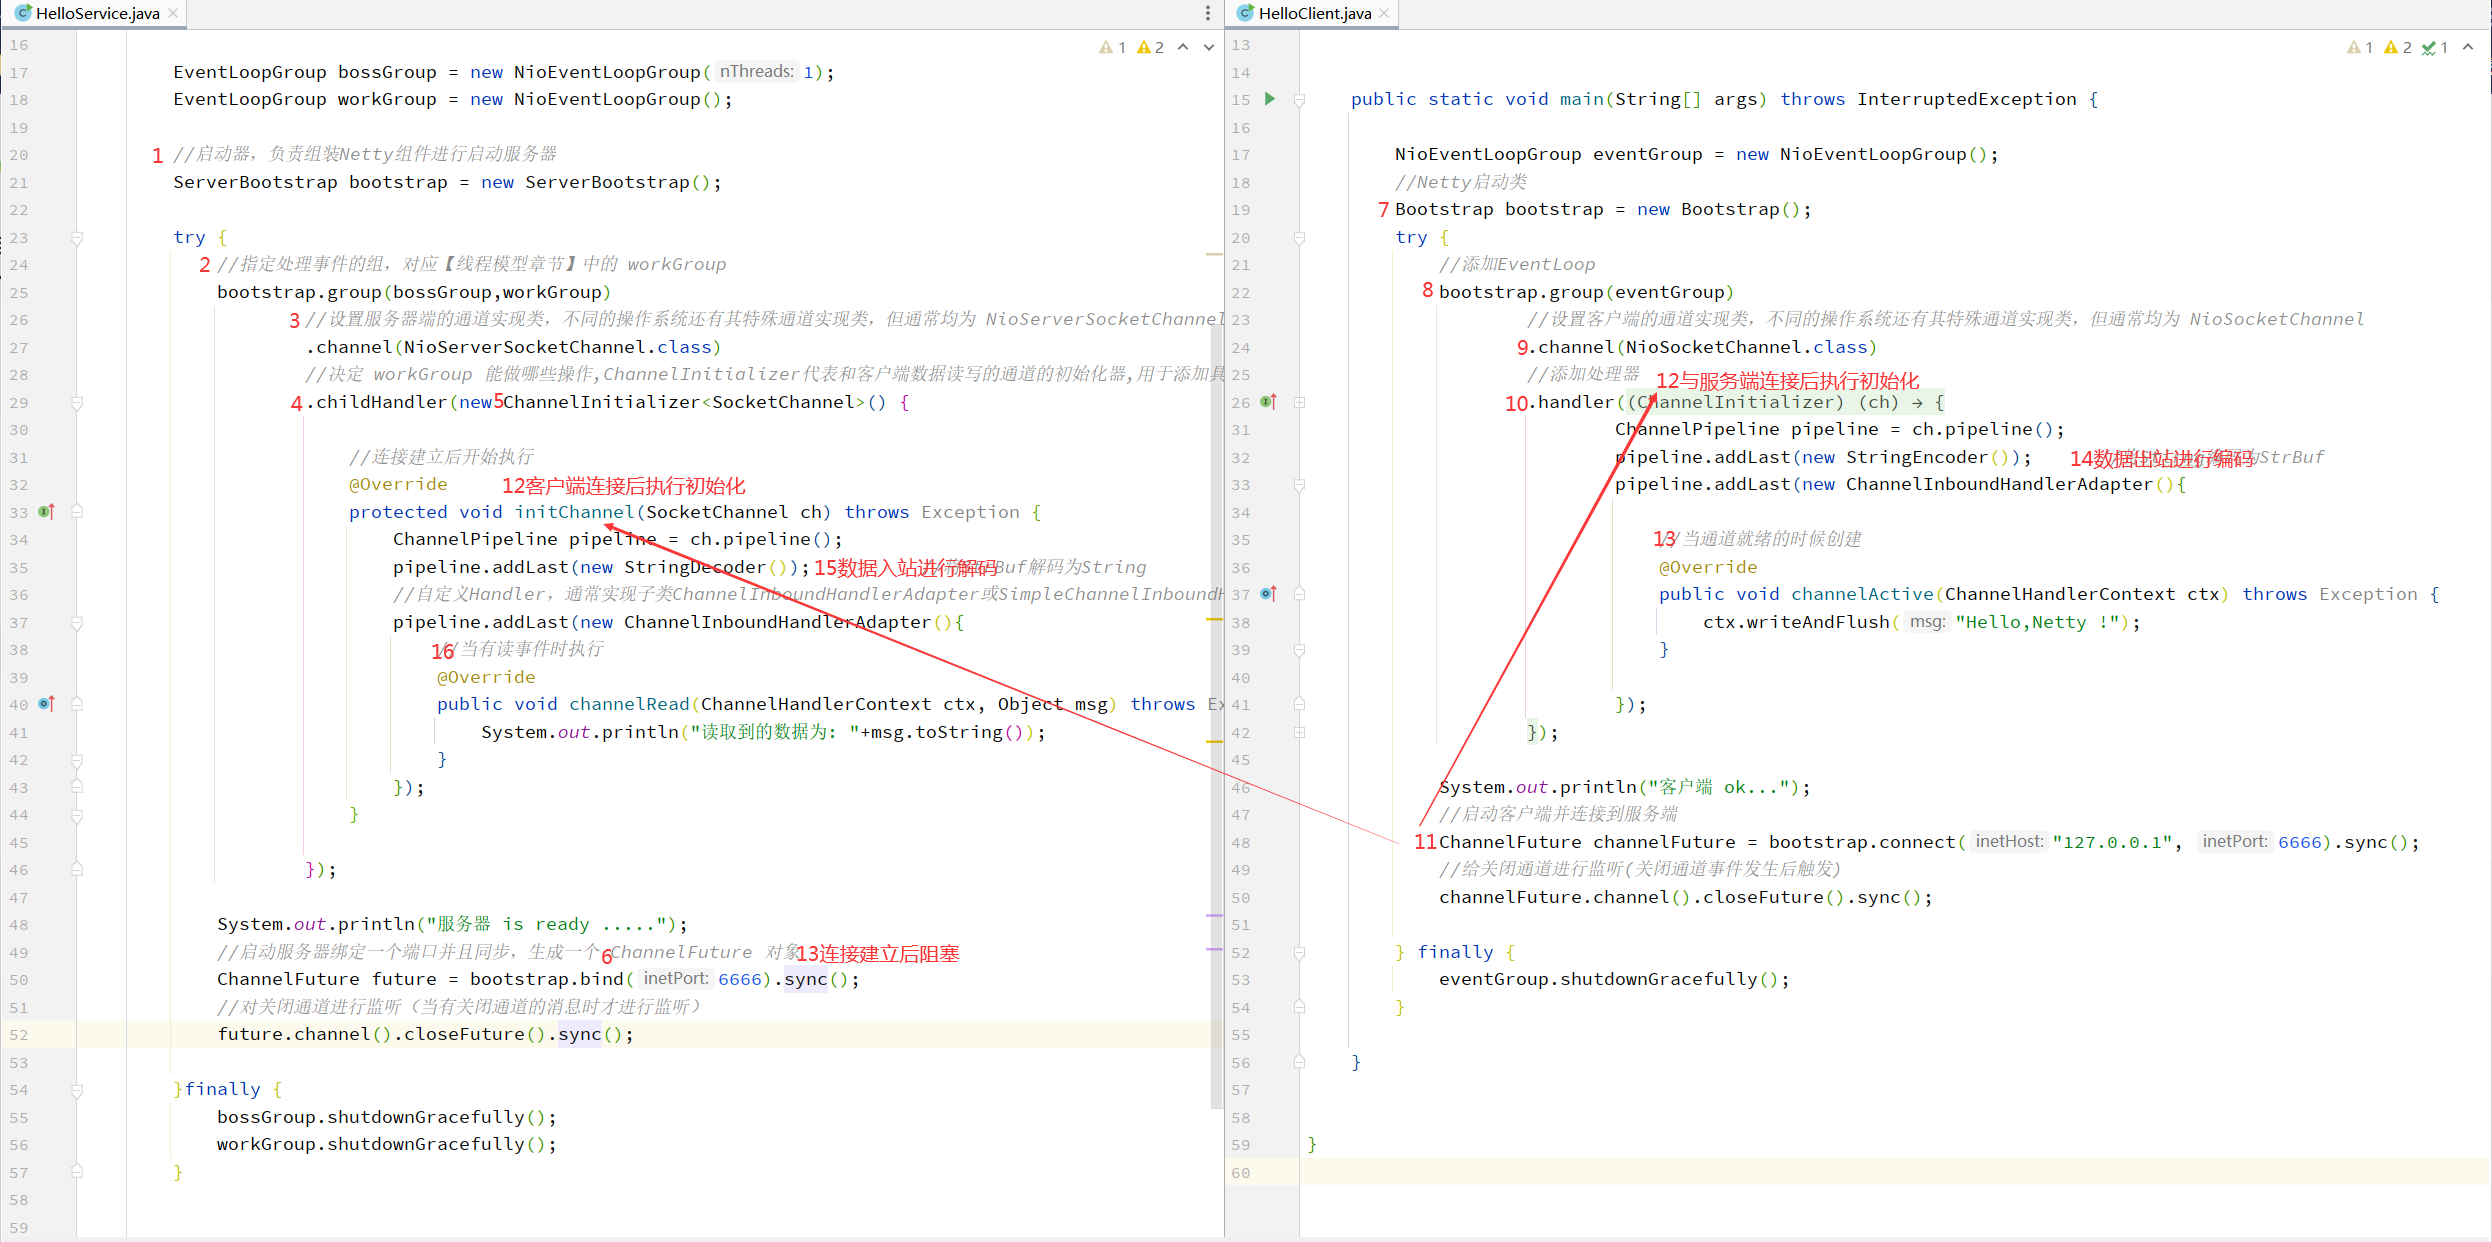
package hello;import io.netty.bootstrap.ServerBootstrap;import io.netty.channel.*;import io.netty.channel.nio.NioEventLoopGroup;import io.netty.channel.socket.SocketChannel;import io.netty.channel.socket.nio.NioServerSocketChannel;import io.netty.handler.codec.string.StringDecoder;/* Netty欢迎案例-服务端 */public class HelloService {public static void main(String[] args) {EventLoopGroup bossGroup = new NioEventLoopGroup(1);EventLoopGroup workGroup = new NioEventLoopGroup();//启动器,负责组装Netty组件进行启动服务器ServerBootstrap bootstrap = new ServerBootstrap();try {//指定处理事件的组,对应【线程模型章节】中的 workGroupbootstrap.group(bossGroup,workGroup)//设置服务器端的通道实现类,不同的操作系统还有其特殊通道实现类,但通常均为 NioServerSocketChannel.channel(NioServerSocketChannel.class)//决定 workGroup 能做哪些操作,ChannelInitializer代表和客户端数据读写的通道的初始化器,用于添加具体业务操作的handler和编码&解码器.childHandler(new ChannelInitializer<SocketChannel>() {//连接建立后开始执行@Overrideprotected void initChannel(SocketChannel ch) throws Exception {ChannelPipeline pipeline = ch.pipeline();pipeline.addLast(new StringDecoder()); //将StrBuf解码为String//自定义Handler,通常实现子类ChannelInboundHandlerAdapter或SimpleChannelInboundHandler<参数>进行实现pipeline.addLast(new ChannelInboundHandlerAdapter(){//当有读事件时执行@Overridepublic void channelRead(ChannelHandlerContext ctx, Object msg) throws Exception {System.out.println("读取到的数据为: "+msg.toString());}});}});System.out.println("服务器 is ready .....");//启动服务器绑定一个端口并且同步,生成一个 ChannelFuture 对象ChannelFuture future = bootstrap.bind(6666).sync();//对关闭通道进行监听(当有关闭通道的消息时才进行监听)future.channel().closeFuture().sync();} catch (InterruptedException e) {e.printStackTrace();}finally {bossGroup.shutdownGracefully();workGroup.shutdownGracefully();}}}
客户端:
package hello;import io.netty.bootstrap.Bootstrap;import io.netty.channel.*;import io.netty.channel.nio.NioEventLoopGroup;import io.netty.channel.socket.SocketChannel;import io.netty.channel.socket.nio.NioSocketChannel;import io.netty.handler.codec.string.StringEncoder;/* Netty欢迎案例-客户端 */public class HelloClient {public static void main(String[] args) throws InterruptedException {NioEventLoopGroup eventGroup = new NioEventLoopGroup();//Netty启动类Bootstrap bootstrap = new Bootstrap();try {//添加EventLoopbootstrap.group(eventGroup)//设置客户端的通道实现类,不同的操作系统还有其特殊通道实现类,但通常均为 NioSocketChannel.channel(NioSocketChannel.class)//添加处理器.handler(new ChannelInitializer<SocketChannel>() {//连接建立后开始执行@Overrideprotected void initChannel(SocketChannel ch) throws Exception {ChannelPipeline pipeline = ch.pipeline();pipeline.addLast(new StringEncoder()); //将Stirng编码为StrBufpipeline.addLast(new ChannelInboundHandlerAdapter(){//当通道就绪的时候创建@Overridepublic void channelActive(ChannelHandlerContext ctx) throws Exception {ctx.writeAndFlush("Hello,Netty !");}});}});System.out.println("客户端 ok...");//启动客户端并连接到服务端ChannelFuture channelFuture = bootstrap.connect("127.0.0.1", 6666).sync();//给关闭通道进行监听(关闭通道事件发生后触发)channelFuture.channel().closeFuture().sync();} finally {eventGroup.shutdownGracefully();}}}
测试:
轮流启动服务端与客户端后服务端收到数据

服务端收到客户端数据
服务端与客户端代码执行流程
解释:
- 把 Channel 理解为数据的通道
- 把 Msg 理解为流动的数据,最开始输入是ByteBuf,但经过 pipeline 的加工会变成其它类型对象,最后输出又变成ByteBuf
- 把 Handler 理解为数据的处理工序
- 工序有多道,合在一起就是pipeline,,pipeline负责发布事件(读、读取完成…)传播给每个 handler,handler 对自己感兴趣的事件进行处理(重写相应事件处理方法)
- handler分Inbound和Outbound两类
- 把 EventLoop 理解为处理数据的工人
- 工人可以管理多个channel的IO操作,并且一旦工人负责了某个channel就要负责到底(绑定)
- 工人既可以执行IO操作,也可以进行任务处理,每位工人有任务队列,队列里可以堆放多个channel的待处理任务,任务分为普通任务、定时任务
- 工人按照pipeline顺序,依次按照handler的规划(代码) 处理数据,可以为每道工序指定不同的人
案例演示二:
在绑定端口与连接时需要使用sync进行异步阻塞操作,在获取与服务端连接前或端口绑定操作完成前代码都会被阻塞在sync处
对案例演示一的客户端进行修改,在去掉sync操作后服务端将收不到任何数据(原因是与服务端建立连接的channel线程为异步的连接线程,和main函数中获取的channel所处线程不为同一个,数据自然发送失败)
package channelFuture;import io.netty.bootstrap.Bootstrap;import io.netty.channel.*;import io.netty.channel.nio.NioEventLoopGroup;import io.netty.channel.socket.SocketChannel;import io.netty.channel.socket.nio.NioSocketChannel;import io.netty.handler.codec.string.StringEncoder;public class EventLoopClient {public static void main(String[] args) throws InterruptedException {NioEventLoopGroup eventGroup = new NioEventLoopGroup();//Netty启动类Bootstrap bootstrap = new Bootstrap();try {//添加EventLoopbootstrap.group(eventGroup)//设置客户端的通道实现类,不同的操作系统还有其特殊通道实现类,但通常均为 NioSocketChannel.channel(NioSocketChannel.class)//添加处理器.handler(new ChannelInitializer<SocketChannel>() {//连接建立后开始执行@Overrideprotected void initChannel(SocketChannel ch) throws Exception {ChannelPipeline pipeline = ch.pipeline();pipeline.addLast(new StringEncoder()); //将Stirng编码为StrBuf}});System.out.println("客户端 ok...");//启动客户端并连接到服务端ChannelFuture channelFuture1 = bootstrap.connect("127.0.0.1", 8652); //没有sync将会继续向下运行,不会阻塞,导致发送数据的依旧是psvm主线程而不是与服务端建立连接的线程//没有sync操作下获取的channel不是与服务端建立连接的channel,数据发送服务端自然不会显示Channel channel = channelFuture1.channel();channel.writeAndFlush("Hello,Netty !");} finally {eventGroup.shutdownGracefully();}}}
案例演示三:
结合常用组件进行案例演示,源码下载
服务端:
调用代码:
package simple;import io.netty.bootstrap.ServerBootstrap;import io.netty.channel.*;import io.netty.channel.nio.NioEventLoopGroup;import io.netty.channel.socket.SocketChannel;import io.netty.channel.socket.nio.NioServerSocketChannel;/* 服务端代码 */public class NettyServer {public static void main(String[] args) throws InterruptedException {/* 创建 BossGroup 和 WorkerGroup 线程组* BossGroup 只处理连接请求,真正的和客户端业务处理会交给 WorkGrouop 完成* bossGroup 和 workerGroup 含有的子线程的个数默认为 CPU最大线程数 X 2,可以手动指定*/EventLoopGroup bossGroup = new NioEventLoopGroup(1); //创建子线程的个数为1的 bossGroupEventLoopGroup workerGroup = new NioEventLoopGroup(8); //创建子线程的个数为8的 workerGrouptry {//创建服务器端的启动对象,配置参数ServerBootstrap bootstrap = new ServerBootstrap();//使用链式参数配置启动参数bootstrap.group(bossGroup,workerGroup) //设置两个线程组.channel(NioServerSocketChannel.class) //使用 NioSocketChannel 作为服务器通道实现.option(ChannelOption.SO_BACKLOG,120) //设置线程队列等待连接的个数.childOption(ChannelOption.SO_KEEPALIVE,true) //保持活动连接状态.childHandler(new ChannelInitializer<SocketChannel>() { //创建一个通道初始化对象//给PipeLine设置处理器@Overrideprotected void initChannel(SocketChannel ch) throws Exception {ch.pipeline().addLast(new NettyServerHandler()); //将自定义处理器加入到PipeLine}}); //给 WorkerGroup 的 EventLoop 对应的管道设置处理器System.out.println("服务器 is ready .....");//启动服务器绑定一个端口并且同步,生成一个 ChannelFuture 对象ChannelFuture cf = bootstrap.bind(6666).sync();//对关闭通道进行监听(当有关闭通道的消息时才进行监听)cf.channel().closeFuture().sync();} finally {bossGroup.shutdownGracefully(); //关闭资源workerGroup.shutdownGracefully(); //关闭}}}
自定义处理器:
package simple;import io.netty.buffer.ByteBuf;import io.netty.buffer.Unpooled;import io.netty.channel.ChannelHandlerContext;import io.netty.channel.ChannelInboundHandlerAdapter;import java.nio.charset.StandardCharsets;/** 自定义管道 Handler* 1、自定义一个 Handler,需要继承 Netty 规定好的某个 HandlerAddapter* 2、这时我们自定义一个 Handler,才能称为一个 Handler*/public class NettyServerHandler extends ChannelInboundHandlerAdapter {/*当有读取事件时该方法将被触发* 参数一: ChannelHandlerContext 上下文对象,含有管道 PipeLine、通道* 参数二: Object 客户端发送的数据,默认是Object需要转换*/@Overridepublic void channelRead(ChannelHandlerContext ctx, Object msg) throws Exception {System.out.println("Server ctx = "+ ctx);//将 Msg 转换为 ByteBuf,ByteBuf是Netty对于NIO ButeBuffer的再包装ByteBuf buf = (ByteBuf) msg;System.out.println("客户端发送消息: "+buf.toString(StandardCharsets.UTF_8));System.out.println("客户端地址: "+ ctx.channel().remoteAddress());}/* 数据读取完毕后触发* 参数一: ChannelHandlerContext 上下文对象,含有管道 PipeLine、通道*/@Overridepublic void channelReadComplete(ChannelHandlerContext ctx) throws Exception {//对发送数据进行编码后写入到缓存并刷新ctx.writeAndFlush(Unpooled.copiedBuffer("服务端连接成功,欢迎!"+LocalDateTime.now(),StandardCharsets.UTF_8));}/* 处理异常,一般为关闭通道 */@Overridepublic void exceptionCaught(ChannelHandlerContext ctx, Throwable cause) throws Exception {ctx.close(); //和 ctx.channel().close() 是一个意思}}
客户端:
调用代码:
package simple;import io.netty.bootstrap.Bootstrap;import io.netty.channel.ChannelFuture;import io.netty.channel.ChannelInitializer;import io.netty.channel.EventLoopGroup;import io.netty.channel.nio.NioEventLoopGroup;import io.netty.channel.socket.SocketChannel;import io.netty.channel.socket.nio.NioSocketChannel;/* 客户端代码 */public class NettyClient {public static void main(String[] args) throws Exception {//客户端需要一个事件循环组EventLoopGroup group = new NioEventLoopGroup();try {//客户端启动对象,客户端使用的是 Bootstrap 而不是 ServerBootstrapBootstrap bootstrap = new Bootstrap();//设置相关参数bootstrap.group(group) //设置线程组.channel(NioSocketChannel.class) //设置客户端通道的实现类.handler(new ChannelInitializer<SocketChannel>() {@Overrideprotected void initChannel(SocketChannel ch) throws Exception {ch.pipeline().addLast(new NettyClientHandler()); //自定义处理器}});System.out.println("客户端 ok...");//启动客户端并连接到服务端ChannelFuture channelFuture = bootstrap.connect("127.0.0.1", 6666).sync();//给关闭通道进行监听(关闭通道事件发生后触发)channelFuture.channel().closeFuture().sync();} finally {group.shutdownGracefully();}}}
自定义处理器:
package simple;import io.netty.buffer.ByteBuf;import io.netty.buffer.Unpooled;import io.netty.channel.ChannelHandlerContext;import io.netty.channel.ChannelInboundHandlerAdapter;import io.netty.util.CharsetUtil;import java.nio.charset.StandardCharsets;/* 自定义管道 Handler */public class NettyClientHandler extends ChannelInboundHandlerAdapter {/* 当通道就绪就会触发该方法 */@Overridepublic void channelActive(ChannelHandlerContext ctx) throws Exception {System.out.println("client "+ ctx);ctx.writeAndFlush(Unpooled.copiedBuffer("Hello,这是客户端发送的消息!", StandardCharsets.UTF_8));}/*当通道有读取数据事件时触发* 参数一: ChannelHandlerContext 上下文对象,含有管道 PipeLine、通道* 参数二: Object 客户端发送的数据,默认是Object需要转换*/@Overridepublic void channelRead(ChannelHandlerContext ctx, Object msg) throws Exception {ByteBuf buf = (ByteBuf) msg;System.out.println("服务器回复的消息: "+buf.toString(CharsetUtil.UTF_8));System.out.println("服务器的地址: "+ctx.channel().remoteAddress());}/* 异常发生时触发 */@Overridepublic void exceptionCaught(ChannelHandlerContext ctx, Throwable cause) throws Exception {cause.printStackTrace();ctx.close();}}
测试:
对客户端启用多实例后运行,服务端成功收到客户端信息
服务端与客户端信息详情
案例演示四:
当存在多个入站handler时,如果需要将上一个handler处理后的数据转发到下一个handler进行处理,需要使用 super.channelRead 或者 ctx.fireChannelRead 方法,否则链将会断开
例如案例中创建5个自定义handler,执行顺序为 head(默认创建) -> h1 -> h2 -> h3 -> h4 -> h5 -> tail(默认创建),当h2注释掉方法传递时,handler链路将会断开,导致h3和之后的自定义handler不再工作
handler链表断开演示:
使用案例演示一的客户端进行配合该服务端代码进行演示
package channelhandler;import io.netty.bootstrap.ServerBootstrap;import io.netty.channel.*;import io.netty.channel.nio.NioEventLoopGroup;import io.netty.channel.socket.SocketChannel;import io.netty.channel.socket.nio.NioServerSocketChannel;/* 服务端代码 */public class NettyServer {public static void main(String[] args) throws InterruptedException {EventLoopGroup bossGroup = new NioEventLoopGroup(1); //创建子线程的个数为1的 bossGroupEventLoopGroup workerGroup = new NioEventLoopGroup(8); //创建子线程的个数为8的 workerGrouptry {//创建服务器端的启动对象,配置参数ServerBootstrap bootstrap = new ServerBootstrap();//使用链式参数配置启动参数bootstrap.group(bossGroup,workerGroup) //设置两个线程组.channel(NioServerSocketChannel.class) //使用 NioSocketChannel 作为服务器通道实现.childHandler(new ChannelInitializer<SocketChannel>() { //创建一个通道初始化对象//给PipeLine设置处理器@Overrideprotected void initChannel(SocketChannel ch) throws Exception {ChannelPipeline pipeline = ch.pipeline();/** 添加处理器顺序: head(默认创建) -> h1 -> h2 -> h3 -> h4 -> h5 -> tail(默认创建)* 当存在多个入站handler时,如果需要将上一个handler处理后的数据转发到下一个handler进行处理,需要使用 super.channelRead 或者 ctx.fireChannelRead 方法,否则链将会断开*/pipeline.addLast("h1",new ChannelInboundHandlerAdapter(){@Overridepublic void channelRead(ChannelHandlerContext ctx, Object msg) throws Exception {System.out.println("进入第一个自定义入站handler");super.channelRead(ctx, msg);}});pipeline.addLast("h2",new ChannelInboundHandlerAdapter(){@Overridepublic void channelRead(ChannelHandlerContext ctx, Object msg) throws Exception {System.out.println("进入第二个自定义入站handler");//ctx.fireChannelRead(msg);}});pipeline.addLast("h3",new ChannelInboundHandlerAdapter(){@Overridepublic void channelRead(ChannelHandlerContext ctx, Object msg) throws Exception {System.out.println("进入第三个自定义入站handler");ctx.writeAndFlush("第三个Handler返回结果");}});pipeline.addLast("h4",new ChannelOutboundHandlerAdapter(){@Overridepublic void write(ChannelHandlerContext ctx, Object msg, ChannelPromise promise) throws Exception {System.out.println("进入第一个自定义出站handler");super.write(ctx, msg, promise);}});pipeline.addLast("h5",new ChannelOutboundHandlerAdapter(){@Overridepublic void write(ChannelHandlerContext ctx, Object msg, ChannelPromise promise) throws Exception {System.out.println("进入第二个自定义出站handler");super.write(ctx, msg, promise);}});}});//启动服务器绑定一个端口并且同步,生成一个 ChannelFuture 对象ChannelFuture cf = bootstrap.bind(6666).sync();//对关闭通道进行监听(当有关闭通道的消息时才进行监听)cf.channel().closeFuture().sync();} finally {bossGroup.shutdownGracefully(); //关闭资源workerGroup.shutdownGracefully(); //关闭}}}

注释之后,后续handler功能无法正常执行
writeAndFlush的区别:
往通道写入数据可以使用ChannelHandlerContext.writeAndFlus与Channel.writeAndFlus方法,二者的区别在于 ChannelHandlerContext.writeAndFlus 寻找的是从所属 handler 开始一直到 head 的出站handler,Channel.writeAndFlus 则是从 tail 开始寻找出站 handler
演示:
对之前的 h3 Handler进行修改,使用 ctx.writeAndFlush 后,handler 出站寻找顺序为 h3 -> h2 -> h1 -> head,由于没有出站handler,所以 h4、h5 handler 都不会被触发
pipeline.addLast("h3",new ChannelInboundHandlerAdapter(){@Overridepublic void channelRead(ChannelHandlerContext ctx, Object msg) throws Exception {System.out.println("进入第三个自定义入站handler");ctx.writeAndFlush("第三个Handler返回结果");//ch.writeAndFlush("第三个Handler返回结果"); 和 ctx.channel().writeAndFlush() 是一个意思}});

测试结果
对之前的 h3 Handler 再次进行修改,使用 ch.writeAndFlush 后,寻找出站 handler 顺序为 tail ->h5 -> h4 -> h3 -> h2 -> h1 -> head,所以 h4、h5 handler 都会被触发
pipeline.addLast("h3",new ChannelInboundHandlerAdapter(){@Overridepublic void channelRead(ChannelHandlerContext ctx, Object msg) throws Exception {System.out.println("进入第三个自定义入站handler");ch.writeAndFlush("第三个Handler返回结果"); // 与 ctx.channel().writeAndFlush() 是一个意思}});

测试结果

