ByteBuf是Netty对于NIO ButeBuffer的再包装,之前已在入门案例进行过使用,这里对其进行简单介绍
ByteBuf不需要像Nio的ByteBuffer使用flip进行反转,它的底层维护了 readerIndex 和 writerIndex,通过对索引的控制来实现读取和写入数据
结构:
和 Nio 中的 ByteBuffer 类似,默认的读写索引位为0
创建方式:
分为直接内存创建与堆内存创建两种方式,默认为直接内存方式创建,也可以进行指定:
ByteBufAllocator.DEFAULT.buffer(); 默认为直接内存方式创建ByteBufAllocator.DEFAULT.directBuffer(); 直接内存方式创建ByteBufAllocator.DEFAULT.heapBuffer(); 堆内存方式进行创建
直接内存创建和销毁的代价昂贵,但读写性能高(减少一次内存复制),适合配合池化功能一起用,池化功能在Netty 4.1 后默认启用
直接内存对GC压力小,因为这部分内存不受JVM垃圾回收的管理, 但要注意及时主动释放
实际项目开发中常用 Unpooled.buffer() 或者 ChannelHandlerContext.alloc().buffer() 在业务 handler 中进行ByteBuf的创建,前者为堆内存创建后者为直接内存创建,根据项目使用场景进行选择即可,案例可参考任务队列中的 handler 方式处理异步任务代码
ChannelHandlerContext.alloc().buffer(); 直接内存方式创建Unpooled.buffer(); 堆内存方式进行创建
池化技术:
池化的最大意义在于可以重用ByteBuf,Netty 4.1版本以后非Android平台默认启用池化实现,Android平台则启用非池化实现
池化优点包括:
- 没有池化则每次都得创建新的ByteBuf实例,该操作对直接内存代价昂贵,就算是堆内存也会增加GC- 池化可以重用池中ByteBuf实例,并且采用了与 jemalloc 类似的内存分配算法提升分配效率- 高并发时,池化功能更节约内存,减少内存溢出的可能
通过指定 JVM 参数可以手动选择是否使用池化,使用 getClass 查看当前ByteBuf对象是否使用池化
-Dio.netty.allocator.type={unpooled|pooled}

JVM池化配置
扩容:
当写入数据容量大于ByteBuf创建时的容量时会引发扩容,具体规则如下
- 如果写入后数据大小未超过512则选择下一个16的整数倍,例如写入后大小为12,则扩容后capacity是16- 如果写入后数据大小超过512则选择下一个2^n,例如写入后大小为513,则扩容后capacity是2^10=1024 (2^9=512 已经不够了)- 扩容不能超过 max capacity,超过则会报错
回收:
堆外创建的ByteBuf最好使用手动GC释放而不是等待GC回收
UnpooledHeapByteBuf 使用的是 JVM内存,只需等待 GC回收内存即可UnpooledDirectByteBuf 使用的是直接内存,需要使用方法进行内存回收PooledByteBuf和其子类使用了池化机制,回收方式更为复杂
Netty采用了引用计数法来控制回收内存,每个ByteBuf都实现了ReferenceCounted接口,回收机制如下:
- 每个ByteBuf对象的初始计数为一- 调用 release方法计数减1,如果计数为0,ByteBuf 内存被回收- 调用 retain方法计数加1,表示调用者没用完之前,其它handler即使调用了release也不会造成回收- 当计数为0时,底层内存会被回收,即使ByteBuf对象依旧存在,其各个方法均无法正常使用
使用 ByteBuf.release() 方法可进行内存回收,但由于 ByteBuf 实际都会在业务处理 Handler 中使用,因此如果需要手动回收,只能在最后使用的 Handler 中对其进行回收以确保出入栈链表不会断开,如果没有手动回收ByteBuf操作,Netty的 head 和 tail Handler 会自动对其释放
源码实现:
最尾部的 tail 自动释放源码位于 TailContext 的 channelRead 方法中,内部会使用 ReferenceCountUtil 进行回收
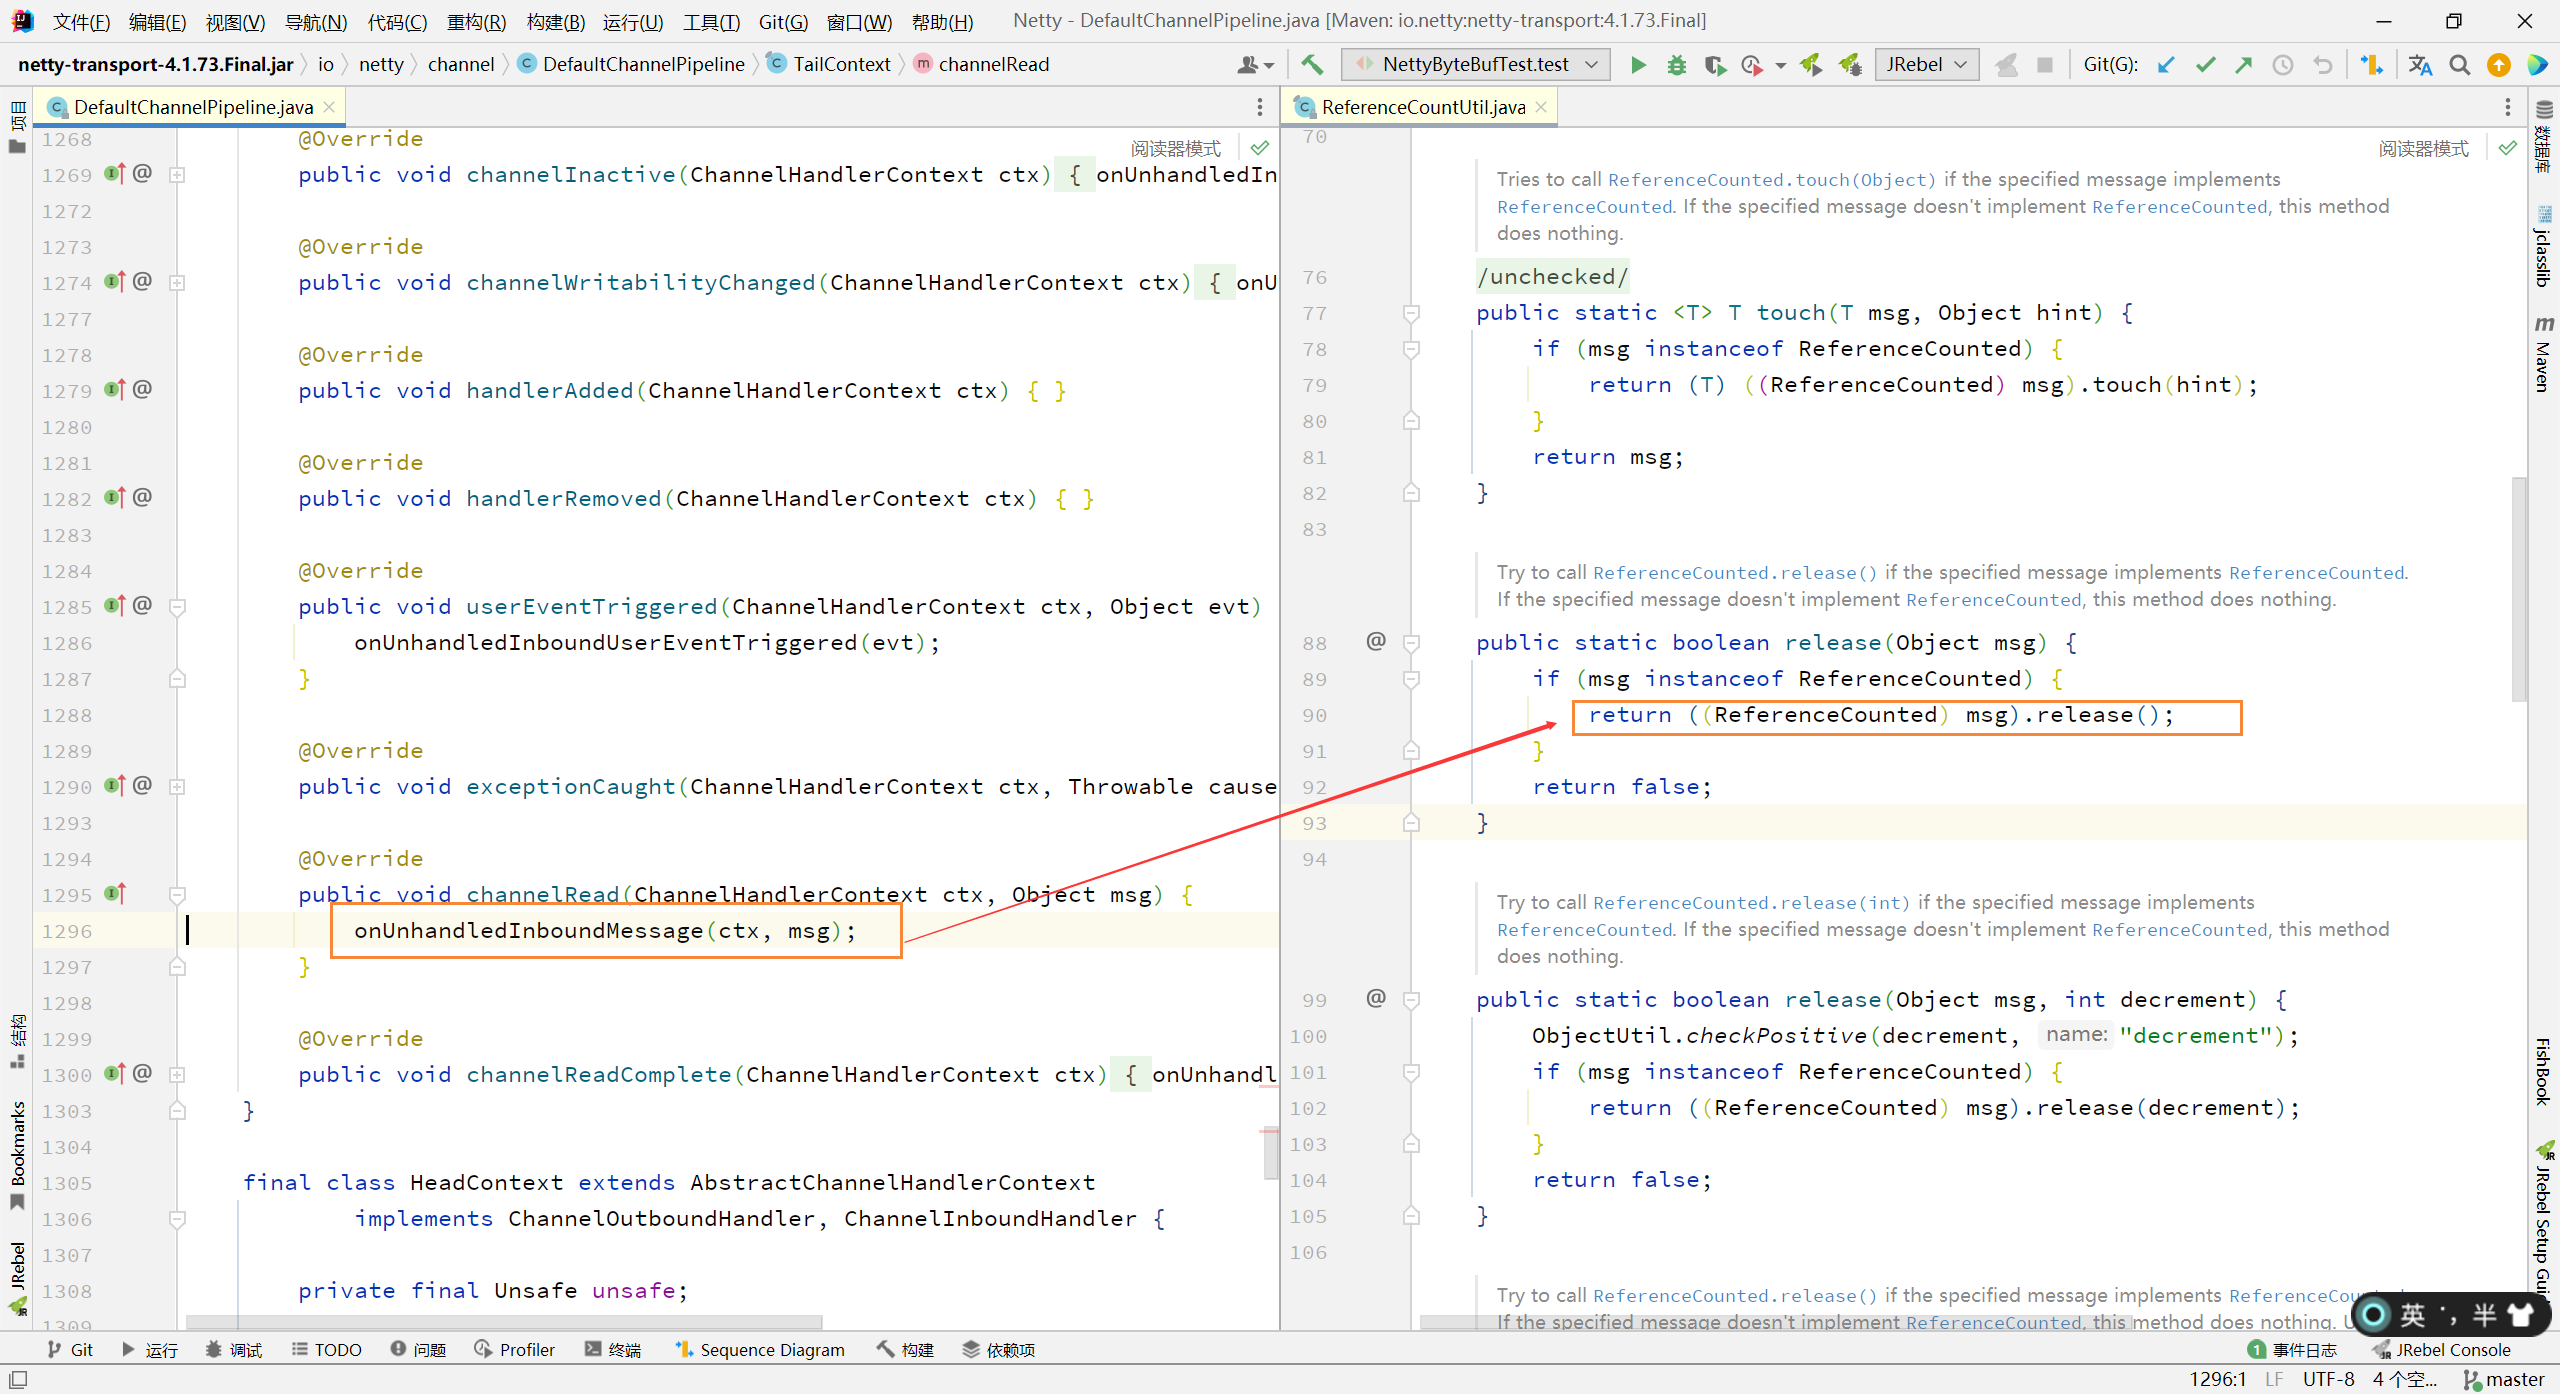
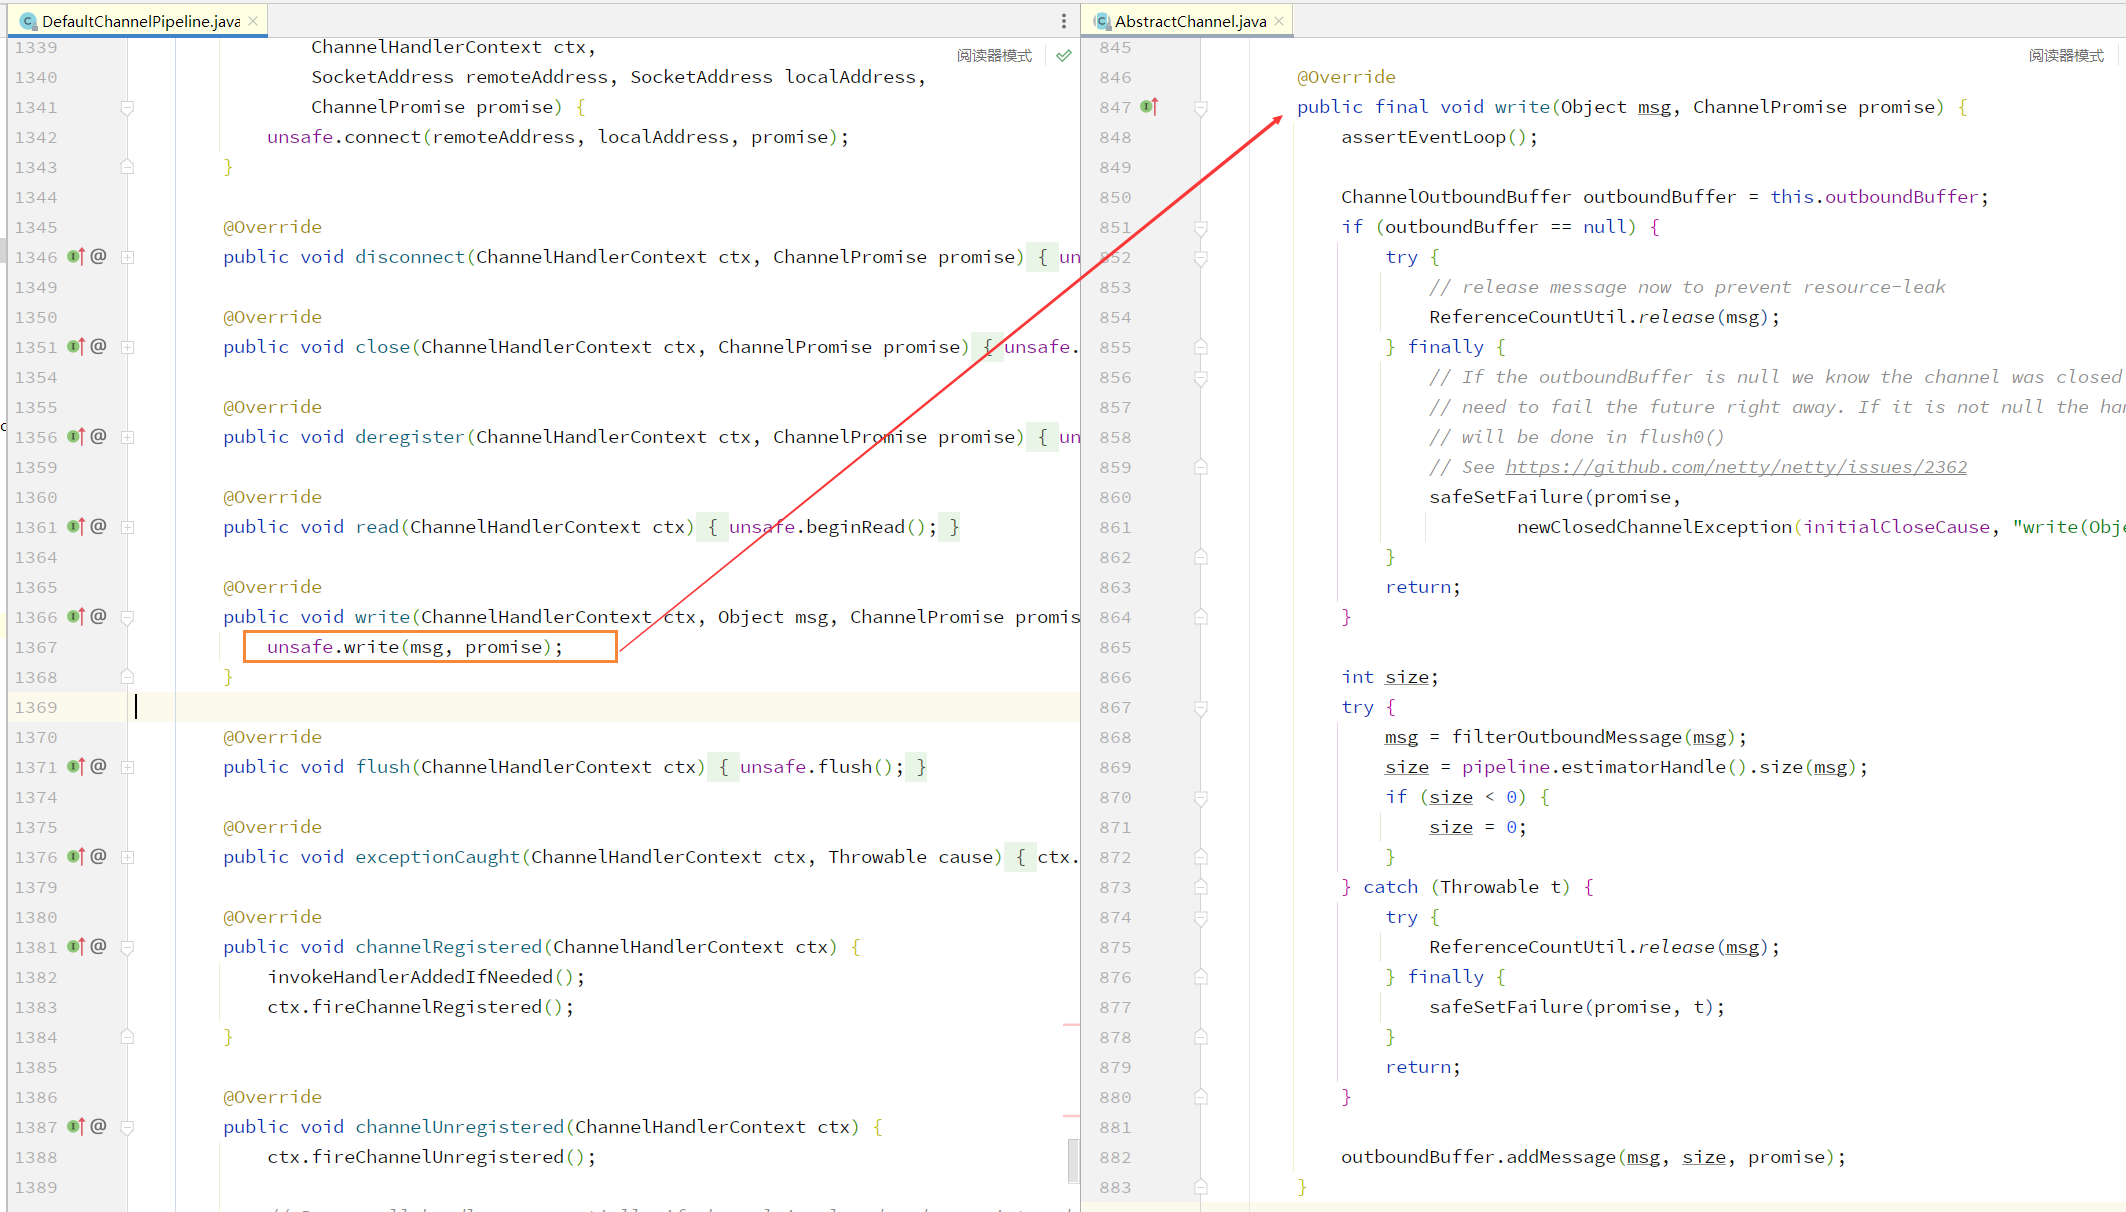
最尾部的 head 自动释放源码位于 HeadContext 的 write 方法中,具体参考出入站分析源码讲解
零拷贝:
slice方式:
对原始ByteBuf进行切片生成多个ByteBuf,切片后的ByteBuf不会发生内存复制,使用的依旧是原始BytreBuf的内存,切片后的ByteBuf维护独立的read、write指针,且无法进行数据添加
由于使用的是原始ByteBuf的内存,当原始ByteBuf被release操作回收后,分片后的数据也无法被访问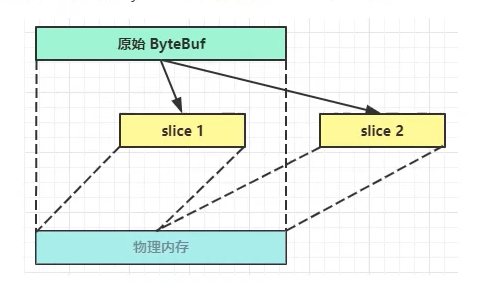
slice零拷贝分析
duplicate方式:
复制原始ByteBuf的所有内容,但还是使用同一个内存地址且没有最大容量限制,只是拥有独立的read、write指针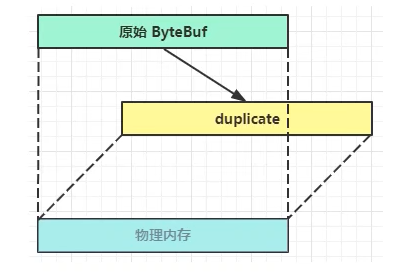
duplicate零拷贝分析
常用写入方法:
| 方法名 | 含义 | 备注 |
|---|---|---|
| writeBoolean(boolean value) | 写入Boolean值 | 字节值,01和00代表True和False |
| writeByte(int value) | 写入byte值 | |
| writeShort(int value) | 写入short值 | |
| writeInt(int value) | 写入Int值 | 大端写入(先写高位字节) 0x250时写入值为 00 00 02 50 |
| writeIntLE(int value) | 写入Int值 | 小端写入(先写低位字节) 0x250时写入值为 50 02 00 00 |
| writeLong(long value) | 写入long值 | |
| writeChar(int value) | 写入Double值 | |
| writeDouble(double value) | 写入 Char值 | |
| writeBytes(ByteBuffer src) | 写入Nio的ByteBuffer | |
| writeBytes(byte[] src) | 写入byte[] | |
| writeBytes(ByteBuf src) | 写入ByteBuf | |
| writeCharSequence(_CharSequence sequence, Charset charset)_; | 写入字符串 |
案例:
常用方法一:
可以在 getByte() 和 readByte()方法处打上断点查看索引偏移量的变化
package bytebuf;import io.netty.buffer.ByteBuf;import io.netty.buffer.ByteBufAllocator;import io.netty.buffer.Unpooled;import io.netty.util.CharsetUtil;import org.junit.jupiter.api.Test;import static io.netty.buffer.ByteBufUtil.appendPrettyHexDump;import static io.netty.util.internal.StringUtil.NEWLINE;public class NettyByteBufTest {/*ByteBuf的基本使用*说明:* 1.创建对象,该对象包含一个数组arr ,是一byte[10]* 2.ByteBuf不需要像 Nio的ByteBuffer使用flip进行反转,它的底层维护了 readerIndex 和 writerIndex* 3.通过 readerIndex 和 writerIndex 和 capacity, 将 buffer分成三 个区域* o ~ readerIndex : 已经读取的区域* readerIndex ~ riterIndex : 可读的区域* writerIndex ~ capacity : 可写的区域*/@Testpublic void test(){ByteBuf buffer1 = Unpooled.buffer(10); //创建ByteBuf方法1,该对系包含一个数组arr,是一个byte[10],为堆方式创建ByteBuf buffer2 = ByteBufAllocator.DEFAULT.buffer(50); //创建ByteBuf方法2,默认大小为256+直接内存方式创建System.out.println("buffer1原始容量: "+buffer1.capacity());System.out.println("buffer2原始容量: "+buffer2.capacity());System.out.println(buffer1.getClass()); //查看是否使用池化及创建方式System.out.println(buffer2.getClass()); //查看是否使用池化及创建方式/* Buf2写入数据 */StringBuilder builder = new StringBuilder();for (int i = 0; i < 300; i++) {builder.append("a");}buffer2.writeBytes(builder.toString().getBytes());System.out.println("buffer2容量: "+buffer2.capacity()); //写入总数据小于512,扩容为16的倍数Log(buffer2);/* Buf1写入数据 */for (int i = 0; i < 10; i++) {buffer1.writeByte(i);}System.out.println("buffer1容量: "+buffer1.capacity());Log(buffer1);for (int i = 0; i < buffer1.capacity(); i++) {// System.out.println("当前值是: "+buffer.getByte(i)); 不该变 readerindexSystem.out.println("当前值是: "+buffer1.readByte()); //会改变 readerindex}}/* 查看ByteBuf内部方法 */private static void Log(ByteBuf buffer) {int Length = buffer.readableBytes();int rows = Length / 16 + (Length % 15 == 0 ? 0 : 1) + 4;StringBuilder buf =new StringBuilder(rows * 80 * 2).append("read index:").append(buffer.readerIndex()).append(" write index: ").append(buffer.writerIndex()).append(" capacity:").append(buffer.capacity()).append(NEWLINE);appendPrettyHexDump(buf, buffer);System.out.println(buf.toString());}}
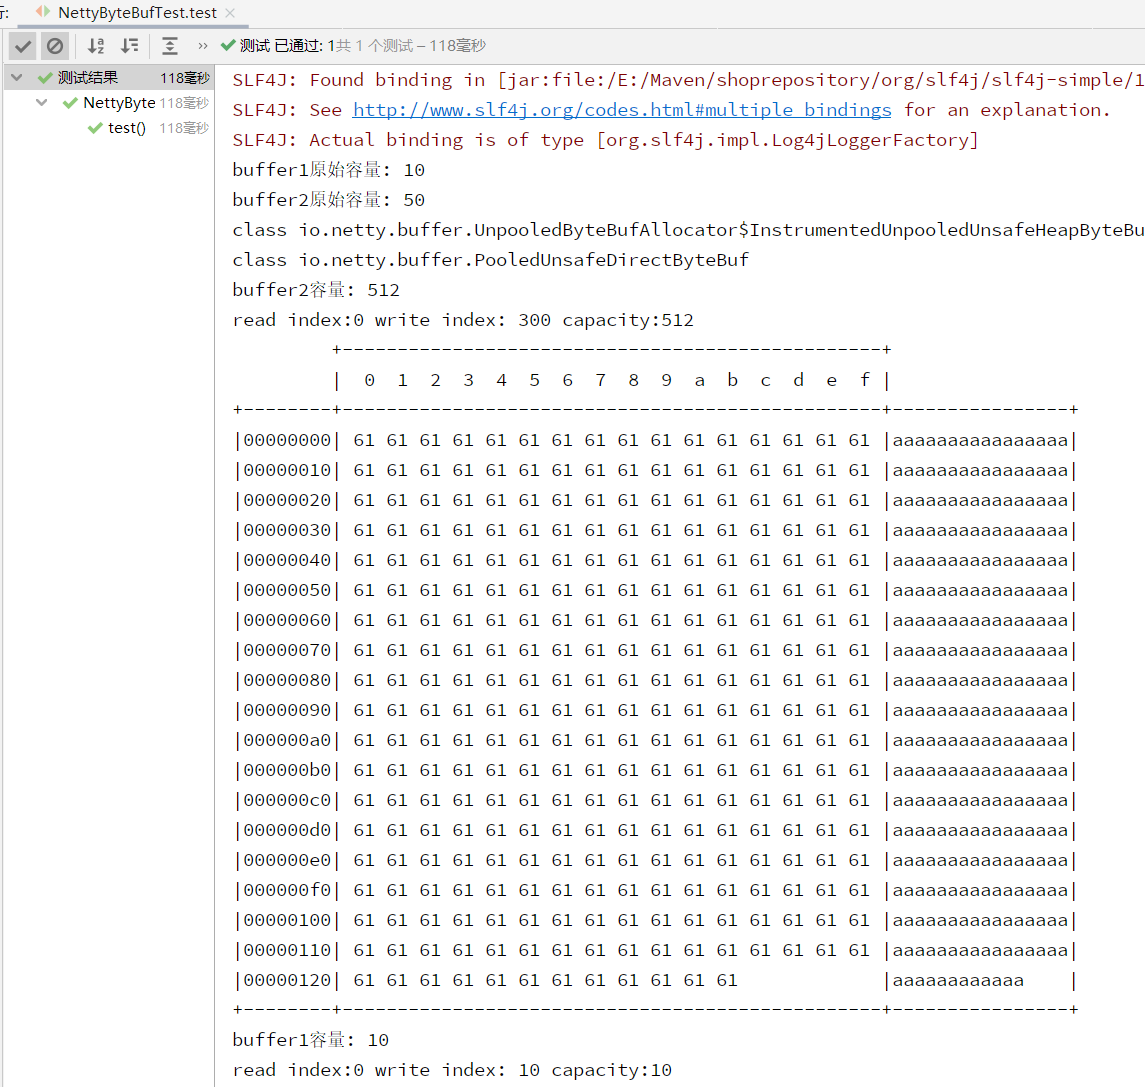
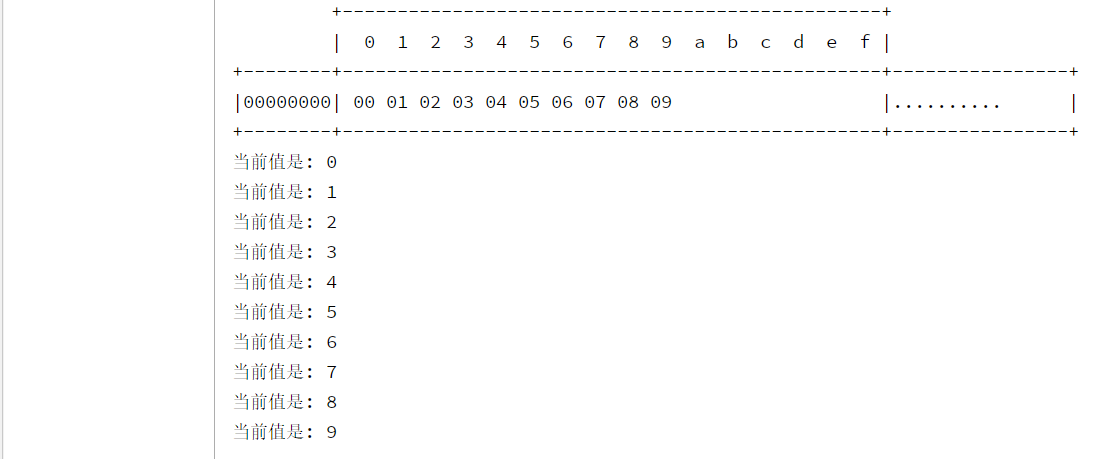
运行结果
常用方法二:
介绍常用方法
package bytebuf;import io.netty.buffer.ByteBuf;import io.netty.buffer.Unpooled;import io.netty.util.CharsetUtil;import org.junit.jupiter.api.Test;public class NettyByteBufTest {/** arrayOffset: 数组偏移量* hasArray: 是否有数组* readerIndex: 读取索引位* writerIndex: 写入索引位* capacity: 容量* readByte: 读取数据,将改变 readerIndex 的位置* readBytes: 读取数据放入byte[]* getByte: 获取数据,返回对应索引为的数据,不改变 readerIndex 的位置* readableBytes: 可读字节数,使用 readByte将会改变该方法返回值* getCharSequence: 从指定索引范围取值* markReaderIndex: 标记读取位* resetReaderIndex: 还原读取位,需要重复读取数据时使用* compositeBuffer: 可以组合多个ByteBuf* addComponents : 将多个ByteBuf放入compositeBuffer,读写指针默认为0,需要指定自动设置指针*/@Testpublic void test2(){//指定编码格式创建有数据的ByteBufByteBuf byteBuf = Unpooled.copiedBuffer("hello,ByteBuf!", CharsetUtil.UTF_8);ByteBuf byteBuf2 = Unpooled.copiedBuffer("hello,Netty!", CharsetUtil.UTF_8);//相关方法使用if(byteBuf.hasArray()){byte[] content = byteBuf.array();System.out.println(new String(content,CharsetUtil.UTF_8));System.out.println(byteBuf.arrayOffset());System.out.println(byteBuf.readerIndex());System.out.println(byteBuf.writerIndex());System.out.println(byteBuf.capacity());System.out.println("当前可读字节数: "+byteBuf.readableBytes());System.out.println((char) byteBuf.readByte());System.out.println("当前可读字节数: "+byteBuf.readableBytes());System.out.println("读取范围0~5的数据"+byteBuf.getCharSequence(0,5,CharsetUtil.UTF_8));System.out.println("读取范围5~7的数据"+byteBuf.getCharSequence(5,2,CharsetUtil.UTF_8));byte[] bcon = new byte[byteBuf.readableBytes()];byteBuf.markReaderIndex();byteBuf.readBytes(bcon);System.out.println("当前可读字节数: "+byteBuf.readableBytes());byteBuf.resetReaderIndex();System.out.println("还原读取标记位后当前可读字节数: "+byteBuf.readableBytes());System.out.println(new String(bcon));}CompositeByteBuf comBuf = ByteBufAllocator.DEFAULT.compositeBuffer();comBuf.addComponents(true,byteBuf,byteBuf2); //自动设置指针,默认不开启,不开启会导致组合后的Buf读写指针全部指向0Log(comBuf);}/* 查看ByteBuf内部方法 */private static void Log(ByteBuf buffer) {int Length = buffer.readableBytes();int rows = Length / 16 + (Length % 15 == 0 ? 0 : 1) + 4;StringBuilder buf =new StringBuilder(rows * 80 * 2).append("read index:").append(buffer.readerIndex()).append(" write index: ").append(buffer.writerIndex()).append(" capacity:").append(buffer.capacity()).append(NEWLINE);appendPrettyHexDump(buf, buffer);System.out.println(buf.toString());}}
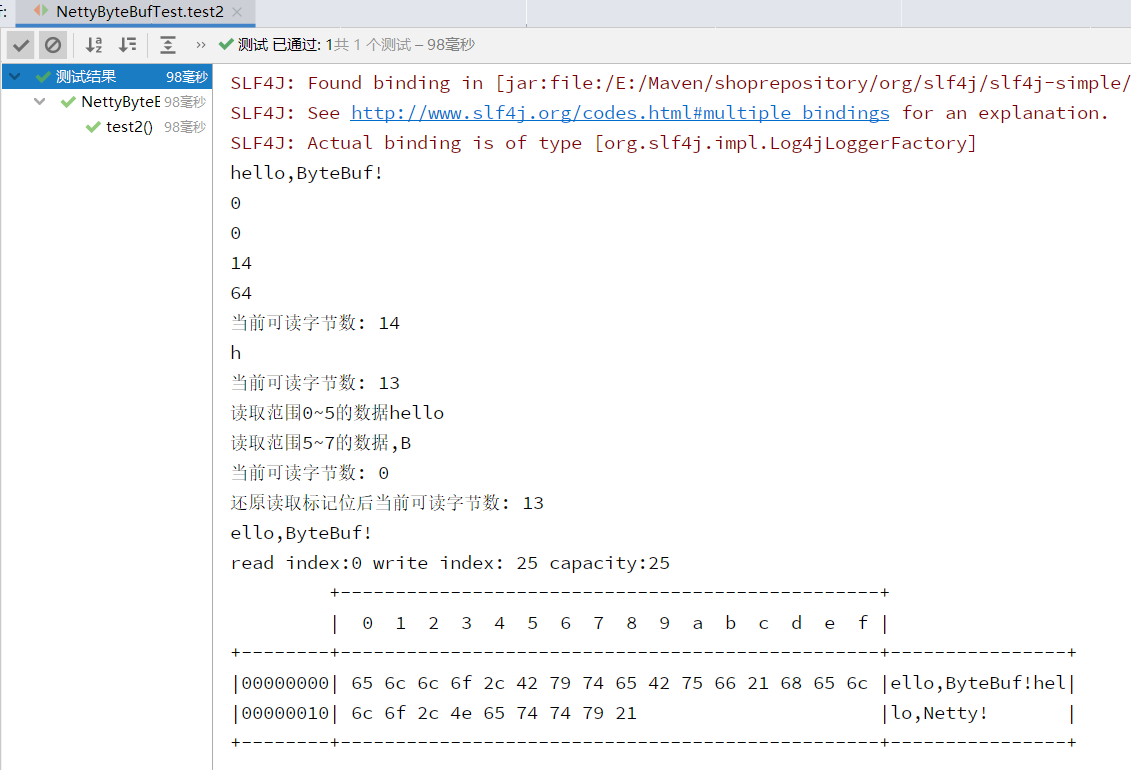
运行结果
零拷贝案例一:
演示 slice 方式的分片零拷贝
package bytebuf;import io.netty.buffer.ByteBuf;import io.netty.buffer.ByteBufAllocator;import io.netty.buffer.Unpooled;import io.netty.util.CharsetUtil;import org.junit.jupiter.api.Test;import static io.netty.buffer.ByteBufUtil.appendPrettyHexDump;import static io.netty.util.internal.StringUtil.NEWLINE;public class NettyByteBufTest {@Testpublic void test3(){ByteBuf buffer = ByteBufAllocator.DEFAULT.buffer(20);buffer.writeBytes(new byte[]{'a','b','c','d','e','f','g','h','i','j'});Log(buffer);//在切片过程中没有发生数据复制ByteBuf slice = buffer.slice(0, 5);ByteBuf slice1 = buffer.slice(5, 5);Log(slice);Log(slice1);//对切片后的数据进行修改,修改的依旧是原始数据slice.setByte(0,'p');Log(slice);Log(buffer);}/* 查看ByteBuf内部方法 */private static void Log(ByteBuf buffer) {int Length = buffer.readableBytes();int rows = Length / 16 + (Length % 15 == 0 ? 0 : 1) + 4;StringBuilder buf =new StringBuilder(rows * 80 * 2).append("read index:").append(buffer.readerIndex()).append(" write index: ").append(buffer.writerIndex()).append(" capacity:").append(buffer.capacity()).append(NEWLINE);appendPrettyHexDump(buf, buffer);System.out.println(buf.toString());}}
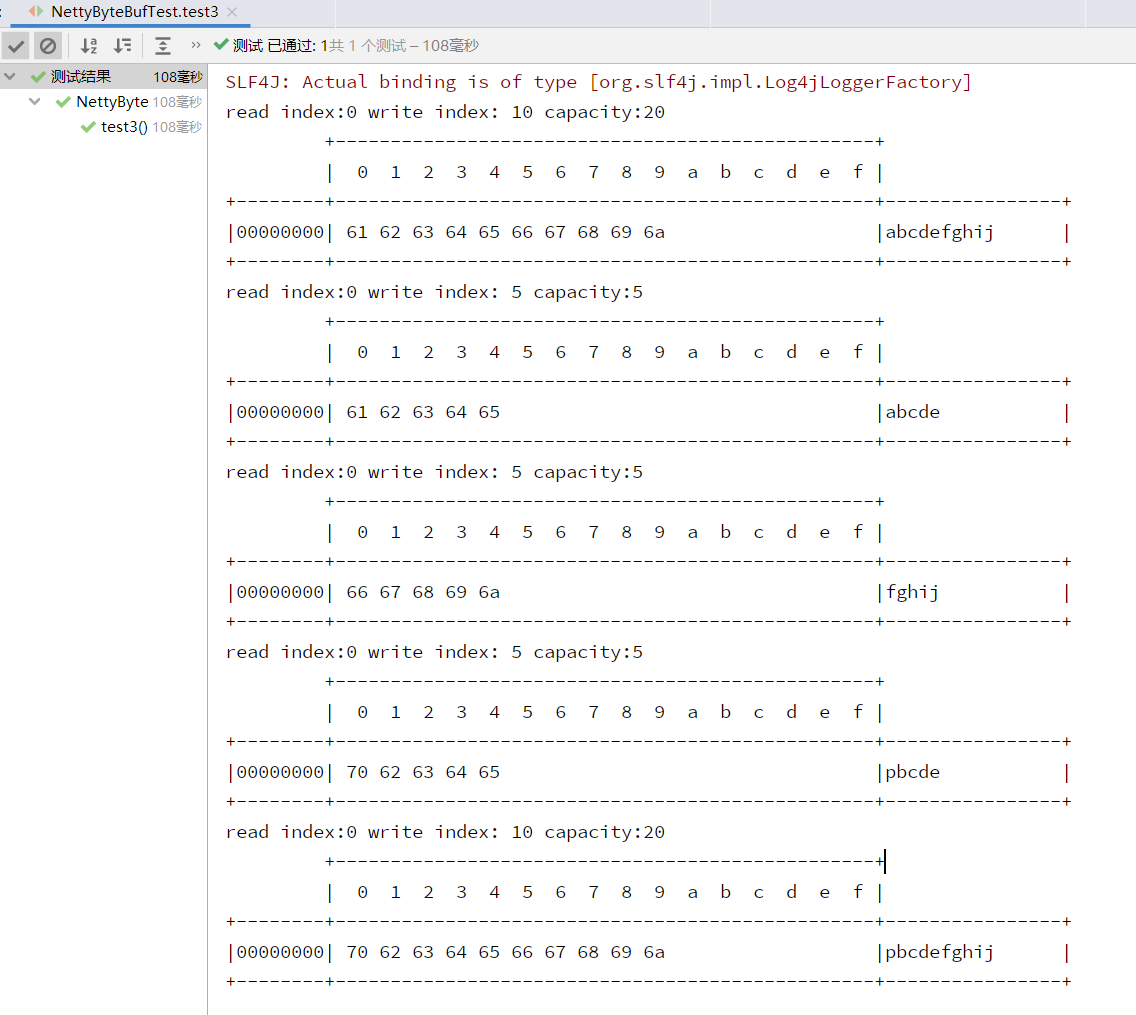
运行结果
零拷贝案例二:
演示 duplicate 方式的全复制零拷贝
package bytebuf;import io.netty.buffer.ByteBuf;import io.netty.buffer.ByteBufAllocator;import io.netty.buffer.Unpooled;import io.netty.util.CharsetUtil;import org.junit.jupiter.api.Test;import static io.netty.buffer.ByteBufUtil.appendPrettyHexDump;import static io.netty.util.internal.StringUtil.NEWLINE;public class NettyByteBufTest {/* 查看ByteBuf内部方法 */private static void Log(ByteBuf buffer) {int Length = buffer.readableBytes();int rows = Length / 16 + (Length % 15 == 0 ? 0 : 1) + 4;StringBuilder buf =new StringBuilder(rows * 80 * 2).append("read index:").append(buffer.readerIndex()).append(" write index: ").append(buffer.writerIndex()).append(" capacity:").append(buffer.capacity()).append(NEWLINE);appendPrettyHexDump(buf, buffer);System.out.println(buf.toString());}/* 零拷贝案例 - duplicate方式 */@Testpublic void test4(){ByteBuf buffer = ByteBufAllocator.DEFAULT.buffer(20);buffer.writeBytes(new byte[]{'a','b','c','d','e','f','g','h','i','j'});Log(buffer);//在切片过程中没有发生数据复制ByteBuf duplicate = buffer.duplicate();Log(duplicate);}}
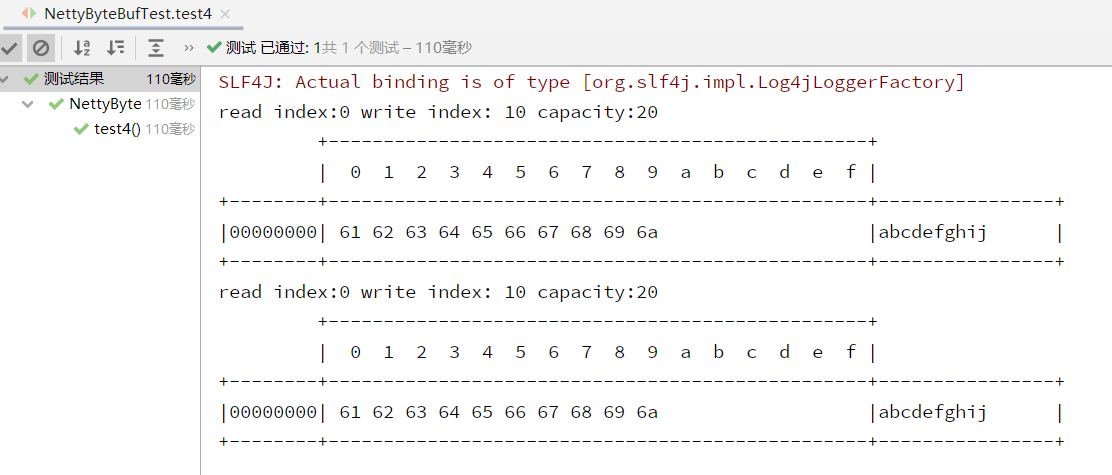<br />** 运行结果**

