一、vant-ui实现视配
1-1 安装依赖
yarn add postcss-pxtorem lib-flexible amfe-flexible
1-2 main.js引入依赖
import 'amfe-flexible/index.js'
1-3 postcss.config.js
module.exports = {plugins: {'autoprefixer': {browsers: ['Android >= 4.0', 'iOS >= 7']},'postcss-pxtorem': {rootValue: 37.5,propList: ['*']}}}
Tips:public/index.html 一定要加上视口
使用这个适配时,当有一些我们不想转换rem的属性,比如border,1px转换rem之后,可能在手机上就看不见了
我们可以在她的配置文件中加上一行属性
propList: [‘‘,’!border‘]
二、配置vant-ui
1-1全局配置
yarn add vant
import Vue from 'vue';import Vant from 'vant';import 'vant/lib/index.css';Vue.use(Vant);
1-2 自动按需引入组件
yarn add vant babel-plugin-import
babel 中添加配置
module.exports = {presets: ['@vue/cli-plugin-babel/preset'],plugins: [['import', {libraryName: 'vant',libraryDirectory: 'es',style: true}, 'vant']]}
三、vw的使用
1-1配置postcss.config.js
module.exports = {plugins: {"postcss-import": {},"postcss-url": {},"postcss-aspect-ratio-mini": {},"postcss-write-svg": {utf8: false},"postcss-cssnext": {},"postcss-px-to-viewport": {viewportWidth: 750, // 视窗的宽度,对应的是我们设计稿的宽度,一般是750viewportHeight: 1334, // 视窗的高度,根据750设备的宽度来指定,一般指定1334,也可以不配置unitPrecision: 3, // 指定`px`转换为视窗单位值的小数位数(很多时候无法整除)viewportUnit: 'vw', // 指定需要转换成的视窗单位,建议使用vwselectorBlackList: ['.ignore', '.hairlines'], // 指定不转换为视窗单位的类,可以自定义,可以无限添加,建议定义一至两个通用的类名minPixelValue: 1, // 小于或等于`1px`不转换为视窗单位,你也可以设置为你想要的值mediaQuery: false // 允许在媒体查询中转换`px`},"postcss-viewport-units": {},"cssnano": {preset: "advanced",autoprefixer: false,"postcss-zindex": false}}}
1-2安装依赖
yarn add cssnano postcss-aspect-ratio-mini postcss-cssnext postcss-px-to-viewport postcss-viewport-units postcss-write-svg
`yarn add cssnano-preset-advanced postcss-import postcss-url autoprefixer``
1-3在public/index.html配置
<!DOCTYPE html><html><head><meta charset="utf-8"><meta http-equiv="X-UA-Compatible" content="IE=edge"><meta name="viewport" content="width=device-width,initial-scale=1.0"><link rel="icon" href="<%= BASE_URL %>favicon.ico"><title>vuecli3vw</title></head><body><noscript><strong>We're sorry but vuecli3vw doesn't work properly without JavaScript enabled. Please enable it to continue.</strong></noscript><div id="app"></div><!-- built files will be auto injected -->//配置下面的js<script src="//g.alicdn.com/fdilab/lib3rd/viewport-units-buggyfill/0.6.2/??viewport-units-buggyfill.hacks.min.js,viewport-units-buggyfill.min.js"></script><script>window.onload = function () {window.viewportUnitsBuggyfill.init({hacks: window.viewportUnitsBuggyfillHacks});}</script></body></html>
四、数据mock
1.在线接口管理平台mock yapi
2. vue-cli mock
参考:https://www.html.cn/archives/10066
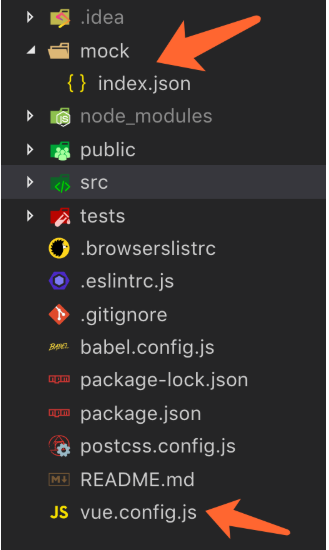
- 2-1 目录

//index.json写上自己的接口//vue.config.jsconst mockIndexData = require("./mock/index.json");module.exports = {//...devServer: {port: 8080,before(app) {app.get("/api/index", (req, res) => {res.json(mockIndexData);});}}};//axios请求mounted(){this.axios.get("/api/index").then(res=>{})}

