一、使用步骤
使用Vue路径实现动态挂载组件。将使用过程步骤化,方便自己后续的使用。快速开始Vue Router的步骤
1.1、安装Vue Router插件
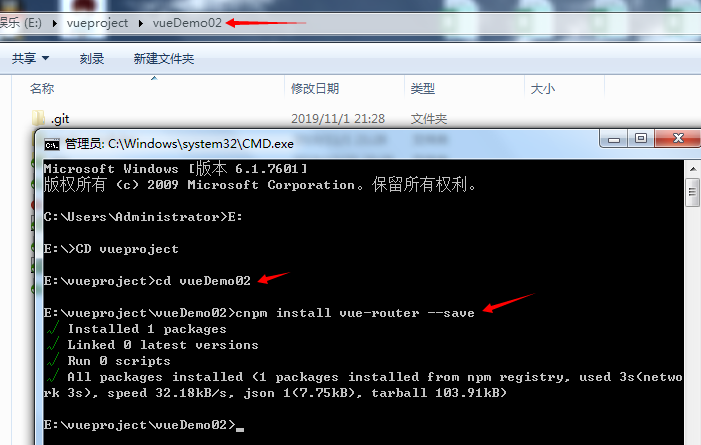
cmd切换到项目目录。执行cnpm install vue-router —save。Vue Router 官网:https://router.vuejs.org/zh/installation.html
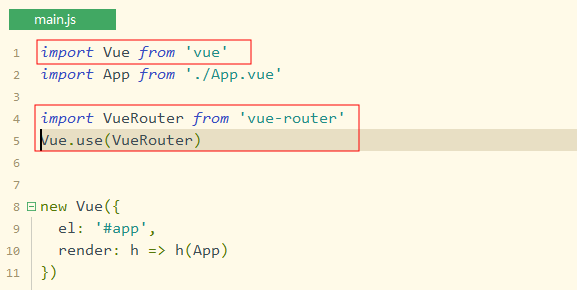
1.2、在main.js中使用Vue Router组件
1.3 配置路由
配置路由分为4个步骤:定义 (路由) 组件、定义路由、创建 router 实例、创建和挂载根实例。这四步可以全部卸载main.js中,也可以使用模块化将这四步单独写在一个模块中,最后import到main.js中挂载
1.3.1 定义 (路由) 组件
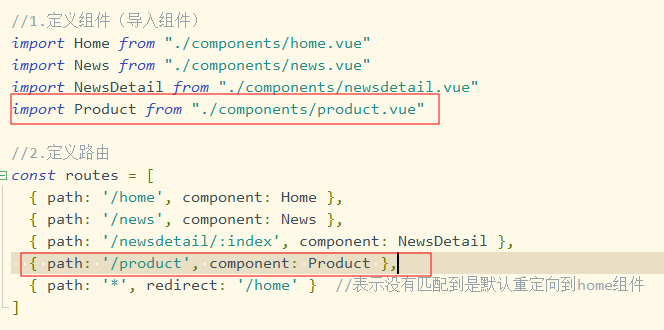
路由组件可以是直接定义,也可以是导入已经定义好的组件。这里导入已经定义好的组件。如下

1.3.2 定义路由(路由对象数组)
定义路由对象数组。对象的path是自定义的路径(即使用这个路径可以找到对应的组件),component是指该路由对应的组件。如下:

1.3.3 实例化Vue Router对象
调用Vue Router的构造方法创建一个Vue Router的实例对象,将3.2步定义的路由对象数组作为参数对象的值传入。如下

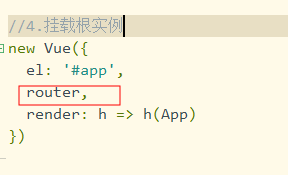
1.3.4 挂载根实例
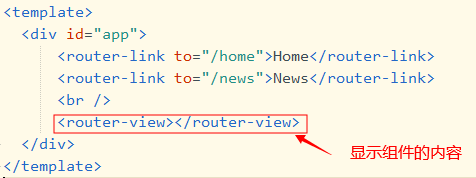
1.4 在App.vue中使用路由
在App.vue中使用
1.5 注意
在HBuilderX中新建的Vue项目使用npm run dev跑不起来,使用npm run serve 就好了
二、动态路由和get传值
2.1 动态路由
动态路由可以理解为同一个组件对于路由传过来的值不同,可以实现不同的功能或者显示不同的信息。使用动态路由分为三步,配置路由、在页面使用
2.1.1 配置路由
一个“路径参数”使用冒号 : 标记,例如 ‘/newsdetail/:index’ ,’:index’ 实现动态路由,当匹配到一个路由时,参数值会被设置到 this.$route.params,可以在每个组件内使用。配置路由如下:

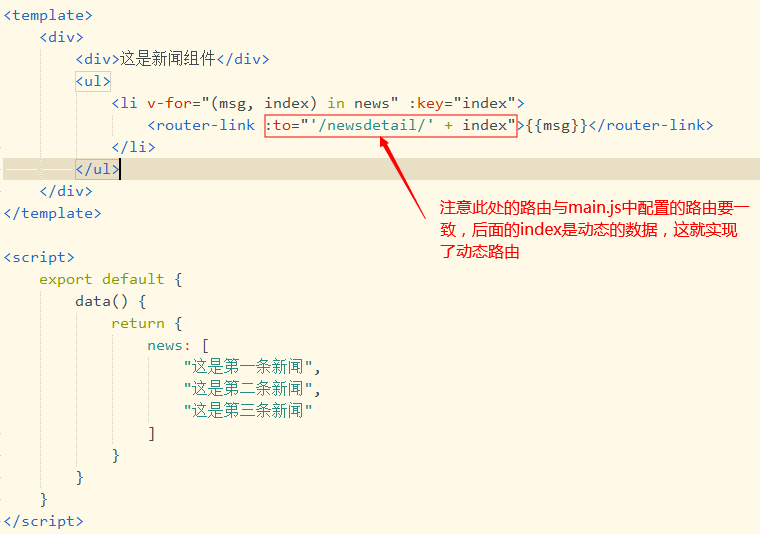
2.1.2 在页面使用实现页面的跳转
在页面使用
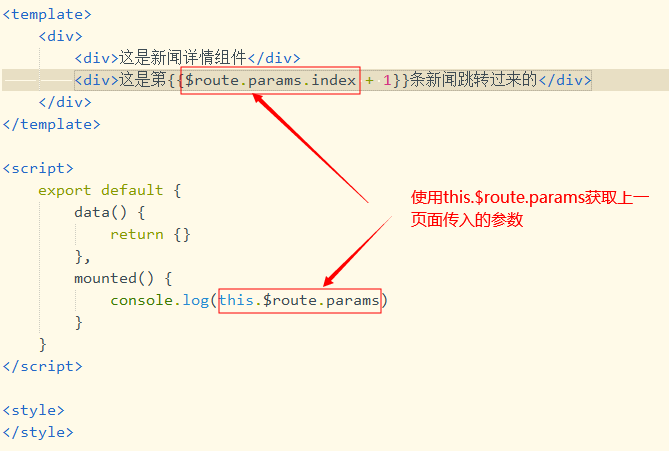
2.1.3 在跳转的目标页面使用this.$route.params获取参数
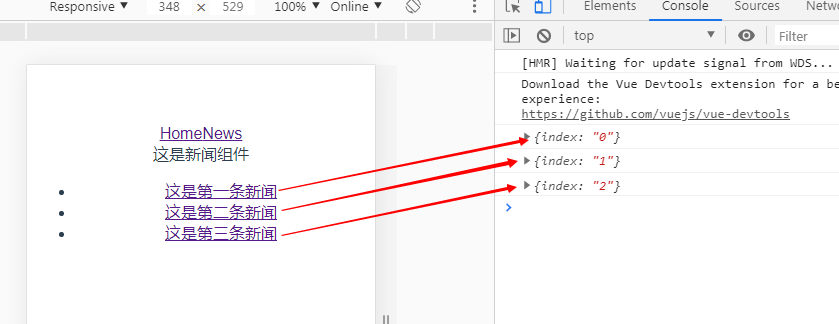
2.1.4 运行项目
运行项目后在新闻页面,点击新闻列表中的不同的新闻,可以实现动态的路由,在新闻详情页面可以获取传递的参数
2.2 get传值
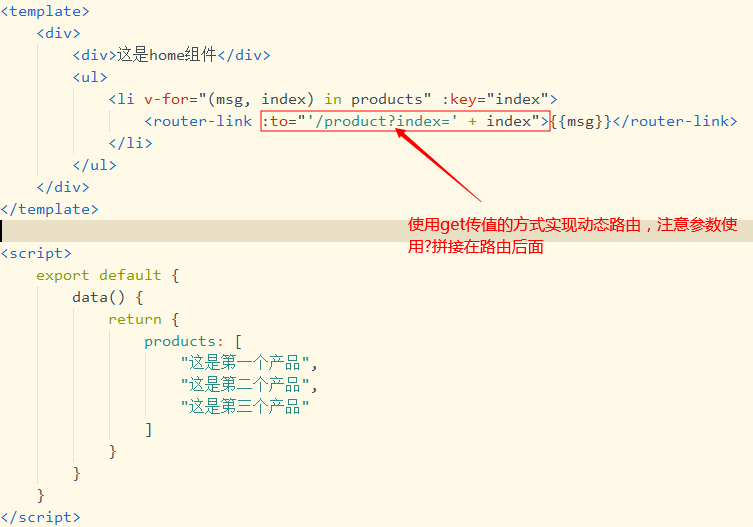
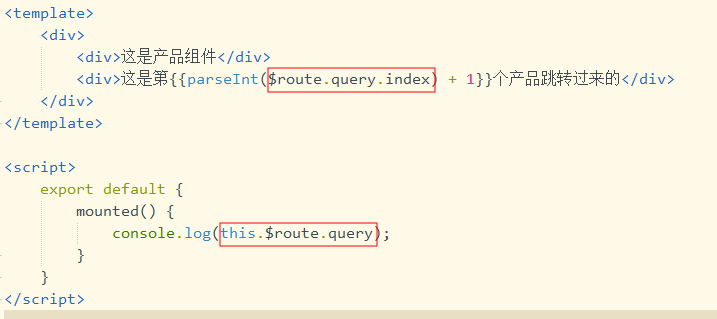
get传值和写普通html页面时使用问号?拼接参数的方式一样,在跳转的页面中使用this.$route.query来获取get传值方式传过来的参数
2.2.1 配置路由
2.2.2 在页面使用实现页面的跳转
2.2.3 在跳转的目标页面使用this.$route.query获取参数
2.2.4 启动项目
启动项目后,在home组件下,如下,点击第二个

可以看到跳转后的页面和控制台如下:

以上。
三、编程式导航
编程式导航就是使用js实现页面的跳转,而不是直接在
3.1 实现编程式导航
实现编程式导航在js中使用this.$router.push(location, onComplete?, onAbort?)。其中第一个参数就是需要跳转的页面的路径,使用在路由中已经配置好的路径。可以有以下几种方式实现跳转。
// 字符串//{ path: '/home', component: Home } 路由中已配置homethis.$router.push('home')// 对象//{ path: '/home', component: Home } 路由中已配置homethis.$router.push({ path: 'home' })// 命名的路由//{ path: '/user/:userId', component: User , name: 'user'} 路由中已配置user,并且路由命名为user.this.$router.push({ name: 'user', params: { userId: '123' }})//{ path: '/register', component: Register } 路由中已配置register// 带查询参数,变成 /register?plan=privatethis.$router.push({ path: 'register', query: { plan: 'private' }}) //使用get传值的方式实现编程式动态路由
注意:如果提供了 path,params 会被忽略,上述例子中的 query 并不属于这种情况。取而代之的是下面例子的做法,你需要提供路由的 name 或手写完整的带有参数的 path:
const userId = '123'this.$router.push({ name: 'user', params: { userId }}) // -> /user/123router.push({ path: `/user/${userId}` }) // -> /user/123 //注意此处不是单引号 ' ,而是 `(键盘左上角的~键).使用 ${varName} 来实现动态传值// 这里的 params 不生效this.$router.push({ path: '/user', params: { userId }}) // -> /user
3.2 使用上面列举的方式
3.2.1 配置的路由:
//2.定义路由const routes = [{ path: '/home', component: Home },{ path: '/news', component: News },{ path: '/newsdetail/:index', component: NewsDetail, name: 'detail'},{ path: '/product', component: Product },{ path: '*', redirect: '/home' } //表示没有匹配到是默认重定向到home组件]
3.2.2 实现js跳转的页面:<div>
<div>这是home组件</div>
<ul>
<li v-for="(msg, index) in products" :key="index">
<router-link :to="'/product?index=' + index">{{msg}}</router-link>
</li>
</ul>
<button @click="toNewsPage()">到新闻页</button>
<button @click="toNewsDetail()">动态路由跳到新闻详情</button>
<button @click="toNewsDetail2()">动态路由跳到新闻详情的第二种编程时导航写法</button>
<button @click="toProduct()">get传值的方式跳转到product页面</button>
</div>
</template>
<script>
export default {
data() {
return {
products: [
"这是第一个产品",
"这是第二个产品",
"这是第三个产品"
]
}
},
methods: {
toNewsPage() {
this.$router.push({path: 'news'})
},
toNewsDetail() {
this.$router.push({name: 'detail', params: {index: 1}})
},
toNewsDetail2() {
let index = 1
this.$router.push({path: `/newsdetail/${index}`})
},
toProduct() {
this.$router.push({path: 'product', query: {index: 1}})
}
}
}
</script>
四、路由嵌套
<div>
 <div>这是home组件</div>
   <ul>
     <li v-for="(msg, index) in products" :key="index">
     <router-link :to="'/product?index=' + index">{{msg}}</router-link>
     </li>
   </ul>
   <button @click="toNewsPage()">到新闻页</button>
   <button @click="toNewsDetail()">动态路由跳到新闻详情</button>
       <button @click="toNewsDetail2()">动态路由跳到新闻详情的第二种编程时导航写法</button>
   <button @click="toProduct()">get传值的方式跳转到product页面</button>
 </div>
</template>
<script>
  export default {
 data() {
   return {
     products: [
    "这是第一个产品",
    "这是第二个产品",
    "这是第三个产品"
    ]
     }
   },
   methods: {
     toNewsPage() {
    this.$router.push({path: 'news'})
     },
     toNewsDetail() {
    this.$router.push({name: 'detail', params: {index: 1}})
     },
         toNewsDetail2() {
            let index = 1
            this.$router.push({path: `/newsdetail/${index}`})
         },
     toProduct() {
    this.$router.push({path: 'product', query: {index: 1}})
     }
   }
 }
</script>
