Linux(Centos)之安装Nginx及注意事项 - Kencery - 博客园
Monday, August 14, 2017
6:29 PM
阅读目录
- 1.Nginx的简单说明
- 2.准备工作
- 3.安装SSL功能需要openssl库以及gzip模块需要的zlib库
- 4.安装 rewrite模块需要pcre库
- 5.安装 Nginx服务
- 6.监测Nginx是否安装成功
- 7.将Nginx设置为开机自动启动
- 8.使用server命令启动nginx服务
1.Nginx的简单说明
a. Nginx是一个高性能的HTTP和反向代理服务器,也是一个IMAP/POP3/SMTP服务器,期初开发的目的就是为了代理电子邮件服务器室友:Igor Sysoev开发,源代码符合BSD开源。其特点就是占用内存少并发能力强,在天朝使用Nginx的大型网站已经有很多:百度、淘宝、腾讯等等…。
b.Nginx作为Http服务器,有以下几项基本特征:
b.1 处理静态文件,索引文件以及自动索引,打开文件描述符缓冲。
b.2 无缓存的反向代理加速,简单的负载均衡和容错
b.3 模块化的结构,包括gzipping,byte ranges,chunked responses以及SSI-filter等filter,如果由FastCGI或其它代理服务器处理蛋液中存在的多个SSI,则这项处理可以并行运行,而不需要相互等待。
b.4 支持SSL和TLSSNI。
c.Nginx官网:http://nginx.org/
d.Nginx推荐学习网址:http://dreamfire.blog.51cto.com/418026/1140965
回到顶部
2.准备工作
a.上面简单介绍了一下Nginx,大家如果想要了解更多关于Nginx的知识,请自行通过网络学习。
b.工欲善其事必先利其器,下面我们就在Linux下面简单安装一下Niginx,在安装过程中需要了一些问题,同步都会在博客中说出来。
c.Nginx的安装依赖于以下三个包,意思就是在安装Nginx之前首先必须安装一下的三个包,安装顺序为我写的顺序:
c.1 SSL功能需要openssl库,下载地址:http://www.openssl.org/
c.2 gzip模块需要zlib库,下载地址:http://www.zlib.net/
c.3 rewrite模块需要pcre库,下载地址:http://www.pcre.org/
d.Nginx的安装包:下载地址为:http://nginx.org/en/download.html
e.将上面下载的几个软件全部使用Xftp上传到Linux系统中,上传路径和软件如图所示:
![[ rootkencery kencery]# cd /usr/local/kencery/nginx/soft/ [ rootkencery soft]# 11 root@kencery soft]# 11 8364 09:52 rw rw- - rw rw 1 1 1 1 kencery kencery kencery kencery kencery kencery kencery kencery 887908 5045283 2053336 571091 10 10 10 10 : 52 : 52 : 52 nginx-1.9.9. tar .gz openss1-SNAP-20160104. tar . gz pc re-8.38. tar .gz zlib-1.2.8. tar .gz
f.操作需要的软件以及系统如下:虚拟机(Vmware),虚拟机中安装的Centos系统,Xshell,Xftp,以及上面的几个包。
g.下面开始按照上面说的按照顺序开始安装软件。
回到顶部
3.安装SSL功能需要openssl库以及gzip模块需要的zlib库
a(1).首先我们安装SSL功能需要的openssl库插件,注意:安装过程是按照我在linux下设置的文件路径来安装的,命令如下:
a.1 tar -zxvf soft/openssl-SNAP-20160104
a.2 cd cd openssl-SNAP-20160104/
a.3 ./config
a.4 make
a.5 make install
b(1).安装gzip模块需要zlib库的安装方法和openssl安装的方法一模一样,也是分为上面五个步骤,只不过是文件的名称不一样,命令简单如下:
b.1 tar -zxvf soft/openssl-SNAP-20160104
b.2 cd openssl-SNAP-20160104/
b.3 ./configure
b.4 make
b.5 make install
b.如果没有报错,则说明安装完全完成了~。
回到顶部
4.安装 rewrite模块需要pcre库
a.安装 rewrite模块需要pcre库的安装方法和openssl安装的方法一模一样,也是分为上面五个步骤,只不过是文件的名称不一样,命令简单如下:
a.1 tar -zxvf soft/pcre-8.38.tar.gz
a.2 cd pcre-8.38/
a.3 ./configure
a.4 make
a.5 make install
b.在执行./configure的出现错误了,导致不能继续往下执行,报错内容为:
error: You need a C++ compiler for C++ support,看到这句话我们就已经猜到了应该是c++包信息,而linux中没有,那么首先安装一下这个包信息即可,安装命令为:
b.1 yum install -y gcc gcc-c++
c.当安装完上面的c++包之后,在此运行,发现消息已经显示安装成功了,当基于上面的东西全部安装完成之后,就需要安装Nginx服务了。
回到顶部
5.安装 Nginx服务
a.安装 rewrite模块需要pcre库的安装方法和openssl安装的方法一模一样,也是分为上面五个步骤,只不过是文件的名称不一样,命令简单如下:
a.1 tar -zxvf soft/nginx-1.9.9.tar.gz
a.2 cd nginx-1.9.9/
a.3 ./configure —with-pcre=../pcre-8.38/ —with-zlib=../zlib-1.2.8/ —with-openssl=../openssl-SNAP-20160104/
a.4 make
a.5 make install
b.在执行./configure的出现错误了,导致不能继续往下执行,报错内容为:
error: You need a C++ compiler for C++ support,看到这句话我们就已经猜到了应该是c++包信息,而linux中没有,那么首先安装一下这个包信息即可,安装命令为:
b.1 yum install -y gcc gcc-c++
c.当安装完上面的c++包之后,在此运行,发现消息已经显示安装成功了。博文到这里如果安装的时候没有遇到错误的话说明已经安装成功了,下面我们就是测试Nginx是否安装成功。
回到顶部
6.监测Nginx是否安装成功
a.当上面的所有步骤完成之后,则说明Nginx安装已经完成,那么我们如何来确定是否安装成功了呢?通过以下命令来确定即可。
a.1 cd /usr/local/nginx/sbin/
a.2 ./nginx -t
b. 当我执行第二个命令(./nginx -t)的时候出错了,报没有权限的错误。如图所示:
![[kencerykencery sbin]$ ./nginx -t nginx: [alert] could not open error log file: open() “ /usr/local/nginx/logs/error . log” failed (13: Permission denied) nginx: the configuration file /usr/local/nginx/conf/nginx.conf syntax is ok 2016/01/16 12:48:02 emerg] open() “ /usr/local/nginx/logs/nginx.pid” failed (13: Permission denied) nginx: configuration file /usr/local/nginx/conf/nginx.conf test failed
备注:根据错误提示,我们就能够看出来,是说/usr/local/nginx下没有权限,解决办法也很简单,我们给文件赋值权限。
c.如下图所示,配置权限(配置权限需要切换到root用户下)之后,执行上面两个步骤,如果linux中如下图所示:则说明安装已成功。
![[kencerykencery / ] $ su [rootkencery chmod -R 777 usr/local/nginx/ [rootkencery cd /usr/local/sbin/ [rootkencery sbin]# ./nginx -t /nginx: bash . [rootkencery sbin]# cd /usr/local/nginx/sbin/ [rootkencery sbin]# ./nginx -t nginx: the configuration file /usr/local/nginx/conf/nginx.conf syntax is ok nginx: configuration file /usr/local/nginx/conf/nginx.conf test is successful root@kencery sbin]#
d.当确认安装完成之后,首先就需要启动和查看Nginx默认安装的端口是多少,两个命令分别如下:
(1) ./nginx
(2) netstat -ntlp , Nginx默认端口为80
e.开放80端口,让其外部环境可以访问(如果不开放80端口,外部环境访问不了),命令以及截图如下:
vim /etc/sysconfig/iptables
备注:这里我使用vim更改防火强信息之后,在重新启动防火墙的时候出现了错误,错误信息为:Try `iptables-restore -h’ or ‘iptables-restore —help’ for more information,这个错误信息提示我们不能重新启动防火墙,那怎么办呢?测试了一下已写命令的方式去更改,发现更改成功了,如图所示:
![[rootkencery sbin]# /etc/init .d/iptables iptables: iptables: ACCEPT: filter iptables: restart [rootkencery sbin]# vim /etc/sysconfig/iptables # Generated by iptables-save v 1.4.7 on Sat Jan 16 13:43:16 2016 *filter : INPUT ACCEPT : FORWARD ACCEPT : OUTPUT ACCEPT 30: 2888] A INPUT -p A INPUT -m -A INPUT -p A INPUT -i A INPUT -p ‘A INPUT j A FORWARD COMMIT # Completed -dport 80 -j ACCEPT tcp -m tcp -state RELATED,ESTABLISHED -j ACCEPT state icmp -j ACCEPT 10 -j ACCEPT -state NEW -m tcp -dport 22 -j ACCEPT tcp -m state REJECT - -reject with icmp-host-prohibited -j REJECT — reject with icmp-host-prohibited on Sat Jan 16 2016
f.当上面的工作完成之后,我们在外部浏览器中浏览:http://IP,出现如图所示,则说明安装已完全完成。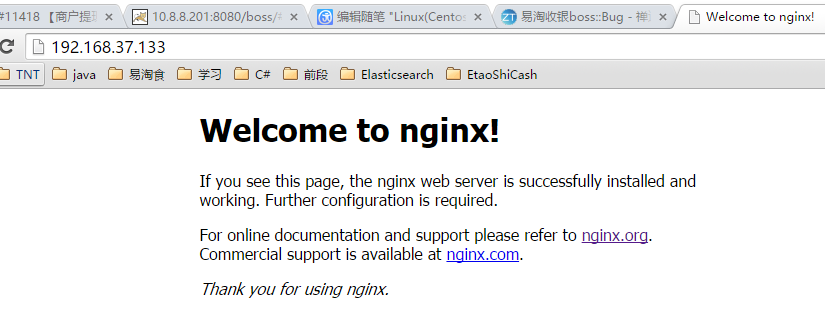
回到顶部
7.将Nginx设置为开机自动启动
a.当上面6步完成之后,说明安装已经完全成功了,但是每次开机我们面临的一个问题,就是每次都要执行命令(1: cd /usr/local/nginx/sbin/ 2:./nginx -t),那么这时候有这个需要,设置开机自启动,开机自动启动的命令为:将Nginx的启动命令添加到/etc/rc.local,命令如下:
echo “/usr/local/nginx/sbin/nginx -c /usr/local/nginx/conf/nginx.conf” >> /etc/rc.local
b.然后将Linux关机重启测试一下,如果http://IP还能够访问,则说明配置成功了,我这边已测试,配置完全成功。
回到顶部
8.使用server命令启动nginx服务
a. 现在觉得启动命令太麻烦,虽然开机可以自启动,但是每次改动要重新启动nginx的话,要么输入命令,要么开机,都还不是很好,那么我们能不能创造一个更好的方式呢?当然可以,我们可以通过设置System V脚本。
b.脚本代码如下所示:


1 #!/bin/sh
2 #
3 # nginx - this script starts and stops the nginx daemon
4 #
5 # chkconfig: - 85 15
6 # description: Nginx is an HTTP(S) server, HTTP(S) reverse
7 # proxy and IMAP/POP3 proxy server
8 # processname: nginx
9 # config: /etc/nginx/nginx.conf
10 # config: /etc/sysconfig/nginx
11 # pidfile: /var/run/nginx.pid
12 # Source function library.
13 . /etc/rc.d/init.d/functions
14 # Source networking configuration.
15 . /etc/sysconfig/network
16 # Check that networking is up.
17 “(basename $nginx)
20 NGINX_CONF_FILE=”/usr/local/nginx/conf/nginx.conf”
21 [ -f /etc/sysconfig/nginx ] && . /etc/sysconfig/nginx
22 lockfile=/var/lock/subsys/nginx
23
24 start() {
25 [ -x $nginx ] || exit 5
26 [ -f $NGINX_CONF_FILE ] || exit 6
27 echo -n $”Starting $prog: “
28 daemon $nginx -c ?
30 echo
31 [ $retval -eq 0 ] && touch $lockfile
32 return $retval
33 }
34
35 stop() {
36 echo -n $”Stopping $prog: “
37 killproc ?
39 echo
40 [ $retval -eq 0 ] && rm -f $lockfile
41 return $retval
42 killall -9 nginx
43 }
44
45 restart() {
46 configtest || return $?
47 stop
48 sleep 1
49 start
50 }
51
52 reload() {
53 configtest || return $?
54 echo -n $”Reloading $prog: “
55 killproc ?
57 echo
58 }
59
60 force_reload() {
61 restart
62 }
63
64 configtest() {
65 $nginx -t -c $NGINX_CONF_FILE
66 }
67
68 rh_status() {
69 status $prog
70 }
71
72 rh_status_q() {
73 rh_status >/dev/null 2>&1
74 }
75
76 case “$1” in
77 start)
78 rh_status_q && exit 0
79 $1
80 ;;
81 stop)
82 rh_status_q || exit 0
83 $1
84 ;;
85 restart|configtest)
86 $1
87 ;;
88 reload)
89 rh_status_q || exit 7
90 $1
91 ;;
92 force-reload)
93 force_reload
94 ;;
95 status)
96 rh_status
97 ;;
98 condrestart|try-restart)
99 rh_status_q || exit 0
100 ;;
101 *)
102 echo $”Usage: $0 {start|stop|status|restart|condrestart|try-restart|reload|force-reload|configtest}”
103 exit 2
104 esac
[
c.创建命令如下,手先跳转到/etc/init.d下创建nginx启动脚本文件,命令如下;
c.1 cd /etc/init.d/
c.2 vim nginx 创建一个新的nginx文件,将上面的命令代码copy到里面,然后保存
d.修改脚本权限,命令如下:chmod 755 nginx
e.将脚本文件加入到chkconfig中 chkconfig —add nginx
f.设置nginx开机在3和5级别自动启动 chkconfig —level 35 nginx on
g.测试nginx脚本文件是否能够正常使用,命令如下,我均已测试,全部可以使用。
g.1 /etc/init.d/nginx restart
g.2 /etc/init.d/nginx reload
g.3 /etc/init.d/nginx stop
到这里我们这片笔记就完成了,能帮助大家就帮到,帮不到大家,谢谢大家了,这只是学习笔记,不用较真某些东西,谢谢~~
后面有机会我还会再说这块的,如何将一个网站部署到nginx下去
每天的努力都是为了未来更够更好
已使用 OneNote 创建。

若有收获,就点个赞吧
0 人点赞

![root@kencery soft]# 11 8364 09:52 rw rw- - rw rw 1 1 1 1 kencery kencery kencery kencery kencery kencery kencery kencery 887908 5045283 2053336 571091 10 10 10 10 : 52 : 52 : 52 nginx-1.9.9. tar .gz openss1-SNAP-20160104. tar . gz pc re-8.38. tar .gz zlib-1.2.8. tar .gz](https://cdn.nlark.com/yuque/0/2021/png/3018302/1639559442746-fff2eb93-4307-419c-a104-f348e6b868ae.png)
![emerg] open() “ /usr/local/nginx/logs/nginx.pid” failed (13: Permission denied) nginx: configuration file /usr/local/nginx/conf/nginx.conf test failed](https://cdn.nlark.com/yuque/0/2021/png/3018302/1639559442839-a8f0b3ba-b9d2-4a3e-baf2-bb63266ffa5b.png)
![root@kencery sbin]#](https://cdn.nlark.com/yuque/0/2021/png/3018302/1639559442946-ce66611d-fecd-484f-bba1-f55ab063ad93.png)
![30: 2888] A INPUT -p A INPUT -m -A INPUT -p A INPUT -i A INPUT -p ‘A INPUT j A FORWARD COMMIT # Completed -dport 80 -j ACCEPT tcp -m tcp -state RELATED,ESTABLISHED -j ACCEPT state icmp -j ACCEPT 10 -j ACCEPT -state NEW -m tcp -dport 22 -j ACCEPT tcp -m state REJECT - -reject with icmp-host-prohibited -j REJECT — reject with icmp-host-prohibited on Sat Jan 16 2016](https://cdn.nlark.com/yuque/0/2021/png/3018302/1639559443043-9e713c16-012c-46a1-bf56-55bfa990a9a7.png)