Data
SpringBoot连接JDBC
连接数据库
@SpringBootTestclass DemoApplicationTests {@AutowiredDataSource dataSource;@Testvoid contextLoads() throws SQLException {//查看默认的数据源:class com.zaxxer.hikari.HikariDataSourceSystem.out.println(dataSource.getClass());//获取数据库连接Connection connection = dataSource.getConnection();//xxx Template SpringBoot已经配置好的模板bean,拿来即用,CURDconnection.close();}}
用template来CURD
@RestControllerpublic class JDBCController {@AutowiredJdbcTemplate jdbcTemplate;@GetMapping("/userList")public List<Map<String,Object>> userList(){String sql = "select * from tb_user";List<Map<String, Object>> maps = jdbcTemplate.queryForList(sql);return maps;}@GetMapping("/addUser")public String addUser(){String sql = "insert into test.tb_user(uid,username,password) values(1,'张三','123123') ";jdbcTemplate.update(sql);return "update-ok";}@GetMapping("/updateUser/{id}")public String updateUser(@PathVariable("id") int id){String sql = "update tb_user set username = ?, password = ? where uid = "+id;//封装Object[] objects = new Object[2];objects[0] = "小米";objects[1] = "32323";jdbcTemplate.update(sql,objects);return "update-ok";}@GetMapping("/deleteUser/{id}")public String deleteUser(@PathVariable("id") int id){String sql = "delete from tb_user where uid = ?";jdbcTemplate.update(sql,id);return "delete-ok";}}
整合Druid数据源
DRUID简介
Druid是阿里巴巴开源平台上一个数据库连接池实现,结合了C3PO、DBCP、PROXOOL等 DB池的优点,同时加入了日志监控。
Druid可以很好的监控DB池连接和SQL的执行情况,天生就是针对监控而生的DB连接池。
Spring Boot 2.0以上默认使用Hikari数据源,可以说Hikari与Driud都是当前Java Web上最优秀的数据源,我们来重点介绍Spring Boot如何集成Druid数据源,如何实现数据库监控。
集成Druid
导入依赖
druid有日志监控的功能,所以同时导入filters与log4j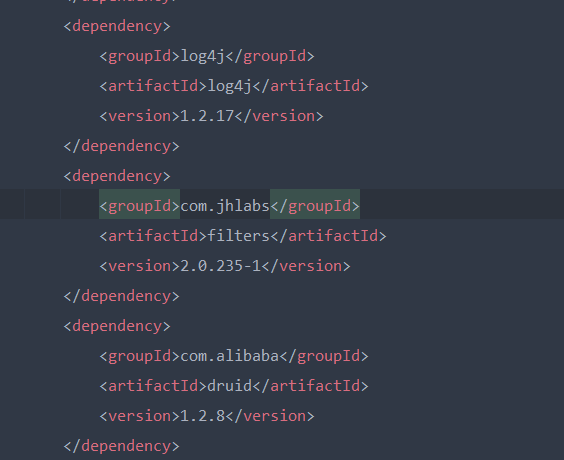
配置Druid
application.yaml:
spring:datasource:driver-class-name: com.mysql.cj.jdbc.Driverpassword: rootusername: rooturl: jdbc:mysql://localhost:3306/test?serverTimezone=UTC&useUnicode=true&characterEncoding=utf-8type: com.alibaba.druid.pool.DruidDataSource#Spring Boot默认是不注入这些属性值的,需要自己绑定#druid数据源专有配置initialsize: 5minIdle: 5maxActive: 20maxWait: 60000timeBetweenEvictionRunsMillis: 60000minEvictableIdleTimeMillis: 300000validationQuery: SELECT 1 FROM DUALtestWhileIdle: truetest0nBorrow: falsetestOnReturn: falsepoolPreparedstatements: true#配置监控统计拦截的fiLters,stat:监控统计、Log4j:日志记录、walL:防御sqL注入#如果允许时报错java.Lang.CLassNotFoundException: org.apache.Log4j.priority#则导入Log4j依赖即可,Maven 地址: https: / /mvnrepository.com/artifact/Log4j/Log4jfilters: stat,wall,log4jmaxPoolPreparedStatementPerConnectionSize: 20useGlobalDataSourceStat: trueconnectionProperties: druid.stat.mergesql=true;druid.stat.slowSq1Millis=500
定义配置类
@Configurationpublic class DruidConfig {@Bean@ConfigurationProperties(prefix = "spring.datasource")public DataSource druidDataSource(){return new DruidDataSource();}//后台监控:web.xml//因为SpringBoot内置了servlet容器,所有没有web.xml 替代方法:ServletRegistrationBean@Beanpublic ServletRegistrationBean statViewServlet(){//这段代码是死的,写法固定ServletRegistrationBean<StatViewServlet> bean = new ServletRegistrationBean<>(new StatViewServlet(), "/druid/*");//后台需要有人登录,账号密码设置HashMap<String,String> initParameters = new HashMap<>();//登录的key是固定的,只能是loginUsername与loginPasswordinitParameters.put("loginUsername","admin");initParameters.put("loginPassword","123123");//允许谁可以访问initParameters.put("allow","");//禁止谁访问initParameters.put("zs","192.168.11.111");//设置初始化参数bean.setInitParameters(initParameters);return bean;}@Beanpublic FilterRegistrationBean webStatFilter(){FilterRegistrationBean<Filter> bean = new FilterRegistrationBean<>();bean.setFilter(new WebStatFilter());//可以过滤哪些请求呢HashMap<String,String> initParameters = new HashMap<>();//这些东西不进行统计initParameters.put("exclusion","*.js,*.css,/druid/*");bean.setInitParameters(initParameters);return bean;}}
集成Mybatis
导入依赖
<dependency><groupId>org.mybatis.spring.boot</groupId><artifactId>mybatis-spring-boot-starter</artifactId><version>2.2.2</version></dependency>
配置mybatis
application.properties
spring.datasource.password=rootspring.datasource.username=rootspring.datasource.url=jdbc:mysql://localhost:3306/test?serverTimezone=UTC&userUnicode=true&characterEncoding=utf-8spring.datasource.driver-class-name=com.mysql.cj.jdbc.Driver#整合mybatismybatis.type-aliases-package=com.example.jy.pojomybatis.mapper-locations=classpath:mybatis/mapper/*.xml
mybatis配置类
<?xml version="1.0" encoding="UTF-8" ?><!DOCTYPE mapperPUBLIC "-//mybatis.org//DTD Mapper 3.0//EN""http://mybatis.org/dtd/mybatis-3-mapper.dtd"><mapper namespace="com.example.jy.mapper.UserMapper"><select id="queryList" resultType="User">select * from tb_user;</select><select id="queryListById" resultType="User">select * from tb_user where uid=#{id};</select></mapper>
目录结构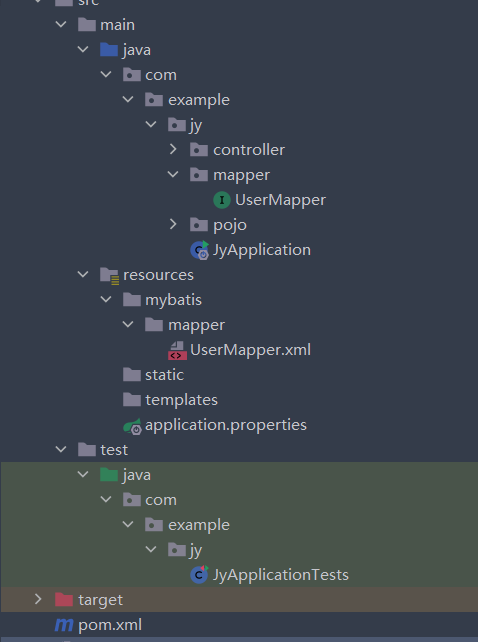
Spring Security
简介
Spring Security是针对Spring项目的安全框架,也是Spring Boot底层安全模块默认的技术选型,他可以实现强大的Web安全控制,对于安全控制,我们仅需要引入spring-boot-starter-security模块,进行少量的配置,即可实现强大的安全管理!
记住几个类:
- webSecurityConfigurerAdapter:自定义Security策略.
- AuthenticationManagerBuilder:自定义认证策略.
- @EnableWebSecurity:开启WebSecurity模式
Spring Security的两个主要目标是“认证”和“授权”(访问控制)。
“认证”(Authentication)
“授权”(Authorization)
这个概念是通用的,而不是只在Spring Security 中存在。
参考官网: https://spring.io/projects/spring-security,查看我们自己项目中的版本,找到对应的帮助文档:https://docs.spring.io/spring-security/site/docs/5.2.0.RELEASE/reference/htmlsingle
用户认证和授权
开端
先导入thymeleaf的包,先不导入security的包
<dependency><groupId>org.thymeleaf</groupId><artifactId>thymeleaf-spring5</artifactId><version>3.0.11.RELEASE</version><scope>compile</scope></dependency><dependency><groupId>org.thymeleaf.extras</groupId><artifactId>thymeleaf-extras-java8time</artifactId><version>3.0.4.RELEASE</version><scope>compile</scope></dependency>
建立一个路由控制类 ```java @Controller public class RouterController {
@RequestMapping({“/“,”/index”}) public String index(){
return "index";
} @RequestMapping({“/toLogin”}) public String toLogin(){
return "views/login";
}
@RequestMapping({“/level1/{id}”}) public String level1(@PathVariable(“id”) int id){
return "views/level1/" +id;
} …… } }
此时访问`localhost:8080`,来到初始页面<br /><br />此时点击任意一个level都是可以访问的<br /><a name="xXlIg"></a>#### 终端- 导入`security`包```java<dependency><groupId>org.springframework.boot</groupId><artifactId>spring-boot-starter-security</artifactId></dependency>
- 配置
securityconfig
授权与验证
@EnableWebSecuritypublic class SecurityConfig extends WebSecurityConfigurerAdapter {//链式编程//授权@Overrideprotected void configure(HttpSecurity http) throws Exception {//首页所有人可以访问,功能页只有有对应权限的人才能访问//请求授权的规则http.authorizeRequests().antMatchers("/").permitAll().antMatchers("/level1/**").hasRole("vip1").antMatchers("/level2/**").hasRole("vip2").antMatchers("/level3/**").hasRole("vip3");//没有权限默认到登录页,需要开启登录的页面http.formLogin();}/*** 认证* springboot 2.1.x以下可以直接使用,2.2.x及以上需要对密码加密* 密码编码:PasswordEncoder* Spring Security 5.0+ 新增了很多加密方法*/@Overrideprotected void configure(AuthenticationManagerBuilder auth) throws Exception {//这些数据正常应该从数据库中读auth.inMemoryAuthentication().passwordEncoder(new BCryptPasswordEncoder()).withUser("rose").password(new BCryptPasswordEncoder().encode("123456")).roles("vip2","vip3").and().withUser("jack").password(new BCryptPasswordEncoder().encode("123456")).roles("vip1","vip2","vip3");}}
在配置授权规则之后,配置http.formLogin()之前,只能访问首页,无法访问任意一个level下的页面
配置http.formLogin()后,点击level下的页面会跳转到默认的login页面,如下图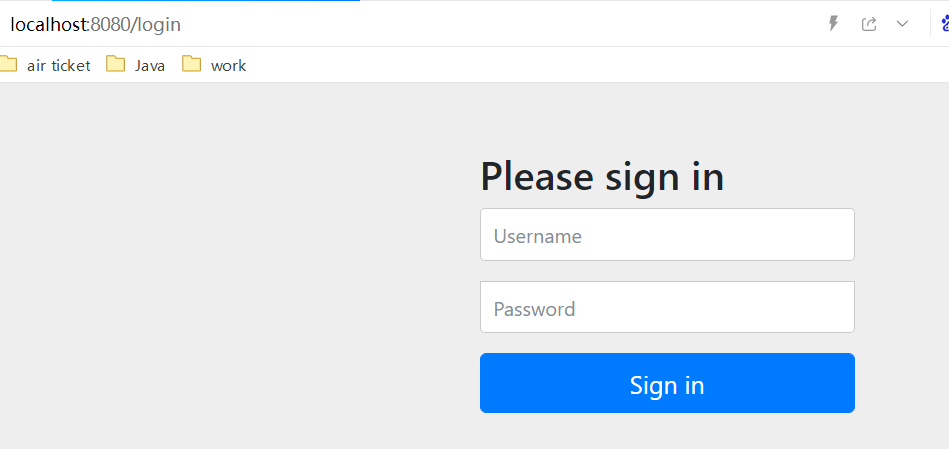
在进行认证的配置后,未进行密码编码之前
@Overrideprotected void configure(AuthenticationManagerBuilder auth) throws Exception {//这些数据正常应该从数据库中读auth.inMemoryAuthentication().withUser("rose").password("123456").roles("vip2","vip3").and().withUser("jack").password("123456").roles("vip1","vip2","vip3");}
这样写在springboot 2.1.x以下是可以直接使用的,但这样是不安全的,比如被反编译,所以在2.2.x及以上需要对密码加密,否则会出现如下错误
进行密码编码后
@Overrideprotected void configure(AuthenticationManagerBuilder auth) throws Exception {//这些数据正常应该从数据库中读auth.inMemoryAuthentication().passwordEncoder(new BCryptPasswordEncoder()).withUser("rose").password(new BCryptPasswordEncoder().encode("123456")).roles("vip2","vip3").and().withUser("jack").password(new BCryptPasswordEncoder().encode("123456")).roles("vip1","vip2","vip3");}
使用passwordEncoder(),有多种编码方式,任选一种,推荐new BCryptPasswordEncoder()
注销和权限控制
开启注销

开启注销后,不用再配置Controller,前端直接接收logout
不同权限展示不同页面
使用thymeleaf实现
导入包:
使用thymeleaf整合springSecurity,SpringBoot的版本至少需要是2.0.9以下,高版本不行
先实现通过判断是否登录来显示用户名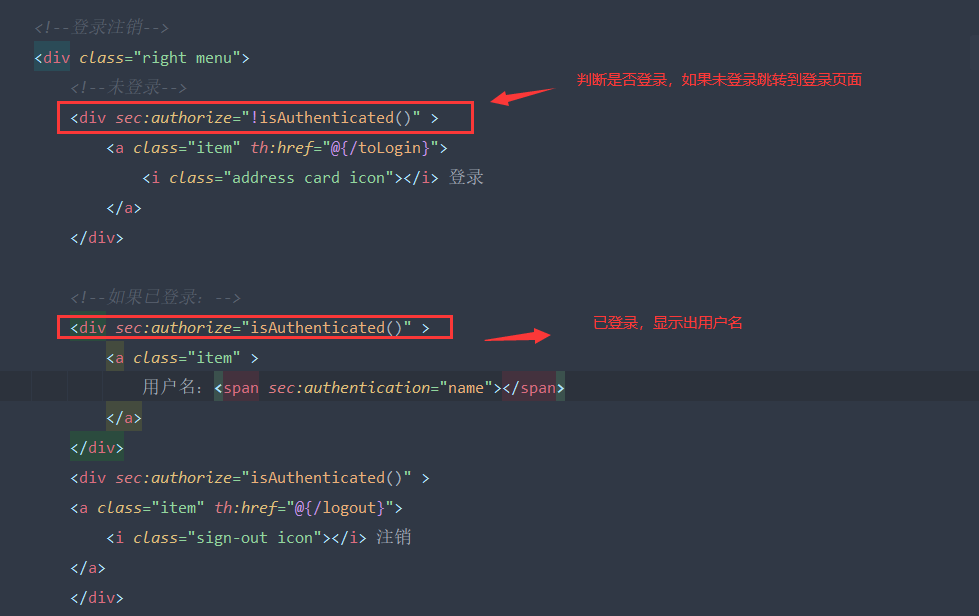
判断用户权限是否包含vip1来决定是否显示level1的页面,之后的同理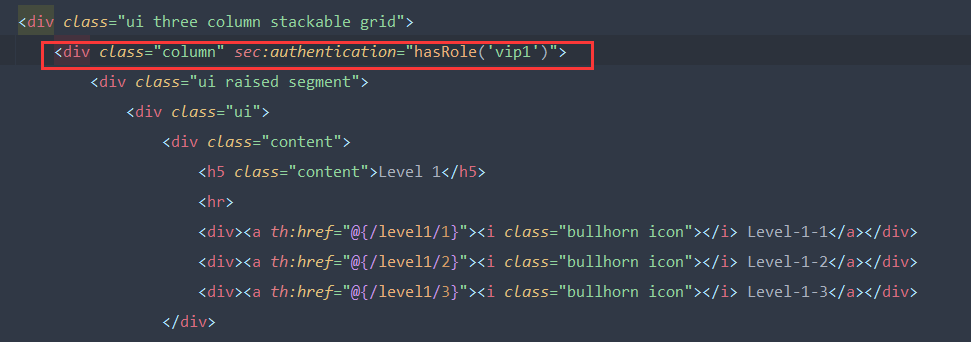
将登录界面换成自己的页面,同时开启记住我功能,关闭csrf攻击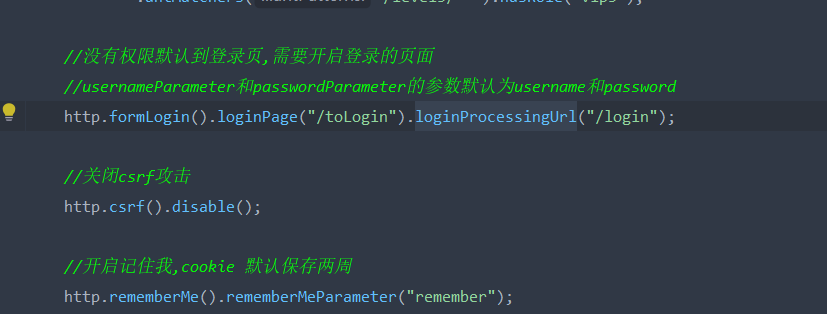
点击登录后会通过/toLogin跳转到login.html自定义登录页面,loginProcessingUrl()这个方法可以看作一个中转站,前台界面提交表单之后跳转到这个路径进行User DetailsService的验证。此时登录页面的action需要和loginProcessUrl中参数一致
如果只使用loginPage,不使用loginProcessUrl,action中参数和loginPage一致
小结:
对于配置loginPage()方法和loginProcessingUrl()方法的同种场景:1、两者都不配置,则使用默认页面;2、只配置loginPage()方法,则使用自定义页面;3、只配置loginProcessingUrl()方法,则使用默认页面;4、两者都配置,则使用自定义页面(其中loginPage()方法为请求,loginProcessingUrl()方法为表单)。

