1.swiper
轮播的使用
<link href="https://cdn.bootcss.com/Swiper/4.5.0/css/swiper.css" rel="stylesheet"><script src="https://cdnjs.cloudflare.com/ajax/libs/Swiper/4.3.5/js/swiper.js"></script><script src="swiper/swiper.js"></script>
window.onload = function () {var mySwiper = new Swiper('.swiper-container', {// direction: 'horizonal',loop: true,autoplay: {delay: 2000,stopOnLastSlide: false,disableOnInteraction: false,},// 如果需要分页器pagination: {el: '.swiper-pagination',clickable: true},// 如果需要前进后退按钮navigation: {nextEl: '.swiper-button-next',prevEl: '.swiper-button-prev',}});};
2.事件流
描述的是从页面中接收事件的顺序。
1.事件冒泡: 阻止事件冒泡:event.stopPropagation
父元素和子元素绑定了相同的事件,子元素的事件执行,父元素的事件也会触发
<style>#parent{width:200px;height:200px;background: red;}#child{width:100px;height:100px;background: yellow;margin:50px}</style><script>var parent=document.getElementById("parent")var child=document.getElementById("child")parent.onclick=function(event){alert("parent")event.stopPropagation()}child.onclick=function(event){alert('child')event.stopPropagation()}</script>
2.事件监听 addEventListener(event)
<script>/* onclick --直接绑定的方式,只会触发一次事件监听 addEventListener(event)*/var parent=document.getElementById("parent")var child=document.getElementById("child")child.addEventListener('click',function(){console.log(1)})child.addEventListener('click',function(){console.log(2)})</script>
3.事件捕获
从不太具体的节点 最早接收事件,而最具体的节点 最后接收事件
父元素和子元素绑定了相同的事件,父元素的事件先触发,子元素的事件后触发addEventListener(event,function,boolean)true -->事件捕获false-->事件冒泡<script>var parent=document.getElementById("parent")var child=document.getElementById("child")child.addEventListener('click',function(){alert("child")},true)parent.addEventListener('click',function(){alert("parent")},true)</script>
3.array
<script>/* 给数组添加一个值 */var arr=[1,2,3,4];/*push -->给数组尾部添加值splice(startNumber,number)*/arr.push(5);arr.splice(1,1)console.log(arr)</script>
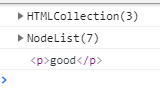
4.节点
<div id="parent">hello world<p id="first">good</p><p>good</p><p>good</p></div><script>/*childNodes -->获取子节点 不会区分文本和元素节点children -->获取元素节点nextSibling -->获取下一个兄弟节点nextElementSibling -->获取下个兄弟元素节点*/var parent=document.getElementById("parent")var childs=parent.children;var child=parent.childNodes;var first=document.getElementById("first")console.log(childs)console.log(child)console.log(first.nextElementSibling)</script>
5.补充
offsetParent //获取给了定位元素的父级offsetLeft //返回元素的相对定位父元素水平偏移位置。 返回numberoffsetTop //返回元素的相对定位父元素水平垂直偏移位置。offsetWidth //返回元素的宽度 -- 包含width,padding,borderoffsetHeight //返回元素的高度可视区域的宽度和高度 clientWidth clientHeight获取滚动区域的宽高 scrollWidth scrollHeight
6.操作元素属性
<p id="p" class="one">hello world</p><script>/* 操作属性setAttributegetAttributeremoveAttribute*/var p =document.getElementById("p");p.onclick=function(){this.setAttribute("style","display:none")}console.log(p.getAttribute("class"))console.log(p.removeAttribute("class"))</script>
7.文档碎片
<ul id="parent"></ul><script>var parent=document.getElementById("parent")var frag=document.createDocumentFragment();for(var i=0;i<=10;i++){var li=document.createElement("li");li.innerHTML=i;frag.appendChild(li)}parent.appendChild(frag)</script>
8.批量操作css
<p id="test">hello world</p><script>/*cssText -->批量操作csslengthgetPropertyValue()item() -->返回对应位置的css属性名removeProperty()setProperty*/var test=document.getElementById("test");test.style.cssText="color:red;background-color:#333"console.log(test.style.getPropertyValue("color"))console.log(test.style.item(0))test.onclick=function(){this.style.removeProperty("color")}</script>
9.try-throw
<input type="text" id="input"><button id="btn">btn</button><p id="msg"></p><script>/* try-catch-throw */var btn=document.getElementById("btn")var input =document.getElementById("input")var msg=document.getElementById("msg")btn.onclick=function(){try{var value=input.value;if(value==""){/* throw可以自定义错误 */throw"输入的值不能为空"}}catch(err){alert(err)}}</script>

若有收获,就点个赞吧
0 人点赞
