sudo提权
切换到root用户
[centos@localhost ~]$ useradd u1-bash: /usr/sbin/useradd: 权限不够[centos@localhost ~]$ su - root密码:[root@localhost ~]# useradd u1
以root用户的身份授权普通用户
[root@localhost ~]# vim /etc/sudoers%wheel ALL=(ALL) NOPASSWD: ALL[root@localhost ~]# gpasswd -a centos wheel[root@localhost ~]# su - centos[centos@localhost ~]$ useradd u2-bash: /usr/sbin/useradd: 权限不够[centos@localhost ~]$ sudo useradd u2[sudo] centos 的密码:[centos@localhost ~]$ id u2uid=1006(u2) gid=1012(u2) 组=1012(u2)
基本权限 UGO
文件权限设置:可以赋予某个用户或组,能够以何种方式,访问某个文件
- 权限对象:
user:属主
group:属组
others:其他人
- 权限类型:
r(read):只读
w(write):可写,可以修改文件,但是不能删除文件
x(execute):可执行
rwx 7
rw- 6
r— 4
设置权限
更改文件属主、属组:
[root@localhost ~]# chown centos:hr file1 # 改属主、属组[root@localhost ~]# chown centos file1 # 只改属主[root@localhost ~]# chown :hr file1 # 只改属组
[root@localhost ~]# chgrp it file1 # 改文件属性组[root@localhost ~]# chgrp -R it dir1 # 改文件属性组
更改权限:
使用符号更改
对象 赋值符 权限类型
u + r
chmod g - w file1
o = x
a
[root@localhost ~]# chmod u+x file1 # 属主增加执行[root@localhost ~]# chmod a=rwx file1 # 所有人等于读写执行[root@localhost ~]# chmod a=- file1 # 所有人没有权限[root@localhost ~]# chmod ug=rw,o=r file1 # 属主属组等于读写,其他人只读[root@localhost ~]# ll file1 # 显示结果
使用数字更改
[root@localhostz ~]# chmod 644 file1[root@localhost ~]# ll file1
- r、w、x 对文件和目录的意义 | 权限 | 对文件的影响 | 对目录的影响 | | —- | —- | —- | | r(读取) | 可以读取文件内容 | 可以列出目录的内容(文件名),可以使用ls命令 | | w(写入) | 可以更改文件内容 | 可以创建或删除目录内的任意文件,可以使用touch或rm命令 | | x(执行) | 可以作为命令执行文件 | 可以访问目录内的文件(取决于文件的权限),可以使用cd命令 |
[root@localhost ~]# mkdir /dir1[root@localhost ~]# touch /dir1/file1[root@localhost ~]# ll /dir1总用量 0-rw-r--r--. 1 root root 0 1月 27 22:12 file1[root@localhost ~]# ll /dir1/file1-rw-r--r--. 1 root root 0 1月 27 22:12 /dir1/file1[root@localhost ~]# chmod 777 /dir1/file1[root@localhost ~]# su zhangsan[zhangsan@localhost root]$ cat /dir1/file1[zhangsan@localhost root]$ rm -rf /dir1/file1rm: 无法删除"/dir1/file1": 权限不够[zhangsan@localhost root]$ exitexit
zhangsan是其他用户,对目录只有 r 权限,对文件chmod改为有 rwx 权限。结果cat查看文件成功了,rm删除文件报错没有权限。
[root@localhost ~]# chmod 777 /dir1[root@localhost ~]# chmod 000 /dir1/file1[root@localhost ~]# ll -d /dir1/drwxrwxrwx. 2 root root 19 1月 27 22:12 /dir1/[root@localhost ~]# ll /dir1/file1----------. 1 root root 0 1月 27 22:12 /dir1/file1[root@localhost ~]# su zhangsan[zhangsan@localhost root]$ cat /dir1/file1cat: /dir1/file1: 权限不够[zhangsan@localhost root]$ rm-rf /dir1/file1bash: rm-rf: 未找到命令[zhangsan@localhost root]$ rm -rf /dir1/file1[zhangsan@localhost root]$
将目录 dir1 修改权限为777,文件修改权限为000,切换为zhangsan,查看文件没有权限,删除文件成功。
总结:对目录有w权限可以在目录中创建、删除文件(与文件本身权限无关)
对文件x权限小心给与。
ACL设置基本权限(r,w,x)
UGO设置文件权限:对象只能是一个用户,一个组和其他人
ACL设置文件权限:可以对具体的用户或组设置每一个文件或目录的权限
ACL基本用法
setacl
常用选项:
-m :添加acl设定参数
-x :删除acl设定参数
-b :移除所有的ACL设定参数
-R :递归添加acl设定参数
-d :添加默认acl设定参数(目录)
常用格式:
添加用户权限:setfacl -m u:[用户名username]:[权限rwx] 文件名
删除用户权限:setfacl -x u:[用户名username] 文件名
删除组的权限:setfacl -x g:[组名groupname] 文件名
删除所有权限:setfacl -b 文件名
查看/设置/删除
[centos@localhost ~]$ ll file1-rw-r--r--. 1 centos it 0 1月 29 11:23 file1[centos@localhost ~]$ getfacl file1# file: file1# owner: centos# group: ituser::rw-group::r--other::r--[centos@localhost ~]$ setfacl -m u:centos:rw file1[centos@localhost ~]$ setfacl -m u:zhangsan:- file1[centos@localhost ~]$ setfacl -m o::rw file1[centos@localhost ~]$ ll file1-rw-rw-rw-+ 1 centos it 0 1月 29 11:23 file1[centos@localhost ~]$ getfacl file1# file: file1# owner: centos# group: ituser::rw-user:zhangsan:---user:centos:rw-group::r--mask::rw-other::rw-[centos@localhost ~]$ setfacl -m g:sale:r file1[centos@localhost ~]$ setfacl -x g:sale file1[centos@localhost ~]$ setfacl -b file1[centos@localhost ~]$ getfacl file1# file: file1# owner: centos# group: ituser::rw-group::r--other::rw-
mask权限
mask决定了最大有效权限,acl权限通常与mask结合使用。
ACL权限与mask权限的值相与后,得到的是最后的真实权限。
| ACL | mask | and |
|---|---|---|
| r | r | r |
| r | - | - |
| - | r | - |
| - | - | - |
为了方便管理文件权限,建议其他人权限设置为空。
[centos@localhost ~]$ setfacl -m o::- file1[centos@localhost ~]$ setfacl -m m::--- file1[centos@localhost ~]$ getfacl file1# file: file1# owner: centos# group: ituser::rw-group::r-- #effective:---mask::---other::---
default
一般针对目录,默认权限独立于该目录本身的权限,规定了在该目录中创建的文件的默认ACL权限。
应用:指定创建出的新文件的acl权限
例:希望centos能够对 /home 以及以后在 /home 下新建的文件有读、写、执行权限
[root@localhost ~]# setfacl -m u:centos:rwx /home[root@localhost ~]# setfacl -m d:u:centos:rwx /home[root@localhost ~]# getfacl /homegetfacl: Removing leading '/' from absolute path names# file: home# owner: root# group: rootuser::rwxuser:centos:rwxgroup::r-xmask::rwxother::r-xdefault:user::rwxdefault:user:centos:rwxdefault:group::r-xdefault:mask::rwxdefault:other::r-x
特殊权限
文件的特殊权限包括:SUID 4、SGID 2、SBIT 1
SUID(借出属主权限)
SUID借出程序所有者的权限。其他人查看程序权限时在属主的x权限位置会改为s:
- 程序所属主有x权限:小写s
- 程序所有主没有x权限:大写S
SUID程序仅对二进制程序有效
执行者必须有x权限
仅在本程序中拥有改权限
属主拥有s权限,即可将自己的权限临时借给他人
案例
现有用户zhangsan,想要在zhangsan用户上创建一个用户lisi
提示我们现在zhangsan对useradd命令没有权限,我们到root用户下查看命令权限并且修改others的权限为rwx
[root@localhost ~]# ll /usr/sbin/useradd-rwxr-x---. 1 root root 118232 10月 31 2018 /usr/sbin/useradd[root@localhost ~]# chmod o=rwx /usr/sbin/useradd[root@localhost ~]# ll /usr/sbin/useradd-rwxr-xrwx. 1 root root 118232 10月 31 2018 /usr/sbin/useradd
此时再到zhangsan用户上尝试添加用户lisi![`A[K9Q5S}VCL9E@]XYOLQ0U.png](/uploads/projects/u427629@ge071f/a16c54416ef408f4b925953a0a66a87c.png)
提示我们useradd命令被拒绝了,因为zhangsan虽然可以调用useradd命令了,但是没有访问/etc/passwd的权限,所以仍然无法添加用户lisi。
这里我们就可以通过特殊权限SUID,在其它用户使用useradd工具的时候借出属主的权限。过程是其他用户zhangsan调用命令useradd添加用户lisi,这就要修改文件/etc/passwd,然后passwd查询是否具有修改权限,发现useradd有SUID权限且属主root具有修改权限(useradd能够借出属主权限),修改成功。![~2ABO7ZGTD~0LJ$]2(_QL89.png](/uploads/projects/u427629@ge071f/f41bd970217bcdb19d5e77b06d1cc8a6.png)
[root@localhost ~]# chmod u+s /usr/sbin/useradd[root@localhost ~]# ll /usr/sbin/useradd-rwsr-xrwx. 1 root root 118232 10月 31 2018 /usr/sbin/useradd[root@localhost ~]# chmod u+s /usr/sbin/useradd[root@localhost ~]# ll /usr/sbin/useradd-rwsr-xrwx. 1 root root 118232 10月 31 2018 /usr/sbin/useradd
此时实现在zhangsan用户上添加用户lisi。
- 对于命令的位置,可以通过type命令查看。

注意:root用户是法外狂徒,哪怕将useradd命令的属主权限设置为—-,只要他的属主还是root,还是能修改/etc/passwd文件。
SGID(接触用户组权限)
二进制程序有效
执行者拥有x权限
执行过程中暂时拥有用户组权限
- 程序所属主有x权限:小写s
-
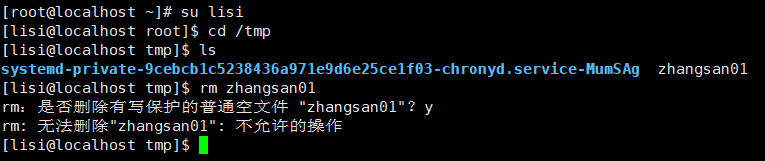
SBIT(共享目录)
当属主拥有x权限时,用小写的字母t表示,当属主没有x权限时,用大写字母T权限表示
只针对目录有效
用户在此目录中创建文件时,只有root用户和自己可以删除该文件,其他用户是不可以修改此文件 典型案例 /tmp/
![D_IEC1OLN{5A%(A_V0S]@{9.png](/uploads/projects/u427629@ge071f/aa14a9b3ffd2c50c06c5f64eeebe9e54.png)
chmod u+s filechmod g+s dirchmod o+t dirchmod 4777 filechmod 7777 filechmod 2770 dirchmod 3770 dir
/tmp 文件夹是1777权限,否则会导致程序不能正常运行
chattr(改变文件属性)
[root@xwz ~]# lsattr file2---------------- file2[root@xwz ~]# chattr +a file2[root@xwz ~]# lsattr file2-----a---------- file2[root@xwz ~]# man chattr----------ATTRIBUTES(属性)当修改设置了'A'属性的文件时,它的atime记录不会改变.这可以在笔记本电脑系统中避免某些磁盘I/O处理.设置了`a'属性的文件只能在添加模式下打开用于写入. 只有超级用户可以设置或清除该属性.设置了`c'属性的文件在磁盘上由内核自动进行压缩处理.从该文件读取时返回的是未压缩的数据.对该文件的一次写入会在保存它们到磁盘之前进行数据压缩.设置了`d'属性的文件不能对其运行 dump(8) 程序进行备份.设置了`i'属性的文件不能进行修改:你既不能删除它,也不能给它重新命名,你不能对该文件创建链接,而且也不能对该文件写入任何数据.只有超级用户可以设置或清除该属性.当删除设置了`s'属性的文件时,将对其数据块清零 并写回到磁盘上.当修改设置了`S'属性的文件时, 修改会同步写入到磁盘上;这与应用到文件子系统上的`sync'挂载选项有相同的效果.当删除设置了`u'属性的文件时, 将会保存其内容. 这使得用户可以请求恢复被删除的文件.
进程umask
[root@localhost ~]# umask0022[root@localhost ~]# umask -Su=rwx,g=rx,o=rx
查看当前用户的umask值
文件:666-umask
目录:777-umask
综合案例
需求:
1. 使用root用户在自己家目录下创建test1文件
2. 创建zhangsan用户
3. 修改zhangsan用户密码
4. 使用zhangsan用户进行远程登录
5. 使用zhangsan用户删除需求一里创建的test1文件
- 使用sudo提权 ```bash [root@localhost ~]# touch test1 [root@localhost ~]# useradd zhangsan [root@localhost ~]# passwd zhangsan
ssh zhangsan@192.168.80.132
[root@localhost ~]# gpasswd -a zhangsan wheel
[zhangsan@localhost ~]$ sudo rm /root/test1
- 基本权限ugo```bash[root@localhost ~]# touch test1[root@localhost ~]# useradd zhangsan[root@localhost ~]# passwd zhangsan[root@localhost ~]# chmod o+w /root[root@localhost ~]# su zhangsan[zhangsan@localhost ~]$ rm -rf /root/test1
- 使用acl权限 ```bash [root@localhost ~]# touch test1 [root@localhost ~]# useradd zhangsan [root@localhost ~]# passwd zhangsan
[root@localhost ~]# setfacl -m u:zhangsan:rwx /root
[root@localhost ~]# su zhangsan
[zhangsan@localhost ~]$ rm -rf /root/test1
- 特殊权限
```bash
[root@localhost ~]# touch test1
[root@localhost ~]# useradd zhangsan
[root@localhost ~]# passwd zhangsan

[root@localhost ~]# chmod u+s /usr/bin/rm

[root@localhost ~]# su zhangsan

[zhangsan@localhost ~]$ rm -rf /root/test1

若有收获,就点个赞吧
0 人点赞
