PlayBook
playbook是Ansible的配置、部署和编制语言。每个playbook由一个列表中的一个或多个”palys”组成。
- Ansible-playbook(剧本)执行过程
- 将已有编排好的任务集写入Ansible-Playbook
- 通过ansible-playbook命令分拆任务集至逐条ansible命令,按预定规则逐条执行
案例样式
name: "Ansible"version: 2.4python_version: 2.7module:- "Network"- "Linux Server"- "Windows Server"plugins:action_plugin: truecache_plugin: trueshell_plugin: false
ansible 演示 palyload
vim host1.yaml- hosts: test1 #组名称,或者host名称name: play-test #设置该host组的名称gather_facts: notasks: #设置任务- name: check host connection #任务名称ping: #使用ping模块
debug模块
平时我们在使用ansible编写playbook时,经常会遇到错误,很多时候有不知道问题在哪里 。这个时候可以使用-vvv参数打印出来详细信息,不过很多时候-vvv参数里很多东西并不是我们想要的,这时候就可以使用官方提供的debug模块来查找问题出现在哪里。
| debug参数 | 作用 |
|---|---|
| msg | 调试输出的消息 |
| var | 将某个任务执行的输出作为变量传递给debug模块,debug会直接将其打印输出 |
| verbosity | debug的级别(默认是0级,全部显示,写其他数字则跳过) 加上-vvv 显示详细的debug参数 |
常见的变量:
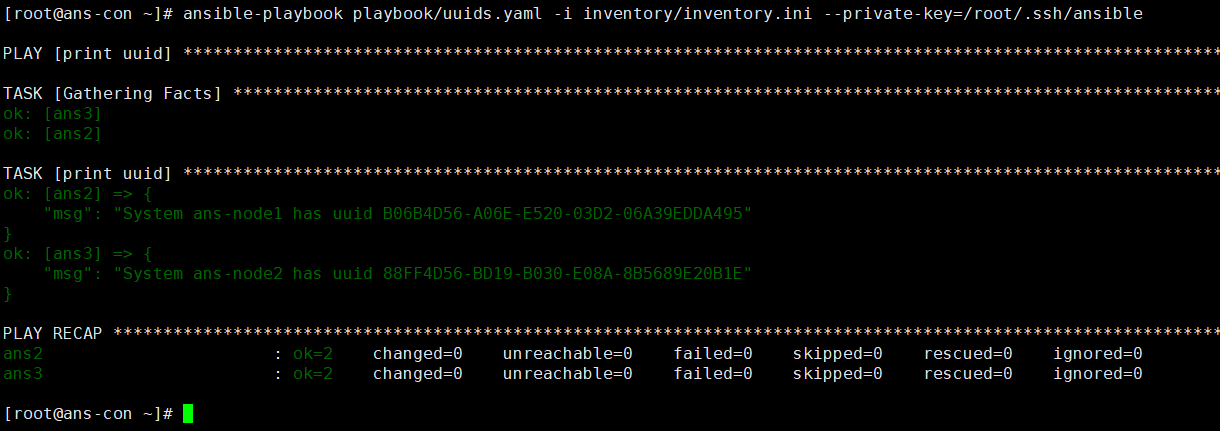
- {{ansible_hostname}} #显示hostname
- {{ansible_product_uuid}} #显示机器的uuid
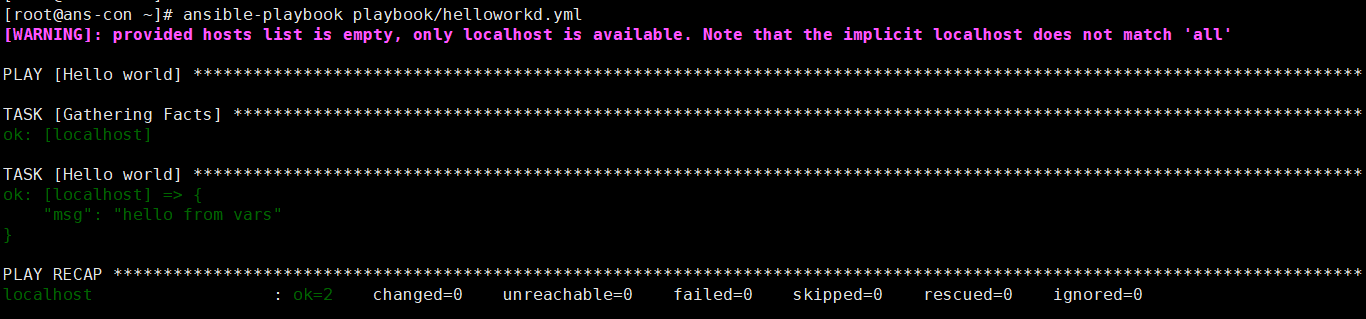
```shell vim helloworld.yamlname: Hello world hosts: localhost #只检查本地 gather_facts: no
tasks:
- name: Hello world debug: msg: “hello ansible” #msg默认打印hello world verbosity: 0 ansible-playbook playbook/helloworkd.yml -vvv #调用debug模块运行
vim uuids.yaml
name: Hello world hosts: localhost
tasks:
- name: Hello world debug: msg: “hello ansible” verbosity: 0 ```
var变量的使用
vim heeloworld.yaml- name: Hello worldhosts: localhostgather_facts: novars:grettings: "hello from vars"tasks:- name: Hello worlddebug:msg: "{{grettings}}"verbosity: 0ansible-playbook playbook/helloworkld.yml
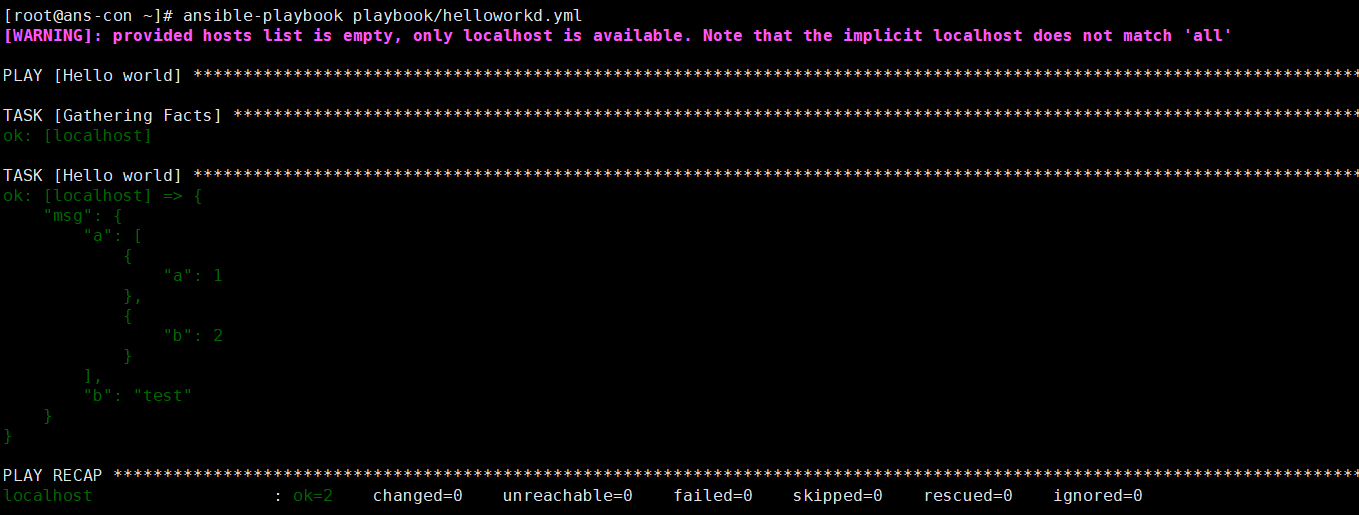
- name: Hello worldhosts: localhostvars:grettings: "hello from vars"demo:a:- a: 1- b: 2b: testtasks:- name: Hello worlddebug:msg: "{{demo}}"verbosity: 0ansible-playbook playbook/helloworkd.yml
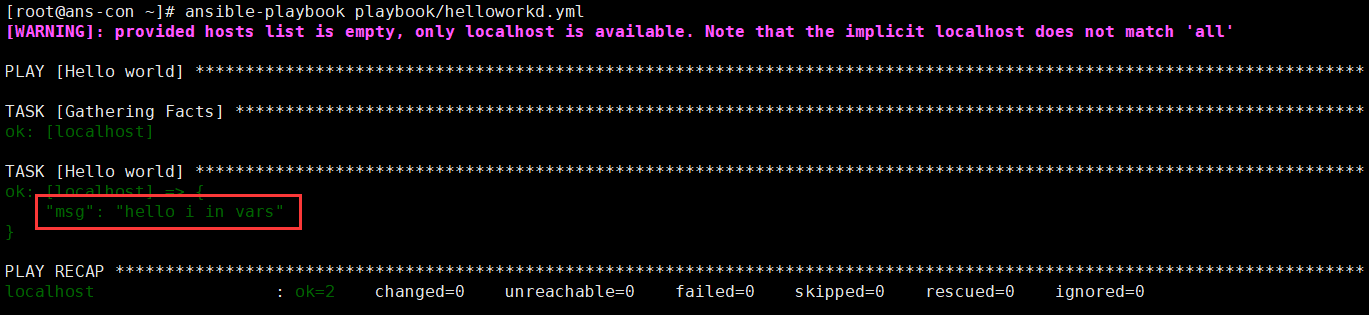
设置变量文件
如果我们将变量在每个文件中创建,文件会变得臃肿,并且占用内存更多,无法重复利用。我们可以将变量创建到某个具体文件中。
mkdir /root/varsvim deno_vars.ymlgrettings: "hello i in vars"vim helloworld.yml- name: Hello worldhosts: localhostvars_files:- "../vars/demo_vars.yml"tasks:- name: Hello worlddebug:msg: "{{grettings}}"verbosity: 0
注意:关于vars_files的优先级。本地创建<先调用文件<后调用文件
var变量循环
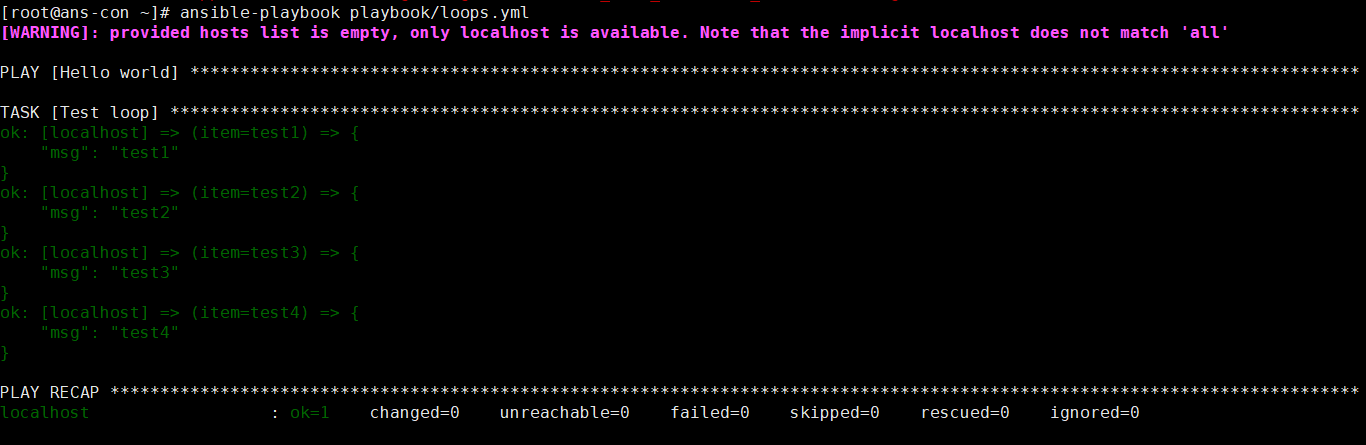
单循环
vim loops.yml- name: loop onehosts: localhostgather_facts: novars:test:- test1- test2- test3- test4tasks:- name: Test loopdebug:msg: "{{item}}"verbosity: 0with_items: "{{test}}" #创建一个with_items,其中写入变量
多层循环
- name: loop twohosts: localhostgather_facts: novars:test:- test1- test2- test3- test4demo:- demo1- demo2- demo3tasks:- name: Test loopdebug:msg: "{{item[0]}},{{item[1]}}"verbosity: 0#with_items: "{{test}}"with_nested: #可以以该格式,多次循环下去- "{{test}}"- "{{demo}}"

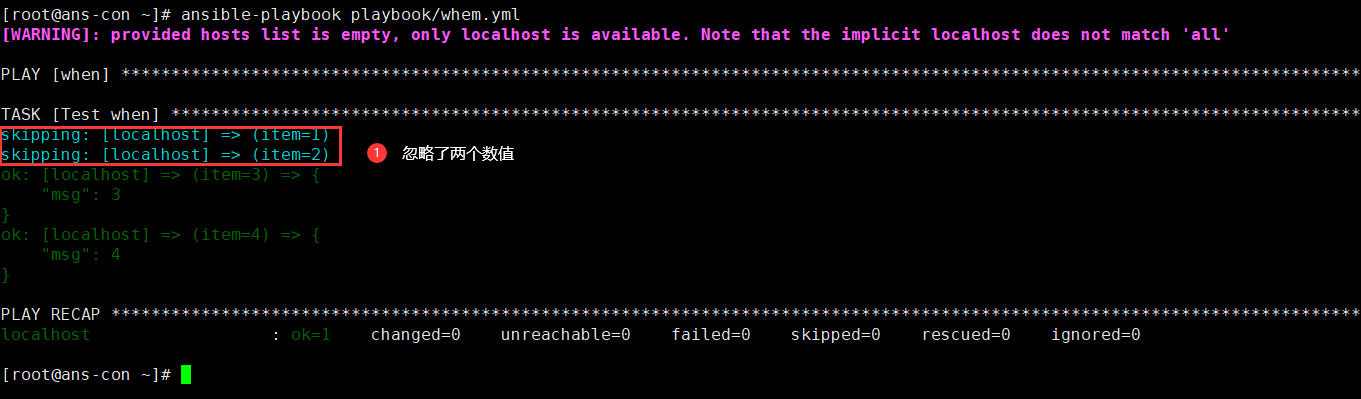
条件语句
- name: whenhosts: localhostgather_facts: novars:seq:- 1- 2- 3- 4tasks:- name: Test whendebug:msg: "{{item}}"verbosity: 0with_items: "{{seq}}"when: item >2 #当数值大于2时打印
Group和Host变量
在主机配置文件中,也可以设置变量,并且变量使多个服务器使用或重复利用。
方式1:在一个文件中设置
这种大多情况下是在配置几乎相同,没有差别变量时
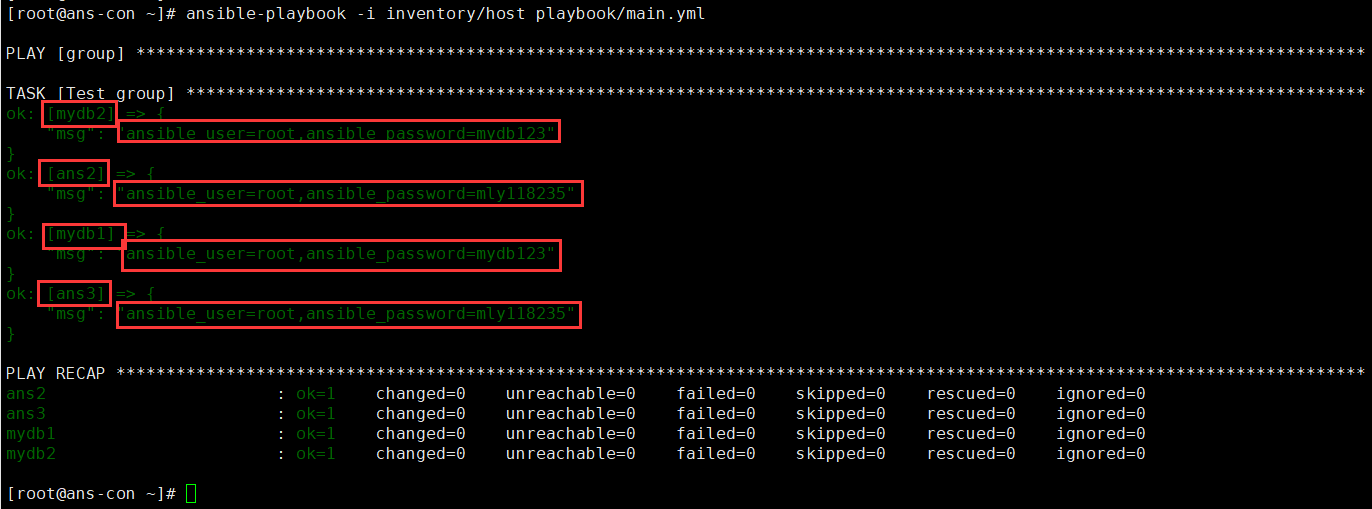
vim host #创建host文件,其中创建主机和所需变量[ans]ans2ans3[mydb]mydb1mydb2[ans:var] #此时创建的变量,就被ans中全部的服务器使用ansible_connection: sshansible_user: rootansible_password: mly118235[mydb:var] #此时创建的变量,就被var中全部的服务器使用ansible_connection: sshansible_user: rootansible_password: mydb123http_port: 3306vim main.yml #创建playbook文件- name: grouphosts: allgather_facts: notasks:- name: Test groupdebug:msg: "ansible_user={{ansible_user}},ansible_password={{ansible_password}}"ansible-playbook -i inventory/host playbook/main.yml
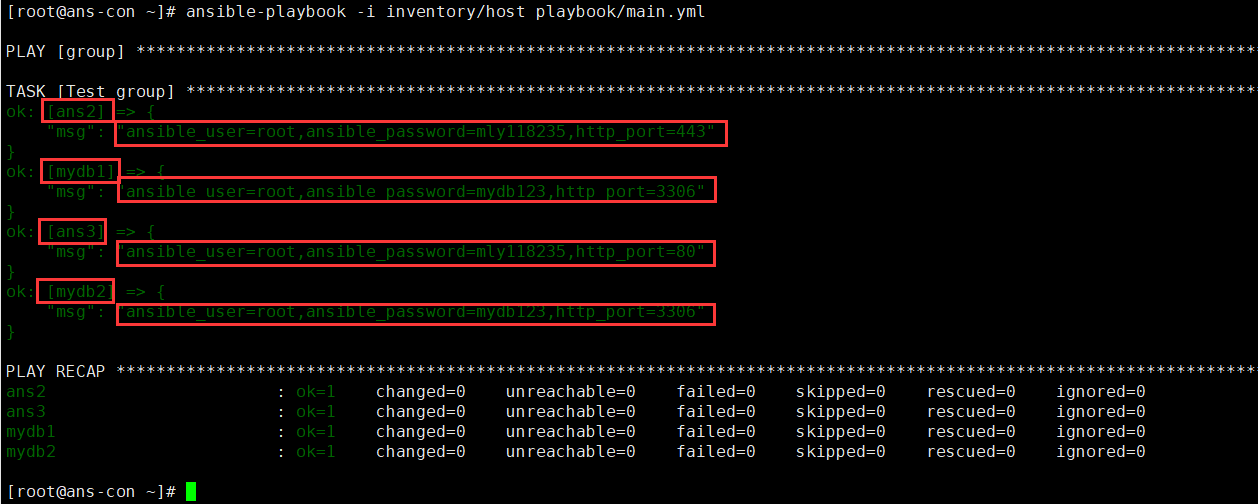
方式2:在不同文件中设置
vim host[all]ans2ans3[mydb]mydb1mydb2#只需要创建服务器名称,必须要再创建变量了mkdir group_vars #创建文件夹,方便管理变量。文件夹名称没限制,但是需要和host文件在同一个文件夹中vim group_vars/ans.yml #文件名必须是host文件中的组名ansible_connection: sshansible_user: rootansible_password: mly118235vim group_vars/mydb.ymlansible_connection: sshansible_user: rootansible_password: mydb123http_port: 3306mkdir host_vars #创建文件夹,该文件夹存放不同的变量,依然会共用group_vars中的变量。vim host_vars/ans2.yml #文件名必须是host的名称http_port: 443 #此时就是单独创建的变量vim host_vars/ans3.ymlhttp_port: 80#两个端口不一样vim main.yml- name: grouphosts: allgather_facts: notasks:- name: Test groupdebug:msg: "ansible_user={{ansible_user}},ansible_password={{ansible_password}},http_port={{http_port}}"#输出用户名,用户名密码,端口号
ansible.cfg 免去填写文件路径
vim /root/playbook/ansible.cfg #将ansible.cfg放入到和main.yml一个文件夹[defaults]inventory= /root/inventory/hostansible-playbook main.yml

若有收获,就点个赞吧
0 人点赞
