- 标签: java springboot
- 判断文件服务器中文件是否存在
- HashMap中的哈希碰撞问题?及解决?
- Java基础
- Thread.sleep(),Object.wait(),LockSupport.part()有什么区别?
- 怎么实现一个生产者消费者?
- 线程池理解
- 怎么根据业务场景确定线程池的参数corePoolSize和maximumPoolSize?
- 方法一 计算密集型任务
- 方法二 IO密集型任务
- ThreadLocal是什么?如何避免内存泄漏
- 锁相关
- IO
- JVM
- Java反射机制
- 注解
- 内部类
- Java并发编程
标签: java springboot
- 标签: java springboot
- 判断文件服务器中文件是否存在
- HashMap中的哈希碰撞问题?及解决?
- Java基础
- Thread.sleep(),Object.wait(),LockSupport.part()有什么区别?
- 怎么实现一个生产者消费者?
- 线程池理解
- 怎么根据业务场景确定线程池的参数corePoolSize和maximumPoolSize?
- 方法一 计算密集型任务
- 方法二 IO密集型任务
- ThreadLocal是什么?如何避免内存泄漏
- 锁相关
- IO
- JVM
- Java反射机制
- 注解
- 内部类
- Java并发编程
判断文件服务器中文件是否存在
String path="http://127.0.0.1/upload/cardpic/aa.jpg";try {URL url =new URL(path);//服务器路径用URLHttpURLConnection urlcon = (HttpURLConnection) url.openConnection();urlcon.setRequestMethod("HEAD"); //请求方法用headif (urlcon.getResponseCode() == HttpURLConnection.HTTP_OK){ 根据返回code值判断是否存在,也可以用404代表不存在mm.setHeadimgurl(path);}else{mm.setHeadimgurl("");}} catch (IOException e) {// TODO Auto-generated catch blocke.printStackTrace();}
java.net.URL 和 java.net.HttpURLConnection
Java URL处理
- URL(Uniform Resource Locator)中文名为统一资源定位符,有时也被俗称为网页地址。表示为互联网上的资源,如网页或者FTP地址。
- 介绍Java是如处理URL的,URL可以分为如下几个部分:
- protocol(协议)可以是 HTTP、HTTPS、FTP 和 File,port 为端口号,path为文件路径及文件名。
URL 解析:
协议为(protocol):http
主机为(host:port):www.runoob.com
端口号为(port): 80 ,以上URL实例并未指定端口,因为 HTTP 协议默认的端口号为 80。
文件路径为(path):/index.html
请求参数(query):language=cn
定位位置(fragment):j2se,定位到网页中 id 属性为 j2se 的 HTML 元素位置 。
前面提到了从空间角度,Java 对象要比原始数据类型开销大的。你知道对象的内存结构是什么样的吗?比如,对象头的结构。如何计算或者获取某个 Java 对象的大小?
CAS机制
- CAS是英文单词Compare and Swap的缩写,翻译过来就是比较并替换。
- CAS机制中使用了3个基本操作数:内存地址V,旧的预期值A,要修改的新值B。
- 更新一个变量的时候,只有当变量的预期值A和内存地址V当中的实际值相同时,才会将内存地址V对应的值修改为B。
- 在java中除了上面提到的Atomic系列类,以及Lock系列类夺得底层实现,甚至在JAVA1.6以上版本,synchronized转变为重量级锁之前,也会采用CAS机制。
CAS缺点:
1) CPU开销过大``` 在并发量比较高的情况下,如果许多线程反复尝试更新某一个变量,却又一直更新不成功,循环往复,会给CPU带来很到的压力。
CAS机制所保证的知识一个变量的原子性操作,而不能保证整个代码块的原子性。比如需要保证3个变量共同进行原子性的更新,就不得不使用synchronized了。 ```<br />2) 不能保证代码块的原子性
3) ABA问题
HashMap中的哈希碰撞问题?及解决?
HashMap的结构
- 在jdk7中hashMap的基础结构是数组+链表,在jdk8中引入了红黑树结构,在使用时,存储数据长度小于8时使用的是数据和链表的存储形式,当数据量超过8时,HashMap会将数据已红黑树的形式存储。因为HashMap是
- 解决哈希碰撞通常有两种方法:链表法和开放地址法;
- 链表法(使用单向链表):将相同hash值的对象组织成一个链表存放在hash值对应的槽位;
开放地址法:通过一个探测算法,当某个槽位已被占据的情况下继续查找下一个使用的槽位。
JAVA 网络编程模型
阻塞I/O模型:常见的I/O模型,在读写的时候客户端会发生阻塞。其工作流程为,在用户线程发出I/O请求之后,内核会检查数据是否就绪,此时用户线程一直处于阻塞等待内存数据就绪;在内存数据就绪后,内核将数据复制到用户线程中,并返回I/O执行结果到用户线程,此时用户线程将解除阻塞状态并开始处理数据。典型的阻塞I/O例子:data=socket.read(),如果内核数据没有就绪,socket线程就会一直阻塞在read()中等待内核数据就绪。
- 非阻塞I/O模型:指用户线程发起一个I/O操作后,无需阻塞就可以得到内核返回的一个结果。如果内核返回的结果为false,表示内核数据还没有准备好,需要稍后再次发起I/O操作。一旦内核数据准备好了,并且再次收到用户请求,内核就会立刻将数据复制到用户线程中并将复制结果通知给用户线程。
- 多路复用I/O模型:是多线程并发编程用的较多的模型,Java NIO就是基于多路复用I/O模型实现的。在多路复用I/O模型中会有一个被称为selector的线程不断的询问多个socket的状况,只有在socket读写事件时,才会通知用户线程进行I/O读写操作。
- 非阻塞I/O模型是在每个用户线程中都进行socket状态检查,而在多路复用I/O模型是在系统内核中进行socket状态检查,所以效率比非阻塞高;
- 多路复用I/O模型通过在一个selector线程上以轮询的方式检测多个socket上是否有事件到达,并逐个处理和响应。因此在事件响应体很大时,selector线程就会成为性能瓶颈。在实践应用中最后在事件处理中不多复杂的操作,只做数据的接收和转发,将具体的业务转发给后面的业务线程处理。
- 信号驱动I/O模型:该模型是,在用户线程发起一个I/O请求操作时,系统会为该请求对应的socket注册一个信号函数,然后用户线程可以继续执行其他业务;在内核数据准备就绪后,会发一个信号到用户线程,用户线程接收到信号后会在信号函数中调用对应的I/O操作;
- 异步I/O模型:在异步线程中,用户不需要关心整个I/O操作是如何进行的,只需要发起一个请求,在接收到内核返回的信号(成功或失败),表明I/O操作已经完成。在异步I/O模型中,I/O操作的两个阶段(请求的发起、数据的读取)都是在内核中自动完成的,最终发送一个信号告知用户线程I/O操作已经完成。与信号模型的区别是,信号模型在接收到信号后还需要用户线程调用I/O函数进行实际的I/O读写操作,在异步I/O中是,在接受的信号后,用户线程已经接收到I/O操作完的数据,可以直接使用数据。异步I/O需要操作系统的支持,需要有Asynchronous I/O的JDK版本。
- Java I/O:在整个java.io包中有重要的五个类和一个接口,五个类有File、outputstream、inputstream、writer、reader,一个接口是指serializable。
- Java NIO:主要包括三大块,selector(选择器)、channel(通道)和buffer(缓冲区)。
- selector:用于监听多个channel事件,例如连接打开和数据到达;selector能够检测多个注册通道上是否有事件发生,若有事件发生,会获取事件然后针对每个事件进行响应处理。
- channel:即为通道,与stream流类似,但与之不同,stream流是单向的,channel是双向的,从channel中读取数据或将数据写入channel中。channel中有四个类型:FileChannel(文件流通道)、DatagramChannel(UDP)、SocketChannel(TCP client端)、ServerSocketChannel(TCP server端)
- buffer:表示缓冲区,实际上是一个容器,是一个连续数组。channel提供从文件或网络读取数据的渠道,数据的读写必须经过buffer,常用的buffer实现类有:ByteBuffer、IntBuffer、CharBuffer、LongBuffer、DoublebBuffer、FloatBuffer、ShortBuffer;
Java NIO 与BIO的区别:
- BIO是面向流的操作,NIO是面向缓冲区的;在面向流的操作中,数据只能在一个流中连续进行读写,数据没有缓冲,因此字节流无法前后移动。在NIO中,每次都是将数据从一个channel读取到一个buffer中,再从buffer中写入到channel中,因此可以方便的在缓冲区中进行移动等操作。
- BIO的流是阻塞模式的,NIO的流是非阻塞模式的;
Java基础
- 重载与重写的区别
重载:方法名相同,但是参数必须不同,返回类型也可修改,异常类型也可以修改
重写:类上是父子类、接口与实现类,方法名相同,且参数不可修改,返回类型也不可修改,异常可减少或删除,但不能扩展。
- StringBuffer 和 StringBuilder
- 线程安全:StringBuffer是线程安全的(有关键字synchronized),stringbuilder没有是使用synchroized修饰
- 缓冲区:StringBuffer的toString()方法中,每次获取toString都会使用缓存区中的toStringCache值来构造一个字符串;StringBuilder每次都需要复制一次字符数组,再造一个字符串。
- 性能:StringBuffer是线程安全的,又是所有方法都公开的且是同步的,StringBuilder是没有对方法加锁同步的,所以StringBuilder性能优先于StringBuffer。
Java集合
ArrayList与LinkedList的区别是什么?
- 底层使用的数据结构
- ArrayList底层使用的是Object数组,初始化时就会指向的会是一个static修饰的空数组,数组的长度一开始为0,插入第一个元素是数组长度会初始化为10,之后每次数组空间不够,进行扩容时都是原来的1.5倍。ArrayList的空间浪费主要体现在list列表的结尾会预留一定的容量空间(为了避免添加元素时,数组空间不够导致频繁申请内存),而LinkedList的空间花费则体现在,其每一个元素浪费的空间更多(存放后继指针next和前驱指针pre以及数据)
- LinkedList底层使用的数据结构是双向链表,每个节点都保存了指向前驱节点和后继节点的指针。初始化时,不执行任何操作,添加第一个元素时,再去构造链表中的节点。
- 是否保证线程安全
ArrayList和LinkedList都是不同步的,即都是线程不安全的。
因为ArrayList的插入元素的方法就是裸奔,直接将原数组index及后面的元素拷贝到index+1及后面的位置上,然后将index位置设置为插入的值,并发修改时保证不了数据安全性,所以也不允许并发修改,一旦检测到并发修改,会抛出ConcurrentModificationException异常;
/*** Inserts the specified element at the specified position in this* list. Shifts the element currently at that position (if any) and* any subsequent elements to the right (adds one to their indices).* ArrayList的插入元素的方法* @param index index at which the specified element is to be inserted* @param element element to be inserted* @throws IndexOutOfBoundsException {@inheritDoc}*/public void add(int index, E element) {rangeCheckForAdd(index);ensureCapacityInternal(size + 1); // Increments modCount!!//将原数组index之后的元素拷贝到元素组index+1后面的位置上System.arraycopy(elementData, index, elementData, index + 1,size - index);elementData[index] = element;size++;}
- 插入和删除的复杂度
- ArrayList采用数组存储,元素的物理存储地址是连续的,支持以O(1)的时间复杂度对元素的快速访问。插入和删除元素后,需要将后面的元素进行移动,所以插入和删除元素的时间复杂度受元素位置的影响。复杂度是O(1)。
- LinkedList采用链表存储,所以不能快速随机访问。所以首尾插入,删除元素时间复杂度不受元素位置影响,都是近似O(1)(如果是插入到中间位置还需要考虑寻找插入位置的时间复杂度)。而数组为近似O(n)。
- 继承树
- ArrayList继承AbstractList,实现了List,RandomAccess,Cloneable,java.io.Serializable接口。
- LinkedList继承自AbstractSequentialList,实现了List,Deque,Cloneable,java.io.Serializable接口。
AbstractSequuentList是AbstractList类的子类,实现了根据下标来访问元素的一些方法,主要是通过ListIterator便利获取特定元素。
List接口代表的是有序集合,与Set相反,List的元素是按照移动的顺序进行排列。
Cloneable接口代表类会重写父类Object的clone()方法,支持对实例对象的clone操作。
java.io.Serializable接口代表类支持序列化。
RandomAccess是一个标示性接口,代表ArrayList支持快速访问,而LinkedList不支持。
Deque接口是双端队列的意思,代表LinkedList支持两端元素插入和移动。
怎么使ArrayList,LinkedList变成线程安全的?
- 使用SynchronizedList
SynchronizedList是一个线程安全的包装类。继承于SynchronizedCollection,SynchronizedCollection实现了Collection接口,SynchronizedList包含一个List对象,对List的访问修改方法进行了一些封装,在封装的方法中会对list使用同步锁加锁,然后再进行存取和修改操作。使用方法如下:
LinkedList<Integer> linkedList = new LinkedList<Integer>();//调用Collections的synchronizedList方法,传入一个linkedList,会返回一个SynchronizedList实例对象List<Integer> synchronizedList = Collections.synchronizedList(linkedList);//调用Collections的synchronizedList方法,ArrayList,返回一个SynchronizedRandomAccessList实例对象ArrayList<Integer> arrayList = new ArrayList<Integer>();List<Integer> synchronizedRandomAccessList = Collections.synchronizedList(arrayList);
- 使用CopyOnWriteArrayList
CopyOnWriteArrayList与ArrayList类似,都实现了List接口,只不过它的父类是Object,而不是AbstractList。CopyOnWriteArrayList与ArrayList不同:
内部持有一个ReentrantLock类型的lock锁,用于控制并发访问(在对数组进行修改的方法中,都会先获取lock,获取成功才能进行修改,修改完释放锁,保证每次只允许一个线程对数组进行修改)
/** The lock protecting all mutators */final transient ReentrantLock lock = new ReentrantLock();
使用volatile修饰Object数组,使得变量具备内存可见性
/** The array, accessed only via getArray/setArray. *///CopyOnWriteArrayListprivate transient volatile Object[] array;/*** The array buffer into which the elements of the ArrayList are stored.* The capacity of the ArrayList is the length of this array buffer. Any* empty ArrayList with elementData == DEFAULTCAPACITY_EMPTY_ELEMENTDATA* will be expanded to DEFAULT_CAPACITY when the first element is added.*///ArrayListtransient Object[] elementData; // non-private to simplify nested class access
可以看到区别主要在于CopyOnWriteArrayList的Object是使用volatile来修饰,volatile可以使变量具备内存可见性,一个线程在工作内存中对变量进行修改后,会立即更新到物理内存,并且使得其他线程中的这个变量缓存失效,其它线程在读取时,会去物理内存中读取最新的值。(volatile修饰的是指向数组的引用变量,所以对数组添加元素,删除元素不会改变引用,只有对数组变量array重新赋值才会改变。所以为了保证内存可见性,CopyOnWriteArrayList.add()方法在添加元素时,都是复制出一个新数组,进行修改操作后,在设置到数组上)
注意事项:Object数组都使用transient修饰,是因为transient修饰的属性不会参与序列化,ArrayList通过实现writeObject()和readObject()方法来自定义序列化方法(基于反序列化时节约空间考虑,如果用默认的序列方法,源elementData数组长度为100,实际上只有10个元素,反序列化时也会出现分配长度为100的数组,造成内存浪费)。下面是copyOpyOnWriteArrayList的add()方法/*** Inserts the specified element at the specified position in this* list. Shifts the element currently at that position (if any) and* any subsequent elements to the right (adds one to their indices).** @throws IndexOutOfBoundsException {@inheritDoc}*/public void add(int index, E element) {//使用ReetrantLock,保证写线程在同时刻只有一个final ReentrantLock lock = this.lock;lock.lock();try {//获取旧数组引用Object[] elements = getArray();int len = elements.length;if (index > len || index < 0)throw new IndexOutOfBoundsException("Index: "+index+", Size: "+len);//创建新数组,并将就数组的数据复制到新数组中Object[] newElements;int numMoved = len - index;if (numMoved == 0)newElements = Arrays.copyOf(elements, len + 1);else {newElements = new Object[len + 1];System.arraycopy(elements, 0, newElements, 0, index);System.arraycopy(elements, index, newElements, index + 1,numMoved);}//向新数组中添加新的数组newElements[index] = element;//将旧数组引用指向新的数组setArray(newElements);} finally {lock.unlock();}}
- SynchronizedList和CopyOnWriteArrayList优缺点
- SynchronizedList:读写都加锁,SynchronizedList是通过在方法上使用synchronized修饰来实现方法同步,即便只是多个线程在读数据,也不能进行,如果是读比较多的的场景下,会使性能不高,所以适合读写均匀的情况下;
CopyOnWriteArrayList:读不加锁,写加锁,因CopyOnWriteArrayList是读写分离的,只有对写操作加锁,但是每次写操作(添加和删除元素)时都会复制出一个新的数组,完成修改后将新数组设置到旧数组的引用上,所以在写比较多的情况写,会有很大的性能开销,所以适合读比较多的应用场景。
ArrayList遍历时删除元素有哪些方法?
首先结论如下:
普通for循环正序删除(结果:会漏掉元素判断)
- 普通for循环倒序删除(结果:正确删除)
- for-each循环删除(结果:抛出异常)
- Iterator遍历,使用ArrayList.remove()删除元素(结果:抛出异常)
- Iterator遍历,使用Iterator的remove删除元素(结果:正确删除)
首先创建一个数组
public static void main(String[] args) {ArrayList<Integer> arrayList = new ArrayList();arrayList.add(1);arrayList.add(2);arrayList.add(3);arrayList.add(3);arrayList.add(4);arrayList.add(5);removeWayOne(arrayList);}
普通for循环正序删除(结果:会漏掉对后一个元素的判断)
for (int i = 0; i < arrayList.size(); i++) {if (arrayList.get(i) == 3) {//3是要删除的元素arrayList.remove(i);//解决方案: 加一行代码i = i - 1; 删除元素后,下标减1}System.out.println("当前arrayList是"+arrayList.toString());}//原ArrayList是[1, 2, 3, 3, 4, 5]//删除后是[1, 2, 3, 4, 5]
原因在于调用remove删除元素时,remove方法调用System.arraycopy()方法将后面的元素移动到前面的位置
普通for循环倒序删除(结果:正确删除)
for (int i = arrayList.size() -1 ; i>=0; i--) {if (arrayList.get(i).equals(3)) {arrayList.remove(i);}System.out.println("当前arrayList是"+arrayList.toString());}
这用方法可以正确删除元素,是因为调用remove删除元素时,remove方法调用System.arraycopy()将删除的元素后面的元素向前移动,而不会影响删除元素之前的元素,所以倒序遍历可以正常删除元素。
for-each循环删除(结果:抛出异常)
抛出异常的根本原因在于for-each是使用Iterator来实现遍历的,调用ArrayList.remove()方法会将modCount+1,而Iterator内部的expectedModCount却没有更新,这样在下次循环时调用Iterator.next()会对modCount和expectedModCount进行比较,不一致就会抛出ConcurrentModificationException异常。
public static void removeWayThree(ArrayList<Integer> arrayList) {for (Integer value : arrayList) {if (value.equals(3)) {//3是要删除的元素arrayList.remove(value);}System.out.println("当前arrayList是"+arrayList.toString());}}
Iterator.hasNext()来判断是否还有下一个元素和Iterator.next()方法来获取下一个元素。而因为在删除元素时,remove()方法会调用fastRemove()方法,其中会调用modCount+1,代表对数组进行修改,将修改次数+1。
/*** Removes the first occurrence of the specified element from this list,* if it is present. If the list does not contain the element, it is* unchanged. More formally, removes the element with the lowest index* <tt>i</tt> such that* <tt>(o==null ? get(i)==null : o.equals(get(i)))</tt>* (if such an element exists). Returns <tt>true</tt> if this list* contained the specified element (or equivalently, if this list* changed as a result of the call).** @param o element to be removed from this list, if present* @return <tt>true</tt> if this list contained the specified element*/public boolean remove(Object o) {if (o == null) {for (int index = 0; index < size; index++)if (elementData[index] == null) {fastRemove(index);return true;}} else {for (int index = 0; index < size; index++)if (o.equals(elementData[index])) {fastRemove(index);return true;}}return false;}/** Private remove method that skips bounds checking and does not* return the value removed.*/private void fastRemove(int index) {modCount++;int numMoved = size - index - 1;if (numMoved > 0)System.arraycopy(elementData, index+1, elementData, index,numMoved);elementData[--size] = null; // clear to let GC do its work}
HashMap添加一个键值对过程?
流程图如下:
- 初始化table
判断table是否为空或为null,否则执行resize()方法(resize方法一般是扩容时调用,也可以调用来初始化table)
- 计算hash值
根据键值key计算hash值。(因为hashCode是一个int类型的变量,是4字节,32位,所以这里会将hashCode的低16位与高16位进行一个异或运算,来保留高位的运算,以便于得到的hash值更加均匀分布)
/*** Computes key.hashCode() and spreads (XORs) higher bits of hash* to lower. Because the table uses power-of-two masking, sets of* hashes that vary only in bits above the current mask will* always collide. (Among known examples are sets of Float keys* holding consecutive whole numbers in small tables.) So we* apply a transform that spreads the impact of higher bits* downward. There is a tradeoff between speed, utility, and* quality of bit-spreading. Because many common sets of hashes* are already reasonably distributed (so don't benefit from* spreading), and because we use trees to handle large sets of* collisions in bins, we just XOR some shifted bits in the* cheapest possible way to reduce systematic lossage, as well as* to incorporate impact of the highest bits that would otherwise* never be used in index calculations because of table bounds.*/static final int hash(Object key) {int h;return (key == null) ? 0 : (h = key.hashCode()) ^ (h >>> 16);}
- 插入或更新节点
根据(n-1)& hash计算得到插入的数组下标i,然后进行判断
3.1 数组为空(table[i] == null)
那么说明当前数组下标下,没有hash冲突的元素,直接新建节点添加。
3.2 等于下标首元素,table[i].hash hash && (table[i] key || (key != null && key.equals(table[i].key)))
判断table[i]的首个元素是否和key,如果相同直接更新value。
3.3 数组下标存的是红黑树,table[i] instanceof TreeNode
判断table[i]是否为treeNode,即table[i]是否是红黑树,如果是红黑树,则直接在树中插入键值对。
3.4 数组下标存的是链表
上面的判断条件都不满足,说明table[i]存储的是一个链表,那么遍历链表,判断是否存在已有元素的key与插入键值对key相等,如果是,那么更新value,如果没有,那么在链表末尾插入一个新节点。插入之后判断链表长度链表长度是否大于8,大于8的话把链表转换为红黑树。
- 扩容
插入成功后,判断实际存在的键值对数量size是否超过了最大容量threshold(一般是数组长度*负载因子0.75),如果超过,进行扩容。
源码如下:
/*** Associates the specified value with the specified key in this map.* If the map previously contained a mapping for the key, the old* value is replaced.** @param key key with which the specified value is to be associated* @param value value to be associated with the specified key* @return the previous value associated with <tt>key</tt>, or* <tt>null</tt> if there was no mapping for <tt>key</tt>.* (A <tt>null</tt> return can also indicate that the map* previously associated <tt>null</tt> with <tt>key</tt>.)*/public V put(K key, V value) {return putVal(hash(key), key, value, false, true);}/*** Implements Map.put and related methods** @param hash hash for key* @param key the key* @param value the value to put* @param onlyIfAbsent if true, don't change existing value* @param evict if false, the table is in creation mode.* @return previous value, or null if none*/final V putVal(int hash, K key, V value, boolean onlyIfAbsent,boolean evict) {Node<K,V>[] tab; Node<K,V> p; int n, i;//1.tab为空则创建if ((tab = table) == null || (n = tab.length) == 0)n = (tab = resize()).length;//2.计算index,并对null做处理//3.插入元素//(n - 1) & hash 确定元素存放在哪个数组下标下//下标没有元素,新生成节点放入中(此时,这个节点是放在数组中)if ((p = tab[i = (n - 1) & hash]) == null)tab[i] = newNode(hash, key, value, null);//下标中已存在元素else {Node<K,V> e; K k;//节点key存在,直接覆盖value//比较桶中第一个元素(数组中的节点)的hash值相等,key相等if (p.hash == hash &&((k = p.key) == key || (key != null && key.equals(k))))//将第一个元素直接赋值给e,用e来记录e = p;//判断该链为红黑树//hash值不相等,即key不相等,为红黑树节点else if (p instanceof TreeNode)//放入树中e = ((TreeNode<K,V>)p).putTreeVal(this, tab, hash, key, value);//该链为链表//为链表节点else {//在链表最末插入结点for (int binCount = 0; ; ++binCount) {//到达链表的尾部if ((e = p.next) == null) {//到达尾部插入新结点p.next = newNode(hash, key, value, null);//结点数量达到阈值,转化为红黑树if (binCount >= TREEIFY_THRESHOLD - 1) // -1 for 1sttreeifyBin(tab, hash);//跳出循环break;}//判断链表中结点的key值与插入的元素的key值是否相等if (e.hash == hash &&((k = e.key) == key || (key != null && key.equals(k))))//相等,跳出循环break;//用于遍历桶中的链表,与前面的e = p.next组合,可以遍历链表p = e;}}//表示在桶中找到了key值、hash值与插入元素相等的结点if (e != null) { // existing mapping for key//纪录e的valueV oldValue = e.value;//onlyIfAbsent为false或者旧值为nullif (!onlyIfAbsent || oldValue == null)//用新值代替旧值e.value = value;//访问后回调afterNodeAccess(e);//返回旧值return oldValue;}}++modCount;//超过最大容量就扩容,实际大小大于阈值则扩容if (++size > threshold)resize();//插入后回调afterNodeInsertion(evict);return null;}
扩容方法:
/*** Initializes or doubles table size. If null, allocates in* accord with initial capacity target held in field threshold.* Otherwise, because we are using power-of-two expansion, the* elements from each bin must either stay at same index, or move* with a power of two offset in the new table.** @return the table*/final Node<K,V>[] resize() {//记录表值Node<K,V>[] oldTab = table;//判断oldTab的空间大小int oldCap = (oldTab == null) ? 0 : oldTab.length;int oldThr = threshold;int newCap, newThr = 0;if (oldCap > 0) {if (oldCap >= MAXIMUM_CAPACITY) {threshold = Integer.MAX_VALUE;return oldTab;}else if ((newCap = oldCap << 1) < MAXIMUM_CAPACITY &&oldCap >= DEFAULT_INITIAL_CAPACITY)newThr = oldThr << 1; // double threshold}else if (oldThr > 0) // initial capacity was placed in thresholdnewCap = oldThr;else { // zero initial threshold signifies using defaultsnewCap = DEFAULT_INITIAL_CAPACITY;newThr = (int)(DEFAULT_LOAD_FACTOR * DEFAULT_INITIAL_CAPACITY);}if (newThr == 0) {float ft = (float)newCap * loadFactor;newThr = (newCap < MAXIMUM_CAPACITY && ft < (float)MAXIMUM_CAPACITY ?(int)ft : Integer.MAX_VALUE);}threshold = newThr;@SuppressWarnings({"rawtypes","unchecked"})Node<K,V>[] newTab = (Node<K,V>[])new Node[newCap];table = newTab;if (oldTab != null) {for (int j = 0; j < oldCap; ++j) {Node<K,V> e;if ((e = oldTab[j]) != null) {oldTab[j] = null;if (e.next == null)newTab[e.hash & (newCap - 1)] = e;else if (e instanceof TreeNode)((TreeNode<K,V>)e).split(this, newTab, j, oldCap);else { // preserve orderNode<K,V> loHead = null, loTail = null;Node<K,V> hiHead = null, hiTail = null;Node<K,V> next;do {next = e.next;if ((e.hash & oldCap) == 0) {if (loTail == null)loHead = e;elseloTail.next = e;loTail = e;}else {if (hiTail == null)hiHead = e;elsehiTail.next = e;hiTail = e;}} while ((e = next) != null);if (loTail != null) {loTail.next = null;newTab[j] = loHead;}if (hiTail != null) {hiTail.next = null;newTab[j + oldCap] = hiHead;}}}}}return newTab;}
ConcurrentHashMap添加一个键值对的工程是怎样的?
ConcurrentHashMap的工作流程图:
- 判断null值
判断key null 或者 value == null,如果是,抛出空指针异常。
- 计算hash
根基key计算hash值(计算结果跟hashMap是一致的,写法不同)。
- 进入for循环,插入或更新元素
3.1 如果tab null || tab.length == 0,说明数组未初始化
说明当前数组tab还没有初始化。
那么调用initTable()方法初始化tab。(在initTable方法中,为了控制只有一个线程对table进行初始化,当前线程会通过CAS操作对SIZECTL变量赋值为-1,如果赋值成功,线程才能初始化table,否则会调用Thread.yield()方法让出时间片。
3.2 如果f == null,说明当前下标没有哈希冲突的键值对
说明当前数组下标还没有哈希冲突的键值对。
Node
3.3 如果 f != null && f.hash = -1,说明存储的是标志节点,表示在扩容
说明ConcurrentHashMap正在扩容,当前的节点f是一个标志节点,当前下标存储的hash冲突的元素已经迁移了。那么当前线程会调用helpTransfer()方法来辅助扩容,扩容完成后会将tab指向新的table,然后继续执行for循环。
3.4 除了上面三种以外情况,说明是下标存储链表或者是红黑树
说明f节点是一个链表的头结点或者是红黑树的根节点,那么对f加synchronize同步锁,然后进行以下判断:
- f.hash > 0
如果是f的hash值大于0,当前数组下标存储的是一个链表,f是链表的头结点。
对链表进行遍历,如果有节点跟当前需要插入的节点的hash值相同,那么节点的value进行更新,否则根据key,value创建一个Node
- f instanceof TreeBin
如果f是TreeBin类型,那么说明当前数组下标存储的是一个红黑树,f是红黑树的根节点,调用putTreeVal方法,插入或更新节点。
- 插入完成后,判断binCount(数组下标存储是一个链表时,binCount是链表长度),当binCount超过8时,并且数组的长度大于64时,那么调用treeifyBin方法将链表转换为红黑树。最后break出for循环。
PS:
当原来的链表长度超过8时,确实会调用treeifyBin方法,但是在treeifyBin方法中会判断当前tab是否为空或者数组长度是否小于64,如果满足条件,那么调用resize方法对tab初始化或者扩容。就不会将链表转换为红黑树了。
treeifyBin方法源码:
/*** Replaces all linked nodes in bin at given index unless table is* too small, in which case resizes instead.*/private final void treeifyBin(Node<K,V>[] tab, int index) {Node<K,V> b; int n, sc;if (tab != null) {if ((n = tab.length) < MIN_TREEIFY_CAPACITY)tryPresize(n << 1);else if ((b = tabAt(tab, index)) != null && b.hash >= 0) {synchronized (b) {if (tabAt(tab, index) == b) {TreeNode<K,V> hd = null, tl = null;for (Node<K,V> e = b; e != null; e = e.next) {TreeNode<K,V> p =new TreeNode<K,V>(e.hash, e.key, e.val,null, null);if ((p.prev = tl) == null)hd = p;elsetl.next = p;tl = p;}setTabAt(tab, index, new TreeBin<K,V>(hd));}}}}}
- 判断是否需要扩容
调用addCount()方法对当前数组长度加一,在addCount()方法中,会判断当前元素个数是否超过sizeCtl(扩容阈值,总长度0.75),如果是,那么会进行扩容,如果正处于扩容中,当前线程会辅助扩容。
*ConcurrentHashMap源码:
/** Implementation for put and putIfAbsent */final V putVal(K key, V value, boolean onlyIfAbsent) {//ConcurrentHashMap不允许key和value为null,否则抛出异常if (key == null || value == null) throw new NullPointerException();//计算hash值int hash = spread(key.hashCode());int binCount = 0;for (Node<K,V>[] tab = table;;) { //进入循环Node<K,V> f; int n, i, fh;if (tab == null || (n = tab.length) == 0) //数组如果为空tab = initTable(); //初始化数组else if ((f = tabAt(tab, i = (n - 1) & hash)) == null) {//如果发现此数组下标下没有哈希冲突的元素,就直接使用CAS操作将Node设置到此下标下if (casTabAt(tab, i, null,new Node<K,V>(hash, key, value, null)))break; // no lock when adding to empty bin} else if ((fh = f.hash) == MOVED) //代表当前下标的头结点是标识结点,代表数组在扩容tab = helpTransfer(tab, f); //协助扩容else { //这种是普通情况,存在的是链表或者红黑树,进行插入V oldVal = null;synchronized (f) { //加同步锁,避免多线程进行插入if (tabAt(tab, i) == f) {if (fh >= 0) { //头结点hash值大于0,此数组下标下代表存的一个链表binCount = 1;for (Node<K,V> e = f;; ++binCount) { //遍历链表K ek;if (e.hash == hash &&((ek = e.key) == key || (ek != null && key.equals(ek)))) {oldVal = e.val;if (!onlyIfAbsent)e.val = value;break;}Node<K,V> pred = e;if ((e = e.next) == null) { //键值对是新添加的,在链表尾部插入新节点pred.next = new Node<K,V>(hash, key,value, null);break;}}} else if (f instanceof TreeBin) { //下标下存的是红黑树Node<K,V> p;binCount = 2;if ((p = ((TreeBin<K,V>)f).putTreeVal(hash, key,value)) != null) {oldVal = p.val;if (!onlyIfAbsent)p.val = value;}}}}if (binCount != 0) {if (binCount >= TREEIFY_THRESHOLD) //链表长度>=8,转换为红黑树treeifyBin(tab, i);if (oldVal != null)return oldVal;break;}}}addCount(1L, binCount);return null;}
HashMap与HashTable,ConcurrentHashMap的区别是什么
主要从底层数据结构,线程安全,执行效率,是否允许Null值,初始容量及扩容,hash值计算来进行分析。
- 底层数据结构
HashMap = 数组+链表+红黑树transient Node<K,V>[] table; //HashMaptransient volatile Node<K,V>[] table; //ConcurrentHashMapprivate transient Entry<?,?>[] table; //HashTable
HashMap的底层数据结构是一个数组+链表+红黑树,数组的每个元素存储是一个链表的头结点,链表中存储了一组哈希冲突的键值对,通过链地址法来解决哈希冲突的。为了避免链表长度过长,影响查找元素的效率,当链表的长度大于8时,会将链表转换为红黑树,链表的长度小于6时,将红黑树转换为链表(但是红黑树转换为链表的时机不是在删除链表时,而是在扩容时,发现红黑树分解后的两个链表小于6,就按链表处理,否则就建立两个小的红黑树,设置到扩容后的位置)。之所以临界点为8是因为红黑树的查找时间复杂度为logN,链表的平均时间查找复杂度为N/2,当N为8时,logN为3是小于N/2的,正好可以通过转换红黑树减少查找的时间复杂度。
ConcurrentHashMap = 数组+链表+红黑树
ConcurrentHashMap底层数据结构跟HashMap一致,底层数据结构是一个数组+链表+红黑树。只不过使用了volatile来进行修饰他的属性,来保证内存可见性(一个线程修改了这些属性后,会使其他线程对于该属性的缓存失效,以便下次读取时取最新的值)。
HashTable = 数组+链表
HashTable底层数据结构跟HashMap一致,底层数据结构是数组+链表,也是通过链地址法来解决冲突,只不过链表过长时,不会转为红黑树来减少查找的时间复杂度。HashTable属于历史遗留类,实际开发中很少使用。
- 线程安全
HashMap 非线程安全
HashMap是非线程安全的。(例如多个线程插入多个键值对,如果两个键值对的key哈希冲突,可能使得两个线程在操作同一个链表中的节点,导致一个键值对的value被覆盖)
HashTable 线程安全
HashTable是线程安全的,主要通过使用synchronize关键字修饰大部分方法,使得每次只能一个线程对HashTable进行同步修改,性能开销较大。
ConcurrentHashMap 线程安全
ConcurrentHashMap 是线程安全的,主要通过CAS操作+synchronize来保证线程安全的。
CAS操作
往ConcurrentHashMap中插入新的键值对是,如果对应的数组下标元素为null,那么通过CAS操作原子性的将节点设置到数组中。
//这是添加新的键值对的方法final V putVal(K key, V value, boolean onlyIfAbsent) {...其他代码if ((f = tabAt(tab, i = (n - 1) & hash)) == null) {if (casTabAt(tab, i, null, new Node<K,V>(hash, key, value, null)))break; // 因为对应的数组下标元素为null,所以null作为预期值,new Node<K,V>(hash, key, value, null)作为即将更新的值,只有当内存中的值与即将预期值一致时,才会进行更新,保证原子性。}...其他代码}static final <K,V> boolean casTabAt(Node<K,V>[] tab, int i,Node<K,V> c, Node<K,V> v) {return U.compareAndSwapObject(tab, ((long)i << ASHIFT) + ABASE, c, v);}
多线程
Java中创建线程有哪些方式
继承Thread类,重写run方法
这种方式通过自定义类继承Thread类,重写run()方法,然后在创建自定义类的对象,然后调用start()方法,JVM会创建一个新线程。并且为线程创建方法调用栈和程序计数器,此时线程处于就绪状态,当线程获取CPU时间片后,线程会进入到运行状态,回去调用run()方法。并且创建自定义类对象的线程与调用run()方法的线程之间是并发的。
class CustomThread extends Thread {public static void main(String[] args) {System.out.println(Thread.currentThread().getName()+"线程调用了main方法");for (int i = 0; i < 10; i++) {if (i == 1) {CustomThread customThread = new CustomThread();customThread.start();System.out.println(Thread.currentThread().getName()+"线程--i是"+i);}}System.out.println("main()方法执行完毕!");}void run() {System.out.println(Thread.currentThread().getName()+"线程调用了run()方法");for (int j = 0; j < 5; j++) {System.out.println(Thread.currentThread().getName()+"线程--j是"+j);}System.out.println("run()方法执行完毕!");}}
执行原理
首先看start方法的源码,在源码中首先会判断threadStatus是否为0,如果为0会抛出异常。然后会将当前对象添加到线程组,最后调用start()方法。
/*** Causes this thread to begin execution; the Java Virtual Machine* calls the <code>run</code> method of this thread.* <p>* The result is that two threads are running concurrently: the* current thread (which returns from the call to the* <code>start</code> method) and the other thread (which executes its* <code>run</code> method).* <p>* It is never legal to start a thread more than once.* In particular, a thread may not be restarted once it has completed* execution.** @exception IllegalThreadStateException if the thread was already* started.* @see #run()* @see #stop()*/public synchronized void start() {/*** This method is not invoked for the main method thread or "system"* group threads created/set up by the VM. Any new functionality added* to this method in the future may have to also be added to the VM.** A zero status value corresponds to state "NEW".*/if (threadStatus != 0)throw new IllegalThreadStateException();/* Notify the group that this thread is about to be started* so that it can be added to the group's list of threads* and the group's unstarted count can be decremented. *///将对象添加到线程组group.add(this);boolean started = false;try {start0(); //这是一个native方法,调用后JVM会新建一个线程来调用run方法started = true;} finally {try {if (!started) {group.threadStartFailed(this);}} catch (Throwable ignore) {/* do nothing. If start0 threw a Throwable thenit will be passed up the call stack */}}}private native void start0();
拓展问题:多次调用Thread对象的start()方法会怎么样?
会抛出IllegalThreadStateException异常。其实在Thread#start()方法里面的注释中有提到,多次调用start()方法是非法的,所以在上面的start()方法源码中一开始就对threadStatus进行判断,不为0就会抛出IllegalThreadStateException异常。
注意:start()方法中判断threadStatus是否为0,是判断当前线程是否新建态,0是代表新建态(上图中源码注释里有提到),而不是就绪态,因为Java的Thread类中,Thread的Runnable状态包括了线程的就绪态和运行态,(Thread的state的RUNNABLE时(也就是threadStatus为4时),代表线程为就绪态或运行态)。执行start()方法的线程还不是JVM新建线程,所以不是就绪态
实现Runnable接口
这种方式就是创建一个类(target类),实现Runnable接口的Run()方法,然后将target类的实例对象作为Thread的构造器入参target,实际上的线程对象还是Thread实例,只不过线程Thread与线程执行体(target类的run方法)分离了,耦合度更低一些。
class ThreadTarget implements Runnable {void run() {System.out.println(Thread.currentThread().getName()+"线程执行了run方法");}public static void main(String[] args) {System.out.println(Thread.currentThread().getName()+"线程执行了main方法");ThreadTarget target = new ThreadTarget();Thread thread = new Thread(target);thread.start();}}
原理:因为Thread类的run()方法中会判断成员变量target是否为空,不为空就会调用target类的run方法。
/* What will be run. */private Runnable target;/*** If this thread was constructed using a separate* <code>Runnable</code> run object, then that* <code>Runnable</code> object's <code>run</code> method is called;* otherwise, this method does nothing and returns.* <p>* Subclasses of <code>Thread</code> should override this method.** @see #start()* @see #stop()* @see #Thread(ThreadGroup, Runnable, String)*/@Overridepublic void run() {if (target != null) {target.run();}}
另外一种写法
匿名内部类
可以不用创建target类,可以使用匿名内部类的方式实现,因此上面的代码也可以按照一下方式写:
Thread thread = new Thread(new Runnable() {@Overridepublic void run() {System.out.println(Thread.currentThread().getName()+"线程执行了run方法");}});thread.start();
lamda表达式
在Java8后使用了@FunctionalInterface注解来修饰Runnable接口,表明Runnable接口是一个函数式接口,有且只有一个抽象方法,也可以Lamda方式来创建Runnable对象,比匿名类的方式更简洁。
@FunctionalInterfacepublic interface Runnable {/*** When an object implementing interface <code>Runnable</code> is used* to create a thread, starting the thread causes the object's* <code>run</code> method to be called in that separately executing* thread.* <p>* The general contract of the method <code>run</code> is that it may* take any action whatsoever.** @see java.lang.Thread#run()*/public abstract void run();}
因此上面的的代码也可以按以下方式写:
Thread thread = new Thread(()->{System.out.println(Thread.currentThread().getName()+"线程执行了run方法");})thread.start()
总结
这种写法不用继承Thread类,但同样也有缺点,就是线程方法体(Run()方法)不能设置返回值。
实现Callable接口
Runnable接口中的run方法是没有返回值,如果需要执行的任务带返回值就不能使用Runnable接口。创建一个类CallableTarget,实现Callable接口,实现带有返回值的call()方法,然后根据CallableTarget创建一个任务FutureTask,然后根据FutureTask来创建一个线程Thread,调用Thread的start方法执行任务。
public class CallableTarget implements Callable<Integer> {public Integer call() throws InterruptedException {System.out.println(Thread.currentThread().getName()+"线程执行了call方法");Thread.sleep(5000);return 1;}public static void main(String[] args) throws ExecutionException, InterruptedException {System.out.println(Thread.currentThread().getName()+"线程执行了main方法");CallableTarget callableTarget = new CallableTarget();FutureTask<Integer> task = new FutureTask<Integer>(callableTarget);Thread thread = new Thread(task);thread.start();Integer result = task.get();//当前线程会阻塞,一直等到结果返回。System.out.println("执行完毕,打印result="+result);System.out.println("执行完毕");}}
原理就是Thread类默认的run()方法实现会去调自身的实例变量target的run()方法,(target就是构造器Thread传入的FutureTask),而FutureTask的run方法中就会调用Callable接口的实例的call()方法。
//Thread类的run方法实现/*** If this thread was constructed using a separate* <code>Runnable</code> run object, then that* <code>Runnable</code> object's <code>run</code> method is called;* otherwise, this method does nothing and returns.* <p>* Subclasses of <code>Thread</code> should override this method.** @see #start()* @see #stop()* @see #Thread(ThreadGroup, Runnable, String)*/@Overridepublic void run() {//这里target就是在创建Thread时传入的FutureTask实例变量if (target != null) {target.run();}}//FutureTask类的run方法实现public void run() {if (state != NEW ||!UNSAFE.compareAndSwapObject(this, runnerOffset,null, Thread.currentThread()))return;try {Callable<V> c = callable;if (c != null && state == NEW) {V result;boolean ran;try {//这里调用Callable实例的call方法result = c.call();ran = true;} catch (Throwable ex) {result = null;ran = false;setException(ex);}if (ran)set(result);}} finally {// runner must be non-null until state is settled to// prevent concurrent calls to run()runner = null;// state must be re-read after nulling runner to prevent// leaked interruptsint s = state;if (s >= INTERRUPTING)handlePossibleCancellationInterrupt(s);}}
Java中Runnable、Callable、Future、FutureTask的区别和联系?
最原始的通过新建线程执行任务的方法就是我们创建一个新类,继承Thread,然后重写run方法,因为限制太大了,Java不支持多继承,所以有了Runnable接口。
Runnable
Runnable接口,只需要新建一个类实现这个接口,然后重写run方法,将该类的实例作为参数创建Thread。线程运行时调用该类的run方法。
Thread.start()方法->Thread.run()方法->target.run()方法
Callable
Callable是跟Runnable类似,也是一个接口。只不过它的call方法有返回值,可以供程序接受任务执行的结果。
@FunctionalInterfacepublic interface Callable<V> {/*** Computes a result, or throws an exception if unable to do so.** @return computed result* @throws Exception if unable to compute a result*/V call() throws Exception;}
Future
Future也是一个接口,Future就像是一个管理容器一样,进一步对Runnable和Callable的实例进行封装,提供了取消任务的cancel()方法,查询任务是否完成的isDone()方法,获取执行结果的get方法,带有超时时间来获取执行结果的get()方法。
public interface Future<V> {/*** Attempts to cancel execution of this task. This attempt will* fail if the task has already completed, has already been cancelled,* or could not be cancelled for some other reason. If successful,* and this task has not started when {@code cancel} is called,* this task should never run. If the task has already started,* then the {@code mayInterruptIfRunning} parameter determines* whether the thread executing this task should be interrupted in* an attempt to stop the task.** <p>After this method returns, subsequent calls to {@link #isDone} will* always return {@code true}. Subsequent calls to {@link #isCancelled}* will always return {@code true} if this method returned {@code true}.** @param mayInterruptIfRunning {@code true} if the thread executing this* task should be interrupted; otherwise, in-progress tasks are allowed* to complete* @return {@code false} if the task could not be cancelled,* typically because it has already completed normally;* {@code true} otherwise*/boolean cancel(boolean mayInterruptIfRunning);/*** Returns {@code true} if this task was cancelled before it completed* normally.** @return {@code true} if this task was cancelled before it completed*/boolean isCancelled();/*** Returns {@code true} if this task completed.** Completion may be due to normal termination, an exception, or* cancellation -- in all of these cases, this method will return* {@code true}.** @return {@code true} if this task completed*/boolean isDone();/*** Waits if necessary for the computation to complete, and then* retrieves its result.** @return the computed result* @throws CancellationException if the computation was cancelled* @throws ExecutionException if the computation threw an* exception* @throws InterruptedException if the current thread was interrupted* while waiting*/V get() throws InterruptedException, ExecutionException;/*** Waits if necessary for at most the given time for the computation* to complete, and then retrieves its result, if available.** @param timeout the maximum time to wait* @param unit the time unit of the timeout argument* @return the computed result* @throws CancellationException if the computation was cancelled* @throws ExecutionException if the computation threw an* exception* @throws InterruptedException if the current thread was interrupted* while waiting* @throws TimeoutException if the wait timed out*/V get(long timeout, TimeUnit unit)throws InterruptedException, ExecutionException, TimeoutException;}
FutureTask
因为Future只是一个接口,并不能实例化,可以认为FutureTask就是Future接口的实现类,FutureTask实现了RunnableFuture接口,而RunnableFuture接口继承了Runnable接口和Future接口。
public class FutureTask<V> implements RunnableFuture<V> {...}public interface RunnableFuture<V> extends Runnable, Future<V> {void run();}
volatile关键字有什么用?怎么理解可见性?一般什么场景去用可见性?
当线程进行一个volatile变量写操作时,JIT编译器生成的汇编指令会在写操作的指令后面加上一个lock指令,代码如下:
instance = new Singleton(); // instance是volatile变量转变成汇编代码,如下。0x01a3de1d: movb $0×0,0×1104800(%esi);0x01a3de24: lock addl $0×0,(%esp);
“lock”有三个作用:
- 将当前CPU缓存行的数据会写回到系统内存。
- 这个写回内存的操作会使得其他CPU里缓存该内存地址的数据无效。
- 确保指令重排序时,内存屏障前的指令不会排到后面去,内存屏障后面的指令不会排到前面去。
可见性可以理解为一个线程的写操作可以立即被其他线程得知。为了提高CPU处理速度,CPU一般不直接与内存进行通信,而是将系统内存的数据读取到内存缓存,再进行操作。对于普通的变量,修改完不知道何时会更新到系统内存。但是如果是对volatile修饰的变量进行写操作,JVM会向处理器发送一条Lock前缀的指令,将这个变量所在的缓存行的数据立即写回到系统内存。但是即便写回到系统内存,其他CPU的缓存行数据还是旧数据,为了保证数据一致性,其他CPU会嗅探在总线上传播的数据来检查自己缓存的行的值是否过期,当CPU发现缓存行对应的内存地址被修改,那么就会将当前缓存行设置为无效,下次当CPU对这个缓存进行修改时,会重新从系统内存中把数据读到处理器缓存里。
使用场景
读写锁
如果需要实现一个读写锁,每次只能一个线程去写数据,但是有多个线程来读取数据,就synchronize同步锁来对set方法加锁,get方法不加锁,使用volatile修饰变量,保存内存可见性,不然多个线程可能会在变量修改后还读到一个旧值。volatile Integer a;//可以实现一写多读的场景,保证并发修改数据时的正确。set(Integer c) {synchronized(this.a) {this.a = c;}}get() {return a;}
状态位
用于做状态位标志,如果多个线程去需要根据一个状态位来执行一些操作,使用volatile修饰可以保存内存可见性。用于单例模式,保证1内存可见性,以防止指令重排序。
Java中线程的状态是怎么样的?
在传统操作系统中,线程等于轻量级的进程。
所以传统的操作系统线程一般有以下状态:
- 新建状态:使用new关键字和Thread类或其子类建立一个线程对象后,该线程对象就处于新建状态。它保持这个状态直到程序start()这个线程;
- 就绪状态:当线程对象调用了start()方法之后,该线程就进入就绪状态。该线程就处于就绪队列中,要等待JVM里线程调度器的调度。
- 运行状态:如果就绪状态的线程获取CPU资源,就可以执行run()方法,此时线程便处于运行状态。处于运行状态的线程最为复杂,它可以变为阻塞状态、就绪状态和死亡状态。
- 阻塞状态:如果一个线程执行了sleep(睡眠)、suspend(挂起)等方法,失去所占用资源之后,该线程就从运行状态进入阻塞状态。在睡眠时间已到或获得设备资源后可以重新进入就绪状态。可以分为三种:
- 等待阻塞:运行状态中的线程执行wait()方法,使线程进入到等待阻塞状态。
- 同步阻塞:线程在获取synchronized同步锁失败(因为同步锁被其他线程占用)。
- 其他阻塞:通过调用线程的sleep()或join()发出I/O请求时,线程就会进入到阻塞状态。当sleep()状态超时,join()等待线程终止或超时,或者I/O处理完毕,线程重新转入就绪状态。
- 死亡状态:一个运行状态的线程完成任务或者在其他终止条件发生时,该线程进入到终止状态。
但是Java中Thread对象的状态划分跟传统的操作系统线程状态有一些区别。
/*** A thread state. A thread can be in one of the following states:* <ul>* <li>{@link #NEW}<br>* A thread that has not yet started is in this state.* </li>* <li>{@link #RUNNABLE}<br>* A thread executing in the Java virtual machine is in this state.* </li>* <li>{@link #BLOCKED}<br>* A thread that is blocked waiting for a monitor lock* is in this state.* </li>* <li>{@link #WAITING}<br>* A thread that is waiting indefinitely for another thread to* perform a particular action is in this state.* </li>* <li>{@link #TIMED_WAITING}<br>* A thread that is waiting for another thread to perform an action* for up to a specified waiting time is in this state.* </li>* <li>{@link #TERMINATED}<br>* A thread that has exited is in this state.* </li>* </ul>** <p>* A thread can be in only one state at a given point in time.* These states are virtual machine states which do not reflect* any operating system thread states.** @since 1.5* @see #getState*/public enum State {/*** Thread state for a thread which has not yet started.*/NEW, //新建状态/*** Thread state for a runnable thread. A thread in the runnable* state is executing in the Java virtual machine but it may* be waiting for other resources from the operating system* such as processor.*/RUNNABLE, //运行态/*** Thread state for a thread blocked waiting for a monitor lock.* A thread in the blocked state is waiting for a monitor lock* to enter a synchronized block/method or* reenter a synchronized block/method after calling* {@link Object#wait() Object.wait}.*/BLOCKED, //阻塞状态/*** Thread state for a waiting thread.* A thread is in the waiting state due to calling one of the* following methods:* <ul>* <li>{@link Object#wait() Object.wait} with no timeout</li>* <li>{@link #join() Thread.join} with no timeout</li>* <li>{@link LockSupport#park() LockSupport.park}</li>* </ul>** <p>A thread in the waiting state is waiting for another thread to* perform a particular action.** For example, a thread that has called <tt>Object.wait()</tt>* on an object is waiting for another thread to call* <tt>Object.notify()</tt> or <tt>Object.notifyAll()</tt> on* that object. A thread that has called <tt>Thread.join()</tt>* is waiting for a specified thread to terminate.*/WAITING, //等待态/*** Thread state for a waiting thread with a specified waiting time.* A thread is in the timed waiting state due to calling one of* the following methods with a specified positive waiting time:* <ul>* <li>{@link #sleep Thread.sleep}</li>* <li>{@link Object#wait(long) Object.wait} with timeout</li>* <li>{@link #join(long) Thread.join} with timeout</li>* <li>{@link LockSupport#parkNanos LockSupport.parkNanos}</li>* <li>{@link LockSupport#parkUntil LockSupport.parkUntil}</li>* </ul>*/TIMED_WAITING, //有时间限制的等待态/*** Thread state for a terminated thread.* The thread has completed execution.*/TERMINATED; //死亡态}

NEW 新建态:处于NEW状态的线程此时尚未启动,还没有调用Thread实例的start()方法。
RUNNABLE 运行态:表示当前线程正在运行中。处于RUNNABLE状态的线程可能在Java虚拟机中运行,也有可能在等待其他系统资源(比如I/O)。Java线程的RUNNABLE状态其实是包括了传统操作系统线程的ready和running两个状态。
BLOCKED 阻塞态:阻塞状态,处于BLOCKED状态的线程等待锁的释放以进入同步区。
WAITING 等待态:等待状态,处于等待状态的线程变成RUNNABLE状态需要其他线程唤醒。调用如下三个方法会使线程进入等待状态:
- Object.wait():使当前线程处于等待状态直到另一个线程调用notify唤醒它;
- Thread.join():等待线程执行完毕,底层调用的是Object实例的wait()方法;
- LockSupport.park():除非获得调用许可,否则禁用当前线程进行线程调用。
TIMED_WAITING 超时等待状态:超时等待状态,线程等待一个具体时间,时间到后悔被自动唤醒。调用如下方法会是线程进入超时等待状态:
- Thread.sleep(long millis):使当前线程睡眠指定时间;
- Object.wait(long timeout):线程休眠指定时间,等待期间可以通过notify()/notifyAll()唤醒;
- Thread.join(long millis):等待当前线程最多执行millis毫秒,如果millis为0,则会一直执行;
- LockSupport.parkNanos(long nanos): 除非获得调用许可,否则禁用当前线程进行线程调度指定时间;
- LockSupport.parkUntil(long deadline):同上,也是禁止线程进行调度指定时间;
TERMINATED 终止态:终止状态,此时线程已执行完毕。
状态转换
1. BLOCKED与RUNNABLE状态转换
处于BLOCKED状态的线程是因为在等待锁的释放,当获得锁之后就转换为RUNNABLE状态。
- WAITING状态与RUNNABLE状态转换
Object.wait(),Thread.join()和LockSupport.park()这3个方法可以使线程从RUNNABLE状态转为WAITING状态。
- TIMED_WAITING与RUNNABLE状态转换
TIMED_WAITING与WAITING状态类似,只是TIMED_WAITING状态等待的时间是指定的。调用Thread.sleep(long),Object.wait(long),Thread.join(long)会使得RUNNABLE状态转换为TIMED_WAITING状态
wait()、join()、sleep()方法有什么作用
Object.wait()方法是什么?
调用wait()方法前线程必须持有对象Object锁。线程调用wait()方法后,会释放当前的Object锁,进入锁的monitor对象的等待队列,知道有其他线程调用notify()/notifyAll()方法唤醒等待锁的线程。
需要注意的是,其他线程调用notify()方法只会唤醒单个等待锁的线程,也不一定马上把时间片分给刚才放弃锁的那个线程,具体看系统调度。
Thread.join()方法是什么?
join()方法是Thread类的一个实例方法。它的作用是让当前线程陷入“等待”状态。等join的这个线程threadA执行完成后,再继续执行当前线程。实现原理是join()方法本身是一个sychronized修饰的方法,也就是调用join()这个方法需要先获取threadA的锁,获得锁之后再调用wait()方法来进行等待,一直到threadA执行完成后,threadA会调用notify_all()方法,唤醒所有等待的线程,当前线程才会结束等待。
join()源码如下:
public final void join() throws InterruptedException {join(0);//0的话代表没有超时时间一直等下去}public final synchronized void join(long millis)throws InterruptedException {long base = System.currentTimeMillis();long now = 0;if (millis < 0) {throw new IllegalArgumentException("timeout value is negative");}if (millis == 0) {while (isAlive()) {wait(0);}} else {while (isAlive()) {long delay = millis - now;if (delay <= 0) {break;}wait(delay);now = System.currentTimeMillis() - base;}}}
sleep()方法是什么
sleep方法是thread类的一个静态方法,它的作用是让当前线程休眠一段时间。sleep方法不会释放当前线程持有的锁,而wait方法会。
sleep与wait区别:
- wait可以指定时间,也可以不指定;而sleep必须指定时间。
- wait释放CPU资源,同时释放锁;sleep释放CPU资源,不会释放锁,所以易死锁。(调用join方法也不会释放锁)
- wait必须放在同步块或同步方法中,而sleep可以在任意位置。
Thread.sleep(),Object.wait(),LockSupport.part()有什么区别?
- 这三个方法都会让线程挂起,释放CPU时间片,进入到阻塞态。但是Object.wait()需要释放锁,所以必须早synchronized同步锁中使用,同理配套的Object.notify()也是。而Thread.sleep(),LockSupport.part()方法不需要在synchronized中使用,并且调用时也不会释放锁。
- 由于Thread.sleep()没有对应的唤醒线程的方法,所以必须指定超时时间,超过时间后,线程恢复。所以调用Thread.sleep()后的线程一般是出于TIME_WAITING状态,而调用了Object.wait(),LockSupport.park()的方法是进入到WAITING状态。
- Object.wait()对应的唤醒方法为Object.notify(),LockSupport.park()对应的唤醒方法为LockSupport.unpark()。
- 在代码中必须能保证wait方法比notify方法先执行,如果notify方法比wait方法早执行的话,就会导致因wait方法进入休眠的线程接收不到唤醒通知的问题。而park、unpark则不会有这个问题,我们可以先调用unpark方法释放一个许可证,这样后面线程调用park方法时,发现已经许可证了,就可以直接获取许可证而不用进入休眠状态了。(LockSupport.park() 的实现原理是通过二元信号量做的阻塞,要注意的是,这个信号量最多只能加到1,也就是无论执行多少次unpark()方法,也最多只会有一个许可证。)
- 三种方法让线程进入阻塞态后,都可以响应中断,也就是调用Thread.interrupt()方法会设置中断标志位,之前执行Thread.sleep(),Object.wait()了的线程会抛出InterruptedException异常,然后需要代码进行处理。而调用了park()方法的线程在响应中断只会相当于一次正常的唤醒操作(等价于调用unpark()方法),让线程唤醒,继续执行后面的代码,不会抛出InterruptedException异常。

怎么实现一个生产者消费者?
- 使用Object.wait()和Object.notify()实现
使用一个queue作为一个队列,存放数据,并且使用Synchronized同步锁,每次只能同时存在一个线程来生产或者消费数据,生成线程发现队列容量大于10,生产者线程进入waiting状态,,一旦成功往队列添加数据,那么就唤醒所有线程(主要是消费者线程起来消费)。消费线程消费时,当队列容量等于0,也会主动1进入waiting状态。
伪代码如下:
LinkedList<Integer> queue = new LinkedList<>();void produce(Integer value) {synchronized(queue) {//加锁控制,保证同一时间点,只能有一个线程生成或者消费while(queue.size()>10) {queue.waiting();}queue.add(value);//唤醒消费者线程queue.notifyAll();}}Integer consumer() {synchronized(queue) {//加锁控制,保证同一时间点,只能有一个线程生成或者消费while(queue.size()==0) {queue.waiting();}Integer value = queue.poll();//唤醒生产者线程queue.notifyAll();return value;}}
完整代码如下:
public static void main(String[] args) {Queue<Integer> queue = new LinkedList<>();final Customer customer = new Customer(queue);final Producer producer = new Producer(queue);ExecutorService pool = Executors.newCachedThreadPool();for (int i = 0; i < 1000; i++) {pool.execute(new Runnable() {@Overridepublic void run() {try {Thread.sleep(1000);} catch (InterruptedException e) {e.printStackTrace();}Integer a = customer.removeObject();System.out.println("消费了数据 "+a);}});pool.execute(new Runnable() {@Overridepublic void run() {try {Thread.sleep(1000);} catch (InterruptedException e) {e.printStackTrace();}Random random = new Random();Integer a = random.nextInt(1000);System.out.println("生成了数据 "+a);producer.addObject(a);}});}}private static class Customer {Queue<Integer> queue;Customer(Queue<Integer> queue) { this.queue = queue; }public Integer removeObject() {synchronized (queue) {try {while (queue.size()==0) {System.out.println("队列中没有元素了,进行等待");queue.wait();}} catch (InterruptedException e) {e.printStackTrace();}Integer number = queue.poll();System.out.println("唤醒所有生产线程,当前queue大小是" + queue.size());queue.notifyAll();return number;}}}private static class Producer {Queue<Integer> queue;Producer(Queue<Integer> queue) { this.queue = queue; }public void addObject(Integer number) {synchronized (queue) {try {while (queue.size()>10) {queue.wait();}} catch (InterruptedException e) {e.printStackTrace();}queue.add(number);queue.notifyAll();System.out.println("唤醒所有消费线程,当前queue大小是"+queue.size());}}}
- 使用Lock和Condition来实现
调用Object.wait()方法可以让线程进入等待状态,被添加到Object的Monitor监视器的等待队列,Object.notifyAll()可以唤醒monitor监视器等待队列中所有的线程。而调用lock的newCondition()方法,可以返回一个ConditionObject实例对象,每个ConditionObject包含一个链表,存储等待队列。可以认为一个ReentrantLock有一个同步队列(存放没有获得锁的线程)和多个等待队列(存放调用wait()方法的线程)。使用Condition.singal()和Condition.singalAll()可以更加精准的唤醒线程,唤醒的都是这个Condition对应的等待队列里面的线程,而Object.notify()和Object.notifyAll()只能唤醒等待队列中的所有的线程。
ReentrantLock lock = new ReentrantLock();Condition customerQueue = lock.newCondition();
ReentrantLock的Condition相关的实现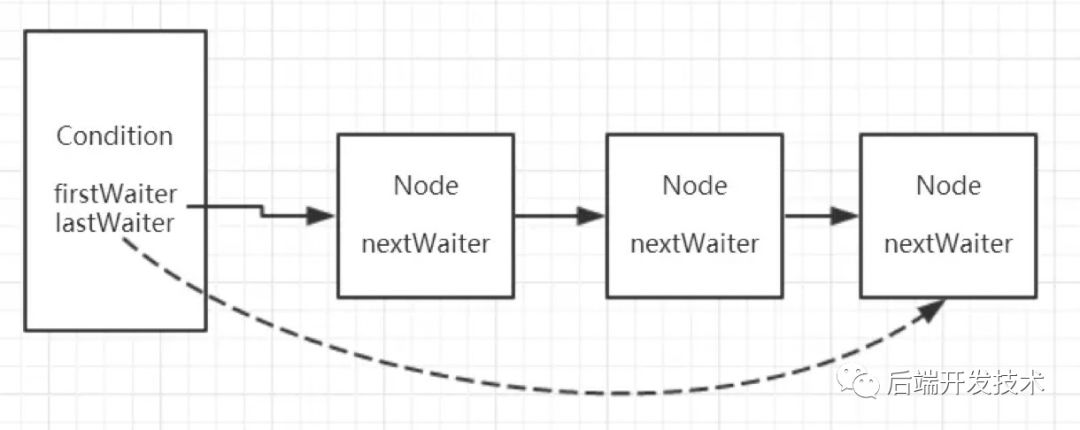
abstract static class Sync extends AbstractQueuedSynchronizer {final ConditionObject newCondition() {return new ConditionObject();}}//AQS内部类 ConditionObjectpublic class ConditionObject implements Condition, java.io.Serializable {private static final long serialVersionUID = 1173984872572414699L;//链表头结点private transient Node firstWaiter;//链表尾结点private transient Node lastWaiter;//真正的创建Condition对象public ConditionObject() { }}
消费者-生产者实现
public static void main(String[] args) {ReentrantLock lock = new ReentrantLock();Condition customerQueue = lock.newCondition();Condition producerQueue = lock.newCondition();Queue<Integer> queue = new LinkedList<>();final Customer customer = new Customer(lock,customerQueue, producerQueue,queue);final Producer producer = new Producer(lock,customerQueue, producerQueue,queue);ExecutorService pool = Executors.newCachedThreadPool();for (int i = 0; i < 1000; i++) {pool.execute(new Runnable() {@Overridepublic void run() {try {Thread.sleep(1000);} catch (InterruptedException e) {e.printStackTrace();}Integer a = customer.take();// System.out.println("消费了数据 "+a);}});pool.execute(new Runnable() {@Overridepublic void run() {try {Thread.sleep(1000);} catch (InterruptedException e) {e.printStackTrace();}Random random = new Random();Integer a = random.nextInt(1000);// System.out.println("生成了数据 "+a);producer.add(a);}});}}private static class Customer {private ReentrantLock lock;private Condition customer;private Condition producer;private Queue<Integer> queue;Customer(ReentrantLock lock, Condition customer, Condition producer,Queue<Integer> queue) {this.lock = lock;this.customer = customer;this.producer = producer;this.queue = queue;}public Integer take() {lock.lock();Integer element = null;try {while (queue.size() == 0) {customer.await();}element = queue.poll();System.out.println("消费者线程取出来元素"+element);producer.signalAll();} catch (InterruptedException e) {e.printStackTrace();} finally {lock.unlock();}return element;}}private static class Producer {private ReentrantLock lock;private Condition customer;private Condition producer;private Queue<Integer> queue;Producer(ReentrantLock lock, Condition customer, Condition producer,Queue<Integer> queue) {this.lock = lock;this.customer = customer;this.producer = producer;this.queue = queue;}public void add( Integer element) {lock.lock();try {while (queue.size() > 10) {producer.await();}queue.add(element);System.out.println("生成和线程添加元素"+element);customer.signalAll();} catch (InterruptedException e) {e.printStackTrace();} finally {lock.unlock();}}}
- 使用阻塞队列BlockingQueue实现
利用阻塞队列BlockingQueue的特征进行生产和消费的同步(其实阻塞队列内部也是基于Lock,condition实现的 )
public class BlockQueueRepository<T> extends AbstractRepository<T> implements Repository<T> {public BlockQueueRepository() {products = new LinkedBlockingQueue<>(cap);}@Overridepublic void put(T t) {if (isFull()) {log.info("repository is full, waiting for consume.....");}try {//如果队列长度已满,那么会阻塞等待((BlockingQueue) products).put(t);} catch (InterruptedException e) {e.printStackTrace();}}@Overridepublic T take() {T product = null;if (isEmpty()) {log.info("repository is empty, waiting for produce.....");}try {//如果队列元素为空,那么也会阻塞等待product = (T) ((BlockingQueue) products).take();} catch (InterruptedException e) {e.printStackTrace();}return product;}}
线程池理解
线程池作用
- 提高响应速度
- 减少资源占用
- 控制并发数,可以通过设置线程池的最大线程数量来控制最大并发数,如果每次都是创建新线程,来了大量的请求,可能会因为创建的线程过多,造成内存溢出。
- 方便管理线程资源
线程池中的参数
从上面代码中可知线程池中的参数有corePoolSize、maximumPoolSize、keepAliveTime、unit、workQueue、handler六个参数/*** Creates a new {@code ThreadPoolExecutor} with the given initial* parameters and default thread factory.** @param corePoolSize the number of threads to keep in the pool, even* if they are idle, unless {@code allowCoreThreadTimeOut} is set* @param maximumPoolSize the maximum number of threads to allow in the* pool* @param keepAliveTime when the number of threads is greater than* the core, this is the maximum time that excess idle threads* will wait for new tasks before terminating.* @param unit the time unit for the {@code keepAliveTime} argument* @param workQueue the queue to use for holding tasks before they are* executed. This queue will hold only the {@code Runnable}* tasks submitted by the {@code execute} method.* @param handler the handler to use when execution is blocked* because the thread bounds and queue capacities are reached* @throws IllegalArgumentException if one of the following holds:<br>* {@code corePoolSize < 0}<br>* {@code keepAliveTime < 0}<br>* {@code maximumPoolSize <= 0}<br>* {@code maximumPoolSize < corePoolSize}* @throws NullPointerException if {@code workQueue}* or {@code handler} is null*/public ThreadPoolExecutor(int corePoolSize,int maximumPoolSize,long keepAliveTime,TimeUnit unit,BlockingQueue<Runnable> workQueue,RejectedExecutionHandler handler) {this(corePoolSize, maximumPoolSize, keepAliveTime, unit, workQueue,Executors.defaultThreadFactory(), handler);}
- corePoolSize 核心线程数
该线程池中核心线程数最大值,添加任务时,即便有空闲线程,只要当前线程池数小于corePoolSize,都是会新建线程来执行这个任务。并且核心线程空闲时间超过keepAliveTime也不会被回收。(从阻塞队列取任务时,如果阻塞队列为空:核心线程的会一直卡在workQueue.take方法,被阻塞并挂起,不会占用CPU资源,非核心线程会调用workQueue.poll(keepAliveTime,TimeUnit.NANOSECONDS)方法取任务,如果超过keepAliveTime时间后还没有拿到,下一次循环判断compareAndDecrementWorkerCount就会返回null,Worker对象的run()方法循环体的判断为null,任务结束,然后线程被系统回收)。
- maximumPoolSize 最大线程数
该线程池中线程总数最大值,一般用于当线程池中线程都在执行任务,并且等待队列满时,如果当前线程数小于maximumPoolSize,可以创建一个新线程来执行任务。maximumPoolSize一般也可以用来现在最大线程并发执行量。
- workerQueue 等待队列
等待队列,一般是抽象类BlockingQueue的子类。
| ArrayBlockingQueue | 有界队列,一种使用数组实现的先进先出的有界阻塞队列。支持公平锁和非公平锁,底层数据结构是数组,需要指定队列大小。 |
|---|---|
| LinkedBlockingQueue | 无界队列,一种使用链表实现的先进先出的有界阻塞队列。默认的容量是Interge.MAX_VALUE,相比于ArrayBlockingQueue具有更高的吞吐量,但是却失去了快速随机存取的特性。默认大小是Interge.MAX_VALUE,也可以指定大小。newFixedThreadPool()和newSingleThreadExecutor()的等待队列都是这个阻塞队列。 |
| LinkedBlockingDeque | 一种使用链表实现的具有双向存取功能的有界阻塞队列。在高并发下,相比于LinkedBlockingQueue可以将锁竞争降低最多一半 |
| PriorityBlockingQueue | 一种提供了优先级排序的无解阻塞队列。如果没有提供具体的排列方法,那么将会使用自然排序进行,会抛出OOM异常。 |
| SynchronousQueue | SynchronousQueue一种不存储任务的同步队列,内部没有使用AQS。如果是公平锁模式每次调用put方法往队列中添加一个线程后,线程先进行自旋,然后超时后就阻塞等待直到有提取线程调用take方法把操作取出,这样之前调用put方法的线程才能继续执行。如果是非公平锁模式,每次添加任务就是把任务添加到栈中,这样就是先进后出,所以非公平 |
| LinkedTransferQueue | 一种使用链表实现的无解阻塞队列 |
| DelayQueue | 一种无界的延时队列,可以设置每个元素需要等待多久才能从队列中取出。延时队列,该队列中的元素只有当其指定的延时时间到了,才能够从队列中获取到该元素。底层数据结构是数组实现的 |
- keepAliveTime 非核心线程限制超时时长
非核心线程如果处于闲置状态超过该值,就会被销毁。如果设置allowCoreThreadTimeOut(true),则会也作用于核心线程。
- RejectedExecutionHandler 拒绝处理策略
拒绝处理策略,核心线程已经满了,等待队列也满了,并且线程数量大于最大线程数时,就会采用拒绝处理策略进行处理。
四种拒绝策略为:
- ThreadPoolExecutor.AbortPolicy:默认拒绝处理策略,丢弃任务并抛出RejectedExecutionException异常;
- ThreadPoolExecutor.DiscardPolicy:丢弃新来的任务,但是不抛出异常;
- ThreadPoolExecutorDiscardOldestPolicy:丢弃等待队列头部(最旧的)任务,然后重新尝试执行程序,将任务添加到队列中(如果再次失败,重试此过程);
- ThreadPoolExecutor.CallerRunsPolicy:由调用线程处理该任务。
线程池执行任务的过程?

Executors提供的四种线程池的使用场景
Executors提供的四种线程池,分别为:
- newFixedThreadPool 定长线程池
一句话总结:线程数固定等待队列无限长。创建一个线程池,核心线程数与最大线程数都是传入参数nThreads。可控制线程最大并发数,超出的线程会在队列中等待(比较适合需要控制并发量的情况)。主要通过将核心线程数设置为与最大线程数相等实现的。缺点是LinkedBlockingQueue队列的默认长度是Interge.MAX_VALUE,存在内存溢出的风险。/*** 创建一个线程池,该线程池重用固定数量的线程*操作一个共享的无界队列。在任何时候,最多* {@code nThreads}线程将是正在处理任务的活动线程。如果在所有线程都处于活动状态时提交额外的任 * 务,那么它们将在队列中等待,直到有一个线程可用。如果任何线程在执行过程中由于失败而终止* 在关闭之前,如果需要*执行后续任务,一个新的线程将取代它。线程池中的线程将存在* 直到显式地{@link ExecutorService#shutdown shutdown}。** @param nThreads the number of threads in the pool* @return the newly created thread pool* @throws IllegalArgumentException if {@code nThreads <= 0}*/public static ExecutorService newFixedThreadPool(int nThreads) {return new ThreadPoolExecutor(nThreads, nThreads,0L, TimeUnit.MILLISECONDS,new LinkedBlockingQueue<Runnable>());}
与CacheThreadPool区别:
- 因为corePoolSize == maximumPoolSize,所以newFixedThreadPool只会创建核心线程。而CachedThreadPool因为corePoolSize = 0,所以只会创建非核心线程。
- 在getTask()方法,如果队列里没有任务可取,线程会一直阻塞在LinkedBlockingQueue.take(),线程不会被回收。CacheThreadPool的线程会在60s后被回收。
- 由于线程不会被回收,会一直卡在阻塞,所以在没有任务的情况下,FixedThreadPool占用资源更多。
- 都几乎不会触发拒绝策略,但是原理不同。FixedThreadPool是因为阻塞队列可以很大(最大为Integer最大值),故几乎不会触发拒绝策略;CacheThreadPool是因为线程池很大(最大为Integer最大值),几乎不会导致线程数量大于最大线程数,故几乎不会触发拒绝策略。
newSingleThreadExecutor 单线程池
/*** Creates an Executor that uses a single worker thread operating* off an unbounded queue. (Note however that if this single* thread terminates due to a failure during execution prior to* shutdown, a new one will take its place if needed to execute* subsequent tasks.) Tasks are guaranteed to execute* sequentially, and no more than one task will be active at any* given time. Unlike the otherwise equivalent* {@code newFixedThreadPool(1)} the returned executor is* guaranteed not to be reconfigurable to use additional threads.** @return the newly created single-threaded Executor*/public static ExecutorService newSingleThreadExecutor() {return new FinalizableDelegatedExecutorService(new ThreadPoolExecutor(1, 1,0L, TimeUnit.MILLISECONDS,new LinkedBlockingQueue<Runnable>()));}
单线程池,等待队列无限长。创建一个单线程化的线程池,它只会用唯一的工作线程来执行任务,保证所有任务按照指定顺序(FIFO,LIFO,优先级)执行。主要通过将核心线程数和最大线程数都设置为1来实现。
newCacheThreadPool 可缓存线程池
/*** Creates a thread pool that creates new threads as needed, but* will reuse previously constructed threads when they are* available. These pools will typically improve the performance* of programs that execute many short-lived asynchronous tasks.* Calls to {@code execute} will reuse previously constructed* threads if available. If no existing thread is available, a new* thread will be created and added to the pool. Threads that have* not been used for sixty seconds are terminated and removed from* the cache. Thus, a pool that remains idle for long enough will* not consume any resources. Note that pools with similar* properties but different details (for example, timeout parameters)* may be created using {@link ThreadPoolExecutor} constructors.** @return the newly created thread pool*/public static ExecutorService newCachedThreadPool() {return new ThreadPoolExecutor(0, Integer.MAX_VALUE,60L, TimeUnit.SECONDS,new SynchronousQueue<Runnable>());}
创建一个可缓存线程池,如果线程池长度超过处理需要,可灵活回收空闲线程。若无可回收,则新建线程。但是由于最大线程数设置的是Integer.MAX_VALUE,存在内存溢出的风险。最大线程数无限大,线程超时被回收。
CacheThreadPool运行流程如下:提交任务进线程池。
- 因corePoolSize为0,所以不创建核心线程,线程池最大为Integer.MAX_VALUE。
- 尝试将任务添加到SynchronousQueue队列。(需要注意SynchronousQueue本身不存储任务,只是将添加任务的线程加入一个栈中,进行阻塞等待,然后线程池中的线程空闲时,会从栈中取出线程,取出线程携带的任务,进行执行)。
- 如果SynchronousQueue入列成功,等待被当前运行的线程空闲后拉取执行。如果当前没有空闲线程,那么就创建一个非核心线程,然后从SynchronousQueue拉取任务并在当前线程执行。
- 如果SynchronousQueue已有任务在等待,入列操作将会阻塞。
当需要执行很多段时间的任务,CacheThreadPool的线程复用率比较高,会显著提升性能。而且线程60s后会回收,意味着即使没有任务进来,CacheThreadPool并不会占用很多资源。
- newScheduleThreadPool 定时执行线程池
创建一个定时执行的线程池,主要是通过DelayedWorkQueue来实现(该队列中的元素只有当其指定的延时时间到了,才能够从队列中获取到该元素)。支持定时及周期性任务执行。但是由于最大线程数设置的是Integer.MAX_VALUE,存在内存溢出风险。线程数无限大,定时执行。/*** Creates a new {@code ScheduledThreadPoolExecutor} with the* given initial parameters.** @param corePoolSize the number of threads to keep in the pool, even* if they are idle, unless {@code allowCoreThreadTimeOut} is set* @param threadFactory the factory to use when the executor* creates a new thread* @throws IllegalArgumentException if {@code corePoolSize < 0}* @throws NullPointerException if {@code threadFactory} is null*/public ScheduledThreadPoolExecutor(int corePoolSize,ThreadFactory threadFactory) {super(corePoolSize, Integer.MAX_VALUE, 0, NANOSECONDS,new DelayedWorkQueue(), threadFactory);}
为什么不建议使用Executors四种线程池?主要是newFixedThreadPool和newSingleThreadExecutor的等待队列是LinkedBlockingQueue,长度是Integer.MAX_VALUE,可以认为是无限大的,如果创建的任务特别多,可能会造成内存溢出。而newCacheThreadPool和newScheduleThreadPool的最大线程数是Integer.MAX_VALUE,如果创建的任务过多,可能会导致创建的线程过多,从而导致内存溢出。
线程池的状态
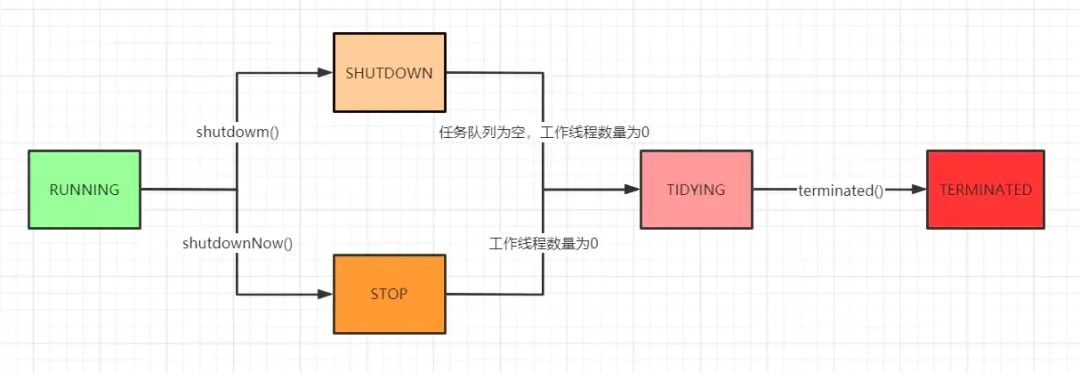
线程池生命周期:
- RUNNING:表示线程池处于运行状态,这时候线程池可以接受和处理任务,值是-1;
- SHUTDOWN:表示线程池不接受新任务,但仍然可以处理队列中的任务,二进制值是0。调用showdown()方法会进入到SHUTDOWN状态。
- STOP:表示线程池不接受新任务,也不处理队列中的任务,同时中断正在执行任务的线程,值是1。调用showdownNow()方法会进入到STOP状态。
- TIDYING:表示所有的任务都已经终止,并且工作线程的数量为0。值是2。SHUTDOWN和STOP状态的线程池任务执行完了,工作线程也为0了就会进入到TIDYING状态。
- TERMINATED:表示线程池处于终止状态。值是3
怎么根据业务场景确定线程池的参数corePoolSize和maximumPoolSize?
方法一 计算密集型任务
因为是计算密集型任务,可以理解为每个任务在执行期间基本没有IO操作,全部都在CPU时间片中执行。所以可以理解为CPU就是满载的,CPU利用率就是100%,其实线程数等于CPU数就可以的,但是由于需要考虑到计算密集型的线程恰好在某时因为发生一个页错误或者因其他原因而暂停,此时应该需要有一个“额外”的空闲线程来获得时间片,然后执行,可以确保在这种情况下CPU周期不会中断工作,充分利用CPU。
最佳线程数=CPU的数量+1
方法二 IO密集型任务
任务在执行时,需要进行一些IO操作,所以为了充分利用CPU,应该在线程进行IO操作时,就让出时间片,CPU进行上下文切换,执行其他线程的任务,保证CPU利用率的100%。
如果任务有50%的时间需要CPU执行状态,其他时间进行IO操作,则程序所需线程数为CPU数量的1除以0.5,也就是2倍。如果任务有20%的时时间需要CPU执行,其他时间需要进行IO操作,最佳线程数也就是1除以0.2,也就是CPU数的5倍 所以公式为
最佳线程数 = CPU数量/(每个任务中需要CPU执行的时间的比例)= CPU数量/(CPU运行时间/任务执行总时间)=CPU数量/(CPU运行时间/(CPU运行时间+IO操作时间))所以最终公式为最佳线程数/CPU数量 = CPU运行时间/(CPU运行时间+IO操作时间)
方法三 动态化线程池
- 追求响应时间的任务
一种是追求响应时间的任务,例如使用线程池对发起多个网络请求,然后对结果进行计算。 这种任务的最大线程数需要设置大一点,然后队列使用同步队列,队列中不缓存任务,任务来了就会被执行。判断线程池资源不够用时,一般是发现活跃线程数/最大线程数>阀值(默认是0.8)时,或者是线程池抛出的RejectedExecut异常次数达到阀值,就会进行告警。然后程序员收到告警后,动态发送修改核心线程数,最大线程数,队列相关的指令,服务器进行动态修改。
- 追求高吞吐量的任务
假设说需要定期自动化生成一些报表,不需要考虑响应时间,只是希望如何使用有限的资源,尽可能在单位时间内处理更多的任务,也就是吞吐量优先的问题。 这种就是使用有界队列,对任务进行缓存,然后线程进行并发执行。判断线程池资源不够用时,一般是发现等待队列中的任务数量/等待队列的长度>阀值(默认是0.8)时,或者是线程池抛出的RejectedExecut异常次数达到阀值,就会进行告警。然后程序员收到告警后,动态发送修改核心线程数,最大线程数,队列相关的指令,服务器进行动态修改。
ThreadPoolExecutor提供了如下几个public的setter方法
调用corePoolSize方法之后,线程池会直接覆盖原来的corePoolSize值,并且基于当前值和原始值的比较结果采取不同的处理策略。(总得来说就是,多退少补的策略)
对于新corePoolSize 小于 当前工作线程数的情况:
说明有多余的worker线程,此时会向当前idle状态的worker线程发起中断请求以实现回收,多余的worker在下次idel的时候也会被回收。
对于新corePoolSize 大于 当前工作线程数的情况:
如果当前队列中有待执行任务,则线程池会创建新的worker线程来执行队列任务。
setCorePoolSize的方法的执行流程入下图所示:
ThreadLocal是什么?如何避免内存泄漏
ThreadLocal表示 线程本地存储,对于代码中的一个变量,每个线程都拥有这个变量的一个副本,访问和修改它时都是对副本进行操作。
使用场景
ThreadLocal 适用于每个线程需要自己独立的实例且该实例需要在多个方法中被使用,也即变量在线程间隔离而在方法或类间共享的场景。(例如:方法直接调用时传递的变量过多,为了代码简洁性,可以使用ThreadLocal,在前一个方法中,将变量进行存储,后一个方法中取,进行使用。)
public class A {// 每个线程本地副本初始化private static ThreadLocal <UserData> threadLocal = new ThreadLocal <>(). withInitial (() -> new UserData ());public static void setUser (UserLogin user){if (user == null )return ;UserData userData = threadLocal.get();userData. setUserLogin (user);}public static UserLogin getUser (){return threadLocal.get(). getUserLogin ();}}
实现原理
每个Thread有一个ThreadLocalMap,类似HashMap,当调用ThreadLocal#set()方法进行存值时,实际上是先获取到当前的线程,然后获取线程的map,是一个ThreadLocalMap类型,然后会在这个map中添加一个新的键值对,key就是我们ThreadLocalMap变量的地址,value就是我们存的值。ThreadLocalMap与HashMap不同的是,解决HashMap使用的是开放定址法,也就是当发现hashCode计算得到数组下标已经存储了元素后,会继续往后找,直到找到一个空的数组下标,存储键值对。
/*** Sets the current thread's copy of this thread-local variable* to the specified value. Most subclasses will have no need to* override this method, relying solely on the {@link #initialValue}* method to set the values of thread-locals.* ThreadLocal实例的复制方法* @param value the value to be stored in the current thread's copy of* this thread-local.*/public void set(T value) {//获取当前线程Thread t = Thread.currentThread();//获取线程对应的mapThreadLocalMap map = getMap(t);//将值存入线程特有的Map中if (map != null)//key 为this就是当前ThreadLocal引用变量的地址,value就是存储的值map.set(this, value);elsecreateMap(t, value);}/*** Get the map associated with a ThreadLocal. Overridden in* InheritableThreadLocal.** @param t the current thread* @return the map*/ThreadLocalMap getMap(Thread t) {//线程的threadLocals实例变量就是Mapreturn t.threadLocals;}/*** Create the map associated with a ThreadLocal. Overridden in* InheritableThreadLocal.** @param t the current thread* @param firstValue value for the initial entry of the map*/void createMap(Thread t, T firstValue) {t.threadLocals = new ThreadLocalMap(this, firstValue);}
ThreadLocal 中的Entry的key使用了弱引用,为什么使用弱引用?

首先上面类A的代码中,类A中有一个ThreadLocal类型的变量
它们的引用链如下:
ThreadLocal变量所在的类的实例(代码中A的实例)->ThreadLocal 执行代码的线程->线程独有的ThreadLocalMap->引用的key就是ThreadLocal
可以看到ThreadLocal变量不仅被所在的类A的实例所引用,还被执行的线程所引用,
- 如果使用强引用,也就是线程对ThreadLocal变量是强引用,那么类A的实例即便已经不被其他变量所引用了,不会被访问到了,需要被回收了,类A被回收了,但是ThreadLocal变量由于有被执行线程所引用,只要线程还在,ThreadLocal变量也不能被被JVM回收,所以会造成内存泄露。
- 如果使用弱引用,不会影响key的回收,也就是不会影响引用了ThreadLocal的实例对象的回收。
但是即便使用弱引用,ThreadLocalMap对value的引用是强引用(一边value是局部变量,也不能用弱引用,那样在用到的时候就会被),但是value依然不会被回收,会造成内存泄露。
通常来说,value回收的时机有两个:
1.我们在用完ThreadLocal后,应该遵循规范手动调用ThreadLocal#remove()对键值对value释放,这样可以使value被回收。
2.此线程在其他对象中使用ThreadLocal对线程ThreadLocalMap进行set()和get()时,由于需要进行开放定址法进行探测,会对沿途过期的键值对(就是key为null的键值对)进行清除。以及set()方法触发的cleanSomeSlots()方法对过期键值对进行清除。
锁相关
Sychronize实现原理是怎么样的?
对于synchronized关键字而言,在javac编译时,会生成对应的monitorenter和monitorexit指令分别对应synchronized同步块的进入和退出,有两个指令的原因是为了保证抛异常的情况下也能释放锁,所以javac为同步代码块添加了一个隐式的try-finally,在finally中会调用monitorexit命令释放锁。
而对于synchronized方法而言,javac为其生成一个ACC_SYNCHRONIZED关键字,在JVM进行方法调用时,发现调用的方法被ACC_SYNCHRONIZED修饰,则会先尝试获得锁。
synchronized锁执行流程图: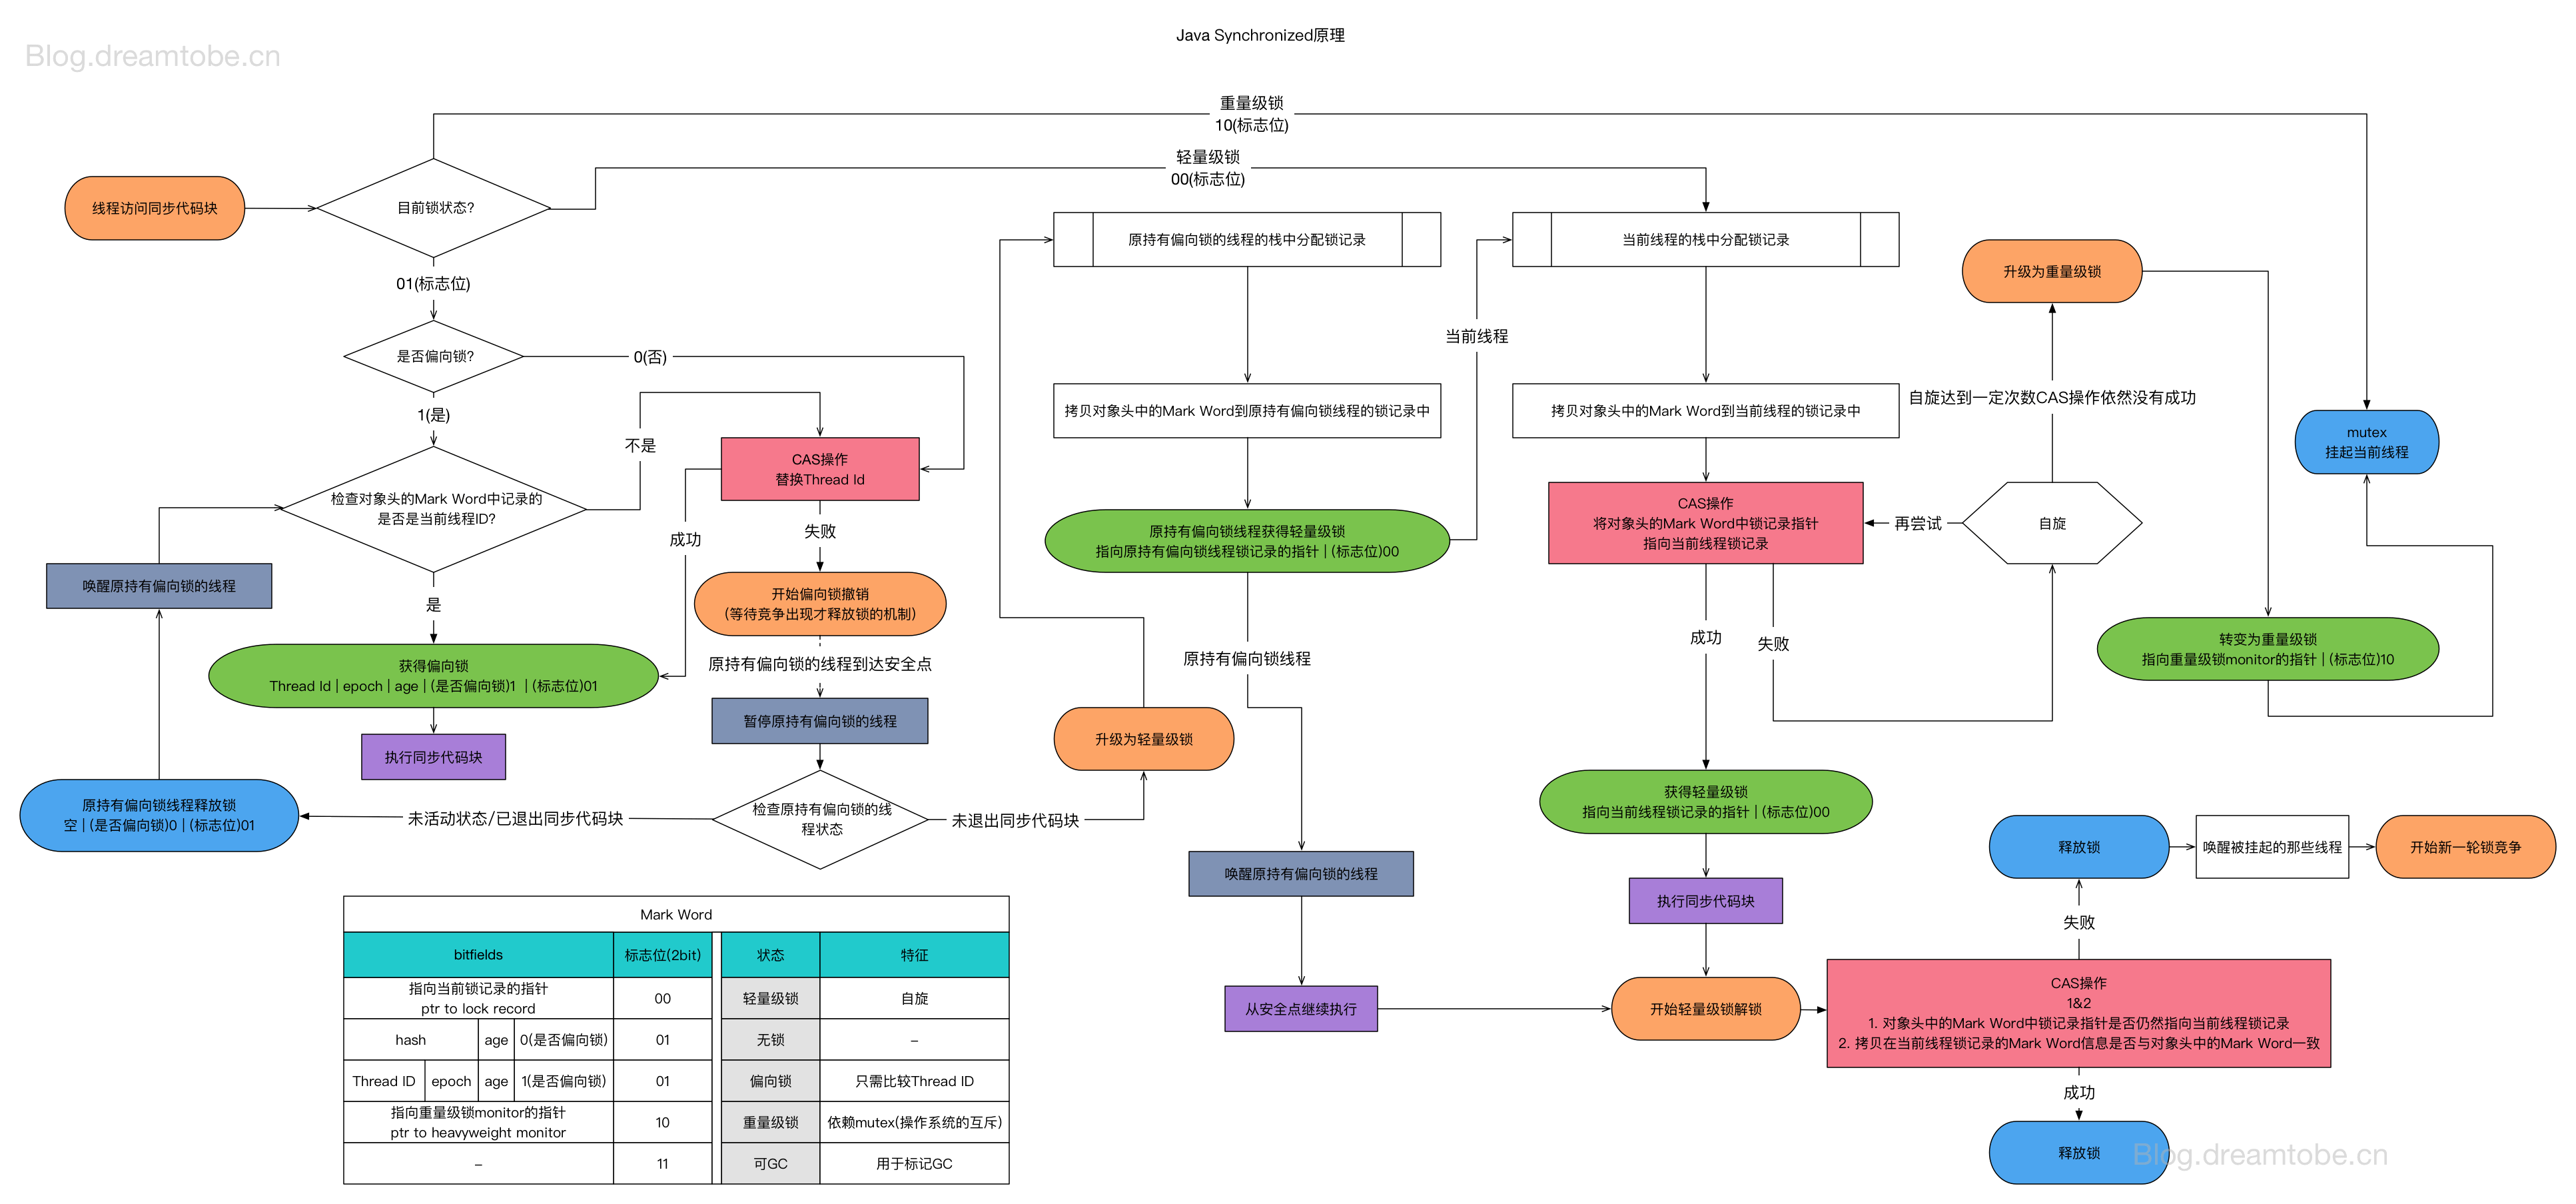
Java对象的内存布局,由对象头+实例数据+对其填充三部分组成,而对象头主要包括Mark Word + 指向对象所属的类指针组成。Mark Word 主要用于存储对象自身的运行时数据,哈希码,GC分代年龄,锁标志等。
Mark word的数据映射表
AbstractQueuedSynchronizer(AQS)是什么?
AQS就是AbstractQueuedSynchronizer,抽象队列同步器,是一个可以用于实现基于先进先出等待队列的锁和同步器的框架。实现锁ReentrantLock,Semaphore,ReentrantReadWriteLock,SynchronousQueue,FutureTask等等都是基于AQS的。
ReentrantLock有一个变量Sync,Sync父类是AbstractQueuedSynchronizer
public class ReentrantLock implements Lock, java.io.Serializable {private static final long serialVersionUID = 7373984872572414699L;/** Synchronizer providing all implementation mechanics */private final Sync sync;}
ReentrantLock的非公平锁和公平锁区别在于非公平锁在CAS更新state失败后会调用tryAcquire()来判断是否需要进入同步队列,会再次判断state的值是否为0,为0会去CAS更新state值,更新成功就直接获得锁,否则就进入等待队列。(进入等待队列前会抢锁)
而公平锁首先会判断state是否为0,为0并且等待队列为空,才会去使用CAS操作抢占锁,抢占成功就获得锁,没有成功并且当前线程不是获得锁的线程,都会被加入到等待队列。
/*** 公平锁* Sync object for fair locks*/static final class FairSync extends Sync {private static final long serialVersionUID = -3000897897090466540L;final void lock() {acquire(1);}/*** Fair version of tryAcquire. Don't grant access unless* recursive call or no waiters or is first.*/protected final boolean tryAcquire(int acquires) {final Thread current = Thread.currentThread();int c = getState();if (c == 0) {if (!hasQueuedPredecessors() &&compareAndSetState(0, acquires)) {setExclusiveOwnerThread(current);return true;}}else if (current == getExclusiveOwnerThread()) {int nextc = c + acquires;if (nextc < 0)throw new Error("Maximum lock count exceeded");setState(nextc);return true;}return false;}}
IO
如何实现零拷贝?
实现零拷贝,关键在于DMA技术,在DMA技术出现之前I/O过程如下: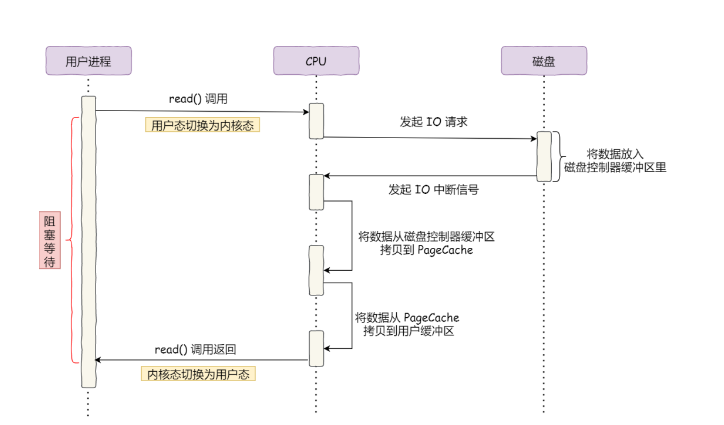
什么是DMA技术?
在进行I/O设备和内存的数据传输的时候,数据搬运工作全部交给DMA控制器,而CPU不再参与任何与数据搬运相关的事情,这样CPU就可以去处理别的事务。DMA控制器进行数据传输过程图如下: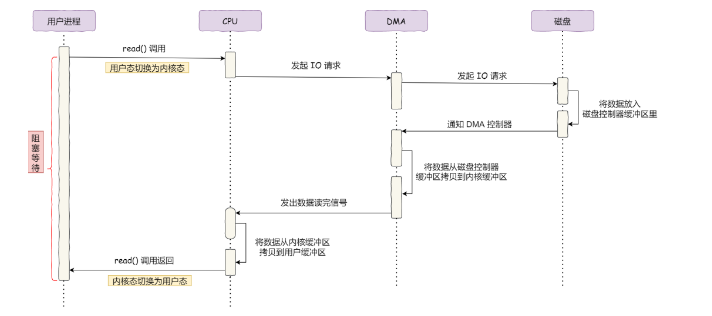
传统文件传输
传统的I/O工作方式是,数据读取和写入是从用户空间到内核来回复制,而内核空间的数量是通过操作系统层面的I/O接口从磁盘读取和写入。过程如下: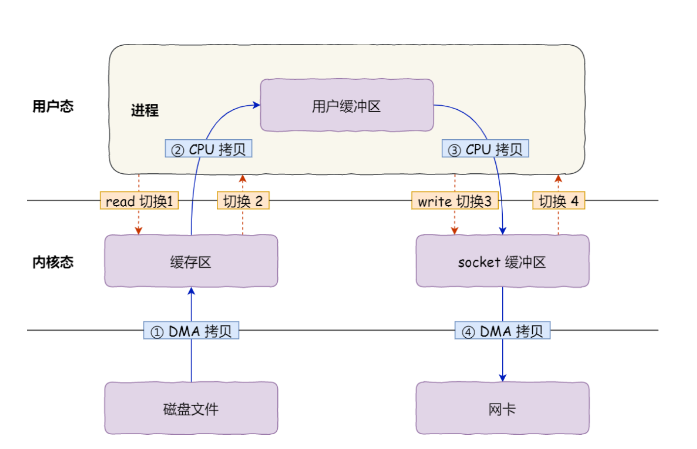
从上图可以看到,共发生了4次用户态与内核态的上下文切换,因为发生了两次系统调用。一次是read(),一次是write(),每次系统调用都得先从用户态切换到内核态,等内核完成任务后,又从内核态切回用户态。
在上图过程中还发生了四次拷贝,两次DMA的拷贝,两次CPU拷贝:
- 第一次,把磁盘上的文件通过DMA搬运将数据拷贝到操作系统内核的缓冲区;
- 第二次,把内核缓冲区通过CPU拷贝将数据拷贝到用户的缓冲区;
- 第三次,使用CPU拷贝将用户缓冲区的数据拷贝到内核的socket的缓冲区;
- 第四次,把内核的socket缓冲区里的数据,使用DMA搬运,拷贝到网卡的缓冲区内。
要想提高文件的传输必须从下面两个方面入手:
- 减少用户态与内核态的上下文切换次数
因为在读取磁盘的时候,发生上下文切换是因为用户空间没有权限操作磁盘和网卡,所以一次系统调用必然会发生两次上下文切换。
- 减少内存拷贝次数
传统的文件传输方式会用4次数据拷贝,在这里面,从内核的读缓冲区拷贝到用户的缓冲区,再从用户的缓冲区拷贝到socket的缓冲区里这个过程是不必要的。因为将数据拷贝到用户缓冲区并不会对数据进行再加工,所以用户的缓冲区是没必要存在的。
如何实现零拷贝?
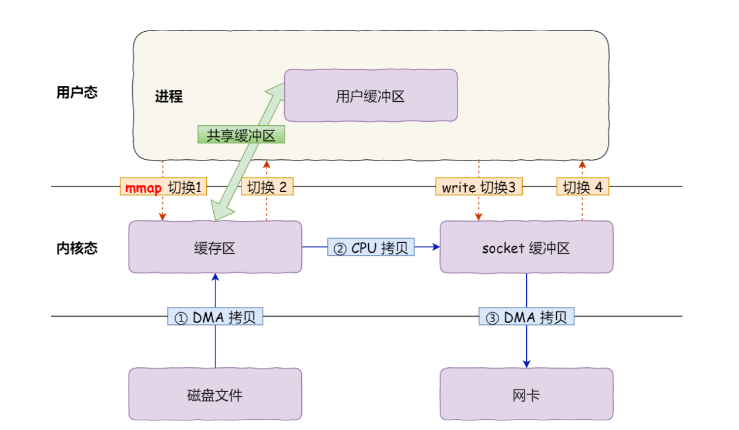
- mmap + write
-
mmap + write
由于read()会将数据拷贝到用户缓冲区,为了减小这一开销,用mmap()替换read()操作
buf = mmap(file, len); //mmap()系统调用函数会直接把内核缓冲区里的数据映射到用户空间,操作系统内核与用户空间就不需要在进行任何数据拷贝操作write(sockfd, buf, len);
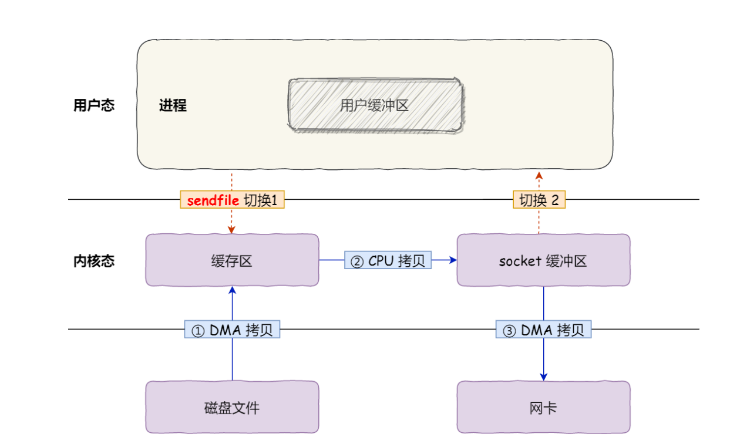
sendfile
在linux内核版本2.1中,有一个专门发送文件的系统调用函数sendfile(),函数形式如下:
#include <sys/socket.h>#前两个参数分别是目的端和源端的文件描述符,后面两个参数是源端的偏移量和复制数据的长度,返回值是实际复制数据长度。这个调用函数可以替代read()和#write()两个系统调用,这样就可以减少一次系统调用,同时也减少了2次上下文切换的开销ssize_t sendfile(int out_fd, int in_fd, off_t *offset, size_t count);
这样,该系统调用可以直接把内核缓冲区里的数据拷贝到socket缓冲区里,不再拷贝到用户态,这样就只有2次上下文切换和3次数据拷贝,过程如下图:
上面两种方式都还不是真正的零拷贝技术,如果网卡支持SG-DMA(the scatter-gather direct memory access)技术(与普通的DMA有所不同),就可以进一步减少通过CPU把内核缓冲区里的数据拷贝到socket缓冲区的过程。#查看linux系统的网卡是否支持scatter-gather特性:$ ethtool -k eth0 | grep scatter-gatherscatter-gather on
从linux内核2.4版本开始起,对于支持网卡SG-DMA技术的情况下,sendfile()系统调用过程发生了变化,具体过程如下:
第一步,通过DMA将磁盘上的数据拷贝到内核缓冲区;
- 第二步,缓冲区描述符和数据长度传到socket缓冲区,这样网卡的SG-DMA控制器就可以直接将内核缓存中的数据拷贝到网卡的缓冲区中,此过程不需要将数据从操作西荣内核缓冲区拷贝到socket缓冲区,这样就减少了一次数据拷贝,所有在这个过程只进行了2次数据拷贝,如下图:
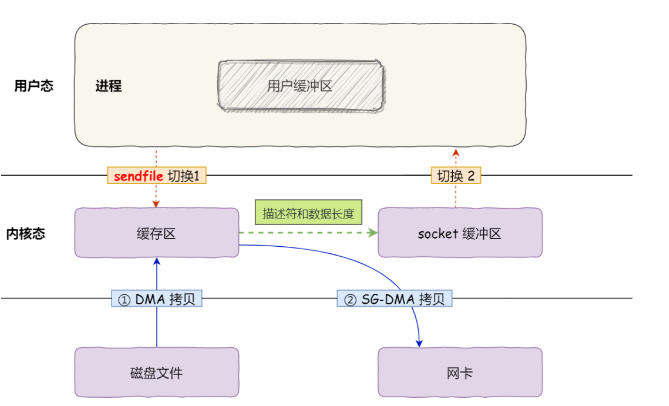
以上就是所谓的零拷贝技术,因为没有在内存层面去拷贝数据,也就是没有通过CPU来搬运数据,所有的数据都是通过DMA来进行传输的。
零拷贝技术的文件传输方式比传统的文件传输方式,减少了两次上下文切换和数据拷贝次数,只需要两次上下文切换和数据拷贝次数,就可以完成文件的传输,而且两次的数据拷贝过程,都不需要通过CPU,两次都是有DMA来搬运。
所以总体来看零拷贝技术可以把文件传输的性能提高至少一倍以上。
使用零拷贝技术的项目
kafka开源项目,使用了零拷贝技术,在kafka文件传输的代码,可以找到调用了Java NIO库里的transferTo方法
@Overridepublic long transferFrom(FileChannel fileChannel, long position, long count) throws IOException {return fileChannel.transferTo(postion, count, socketChannel);}
JVM
类加载机制、双亲委派机制和双亲委派模型
类加载
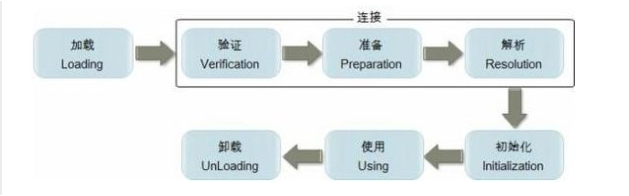
以上是类加载的过程,在java中类是指java源代码通过编译后的class文件。
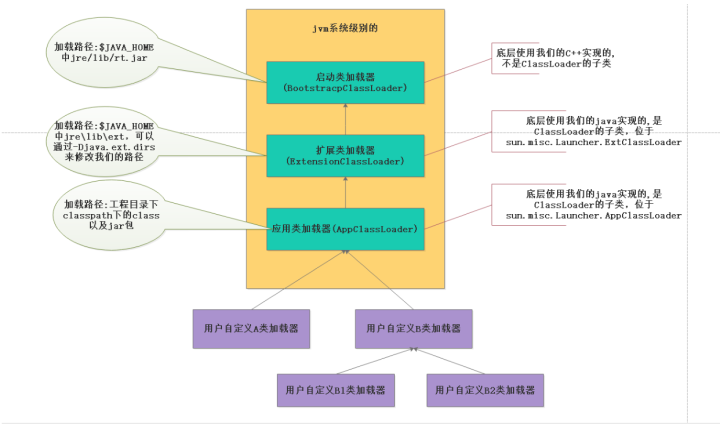
类加载器有:
- 系统级别:启动类加载器、扩展类加载器、系统类加载器
- 用户级别:自定义类加载器(继承了ClassLoader)
- 层级结构:
双亲委派机制
双亲委派机制:除了顶层的根加载器外,所有的加载器按照父子关系形成树形结构,每个加载器有且只有一个父加载器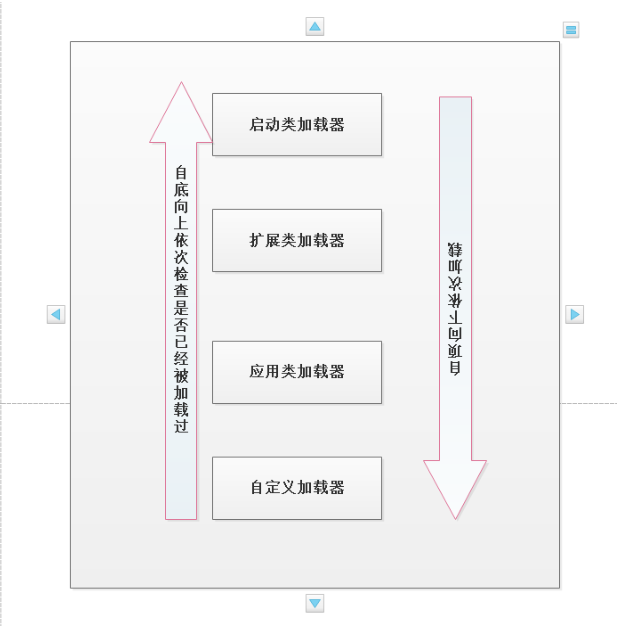
双亲委派机制执行过程,根据源码分析:
protected Class loadClass(String class_name, boolean resolve) throws ClassNotFoundException {Class cl = null;/* First try: lookup hash table.*/if((cl=(Class)classes.get(class_name)) == null) {/* Second try: Load system class using system class loader. You better* don't mess around with them.*/for(int i=0; i < ignored_packages.length; i++) {if(class_name.startsWith(ignored_packages[i])) {cl = deferTo.loadClass(class_name);break;}}if(cl == null) {JavaClass clazz = null;/* Third try: Special request?*/if(class_name.indexOf("$$BCEL$$") >= 0)clazz = createClass(class_name);else { // Fourth try: Load classes via repositoryif ((clazz = repository.loadClass(class_name)) != null) {clazz = modifyClass(clazz);}elsethrow new ClassNotFoundException(class_name);}if(clazz != null) {byte[] bytes = clazz.getBytes();cl = defineClass(class_name, bytes, 0, bytes.length);} else // Fourth try: Use default class loadercl = Class.forName(class_name);}if(resolve)resolveClass(cl);}classes.put(class_name, cl);return cl;}
Java反射机制
反射机制概念:是指在程序运行过程中,对任意一个类都能获取其所有的属性和方法,并且对任意一个方法。这种动态获取类和对象的信息,以及动态调用对象的方法的功能被称为Java语言的反射机制。
反射的应用
Java中的对象有两种类型:编译时类型和运行时类型;
- 编译时类型:指在声明对象时所采用的类型;
-
Java的反射API
Java的反射API主要在运行过程中动态的生成类、接口或对象。常用的API,如下:
class类:用于获取类的属性、方法等信息;
- field类:表示类的成员变量,用于获取和设置类中的属性值;
- method类:表示类的的方法,用于获取方法的描述信息或执行某个方法;
- constructor类:表示类的构造方法。
反射的步骤
- 获取想要操作类的class对象,该class对象时反射的核心,通过它可以调用类的任意方法;
- 调用class对象所对应的类中定义的方法,这是反射的使用阶段;
- 使用反射API来获取并调用类的属性和方法等信息;
获取class对象的三种方法:
调用某个对象的getClass方法以获取该类对应的对象;
Person p = new Person();Class class = p.getClass();
调用某个类的class属性以获取该类对应的class对象;
Class class = Person.getClass();
调用class类中的forName静态方法以获取该类对应的class对象,这是最安全、性能也最好的方法;
Class class = Class.forName("fullClassPath"); //fullClassPath为类的包路径及名称
创建对象的两种方式
使用class对象的newInstance方法创建该class对象对应类的实例,这种方法要求class对象对应的类有默认的空构造器;
- 先使用class对象获取指定的constructor对象,再调用constructor对象的newInstance方法创建class对象对应类的实例,通过这种方法可以选定构造方法创建实例;
注解
注解概念
注解(Annotation)是Java提供的设置程序中元素的关联信息和元数据(MetaData)的方法,它是一个接口,程序可以通过反射获取指定程序中元素的注解对象,然后通过该注解对象获取注解中的元数据信息。
标准元注解
标准元注解:@Target 、@Retention、@Documented、@Inherited 元注解(Meta-Annotation)负责注解其他注解。在Java中定义了4个标准的元注解类型,用于定义不同类型的注解
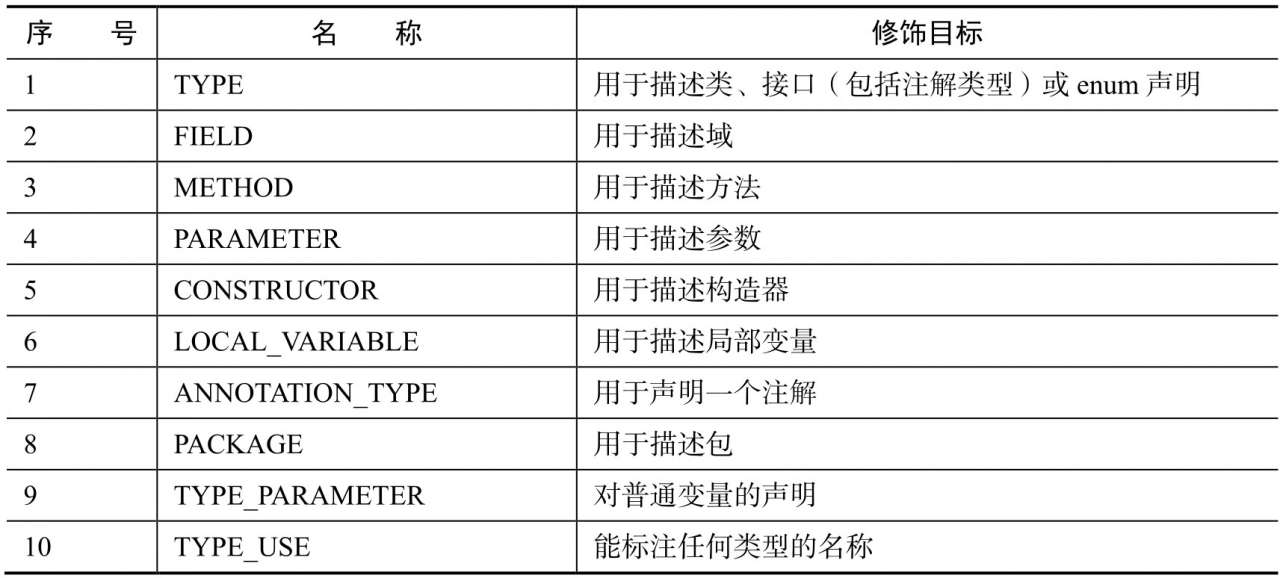
- @Target :说明了注解所修饰的对象范围。注解可被用于packages、types(类、接口、枚举、注解类型)、类型成员(方法、构造方法、成员变量、枚举值)、方法参数和本地变量(循环变量、catch参数等)。在注解类型的声明中使用了target,可更加明确其修饰的目标,target取值如下
- @Retention:定义了该注解被保留的级别,即被描述的注解在什么级别有效,如下三种类型:
- SOURCE:在源文件中有效,即在源文件中被保留;
- CLASS:在class文件中有效,即在class文件中被保留;
- RUNTIME:在运行时有效,即运行时被保留;
- @Documented:表明这个注解应该被javadoc工具记录,因此可以被javadoc类的工具文档化;
- @Inherited:是一个标记注解,表明某个被标注的类型是被继承的。如果有一个使用了@Inherited修饰的Annotation被用于一个Class,则这个注解将被用于该Class的子类。
内部类
内部类是定义在类内部的类。内部类根据不同的定义方式,可分为静态内部类、成员内部类、局部内部类和匿名内部类这四种。
静态内部类
定义在类内部的静态类被称为静态内部类。静态内部类可以访问外部;类的静态变量和方法;在静态内部类中可以定义静态变量、方法、构造函数等;静态内部类通过“外部类.静态内部类”的方式调用。 在Java集合HashMap在内部维护了一个静态内部类Node数据用于存放元素,但Node数组对使用者是透明的。像这种和外部关系密切且不依赖外部类实例的类,可以使用静态内部类实现。
成员内部类
定义在类内部的非静态类叫作成员内部类。成员内部类不能定义静态方法和变量(final修饰除外),因为成员内部类是非静态的,而在Java的非静态代码块中不能定义静态方法和变量。 成员内部类的调用方式与静态内部类的调用方式一样。
局部内部类
定义在方法中的类叫作局部内部类。当一个类只需要在某个方法中使用某个特定的类时,可以通过局部类实现。
匿名内部类
匿名内部类是指通过继承一个父类或者实现一个接口的方式直接定义并使用的类。匿名内部类没有class关键字,这是因为匿名内部类直接使用new生成一个对象的引用。
Java并发编程
Java线程的创建
常见的Java线程的4种创建方式分别:
实现Runnable接口
基于线程池
线程池的工作原理
Java线程池主要用于管理线程组及其运行状态,以便Java虚拟机更好的利用CPU资源。 Java线程池工作原理:JVM先根据用户参数创建一定数量的可运行的线程任务,并将其放入队列中,在线程创建后启动这些任务,如果线程数量超过了最大线程数量(用户设置线程池的大小),则超出数量的线程排队等候,在有任务执行完毕后,线程池调度器会发现有可用的线程,进而再次从队列中取出任务。 线程池主要作用:线程复用、线程资源管理、控制操作系统的最大并发数,以保证系统高效且安全的运行。
线程复用
线程池核心组件和核心类
Java线程池主要由以下4个核心组件组成:
- 线程池管理器:用于创建并管理线程池;
- 工作线程:线程池中执行具体任务的线程;
- 任务接口:用于定义工作线程的调度和执行策略,只有线程实现该接口,线程中的任务才能够被线程池调度。
- 任务队列:存放待处理的任务,新的任务将会不断被加入队列中,执行完成的任务将被从队列中移除。
Java线程池是通过Executor框架实现,在该框架中用到了Executor、Excutors、ExecutorService、ThreadPoolExecutor、Callable、Future、FutureTask几个核心类。
作者 @zzxhub
2018 年 07月 07日

若有收获,就点个赞吧
0 人点赞
