Background and Viewpoint
要理解 assembly code,就必须知道它工作所在的体系结构。至少,你需要弄清楚 instruction 是如何在 CPU、register 和 memory 中流动的,instruction 又是如何指挥它们运转的。特别是,对于 newbie 来讲很容易忽略 register 的重要作用,从而导致自己对 instruction 在整个体系中的行为产生误解。
一个高度概括 CPU、register 和 memory 的宏观体系架构「经典图例」来自于 CSAPP(Computer Systems A Programmers Perspective)的 Figure 1.4:
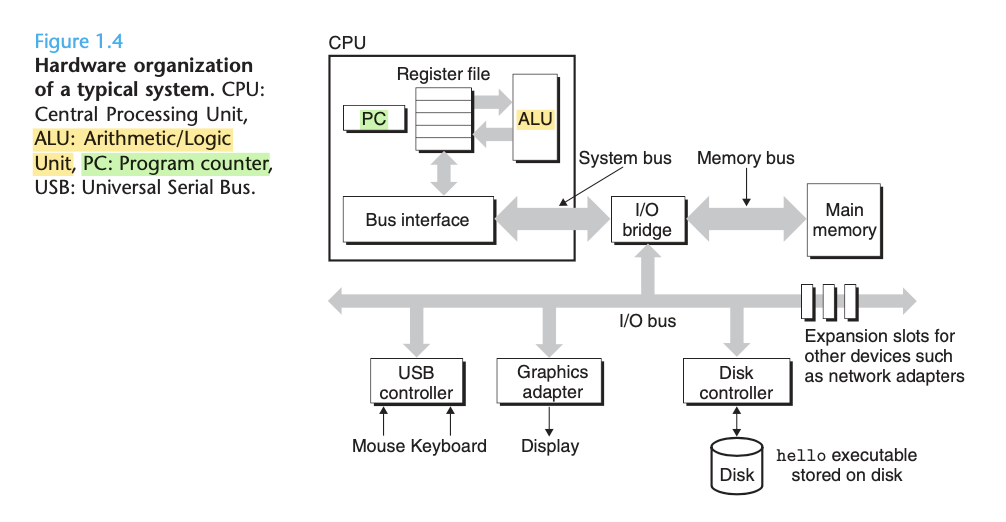
如图可知可以看到:
- CPU 的一个核心是 PC(program counter),它是一个仅有 word-sized 大小的 storage device。
- 凡是 word-sized 大小的存储设备都可以叫 register,所以 PC 是一个特殊的 register,它的名称叫做 PC。
- register file 中也包含了多个 register,为了区分彼此,每一个 register 都有一个特定的名称。
- 一般使用 register 时,泛指 register file 中的 register;指定 PC 这个 register 时通常不用 register 来简称,而是直接用 PC 称呼。
- 这个 register 仅能存放 word-sized 大小的数据,即:memory address。
- 从计算机开机到关机,每时每刻 CPU 都在执行 PC 所指向的、存放于 memory 的 instruction:
- 从 PC 所指向的 memory address 读取到相应的 instruction 。
- 按照这个 instruction 在 ALU 中做相应的计算。
- 更新 PC 的值为下一条 instruction 的 memory address(不一定同刚才那条 instruction 连续)。
- register file(上图中 PC 旁边的、多个小长方形组成的矩形):由多个 word-sized 大小的 register 组成的 small storage device。
- 每一个小的长方形,即是一个 register,且它的大小为 word-sized。
- 显然,register file 中的「每个小长方形」跟 PC 是一样大小的。且它们都被称之为 register。由此可见,register 可被当做是一个 word-sized 的、在 CPU 中的存储单位。
- register file 中的每个小长方形,各自都有一个 unique name。
- ALU 可计算出 new data 或者 new address value。
- CPU 支持的 instruction:
- Load:将 memory 中的一个 word-sized 大小的内容,复写到某个 register。
- Store:将 register 中的 word-sized 大小的内容,复写到 memory 中的某个位置。
- Operate:将两个 register 中的内容拷贝到 ALU,对这两个 word-sized 的值做算数运算,将结果复写到一个 register 中。
- Jump:从 instruction 中提取出一个 word-sized 大小的内容,将其复写到 PC。
register file 中的 register 有多个,它们分别有不同的作用,如:
- general purpose register:用于 data movement、arithmetic instructions。
- index register:充当 pointer
- base pointer:data pointer
- stack pointer
- segment register:用于存储 program 的 不同部分,如 code segment、data segment、stack segment、extra segment。
每一条 machine instruction,其实就是一个 number:
- 例如
03 C3表示:将 EAX 和 EBX 这两个 register 中的内容相加,并将结果放到 EAX 中。 - 但这样的 machine instruction 太难记忆,于是引入 assemble language:
- 每一个条 assemble statement 都对应一条 machine instruction;
- 例如上面的
03 C3machine instruction 对应的 assemble statement 为add eax, ebx。
Intel x86 Key Processors:
- 8088, 8086:仅支持 real mode。在 real mode 下,任何一根 process 可以访问任意的 memory address,甚至可以访问其他 process 的 memory address!
- 80286:开始支持 16-bit protected mode。
- 80386:开始支持 32-bit protected mode。
OS Conceptual Model

容易将 OS 当做客观的存在(左图)。而是事实是,OS 也是 program,它也是必须依赖于 memory 和 CPU、以 instruction 在两者之间传递的形式而存在(右图)。
x86 Assembler Language
相同的 x86 ISA(instruction set architecture)可以由不同的 assembler 来解析。而不同的 assembler 则会使用不同的 assembly language。
常用的 assembly language 有:MASM、NASM、GAS(GNU Assembler)、as86、TASM、a86、Terse 等(assembly code 通常保存于 .s file 中。另:如果是 **.S** file,则其中可以容纳 preprocess 的语句,如 **include** 等)。其中:
- GNU assembler 的介绍,可参考文章:x86 Assembly Language Programming .
- NASM assembler 的介绍,可参考文章:NASM Tutorial .
如同 assembler 是各式各样的,x86 的 object file 的类型也是各式各样的,例如:
- OMF: used in DOS but has 32-bit extensions for Windows. Old.
- AOUT: used in early Linux and BSD variants
- COFF: “Common object file format”
- Win, Win32: Microsoft’s version of COFF, not exactly the same! Replaces OMF.
- Win64: Microsoft’s format for Win64.
- ELF, ELF32: Used in modern 32-bit Linux and elsewhere
- ELF64: Used in 64-bit Linux and elsewhere
- macho32: NeXTstep/OpenStep/Rhapsody/Darwin/OS X 32-bit
- macho64: NeXTstep/OpenStep/Rhapsody/Darwin/OS X 64-bit
广义上讲,「目标文件」与「可执行文件」的格式几乎是一样的,可以粗略地看作是一种类型的文件。「可执行文件」格式主要是 Windows 的 PE(portable executable)和 Linux 的 ELF(executable linkable format),它们都是 COFF(common file format)格式的变种。于是,我们可以对其做如下分类(参考《程序员的自我修养—链接、装载与库》):
- 可执行文件:
- executable:Windows
- ELF(executable linkable format):Linux
- 动态链接库(DLL,dynamic linking library):
.dll:Windows.so(shared object file):Linux
- 静态链接库(static linking library):
.lib:Windows.a:Linux | ELF文件类型 | 说明 | 实例 | | —- | —- | —- | | 可重定位文件(Relocatable File) | 包含了「代码」和「数据」,可被用来链接成「可执行文件」或「目标文件」。
静态链接库也可以归为这一类。 |
- Linux的.o
- Windows的.obj
| | 可执行文件(Executable file) | 包含了可以直接执行的程序,如ELF可行性文件。(一般没有扩展名) |
-/bin/bash文件
- Windows的.exe
| | 共享目标文件(shared object file) | 包含了「代码」和「数据」,可以在下面两种情况下使用:
- “连接器”可以使用这种文件跟其它「可重定向文件」和「共享目标文件」,产生新的目标文件。
- “动态链接器”可以将这几种共享目标文件与「可执行文件」结合,作为进程映像的一部分来执行。
|
- Linux的.so,如/lib/glibc-2.5.so。
- Windows的dll。
| | 核心转储文件(core dump file) | 当进程意外终止时,系统可以将该进程的地址空间内容即终止时的其它信息,转储到这类文件。 | Linux下的 core dump |
整个 assembly code 都是围绕着 CPU、register、memory 打转,特别是 register 值得格外重视,它是整个 instruction 的枢纽中心,是 hardware provided variable(不像 memory variable 可以随时在某一个 physical position 消失、再从另一个 physical position 重新分配)。
如果按照 instruction 操作来分类,assembly code 的结构其实很简单,仅 6 类:
- access data(register、memory access)
- arithmetic、logical operation(+-*/、and/or/xor)
- control(if, loop)
- procedure(function call)
- array(allocation、access)
- heterogeneous data structure(struct、union)
所谓掌握 assembly code,无非就是掌握这 6 类 instruction 对应的 assembly code。
Assembly code 中最常使用的便是对 memory 或 register 的访问(即上述「1」)。掌握了对 data source access 的含义,配合上基本的 action name(如:add, mov, sub),就能将大部分的 assembly code 读懂。
理论上讲,register 就是 CPU 中的 physical variable 的位置,可以存放任何数据。但它们都有各自的习惯用法,因而可以按照「习惯用法」做一些初步的分类。例如,可以考察 CSAPP 的 Figure 3.2: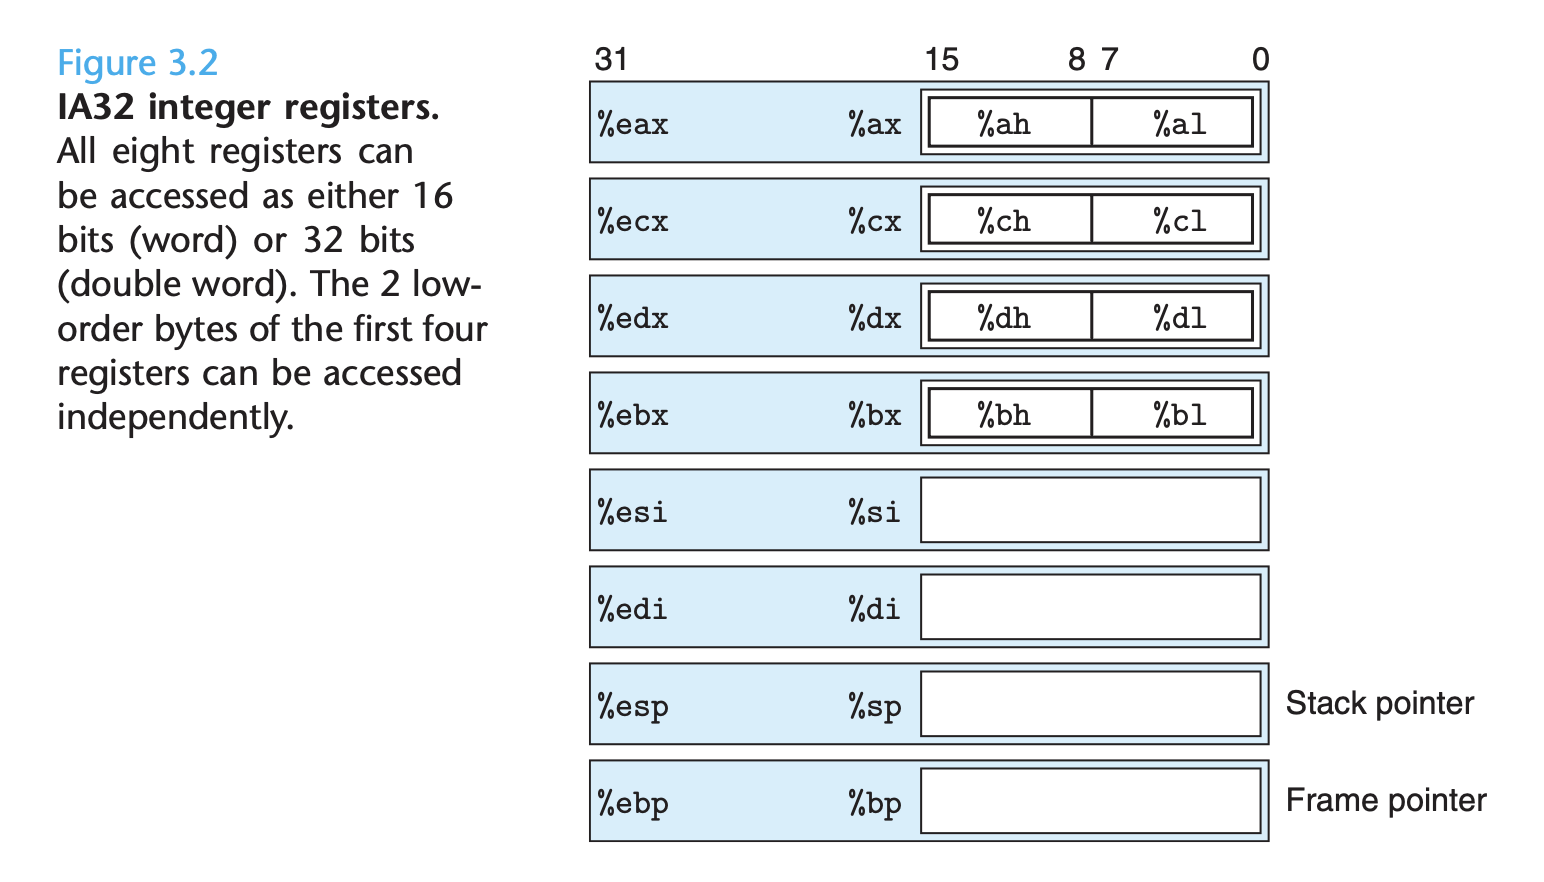
这些 32 位寄存器有多种用途,但每一个都有 “专长”,有各自的特别之处(前缀 e 是因为从 16-bit 扩大到了 32-bit 来标明 extend):
- arithmetic operation**:**
- eax(accumulator):是 “累加器”,它是很多加法乘法指令的 default 寄存器。
- ecx(counter): 是计数器,是重复(rep)前缀指令和 loop 指令的内定计数器。
- edx(divider): 则总是被用来放整数除法产生的余数。
- ebx(base): 是 “基地址” 寄存器,在内存寻址时存放基地址。
- source/destination**:**
- esi(source index):分别叫做 “源索引寄存器”(source index),因为在很多字符串操作指令中,DS:ESI 指向源串,而 ES:EDI 指向目标串.
- edi(destination index):目标索引寄存器(destination index)
- pointer**:**
- esp(stack pointer):栈顶(stack top)指针。
- ebp(base pointer):是 “基址指针”(base pointer),它最经常被用作高级语言「函数调用」(function call)的 “框架指针”(frame pointer)
- PC(program counter)**:**
- eip:寄存器存放下一个 CPU 指令存放的内存地址,当 CPU 执行完当前的指令后,从 EIP 寄存器中读取下一条指令的内存地址,然后继续执行。
知晓了每个 register 的习惯用法后,我们便可以探讨 assembly code 对 data source(register, memory)的引用了。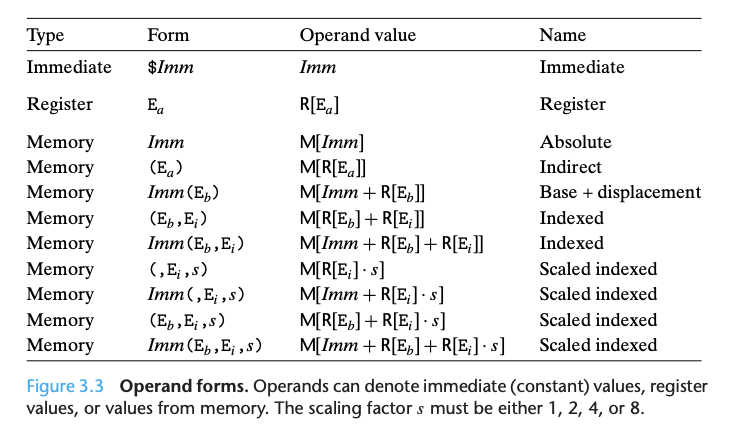
可以总结的规律是:
- 「有括号」的表达式,都会被映射为 M [] 操作
- 最 general 的形态:
Imm(Eb, Ei, s) = M[ Imm + R[Eb] + R[Ei] * s ].
- 最 general 的形态:
- 「 没有括号」时,分三种情况:
- 以 % 开头的,映射为 R [] 操作
- 以 $ 开头的,映射为常数值
- 单纯的常数值,映射为 M [] 操作
作为一个快速应用,我们根据上述规则来尝试解答 CSAPP 的习题: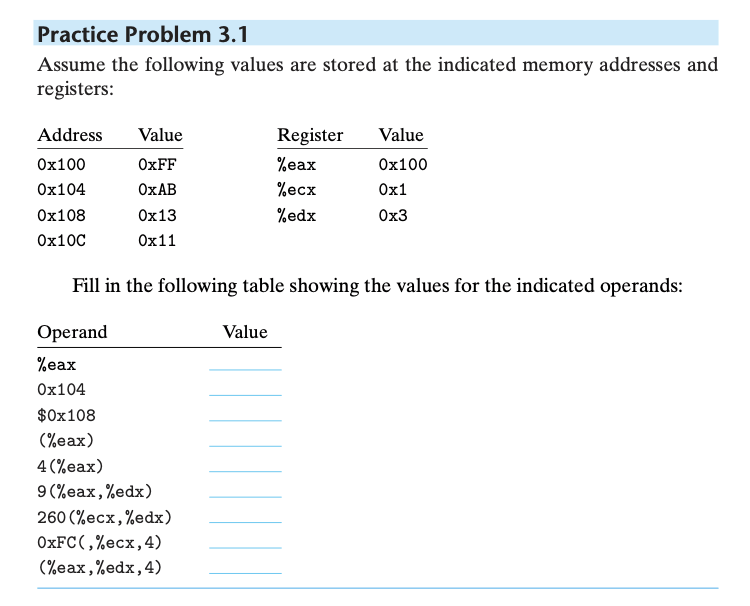
- %eax = R[%eax] = 0x100
- 0x104 = M[0x104] = 0xAB
- $0x108 = 0x108
- (%eax) = M[ R[%eax] ] = M[0x100] = 0xFF
- 4(%eax) = M[4 + R[%eax]] = M[4 + 0x100] = M[0x104] = 0xAB
- 9(%eax, %edx) = M[9 + R[%eax] + R[%edx]] = M[9 + 0x100 + 0x3] = M[0x10C] = 0x11
- 260(%ecx, %edx) = M[260 + R[%ecx] + R[%edx]] = M[260 + 0x1 + 0x3] = M[0x104 + 0x4] = M[0x108] = 0x13
- 0xFC(, %ecx, 4) = M[0xFC + R[%ecx] 4] = M[0xFC + 0x1 4] = M[0x100] = 0xFF
- (%eax, %edx, 4) = M[R[%eax] + R[%edx] 4] = M[0x100 + 0x3 4] = M[0x100 + 0xC] = M[0x10C] = 0x11
再来是 mov 操作: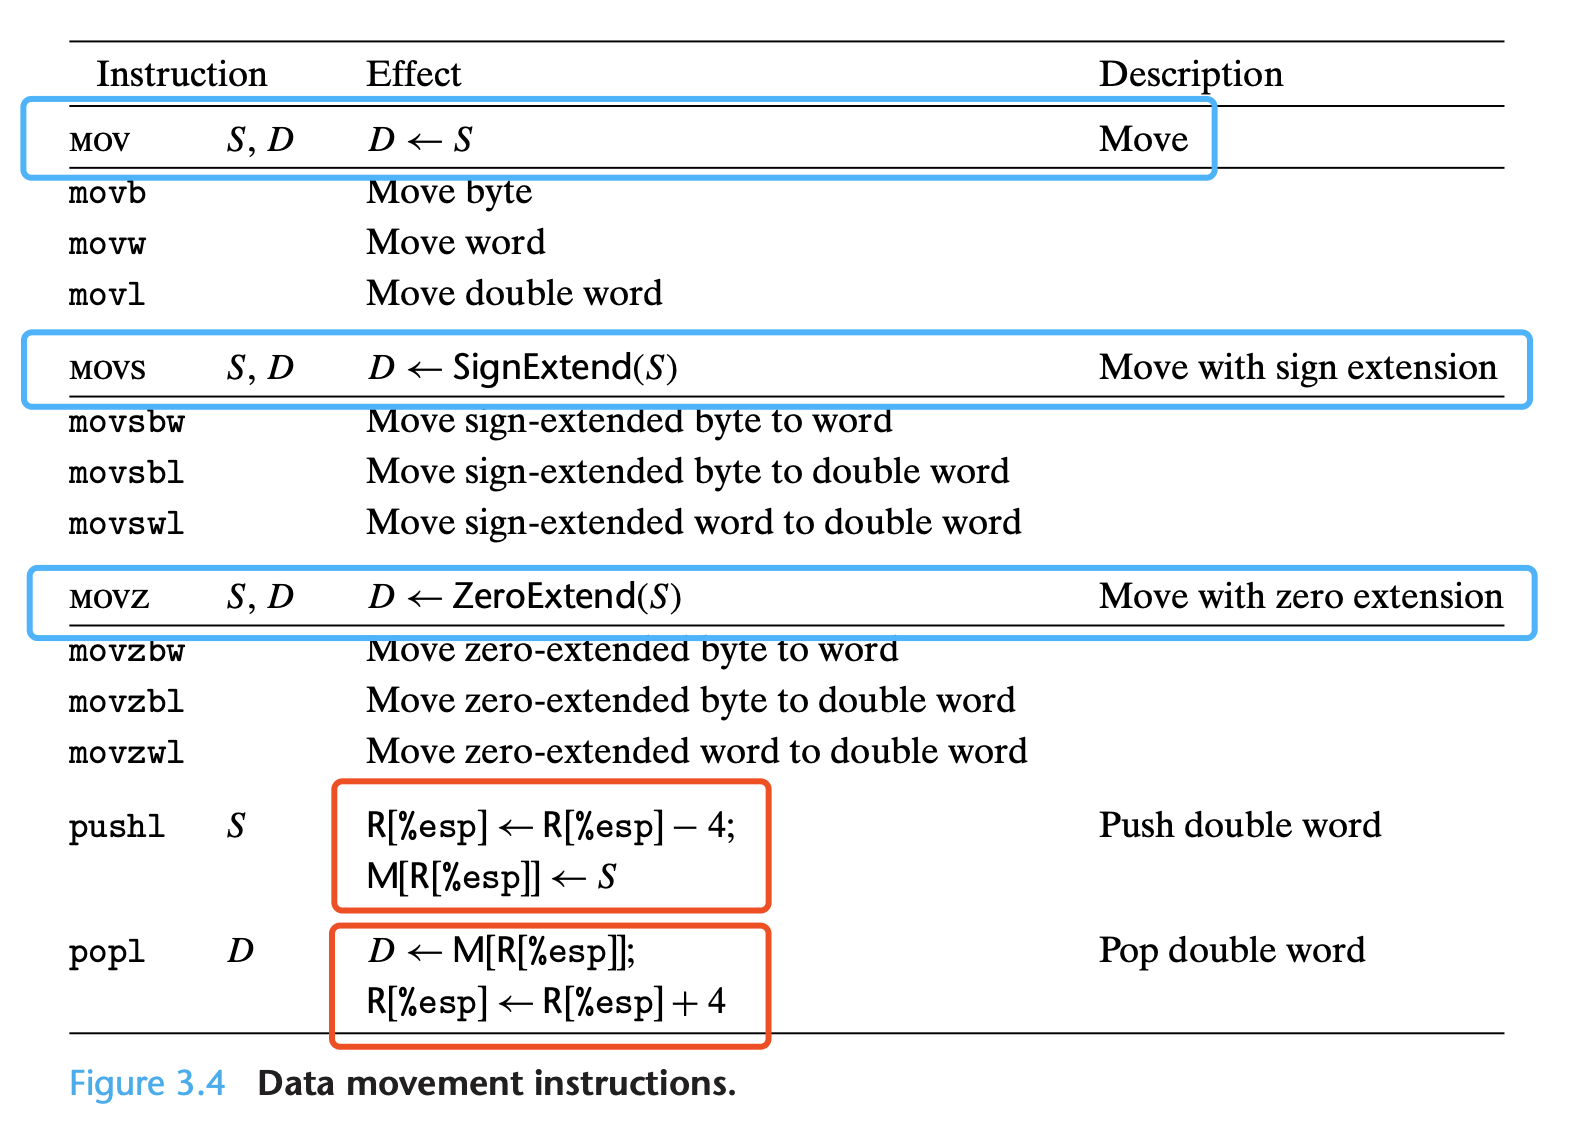
可以看到:
mov操作的后缀:- 仅有数量单位 b, w, l
- 后缀 s(sign-extended),紧接数量单位转换
- 后缀 z(zero-extended),紧接数量单位转换
pushl操作,实际是由两步构成的:- 将 register % esp 的值,修改为 R [% esp] - 4;(即 memory 中的地址值减 4)
- 之后,再将 S 的值复写到 register % esp 的值所指向的 memory 区域;(即将 S 复写到 M [R [% esp] ] .)
popl操作,也是由两步构成:- 将当前 register % esp 所指向的 memory 区域的值,复写到 D;(即将 M [R [% esp] ] 的值写到 D)
- 再将 register % esp 保存的地址值,更新,即自增 4。
x86 register 分类
https://wiki.osdev.org/CPU_Registers_x86
- 1、General Purpose Registers
- 2、Pointer Registers
- 3、Segment Registers
- 4、EFLAGS Register
- 5、Control Registers
- 6、Debug Registers
- 7、Test Registers
- 8、Protected Mode Registers
Control Register
(可参考 xv6 中 entry.S 中的代码)
https://en.wikipedia.org/wiki/Control_register
以 CR 开头的 register 都是 control register,用于控制 CPU behavior,如:
- interrupt control
- switching addressing mode
- paging control
- coprocessor control
%CRO :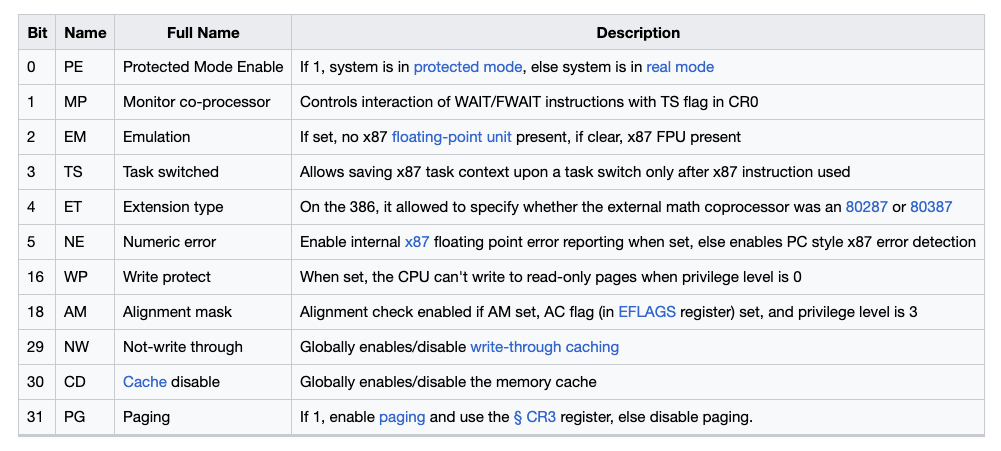
%CR1:reserved%CR2(Page Fault Linear Address):当发生 page default 时,program 需要去访问的 address 就存储于%CR2。
%CR3 :当 virtual address 被打开时(即:%CR0 设置了 PG 字段时),%CR3 允许 CPU 做 paging 的地址转换(linear virtual address —> page directory —> page table —> physical address)。
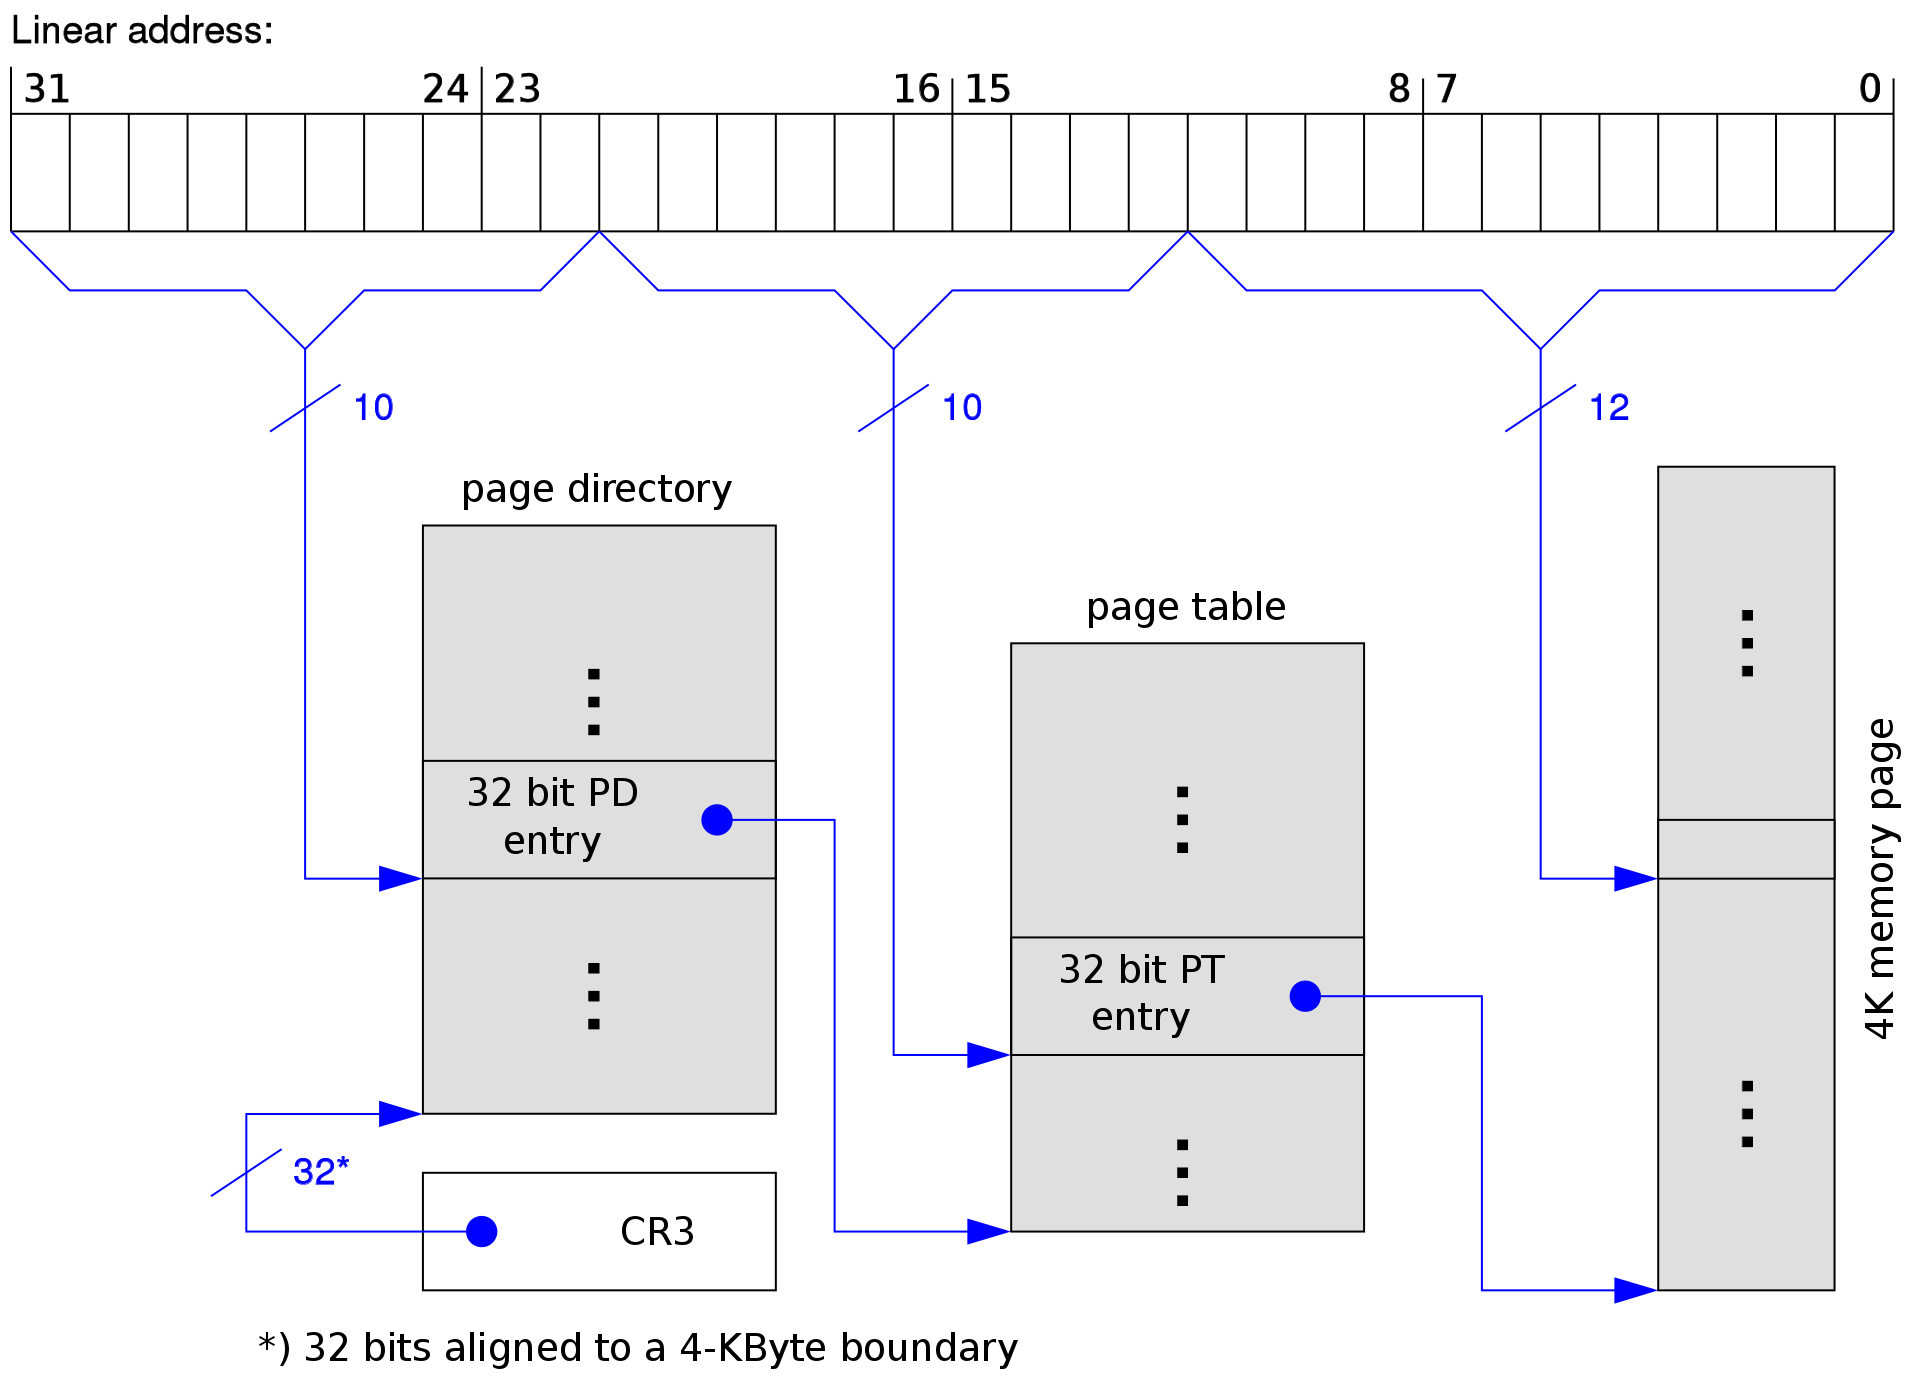
如上图可知,CR3 存储了 page directory 的地址。当遇到从 memory 取出来的 virtual linear address 时,就根据 %CR3 中的值找到 page directory 的地址,在按照上图的映射流程找到 page table,进而找到 physical address。
%CR4 :在 protected mode 时使用,用于:
- enabling I/O breakpoints
- page size extension(
PSE) - machine-check exceptions

MMU: memory management unit
https://en.wikipedia.org/wiki/Memory_management_unit
Machine Code & Assembly Code
最真实的 machine code 无疑是:
1000101101001100001001000000010010001011110000011001100100110011110000100100101111000010100000111110000000000001001100111100001000101011110000101000110101000100010010010000000101110100000001111000110100000100100011011111110111111111111111000011
将其使用 16 进制的数字描述为:
8b 4c 24 04 8b c1 99 33 c2 2b c2 83 e0 01 33 c22b c2 8d 44 49 01 74 07 8d 04 8d fd ff ff ff c3
这份 machine code 使用 NASM assembler syntax 来描述(参考:Assembly and Disassembly)为: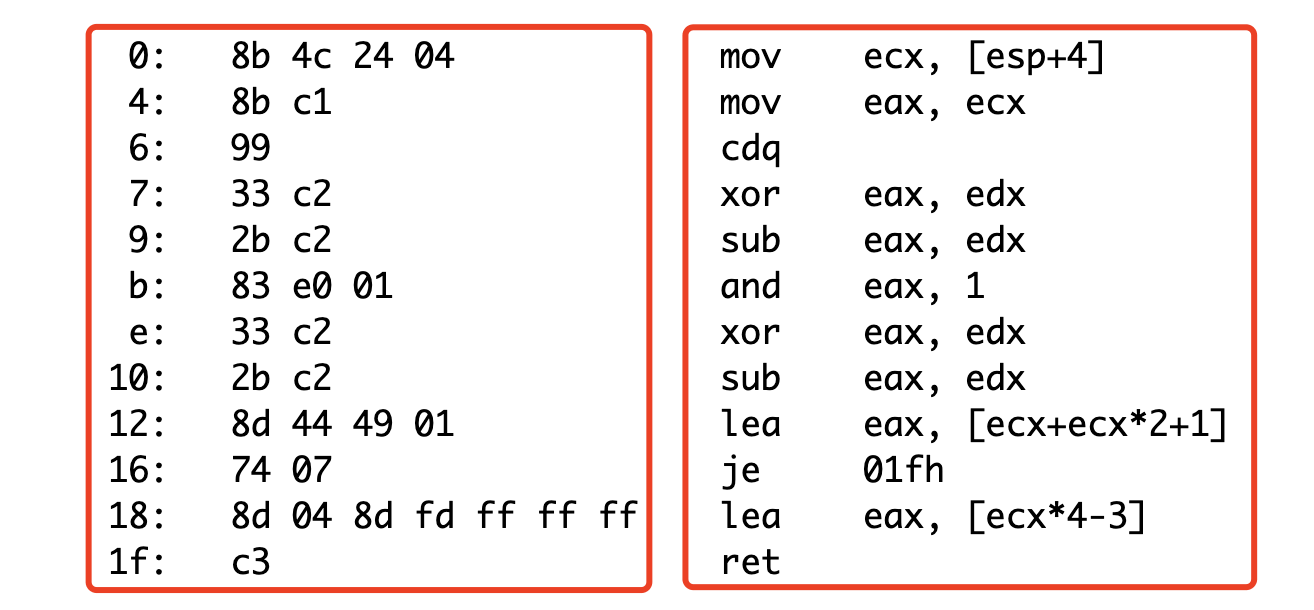
使用 GAS assembler syntax(GAS is the GNU Assembler, that GCC relies upon. Because GAS was invented to support a 32-bit unix compiler, it uses standard AT&T syntax, which resembles a lot the syntax for standard m68k assemblers, and is standard in the UNIX world.)的描述为: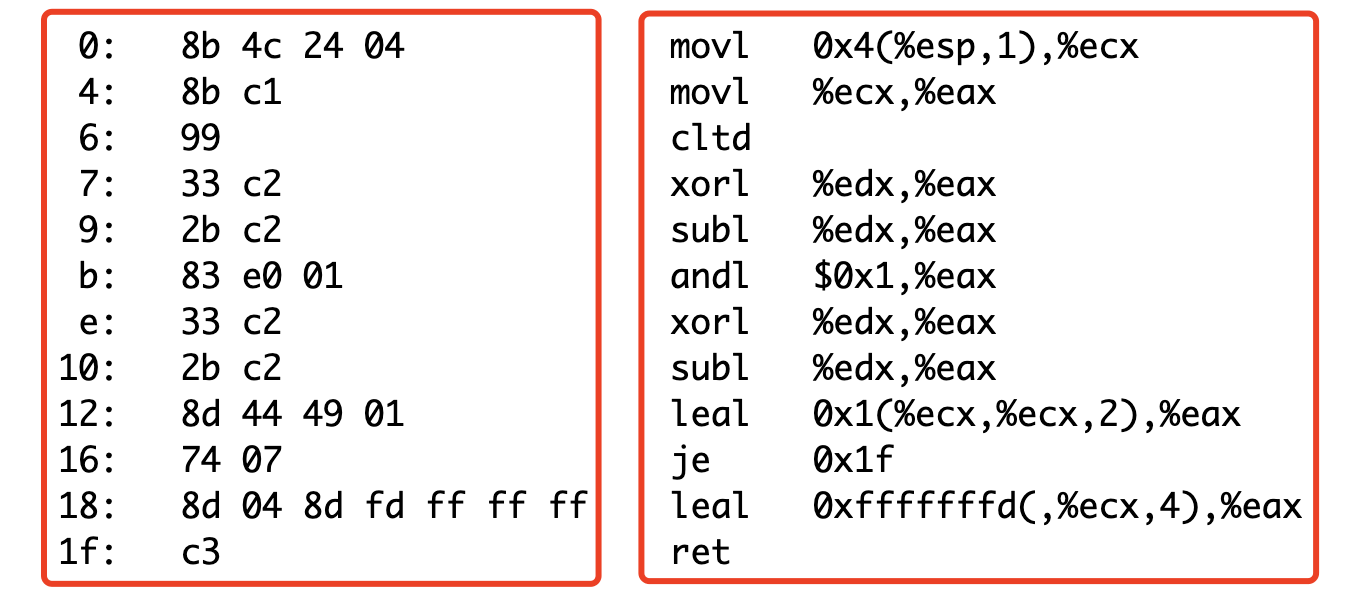
由此可知,machine code 和 assembly code 是一一对应的,每一条 assembly code 只不过是一条 instruction 的翻译而已。
通常,assembly code 存储于 .S 文件中。我们可以通过 gcc 来将 source code 先转换为 .S 文件的 assembly code,然后再将其转换为 binary code。
例如,根据 x86 Assembly/GAS Syntax 的示例可知,对于 hello.c 文件来讲,我们可以做如下操作:
# 直接从 source code 生成 binary codegcc -o hello_c hello.c./hello_c# --------------------------------------------# 从 source code 到 assembly code:# - 使用 32-bit x86 assembly language# - 生成的是 hello.s 文件gcc -S -m32 hello.c# 从 assembly code 到 binary codegcc -o hello_asm -m32 hello.s./hello_asm
我们可以一撇 hello.s 文件:
.file "hello.c".def ___main; .scl 2; .type 32; .endef.textLC0:.ascii "Hello, world!\12\0".globl _main.def _main; .scl 2; .type 32; .endef_main:pushl %ebpmovl %esp, %ebpsubl $8, %espandl $-16, %espmovl $0, %eaxmovl %eax, -4(%ebp)movl -4(%ebp), %eaxcall __allocacall ___mainmovl $LC0, (%esp)call _printfmovl $0, %eaxleaveret.def _printf; .scl 2; .type 32; .endef
Remarks:
- 以
.file、.def、.ascii开头的行,是 assembler directive 行,用于告知 assembler 如何 assemble the file。 - 类似于
_main:这样以「text 和:」作为组合形式的行,表示 label,用于标识 file location。
其中 .file 、.def 行用于 debug,因而可将其去掉,进而得到:
.textLC0:.ascii "Hello, world!\12\0".globl _main_main:pushl %ebpmovl %esp, %ebpsubl $8, %espandl $-16, %espmovl $0, %eaxmovl %eax, -4(%ebp)movl -4(%ebp), %eaxcall __allocacall ___mainmovl $LC0, (%esp)call _printfmovl $0, %eaxleaveret
Remarks:
.text行(「line 1」)用于标识 code 的起始位置。- 「line 2-3」声明了一个名为 LC0 的 label,「line 3」将一些 raw ASCII 放于 program。
- 「line 4」告知 assembler
_main为一个 global label,可以被 program 的其它部分看见。_mainlabel 需要被 linker 看见,因为 startup code 会调用_main作为 subroutine。
- 「line 5」是
_mainlabel 的定义。 - 「line 6-8」做了 3 部分的工作(start of main function):
- 先将
%ebp的 value 保存于 stack 上(做一个备份,因为之后要使用%ebp来做临时变量)。 - 将
%esp的 value 赋值到%ebp中。 - 将
%ebp上的值减去 8。
- 先将
- 「line 9」 将
%epb的值同0xFFFFFFF0取 AND 操作。 - 「line 10-12」一些 mov 操作。
- 「line 13-14」:通过
call语句来调用 C library 的 function。 - 「line 15-16」:
- 将
$LC0label 所代表的 raw ASCII string 移动至 stack top(由(%esp)表示,%esp是 stack pointer,根据它的值取到对应的 memory 即是取到 stack top)。 - 调用 C library 的
_printfsubroutine 将 message 打印到 console。
- 将
- 「line 17」:将整个 program 的返回值:0,保存于
%eax中。 - 「line 18」:
leave通常是 subroutine 的最后一行,用于 free space(将「line 6」保存于 stack 的值重新赋值给%ebp) - 「line 19」:将 control 交还给 calling procedure。
当然,我们可以尝试不通过 C 语言的编译,而是直接通过撰写 assembly code 来调用 system call 将「hello word」打印出来(参考:x86 Assembly Language Programming、GNU Assembler Examples):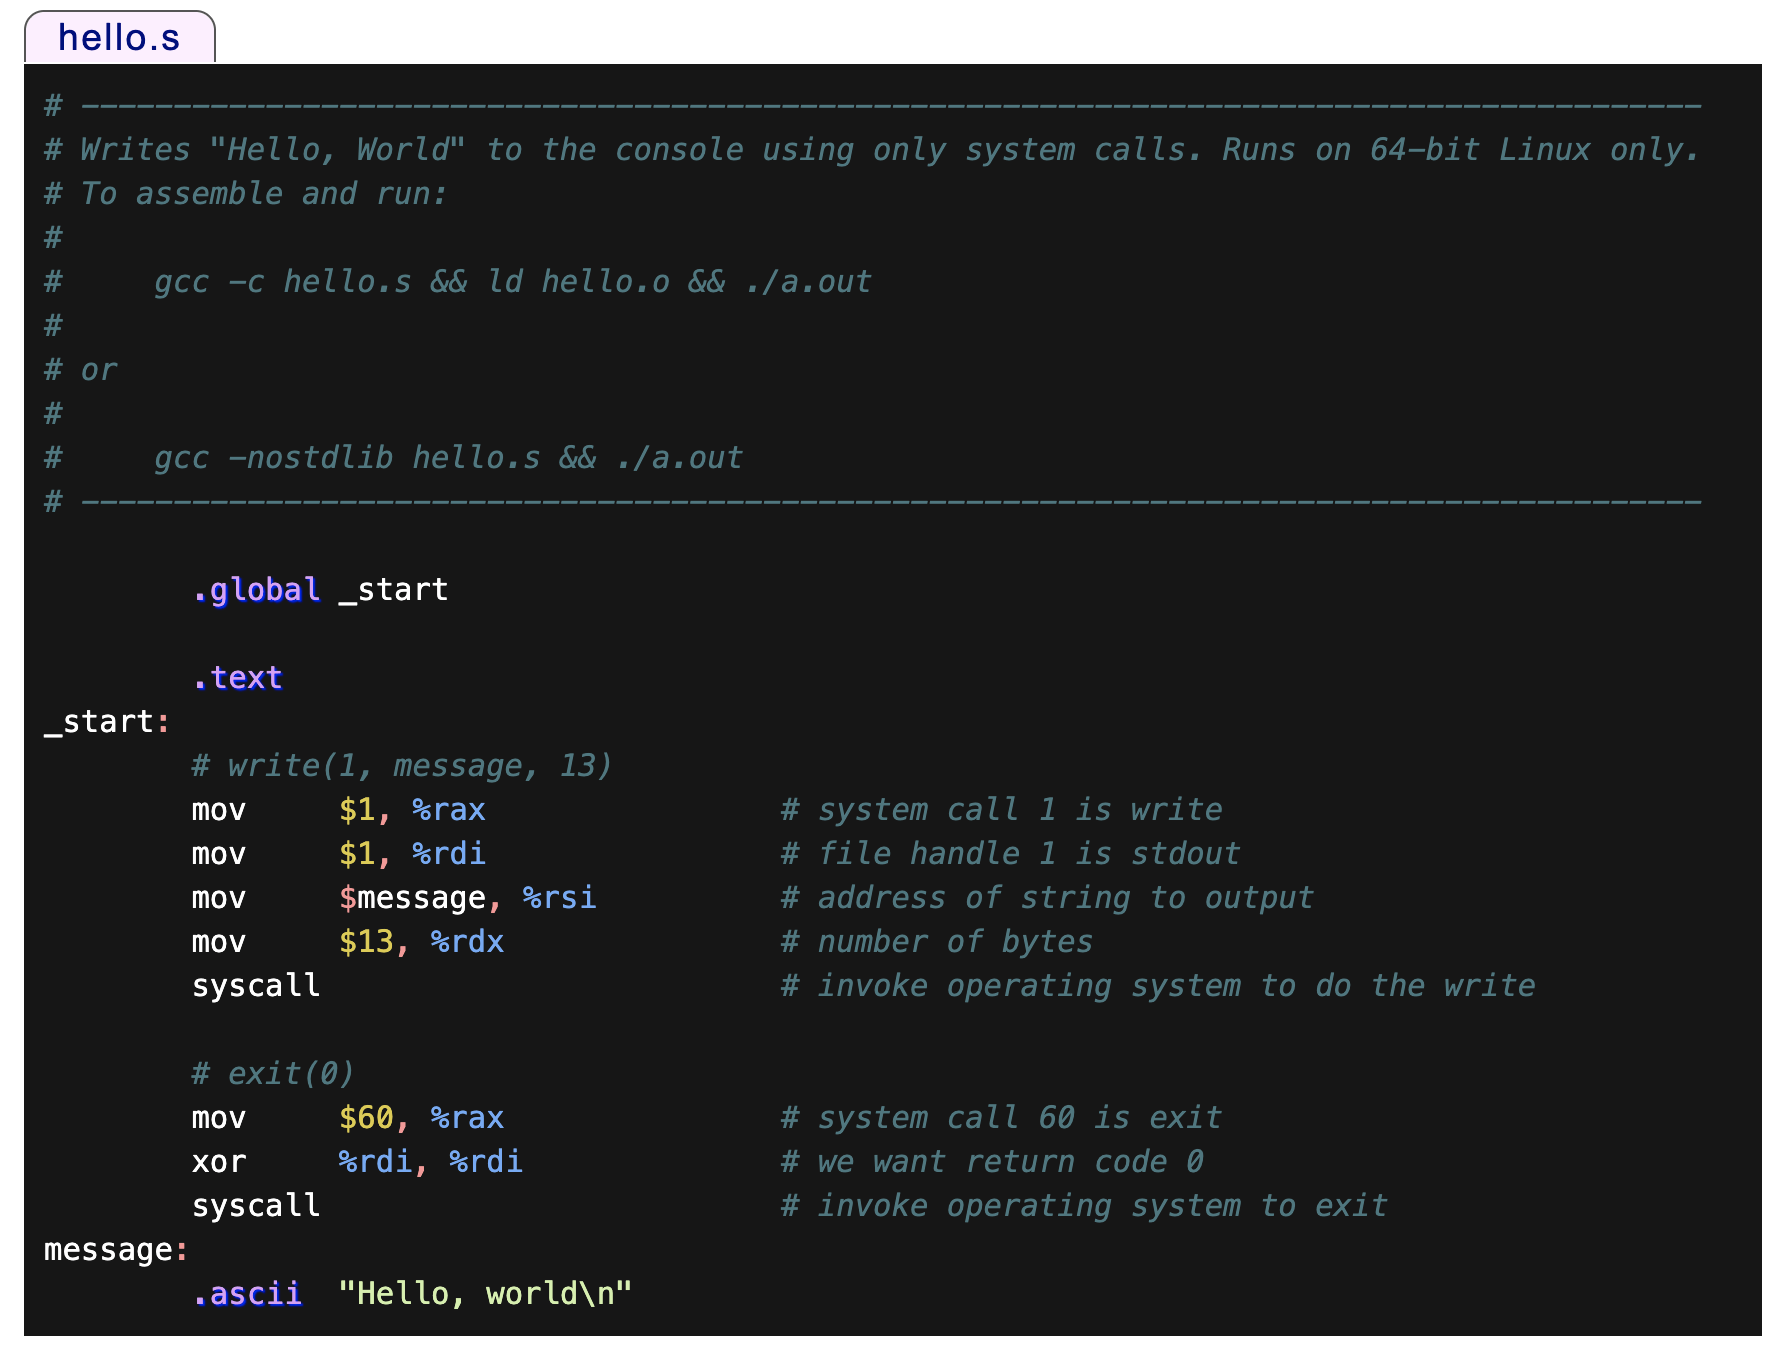
这个 hello.s 文件的运行方式如图中注释所示:
gcc -c hello.s && ld hello.o && ./a.out
根据上述 hello.c 和 hello.s 文件的转换过程,我们可以稍微梳理一下从 source code 到 executable code 的变化过程:
- source code(
.cfile) ==> assembly code(.sfile, by compiling:gcc -S -m32 hello.c) - assembly code(
.sfile) ==> machine code of object file(.ofile, by assembler processing:gcc -c hello.s) - object file(
.ofile) ==> executable file(.outfile, by linking:ld hello.o)
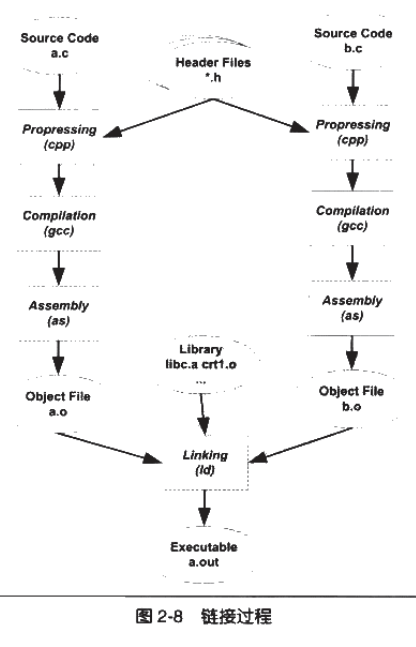
如果再将 preprocess 等过程完整地考虑进来,我们便能得到整个从 source code 到 executable code 的过程(参考 CSAPP Figure 1.3):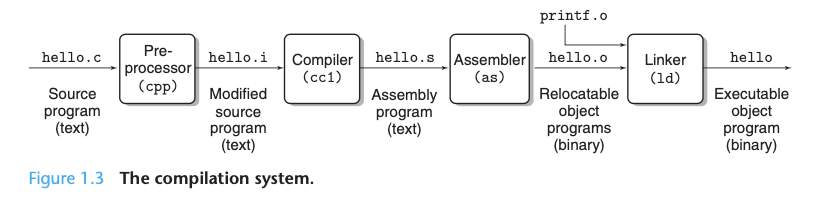
- Preprocessing:
- 按照「预处理」命令(如
#include)来修改 source code,相当于通过命令来执行 editor 的一些工作。 - 纯粹是「编辑器」修改 source code 的工作,只不过使用「预处理」命令来工程化。
- 文件类型修改:
hello.c—>hello.i。 - 单独此步使用的命令:
gcc -E hello.c -o hello.i。
- 按照「预处理」命令(如
- Compiling:
- 将 source code 编译为「汇编语言」。
- 之所以不是直接编译为 machine code,是因为这一步之后,还可以同其它编译为 assembly code 的代码结合,例如同一个由 Fortran 编写编译为 assembly code 的代码。
- 文件类型修改:
hello.i—>hello.s。 - 单独此步使用的命令:
gcc -S hello.c -o hello.s。
- Assembly:
- 将 assembly code 编译为 machine code,即 object code。
- 此时虽然是 machine code,还不可以被执行。因为此时只引入了头文件,头文件中的函数「声明」对应的到底是「定义」并不清楚。
- 文件类型修改:
hello.s—>hello.o。 - 单独此步使用的命令:
as hello.s -o hello.o或者gcc -c hello.s -o hello.o或gcc -c hello.c -o hello.o。
- Linking:
- 将头文件中涉及到的「其它代码」连接起来,生成 executable file。例如,
printf()函数并未在hello.c中定义,linking phase 这一步便可以将printf()的定义代码连接过来。 - 这里连接过来的并不是
printf()的 source code,而是printf()的 object code:printf.o。 printf.o是一个单独放置的「precompiled」object file。- 之所以需要 linking phase 这一步,不过是为了将「引入的代码」真正合并过来。compiling/assembly 阶段只引入了声明,具体做了什么事其实是不知道的。
- 文件类型:
hello.o—>hello。 - 单独此步使用的命令:
ld -static /usr/lib/crt1.o /usr/lb/crti.o /usr/lib/gcc/i486-linux-gnu/4.1.3/crtbeginT.o -L/usr/lib/gcc/i486-linux-gnu/4.1.3 -L/usr/lib -L/lib hello.o --start-group-lgcc -lgcc_eh -lc --end-group /usr/lib/gcc/i486-linux-gnu/4.1.3/crtend.o /usr/lib/crtn.o。
- 将头文件中涉及到的「其它代码」连接起来,生成 executable file。例如,
这里最微妙的地方,或许在于将「引入外部代码」这个过程拆为了两步:1、引入声明;2、引入定义(可执行代码)。
最常见的库就是运行时库(runtime library),它是支持程序运行的基本函数的集合。「库」其实就是一组「目标文件」的包,就是一些最正常用的代码编译成目标文件后,被打包存放。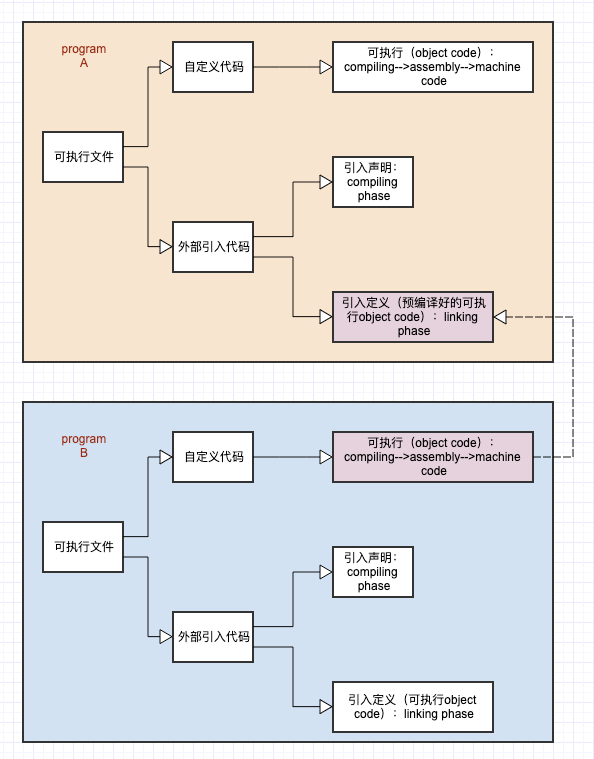
Remarks(假设在 main.c 中调用了另一个模块 func.c 中的 foo() 函数):
- 这时,在
main.c中的每一处调用了foo()的时候都必须确切知道foo这函数的地址(找到函数地址,就能加载函数的执行代码)。 - 由于每个模块是单独编译的,在 compiling 阶段
main.c并不知道foo的地址,于是只能暂时把foo的目标地址搁置,等待在 linking 阶段被修正。 - 当
func.c模块被重新编译时,foo函数的地址有可能被改变。此时,在main.c中所有使用foo的地址的指令都需要被重新调整。 - 连接器能自动地在 linking 阶段重新调整所有变动的地址。
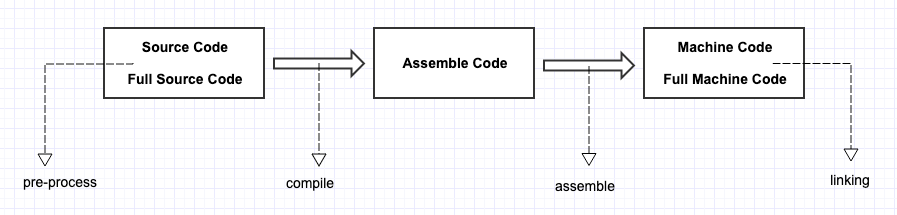
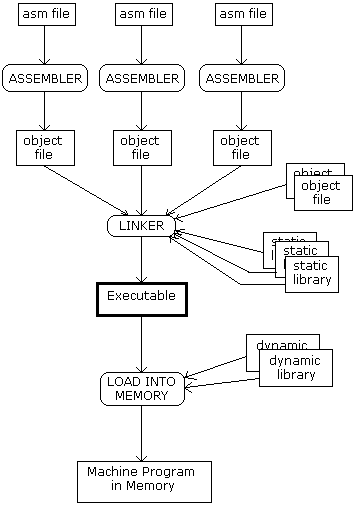
另:x86 Assembly Language Programming 以另一种视角来整理了上述的过程,我们可以姑且一看以作参考:
以上讨论,均为 hello world 的 toy program,如要进一步检验自己对 GNU assembler language 的理解,则需尝试阅读 xv6 中 bootasm.S 的代码: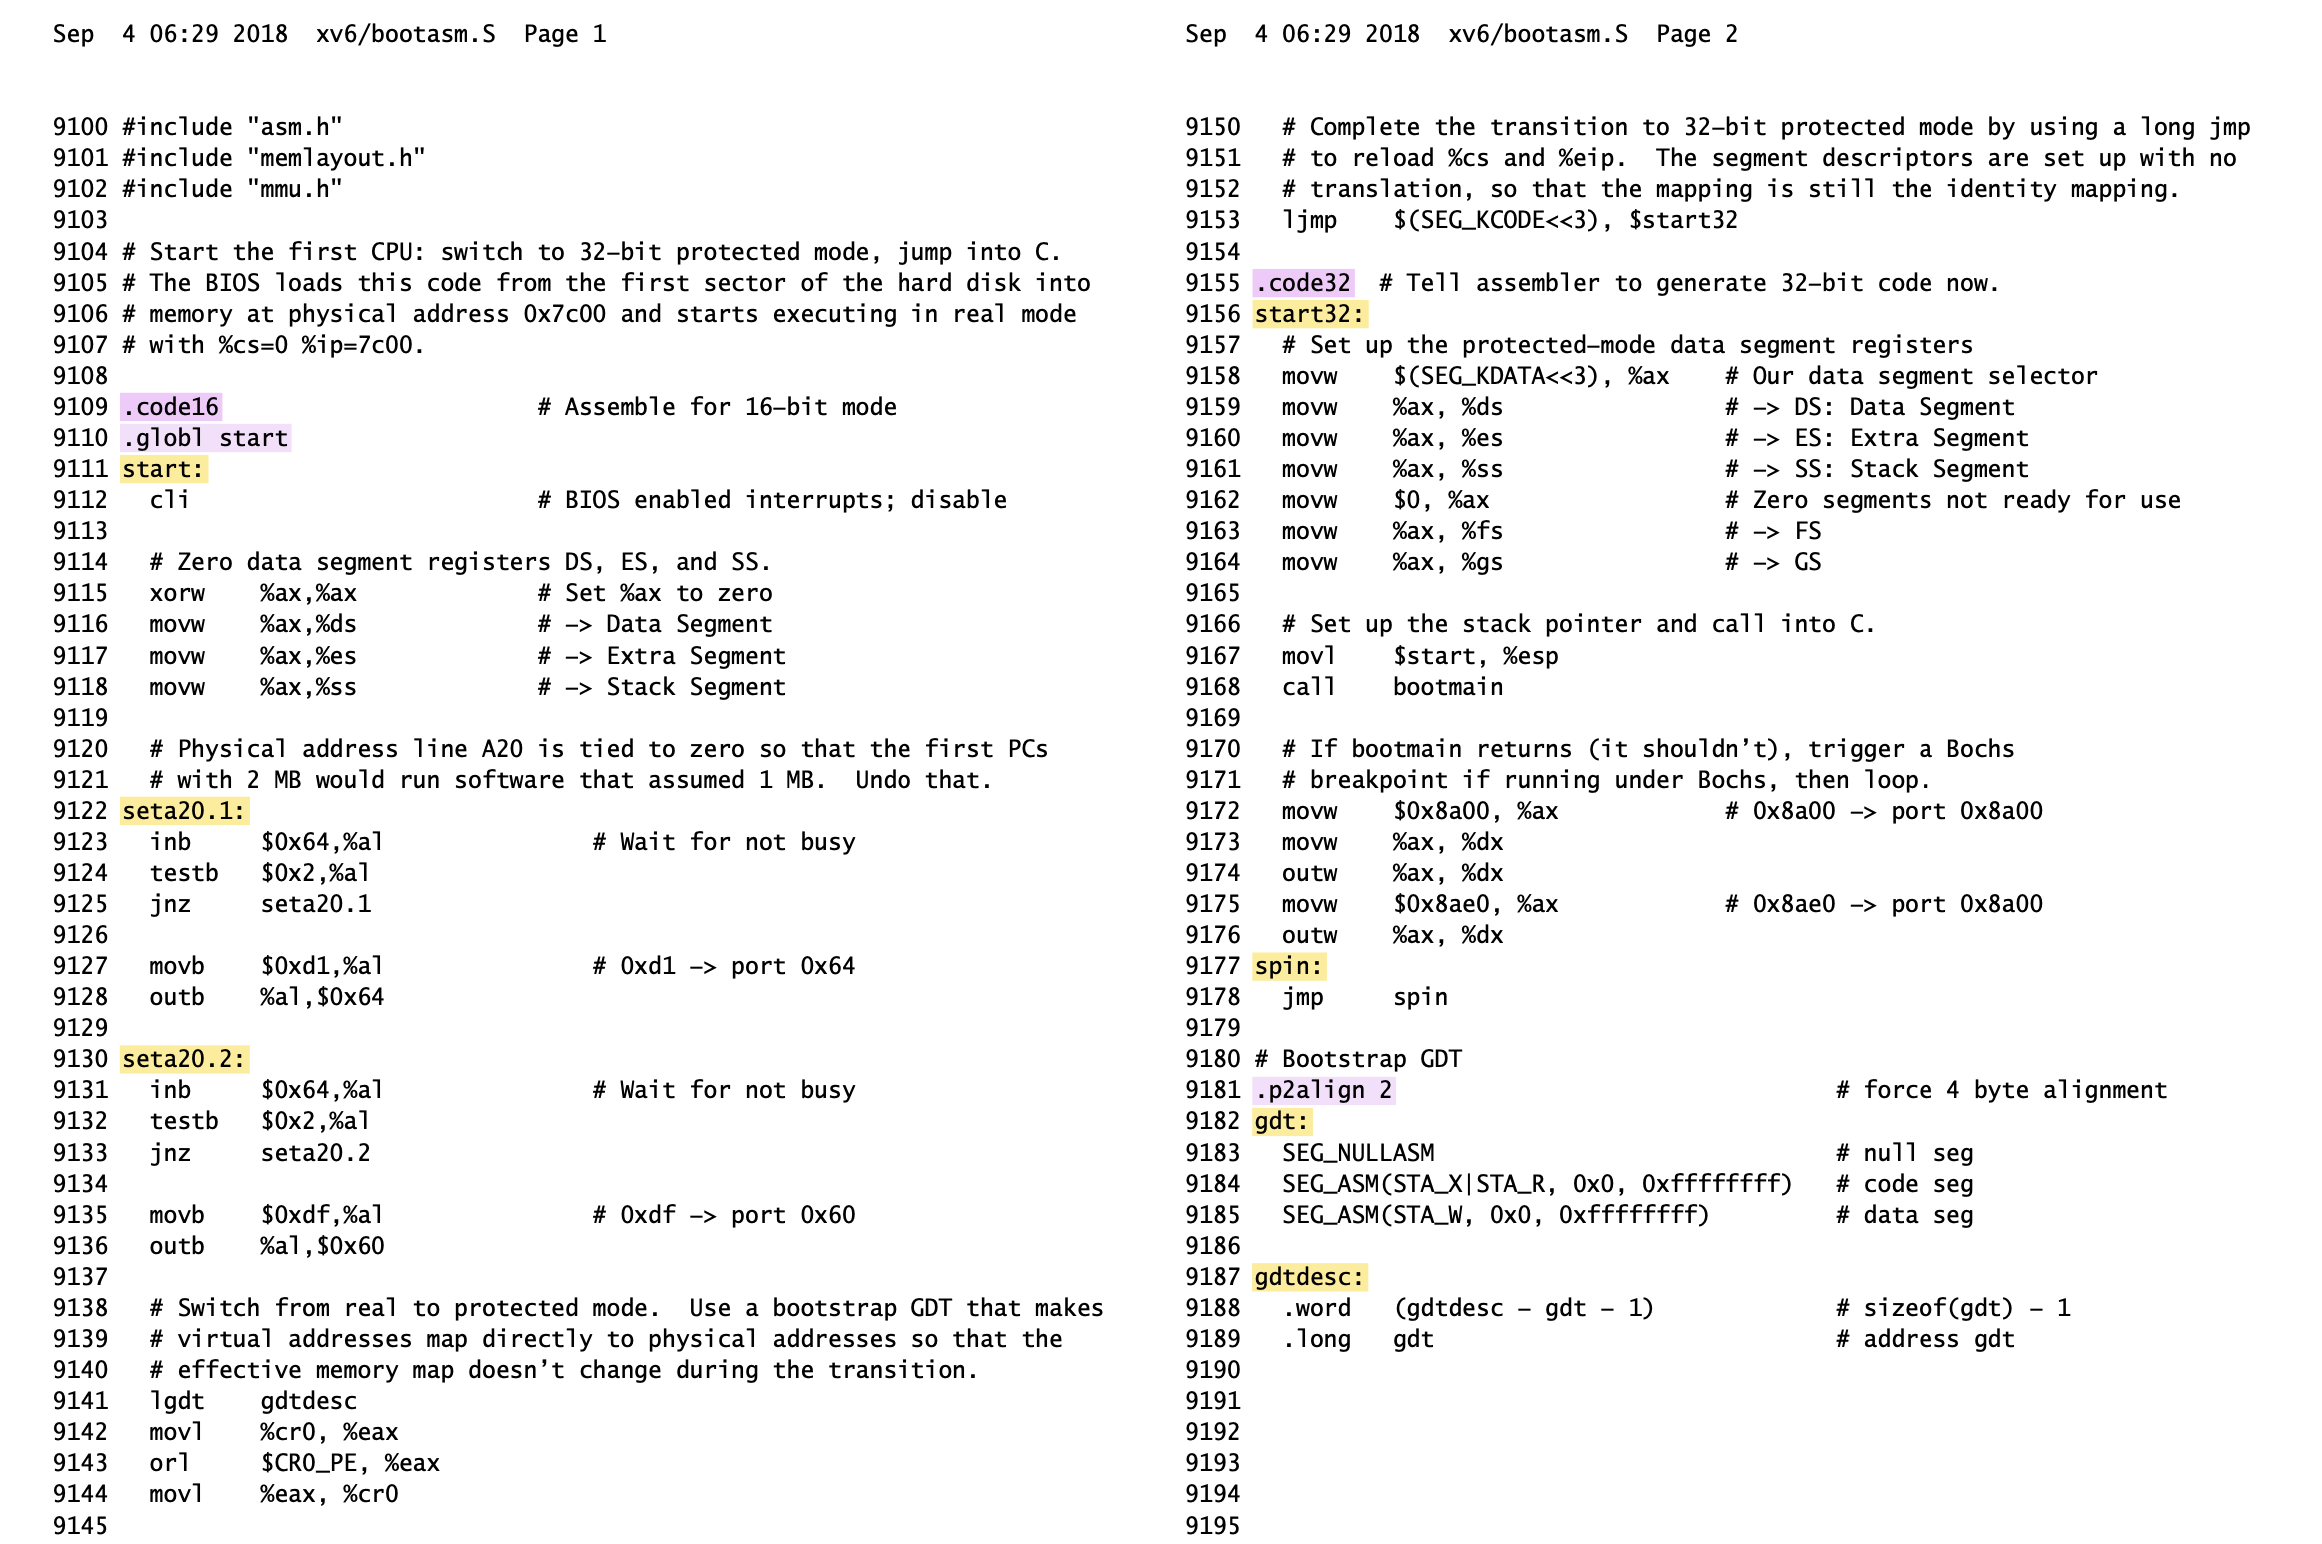
可以看到在 bootasm.s 文件中有如下 assembly directive:
.code16.global:.globalmakes the symbol visible told. If you define symbol in your partial program, its value is made available to other partial programs that are linked with it. Otherwise,symbol takes its attributes from a symbol of the same name from another file linked into the same program..code32.p2align 2.word:.long:same as.int, expect zero or more expressions, of any section, separated by commas. For each expression, emit a number that, at run time, is the value of that expression. The byte order and bit size of the number depends on what kind of target the assembly is for.
而 assembly label 有:
- start
- seta20.1
- seta20.2
- start32
- spin
- gdt
- gdtdesc
在各种 assembly operation 中,不容易辨识的一些操作为(参考:The Linux Kernel/Syscalls):
- cli:表示 clear interrupt flag(if),用于关闭 interrupt
- testb:test byte, s1 & s2
- jnz(同 jne):not equal / not zero
- lgdt:load processor’s global descriptor table
- ljmp:long jump
- inb:port IO
- outb:port IO
- outw:port IO
- SEG_NULLASM:
- SEG_ASM:

若有收获,就点个赞吧
0 人点赞
