原文地址:https://doc.cgal.org/latest/Manual/tuto_gis.html
CGAL中的术语
- 【TIN】Triangulated Irregular Network,不规则三角网格,一种2D的三角形结构,由3D三角形在水平面上的投影组成
- 【DSM】Digital Surface Model,数字表面模型,扫描地表所得到的模型,包括建筑物和植被。我们使用TIN来存储DSM
- 【DTM】Digital Terrain Model,数字地形模型,是一种没有建筑物或植被等物体的裸露地面模型。我们使用TIN和栅格来存储DTM
- 【DEM】Digital Elevation Model,数字高程模型,一个更通用的属于,其包括DSM和DTM
CGAL针对点云的工艺流程
- 可基于点云生成DSM数字表面模型(以TIN数据结构保存)
- 可基于DSM去除地表的地物(建筑物和植被等),以生成DTM数字地形模型(以TIN数据结构保存)
- TIN可以带有属性
- 可识别出连接的组件(即可识别出一个一个地物,但没有地物的类别)
- 可以对三角网进行一定条件的筛选
- 筛选之后,可能会出现孔洞,CGAL可以对孔进行填充,并重新网格化
- CGAL支持对TIN的栅格化
- CGAL支持基于TIN计算等高线,并且可利用内部模块对等高线进行简化
- CGAL提供监督分类,以对点云进行分类
TIN不规则三角网
CGAL提供了一些三角剖分的数据结构和算法。可以通过2D Delaunay和投影特征来生成TIN,使用沿选定平面(通常为XY平面)上的2D点计算三角剖分结构,而3D位置被保留为可视化和测量的量。
因此,可以通过以下方式简单定义TIN的数据结构
using Kernel = CGAL::Exact_predicates_inexact_constructions_kernel; //精确谓词,非精确构造的内核using Projection_traits = CGAL::Projection_traits_xy_3<Kernel>; //投影特征,往XY平面上投影using Point_2 = Kernel::Point_2; //2D点using Point_3 = Kernel::Point_3; //3D点using Segment_3 = Kernel::Segment_3;//3D线段// TIN的数据结构using TIN = CGAL::Delaunay_triangulation_2<Projection_traits>;
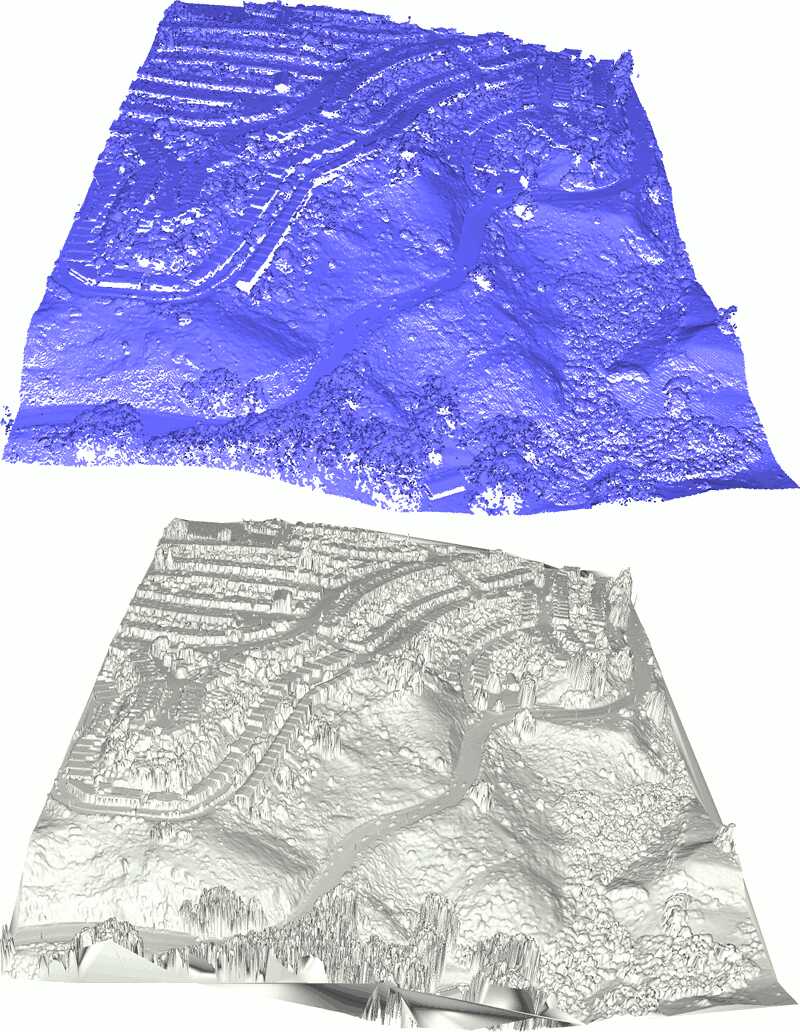
DSM数字表面模型
使用流运算符可以轻松地将各种格式的点云(XYZ、OFF、PLY、LAS)加载到CGAL::Point_set_3数据结构中。
使用这种方式,我们可以很容易的构建存储在TIN中的DSM
// 读取点集
std::ifstream ifile(argv[1], std::ios_base::binary);
CGAL::Point_set_3<Point_3> points;
ifile >> points;
std::cerr << points.size() << " point(s) read" << std::endl;
// 创建DSM
TIN dsm (points.points().begin(), points.points().end());
由于CGAL的Delaunay三角剖分是基于FaceGraph模型的,因此需要将生成的TIN转换为FaceGraph类型的网格结构,如CGAL::Surface_mesh。
using Mesh = CGAL::Surface_mesh<Point_3>; //FaceGraph类型的网格结构

Mesh dsm_mesh; //DSM
CGAL::copy_face_graph(dsm, dsm_mesh);
//将DSM保存
std::ofstream dsm_ofile ("dsm.ply", std::ios_base::binary);
CGAL::set_binary_mode(dsm_ofile);
CGAL::write_ply(dsm_ofile, dsm_mesh);
dsm_ofile.close();
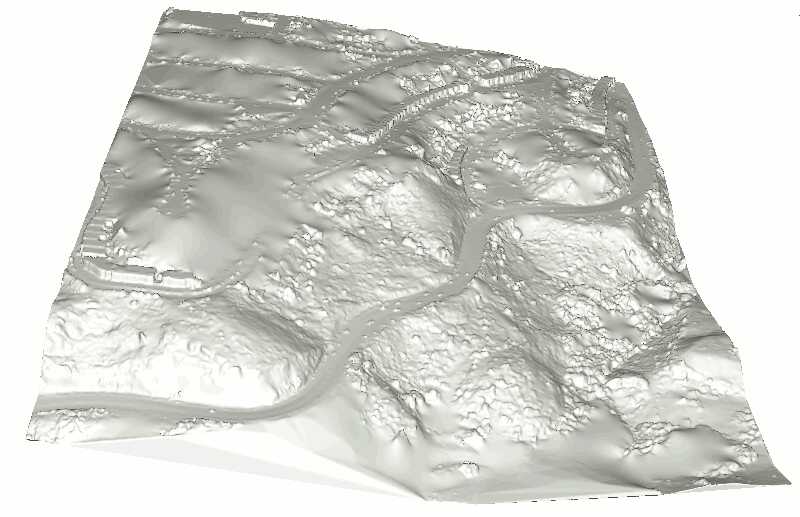
DTM数字地形模型
可以在DSM的基础上计算获得DTM。在过滤掉非地面点之后,即可获得DTM。
作为示例,我们提出了一个简单的DTM估算方式,该估算有以下步骤:
- 设定小平面的高度以消除残酷的海拔变化
- 将其他方面聚集到连接的组件中
- 过滤所有小于用户定义阈值的组件
此算法依赖于2个参数:
- 高度阈值:建筑物的最小高度
- 周长阈值:在2D投影上,建筑物的最大尺寸
TIN属性
由于它是基于CGAL Delaunay三角网的API,我们可以给TIN的点、面添加附属信息。
举例:为每个顶点都添加一个属性,这个属性是顶点在点云中对应点的索引(在随后过滤地面点的时候会用到)
auto idx_to_point_with_info = [&](const Point_set::Index& idx) -> std::pair<Point_3, Point_set::Index>
{
    return std::make_pair (points.point(idx), idx);
};

TIN_with_info tin_with_info(
    boost::make_transform_iterator (points.begin(), idx_to_point_with_info),
    boost::make_transform_iterator (points.end(), idx_to_point_with_info));
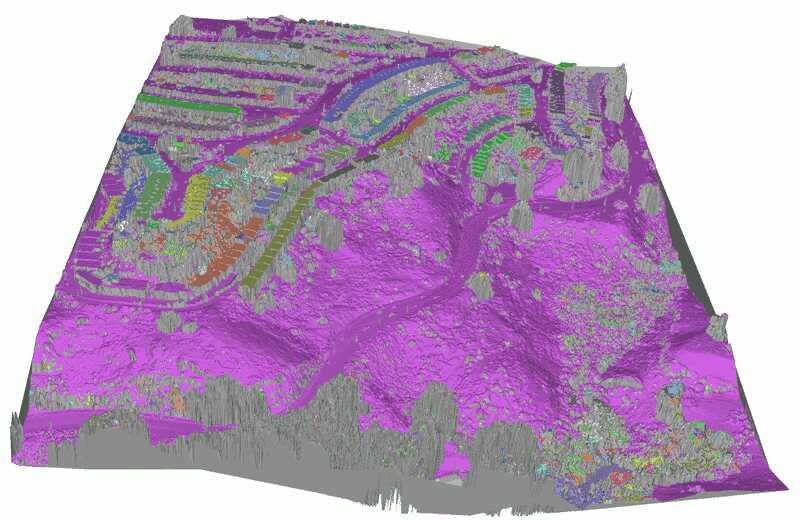
识别连接的组件
通过flooding算法来标识连接的组件:从一个种子面(a seed face)开始,所有输入面都插入到当前连接的组件中,除非它们的高度超过用户定义的阈值。
double spacing = CGAL::compute_average_spacing<Concurrency_tag>(points, 6);
spacing *= 2;
auto face_height
    = [&](const TIN_with_info::Face_handle fh) -> double
      {
        double out = 0.;
        for (int i = 0; i < 3; ++ i)
          out = (std::max) (out, CGAL::abs(fh->vertex(i)->point().z() - fh->vertex((i+1)%3)->point().z()));
        return out;
      };
// Initialize faces info
for (TIN_with_info::Face_handle fh : tin_with_info.all_face_handles())
    if (tin_with_info.is_infinite(fh) || face_height(fh) > spacing) // Filtered faces are given info() = -2
        fh->info() = -2;
else // Pending faces are given info() = -1;
    fh->info() = -1;
// Flooding algorithm
std::vector<int> component_size;
for (TIN_with_info::Face_handle fh : tin_with_info.finite_face_handles())
{
    if (fh->info() != -1)
        continue;
    std::queue<TIN_with_info::Face_handle> todo;
    todo.push(fh);
    int size = 0;
    while (!todo.empty())
    {
        TIN_with_info::Face_handle current = todo.front();
        todo.pop();
        if (current->info() != -1)
            continue;
        current->info() = int(component_size.size());
        ++ size;
        for (int i = 0; i < 3; ++ i)
            todo.push (current->neighbor(i));
    }
    component_size.push_back (size);
}
std::cerr << component_size.size() << " connected component(s) found" << std::endl;
可以将带有属性的TIN、连接的组件信息一起保存为彩色的网格:
Mesh tin_colored_mesh;
Mesh::Property_map<Mesh::Face_index, CGAL::Color>
    color_map = tin_colored_mesh.add_property_map<Mesh::Face_index, CGAL::Color>("f:color").first;
CGAL::copy_face_graph (tin_with_info, tin_colored_mesh,
                       CGAL::parameters::face_to_face_output_iterator
                         (boost::make_function_output_iterator
                          ([&](const std::pair<TIN_with_info::Face_handle, Mesh::Face_index>& ff)
                           {
                               // Color unassigned faces gray
                               if (ff.first->info() < 0)
                                   color_map[ff.second] = CGAL::Color(128, 128, 128);
                               else
                               {
                                   // Random color seeded by the component ID
                                   CGAL::Random r (ff.first->info());
                                   color_map[ff.second] = CGAL::Color (r.get_int(64, 192),
                                                                       r.get_int(64, 192),
                                                                       r.get_int(64, 192));
                               }
                           })));
std::ofstream tin_colored_ofile ("colored_tin.ply", std::ios_base::binary);
CGAL::set_binary_mode (tin_colored_ofile);
CGAL::write_ply (tin_colored_ofile, tin_colored_mesh);
tin_colored_ofile.close();
筛选
小于最大建筑物的组件可以通过以下方式删除
int min_size = int(points.size() / 2);

std::vector<TIN_with_info::Vertex_handle> to_remove;

for (TIN_with_info::Vertex_handle vh : tin_with_info.finite_vertex_handles())
{
    TIN_with_info::Face_circulator circ = tin_with_info.incident_faces (vh),
    start = circ;
    // Remove a vertex if it's only adjacent to components smaller than threshold
    bool keep = false;
    do
    {
        if (circ->info() >= 0 && component_size[std::size_t(circ->info())] > min_size)
        {
            keep = true;
            break;
        }
    }
    while (++ circ != start);
    if (!keep)
        to_remove.push_back (vh);
}

std::cerr << to_remove.size() << " vertices(s) will be removed after filtering" << std::endl;
for (TIN_with_info::Vertex_handle vh : to_remove)
    tin_with_info.remove (vh);
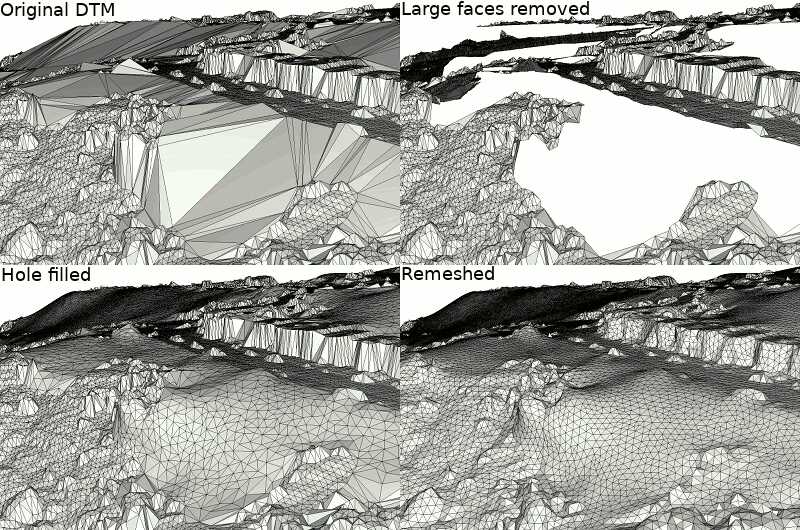
孔填充和重新网格化
简单删除建筑物所覆盖大区域上的顶点,会导致Delaunay面变大,从而导致DTM的3D表现不佳,所以我们可以以额外的步骤生成更好的网格:删除大于阈值的面,并通过孔填充算法三角化、细化和修正孔。
举例:将TIN复制到网格中,同时滤除过大的面,然后识别孔并填充它们,除了最大的孔(即外壳)
// Copy and keep track of overly large faces
Mesh dtm_mesh;
std::vector<Mesh::Face_index> face_selection;
Mesh::Property_map<Mesh::Face_index, bool> face_selection_map
   = dtm_mesh.add_property_map<Mesh::Face_index, bool>("is_selected", false).first;
double limit = CGAL::square (5 * spacing);
CGAL::copy_face_graph (tin_with_info, dtm_mesh,
                       CGAL::parameters::face_to_face_output_iterator
                         (boost::make_function_output_iterator
                          ([&](const std::pair<TIN_with_info::Face_handle, Mesh::Face_index>& ff)
                           {
                               double longest_edge = 0.;
                               bool border = false;
                               for (int i = 0; i < 3; ++ i)
                               {
                                   longest_edge = (std::max)(longest_edge, CGAL::squared_distance
                                                             (ff.first->vertex((i+1)%3)->point(),
                                                              ff.first->vertex((i+2)%3)->point()));
                                   TIN_with_info::Face_circulator circ
                                       = tin_with_info.incident_faces (ff.first->vertex(i)),
                                   start = circ;
                                   do
                                   {
                                       if (tin_with_info.is_infinite (circ))
                                       {
                                           border = true;
                                           break;
                                       }
                                   }
                                   while (++ circ != start);
                                   if (border)
                                       break;
                               }
                               // Select if face is too big AND it's not
                               // on the border (to have closed holes)
                               if (!border && longest_edge > limit)
                               {
                                   face_selection_map[ff.second] = true;
                                   face_selection.push_back (ff.second);
                               }
                           })));
// Save original DTM
std::ofstream dtm_ofile ("dtm.ply", std::ios_base::binary);
CGAL::set_binary_mode (dtm_ofile);
CGAL::write_ply (dtm_ofile, dtm_mesh);
dtm_ofile.close();
std::cerr << face_selection.size() << " face(s) are selected for removal" << std::endl;
// Expand face selection to keep a well formed 2-manifold mesh after removal
CGAL::expand_face_selection_for_removal (face_selection, dtm_mesh, face_selection_map);
face_selection.clear();
for (Mesh::Face_index fi : faces(dtm_mesh))
    if (face_selection_map[fi])
        face_selection.push_back(fi);
std::cerr << face_selection.size() << " face(s) are selected for removal after expansion" << std::endl;
for (Mesh::Face_index fi : face_selection)
    CGAL::Euler::remove_face (halfedge(fi, dtm_mesh), dtm_mesh);
dtm_mesh.collect_garbage();
if (!dtm_mesh.is_valid())
    std::cerr << "Invalid mesh!" << std::endl;
// Save filtered DTM
std::ofstream dtm_holes_ofile ("dtm_with_holes.ply", std::ios_base::binary);
CGAL::set_binary_mode (dtm_holes_ofile);
CGAL::write_ply (dtm_holes_ofile, dtm_mesh);
dtm_holes_ofile.close();
// Get all holes
std::vector<Mesh::Halfedge_index> holes;
CGAL::Polygon_mesh_processing::extract_boundary_cycles (dtm_mesh, std::back_inserter (holes));
std::cerr << holes.size() << " hole(s) identified" << std::endl;
// Identify outer hull (hole with maximum size)
double max_size = 0.;
Mesh::Halfedge_index outer_hull;
for (Mesh::Halfedge_index hi : holes)
{
    CGAL::Bbox_3 hole_bbox;
    for (Mesh::Halfedge_index haf : CGAL::halfedges_around_face(hi, dtm_mesh))
    {
        const Point_3& p = dtm_mesh.point(target(haf, dtm_mesh));
        hole_bbox += p.bbox();
    }
    double size = CGAL::squared_distance (Point_2(hole_bbox.xmin(), hole_bbox.ymin()),
                                          Point_2(hole_bbox.xmax(), hole_bbox.ymax()));
    if (size > max_size)
    {
        max_size = size;
        outer_hull = hi;
    }
}
// Fill all holes except the bigest (which is the outer hull of the mesh)
for (Mesh::Halfedge_index hi : holes)
    if (hi != outer_hull)
        CGAL::Polygon_mesh_processing::triangulate_refine_and_fair_hole
        (dtm_mesh, hi, CGAL::Emptyset_iterator(), CGAL::Emptyset_iterator());
// Save DTM with holes filled
std::ofstream dtm_filled_ofile ("dtm_filled.ply", std::ios_base::binary);
CGAL::set_binary_mode (dtm_filled_ofile);
CGAL::write_ply (dtm_filled_ofile, dtm_mesh);
dtm_filled_ofile.close();
各向同性重新网格化也可以作为最终步骤执行,以生成不受2D Delaunay面形状限制的更规则的网格。
CGAL::Polygon_mesh_processing::isotropic_remeshing (faces(dtm_mesh), spacing, dtm_mesh);
std::ofstream dtm_remeshed_ofile ("dtm_remeshed.ply", std::ios_base::binary);
CGAL::set_binary_mode (dtm_remeshed_ofile);
CGAL::write_ply (dtm_remeshed_ofile, dtm_mesh);
dtm_remeshed_ofile.close();
栅格化
TIN数据结构可以与重心坐标组合,以便进行插值,从而以所需的任何分辨率将高度图栅格化,这些分辨率需要嵌入顶点中的信息。
由于在3D网格上执行了最新的两个步骤(孔填充和重新网格化),因此我们的DTM是2.5D表示的假设可能不再成立。因此,我们首先使用最后计算的各向同性DTM网格的顶点来重建TIN。
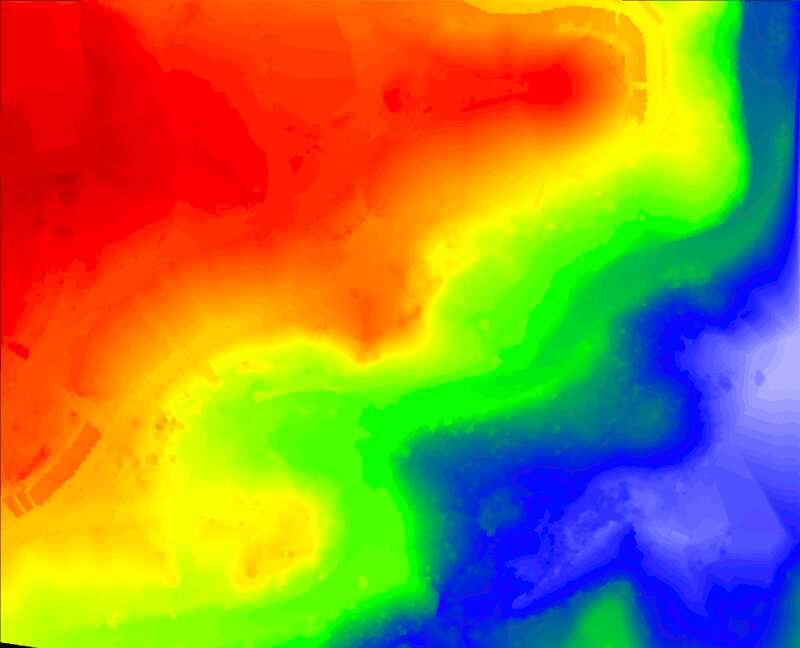
举例:以下代码段以彩虹渐变PPM文件(简单的位图格式)的形式生成高度的栅格图像:
 CGAL::Bbox_3 bbox = CGAL::bbox_3 (points.points().begin(), points.points().end());
// Generate raster image 1920-pixels large
std::size_t width = 1920;
std::size_t height = std::size_t((bbox.ymax() - bbox.ymin()) * 1920 / (bbox.xmax() - bbox.xmin()));
std::cerr << "Rastering with resolution " << width << "x" << height << std::endl;
// Use PPM format (Portable PixMap) for simplicity
std::ofstream raster_ofile ("raster.ppm", std::ios_base::binary);
// PPM header
raster_ofile << "P6" << std::endl // magic number
    << width << " " << height << std::endl // dimensions of the image
    << 255 << std::endl; // maximum color value
// Use rainbow color ramp output
Color_ramp color_ramp;
// Keeping track of location from one point to its neighbor allows
// for fast locate in DT
TIN::Face_handle location;
// Query each pixel of the image
for (std::size_t y = 0; y < height; ++ y)
    for (std::size_t x = 0; x < width; ++ x)
    {
        Point_3 query (bbox.xmin() + x * (bbox.xmax() - bbox.xmin()) / double(width),
                       bbox.ymin() + (height-y) * (bbox.ymax() - bbox.ymin()) / double(height),
                       0); // not relevant for location in 2D
        location = dtm_clean.locate (query, location);
        // Points outside the convex hull will be colored black
        std::array<unsigned char, 3> colors { 0, 0, 0 };
        if (!dtm_clean.is_infinite(location))
        {
            std::array<double, 3> barycentric_coordinates
                = CGAL::Polygon_mesh_processing::barycentric_coordinates
                (Point_2 (location->vertex(0)->point().x(), location->vertex(0)->point().y()),
                 Point_2 (location->vertex(1)->point().x(), location->vertex(1)->point().y()),
                 Point_2 (location->vertex(2)->point().x(), location->vertex(2)->point().y()),
                 Point_2 (query.x(), query.y()),
                 Kernel());
            double height_at_query
                = (barycentric_coordinates[0] * location->vertex(0)->point().z()
                   + barycentric_coordinates[1] * location->vertex(1)->point().z()
                   + barycentric_coordinates[2] * location->vertex(2)->point().z());
            // Color ramp generates a color depending on a value from 0 to 1
            double height_ratio = (height_at_query - bbox.zmin()) / (bbox.zmax() - bbox.zmin());
            colors = color_ramp.get(height_ratio);
        }
        raster_ofile.write ((char*)(&colors), 3);
    }
raster_ofile.close();
等高线
为每个面提取等值线段
第一步是从每个面中提取等值线段,根据下面两个函数,我们可以获得一个线段集。
//这个面是否存在z=isovalue的部分
bool face_has_isovalue(TIN::Face_handle fh, double isovalue)
{
  bool above = false, below = false;
  for (int i = 0; i < 3; ++ i)
  {
    // Face has isovalue if one of its vertices is above and another
    // one below
    if (fh->vertex(i)->point().z() > isovalue)
      above = true;
    if (fh->vertex(i)->point().z() < isovalue)
      below = true;
  }
  return (above && below);
}

//在这个面中,求出z=isovalue的线段
Segment_3 isocontour_in_face (TIN::Face_handle fh, double isovalue)
{
  Point_3 source;
  Point_3 target;


  bool source_found = false;
  for (int i = 0; i < 3; ++ i)
  {
    Point_3 p0 = fh->vertex((i+1) % 3)->point();
    Point_3 p1 = fh->vertex((i+2) % 3)->point();
    // Check if the isovalue crosses segment (p0,p1)
    if ((p0.z() - isovalue) * (p1.z() - isovalue) > 0)
      continue;
    double zbottom = p0.z();
    double ztop = p1.z();
    if (zbottom > ztop)
    {
      std::swap (zbottom, ztop);
      std::swap (p0, p1);
    }
    // Compute position of segment vertex
    double ratio = (isovalue - zbottom) / (ztop - zbottom);
    Point_3 p = CGAL::barycenter (p0, (1 - ratio), p1,ratio);
    if (source_found)
      target = p;
    else
    {
      source = p;
      source_found = true;
    }
  }

  return Segment_3 (source, target);
}
接下来,将线段集处理成一组折线。
我们使用boost::adjacency_list结构,并记录原先端点到图顶点的映射关系。
举例:生成50个等值线(均匀分布在最小值和最大值之间)
//////////根据z的最大值、最小值,生成50个值,作为等值线
std::array<double, 50> isovalues;
for (std::size_t i = 0; i < isovalues.size(); ++ i)
    isovalues[i] = bbox.zmin() + ((i+1) * (bbox.zmax() - bbox.zmin()) / (isovalues.size() - 2));

//////////在每个面上提取等值线段
// First find on each face if they are crossed by some isovalues and
// extract segments in a graph

//线段图
using Segment_graph = boost::adjacency_list<boost::listS, boost::vecS, boost::undirectedS, Point_3>;
Segment_graph graph;

//点-线段图顶点的索引关系
using Map_p2v = std::map<Point_3, Segment_graph::vertex_descriptor>;
Map_p2v map_p2v;

//遍历每个面
for (TIN::Face_handle vh : dtm_clean.finite_face_handles())
{
    //遍历每个值
    for (double iv : isovalues)
    {
        //vh这个面,是否存在z=iv的部分
        if (face_has_isovalue (vh, iv))
        {
            //在vh面上,求出z=iv的线段
            Segment_3 segment = isocontour_in_face (vh, iv);

            //遍历线段的两个端点
            for (const Point_3& p : { segment.source(), segment.target() })
            {
                //只需插入一次端点,就可以得到连通良好的图
                // Only insert end points of segments once to get a well connected graph
                Map_p2v::iterator iter;
                bool inserted;

                //创建一个点-图顶点的映射关系,并将这个值对插入map中
                std::tie (iter, inserted) = map_p2v.insert(
                    std::make_pair (p, Segment_graph::vertex_descriptor()) //创建一个点-图顶点的映射关系
                );

                //插入成功
                if (inserted)
                {
                    //往图中添加一个点,并将引用放在map的第二个值中
                    iter->second = boost::add_vertex(graph);
                    //图中的点 = CGAL的点
                    graph[iter->second] = p;
                }
            }

            //往图中添加边
            boost::add_edge(
                map_p2v[segment.source()], //线段顶点
                map_p2v[segment.target()], //线段终点
                graph //线段图
            );
        }
    }
}
线集转折线集
一旦创建了图,可以使用函数CGAL::split_graph_into_polylines()获得折线
//////////线段集 => 折线集
std::vector<std::vector<Point_3> > polylines; //折线
Polylines_visitor<Segment_graph> visitor (graph, polylines);
CGAL::split_graph_into_polylines (graph, visitor);
std::cerr << polylines.size() << " polylines computed, with "
    << map_p2v.size() << " vertices in total" << std::endl;
//输出成WKT文件,便于查看
std::ofstream contour_ofile ("contour.wkt");
contour_ofile.precision(18);
CGAL::write_multi_linestring_WKT (contour_ofile, polylines);
contour_ofile.close();
这个函数需要访问器,在开始折线、向折线添加点和结束折线时调用访问器。在本例中,定义这样的类很简单:
template <typename Graph>
class Polylines_visitor
{
private:
  std::vector<std::vector<Point_3> >& polylines;
  Graph& graph;
public:
  Polylines_visitor (Graph& graph, std::vector<std::vector<Point_3> >& polylines)
    : polylines (polylines), graph(graph) { }
  void start_new_polyline()
  {
    polylines.push_back (std::vector<Point_3>());
  }
  void add_node (typename Graph::vertex_descriptor vd)
  {
    polylines.back().push_back (graph[vd]);
  }
  void end_polyline()
  {
    // filter small polylines
    if (polylines.back().size() < 50)
      polylines.pop_back();
  }
};
简化
由于输出噪声很大,用户可能需要简化折线。CGAL提供了折线简化的算法,可确保两条折线在简化后不会相交。此算法利用CGAL::Constrained_triangulation_plus_2的优势,将折线嵌入为一组约束:
//线段集简化
namespace PS = CGAL::Polyline_simplification_2;
using CDT_vertex_base = PS::Vertex_base_2<Projection_traits>;
using CDT_face_base = CGAL::Constrained_triangulation_face_base_2<Projection_traits>;
using CDT_TDS = CGAL::Triangulation_data_structure_2<CDT_vertex_base, CDT_face_base>;
using CDT = CGAL::Constrained_Delaunay_triangulation_2<Projection_traits, CDT_TDS>;
using CTP = CGAL::Constrained_triangulation_plus_2<CDT>;
举例:以原始折线距离的平方简化折线集,并在到达一定条件下的时候停止简化。这些条件是:①无法移除更多顶点;②不超过平均间距的4倍
// Construct constrained Delaunay triangulation with polylines as constraints
CTP ctp;
for (const std::vector<Point_3>& poly : polylines)
    ctp.insert_constraint (poly.begin(), poly.end());
// Simplification algorithm with limit on distance
PS::simplify (ctp, PS::Squared_distance_cost(), PS::Stop_above_cost_threshold (16 * spacing * spacing));
polylines.clear();
for (CTP::Constraint_id cid : ctp.constraints())
{
    polylines.push_back (std::vector<Point_3>());
    polylines.back().reserve (ctp.vertices_in_constraint (cid).size());
    for (CTP::Vertex_handle vh : ctp.vertices_in_constraint(cid))
        polylines.back().push_back (vh->point());
}
std::size_t nb_vertices
    = std::accumulate (polylines.begin(), polylines.end(), 0u,
                       [](std::size_t size, const std::vector<Point_3>& poly) -> std::size_t
                       { return size + poly.size(); });
std::cerr << nb_vertices
            << " vertices remaining after simplification ("
    << 100. * (nb_vertices / double(map_p2v.size())) << "%)" << std::endl;
// Output to WKT file
std::ofstream simplified_ofile ("simplified.wkt");
simplified_ofile.precision(18);
CGAL::write_multi_linestring_WKT (simplified_ofile, polylines);
simplified_ofile.close();
最终效果:Contouring using 50 isovalues evenly spaced. Top: original contouring using 148k vertices and simplification with a tolerance equal to the average spacing of the input point cloud (3.4% of the original polyline vertices remaining). Bottom: simplification with tolerance 4 times the average spacing (1.3% of vertices remaining) and with tolerance 10 times the average spacing (0.9% of vertices remaining). Polylines are intersection-free in all cases.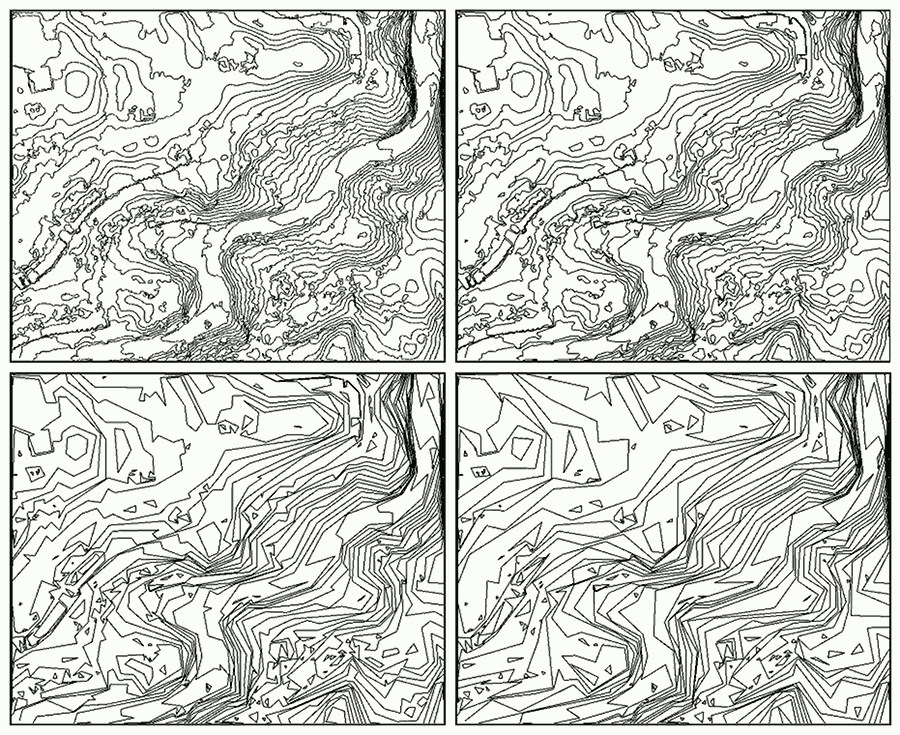
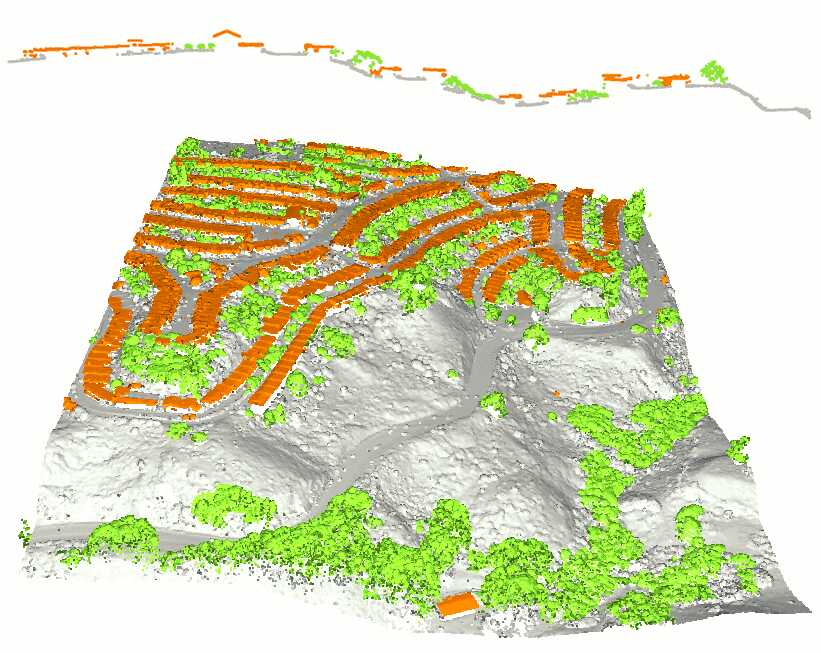
分类
CGAL提供了一个包分类,可用于将点云细分为用户定义的标签集。CGAL中当前可用的最新分类器是ETHZ的随机森林。由于它是监督分类器,因此需要训练集。
// Get training from input
  Point_set::Property_map<int> training_map;
  bool training_found;
  std::tie (training_map, training_found) = points.property_map<int>("training");
  if (training_found)
  {
    std::cerr << "Classifying ground/vegetation/building" << std::endl;
    // Create labels
    Classification::Label_set labels ({ "ground", "vegetation", "building" });
    // Generate features
    Classification::Feature_set features;
    Classification::Point_set_feature_generator<Kernel, Point_set, Point_set::Point_map>
      generator (points, points.point_map(), 5); // 5 scales
#ifdef CGAL_LINKED_WITH_TBB
    // If TBB is used, features can be computed in parallel
    features.begin_parallel_additions();
    generator.generate_point_based_features (features);
    features.end_parallel_additions();
#else
    generator.generate_point_based_features (features);
#endif
    // Train a random forest classifier
    Classification::ETHZ::Random_forest_classifier classifier (labels, features);
    classifier.train (points.range(training_map));
    // Classify with graphcut regularization
    Point_set::Property_map<int> label_map = points.add_property_map<int>("labels").first;
    Classification::classify_with_graphcut<Concurrency_tag>
      (points, points.point_map(), labels, classifier,
       generator.neighborhood().k_neighbor_query(12), // regularize on 12-neighbors graph
       0.5f, // graphcut weight
       12, // Subdivide to speed-up process
       label_map);
    // Evaluate
    std::cerr << "Mean IoU on training data = "
              << Classification::Evaluation(labels,
                                            points.range(training_map),
                                            points.range(label_map)).mean_intersection_over_union() << std::endl;
    // Save the classified point set
    std::ofstream classified_ofile ("classified.ply");
    CGAL::set_binary_mode (classified_ofile);
    classified_ofile << points;
    classified_ofile.close();
  }
完整代码
提供本文档中的所有代码,以创建完整的GIS管道。

若有收获,就点个赞吧
0 人点赞
