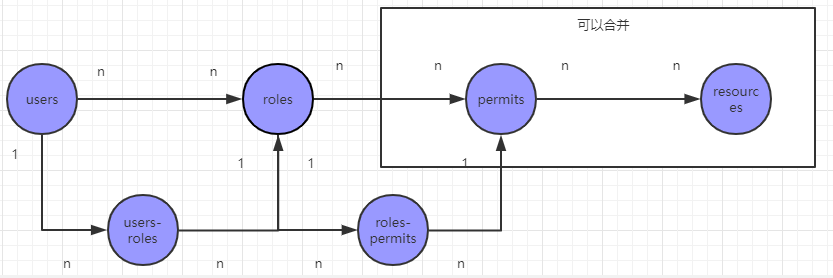
认证授权

过滤器链
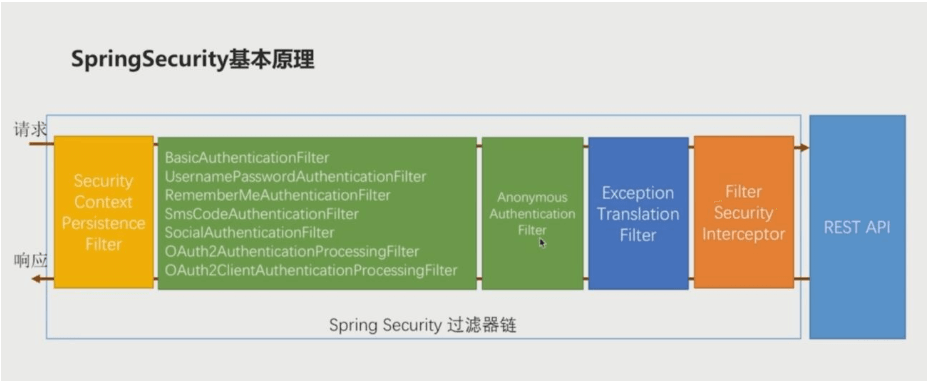
- 贯穿于整个过滤器链始终有一个上下问对象 SecurityContext 和一个 Authentication 对象(登录认证的主体)
- 一旦某一个该主体通过其中某一个过滤器的认证,Authentication 对象信息被填充,比如:Authentication #isAuthenticated=true 表示该主体通过验证。
- 如果该主体通过了所有的过滤器,仍然没有被认证,在整个过滤器链的最后方有一个FilterSecurityInterceptor过滤器(虽然叫Interceptor,但它是名副其实的过滤器,不是拦截器)。判断Authentication对象的认证状态,如果没有通过认证则抛出异常,通过认证则访问后端API。
- 之后进入响应阶段,FilterSecurityInterceptor 抛出的异常被 ExceptionTransactionFilter 对异常进行相应的处理。比如:用户名密码登录异常,会被引导到登录页重新登陆。
- 如果是登陆成功,且没有任何异常,在 SecurityContextPersistenceFilter 中将 SecurityContext 放入session。下次再进行请求的时候,直接从 SecurityContextPersistenceFilter的session 中取出认证信息。从而避免多次重复认证。
登录过程
通过各种
Filters拦截构建认证登录主体,返回一个Authentication实体 ```java public interface Authentication extends Principal, Serializable { Collection<? extends GrantedAuthority> getAuthorities();Object getCredentials();
Object getDetails();
Object getPrincipal();
// 返回 true 时,该 认证实体 认证通过 boolean isAuthenticated();
void setAuthenticated(boolean isAuthenticated) throws IllegalArgumentException; }
2. 使用 `AuthenticationManager `接口对登录认证主体进行 `#authenticate` 认证。```javapublic interface AuthenticationManager {Authentication authenticate(Authentication authentication) throwsAuthenticationException;}
a. 实现类有 ProviderManager,是登录认证的核心类
public class ProviderManager implements AuthenticationManager, MessageSourceAware, InitializingBean {private List<AuthenticationProvider> providers;// other}
b. 里面有 AuthenticationProvider 列表,提供多种登录认证方式,只要有一个通过,那么这个 Authentication 实体就会认可,会填充对应的信息。 比如 Authentication#isAuthenticated() 就会返回 true
public interface AuthenticationProvider {Authentication authenticate(Authentication var1) throws AuthenticationException;boolean supports(Class<?> var1);}
- 将认证完成的
Authtication对象( authenticate: true, 有授权列表 authority list, 和 username 信息)放入SecurityContext上下文里面。后续的请求就直接从SecurityContextFilter中获得认证主体
登录验证后的处理
AuthenticationSuccessHandler
使用
SecurityConfig.java
@Configurationpublic class SecurityConfig extends WebSecurityConfigurerAdapter {@Overrideprotected void configure(HttpSecurity http) throws Exception {// <1.1> 开启 httpBasic 认证/*将键入的 <user>:<password> 经过 Base64 加密通过 header 头 Authorization 将 "Basic <加密字段>" 进行传递注意:security:basic:# security 5.x 后,默认不是 HttpBasic 了,虚招自己配置中指定enabled: truehttp.httpBasic().and().authorizeRequests() // 对请求开始授权处理.anyRequest() // 要求 对于任何请求.authenticated(); // 要求 需要认证*/// <1.2> 开启 formLogin(security 5.X 默认模式)http.csrf().disable() // 禁用 csrf 防御.formLogin() // formLogin, 要求 <Strong>post</Strong> 提交.loginPage("/login.html") // 未登录时,跳转登录页面.loginProcessingUrl("/auth/login") // 登录表单跳转的处理认证接口, security 会拦截该接口访问,不用自行实现.usernameParameter("username") // 登录表单用户名的 name 值,默认就是 username.passwordParameter("password") // 登录表单用户密码的 name 值,默认就是 password.defaultSuccessUrl("/index.html") // 登录成功跳转.failureForwardUrl("/login.html").and().authorizeRequests() // 对请求开始授权处理.antMatchers("/login.html", "/auth/login").permitAll() // 登录相关接口放开权限// 设置对应权限可访问的接口.antMatchers("/biz1.html", "/biz2.html").hasAnyAuthority("ROLE_user", "ROLE_admin").antMatchers("/syslog.html", "/sysuser.html").hasAnyAuthority("ROLE_admin") // 等效于下面// .hasAnyRole("admin") // 设置对应角色可以访问的接口 由于角色是一种特殊的权限 等效于上面// .antMatchers("/test").hasAnyAuthority("sys:log", "sys:user") // sys:log 自定义权限id.anyRequest() // 除开上面设置的,其余一切请求.authenticated(); // 都需要登录}/*** 配置 角色和 权限** @param auth* @throws Exception*/@Overrideprotected void configure(AuthenticationManagerBuilder auth) throws Exception {auth.inMemoryAuthentication().withUser("admin").password(passwordEncoder().encode("admin"))// .authorities("sys:log", "sys:user) // 自定义权限id.roles("admin").and().withUser("user").password(passwordEncoder().encode("user")).roles("user").and().passwordEncoder(passwordEncoder()); // 配置加密器,上面是用加密器直接加密了密码,这里配置后可以用于解密}@Beanpublic PasswordEncoder passwordEncoder() {return new BCryptPasswordEncoder();}/*** 放开静态资源** @param web*/@Overridepublic void configure(WebSecurity web) {//将项目中静态资源路径开放出来web.ignoring().antMatchers("/css/**", "/fonts/**", "/img/**", "/js/**");}}
自定义 成功/失败 处理逻辑
- 当登录成功的时候,是由 AuthenticationSuccessHandler 进行登录结果处理,默认跳转到 defaultSuccessUrl 配置的路径对应的资源页面(一般是首页 index.html)。
当登录失败的时候,是由 AuthenticationfailureHandler 进行登录结果处理,默认跳转到 failureUrl 配置的路径对应的资源页面(一般是登录页 login.html)。
自定义成功跳转
可以实现 AuthenticationSuccessHandler 接口的子类
SavedRequestAwareAuthenticationSuccessHandler类,这个类会记住用户上一次请求的资源路径。
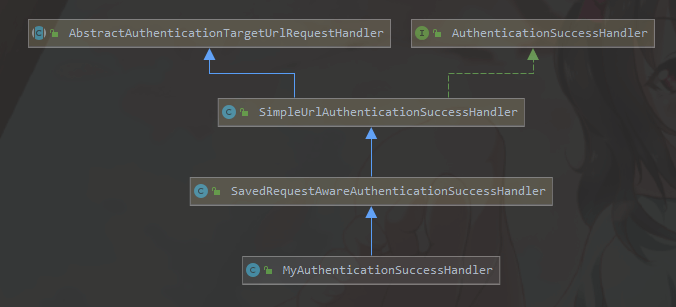
@Componentpublic class MyAuthenticationSuccessHandler extends SavedRequestAwareAuthenticationSuccessHandler {private String loginType = "JSON";private static final ObjectMapper mapper = new ObjectMapper();@Overridepublic void onAuthenticationSuccess(HttpServletRequest request, HttpServletResponse response, Authentication authentication) throws ServletException, IOException {if ("JSON".equalsIgnoreCase(loginType)) {response.setContentType("application/json;charset=UTF-8");response.getWriter().write(mapper.writeValueAsString(ResResult.success("success")));} else {// 非 json 会跳转默认登录页super.onAuthenticationSuccess(request, response, authentication);}}}
自定义失败跳转
继承
SimpleUrlAuthenticationFailureHandler类。该类中默认实现了登录验证失败的跳转逻辑,即登陆失败之后回到登录页面。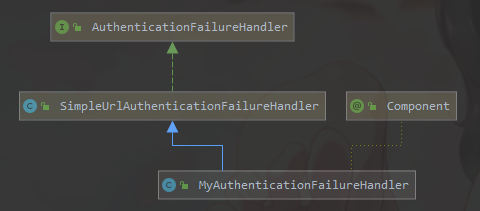
@Componentpublic class MyAuthenticationFailureHandler extends SimpleUrlAuthenticationFailureHandler {private String loginType = "JSON";private static final ObjectMapper mapper = new ObjectMapper();@Overridepublic void onAuthenticationFailure(HttpServletRequest request, HttpServletResponse response, AuthenticationException exception) throws IOException, ServletException {if ("JSON".equalsIgnoreCase(loginType)) {response.setContentType("application/json;charset=UTF-8");response.getWriter().write(mapper.writeValueAsString(ResResult.fail("账号或者密码错误")));} else {response.setContentType("text/html;charset=UTF-8");super.onAuthenticationFailure(request, response, exception);}}}
配置到 SecurityConfig
@Configurationpublic class SecurityConfig extends WebSecurityConfigurerAdapter {// 注入自定义跳转 Handler@Autowiredprivate MyAuthenticationSuccessHandler successHandler;@Autowiredprivate MyAuthenticationFailureHandler failureHandler;@Overrideprotected void configure(HttpSecurity http) throws Exception {http.csrf().disable().formLogin().loginPage("/login.html").loginProcessingUrl("/auth/login").usernameParameter("username").passwordParameter("password").successHandler(successHandler).failureHandler(failureHandler)// 自定义 handler 和默认 handler 二选一// .defaultSuccessUrl("/index.html") // 登录成功跳转// .failureForwardUrl("/login.html")// other}
session 和 cookie

Session
session 创建策略
@Configurationpublic class SecurityConfig extends WebSecurityConfigurerAdapter {@Overrideprotected void configure(HttpSecurity http) throws Exception {// other config// session 创建策略/*该配置只能控制Spring Security如何创建与使用session,而不是控制整个应用程序。即使不指定,应用程序本身可能会创建session, 而一般spring应用的session管理交由Spring Session进行导致 spring security 还是用到了session*/http.sessionManagement().sessionCreationPolicy(SessionCreationPolicy.IF_REQUIRED);}// other}
session 会话超时配置
- 两种配置
Springboot 配置
server:servlet:session:# 默认 30mtimeout: 15mspring:session:# 最少 1timeout: 15m
Spring Session
- 优先级更高
session.setTime();
- 优先级更高
session 超时处理
- 可以设置超时跳转页面
注意该跳转页面需要
permitAll()进行配置@Configurationpublic class SecurityConfig extends WebSecurityConfigurerAdapter {@Overrideprotected void configure(HttpSecurity http) throws Exception {// other config// 非法超时session跳转页面,需要 permitAll() 进行配置http.sessionManagement().invalidSessionUrl("/invalidSession.html");}// other}
会话固化存储设置
@Configurationpublic class SecurityConfig extends WebSecurityConfigurerAdapter {@Overrideprotected void configure(HttpSecurity http) throws Exception {// other config// <默认> 旧会话失效,新会话赋值旧会话的属性http.sessionManagement().sessionFixation().migrateSession();// 原始会话不会无效http.sessionManagement().sessionFixation().none();// 将创建一个干净的会话,而不会复制旧会话中的任何属性http.sessionManagement().sessionFixation().newSession();}// other}
限制登录数和下线处理
public class SecurityConfig extends WebSecurityConfigurerAdapter {@Overrideprotected void configure(HttpSecurity http) throws Exception {// other config// session 限制登录数量http.sessionManagement().maximumSessions(1) // 同一用户最大登录数.maxSessionsPreventsLogin(false) // session 保护策略 true: 已登录无法再登录 false: 可以多次登录,但是之前登录会下线.expiredSessionStrategy(new CustomExpiredSessionStrategy()); // 自定义 session 下线(超时) 处理策略}// other}
/*** 自定义session被下线(超时)之后的处理策略。*/public class CustomExpiredSessionStrategy implements SessionInformationExpiredStrategy {private ObjectMapper objectMapper = new ObjectMapper();@Overridepublic void onExpiredSessionDetected(SessionInformationExpiredEvent event) throws IOException {// Map -> JsonString json = objectMapper.writeValueAsString(ResResult.fail("您的登录已经超时或者已经在另一台机器登录,您被迫下线。"+ event.getSessionInformation().getLastRequest()));//输出JSON信息的数据event.getResponse().setContentType("application/json;charset=UTF-8");event.getResponse().getWriter().write(json);// 或者是跳转html页面,url代表跳转的地址// redirectStrategy.sendRedirect(event.getRequest(), event.getResponse(), "url");}}
Cookie
server:servlet:session:cookie:# true 表示浏览器脚本无法访问 cookiehttp-only: true# true 表示只有 https 连接才能携带 cookie, 测试记得关掉secure: true
自定义加载用户数据
Spring Security 通过
UserDetailsService#loadUserByUserName()加载UserDetails的getterpublic interface UserDetails extends Serializable {//获取用户的权限集合Collection<? extends GrantedAuthority> getAuthorities();//获取密码String getPassword();//获取用户名String getUsername();//账号是否没过期boolean isAccountNonExpired();//账号是否没被锁定boolean isAccountNonLocked();//密码是否没过期boolean isCredentialsNonExpired();//账户是否可用boolean isEnabled();}
// Getter 通过实现 UserDetails 来重写@Setter@ToStringpublic class MyUserDetails implements UserDetails {private String password; //密码private String username; //用户名private Boolean accountNonExpired; //是否没过期private Boolean accountNonLocked; //是否没被锁定private Boolean credentialsNonExpired; //是否没过期private Boolean enabled; //账号是否可用private Collection<? extends GrantedAuthority> authorities; //用户的权限集合@Overridepublic Collection<? extends GrantedAuthority> getAuthorities() {return authorities;}@Overridepublic String getPassword() {return password;}@Overridepublic String getUsername() {return username;}// 下面默认都是 true@Overridepublic boolean isAccountNonExpired() {return accountNonExpired == null;}@Overridepublic boolean isAccountNonLocked() {return accountNonLocked == null;}@Overridepublic boolean isCredentialsNonExpired() {return credentialsNonExpired == null;}@Overridepublic boolean isEnabled() {return enabled == null;}}
- 有不需要的逻辑灵活处理
实现
UserDetailsService,重写loadUserByUsername(),填充UserDetails实现类- 填充权限、角色
其中角色需要加上
ROLE_前缀,因为角色是一种特殊的权限,在Spring Security 我们可以使用hasRole(角色标识)表达式判断用户是否具有某个角色,决定他是否可以做某个操作;通过hasAuthority(权限标识)表达式判断是否具有某个操作权限。) ```java @Component public class MyUserDetailsService implements UserDetailsService { private static final Logger log = LoggerFactory.getLogger(MyUserDetailsService.class);@Autowired private RBACMapper rbacMapper;
@Override public UserDetails loadUserByUsername(String username) throws UsernameNotFoundException { // 1. 查询到用户的信息 UserDO userDO = rbacMapper.getUserInfoByUserName(username);
if (Objects.isNull(userDO)) {
throw new UsernameNotFoundException("没有该用户");
}
MyUserDetails myUserDetails = new MyUserDetails();
BeanUtils.copyProperties(userDO, myUserDetails); log.info(“init myUserDetails {}”, myUserDetails);
// 2. 查询角色信息 List
roles = rbacMapper.getUserRolesByUserName(username); // 3. 查询权限信息 List
authorities = rbacMapper.getUserPermitByUserName(username); // 3.1 由于 Spring Security 将角色当作权限,需要补充 ROLE_ 前缀 roles = roles.stream()
.map(role->"ROLE_" + role).collect(Collectors.toList());
// 3.2 并且作为权限填充进权限列表中 authorities.addAll(roles);
log.info(“final myUserDetails {}”, myUserDetails);
// 4. 利用 Security 提供的工具类修改下权限列表类型 // 注意参数需要工具类需要逗号切分,所以要补充逗号, myUserDetails.setAuthorities(
AuthorityUtils.commaSeparatedStringToAuthorityList(String.join(",", authorities))
); return myUserDetails; } }
<a name="zEw7g"></a>### 注册```java@Configurationpublic class SecurityConfig extends WebSecurityConfigurerAdapter {@Autowiredprivate MyUserDetailsService myUserDetailsService;@Overrideprotected void configure(AuthenticationManagerBuilder builder) throws Exception {// 可以配置多个 DetailsServicebuilder.userDetailsService(myUserDetailsService).passwordEncoder(passwordEncoder());}@Bean("passwordEncoder")public PasswordEncoder passwordEncoder(){return new BCryptPasswordEncoder();}// other}
实现登录
- 之前配置了
.loginProcessingUrl("/auth/login")即需要把所需的字段发送到这个地址即可- 所需字段是
username和password(根据UsernamePasswordAuthenticationFilter的要求)
- 所需字段是
- 然后配置登录成功的跳转页面 或者 handler 即可
- 登录成功就会执行对应的逻辑
- 即将登录的过程交给 Spring Security
自定义权限检查
- 用
access(权限表达式函数)
| 权限表达式函数 | 描述 |
|---|---|
hasRole([role]) |
用户拥有指定的角色时返回true (Spring security默认会带有ROLE_前缀),去除前缀参考 |
hasAnyRole([role1,role2]) |
用户拥有任意一个指定的角色时返回true |
hasAuthority([authority]) |
拥有某资源的访问权限时返回true |
hasAnyAuthority([auth1,auth2]) |
拥有某些资源其中部分资源的访问权限时返回true |
permitAll |
返回true |
denyAll |
返回false |
anonymous |
当前用户是anonymous时返回true |
rememberMe |
当前用户是rememberMe用户返回true |
authentication |
当前登录用户的authentication对象 |
fullAuthenticated |
当前用户既不是anonymous也不是rememberMe用户时返回true |
hasIpAddress('192.168.1.0/24') |
请求发送的IP匹配时返回true |
使用自带的权限表达式
.antMatchers("/biz1.html", "/biz2.html").access("hasAnyAuthority('ROLE_user', 'ROLE_admin')")// 等效于这句// .hasAnyAuthority("ROLE_user", "ROLE_admin")
- 并且可以使用 and 等逻辑符号,灵活性更高
.access("hasAnyAuthority('ROLE_user') or hasAnyAuthority('ROLE_admin')")
使用自定义 bean 逻辑
创建一个 bean
@Component("checkPermit")public class CheckPermit {private AntPathMatcher antPathMatcher = new AntPathMatcher();/*** 判断用户是否具有该request资源的访问权限* 即假设 UserDetails 的 authority 属性存储的是 url*/public boolean hasPermission(HttpServletRequest request, Authentication authentication) {Object principal = authentication.getPrincipal();if (principal instanceof UserDetails) {UserDetails userDetails = (UserDetails) principal;// 这里是直接判断网页 uri 是否为当前用户的持有的权限列表的一部分List<GrantedAuthority> authorityList = AuthorityUtils.commaSeparatedStringToAuthorityList(request.getRequestURI());return userDetails.getAuthorities().contains(authorityList.get(0));}return false;}}
加载该 bean 的逻辑
.antMatchers("/demo.html")// 配置校验器// 参数必须是 request 和 authentication, 源码要求.access("@checkPermit.hasPermission(request, authentication)")
传入额外参数
如果需要传入除了 request、authentication 之外的参数
- 比如在 antPattern 中定义
/user/{userId}带有PathVariable的参数,需要在对应的权限表达式中用#{}包裹.antMatchers("/user/{userId}")// 配置校验器// 参数必须是 request 和 authentication, 源码要求.access("@checkPermit.hasPermission2(request, authentication, #{userId})")
方法级别权限检查
- 需要开启方法界别权限检查功能
@Configuration@EnableGlobalMethodSecurity(prePostEnabled = true)public class SecurityConfig extends WebSecurityConfigurerAdapter {// other}
@PreAuthorize()进入方法前进行权限检查/*** Annotation for specifying a method access-control expression which will be evaluated to* decide whether a method invocation is allowed or not.** @author Luke Taylor* @since 3.0*/@Target({ ElementType.METHOD, ElementType.TYPE })@Retention(RetentionPolicy.RUNTIME)@Inherited@Documentedpublic @interface PreAuthorize {/*** @return the Spring-EL expression to be evaluated before invoking the protected* method*/String value();}
@PreFilter()进入方法前进行参数过滤@Target({ ElementType.METHOD, ElementType.TYPE })@Retention(RetentionPolicy.RUNTIME)@Inherited@Documentedpublic @interface PreFilter {/*** @return the Spring-EL expression to be evaluated before invoking the protected* method*/String value();/*** @return the name of the parameter which should be filtered (must be a non-null* collection instance) If the method contains a single collection argument, then this* attribute can be omitted.*/String filterTarget() default "";}
@PostAuthorize()在方法执行后再进行权限验证,适合根据返回值结果进行权限验证。/*** Annotation for specifying a method access-control expression which will be evaluated* after a method has been invoked.** @author Luke Taylor* @since 3.0*/@Target({ ElementType.METHOD, ElementType.TYPE })@Retention(RetentionPolicy.RUNTIME)@Inherited@Documentedpublic @interface PostAuthorize {/*** @return the Spring-EL expression to be evaluated after invoking the protected* method*/String value();}
@PostFilter()针对返回结果进行过滤,特别适用于集合类返回值,过滤集合中不符合表达式的对象。 ```java @Target({ ElementType.METHOD, ElementType.TYPE }) @Retention(RetentionPolicy.RUNTIME) @Inherited @Documented public @interface PostFilter { /**- @return the Spring-EL expression to be evaluated after invoking the protected
- method */ String value(); }
<a name="mvfqC"></a>## 记住我<a name="OcMYs"></a>### 快速使用- 前端```html<label for=""><input type="checkbox" name="remember-me">记住密码</label>
后端
http.rememberMe().rememberMeParameter("remember-me") // 设置前端 checkbox 的 name,默认要求 remember-me.rememberMeCookieName("remember-me-name") // 成功返回 cookie,默认名为 remember-me.tokenValiditySeconds(60*20); // 记住我过期时间,默认 2周
实现原理
当我们登陆的时候,除了用户名、密码,我们还可以勾选remember-me。
- 如果我们勾选了remember-me,当我们登录成功之后服务端会生成一个Cookie返回给浏览器,这个Cookie的名字默认是remember-me;值是一个token令牌。
当我们在有效期内再次访问应用时,经过RememberMeAuthenticationFilter,读取Cookie中的token进行验证。验正通过不需要再次登录就可以进行应用访问。
代码原理
RememberMeAuthenticationFilter 在 Spring Security过滤器链中处于整体偏后的位置
token 生成
public class TokenBasedRememberMeServices extends AbstractRememberMeServices {// other// token 生成protected String makeTokenSignature(long tokenExpiryTime, String username, String password) {String data = username + ":" + tokenExpiryTime + ":" + password + ":" + this.getKey();MessageDigest digest;try {digest = MessageDigest.getInstance("MD5");} catch (NoSuchAlgorithmException var8) {throw new IllegalStateException("No MD5 algorithm available!");}return new String(Hex.encode(digest.digest(data.getBytes())));}
token 固化
- todo
- 参考
退出登录
快速使用
前端
<button><a href="/logout">退出</a></button>
后端
http.logout();
默认流程
- 当前 session 失效,核心功能,将访问权限的回收。
- 删除当前用户的 remember-me 功能信息
- 清除当前的 SecurityContext
- 重定向到登录页面(
loginPage配置项指定的页面)
自定义登出配置
- 简单版本 ```java http.logout() .logoutUrl(“/byte”) // 显式配置前端登出要跳转的地址,默认就是 /logout // .logoutSuccessUrl(“/logoutSuccess.html”) // 显式配置登出成功后,要跳转的地址, 默认跳转登录页 .deleteCookies(“JSESSIONID”); // 配置登录成功后,要删除的 cookies
- 配置登出 handler- 注意优先级```javahttp.logout().logoutUrl("/byte") // 显式配置前端登出要跳转的地址,默认就是 /logout// .logoutSuccessUrl("/logoutSuccess.html") // 显式配置登出成功后,要跳转的地址, 默认跳转登录页.deleteCookies("JSESSIONID") // 配置登录成功后,要删除的 cookies.logoutSuccessHandler(new MyLogoutSuccessHandler()); // 配置登出 handler,<strong>优先级效于 logoutSuccessUrl() </strong>
public class MyLogoutSuccessHandler implements LogoutSuccessHandler {@Overridepublic void onLogoutSuccess(HttpServletRequest httpServletRequest, HttpServletResponse httpServletResponse, Authentication authentication) throws IOException, ServletException {// do something// 可以配置跳转页面或者返回 jsonhttpServletResponse.sendRedirect("/logoutSuccess.html");}}
验证逻辑
短信验证码
SmsValidateFilter
- 通过继承
OncePerRequestFilter实现一个Spring环境下的过滤器。- 其核心校验规则如下:
- 用户登录时手机号不能为空
- 用户登录时短信验证码不能为空
- 用户登陆时在 session/缓存中 中必须存在对应的校验谜底(获取验证码时存放的)
- 用户登录时输入的短信验证码必须和 谜底 中的验证码一致
- 用户登录时输入的手机号必须和 谜底中保存的手机号一致
- 另外的要求
- 用户登录时输入的手机号必须是系统注册用户的手机号,并且唯一
- 也可以登录就注册
- 为获取验证码接口
permitAll()或者其他权限校验规则
SmsCodeAuthenticationFilter
- 由于默认的 UsernamePasswordAuthenticationFilter 是校验 username 和 password 两个字段
- 需要自定义一个 AuthenticationFilter, 可以仿照
UsernamePasswordAuthenticationFilter, 重写它的attemptAuthentication()方法
- 需要自定义一个 AuthenticationFilter, 可以仿照
- 由于 AuthenticationFilter 将登录信息封装为一个 token, 通过 Authenticationmanager 来利用多个 XXXAuthenticationProvider 去调用 XXXUserService 来获取用户信息,来验证该 token
- 需要自定义一个 AuthenticationToken 来传递登录信息,可以实现
AbstractAuthenticationToken,仿照UsernamePasswordAuthenticationToken来写 - 需要自定义一个 AuthenticationFilter,可以仿照
DaoAuthenticationProvider,实现AuthenticationProvider来写 - 需要自定义一个 AuthenticationUserService 和一个 UserDetails 来获取用户信息
- 需要自定义一个 AuthenticationToken 来传递登录信息,可以实现
- TODO
前后端分离
jwt
安全性
- 避免网络劫持,一般用 HTTP 的 header 传递 JWT,所以使用 HTTPS 传输更加安全。在网络层面避免了JWT的泄露。
- secret 是存放在服务器端的,所以只要应用服务器不被攻破,理论上JWT是安全的。因此要保证服务器的安全。
- 定期更换 secret 并且保证 secret 的复杂度,避免被暴力破解

若有收获,就点个赞吧
0 人点赞
