一、中间件
一、中间件的概念
ASP.NET Core的处理流程是一个管道,中间件是组装到应用程序管道中用来处理请求和响应的组件。 每个中间件可以:- 选择是否将请求传递给管道中的下一个组件。
- 可以在调用管道中的下一个组件之前和之后执行业务逻辑。
1. Run
新建一个WebAPI项目,修改StartUp中的Configure方法如下,用Run方法注册的中间件可以叫做终端中间件,即该中间件执行完成后不再执行后续的中间件。
public void Configure(IApplicationBuilder app, IHostingEnvironment env){//第一个中间件app.Run(async (context) =>{context.Response.ContentType = "text/plain;charset=utf-8";//防止中文乱码await context.Response.WriteAsync("第一个中间件输出你好~");});//第二个中间件app.Run(async (context) =>{await context.Response.WriteAsync("第二个中间件输出你好~");});}
2. Use
Use方法的参数是一个委托实例,委托的第一个参数是HttpContext,这是待处理的请求上下文;第二个参数next是下一个中间件,我们可以通过next.Invoke()调用下一个中间件,并且可以在调用下一个中间件之前/之后对HttpContext做一个逻辑处理。运行程序如下所示。注意如果我们没有调用next.Invoke()方法,会造成管道短路,后续的所有中间件都不再执行。
public void Configure(IApplicationBuilder app, IHostingEnvironment env){//第一个中间件app.Use(async (context, next) =>{context.Response.ContentType = "text/plain;charset=utf-8";//防止中文乱码await context.Response.WriteAsync($"第一个中间件输出你好~{Environment.NewLine}");await context.Response.WriteAsync($"下一个中间件执行前执行===>{Environment.NewLine}");await next.Invoke();await context.Response.WriteAsync($"下一个中间件执行后执行<==={Environment.NewLine}");});//第二个中间件app.Use(async (context,next) =>{await context.Response.WriteAsync($"第二个中间件输出你好~{Environment.NewLine}");});}
3. Map
在业务简单的情况下,使用一个请求处理管道来处理所有的请求就可以了,当业务复杂的时候, 我们可能考虑把不同业务的请求交给不同的管道中处理。 Map** 基于给定请求路径的匹配项来创建请求管道分支。 如果请求路径以给定路径开头,则执行分支**。看一个栗子,需求是/userinfo开头的请求使用用户分支管道来处理,/product开头的请求使用产品分支管道处理,代码如下:运行程序执行结果如下:
public class Startup{public Startup(IConfiguration configuration){Configuration = configuration;}public IConfiguration Configuration { get; }// 依赖注入public void ConfigureServices(IServiceCollection services){services.AddMvc().SetCompatibilityVersion(CompatibilityVersion.Version_2_2);}/// <summary>/// 配置用户分支管道,处理以url以/userinfo开头的请求/// </summary>/// <param name="app"></param>private static void UserinfoConfigure(IApplicationBuilder app){app.Use(async (context, next) =>{await context.Response.WriteAsync($"处理用户业务,{Environment.NewLine}");await next.Invoke();});app.Run(async (context) => { await context.Response.WriteAsync("用户业务处理完成~"); });}/// <summary>/// 配置产品分支管道,处理以url以/product开头的请求/// </summary>/// <param name="app"></param>private static void ProductConfigure(IApplicationBuilder app){app.Use(async (context, next) =>{await context.Response.WriteAsync($"处理产品业务");await next.Invoke();});}// 配置请求处理管道public void Configure(IApplicationBuilder app, IHostingEnvironment env){//防止中文乱码app.Use(async (context,next) =>{context.Response.ContentType = "text/plain;charset=utf-8";await next.Invoke();});app.Map("/userinfo", UserinfoConfigure);app.Map("/product", ProductConfigure);app.Run(async context =>{await context.Response.WriteAsync("主管道处理其他业务");});}}
4. MapWhen
MapWhen和Map的思想比较相似,MapWhen基于自定义条件来创建请求管道分支,并将请求映射到管道的新分支。看一个栗子就明白了,下边栗子的需求是查询参数包含name的请求交给一个分支管道处理,url包含/userinfo的请求交给用户分支来处理,代码如下:程序执行结果如下:
public class Startup{public Startup(IConfiguration configuration){Configuration = configuration;}public IConfiguration Configuration { get; }// 依赖注入public void ConfigureServices(IServiceCollection services){services.AddMvc().SetCompatibilityVersion(CompatibilityVersion.Version_2_2);}/// <summary>/// 配置分支管道,处理以url中有包含/userinfo的请求/// </summary>/// <param name="app"></param>private static void UserinfoConfigure(IApplicationBuilder app){app.Use(async (context, next) =>{await context.Response.WriteAsync($"处理用户业务,{Environment.NewLine}");await next.Invoke();});app.Run(async (context) => { await context.Response.WriteAsync("用户业务处理完成~"); });}/// <summary>/// 配置分支管道,处理以查询参数有name的请求/// </summary>/// <param name="app"></param>private static void HNameConfigure(IApplicationBuilder app){app.Use(async (context, next) =>{await context.Response.WriteAsync($"查询参数包含name,值为:{context.Request.Query["name"]}");await next.Invoke();});}// 配置请求处理管道public void Configure(IApplicationBuilder app, IHostingEnvironment env){//防止中文乱码app.Use(async (context,next) =>{context.Response.ContentType = "text/plain;charset=utf-8";await next.Invoke();});app.MapWhen(context => context.Request.Query.ContainsKey("name"), HNameConfigure);app.MapWhen(context => context.Request.Path.Value.ToString().Contains("/userinfo"), UserinfoConfigure);app.Run(async context =>{await context.Response.WriteAsync("主管道处理其他业务");});}}
二、中间件(Middleware)的作用
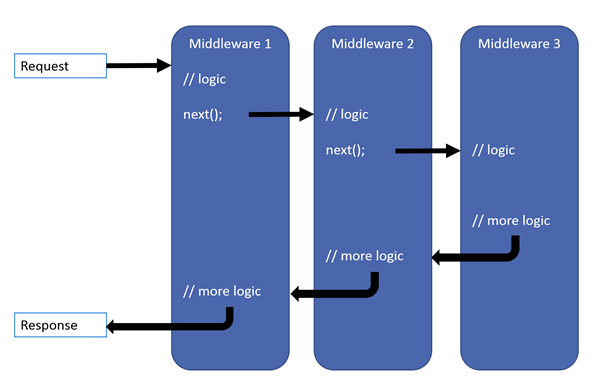
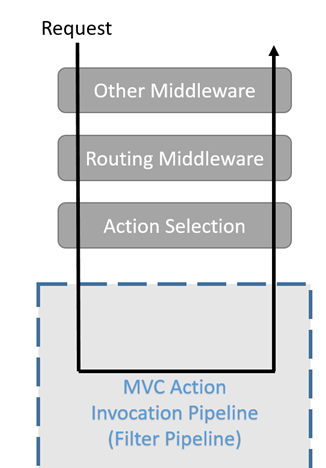
我们知道,任何的一个web框架都是把http请求封装成一个管道,每一次的请求都是经过管道的一系列操作,最终到达我们写的代码中。那么中间件就是在应用程序管道中的一个组件,用来拦截请求过程进行一些其他处理和响应。中间件可以有很多个,每一个中间件都可以对管道中的请求进行拦截,它可以决定是否将请求转移给下一个中间件。 asp.net core 提供了IApplicationBuilder接口来让把中间件注册到asp.net的管道请求当中去,中间件是一个典型的AOP应用。 下面是一个微软官方的一个中间件管道请求图:
可以看到,每一个中间件都都可以在请求之前和之后进行操作。请求处理完成之后传递给下一个请求。
三、中间件的运行方式
默认情况下,中间件的执行顺序根据Startup.cs文件中,在public void Configure(IApplicationBuilder app){} 方法中注册的先后顺序执行。大概有3种方式可以在管道中注册”中间件”
- app.Use(),IApplicationBuilder接口原生提供,注册等都用它。
- app.Run(),是一个扩展方法,它需要一个RequestDelegate委托,里面包含了Http的上下文信息,没有next参数,因为它总是在管道最后一步执行。
- app.Map(),也是一个扩展方法,类似于MVC的路由,用途一般是一些特殊请求路径的处理。如:www.example.com/token等。
四、什么情况我们需要中间件
那么,何时使用中间件呢?我的理解是在我们的应用程序当中和业务关系不大的一些需要在管道中做的事情可以使用,比如身份验证,Session存储,日志记录等。其实我们的 asp.net core项目中本身已经包含了很多个中间件。 举例,我们在新建一个 asp.net core应用程序的时候,默认生成的模板当中懒得去下载源码了,我们使用Reflector去查看源码:
public void Configure(IApplicationBuilder app, ILoggerFactory loggerFactory){app.UseDeveloperExceptionPage();app.UseStaticFiles();loggerFactory.AddConsole();app.UseMvc(routes =>{routes.MapRoute(name: "default",template: "{controller=Home}/{action=Index}/{id?}");});}
可以看到 app.UseDeveloperExceptionPage(),app.UseStaticFiles()等等都是通过中间件实现的。
//扩展方法`app.UseDeveloperExceptionPage();`public static class DeveloperExceptionPageExtensions{// Methodspublic static IApplicationBuilder UseDeveloperExceptionPage(this IApplicationBuilder app){if (app == null){throw new ArgumentNullException("app");}return UseMiddlewareExtensions.UseMiddleware<DeveloperExceptionPageMiddleware>(app, Array.Empty<object>());}}//扩展方法`app.UseStaticFiles();`public static class StaticFileExtensions{// Methodspublic static IApplicationBuilder UseStaticFiles(this IApplicationBuilder app){if (app == null){throw new ArgumentNullException("app");}return UseMiddlewareExtensions.UseMiddleware<StaticFileMiddleware>(app, Array.Empty<object>());}}
五、如何自定义自己的中间件
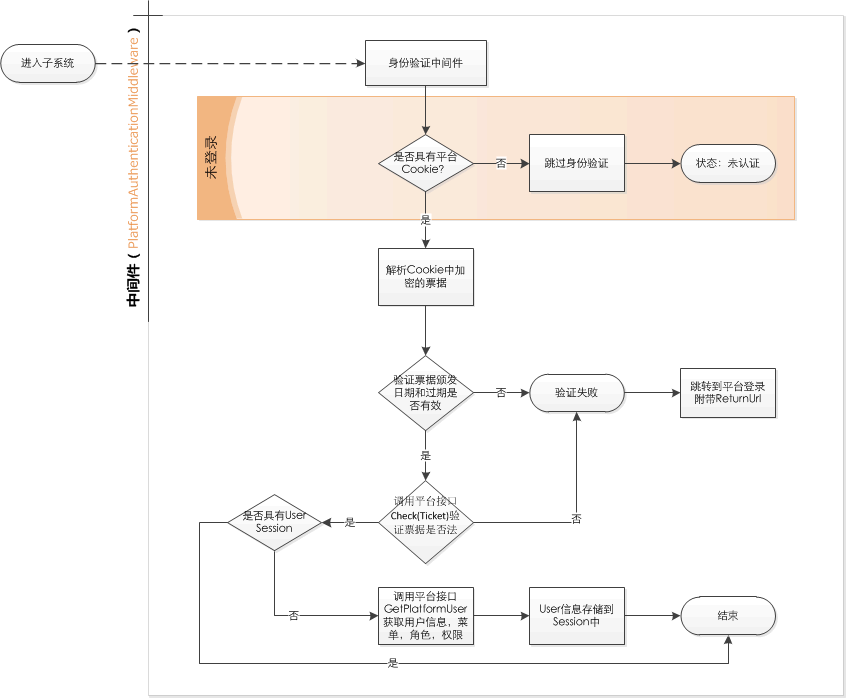
背景:我们项目使用到中间件的情景是,需要和其他部门进行用户(User)信息的共享。 以平台和子系统举例,我们正在开发一个子系统,其中用户信息,登录,注册等功能是放在平台上的,这是一个跨多语言的系统,平台是Java语言开发,用户在访问子系统的一些页面的时候需要验证是否登录,另外一些页面是不需要验证是否登录的,所以需要一个身份验证系统来代替Identity的功能。 幸运的是微软已经给我们提供了一套身份验证的中间件,在Microsoft.AspNetCore.Authentication命名空间下,我们只需要拓展,添加自己的功能就行了 。具体怎么做呢?直接看代码吧。 根据约定俗成,中间件类需要有一个Invoke方法,签名是public async Task Invoke(HttpContext context){},下面是一个中间件的示例类:了解了上面的约定之后,我们就开始定义我们自己的中间件Class。 我们需要一个流程图来理清逻辑思路,以便于写代码的时候思路更加的清晰。
public class RequestLoggerMiddleware{private readonly RequestDelegate _next;private readonly ILogger _logger;public RequestLoggerMiddleware(RequestDelegate next, ILoggerFactory loggerFactory){_next = next;_logger = loggerFactory.CreateLogger<RequestLoggerMiddleware>();}public async Task Invoke(HttpContext context){_logger.LogInformation("Handling request: " + context.Request.Path);await _next.Invoke(context);_logger.LogInformation("Finished handling request.");}}
平台有一个要求就是,用户在我们子系统退出之后,要调用平台的一个接口通知他们,他们要做一些后续的业务。 OK,开始撸码。
- 首先创建一个PlatformAuthoricationMiddleware,它继承于Microsoft.AspNetCore.Authentication下的类AuthenticationMiddleware,由于AuthenticationMiddleware已经实现了Invoke功能,所以我们只需要重写(override)它里面的一些方法就可以了。等等,我们好像还需要一些配置,比如流程图中的ReturnUrl,平台的Cookie的Key值,平台验证用户合法性的接口地址等参数。
- 建立一个Options类进行配置的设置,我们取名字为:PlatformAuthenticationOptions,继承AuthenticationOptions,并且实现掉IOptions
接口,这样子就能在Startup中直接配置了。 - 我们只需要重写AuthenticationMiddleware中的CreateHandler方法就行了,在Handler中可以实现掉我们中间件的功能。
- 然后创建一个处理的Handler类,取名为PlatformAuthenticationHandler,继承于AuthenticationHandler
用来处理请求中的调用。
- 在PlatformAuthenticationHandler中重写HandleAuthenticateAsync()方法 ,
进行主流程的控制。 - 在PlatformAuthenticationHandler中重写FinishResponseAsync()方法,进行Session的存储操作。
- 在PlatformAuthenticationHandler中重写HandleSignOutAsync()方法,进行登出的控制,因为用户登出之后我们要通知平台做一些其他操作。
- 在PlatformAuthenticationHandler中重写HandleUnauthorizedAsync()方法,进行未认证操作。
在Startup中就是app.UsePlatformAuthentication()
public static class MiddlewareExtensions{public static IApplicationBuilder UsePlatformAuthentication(this IApplicationBuilder app) {if (app == null) {throw new ArgumentNullException(nameof(app));}return app.UseMiddleware<PlatformAuthenticationMiddleware>();}public static IApplicationBuilder UsePlatformAuthentication(this IApplicationBuilder app, CookieAuthenticationOptions options) {if (app == null) {throw new ArgumentNullException(nameof(app));}if (options == null) {throw new ArgumentNullException(nameof(options));}return app.UseMiddleware<PlatformAuthenticationMiddleware>(Options.Create(options));}}
示例源码:https://github.com/yuleyule66/PlatformAuthMiddleware ### 六、中间件的使用 #### 1. 使用中间件记录错误日志 这里使用的日志组件为nlog,首先创建一个WebAPI项目,添加一个自定义日志处理中间件CostomErrorMiddleware,当程序出错时会记录日志,同时开发环境下会把异常的详细信息打印在页面上,非开发环境隐藏详细信息,代码如下:
public void Configure(IApplicationBuilder app, IHostingEnvironment env, ILoggerFactory loggerFactory) {loggerFactory.AddConsole(Configuration.GetSection("Logging"));//注册PlatformAuthentication中间件app.UsePlatformAuthentication(new PlatformAuthenticationOptions() {UserSessionStore = new UserSessionStore(),});app.UseMvc();}
修改StartUp类中的Configure方法如下,注入nlog 需要先安装 NLog.Web.AspNetCore ,使用app.UseMiddleware
/// <summary>/// 自定义的错误处理类/// </summary>public class CostomErrorMiddleware{private readonly RequestDelegate next;private readonly ILogger logger;private IHostingEnvironment environment;/// <summary>/// DI,注入logger和环境变量/// </summary>/// <param name="next"></param>/// <param name="logger"></param>/// <param name="environment"></param>public CostomErrorMiddleware(RequestDelegate next, ILogger<CostomErrorMiddleware> logger, IHostingEnvironment environment){this.next = next;this.logger = logger;this.environment = environment;}/// <summary>/// 实现Invoke方法/// </summary>/// <param name="context"></param>/// <returns></returns>public async Task Invoke(HttpContext context){try{await next.Invoke(context);}catch (Exception ex){await HandleError(context, ex);}}/// <summary>/// 错误信息处理方法/// </summary>/// <param name="context"></param>/// <param name="ex"></param>/// <returns></returns>private async Task HandleError(HttpContext context, Exception ex){context.Response.StatusCode = 500;context.Response.ContentType = "text/json;charset=utf-8;";string errorMsg = $"错误消息:{ex.Message}{Environment.NewLine}错误追踪:{ex.StackTrace}";//无论是否为开发环境都记录错误日志logger.LogError(errorMsg);//浏览器在开发环境显示详细错误信息,其他环境隐藏错误信息if (environment.IsDevelopment()){await context.Response.WriteAsync(errorMsg);}else{await context.Response.WriteAsync("抱歉,服务端出错了");}}}
nlog.config:
/// 配置请求管道public void Configure(IApplicationBuilder app, IHostingEnvironment env, ILoggerFactory factory){//添加nlogfactory.AddNLog();env.ConfigureNLog("nlog.config");//泛型方法添加中间件app.UseMiddleware<CostomErrorMiddleware>();app.UseMvc();}
到这里异常处理中间件就注册完成了,修改ValueController自己制造一个异常来测试一下,代码如下:
<?xml version="1.0" encoding="utf-8" ?><nlog xmlns="http://www.nlog-project.org/schemas/NLog.xsd"xmlns:xsi="http://www.w3.org/2001/XMLSchema-instance"autoReload="true"internalLogLevel="Info"internalLogFile="D:\LogDemoOfWebapi\internal-nlog.txt"><!-- enable asp.net core layout renderers --><extensions><add assembly="NLog.Web.AspNetCore"/></extensions><targets><target xsi:type="File" name="errorLog" fileName="D:/logs/AT___${shortdate}.log"layout="----------------日志记录开始----------------${newline}【日志时间】:${longdate} ${newline}【日志级别】:${level:uppercase=true}${newline}【异常相关信息】${newline}${message}${newline}${newline}${newline}" /></targets><rules><logger name="*" minlevel="Error" writeTo="errorLog" /></rules></nlog>
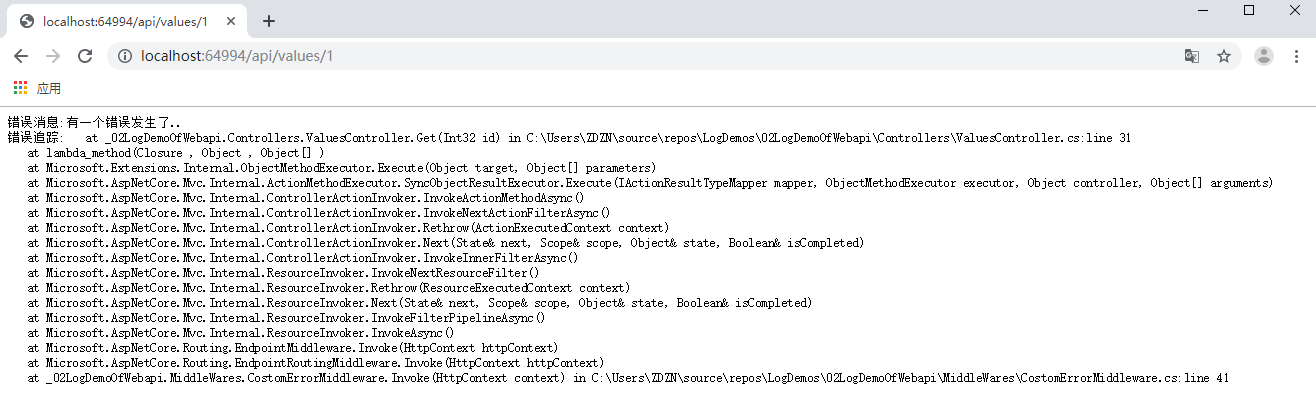
运行程序,在开发环境下访问/Values/1,显示结果如下,同时这些错误信息也会通过nlog写入到错误日志中:
[Route("api/[controller]")][ApiController]public class ValuesController : ControllerBase{private ILogger<ValuesController> _logger;public ValuesController(ILogger<ValuesController> logger){_logger = logger;}// GET api/values[HttpGet]public ActionResult<IEnumerable<string>> Get(){return new string[] { "value1", "value2" };}// GET api/values/5[HttpGet("{id}")]public ActionResult<string> Get(int id){throw new Exception("有一个错误发生了..");return "value";}}
 用类似app.UseMvc()这样的形式来使用我们自定义的中间件的话,就需要给ApplicationBuilder添加一个扩展方法,首先添加一个静态类CostomMiddleware,代码如下:
然后修改Configure方法即可:
/// <summary>/// 扩展方法/// </summary>public static class CostomMiddleware{public static IApplicationBuilder UseCostomError(this IApplicationBuilder app){return app.UseMiddleware<CostomErrorMiddleware>();}}
public void Configure(IApplicationBuilder app, IHostingEnvironment env, ILoggerFactory factory){//添加nlogfactory.AddNLog();env.ConfigureNLog("nlog.config");//使用扩展方法app.UseCostomError();app.UseMvc();}
2. 通过中间件实现全局异常处理
- 建立一个自定义的全局异常处理中间件
public class ExceptionMiddleware{private readonly RequestDelegate next;private readonly ILogger logger;private IHostingEnvironment environment;public ExceptionMiddleware(RequestDelegate next, ILogger<ExceptionMiddleware> logger, IHostingEnvironment environment){this.next = next;this.logger = logger;this.environment = environment;}public async Task Invoke(HttpContext context){try{await next.Invoke(context);var features = context.Features;}catch (Exception e){await HandleException(context, e);}}private async Task HandleException(HttpContext context, Exception e){context.Response.StatusCode = 500;context.Response.ContentType = "text/json;charset=utf-8;";string error = "";void ReadException(Exception ex){error += string.Format("{0} | {1} | {2}", ex.Message, ex.StackTrace, ex.InnerException);if (ex.InnerException != null){ReadException(ex.InnerException);}}ReadException(e);if (environment.IsDevelopment()){var json = new { message = e.Message, detail = error };error = JsonConvert.SerializeObject(json);}elseerror = "抱歉,出错了";await context.Response.WriteAsync(error);}}
- 在管道中加入自定义中间件
app.UseMiddleware
- 在管道中通过try catch进行异常捕获 这个中间件后面的所有代码都在 try catch里面 只要出发了异常 就会给当前中间件捕获
3. 中间件接口校验
//使用方式不一样了 添加的位置要改变了/// <summary>/// 中间件启动类/// </summary>/// <param name="app"></param>/// <param name="env"></param>// This method gets called by the runtime. Use this method to configure the HTTP request pipeline.public void Configure(IApplicationBuilder app, IWebHostEnvironment env){//拦截器中间件app.UseMiddleware<ValidateMiddleware>();}
/// <summary>/// 中间件校验信息 类似Framework中的HttpModel 管道模型/// </summary>public class ValidateMiddleware{private readonly RequestDelegate _nextDelegate;/// <summary>////// </summary>/// <param name="nextDelegate"></param>public ValidateMiddleware(RequestDelegate nextDelegate){_nextDelegate = nextDelegate;}/// <summary>/// 处理对应的参数信息 进行拦截校验信息/// </summary>/// <param name="httpContext">拦截HTTP请求处理</param>/// <returns></returns>public async Task Invoke(HttpContext httpContext){//这个地方可以获取到HttpContext 这个时候 你想干啥都可以 做自己想要实现的功能就好了//返回执行下一个中间件的处理 不能去掉 去掉参数就会丢失await _nextDelegate.Invoke(httpContext);}}
二、过滤器
- 一共有五类过滤器IAsyncAuthorizationFilter IAsyncResourceFilter IAsyncActonFilter IAsyncExceptionFilter IAsyncResultFilter 去掉Async就是同步的
- 注册过滤器 全局注册和Attribute注册 用在特定的Action上
一、中间件(Middleware)和过滤器(Filter)的区别
熟悉MVC框架的同学应该知道,MVC也提供了5大过滤器供我们用来处理请求前后需要执行的代码。分别是<font style="color:rgb(199, 37, 78);background-color:rgb(249, 242, 244);">AuthenticationFilter,AuthorizationFilter,ActionFilter,ExceptionFilter,ResultFilter</font>。
根据描述,可以看出中间件和过滤器的功能类似,那么他们有什么区别?为什么又要搞一个中间件呢?其实,过滤器和中间件他们的关注点是不一样的,也就是说职责不一样,干的事情就不一样。 同作为两个AOP利器,过滤器更贴合业务,它关注于应用程序本身,比如你看ActionFilter 和 ResultFilter,它都直接和你的Action,ActionResult交互了,是不是离你很近的感觉,那我有一些比如对我的输出结果进行格式化啦,对我的请求的ViewModel进行数据验证啦,肯定就是用Filter无疑了。它是MVC的一部分,它可以拦截到你Action上下文的一些信息,而中间件是没有这个能力的。
过滤器和中间件一样,都可以用来拦截用户请求和请求数据的。控制器目前用到的过滤器种类有它们的主要用途有错误处理,缓存,配置,授权,日志记录,主要的好处就是避免重复代码。 一个请求经过服务器管道处理的流程
根据上图所示,过滤器的事件是在各种中间件运行过后,到Action截面处才执行。它先执行全局过滤器的,然后才是类和方法过滤器。
过滤器在处理上述提到的重复性操作的需求有优势,它也有局限性。对于不属于ASP.NET范畴的静态页面,就不能用过滤器,而是用中间件来处理,因为中间件一旦被注册,它将拦截一切向服务器发起的请求,解析HttpContext可以实现一些过滤器难以实现的业务逻辑。 把ASP.NET Core处理请求的方式看做是一个管道,中间件是组装到应用程序管道中用来处理请求和响应的组件。 每个中间件可以:
- 选择是否将请求传递给管道中的下一个组件。
- 可以在调用管道中的下一个组件之前和之后执行业务逻辑。
它们之间的主要区别在于它们的范围。过滤器是MVC的一部分,因此它们的范围完全限于MVC中间件。中间件只能访问HttpContext和之前的中间件添加的内容。相反,过滤器可以访问更广泛的MVC上下文,因此可以访问路由数据和模型绑定信息。
二、过滤器的使用
1. 使用过滤器记录错误日志
过滤器大家应该都很熟悉,在ASP.NET Core中过滤器的使用没有太大的变化,这里也实现一个使用过滤器记录错误日志的栗子,直接看代码吧,首先创建一个过滤器,代码如下:修改StartUp类,注入nlog,配置全局过滤器,代码如下,其中nlog.config和中间件栗子中一样:
/// <summary>/// 自定义的错误处理过滤器/// </summary>public class CustomErrorFilter :Attribute, IExceptionFilter{private readonly ILogger _logger;private IHostingEnvironment _environment;public CustomErrorFilter(ILogger<CustomErrorFilter> logger,IHostingEnvironment environment){_logger = logger;_environment = environment;}public void OnException(ExceptionContext context){Exception ex = context.Exception;string errorMsg = $"错误消息:{ex.Message}{Environment.NewLine}错误追踪:{ex.StackTrace}";ContentResult result = new ContentResult{ContentType = "text/json;charset=utf-8;",StatusCode = 500};//无论是否为开发环境都记录错误日志_logger.LogError(errorMsg);//浏览器在开发环境显示详细错误信息,其他环境隐藏错误信息if (_environment.IsDevelopment()){result.Content = $"错误消息:{ex.Message}{Environment.NewLine}错误追踪:{ex.StackTrace}";}else{result.Content = "抱歉,服务端出错了";}context.Result = result;context.ExceptionHandled = true;}}
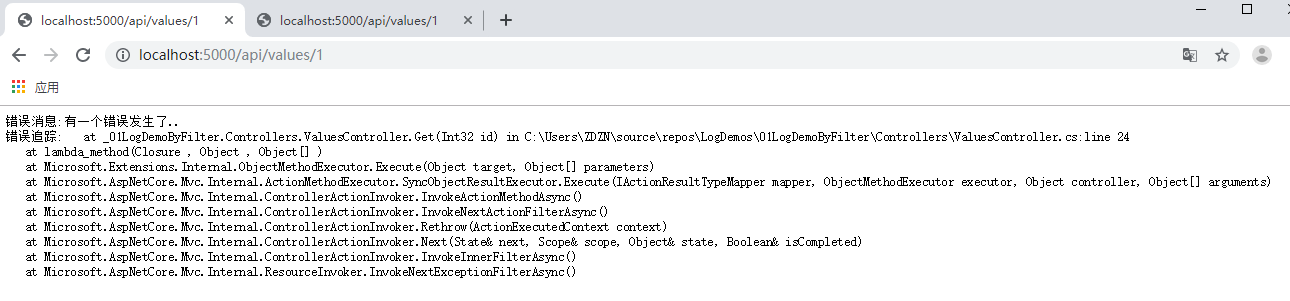
然后修改ValuesController,设置错误和上边中间件的栗子一样,运行代码访问/values/1时,在开发环境中显示如下,同时错误信息也会写入错误日志中:
public class Startup{public Startup(IConfiguration configuration){Configuration = configuration;}public IConfiguration Configuration { get; }// 依赖注入public void ConfigureServices(IServiceCollection services){services.AddMvc(configure =>{configure.Filters.Add<CustomErrorFilter>();//全局过滤器,不用添加特性头}//全局过滤器,不用添加特性头).SetCompatibilityVersion(CompatibilityVersion.Version_2_2);//services.AddScoped<CustomErrorFilter>();//局部过滤器,需要在Controller/Action添加特性头 [ServiceFilter(typeof(CustomErrorFilter))]}// 配置管道public void Configure(IApplicationBuilder app, IHostingEnvironment env, ILoggerFactory factory){factory.AddNLog();env.ConfigureNLog("nlog.config");app.UseMvc();}}

2. 通过过滤器实现全局异常处理
- 建立自己的一个过滤器
public class CustomerExceptionFilter : Attribute, IExceptionFilter{private readonly ILogger logger = null;private readonly IHostingEnvironment environment = null;public CustomerExceptionFilter(ILogger<CustomerExceptionFilter> logger, IHostingEnvironment environment){this.logger = logger;this.environment = environment;}public void OnException(ExceptionContext context){Exception exception = context.Exception;string error = string.Empty;void ReadException(Exception ex){error += string.Format("{0} | {1} | {2}", ex.Message, ex.StackTrace, ex.InnerException);if (ex.InnerException != null){ReadException(ex.InnerException);}}ReadException(context.Exception);logger.LogError(error);ContentResult result = new ContentResult{StatusCode = 500,ContentType = "text/json;charset=utf-8;"};if (environment.IsDevelopment()){var json = new { message = exception.Message, detail = error };result.Content = JsonConvert.SerializeObject(json);}else{result.Content = "抱歉,出错了";}context.Result = result;context.ExceptionHandled = true;}}
- 添加Nugut包 NLog.Extensions.Logging NLog.Web.AspNetCore ,并在 Startup.cs 文件的 Configure 方法中添加扩展
public void Configure(IApplicationBuilder app, IHostingEnvironment env, ILoggerFactory factory){// 将 NLogfactory.AddConsole(Configuration.GetSection("Logging")).AddNLog().AddDebug();var nlogFile = System.IO.Path.Combine(env.ContentRootPath, "nlog.config");env.ConfigureNLog(nlogFile);if (env.IsDevelopment()){app.UseDeveloperExceptionPage();}app.UseMvc();}
- 日志配置文件信息
<?xml version="1.0" encoding="utf-8" ?><nlog xmlns="http://www.nlog-project.org/schemas/NLog.xsd" xmlns:xsi="http://www.w3.org/2001/XMLSchema-instance" autoReload="true" internalLogLevel="info"><!-- Load the ASP.NET Core plugin --><extensions><add assembly="NLog.Web.AspNetCore"/></extensions><!-- Layout: https://github.com/NLog/NLog/wiki/Layout%20Renderers --><targets><target xsi:type="File" name="errorfile" fileName="/data/logs/logfilter/error-${shortdate}.log" layout="${longdate}|${logger}|${uppercase:${level}}| ${message} ${exception}|${aspnet-Request-Url}" /><target xsi:type="Null" name="blackhole" /></targets><rules><logger name="Microsoft.*" minlevel="Error" writeTo="blackhole" final="true" /><logger name="*" minlevel="Error" writeTo="errorfile" /></rules></nlog>
- 把这个过滤器注入到容器中
services.AddMvc(options =>{options.Filters.Add(typeof(CustomerExceptionFilter));}).SetCompatibilityVersion(CompatibilityVersion.Version_2_1);
只要请求进入到了MVC中间件中之后抛的异常 都会进到自定义的Filter中。
3. ActionFilter
public void ConfigureServices(IServiceCollection services){//添加对应的拦截器信息services.AddMvc(options =>{options.Filters.Add<ActionFilter>();});//.....}
/// <summary>/// MVC中的Action过滤器 这个类的位置可以按照你的规则放/// 这个地方进行数据格式的校验 一般检查参数是否规范/// </summary>public class ActionFilter : IActionFilter{/// <summary>/// 验证对应的信息/// </summary>/// <param name="context"></param>public void OnActionExecuting(ActionExecutingContext context){//校验接口参数是否有传递if (!context.ModelState.IsValid){ActionResult result = new ActionResult() { code = 0, msg="Action验证失败" };foreach (var item in context.ModelState.Values){foreach (var error in item.Errors){result.msg += error.ErrorMessage + "|";}}context.Result = new JsonResult(result);}}public void OnActionExecuted(ActionExecutedContext context){}}
4. ApiAuthorizeFilter
//使用方式类似anction拦截器public void ConfigureServices(IServiceCollection services){//添加对应的拦截器信息services.AddMvc(options =>{options.Filters.Add<ApiAuthorizeFilter>();});//.....}
/// <summary>/// Api接口拦截器/// </summary>public class CUMSApiAuthorizeFilter : IAuthorizationFilter{public CUMSApiAuthorizeFilter(){}/// <summary>/// 只判断参数是否正确,不判断权限/// </summary>/// <param name="context"></param>public void OnAuthorization(AuthorizationFilterContext context){#region 校验参数是否正确ApiResult result = new ApiResult() { code = 0, msg = "Api验证失败" };#region API接口校验 校验信息 校验token,或者用户id//根据对应的信息进行一个判断处理 逻辑暂时不写了#endregionreturn;#endregion}}
三、参考文章
【1】https://docs.microsoft.com/zh-cn/aspnet/core/fundamentals/logging/?view=aspnetcore-3.0
【2】https://docs.microsoft.com/zh-cn/aspnet/core/fundamentals/middleware/?view=aspnetcore-3.0

若有收获,就点个赞吧
0 人点赞
