egrep -v “^ #|^ $” 去除所有以#号开头的文件
Demo system
[Alex@Test01 ~]$ uname -aLinux Test01 2.6.32-504.el6.x86_64 #1 SMP Wed Oct 15 04:27:16 UTC 2014 x86_64 x86_64 x86_64 GNU/Linux[Alex@Test01 ~]$ ip addr | grep eth02: eth0: <BROADCAST,MULTICAST,UP,LOWER_UP> mtu 1500 qdisc pfifo_fast state UP qlen 1000inet 10.0.2.128/24 brd 10.0.2.255 scope global eth0
Install httpd
[Alex@Test01 yum.repos.d]$ sudo yum install -y httpd[Alex@Test01 ~]$ rpm -qa | grep httpdhttpd-2.2.15-39.el6.centos.x86_64httpd-tools-2.2.15-39.el6.centos.x86_64# remove welcome page[Alex@Test01 yum.repos.d]$ sudo rm -f /etc/httpd/conf.d/welcome.conf# remove default error page[Alex@Test01 yum.repos.d]$ sudo rm -f /var/www/error/noindex.html
Configure httpd . Replace the server name to you own one.
[Alex@Test01 ~]# sudo vi /etc/httpd/conf/httpd.conf# line 44: changeServerTokens Prod# line 76: change to ONKeepAlive On# line 262: Admin's addressServerAdmin luchuanjia@msn.com# line 338: changeAllowOverride All# line 276: change to your server's nameServerName www.ultraera.org:80# line 402: add file name that it can access only with directory's nameDirectoryIndex index.html index.htm# line 536: changeServerSignature Off# line 759: comment out# AddDefaultCharset UTF-8[Alex@Test01 ~]# sudo /etc/init.d/httpd startStarting httpd:[ OK ][Alex@Test01 ~]# sudo chkconfig httpd on # set httpd start with system.
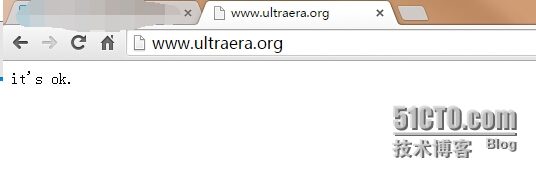
create a HTML test page
[Alex@Test01 ~]# sudo vi /var/www/html/index.htmlit's ok.
Install PHP.
[Alex@Test01 ~]$ sudo yum install -y php php-mbstring php-pear[Alex@Test01 ~]$ rpm -qa | grep phpphp-common-5.3.3-46.el6_6.x86_64php-5.3.3-46.el6_6.x86_64php-mbstring-5.3.3-46.el6_6.x86_64php-cli-5.3.3-46.el6_6.x86_64php-pear-1.9.4-4.el6.noarch[Alex@Test01 ~]$ sudo vi /etc/httpd/conf/httpd.conf# line 402 add file name that it can access only with directory's nameDirectoryIndex index.html index.htm index.php[Alex@Test01 ~]$ sudo vi /etc/php.ini# line 946 set your timezonedate.timezone = "Asia/Shanghai"[Alex@Test01 ~]$ sudo /etc/init.d/httpd restartStopping httpd:[ OK ]Starting httpd:[ OK ]
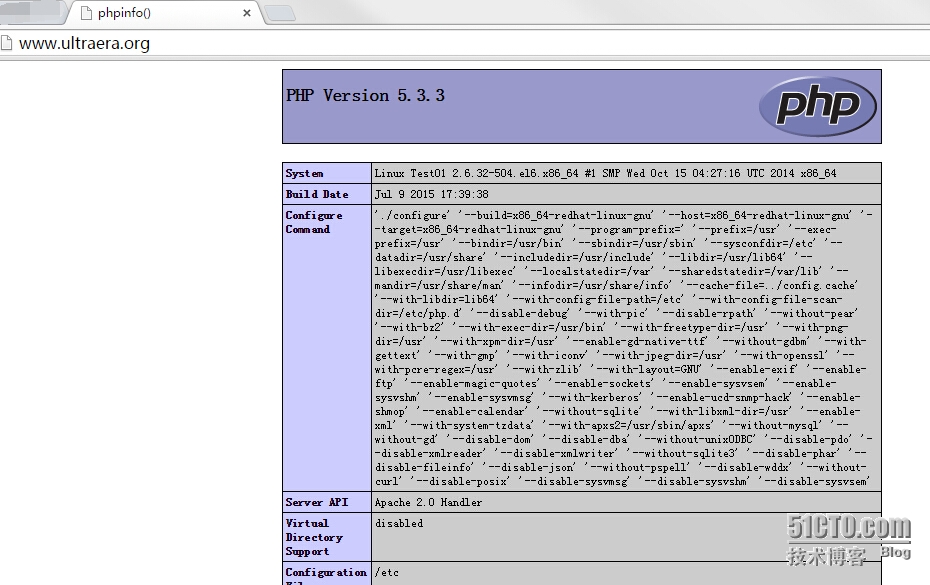
create a php test page.
[Alex@Test01 ~]# sudo vi /var/www/html/index.php<?phpphpinfo();?>
Install MySQL
[Alex@Test01 ~]$ sudo -y install mysql-server[Alex@Test01 ~]$ rpm -qa | grep mysql-servermysql-server-5.1.73-5.el6_6.x86_64[Alex@Test01 ~]$ sudo vi /etc/my.cnf[mysqld]datadir=/var/lib/mysqlsocket=/var/lib/mysql/mysql.sockuser=mysql# Disabling symbolic-links is recommended to prevent assorted security riskssymbolic-links=0# addcharacter-set-server=utf8[Alex@Test01 ~]$ sudo /etc/rc.d/init.d/mysqld startInitializing MySQL database: WARNING: The host 'www.ultraera.org' could not be looked up with resolveip.This probably means that your libc libraries are not 100 % compatiblewith this binary MySQL version. The MySQL daemon, mysqld, should worknormally with the exception that host name resolving will not work.This means that you should use IP addresses instead of hostnameswhen specifying MySQL privileges !Installing MySQL system tables...OKFilling help tables...OK.........You can test the MySQL daemon with mysql-test-run.plcd /usr/mysql-test ; perl mysql-test-run.plPlease report any problems with the /usr/bin/mysqlbug script![ OK ]Starting mysqld: [ OK ][Alex@Test01 ~]$ sudo chkconfig mysqld on
Initial settings for MySQL
[root@www ~]#mysql_secure_installationNOTE: RUNNING ALL PARTS OF THIS SCRIPT IS RECOMMENDED FOR ALL MySQLSERVERS IN PRODUCTION USE! PLEASE READ EACH STEP CAREFULLY!In order to log into MySQL to secure it, we'll need the currentpassword for the root user. If you've just installed MySQL, andyou haven't set the root password yet, the password will be blank,so you should just press enter here.# EnterEnter current password for root (enter for none):OK, successfully used password, moving on...Setting the root password ensures that nobody can log into the MySQLroot user without the proper authorisation.# set root passwordSet root password? [Y/n]yNew password: # input any passwordRe-enter new password:Password updated successfully!Reloading privilege tables..... Success!By default, a MySQL installation has an anonymous user, allowing anyoneto log into MySQL without having to have a user account created forthem. This is intended only for testing, and to make the installationgo a bit smoother. You should remove them before moving into aproduction environment.# remove anonymous usersRemove anonymous users? [Y/n]y... Success!Normally, root should only be allowed to connect from 'localhost'. Thisensures that someone cannot guess at the root password from the network.# disallow root login remotelyDisallow root login remotely? [Y/n]y... Success!By default, MySQL comes with a database named 'test' that anyone canaccess. This is also intended only for testing, and should be removedbefore moving into a production environment.# remove test databaseRemove test database and access to it? [Y/n]y- Dropping test database...... Success!- Removing privileges on test database...... Success!Reloading the privilege tables will ensure that all changes made so farwill take effect immediately.# reload privilege tablesReload privilege tables now? [Y/n]y... Success!Cleaning up...All done! If you've completed all of the above steps, your MySQLinstallation should now be secure.Thanks for using MySQL!# try to connect with root[root@www ~]#mysql -u root -pEnter password:# MySQL root passwordWelcome to the MySQL monitor. Commands end with ; or \g.Your MySQL connection id is 10Server version: 5.1.73 Source distributionCopyright (c) 2000, 2013, Oracle and/or its affiliates. All rights reserved.Oracle is a registered trademark of Oracle Corporation and/or itsaffiliates. Other names may be trademarks of their respectiveowners.Type 'help;' or '\h' for help. Type '\c' to clear the current input statement.# display user listmysql>select user,host,password from mysql.user;+------+-----------+-------------------------------------------+| user | host | password |+------+-----------+-------------------------------------------+| root | localhost | ***************************************** || root | 127.0.0.1 | ***************************************** |+------+-----------+-------------------------------------------+2 rows in set (0.00 sec)# display database listmysql>show databases;+--------------------+| Database |+--------------------+| information_schema || mysql |+--------------------+2 rows in set (0.00 sec)mysql>exitBye

若有收获,就点个赞吧
0 人点赞
