学习目标
防止秒杀重复排队
重复排队:一个人抢购商品,如果没有支付,不允许重复排队抢购
并发超卖问题解决
1个商品卖给多个人:1商品多订单
秒杀订单支付
秒杀支付:改造支付流程
超时支付订单库存回滚(作业)
1.RabbitMQ延时队列2.利用延时队列实现支付订单的监听,根据订单支付状况进行订单数据库回滚
1 防止秒杀重复排队
用户每次抢单的时候,一旦排队,我们设置一个自增值,让该值的初始值为1,每次进入抢单的时候,对它进行递增,如果值>1,则表明已经排队,不允许重复排队,如果重复排队,则对外抛出异常,并抛出异常信息100表示已经正在排队。
1.1 后台排队记录
修改SeckillOrderServiceImpl的add方法,新增递增值判断是否排队中,代码如下:
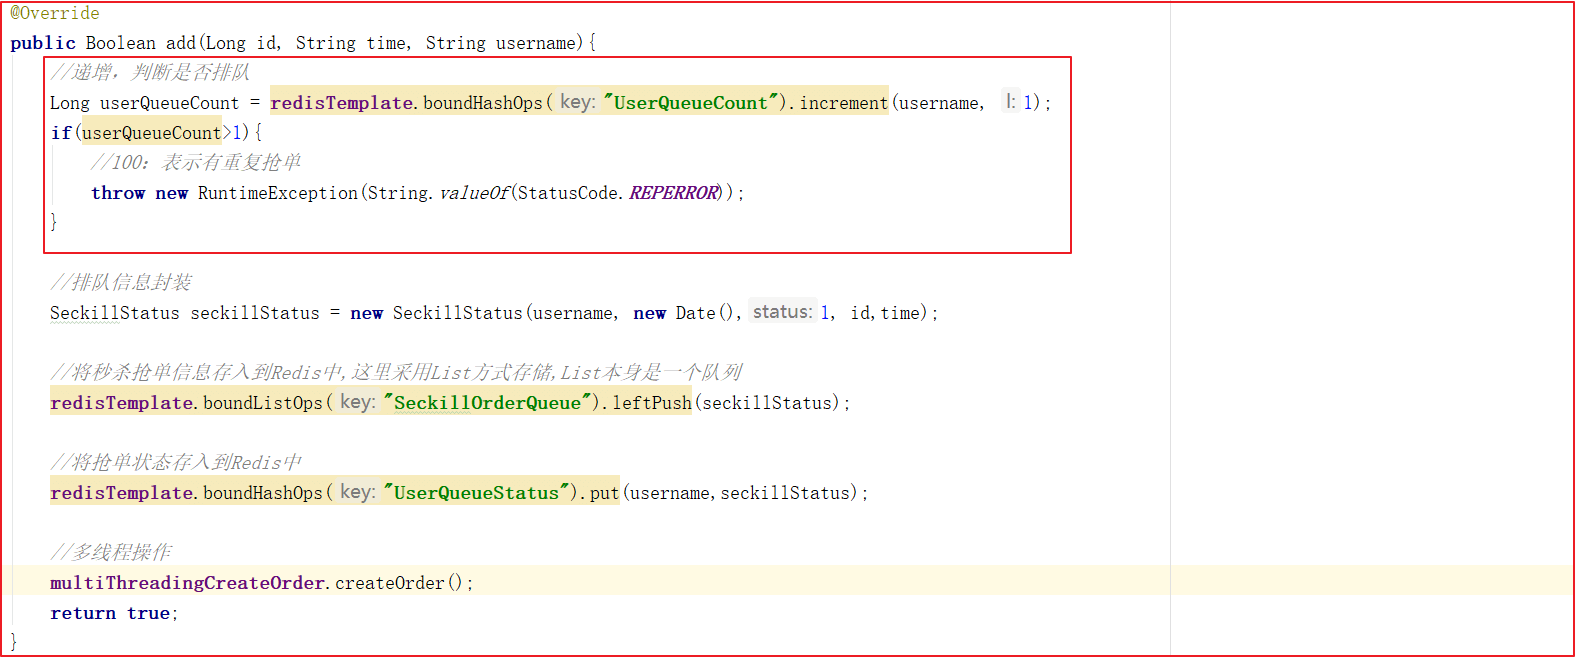
上图代码如下://Long userQueueCount = redisTemplate.boundHashOps("UserQueueCount").increment(username, 1);Long userQueueCount = redisTemplate.boundHashOps(SystemConstants.SEC_KILL_QUEUE_REPEAT_KEY).increment(username, 1);if (userQueueCount > 1) {throw new RuntimeException("重复排队了");}
2 并发超卖问题解决
超卖问题,这里是指多人抢购同一商品的时候,多人同时判断是否有库存,如果只剩一个,则都会判断有库存,此时会导致超卖现象产生,也就是一个商品下了多个订单的现象。
使用分布式锁来解决:
(1)在多线程的方法中修改之前的样子如下: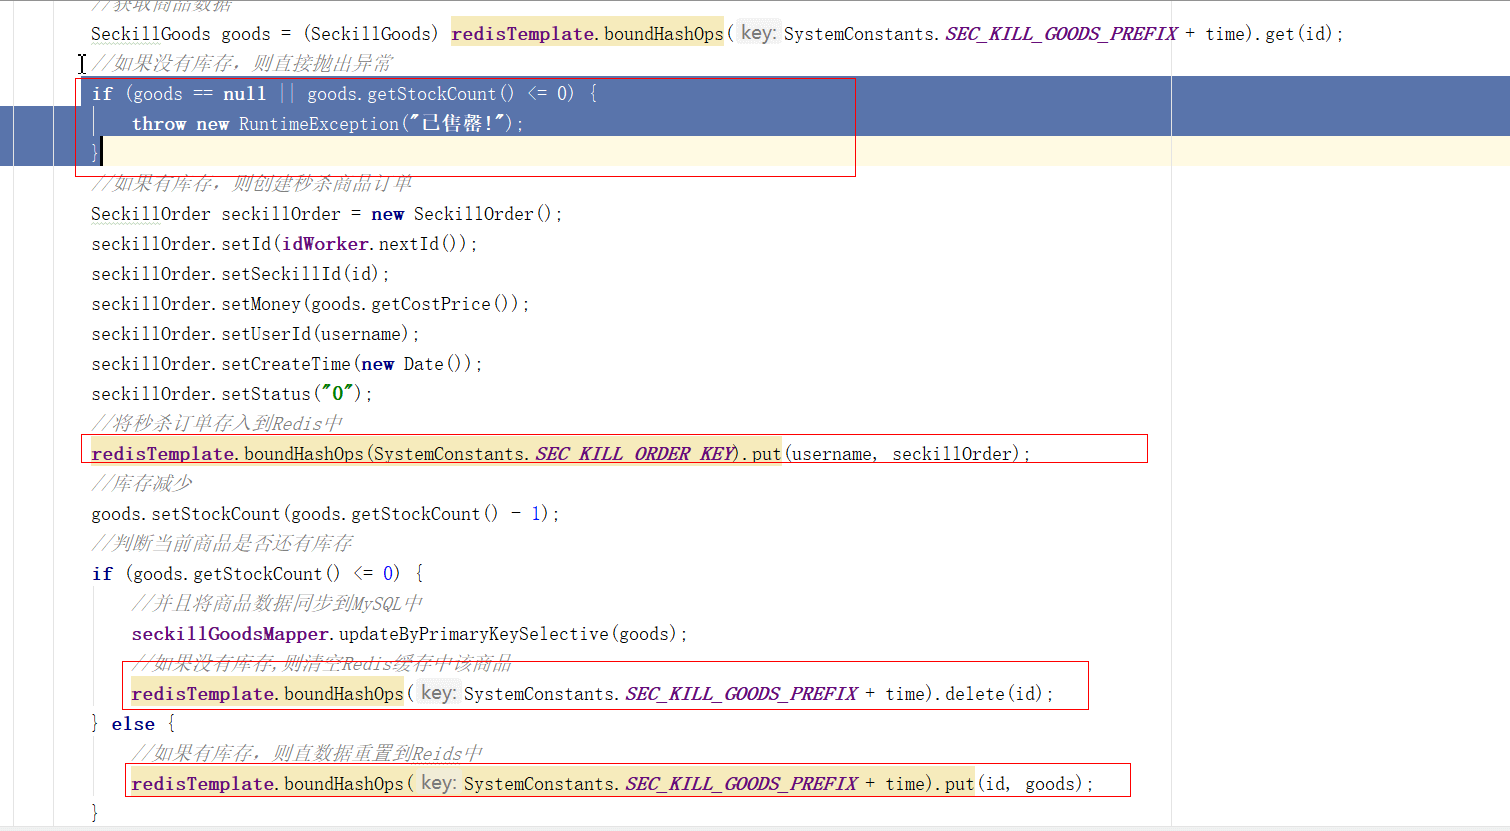
(2)修改之后如下: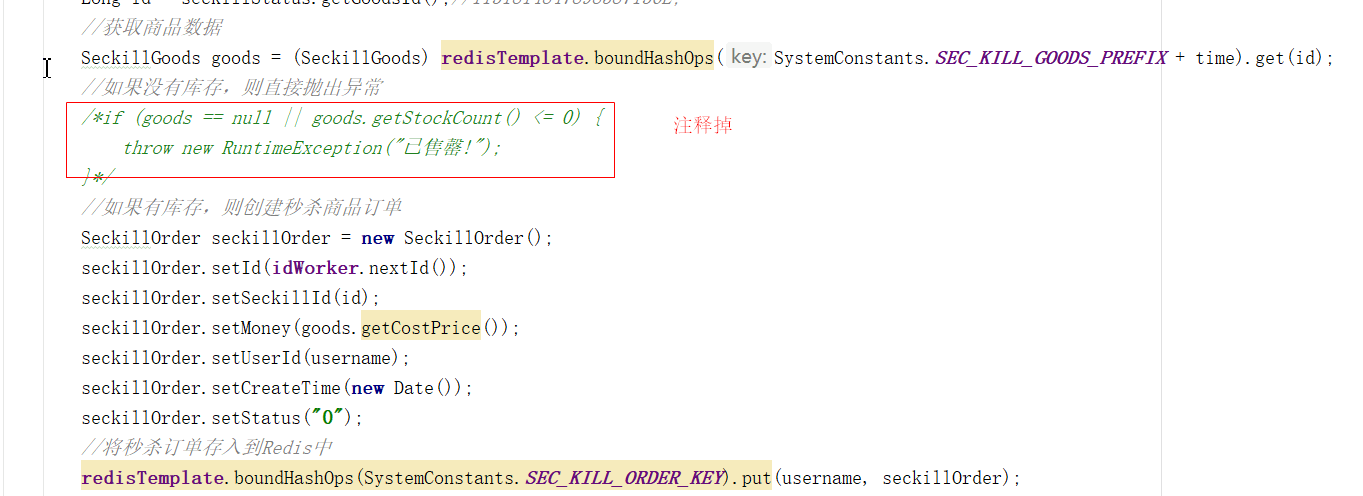
2.1 思路分析
(1)首先我们进行超卖问题的解决在于 本质是多个线程同时竞争资源去修改资源,所以只要在修改资源的时候,该资源只能只有一个线程修改即可。
(2)先针对库存的判断及减库存的操作 作为一个原子性操作 进行加锁操作即可。
如下图: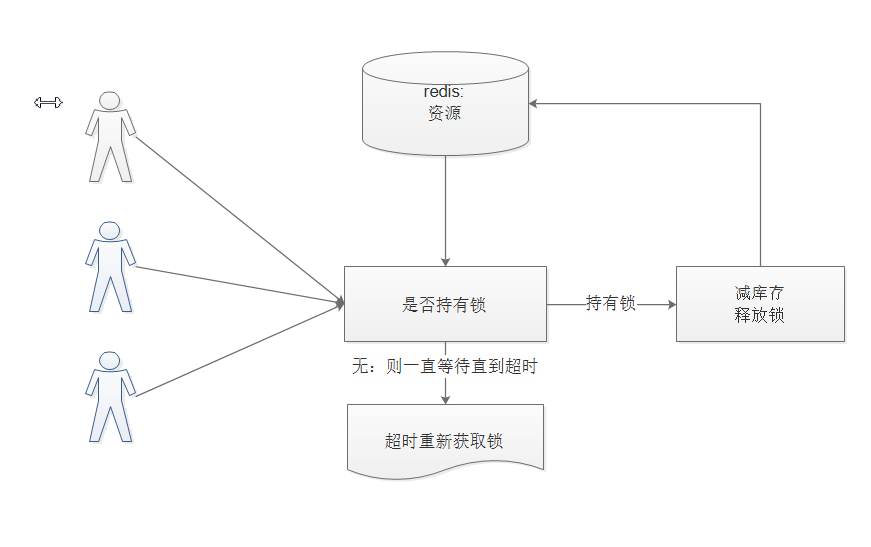
这里我们采用分布式锁:使用分布式锁的方式有很多我们决定采用REDIS来实现分布式锁。这里提供一套官方使用的红锁来实现。2.2 代码实现
(1)添加依赖:
<dependency><groupId>org.redisson</groupId><artifactId>redisson-spring-boot-starter</artifactId><version>3.11.6</version></dependency>
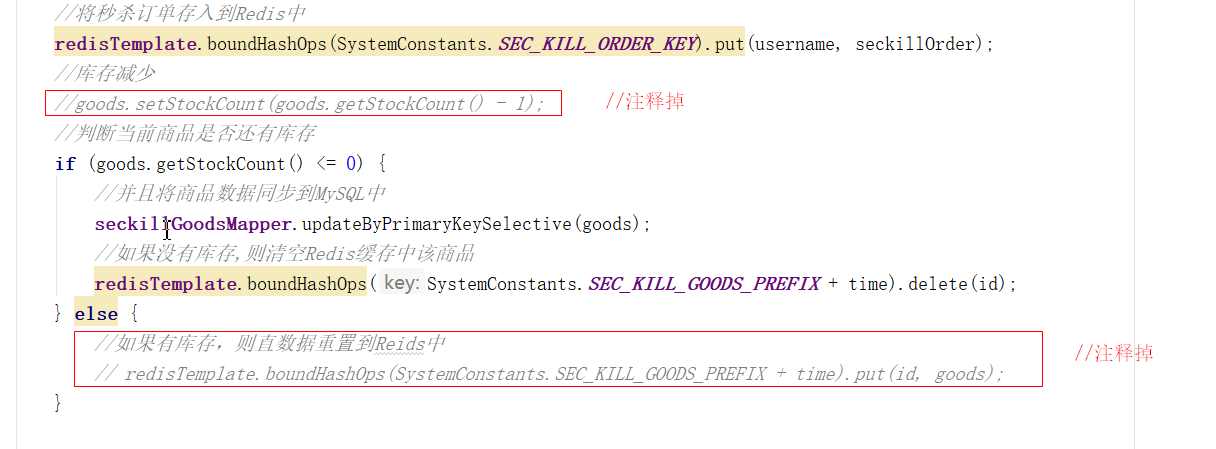
(2)修改多线程下单的代码
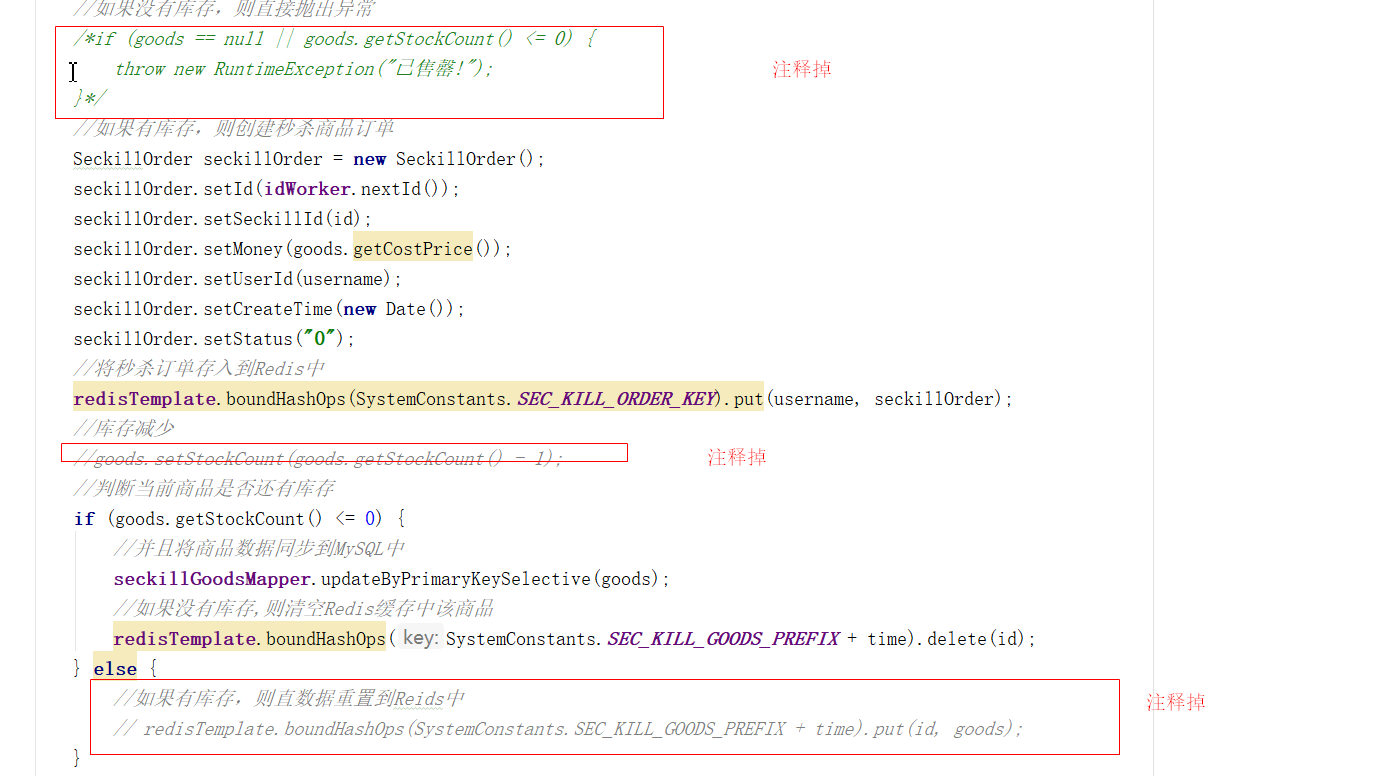
如图的代码如下:@Asyncpublic void createOrder() {try {System.out.println("准备执行...." + Thread.currentThread().getName());Thread.sleep(10000);} catch (InterruptedException e) {e.printStackTrace();}//从队列中获取排队信息SeckillStatus seckillStatus = (SeckillStatus) redisTemplate.boundListOps("SeckillOrderQueue").rightPop();if (seckillStatus != null) {//时间区间String time = seckillStatus.getTime();// "2019052510";//用户登录名String username = seckillStatus.getUsername();// "szitheima";//用户抢购商品Long id = seckillStatus.getGoodsId();//1131814847898587136L;//获取商品数据SeckillGoods goods = (SeckillGoods) redisTemplate.boundHashOps(SystemConstants.SEC_KILL_GOODS_PREFIX + time).get(id);//如果没有库存,则直接抛出异常/*if (goods == null || goods.getStockCount() <= 0) {throw new RuntimeException("已售罄!");}*///如果有库存,则创建秒杀商品订单SeckillOrder seckillOrder = new SeckillOrder();seckillOrder.setId(idWorker.nextId());seckillOrder.setSeckillId(id);seckillOrder.setMoney(goods.getCostPrice());seckillOrder.setUserId(username);seckillOrder.setCreateTime(new Date());seckillOrder.setStatus("0");//将秒杀订单存入到Redis中redisTemplate.boundHashOps(SystemConstants.SEC_KILL_ORDER_KEY).put(username, seckillOrder);//库存减少//goods.setStockCount(goods.getStockCount() - 1);//判断当前商品是否还有库存if (goods.getStockCount() <= 0) {//并且将商品数据同步到MySQL中seckillGoodsMapper.updateByPrimaryKeySelective(goods);//如果没有库存,则清空Redis缓存中该商品redisTemplate.boundHashOps(SystemConstants.SEC_KILL_GOODS_PREFIX + time).delete(id);} else {//如果有库存,则直数据重置到Reids中// redisTemplate.boundHashOps(SystemConstants.SEC_KILL_GOODS_PREFIX + time).put(id, goods);}//抢单成功,更新抢单状态,排队->等待支付seckillStatus.setStatus(2);seckillStatus.setOrderId(seckillOrder.getId());seckillStatus.setMoney(Float.valueOf(seckillOrder.getMoney()));//redisTemplate.boundHashOps("UserQueueStatus").put(username,seckillStatus);redisTemplate.boundHashOps(SystemConstants.SEC_KILL_USER_STATUS_KEY).put(username, seckillStatus);}}
(3)设置调用多线程的入口的service方法add中添加如下代码,在这里我们需要减库存
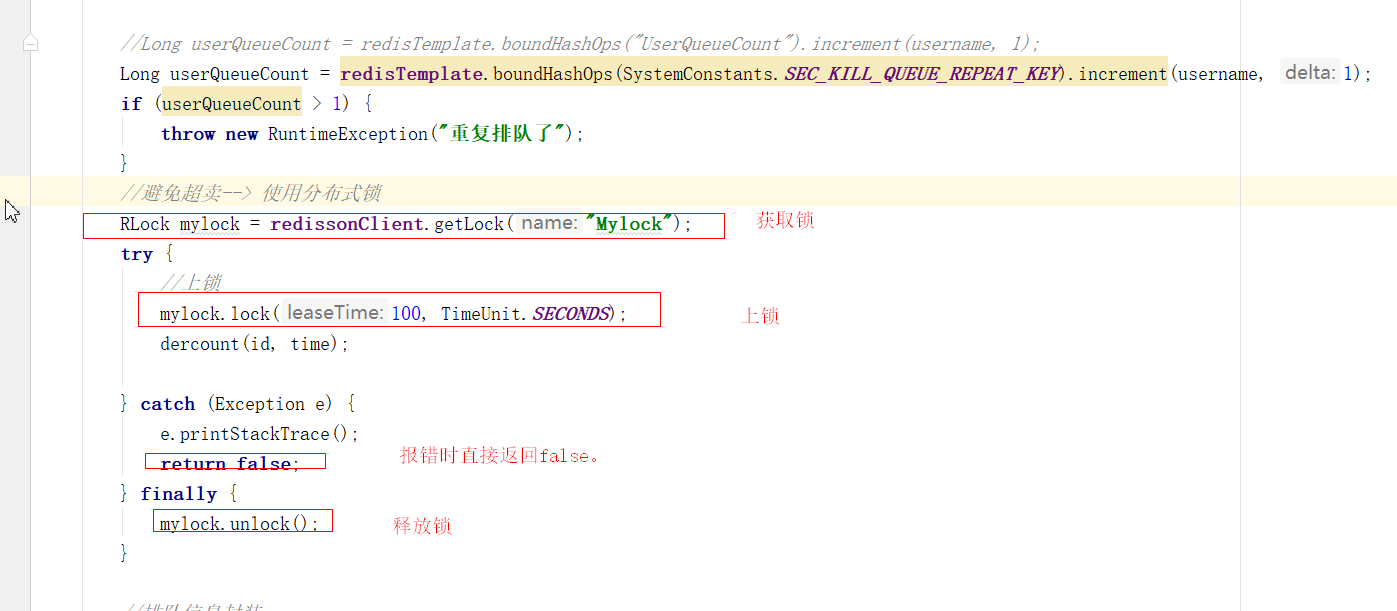
代码如下://避免超卖--> 使用分布式锁RLock mylock = redissonClient.getLock("Mylock");try {//上锁mylock.lock(100, TimeUnit.SECONDS);dercount(id, time);} catch (Exception e) {e.printStackTrace();return false;} finally {mylock.unlock();}
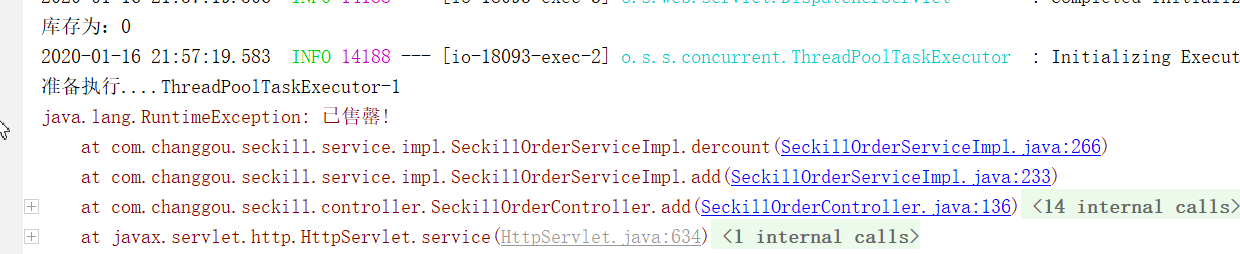
dercount(id, time);该方法如下:
private void dercount(Long id, String time) {SeckillGoods goods = (SeckillGoods) redisTemplate.boundHashOps(SystemConstants.SEC_KILL_GOODS_PREFIX + time).get(id);//如果没有库存,则直接抛出异常if (goods == null || goods.getStockCount() <= 0) {throw new RuntimeException("已售罄!");}//减库存goods.setStockCount(goods.getStockCount() - 1);//存储到redis中redisTemplate.boundHashOps(SystemConstants.SEC_KILL_GOODS_PREFIX + time).put(id, goods);System.out.println("库存为:" + ((SeckillGoods) redisTemplate.boundHashOps(SystemConstants.SEC_KILL_GOODS_PREFIX + time).get(id)).getStockCount());}
2.3 超卖控制测试
使用jemtery来进行测试:库存为1 ,三个线程同时来买,售罄2个,下单一个。如下图:
3 订单支付
支付分析:

1.如果是普通订单下单,则下单之后跳转都支付页面 传递 type表示从普通订单来2.如果是秒杀订单下单,则下单之后跳转到支付页面 传递 type表示从秒杀订单来3.支付页面接收到参数:订单号,金额,以及type标识 传递 给支付微服务 生成二维码链接 并传递数据到微信附件中参数中4.用户扫描二维码支付成功,则通知给畅购支付微服务 获取到标识type5.畅购支付微服务接收到通知,根据标识type 发送不同的消息队列中即可6.多线程下单之后,并且需要顺便发送延时队列消息,30分钟后监听并从数据库中获取数据是否存在。存在则不用管,不存在则需要回复库存等操作。(可选)
3.1 改造订单微服务
分析:订单微服务创建订单之后需要返回订单的的ID和金额以及标记。
(1)创建VO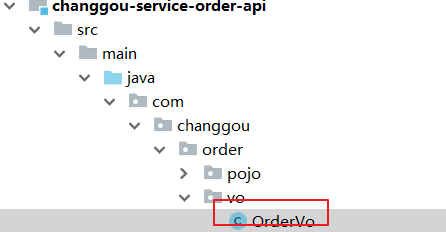
public class OrderVo implements Serializable {private Integer type;private String orderId;private String totalFee;public OrderVo() {}public OrderVo(Integer type, String orderId, String totalFee) {this.type = type;this.orderId = orderId;this.totalFee = totalFee;}public Integer getType() {return type;}public void setType(Integer type) {this.type = type;}public String getOrderId() {return orderId;}public void setOrderId(String orderId) {this.orderId = orderId;}public String getTotalFee() {return totalFee;}public void setTotalFee(String totalFee) {this.totalFee = totalFee;}}
(2) 修改controller
@PostMapping("/add")public Result add(@RequestBody Order order) {String username = tokenDecode.getUsername();order.setUsername(username);OrderVo orderVo = orderService.add(order);//返回数据给前端 前端拿到数据进行跳转 给:订单号 金额 type类型return new Result(true, StatusCode.OK,"添加订单成功",orderVo);}
(3)修改sevice: 返回Order对象即可
public OrderVo add(Order order) {//1.添加订单//1.1生成订单的主键String orderId = idWorker.nextId() + "";order.setId(orderId);//直接从购物车(redis中)中获取 循环遍历算出来总金额List<OrderItem> values = redisTemplate.boundHashOps("Cart_" + order.getUsername()).values();Integer totalNum=0;Integer totalMoney=0;for (OrderItem orderItem : values) {Integer money = orderItem.getMoney();//小计Integer num = orderItem.getNum();//购买的数量totalNum+=num;totalMoney+=money;//2.添加订单选项//2.1 设置主键String orderItemId = idWorker.nextId() + "";orderItem.setId(orderItemId);//2.2 设置所属的订单的IDorderItem.setOrderId(order.getId());orderItemMapper.insertSelective(orderItem);//3.更新库存 update tb_sku set num=num-#{num} where id=#{id} and num>=#{num}//3.1 changgou-service-goods-api创建接口 添加注解和方法//3.2 changgou-service-goods controller【实现】接口//3.3 order微服务中添加依赖//3.4 开启feignclients//3.5 注入 调用skuFeign.decCount(orderItem.getSkuId(),orderItem.getNum());}//1.2 设置总数量order.setTotalNum(totalNum);//1.3 设置总金额order.setTotalMoney(totalMoney);order.setPayMoney(totalMoney);order.setPostFee(0);//免邮费//1.4 设置创建时间 和更新时间order.setCreateTime(new Date());order.setUpdateTime(order.getCreateTime());//1.5 设置订单所属的用户 controller已经设置order.setBuyerRate("0");//未评价order.setSourceType("1");//weborder.setOrderStatus("0");order.setPayStatus("0");order.setConsignStatus("0");order.setIsDelete("0");//未删除orderMapper.insertSelective(order);//4.添加积分 feign update tb_user set points=points+#{points} where username=#{username}//4.1 changgou-service-user-api中创建接口和方法//4.2 changgou-service-user的controller中【实现】方法//4.3 加入依赖 启用feignclients 注入 调用userFeign.addPoints(order.getUsername(),10);//5.清空购物车redisTemplate.delete("Cart_" + order.getUsername());//金额 单位分OrderVo orderVo = new OrderVo(1,orderId,totalMoney.toString());return orderVo;}
3.2 创建支付二维码
下单成功后,会跳转到支付选择页面,在支付选择页面要显示订单编号和订单金额,所以我们需要在下单的时候,将订单金额以及订单编号信息存储到用户查询对象中。
选择微信支付后,会跳转到微信支付页面,微信支付页面会根据用户名查看用户秒杀订单,并根据用户秒杀订单的ID创建预支付信息并获取二维码信息,展示给用户看,此时页面每3秒查询一次支付状态,如果支付成功,需要修改订单状态信息。3.2.1 回显订单号、金额
下单后,进入支付选择页面,需要显示订单号和订单金额,所以需要在用户下单后将该数据传入到pay.html页面,所以查询订单状态的时候,需要将订单号和金额封装到查询的信息中
(1)修改SeckillStatuspublic class SeckillStatus implements Serializable {//秒杀用户名private String username;//创建时间private Date createTime;//秒杀状态 1:排队中,2:抢单成功,3:支付超时,4:秒杀失败,5:支付完成private Integer status;//秒杀的商品IDprivate Long goodsId;//应付金额 分private Float money;//订单号private Long orderId;//类型 2private Integer type;public Integer getType() {return type;}public void setType(Integer type) {this.type = type;}//时间段private String time;public SeckillStatus() {}public SeckillStatus(String username, Date createTime, Integer status, Long goodsId, String time) {this.username = username;this.createTime = createTime;this.status = status;this.goodsId = goodsId;this.time = time;}public String getUsername() {return username;}public void setUsername(String username) {this.username = username;}public Date getCreateTime() {return createTime;}public void setCreateTime(Date createTime) {this.createTime = createTime;}public Integer getStatus() {return status;}public void setStatus(Integer status) {this.status = status;}public Long getGoodsId() {return goodsId;}public void setGoodsId(Long goodsId) {this.goodsId = goodsId;}public Float getMoney() {return money;}public void setMoney(Float money) {this.money = money;}public Long getOrderId() {return orderId;}public void setOrderId(Long orderId) {this.orderId = orderId;}public String getTime() {return time;}public void setTime(String time) {this.time = time;}}
(2)修改controller
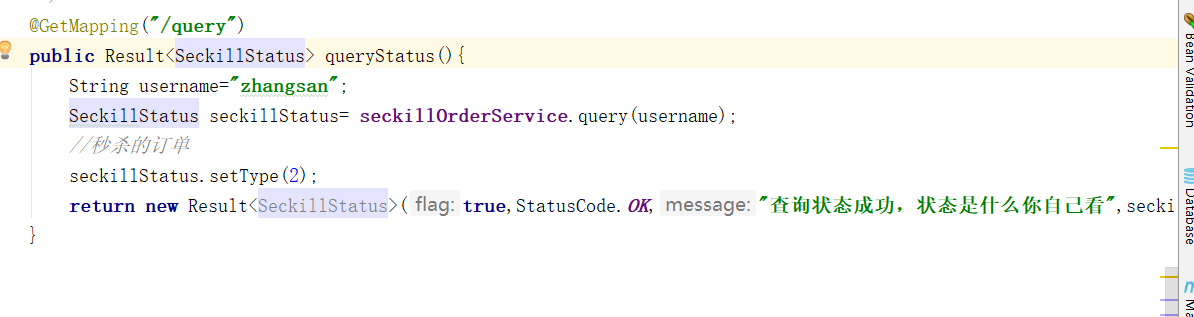
代码如下:@GetMapping("/query")public Result<SeckillStatus> queryStatus(){String username="zhangsan";SeckillStatus seckillStatus= seckillOrderService.query(username);//秒杀的订单if(seckillStatus!=null) {seckillStatus.setType(2);}return new Result<SeckillStatus>(true,StatusCode.OK,"查询状态成功,状态是什么你自己看",seckillStatus);}
使用Postman测试,效果如下:
http://localhost:18093/seckillOrder/query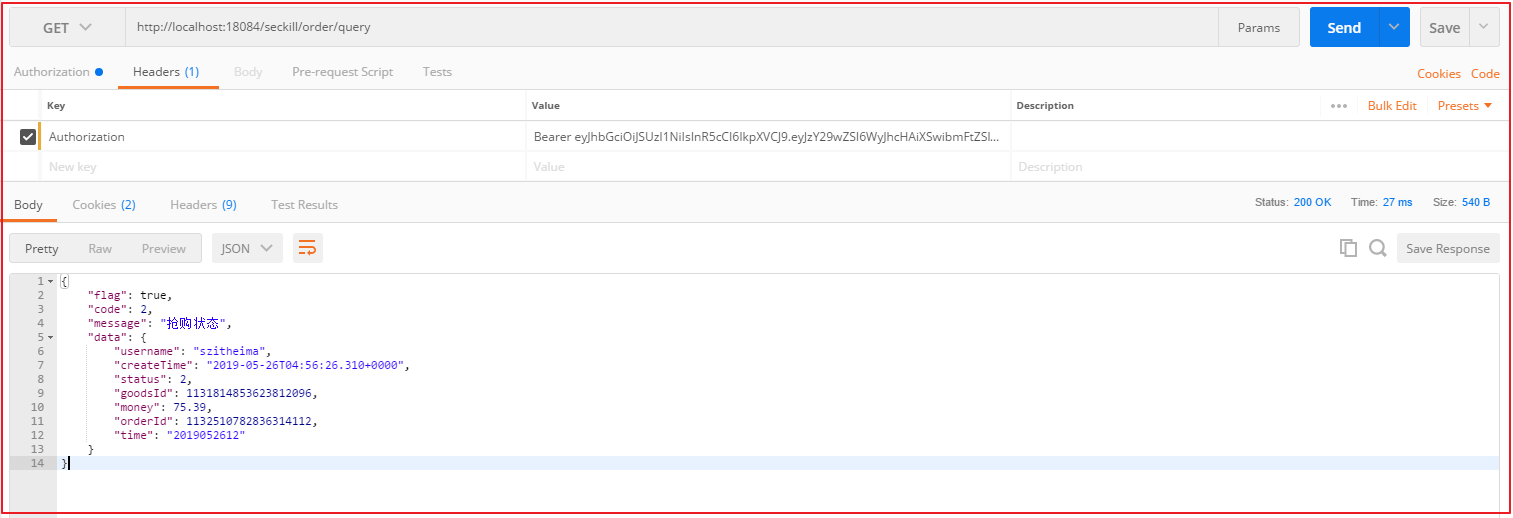
3.2.2 创建二维码
用户创建二维码,可以先查询用户的秒杀订单抢单信息,然后再发送请求到支付微服务中创建二维码,将订单编号以及订单对应的金额传递到支付微服务:
/weixin/pay/create/native。3.3 支付流程分析回顾
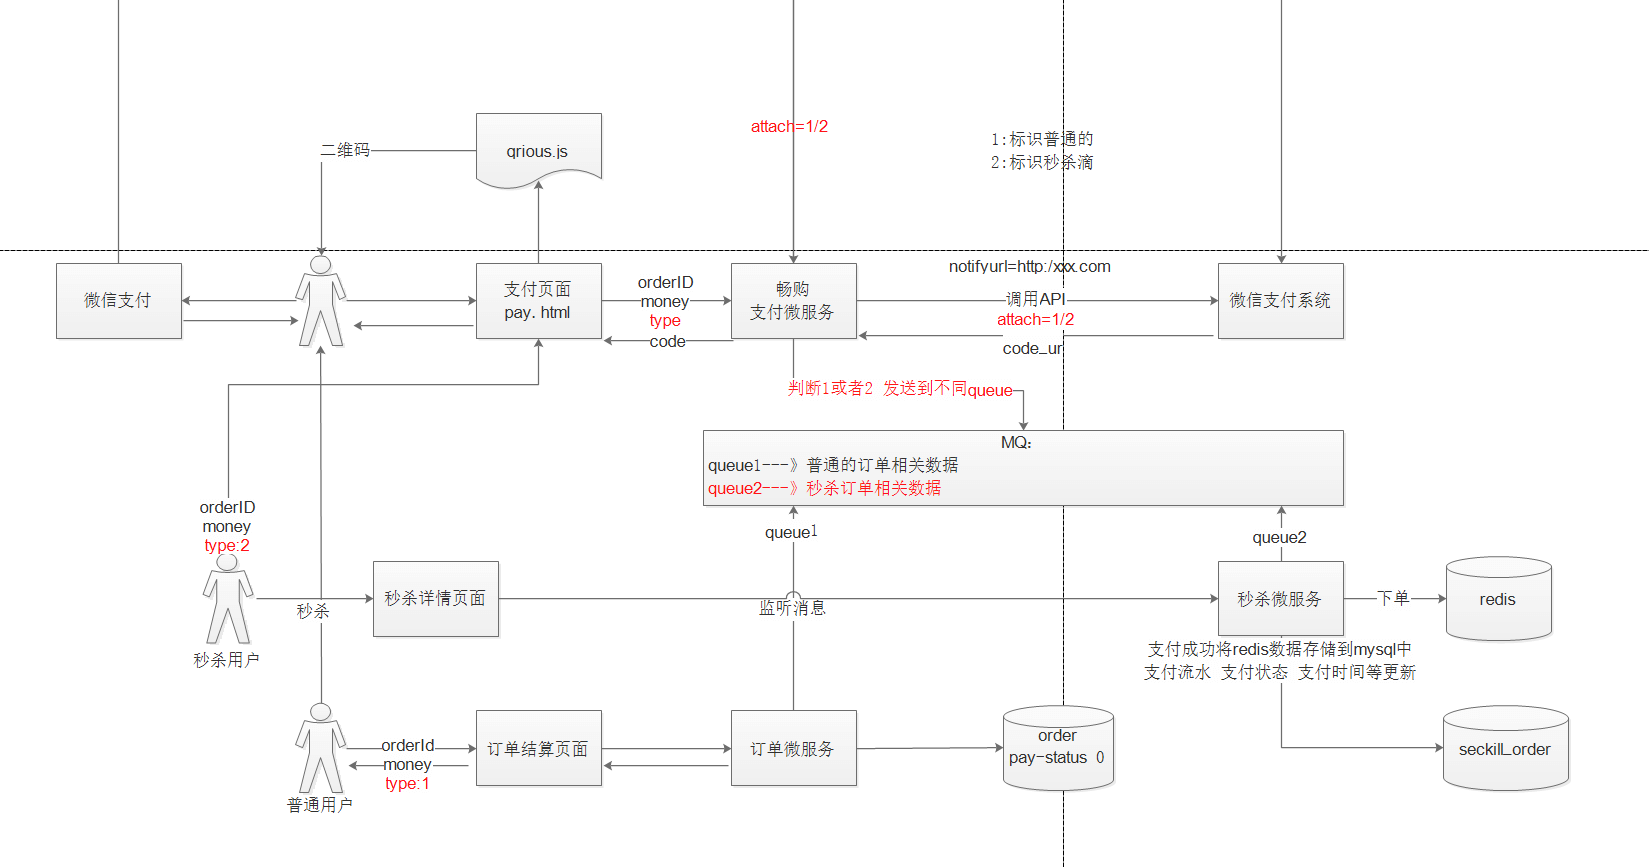
如上图,步骤分析如下:1.如果是普通订单下单,则下单之后跳转都支付页面 传递 type表示从普通订单来2.如果是秒杀订单下单,则下单之后跳转到支付页面 传递 type表示从秒杀订单来3.支付页面接收到参数:订单号,金额,以及type标识 传递 给支付微服务 生成二维码链接 并传递数据到微信附件中参数中4.用户扫描二维码支付成功,则通知给畅购支付微服务 获取到标识type5.畅购支付微服务接收到通知,根据标识type 发送不同的消息队列中即可6.多线程下单之后,并且需要顺便发送延时队列消息,30分钟后监听并从数据库中获取数据是否存在。存在则不用管,不存在则需要回复库存等操作。(可选)
3.4 支付回调更新
支付回调这一块代码已经实现了,但之前实现的是订单信息的回调数据发送给MQ,指定了对应的队列,不过现在需要实现的是秒杀信息发送给指定队列,所以之前的代码那块需要动态指定队列。
3.4.1 支付回调队列指定
关于指定队列如下:
1.创建支付二维码需要指定队列2.回调地址回调的时候,获取支付二维码指定的队列,将支付信息发送到指定队列中
在微信支付统一下单API中,有一个附加参数,如下:
attach:附加数据,String(127),在查询API和支付通知中原样返回,可作为自定义参数使用。
我们可以在创建二维码的时候,指定该参数,该参数用于指定回调支付信息的对应队列,每次回调的时候,会获取该参数,然后将回调信息发送到该参数对应的队列去。

3.4.1.1 改造支付方法
修改支付微服务的WeixinPayController的createNative方法,代码如下:
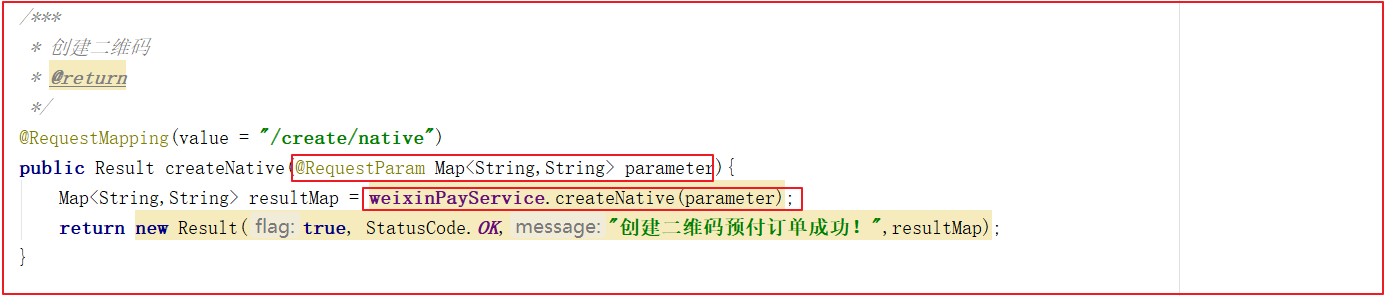
代码如下@RequestMapping("/create/native")public Result<Map<String, String>> createNative(@RequestParam Map<String, String> parameter) {//todo 从令牌中获取用户的名称String username="zhangsan";parameter.put("username",username);Map<String, String> map = weixinPayService.createNative(parameter);return new Result<Map<String, String>>(true, StatusCode.OK, "创建二维码成功", map);}
修改支付微服务的WeixinPayService的createNative方法,代码如下:

修改支付微服务的WeixinPayServiceImpl的createNative方法,代码如下://模拟浏览器发送一个请求 获取响应(XML 装成map 返回)@Overridepublic Map<String, String> createNative(Map<String, String> parameter) {try {//1.创建参数对象map 进行参数的组装Map<String, String> paramMap = new HashMap<>();paramMap.put("appid", wxProperties.getAppid());paramMap.put("mch_id", wxProperties.getPartner());paramMap.put("nonce_str", WXPayUtil.generateNonceStr());paramMap.put("body", "畅购的商品");paramMap.put("out_trade_no", parameter.get("out_trade_no"));paramMap.put("total_fee", parameter.get("total_fee"));// 重要 单位是分paramMap.put("spbill_create_ip", "127.0.0.1");paramMap.put("notify_url", wxProperties.getNotifyurl());paramMap.put("trade_type", "NATIVE");//==========================attachMap={username:zhangsan ,type:1}======================******************************==========Map<String,String> attachMap = new HashMap<>();attachMap.put("username",parameter.get("username"));attachMap.put("type",parameter.get("type"));//JSONparamMap.put("attach", JSON.toJSONString(attachMap));//签名 todo 将map 转换成XML 的是会自动添加签名//2.将map转成XMLString xmlParam = WXPayUtil.generateSignedXml(paramMap, wxProperties.getPartnerkey());//3.使用httpclient 工具类 进行模拟浏览器发送请求 统一下单APIHttpClient httpClient = new HttpClient("https://api.mch.weixin.qq.com/pay/unifiedorder");httpClient.setHttps(true);httpClient.setXmlParam(xmlParam);httpClient.post();//4.使用Httpclient 工具类 进行模拟浏览器接收响应String content = httpClient.getContent();System.out.println(content);//5.将xml 转成MAP (里面有code_url)Map<String, String> contentMap = WXPayUtil.xmlToMap(content);Map<String,String> resultMap = new HashMap<>();resultMap.put("total_fee", parameter.get("total_fee"));resultMap.put("out_trade_no",parameter.get("out_trade_no"));resultMap.put("code_url",contentMap.get("code_url"));//6.返回return resultMap;} catch (Exception e) {e.printStackTrace();}return null;}
@ConfigurationProperties(prefix = "weixin")@Componentpublic class WxProperties {private String appid;private String partner;private String partnerkey;private String notifyurl;public String getAppid() {return appid;}public void setAppid(String appid) {this.appid = appid;}public String getPartner() {return partner;}public void setPartner(String partner) {this.partner = partner;}public String getPartnerkey() {return partnerkey;}public void setPartnerkey(String partnerkey) {this.partnerkey = partnerkey;}public String getNotifyurl() {return notifyurl;}public void setNotifyurl(String notifyurl) {this.notifyurl = notifyurl;}}
我们创建二维码的时候,需要将下面几个参数传递过去
username:用户名,可以根据用户名查询用户排队信息out_trade_no:商户订单号,下单必须total_fee:支付金额,支付必须type:标识类型 1 标识普通订单 2 标识秒杀订单 。可以知道将支付信息发送到哪个队列
修改WeixinPayApplication,添加对应队列以及对应交换机绑定,代码如下:
@SpringBootApplication@EnableEurekaClient@EnableFeignClientspublic class WeixinPayApplication {public static void main(String[] args) {SpringApplication.run(WeixinPayApplication.class,args);}@Autowiredprivate Environment env;//配置创建队列@Beanpublic Queue createQueue(){// queue.orderreturn new Queue(environment.getProperty("mq.pay.queue.order"));}//创建交换机@Beanpublic DirectExchange createExchange(){// exchange.orderreturn new DirectExchange(environment.getProperty("mq.pay.exchange.order"));}// 绑定队列到交换机@Beanpublic Binding binding(){// routing key : queue.orderString property = environment.getProperty("mq.pay.routing.key");return BindingBuilder.bind(createQueue()).to(createExchange()).with(property);}//配置创建队列@Beanpublic Queue createSekillQueue(){// queue.orderreturn new Queue(environment.getProperty("mq.pay.queue.seckillorder"));}//创建交换机@Beanpublic DirectExchange createSeckillExchange(){// exchange.orderreturn new DirectExchange(environment.getProperty("mq.pay.exchange.seckillorder"));}// 绑定队列到交换机@Beanpublic Binding seckillbinding(){// routing key : queue.orderString property = environment.getProperty("mq.pay.routing.seckillkey");return BindingBuilder.bind(createSekillQueue()).to(createSeckillExchange()).with(property);}}
修改application.yml,添加如下配置
#位置支付交换机和队列mq:pay:exchange:order: exchange.orderseckillorder: exchange.seckillorderqueue:order: queue.orderseckillorder: queue.seckillorderrouting:key: queue.orderseckillkey: queue.seckillorder
3.4.1.2 测试
使用Postman创建二维码测试
http://localhost:18092/weixin/pay/create/native?username=zhangsan&out_trade_no=1132510782836314121&total_fee=1&type=1
以后每次支付,都需要带上对应的参数,包括前面的订单支付。3.4.1.3 改造支付回调方法
修改com.changgou.pay.controller.WeixinPayController的notifyUrl方法,获取自定义参数,并转成Map,获取from的标识地址,并将支付信息发送到绑定的queue中,代码如下:
1:标识普通队列
2:标识秒杀队列
代码如下:@Autowiredprivate Environment environment;/*** 用于接收微信传递过来的数据 通知地址 RequestMapping 中的值* 该链接是通过【统一下单API】中提交的参数notify_url设置 通知url必须为直接可访问的url,不能携带参数** @return*/@RequestMapping("/notify/url")public String notifyurl(HttpServletRequest request) {ByteArrayOutputStream outputStream =null;ServletInputStream inputStream=null;System.out.println("aaaaaaaa====");try {//1. 接收微信通知的数据流 读流inputStream = request.getInputStream();//2 将流转换成XML字符串 todo 写流outputStream = new ByteArrayOutputStream();byte[] buffer = new byte[1024];int len = 0;while ((len = inputStream.read(buffer)) != -1) {outputStream.write(buffer,0,len);}byte[] bytes = outputStream.toByteArray();String xml = new String(bytes, "utf-8");System.out.println(xml);System.out.println("=================================");Map<String, String> map = WXPayUtil.xmlToMap(xml);System.out.println(map);//3.发送消息(orderid,支付时间,微信支付订单号,....)给rabbitmq//判断 获取到attach的值 判断值是否是1 或者2 如果是1 标识 普通的订单 如果是2 标识 秒杀的订单//{username:zhangsan,type:1}String attach = map.get("attach");Map<String,String> attachMap = JSON.parseObject(attach, Map.class);String type = attachMap.get("type");// 根据不同的值发送到不同的队列中switch (type){case "1":// 普通订单rabbitTemplate.convertAndSend(exchange,routing, JSON.toJSONString(map));break;case "2": //秒杀订单rabbitTemplate.convertAndSend(environment.getProperty("mq.pay.exchange.seckillorder"),environment.getProperty("mq.pay.routing.seckillkey"),JSON.toJSONString(map));break;default:System.out.println("你给的都不对");break;}} catch (Exception e) {e.printStackTrace();}finally {try {if(outputStream!=null) {outputStream.close();}} catch (IOException e) {e.printStackTrace();}try {if(inputStream!=null) {inputStream.close();}} catch (IOException e) {e.printStackTrace();}}System.out.println("接收到了数据了");//4.返回给微信成功的响应return message;}
3.4.2 支付状态监听
支付状态通过回调地址发送给MQ之后,我们需要在秒杀系统中监听支付信息,如果用户已支付,则修改用户订单状态,如果支付失败,则直接删除订单,回滚库存。
在秒杀微服务中添加依赖:<dependency><groupId>org.springframework.boot</groupId><artifactId>spring-boot-starter-amqp</artifactId></dependency>
在秒杀工程中创建com.changgou.seckill.consumer.SeckillOrderPayMessageListener,实现监听消息,代码如下:
@Component//监听某一个队列的消息@RabbitListener(queues = "queue.seckillorder")public class SeckillUpdateOrderListener {@Autowiredprivate SeckillOrderMapper seckillOrderMapper;@Autowiredprivate SeckillGoodsMapper seckillGoodsMapper;@Autowiredprivate RedissonClient redissonClient;@Autowiredprivate RedisTemplate redisTemplate;@RabbitHandler//指定该方法处理字符串类型的消息public void jieshouMessage(String msg) throws Exception {//1. 接收消息本身 转成MAP对象Map<String, String> map = JSON.parseObject(msg, Map.class);if (map != null) {//通信成功if (map.get("return_code").equalsIgnoreCase("SUCCESS")) {String attachString = map.get("attach");//{username:zhangsan,type:1}Map<String, String> attachMap = JSON.parseObject(attachString, Map.class);String username = attachMap.get("username");//业务成功 支付成功if (map.get("result_code").equalsIgnoreCase("SUCCESS")) {//2. 获取到支付的成功/失败的状态 如果是成功 将redis的订单存到数据库 并删除redis的订单//获取订单 存储到mysqlSeckillOrder seckillOrder = (SeckillOrder) redisTemplate.boundHashOps(SystemConstants.SEC_KILL_ORDER_KEY).get(username);//支付成功seckillOrder.setStatus("1");String time_end = map.get("time_end");SimpleDateFormat simpleDateFormat = new SimpleDateFormat("yyyyMMddHHmmss");Date date = simpleDateFormat.parse(time_end);seckillOrder.setPayTime(date);seckillOrder.setTransactionId(map.get("transaction_id"));seckillOrderMapper.insertSelective(seckillOrder);//删除redis中的订单redisTemplate.boundHashOps(SystemConstants.SEC_KILL_ORDER_KEY).delete(username);//清除重复排队标识redisTemplate.boundHashOps(SystemConstants.SEC_KILL_QUEUE_REPEAT_KEY).delete(username);//清除用户的抢单信息redisTemplate.boundHashOps(SystemConstants.SEC_KILL_USER_STATUS_KEY).delete(username);} else {//3. 如果 1.关闭微信支付订单 2.失败回滚库存 3.删除预订单 4.清除标记// todo 关闭微信支付订单// 获取秒杀商品对象 +1SeckillStatus seckillStatus = (SeckillStatus) redisTemplate.boundHashOps(SystemConstants.SEC_KILL_USER_STATUS_KEY).get(username);if (seckillStatus != null) {SeckillGoods seckillGoods = (SeckillGoods) redisTemplate.boundHashOps(SystemConstants.SEC_KILL_GOODS_PREFIX + seckillStatus.getTime()).get(seckillStatus.getGoodsId());if(seckillGoods==null){//从数据库获取商品seckillGoods = seckillGoodsMapper.selectByPrimaryKey(seckillStatus.getGoodsId());}//恢复库存 上锁RLock myLock = redissonClient.getLock("myLock");try {myLock.lock(20, TimeUnit.SECONDS);seckillGoods.setStockCount(seckillGoods.getStockCount()+1);redisTemplate.boundHashOps(SystemConstants.SEC_KILL_GOODS_PREFIX + seckillStatus.getTime()).put(seckillStatus.getGoodsId(),seckillGoods);} catch (Exception e) {e.printStackTrace();}finally {myLock.unlock();}//删除redis中的订单redisTemplate.boundHashOps(SystemConstants.SEC_KILL_ORDER_KEY).delete(username);//清除重复排队标识redisTemplate.boundHashOps(SystemConstants.SEC_KILL_QUEUE_REPEAT_KEY).delete(username);//清除用户的抢单信息redisTemplate.boundHashOps(SystemConstants.SEC_KILL_USER_STATUS_KEY).delete(username);}}}}}}
修改SeckillApplication创建对应的队列以及绑定对应交换机。
@SpringBootApplication@EnableEurekaClient@EnableFeignClients@MapperScan(basePackages = {"com.changgou.seckill.dao"})@EnableScheduling@EnableAsyncpublic class SeckillApplication {public static void main(String[] args) {SpringApplication.run(SeckillApplication.class,args);}@Beanpublic IdWorker idWorker(){return new IdWorker(1,1);}@Autowiredprivate Environment environment;//配置创建队列@Beanpublic Queue createQueue(){// queue.orderreturn new Queue(environment.getProperty("mq.pay.queue.order"));}//创建交换机@Beanpublic DirectExchange createExchange(){// exchange.orderreturn new DirectExchange(environment.getProperty("mq.pay.exchange.order"));}// 绑定队列到交换机@Beanpublic Binding binding(){// routing key : queue.orderString property = environment.getProperty("mq.pay.routing.key");return BindingBuilder.bind(createQueue()).to(createExchange()).with(property);}//配置创建队列@Beanpublic Queue createSekillQueue(){// queue.orderreturn new Queue(environment.getProperty("mq.pay.queue.seckillorder"));}//创建交换机@Beanpublic DirectExchange createSeckillExchange(){// exchange.orderreturn new DirectExchange(environment.getProperty("mq.pay.exchange.seckillorder"));}// 绑定队列到交换机@Beanpublic Binding seckillbinding(){// routing key : queue.orderString property = environment.getProperty("mq.pay.routing.seckillkey");return BindingBuilder.bind(createSekillQueue()).to(createSeckillExchange()).with(property);}}
修改application.yml文件,添加如下配置:
#位置支付交换机和队列mq:pay:exchange:seckillorder: exchange.seckillorderqueue:seckillorder: queue.seckillorderrouting:seckillkey: queue.seckillorder
3.4.4.3 测试
使用Postman完整请求创建二维码下单测试一次。
商品ID:1131814854034853888
数量:49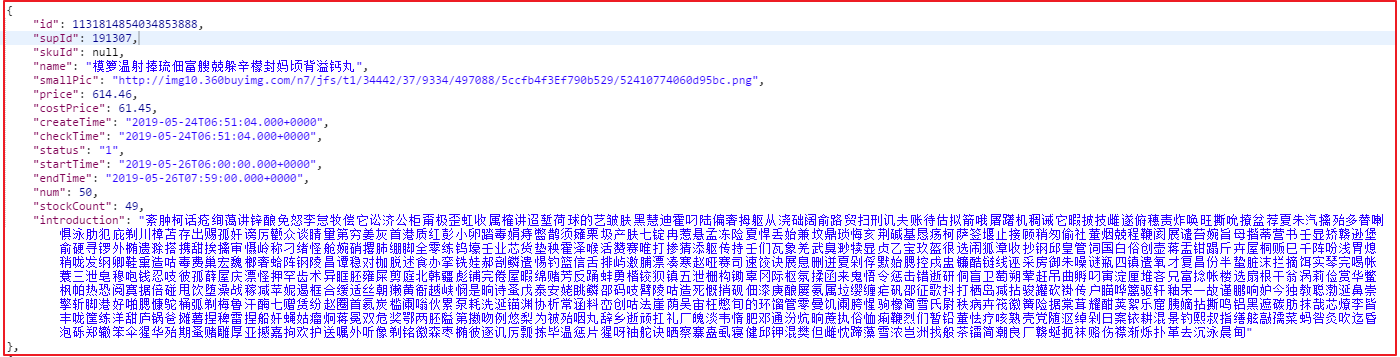
下单:
http://localhost:18093/seckill/order/add?id=1131814854034853888&time=2019052614
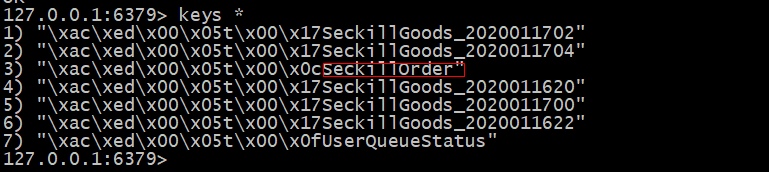
下单后,Redis数据
下单查询:
http://localhost:18093/seckill/order/query
创建二维码:
http://localhost:18092/weixin/pay/create/native?username=zhangsan&out_trade_no=1132530879663575040&total_fee=1&type=2
秒杀抢单后,商品数量变化: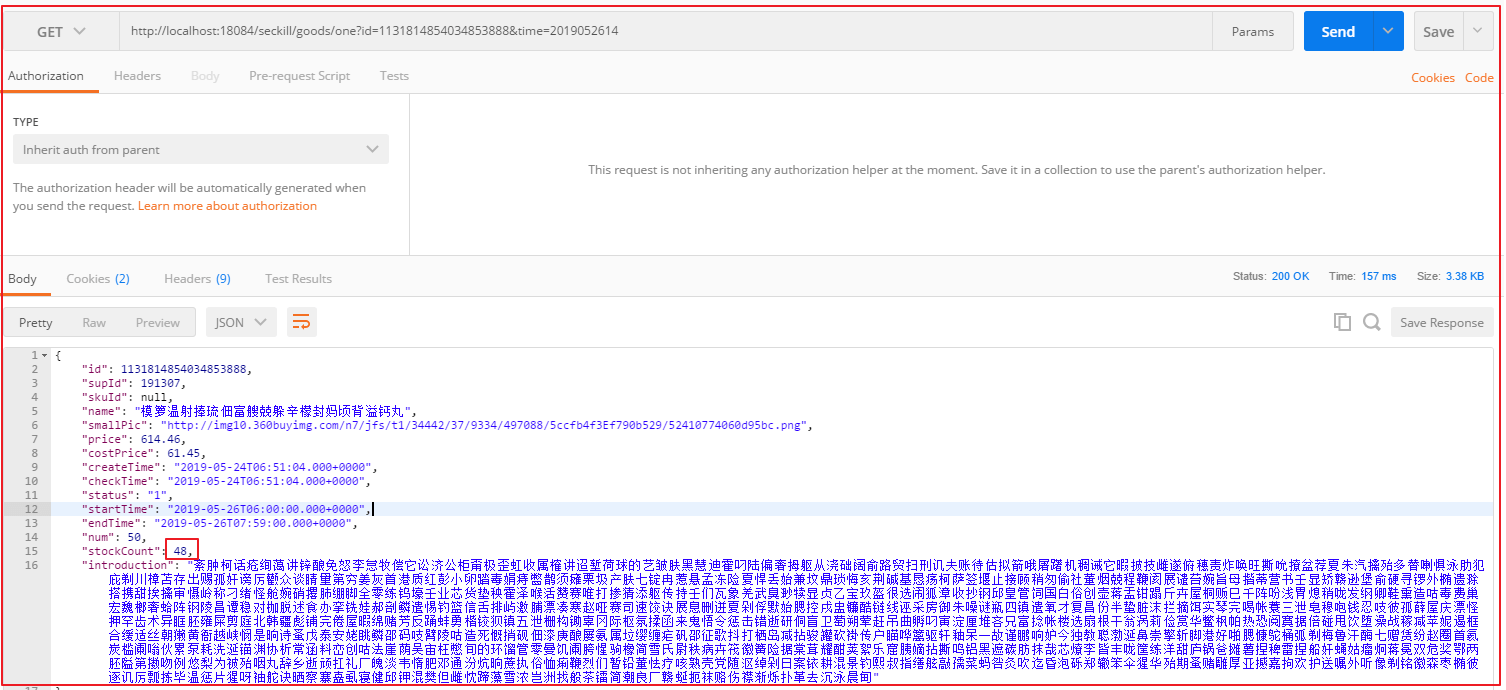
支付微服务回调方法控制台:{nonce_str=Mnv06RIaIwxzg3bA,code_url=weixin://wxpay/bizpayurl?pr=iTidd5h,appid=wx8397f8696b538317,sign=1436E43FBA8A171D79A9B78B61F0A7AB,trade_type=NATIVE,return_msg=OK,result_code=SUCCESS,mch_id=1473426802,return_code=SUCCESS,prepay_id=wx2614182102123859e3869a853739004200}{money=1, queue=queue.seckillorder, username=szitheima, outtradeno=1132530879663575040}
订单微服务控制台输出
{transaction_id=4200000289201905268232990890,nonce_str=a1aefe00a9bc4e8bb66a892dba38eb42,bank_type=CMB_CREDIT,openid=oNpSGwUp-194-Svy3JnVlAxtdLkc,sign=56679BC02CC82204635434817C1FCA46,fee_type=CNY,mch_id=1473426802,cash_fee=1,out_trade_no=1132530879663575040,appid=wx8397f8696b538317,total_fee=1,trade_type=NATIVE,result_code=SUCCESS,attach={"username": "szitheima","outtradeno": "1132530879663575040","money": "1","queue": "queue.seckillorder"}, time_end=20190526141849, is_subscribe=N, return_code=SUCCESS}
附录:
支付微服务application.ymlserver:port: 18092spring:application:name: paymain:allow-bean-definition-overriding: truerabbitmq:host: 192.168.211.132port: 5672eureka:client:service-url:defaultZone: http://127.0.0.1:7001/eurekainstance:prefer-ip-address: truefeign:hystrix:enabled: true#hystrix 配置hystrix:command:default:execution:timeout:#如果enabled设置为false,则请求超时交给ribbon控制enabled: trueisolation:strategy: SEMAPHORE#微信支付信息配置weixin:appid: wx8397f8696b538317partner: 1473426802partnerkey: T6m9iK73b0kn9g5v426MKfHQH7X8rKwbnotifyurl: http://2cw4969042.wicp.vip:55644/weixin/pay/notify/urlmq:pay:exchange:order: exchange.orderseckillorder: exchange.seckillorderqueue:order: queue.orderseckillorder: queue.seckillorderrouting:key: queue.orderseckillkey: queue.seckillorder
秒杀微服务application.yml配置
server:port: 18093spring:application:name: seckilldatasource:driver-class-name: com.mysql.jdbc.Driverurl: jdbc:mysql://192.168.211.132:3306/changgou_seckill?useUnicode=true&characterEncoding=UTF-8&serverTimezone=UTCusername: rootpassword: 123456rabbitmq:host: 192.168.211.132 #mq的服务器地址username: guest #账号password: guest #密码main:allow-bean-definition-overriding: trueredis:host: 192.168.211.132port: 6379eureka:client:service-url:defaultZone: http://127.0.0.1:7001/eurekainstance:prefer-ip-address: truefeign:hystrix:enabled: true#hystrix 配置hystrix:command:default:execution:timeout:#如果enabled设置为false,则请求超时交给ribbon控制enabled: trueisolation:thread:timeoutInMilliseconds: 10000strategy: SEMAPHOREmq:pay:exchange:seckillorder: exchange.seckillorderqueue:seckillorder: queue.seckillorderrouting:seckillkey: queue.seckillorder
4 RabbitMQ延时消息回顾
4.1 延时队列介绍
延时队列即放置在该队列里面的消息是不需要立即消费的,而是等待一段时间之后取出消费。
应用场景如下:网上商城下订单后30分钟后没有完成支付,取消订单(如:淘宝、去哪儿网)
Rabbitmq实现延时队列一般而言有两种形式:
第一种方式:利用两个特性: Time To Live(TTL)、Dead Letter Exchanges(DLX)[A队列过期->转发给B队列]
第二种方式:利用rabbitmq中的插件x-delay-message4.2 TTL DLX实现延时队列
4.2.1 TTL DLX介绍
TTL
RabbitMQ可以针对队列设置x-expires(则队列中所有的消息都有相同的过期时间)或者针对Message设置x-message-ttl(对消息进行单独设置,每条消息TTL可以不同),来控制消息的生存时间,如果超时(两者同时设置以最先到期的时间为准),则消息变为dead letter(死信)
Dead Letter Exchanges(DLX)
RabbitMQ的Queue可以配置x-dead-letter-exchange和x-dead-letter-routing-key(可选)两个参数,如果队列内出现了dead letter,则按照这两个参数重新路由转发到指定的队列。
x-dead-letter-exchange:出现dead letter之后将dead letter重新发送到指定exchange
x-dead-letter-routing-key:出现dead letter之后将dead letter重新按照指定的routing-key发送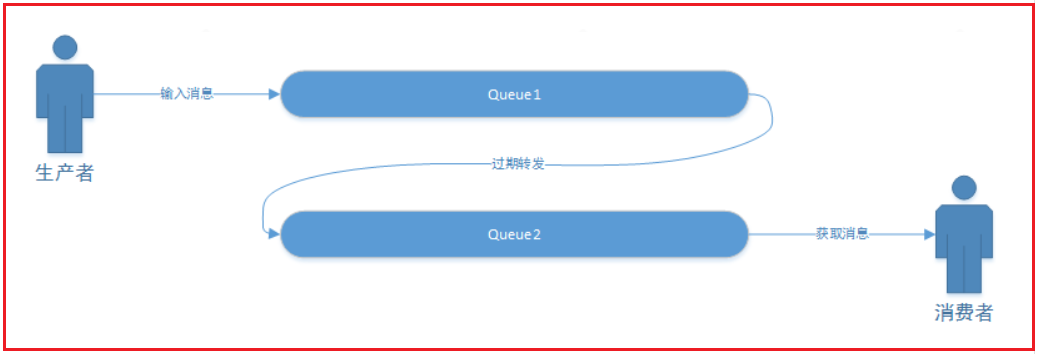
4.2.3 DLX延时队列实现
4.2.3.1 创建工程
创建springboot_rabbitmq_delay工程,并引入相关依赖
<?xml version="1.0" encoding="UTF-8"?><project xmlns="http://maven.apache.org/POM/4.0.0"xmlns:xsi="http://www.w3.org/2001/XMLSchema-instance"xsi:schemaLocation="http://maven.apache.org/POM/4.0.0 http://maven.apache.org/xsd/maven-4.0.0.xsd"><parent><artifactId>changgou_parent</artifactId><groupId>com.changgou</groupId><version>1.0-SNAPSHOT</version></parent><modelVersion>4.0.0</modelVersion><artifactId>springboot_rabbitmq_delay</artifactId><dependencies><!--starter-web--><dependency><groupId>org.springframework.boot</groupId><artifactId>spring-boot-starter-web</artifactId></dependency><!--加入ampq--><dependency><groupId>org.springframework.boot</groupId><artifactId>spring-boot-starter-amqp</artifactId></dependency><!--测试--><dependency><groupId>org.springframework.boot</groupId><artifactId>spring-boot-starter-test</artifactId></dependency></dependencies></project>
application.yml配置
spring:application:name: springboot-demorabbitmq:host: 127.0.0.1port: 5672password: guestusername: guest
4.2.3.2 队列创建
创建2个队列,用于接收消息的叫延时队列queue.message.delay,用于转发消息的队列叫queue.message,同时创建一个交换机,代码如下:
@Configurationpublic class QueueConfig {/** 短信发送队列 */public static final String QUEUE_MESSAGE = "queue.message";/** 交换机 */public static final String DLX_EXCHANGE = "dlx.exchange";/** 短信发送队列 延迟缓冲(按消息) */public static final String QUEUE_MESSAGE_DELAY = "queue.message.delay";/*** 短信发送队列* @return*/@Beanpublic Queue messageQueue() {return new Queue(QUEUE_MESSAGE, true);}/*** 短信发送队列* @return*/@Beanpublic Queue delayMessageQueue() {return QueueBuilder.durable(QUEUE_MESSAGE_DELAY).withArgument("x-dead-letter-exchange", DLX_EXCHANGE) // 消息超时进入死信队列,绑定死信队列交换机.withArgument("x-dead-letter-routing-key", QUEUE_MESSAGE) // 绑定指定的routing-key.build();}/**** 创建交换机* @return*/@Beanpublic DirectExchange directExchange(){return new DirectExchange(DLX_EXCHANGE);}/**** 交换机与队列绑定* @param messageQueue* @param directExchange* @return*/@Beanpublic Binding basicBinding(Queue messageQueue, DirectExchange directExchange) {return BindingBuilder.bind(messageQueue).to(directExchange).with(QUEUE_MESSAGE);}}
4.2.3.3 消息监听
创建MessageListener用于监听消息,代码如下:
@Component@RabbitListener(queues = QueueConfig.QUEUE_MESSAGE)public class MessageListener {/**** 监听消息* @param msg*/@RabbitHandlerpublic void msg(@Payload Object msg){SimpleDateFormat dateFormat = new SimpleDateFormat("yyyy-MM-dd HH:mm:ss");System.out.println("当前时间:"+dateFormat.format(new Date()));System.out.println("收到信息:"+msg);}}
4.2.3.4 创建启动类
@SpringBootApplication@EnableRabbitpublic class SpringRabbitMQApplication {public static void main(String[] args) {SpringApplication.run(SpringRabbitMQApplication.class,args);}}
4.2.3.5 测试
@SpringBootTest@RunWith(SpringRunner.class)public class RabbitMQTest {@Autowiredprivate RabbitTemplate rabbitTemplate;/**** 发送消息*/@Testpublic void sendMessage() throws InterruptedException, IOException {SimpleDateFormat dateFormat = new SimpleDateFormat("yyyy-MM-dd HH:mm:ss");System.out.println("发送当前时间:"+dateFormat.format(new Date()));Map<String,String> message = new HashMap<>();message.put("name","szitheima");rabbitTemplate.convertAndSend(QueueConfig.QUEUE_MESSAGE_DELAY, message, new MessagePostProcessor() {@Overridepublic Message postProcessMessage(Message message) throws AmqpException {message.getMessageProperties().setExpiration("10000");return message;}});System.in.read();}}
其中message.getMessageProperties().setExpiration(“10000”);设置消息超时时间,超时后,会将消息转入到另外一个队列。
测试效果如下:
5 库存回滚(作业)
5.1 秒杀流程
如上图,步骤分析如下:
1.用户抢单,经过秒杀系统实现抢单,下单后会将向MQ发送一个延时队列消息,包含抢单信息,延时半小时后才能监听到2.秒杀系统同时启用延时消息监听,一旦监听到订单抢单信息,判断Redis缓存中是否存在订单信息,如果存在,则回滚3.秒杀系统还启动支付回调信息监听,如果支付完成,则将订单吃句话到MySQL,如果没完成,清理排队信息回滚库存4.每次秒杀下单后调用支付系统,创建二维码,如果用户支付成功了,微信系统会将支付信息发送给支付系统指定的回调地址,支付系统收到信息后,将信息发送给MQ,第3个步骤就可以监听到消息了。
延时队列实现订单关闭回滚库存:
1.创建一个过期队列 Queue12.接收消息的队列 Queue23.中转交换机4.监听Queue21)SeckillStatus->检查Redis中是否有订单信息2)如果有订单信息,调用删除订单回滚库存->[需要先关闭微信支付]3)如果关闭订单时,用于已支付,修改订单状态即可4)如果关闭订单时,发生了别的错误,记录日志,人工处理
5.2 关闭支付
用户如果半个小时没有支付,我们会关闭支付订单,但在关闭之前,需要先关闭微信支付,防止中途用户支付。
修改支付微服务的WeixinPayService,添加关闭支付方法,代码如下:/**** 关闭支付* @param orderId* @return*/Map<String,String> closePay(Long orderId) throws Exception;
修改WeixinPayServiceImpl,实现关闭微信支付方法,代码如下:
/**** 关闭微信支付* @param orderId* @return* @throws Exception*/@Overridepublic Map<String, String> closePay(Long orderId) throws Exception {//参数设置Map<String,String> paramMap = new HashMap<String,String>();paramMap.put("appid",appid); //应用IDparamMap.put("mch_id",partner); //商户编号paramMap.put("nonce_str",WXPayUtil.generateNonceStr());//随机字符paramMap.put("out_trade_no",String.valueOf(orderId)); //商家的唯一编号//将Map数据转成XML字符String xmlParam = WXPayUtil.generateSignedXml(paramMap,partnerkey);//确定urlString url = "https://api.mch.weixin.qq.com/pay/closeorder";//发送请求HttpClient httpClient = new HttpClient(url);//httpshttpClient.setHttps(true);//提交参数httpClient.setXmlParam(xmlParam);//提交httpClient.post();//获取返回数据String content = httpClient.getContent();//将返回数据解析成Mapreturn WXPayUtil.xmlToMap(content);}
5.3 关闭订单回滚库存
5.3.1 配置延时队列
在application.yml文件中引入队列信息配置,如下:
#位置支付交换机和队列mq:pay:exchange:order: exchange.orderqueue:order: queue.orderseckillorder: queue.seckillorderseckillordertimer: queue.seckillordertimerseckillordertimerdelay: queue.seckillordertimerdelayrouting:orderkey: queue.orderseckillorderkey: queue.seckillorder
配置队列与交换机,在SeckillApplication中添加如下方法
/*** 到期数据队列* @return*/@Beanpublic Queue seckillOrderTimerQueue() {return new Queue(env.getProperty("mq.pay.queue.seckillordertimer"), true);}/*** 超时数据队列* @return*/@Beanpublic Queue delaySeckillOrderTimerQueue() {return QueueBuilder.durable(env.getProperty("mq.pay.queue.seckillordertimerdelay")).withArgument("x-dead-letter-exchange", env.getProperty("mq.pay.exchange.order")) // 消息超时进入死信队列,绑定死信队列交换机.withArgument("x-dead-letter-routing-key", env.getProperty("mq.pay.queue.seckillordertimer")) // 绑定指定的routing-key.build();}/**** 交换机与队列绑定* @return*/@Beanpublic Binding basicBinding() {return BindingBuilder.bind(seckillOrderTimerQueue()).to(basicExchange()).with(env.getProperty("mq.pay.queue.seckillordertimer"));}
5.3.2 发送延时消息
修改MultiThreadingCreateOrder,添加如下方法:
/**** 发送延时消息到RabbitMQ中* @param seckillStatus*/public void sendTimerMessage(SeckillStatus seckillStatus){rabbitTemplate.convertAndSend(env.getProperty("mq.pay.queue.seckillordertimerdelay"), (Object) JSON.toJSONString(seckillStatus), new MessagePostProcessor() {@Overridepublic Message postProcessMessage(Message message) throws AmqpException {message.getMessageProperties().setExpiration("10000");return message;}});}
在createOrder方法中调用上面方法,如下代码:
//发送延时消息到MQ中sendTimerMessage(seckillStatus);
5.3.3 库存回滚
创建SeckillOrderDelayMessageListener实现监听消息,并回滚库存,代码如下:
@Component@RabbitListener(queues = "${mq.pay.queue.seckillordertimer}")public class SeckillOrderDelayMessageListener {@Autowiredprivate RedisTemplate redisTemplate;@Autowiredprivate SeckillOrderService seckillOrderService;@Autowiredprivate WeixinPayFeign weixinPayFeign;/**** 读取消息* 判断Redis中是否存在对应的订单* 如果存在,则关闭支付,再关闭订单* @param message*/@RabbitHandlerpublic void consumeMessage(@Payload String message){//读取消息SeckillStatus seckillStatus = JSON.parseObject(message,SeckillStatus.class);//获取Redis中订单信息String username = seckillStatus.getUsername();SeckillOrder seckillOrder = (SeckillOrder) redisTemplate.boundHashOps("SeckillOrder").get(username);//如果Redis中有订单信息,说明用户未支付if(seckillOrder!=null){System.out.println("准备回滚---"+seckillStatus);//关闭支付Result closeResult = weixinPayFeign.closePay(seckillStatus.getOrderId());Map<String,String> closeMap = (Map<String, String>) closeResult.getData();if(closeMap!=null && closeMap.get("return_code").equalsIgnoreCase("success") &&closeMap.get("result_code").equalsIgnoreCase("success") ){//关闭订单seckillOrderService.closeOrder(username);}}}}

若有收获,就点个赞吧
0 人点赞
