防抖
当按下时,按键经常产生错误的开/关变迁,这是机械物理的问题:这些变迁可能被读取为在短时间内多次按下,从而使程序变笨。这个例子示范了怎样使一个输入防抖,这意味着在一个短时间内检查两次来确保这个按键是确实被按下了。如果没有防抖,按一次这个按键可能会引起不可预测的结果。这个程序利用millis()函数来保持按下的时间间隔。
硬件要求
- Arduino or Genuino 开发板
- 即时按键或者开关
- 10k ohm 电阻
- 连接线
- 面包板
电路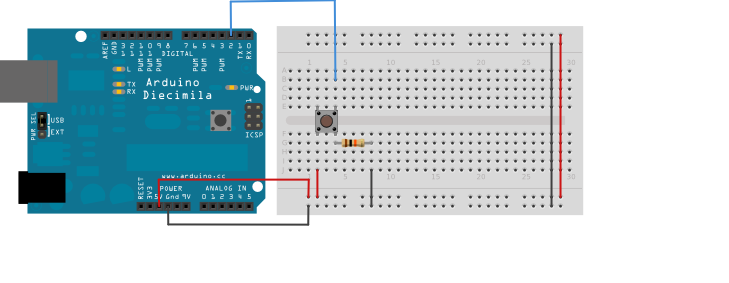
原理图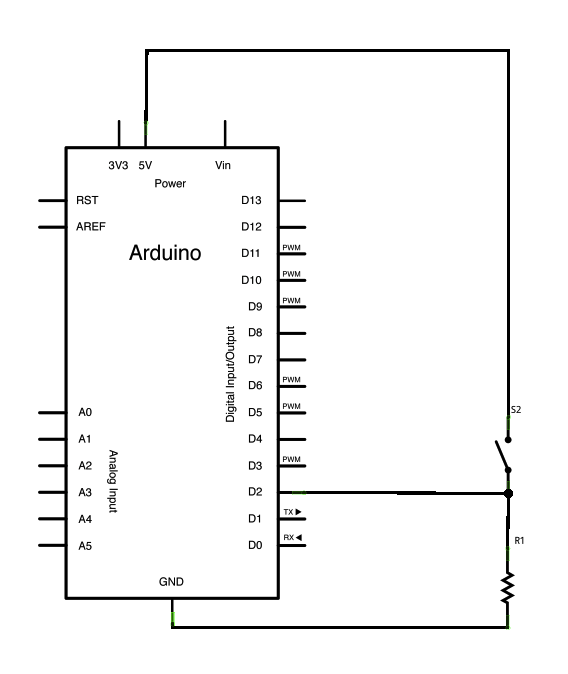
样例代码
以下程序基于Limor Fried的防抖版本,但是她的例子的逻辑是反过来的。在她的例子里,当闭合时开关为低电平,而断开时开关未高电平。这里当按下开关时为高电平,没有按下时为低电平。
/*DebounceEach time the input pin goes from LOW to HIGH (e.g. because of a push-buttonpress), the output pin is toggled from LOW to HIGH or HIGH to LOW. There'sa minimum delay between toggles to debounce the circuit (i.e. to ignorenoise).The circuit:* LED attached from pin 13 to ground* pushbutton attached from pin 2 to +5V* 10K resistor attached from pin 2 to ground* Note: On most Arduino boards, there is already an LED on the boardconnected to pin 13, so you don't need any extra components for this example.created 21 November 2006by David A. Mellismodified 30 Aug 2011by Limor Friedmodified 28 Dec 2012by Mike WaltersThis example code is in the public domain.http://www.arduino.cc/en/Tutorial/Debounce*/// constants won't change. They're used here to// set pin numbers:const int buttonPin = 2; // the number of the pushbutton pinconst int ledPin = 13; // the number of the LED pin// Variables will change:int ledState = HIGH; // the current state of the output pinint buttonState; // the current reading from the input pinint lastButtonState = LOW; // the previous reading from the input pin// the following variables are long's because the time, measured in miliseconds,// will quickly become a bigger number than can be stored in an int.long lastDebounceTime = 0; // the last time the output pin was toggledlong debounceDelay = 50; // the debounce time; increase if the output flickersvoid setup() {pinMode(buttonPin, INPUT);pinMode(ledPin, OUTPUT);// set initial LED statedigitalWrite(ledPin, ledState);}void loop() {// read the state of the switch into a local variable:int reading = digitalRead(buttonPin);// check to see if you just pressed the button// (i.e. the input went from LOW to HIGH), and you've waited// long enough since the last press to ignore any noise:// If the switch changed, due to noise or pressing:if (reading != lastButtonState) {// reset the debouncing timerlastDebounceTime = millis();}if ((millis() - lastDebounceTime) > debounceDelay) {// whatever the reading is at, it's been there for longer// than the debounce delay, so take it as the actual current state:// if the button state has changed:if (reading != buttonState) {buttonState = reading;// only toggle the LED if the new button state is HIGHif (buttonState == HIGH) {ledState = !ledState;}}}// set the LED:digitalWrite(ledPin, ledState);// save the reading. Next time through the loop,// it'll be the lastButtonState:lastButtonState = reading;}
- pinMode()
- digitalWrite()
- digitalRead()
- if()
- millis()
- DigitalReadSerial - 读取一个开关,然后打印其状态到串口监视器
- Blink - 使LED灯开和关
- Button State Change - 记录按键按下的次数

若有收获,就点个赞吧
0 人点赞
