监测按钮的状态变化(边沿监测)
如果你让按键工作,你经常会想做一些要按下很多次按钮的才有响应的动作。这时你需要知道按钮的从闭合到断开的变化状态,然后记录这个状态发生了多少次。这叫状态变化检测或者边沿检测。在这个教程里我们学习怎样检查状态变化,然后我们把相关信息发送到串口监视器里,并记录4次LED灯的开和关。
硬件要求
- Arduino or Genuino 开发板
- 即时按钮或者开关
- 10k ohm 电阻
- 连接线
- 面包板
电路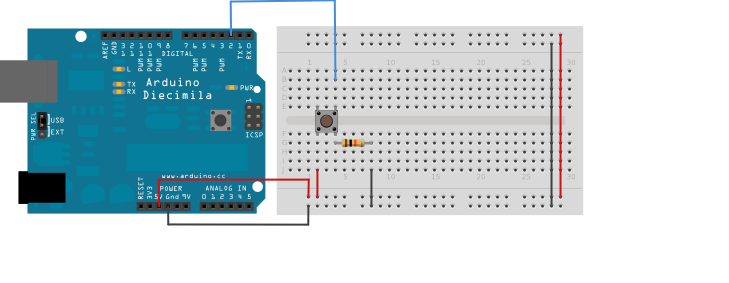
- 连接3根线到开发板。最开始两根,红和黑,连接到面包板上的两个长垂直行来提供5V电源电压和地。第三根线从数字引脚pin2连接到按钮的一个引脚。按钮的同一个引脚连接下拉电阻(10k ohm)到地。按钮的另一个引脚连接到5V电源。
- 按钮或者开关连接电路的两点。按钮是断开的(未按),按钮两个引脚是没有接通的,所以这个引脚连接到地(通过一个下拉电阻),读取为低电平或者0。当如果按钮是闭合的(未按),按钮两个引脚是接通的,所以这个引脚连接到5V,读取为高电平,或者1。
- 如果你没有连接到数字I/O口到任何地方,LED灯可能会不规则闪烁。这是因为输入引脚处于悬浮状态——它没有固定连接到电源或者地,并且它会随机在高电平和低电平之间切换。这是你需要下拉电阻的原因。
原理图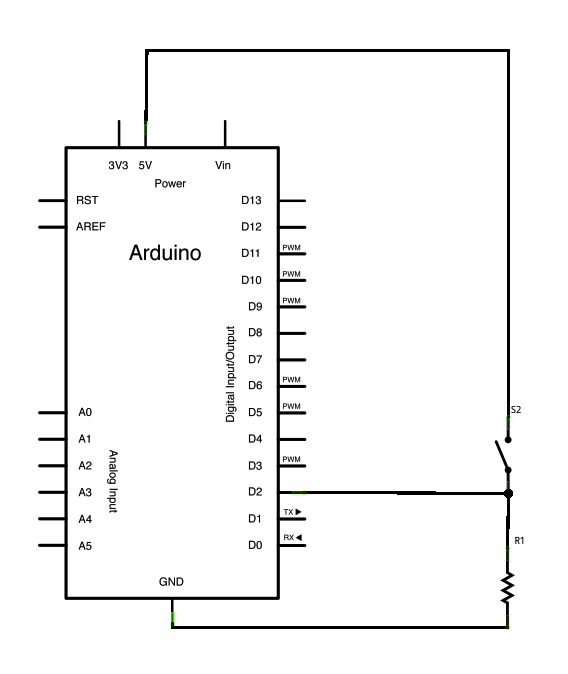
样例代码
下面的代码连续读取按钮的状态。然后通过循环来对比这个按钮的状态和它上一段时间的状态。如果当前按键的状态和之前的状态不一样并且当前状态是高电平,那么这个按键刚从关变为开。然后程序增加按键按下的计数器。
这个程序也检查按键按下次数的值,并且如果它是4的倍数,它会打开pin13的LED灯,否则这个LED灯饰熄灭的。
/*State change detection (edge detection)Often, you don't need to know the state of a digital input all the time,but you just need to know when the input changes from one state to another.For example, you want to know when a button goes from OFF to ON. This is calledstate change detection, or edge detection.This example shows how to detect when a button or button changes from off to onand on to off.The circuit:* pushbutton attached to pin 2 from +5V* 10K resistor attached to pin 2 from ground* LED attached from pin 13 to ground (or use the built-in LED onmost Arduino boards)created 27 Sep 2005modified 30 Aug 2011by Tom IgoeThis example code is in the public domain.http://www.arduino.cc/en/Tutorial/ButtonStateChange*/// this constant won't change:const int buttonPin = 2; // the pin that the pushbutton is attached toconst int ledPin = 13; // the pin that the LED is attached to// Variables will change:int buttonPushCounter = 0; // counter for the number of button pressesint buttonState = 0; // current state of the buttonint lastButtonState = 0; // previous state of the buttonvoid setup() {// initialize the button pin as a input:pinMode(buttonPin, INPUT);// initialize the LED as an output:pinMode(ledPin, OUTPUT);// initialize serial communication:Serial.begin(9600);}void loop() {// read the pushbutton input pin:buttonState = digitalRead(buttonPin);// compare the buttonState to its previous stateif (buttonState != lastButtonState) {// if the state has changed, increment the counterif (buttonState == HIGH) {// if the current state is HIGH then the button// wend from off to on:buttonPushCounter++;Serial.println("on");Serial.print("number of button pushes: ");Serial.println(buttonPushCounter);} else {// if the current state is LOW then the button// wend from on to off:Serial.println("off");}// Delay a little bit to avoid bouncingdelay(50);}// save the current state as the last state,//for next time through the looplastButtonState = buttonState;// turns on the LED every four button pushes by// checking the modulo of the button push counter.// the modulo function gives you the remainder of// the division of two numbers:if (buttonPushCounter % 4 == 0) {digitalWrite(ledPin, HIGH);} else {digitalWrite(ledPin, LOW);}}
- pinMode()
- digitalWrite()
- digitalRead()
- millis()
- if
- BlinkWithoutDelay - 不用delay()函数,使LED灯闪烁
- Button - 用一个按钮来控制LED灯
- Debounce - 读取一个按钮,并滤掉噪音
- DigitalInputPullup - 示范怎么用pinMode()来上拉引脚
- toneKeyboard - 一个用压力传感器和压电扬声器的三键音乐键盘
- toneMelody - 用压电扬声器弹奏一个旋律
- toneMultiple - 用tone()命令在多个扬声器上发音
- tonePitchFollower - 用模拟输入在压电扬声器上弹奏高音

若有收获,就点个赞吧
0 人点赞
