OLED 屏幕应用
前言
但近些年来, 有一种显示器越来越流行—-OLED
OLED应用于各种大小显示需求, 大到电视屏幕, 小到微型智能穿戴设备的显示器都是它的用武之地. 在各种照明条件下它都能熠熠生辉, 且消耗的电流很小! OLED相对于LCD等有着极大的优势
OLED是一种利用多层有机薄膜结构产生电致发光的器件,它很容易制作,而且只需要低的驱动电压,这些主要的特征使得OLED在满足平面显示器的应用上显得非常突出。OLED显示屏比LCD更轻薄、亮度高、功耗低、响应快、清晰度高、柔性好、发光效率高,能满足消费者对显示技术的新需求。全球越来越多的显示器厂家纷纷投入研发,大大的推动了OLED的产业化进程。(资料来源于百度百科)
以上介绍了OLED的优势, 相信大家都对如何使用Arduino去控制OLED显示比较好奇, 因此本篇将对Arduino如何控制OLED展开说明,以创客朋友们常用的OLED 0.96 IIC 128×64)模块进行实例应用讲解其他尺寸的OLED可参考本教程进行学习和开发
模块介绍
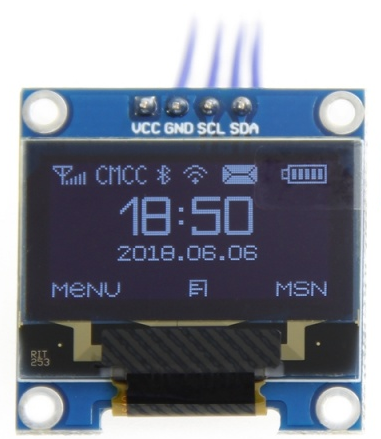 OLED0.96屏幕样图
首先对OLED 0.96 IIC 128x64模块里的几个参数进行说明, 0.96指的是屏幕的显示尺寸0.96inch, 128×64指的是屏幕的分辨率为128×64, 而IIC指的是该模块使用IIC协议进行通讯, (关于Arduino-IIC协议可参考Arduino-Wire)
以下是OLED 0.96 12864屏幕的基本介绍
- 高分辨率:128×64(和12864同分辨率,高PPI)
- 超大可视角度:大于160°(显示屏中可视角度最大的一种屏幕)
- 超低功耗:正常显示0.06w(远低于TFT显示屏)
- 宽电压供电(3V~5V),兼容3.3V和5V电平逻辑,无需电平转换芯片
- IIC接口只需2个IO轻松点亮
- 工作温度范围为工业级(-20℃~70℃)
- 军工级工艺标准,长期稳定工作
- 提供丰富的多平台例程,提供底层驱动技术支持
- 黄蓝、白、蓝三种颜色显示方案可选
模块参数
| 名称 | 颜色分类 | | | | :—- | :—- | :—- | :—- | | 显示颜色 | 白色 | 蓝色 | 黄蓝双色 | | SKU | MC096GW | MC096GB | MC096GY | | 尺寸 | 0.96(inch) | | | | 类型 | OLED | | | | OLED驱动芯片 | SSD1306 | | | | 分辨率 | 128*64 (Pixel) | | | | 模块接口 | IIC,①-GND,②-VCC,③-SCL,④-SDA | | | | 有效显示区域 | 21.744×10.864(mm) | | | | 模块尺寸 | 27.3×27.8(mm) | | | | 视角 | >160° | | | | 工作温度 | -20℃~70℃ | | | | 存储温度 | -30℃~80℃ | | | | 工作电压 | 3.3V / 5V | | | | 功耗 | 全亮约为25mA,全灭约为1.5mA。 | | | | 产品重量 | 15(g) | | |
模块尺寸
为了方便更多创客朋友们开发自己的OLED创客作品, 以下提供OLED0.96的模块尺寸图供大家参考
资料来源于[lcdwiki-OLED0.96](http://www.lcdwiki.com/zh/0.96inch_OLED_Module(IIC-4PSKU:MC096GX))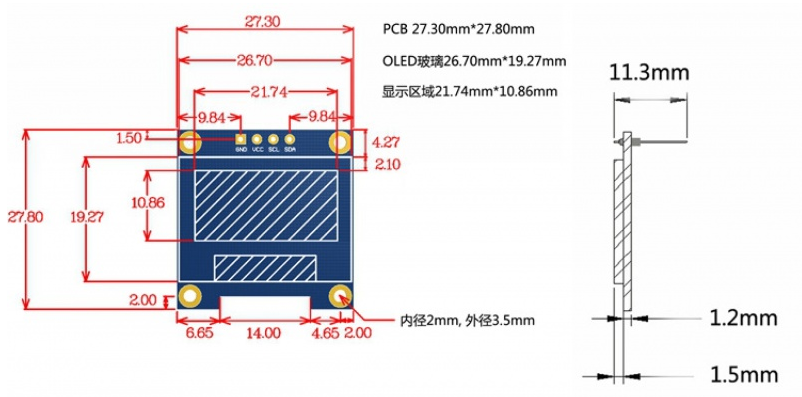
接口定义
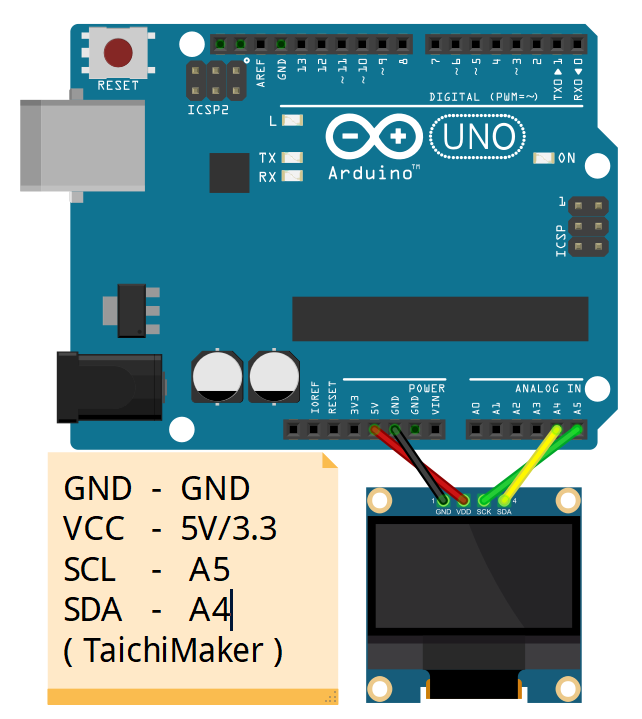
OLED0.96 IIC模块使用IIC通信接口,只需要接4根线就可以完成OLED屏数据通信
- VCC:电源正极(接5V电源)
- GND:电源负极(接地)
- SCL:IIC时钟信号线
- SDA:IIC数据信号线
VCC接到开发板的5V电源引脚上,GND接到开发板GND引脚上,SCL和SDA需要根据不同的开发板引脚定义来接线(可参考Arduino-Wire)
该OLED模块的IIC地址为0x3C
Arduino控制OLED
我们使用Adafruit_SSD1306库来更加快捷高效的实现Arduino控制OLED, 在使用这个库时,需要依赖Adafruit-GFX-Library库才能使其正常工作,因此您需要在您的ArduinoIDE同时安装这两个库, 此外您可以通过Arduino自带的库管理器来安装,在安装时,如果出现以下情况, 点击Install all即可,这是Adafruit-GFX-Library的依赖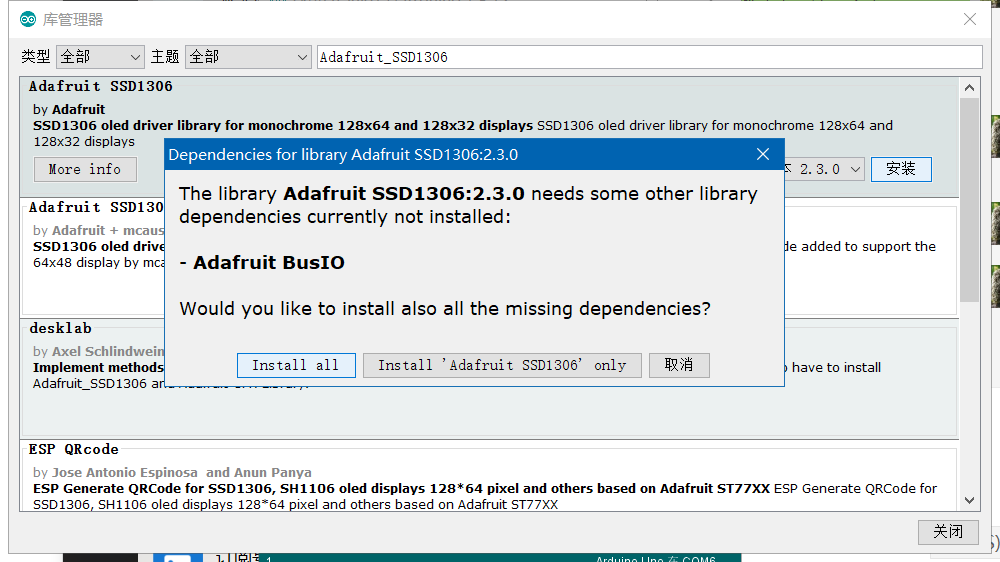 OLED0.96依赖库安装Arduino
Arduino使用硬件IIC,芯片内部已经对IIC引脚做了定义,因此软件上不需要再对IIC引脚进行定义,只是不同型号的单片机,IIC引脚定义不一样,需要在接线上根据开发板做调整。
我们将以控制OLED 0.96 I2C 屏幕为例子进行说明。无论你手里的OLED 0.96是单色的还是双色的都没关系, 这些显示器都是基于SSD1306 OLED驱动芯片,因此它们都可以使用Adafruit_SSD1306库来控制显示。
在开始之前,请大家在屏幕建立一个坐标系的概念,因为在程序里,位置都是以坐标的形式去定位的,以OLED 0.96 128X64为例,面向屏幕,以屏幕左上角为坐标原点,横向向右是X轴,竖向向下是Y轴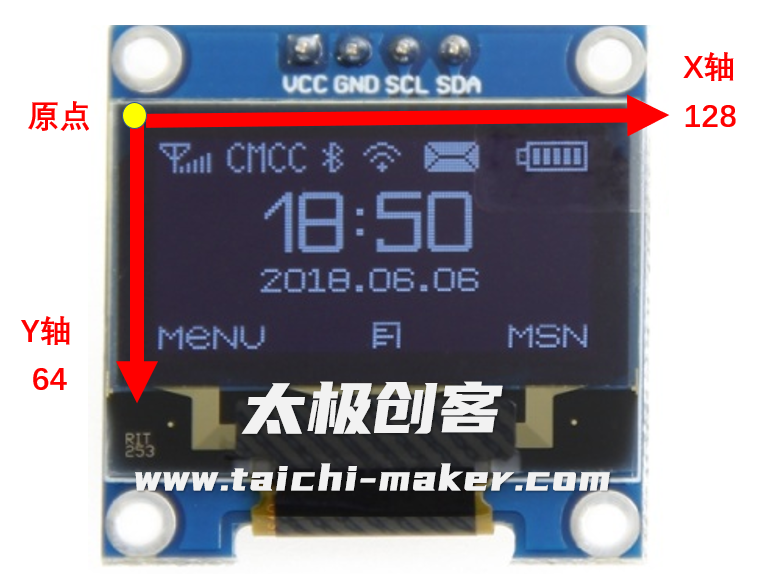 OLED0.96坐标系建立
1 OLED显示文字
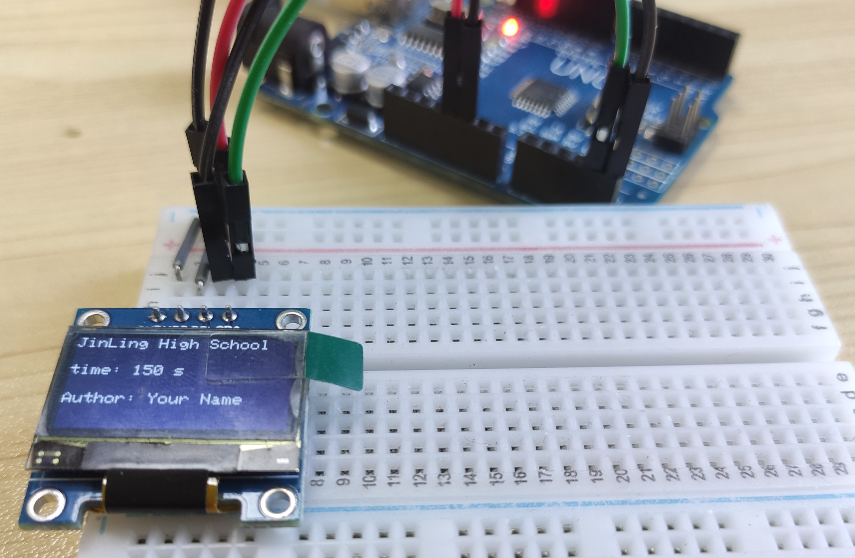
电路连接

示例程序
/**********************************************************************程序名称/Program name : words_display团队/Team : 太极创客团队 / Taichi-Maker (www.taichi-maker.com)作者/Author : Dapenson日期/Date(YYYYMMDD) : 2020/07/01程序目的/Purpose :使用OLED0.96 IIC 12864显示文字-----------------------------------------------------------------------修订历史/Revision History日期/Date 作者/Author 参考号/Ref 修订说明/Revision Description2021/03/22 金陵中学 1.0 金陵中学Arduino选修课使用-----------------------------------------------------------------------其它说明:***********************************************************************/// 引入IIC通讯所需的Wire库文件#include <Wire.h>// 引入驱动OLED0.96所需的库#include <Adafruit_GFX.h>#include <Adafruit_SSD1306.h>#define SCREEN_WIDTH 128 // 设置OLED宽度,单位:像素#define SCREEN_HEIGHT 64 // 设置OLED高度,单位:像素// 自定义重置引脚,虽然教程未使用,但却是Adafruit_SSD1306库文件所必需的#define OLED_RESET 4Adafruit_SSD1306 display(SCREEN_WIDTH, SCREEN_HEIGHT, &Wire, OLED_RESET);void setup(){// 初始化Wire库// Wire.begin();// 初始化OLED并设置其IIC地址为 0x3Cdisplay.begin(SSD1306_SWITCHCAPVCC, 0x3C);}void loop(){words_display();display.display();}void words_display(){// 清除屏幕display.clearDisplay();// 设置字体颜色,白色可见display.setTextColor(WHITE);//设置字体大小display.setTextSize(1.5);//设置光标位置display.setCursor(0, 0);display.print("JinLing High School");display.setCursor(0, 20);display.print("time: ");//打印自开发板重置以来的秒数:display.print(millis() / 1000);display.print(" s");display.setCursor(0, 40);display.print("Author: ");display.print("Your Name");}
效果演示
2 OLED显示汉字
汉字的显示需要对文字进行取模操作,紧接着使用drawBitmap()函数对取模生成的数组进行显示
汉字取模
1 打开取模软件,切换到字符模式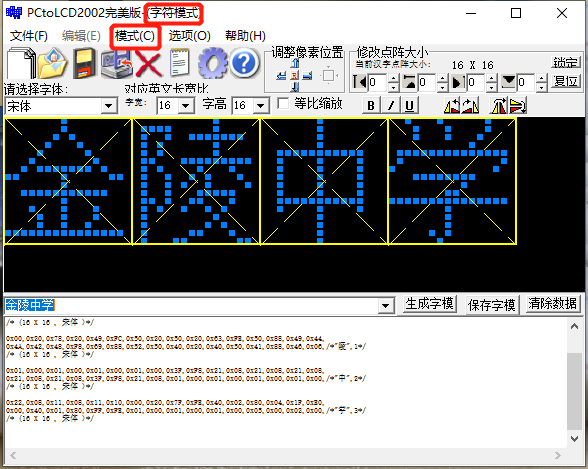
OLED0.96文字取模Arduino
2 在菜单栏区设置字体和尺寸选择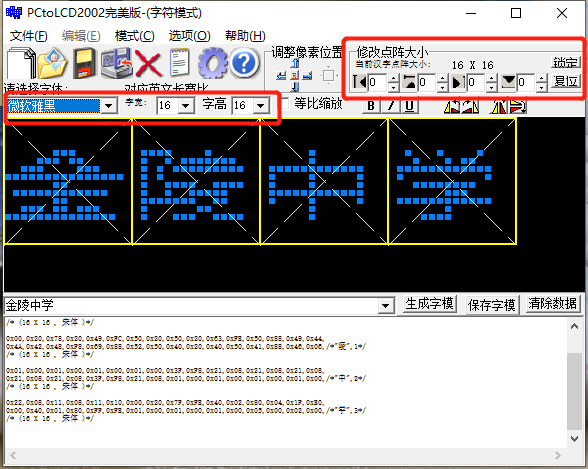
3 字模选项设置,设置之后点击确定按钮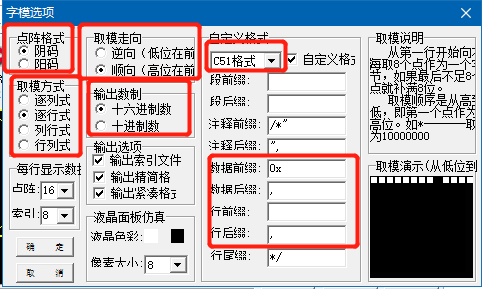
4 输入字符,点击生成子模, 生成之后需要对生成的数据进行变量赋值和加工,具体格式参考示例程序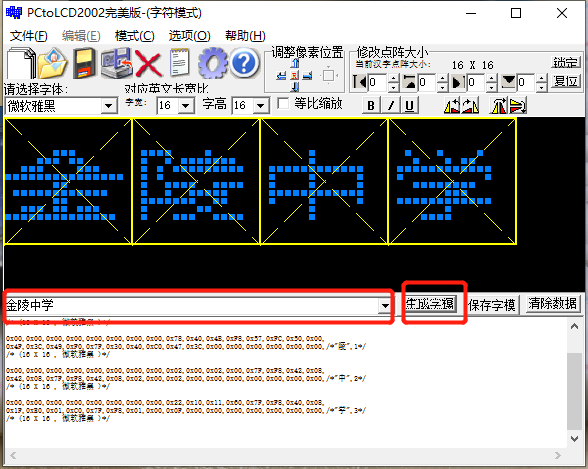
电路连接
示例程序
hans_display.ino
/**********************************************************************程序名称/Program name : hans_display团队/Team : 太极创客团队 / Taichi-Maker (www.taichi-maker.com)作者/Author : Dapenson日期/Date(YYYYMMDD) : 2020/07/01程序目的/Purpose :使用OLED0.96 IIC 12864显示汉字-----------------------------------------------------------------------修订历史/Revision History日期/Date 作者/Author 参考号/Ref 修订说明/Revision Description2021/03/22 金陵中学 1.0 金陵中学Arduino选修课使用-----------------------------------------------------------------------其它说明:***********************************************************************/// 引入IIC通讯所需的Wire库文件// 教程参考http://www.taichi-maker.com/homepage/reference-index/arduino-library-index/wire-library/#include <Wire.h>#include "text.h"// 引入驱动OLED0.96所需的库#include <Adafruit_GFX.h>#include <Adafruit_SSD1306.h>#define SCREEN_WIDTH 128 // 设置OLED宽度,单位:像素#define SCREEN_HEIGHT 64 // 设置OLED高度,单位:像素// 自定义重置引脚,虽然教程未使用,但却是Adafruit_SSD1306库文件所必需的#define OLED_RESET 4Adafruit_SSD1306 display(SCREEN_WIDTH, SCREEN_HEIGHT, &Wire, OLED_RESET);void setup(){// 初始化OLED并设置其IIC地址为 0x3Cdisplay.begin(SSD1306_SWITCHCAPVCC, 0x3C);}void loop(){hans_display_0();hans_display_1();}void hans_display_0(void){// 显示之前清屏display.clearDisplay();// 显示文字 (左上角x坐标,左上角y坐标, 图形数组, 图形宽度像素点, 图形高度像素点, 设置颜色)display.drawBitmap(20 * 1, 16, hans_jin, 16, 16, 1);display.drawBitmap(20 * 2, 16, hans_ling, 16, 16, 1);display.drawBitmap(20 * 3, 16, hans_zhong, 16, 16, 1);display.drawBitmap(20 * 4, 16, hans_xue, 16, 16, 1);//显示图形display.display();delay(2000);}void hans_display_1(void){// 显示之前清屏display.clearDisplay();// 显示文字 (左上角x坐标,右上角y坐标, 图形数组, 图形宽度像素点, 图形高度像素点, 设置颜色)display.drawBitmap(20 * 1, 16, hans_jin1, 16, 16, 1);display.drawBitmap(20 * 2, 16, hans_ling1, 16, 16, 1);display.drawBitmap(20 * 3, 16, hans_zhong1, 16, 16, 1);display.drawBitmap(20 * 4, 16, hans_xue1, 16, 16, 1);//显示图形display.display();delay(2000);}
text.h
static const unsigned char PROGMEM hans_jin[] = {0x01,0x00,0x01,0x00,0x02,0x80,0x04,0x40,0x08,0x20,0x10,0x10,0x2F,0xE8,0xC1,0x06,0x01,0x00,0x3F,0xF8,0x01,0x00,0x11,0x10,0x09,0x10,0x09,0x20,0xFF,0xFE,0x00,0x00,/*"金",0*/};static const unsigned char PROGMEM hans_ling[] = {0x00,0x20,0x78,0x20,0x49,0xFC,0x50,0x20,0x50,0x20,0x63,0xFE,0x50,0x88,0x49,0x44,0x4A,0x42,0x48,0xF8,0x69,0x88,0x52,0x50,0x40,0x20,0x40,0x50,0x41,0x88,0x46,0x06,/*"陵",1*//* (16 X 16 , 宋体 )*/};static const unsigned char PROGMEM hans_zhong[] = {0x01,0x00,0x01,0x00,0x01,0x00,0x01,0x00,0x3F,0xF8,0x21,0x08,0x21,0x08,0x21,0x08,0x21,0x08,0x21,0x08,0x3F,0xF8,0x21,0x08,0x01,0x00,0x01,0x00,0x01,0x00,0x01,0x00,/*"中",2*//* (16 X 16 , 宋体 )*/};static const unsigned char PROGMEM hans_xue[] = {0x22,0x08,0x11,0x08,0x11,0x10,0x00,0x20,0x7F,0xFE,0x40,0x02,0x80,0x04,0x1F,0xE0,0x00,0x40,0x01,0x80,0xFF,0xFE,0x01,0x00,0x01,0x00,0x01,0x00,0x05,0x00,0x02,0x00,/*"学",3*//* (16 X 16 , 宋体 )*/};static const unsigned char PROGMEM hans_jin1[] = {0x00,0x00,0x00,0x00,0x01,0x80,0x06,0x60,0x08,0x10,0x70,0x0C,0x1F,0xFA,0x01,0x00,0x01,0x00,0x3F,0xFC,0x11,0x08,0x11,0x08,0x09,0x10,0x09,0x10,0x09,0x10,0x7F,0xFE,/*"金",0*//* (16 X 16 , 幼圆 )*/};static const unsigned char PROGMEM hans_ling1[] = {0x00,0x00,0x00,0x40,0x78,0x40,0x4F,0xFE,0x48,0x40,0x50,0x40,0x5F,0xFE,0x51,0x88,0x51,0x04,0x4A,0x82,0x4D,0xFC,0x4B,0x04,0x74,0x88,0x48,0x50,0x40,0x70,0x4F,0x8C,/*"陵",1*//* (16 X 16 , 幼圆 )*/};static const unsigned char PROGMEM hans_zhong1[] = {0x00,0x00,0x01,0x00,0x01,0x00,0x01,0x00,0x3F,0xFC,0x21,0x04,0x21,0x04,0x21,0x04,0x21,0x04,0x21,0x04,0x21,0x04,0x3F,0xFC,0x01,0x00,0x01,0x00,0x01,0x00,0x01,0x00,/*"中",2*//* (16 X 16 , 幼圆 )*/};static const unsigned char PROGMEM hans_xue1[] = {0x00,0x00,0x00,0x00,0x21,0x08,0x11,0x08,0x08,0x90,0x77,0x6E,0x40,0x02,0x5F,0xF2,0x00,0x20,0x00,0xC0,0x00,0x80,0x7F,0xFE,0x00,0x40,0x00,0x40,0x00,0x40,0x0C,0xC0,/*"学",3*//* (16 X 16 , 幼圆 )*/};
效果演示


3 OLED显示图片
图片的显示需要对图片进行取模操作,再使用drawBitmap()函数对取模生成的数组进行显示,下面介绍如何对图片进行取模操作
图片取模
1 打开取模软件,切换到图形模式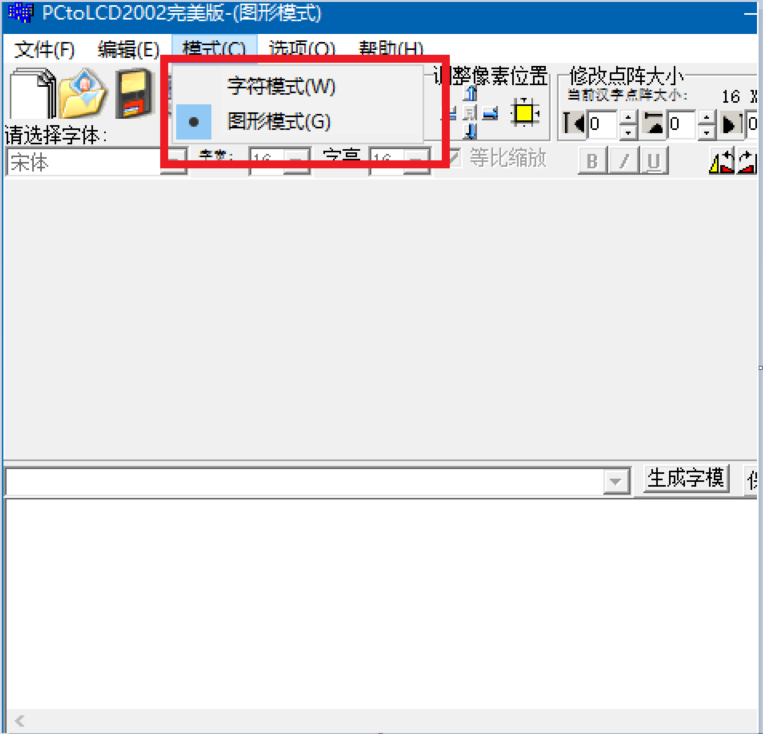
2 打开图片或新建图片
图形模式有三种方法可以处理图片(如下图所示)
A、点击文件->打开,打开现有的BMP单色图片
B、点击打开图片按钮打开现有的BMP单色图片
C、点击新建图片按钮,设置宽度和高度,新建一幅单色BMP图片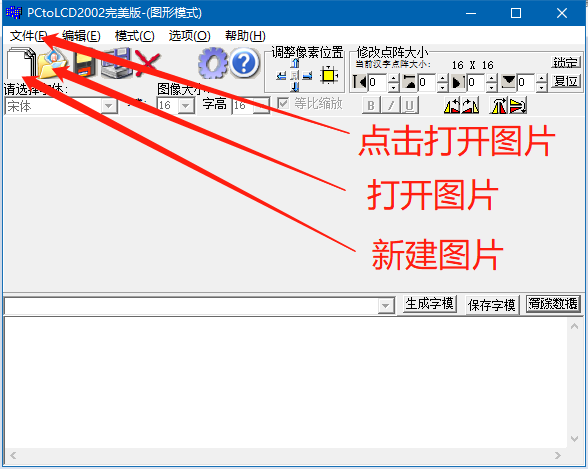
3 打开图片之后,点击生成子模,生成之后需要对生成的数据进行变量赋值和加工,具体格式参考示例程序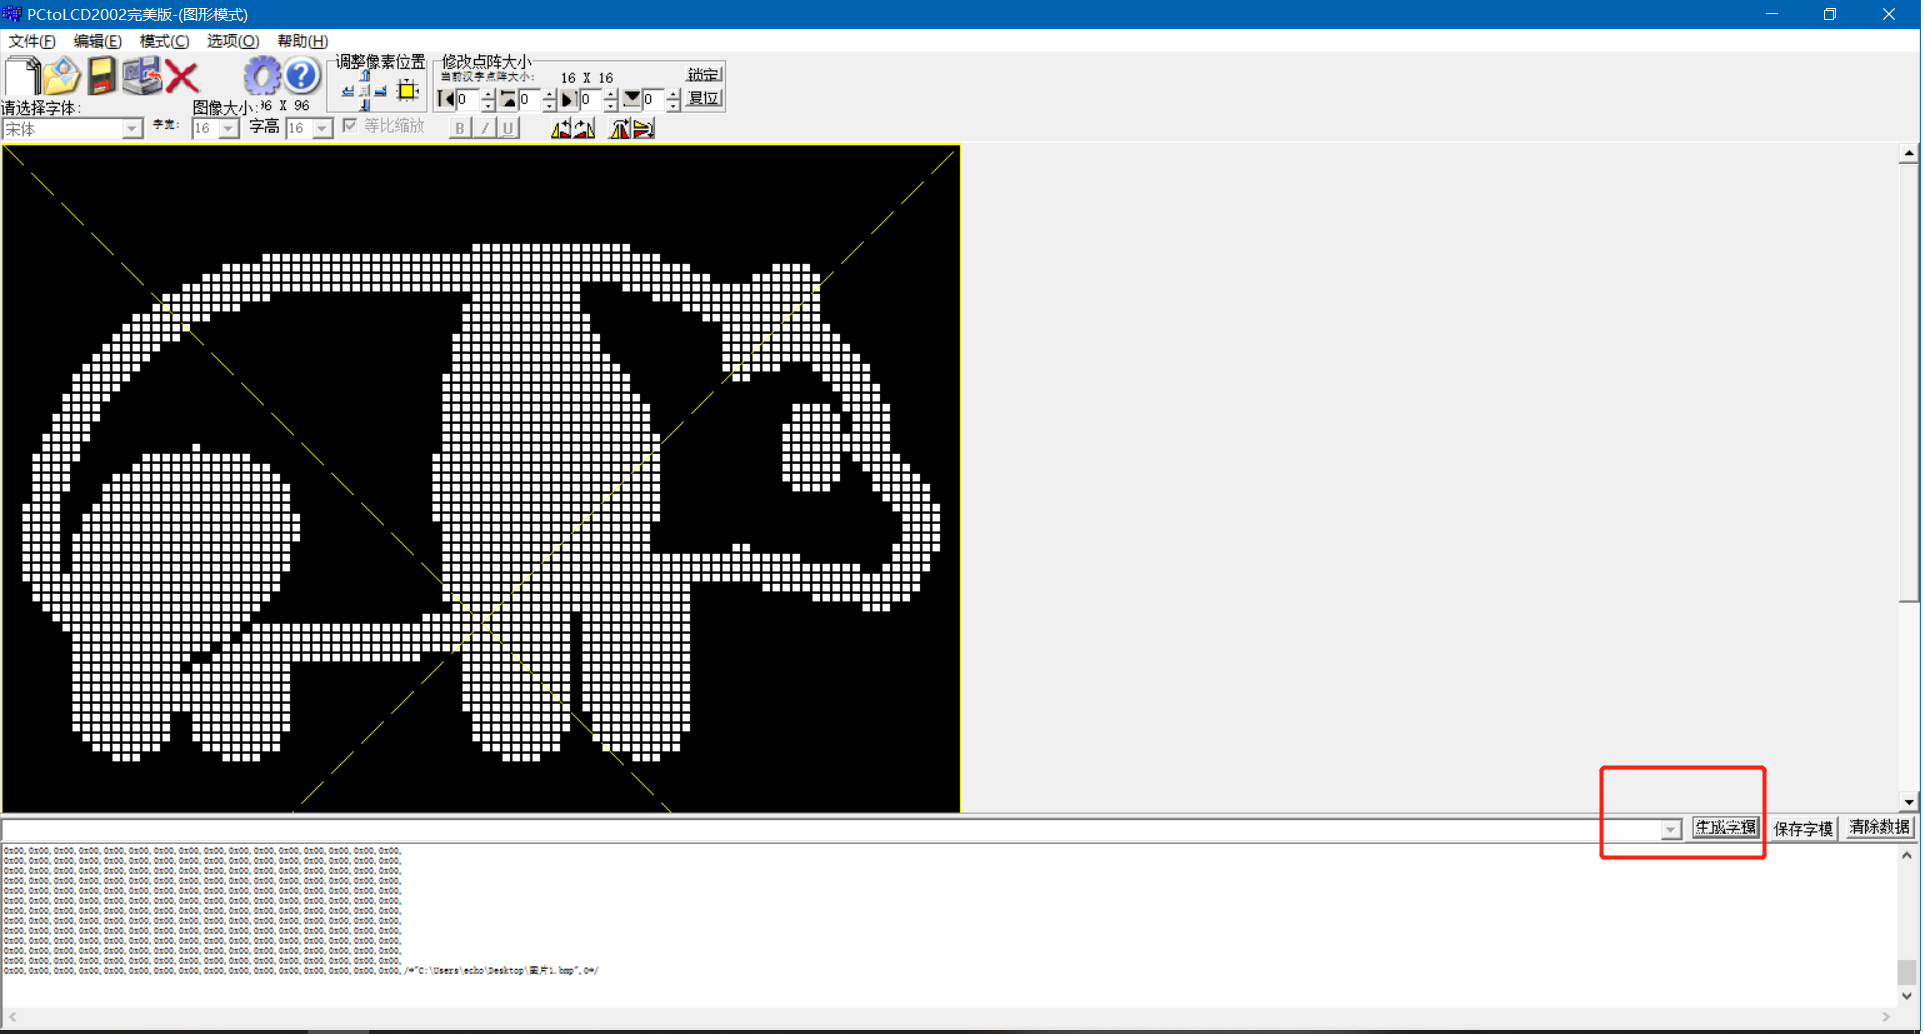
电路连接

示例程序
/**********************************************************************程序名称/Program name : words_display团队/Team : 太极创客团队 / Taichi-Maker (www.taichi-maker.com)作者/Author : Dapenson日期/Date(YYYYMMDD) : 2020/07/01程序目的/Purpose :使用OLED0.96 IIC 12864显示图片-----------------------------------------------------------------------修订历史/Revision History日期/Date 作者/Author 参考号/Ref 修订说明/Revision Description-----------------------------------------------------------------------其它说明:***********************************************************************/// 引入IIC通讯所需的Wire库文件// 教程参考http://www.taichi-maker.com/homepage/reference-index/arduino-library-index/wire-library/#include <Wire.h>// 引入驱动OLED0.96所需的库#include <Adafruit_GFX.h>#include <Adafruit_SSD1306.h>#define SCREEN_WIDTH 128 // 设置OLED宽度,单位:像素#define SCREEN_HEIGHT 64 // 设置OLED高度,单位:像素// 自定义重置引脚,虽然教程未使用,但却是Adafruit_SSD1306库文件所必需的#define OLED_RESET 4Adafruit_SSD1306 display(SCREEN_WIDTH, SCREEN_HEIGHT, &Wire, OLED_RESET);static const unsigned char PROGMEM panda_bmp[] ={0x00,0x00,0x00,0x00,0x00,0x00,0x00,0x00,0x00,0x00,0x00,0x00,0x00,0x00,0x00,0x00,0x00,0x00,0x00,0x00,0x00,0x00,0x00,0x00,0x00,0x00,0x00,0x00,0x00,0x00,0x00,0x00,0x00,0x00,0x00,0x00,0x00,0x00,0x00,0x00,0x00,0x00,0x00,0x00,0x00,0x00,0x00,0x00,0x00,0x00,0x00,0x00,0x00,0x00,0x00,0x00,0x00,0x00,0x00,0x00,0x00,0x00,0x00,0x00,0x00,0x00,0x00,0x00,0x00,0x00,0x00,0x00,0x00,0x00,0x00,0x00,0x00,0x00,0x00,0x00,0x00,0x00,0x00,0x00,0x00,0x00,0x00,0x00,0x00,0x00,0x00,0x00,0x00,0x00,0x00,0x00,0x00,0x00,0x00,0x00,0x00,0x00,0x00,0x00,0x00,0x00,0x00,0x00,0x00,0x00,0x00,0x00,0x00,0x00,0x00,0x00,0x00,0x00,0x00,0x00,0x00,0x00,0x00,0x00,0x00,0x00,0x00,0x00,0x00,0x00,0x00,0x00,0x00,0x00,0x00,0x00,0x00,0x00,0x00,0x00,0x00,0x00,0x00,0x00,0x00,0x00,0x00,0x00,0x00,0x00,0x00,0x00,0x00,0x00,0x00,0x00,0x00,0x00,0x00,0x00,0x00,0x00,0x00,0x00,0x00,0x00,0x00,0x00,0x00,0x00,0x00,0x00,0x00,0x00,0x00,0x00,0x00,0x00,0x00,0x00,0x00,0x00,0x00,0x00,0x00,0x00,0x00,0x00,0x00,0x00,0x00,0x00,0x00,0x00,0x00,0x00,0x00,0x00,0x00,0x00,0x00,0x00,0x00,0x00,0x00,0x00,0x00,0x00,0x00,0x00,0x00,0x00,0x00,0x00,0x00,0x00,0x00,0x00,0x00,0x00,0x00,0x00,0x00,0x00,0x00,0x00,0x00,0x00,0x00,0x00,0x00,0x00,0x00,0x00,0x00,0x00,0x00,0x00,0x00,0x00,0x00,0x00,0x00,0x00,0x00,0x00,0x00,0x00,0x00,0x00,0x00,0x00,0x00,0x00,0x00,0x00,0x00,0x01,0xFF,0xFE,0x00,0x00,0x00,0x00,0x00,0x00,0x00,0x3F,0xFF,0xFF,0xFF,0xFF,0xC0,0x00,0x00,0x00,0x00,0x00,0x03,0xFF,0xFF,0xFF,0xFF,0xFF,0xF8,0x07,0x80,0x00,0x00,0x00,0x0F,0xFF,0xFF,0xFF,0xFF,0xFF,0xFE,0x1F,0xC0,0x00,0x00,0x00,0x3F,0xFF,0xFF,0xFF,0xFF,0xC3,0xFF,0xFF,0xC0,0x00,0x00,0x00,0xFF,0xE0,0x00,0x01,0xFF,0xC0,0x7F,0xFF,0xC0,0x00,0x00,0x01,0xFF,0x00,0x00,0x03,0xFF,0xC0,0x0F,0xFF,0xC0,0x00,0x00,0x07,0xF8,0x00,0x00,0x03,0xFF,0xE0,0x03,0xFF,0xC0,0x00,0x00,0x0F,0xE0,0x00,0x00,0x03,0xFF,0xE0,0x00,0xFF,0xE0,0x00,0x00,0x1F,0xC0,0x00,0x00,0x07,0xFF,0xF0,0x00,0xFF,0xF0,0x00,0x00,0x3F,0x00,0x00,0x00,0x07,0xFF,0xF0,0x00,0xFF,0xF8,0x00,0x00,0x7E,0x00,0x00,0x00,0x07,0xFF,0xF8,0x00,0xFF,0xFC,0x00,0x00,0xFC,0x00,0x00,0x00,0x07,0xFF,0xFC,0x00,0xFC,0x7E,0x00,0x01,0xF8,0x00,0x00,0x00,0x0F,0xFF,0xFE,0x00,0x60,0x3E,0x00,0x01,0xF0,0x00,0x00,0x00,0x0F,0xFF,0xFE,0x00,0x00,0x1F,0x00,0x03,0xE0,0x00,0x00,0x00,0x0F,0xFF,0xFF,0x00,0x00,0x0F,0x00,0x03,0xC0,0x00,0x00,0x00,0x0F,0xFF,0xFF,0x80,0x01,0xEF,0x80,0x07,0xC0,0x00,0x00,0x00,0x0F,0xFF,0xFF,0x80,0x01,0xF7,0x80,0x07,0x80,0x00,0x00,0x00,0x0F,0xFF,0xFF,0x80,0x03,0xF7,0x80,0x0F,0x80,0x00,0x00,0x00,0x0F,0xFF,0xFF,0xC0,0x03,0xFF,0x80,0x0F,0x00,0x10,0x00,0x00,0x0F,0xFF,0xFF,0xC0,0x03,0xFF,0x80,0x1F,0x03,0xFF,0x80,0x00,0x1F,0xFF,0xFF,0xC0,0x03,0xF7,0xC0,0x1E,0x07,0xFF,0xE0,0x00,0x1F,0xFF,0xFF,0xC0,0x03,0xF3,0xE0,0x1E,0x1F,0xFF,0xF0,0x00,0x1F,0xFF,0xFF,0xC0,0x03,0xF1,0xF0,0x1E,0x3F,0xFF,0xF8,0x00,0x1F,0xFF,0xFF,0xC0,0x01,0xE1,0xF8,0x1C,0x3F,0xFF,0xF8,0x00,0x1F,0xFF,0xFF,0xC0,0x00,0x00,0xF8,0x3C,0x7F,0xFF,0xF8,0x00,0x1F,0xFF,0xFF,0xC0,0x00,0x00,0x7C,0x3C,0xFF,0xFF,0xFC,0x00,0x1F,0xFF,0xFF,0xC0,0x00,0x00,0x3C,0x3C,0xFF,0xFF,0xFC,0x00,0x0F,0xFF,0xFF,0x80,0x00,0x00,0x3C,0x3D,0xFF,0xFF,0xFC,0x00,0x0F,0xFF,0xFF,0x80,0x00,0x00,0x3C,0x3D,0xFF,0xFF,0xF8,0x00,0x0F,0xFF,0xFF,0x80,0x60,0x00,0x7C,0x3D,0xFF,0xFF,0xF8,0x00,0x0F,0xFF,0xFF,0xFF,0xFF,0x00,0x78,0x3D,0xFF,0xFF,0xF8,0x00,0x0F,0xFF,0xFF,0xFF,0xFF,0xFC,0xF8,0x3F,0xFF,0xFF,0xF0,0x00,0x0F,0xFF,0xFF,0xFF,0xFF,0xFF,0xF0,0x1F,0xFF,0xFF,0xF0,0x00,0x0F,0xFF,0xFF,0xF8,0x0F,0xFF,0xF0,0x1F,0xFF,0xFF,0xE0,0x00,0x0F,0xFF,0xFF,0xF8,0x00,0x7F,0xE0,0x0F,0xFF,0xFF,0xC0,0x00,0x07,0xFF,0xFF,0xF8,0x00,0x03,0x80,0x07,0xFF,0xFF,0x80,0x00,0x3F,0xFF,0xBF,0xF8,0x00,0x00,0x00,0x03,0xFF,0xFF,0x7F,0xFF,0xFF,0xFF,0xBF,0xF8,0x00,0x00,0x00,0x01,0xFF,0xFE,0xFF,0xFF,0xFF,0xFF,0xBF,0xF8,0x00,0x00,0x00,0x01,0xFF,0xFB,0xFF,0xFF,0xFF,0xFF,0xBF,0xF8,0x00,0x00,0x00,0x01,0xFF,0xE7,0xFF,0xFF,0xC3,0xFF,0xBF,0xF8,0x00,0x00,0x00,0x01,0xFF,0xDF,0xF8,0x00,0x03,0xFF,0xBF,0xF8,0x00,0x00,0x00,0x01,0xFF,0xFF,0xF8,0x00,0x03,0xFF,0xBF,0xF8,0x00,0x00,0x00,0x01,0xFF,0xFF,0xF8,0x00,0x03,0xFF,0xBF,0xF8,0x00,0x00,0x00,0x01,0xFF,0xFF,0xF8,0x00,0x03,0xFF,0xBF,0xF8,0x00,0x00,0x00,0x01,0xFF,0xFF,0xF8,0x00,0x03,0xFF,0xBF,0xF8,0x00,0x00,0x00,0x01,0xFF,0x9F,0xF8,0x00,0x01,0xFF,0x9F,0xF8,0x00,0x00,0x00,0x01,0xFF,0x9F,0xF8,0x00,0x01,0xFF,0x9F,0xF8,0x00,0x00,0x00,0x00,0xFF,0x9F,0xF0,0x00,0x01,0xFF,0x1F,0xF0,0x00,0x00,0x00,0x00,0x7F,0x0F,0xF0,0x00,0x00,0xFF,0x0F,0xF0,0x00,0x00,0x00,0x00,0x1C,0x03,0xC0,0x00,0x00,0x3C,0x01,0xC0,0x00,0x00,0x00,0x00,0x00,0x00,0x00,0x00,0x00,0x00,0x00,0x00,0x00,0x00,0x00,0x00,0x00,0x00,0x00,0x00,0x00,0x00,0x00,0x00,0x00,0x00,0x00,0x00,0x00,0x00,0x00,0x00,0x00,0x00,0x00,0x00,0x00,0x00,0x00,0x00,0x00,0x00,0x00,0x00,0x00,0x00,0x00,0x00,0x00,0x00,0x00,0x00,0x00,0x00,0x00,0x00,0x00,0x00,0x00,0x00,0x00,0x00,0x00,0x00,0x00,0x00,0x00,0x00,0x00,0x00,0x00,0x00,0x00,0x00,0x00,0x00,0x00,0x00,0x00,0x00,0x00,0x00,0x00,0x00,0x00,0x00,0x00,0x00,0x00,0x00,0x00,0x00,0x00,0x00,0x00,0x00,0x00,0x00,0x00,0x00,0x00,0x00,0x00,0x00,0x00,0x00,0x00,0x00,0x00,0x00,0x00,0x00,0x00,0x00,0x00,0x00,0x00,0x00,0x00,0x00,0x00,0x00,0x00,0x00,0x00,0x00,0x00,0x00,0x00,0x00,0x00,0x00,0x00,0x00,0x00,0x00,0x00,0x00,0x00,0x00,0x00,0x00,0x00,0x00,0x00,0x00,0x00,0x00,0x00,0x00,0x00,0x00,0x00,0x00,0x00,0x00,0x00,0x00,0x00,0x00,0x00,0x00,0x00,0x00,0x00,0x00,0x00,0x00,0x00,0x00,0x00,0x00,0x00,0x00,0x00,0x00,0x00,0x00,0x00,0x00,0x00,0x00,0x00,0x00,0x00,0x00,0x00,0x00,0x00,0x00,0x00,0x00,0x00,0x00,0x00,0x00,0x00,0x00,0x00,0x00,0x00,0x00,0x00,0x00,0x00,0x00,0x00,0x00,0x00,0x00,0x00,0x00,0x00,0x00,0x00,0x00,0x00,0x00,0x00,0x00,0x00,0x00,0x00,0x00,0x00,0x00,0x00,0x00,0x00,0x00,0x00,0x00,0x00,0x00,0x00,0x00,0x00,0x00,0x00,0x00,0x00,0x00,0x00,0x00,0x00,0x00,0x00,0x00,0x00,0x00,0x00,0x00,0x00,0x00,0x00,0x00,0x00,0x00,0x00,0x00,0x00,0x00,0x00,0x00,0x00,0x00,0x00,0x00,0x00,0x00,0x00,0x00,0x00,0x00,0x00,0x00,0x00,0x00,0x00};void setup(){// 初始化OLED并设置其IIC地址为 0x3Cdisplay.begin(SSD1306_SWITCHCAPVCC, 0x3C);}void loop(){bmp_display();}void bmp_display(void){// 显示前清屏display.clearDisplay();// 将图片显示在中心位置display.drawBitmap(0,0,panda_bmp, 96, 96, 1);// 将内容显示到屏幕display.display();delay(1000);}
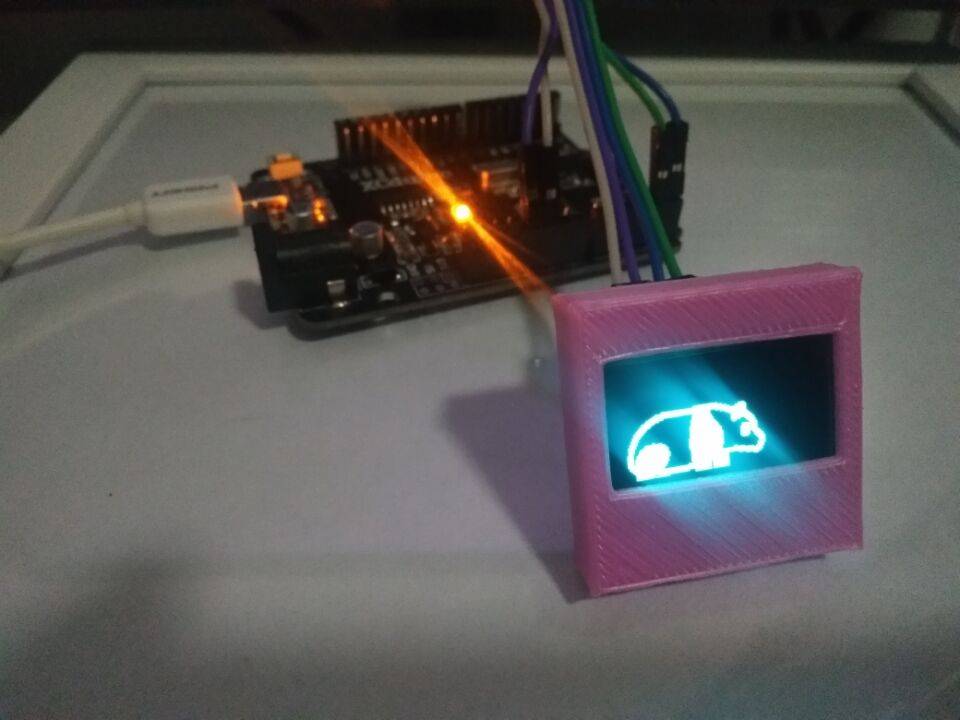
效果演示
相关资源
1 取模软件PCTOLCD2002下载地址
4 OLED贪吃蛇
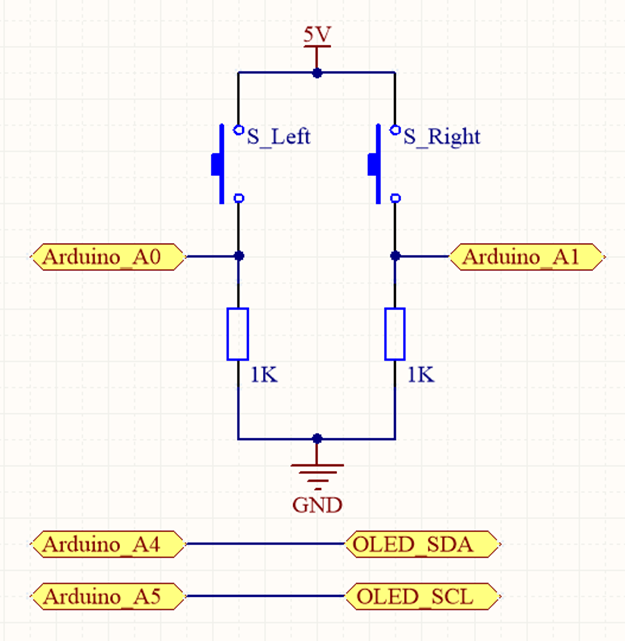
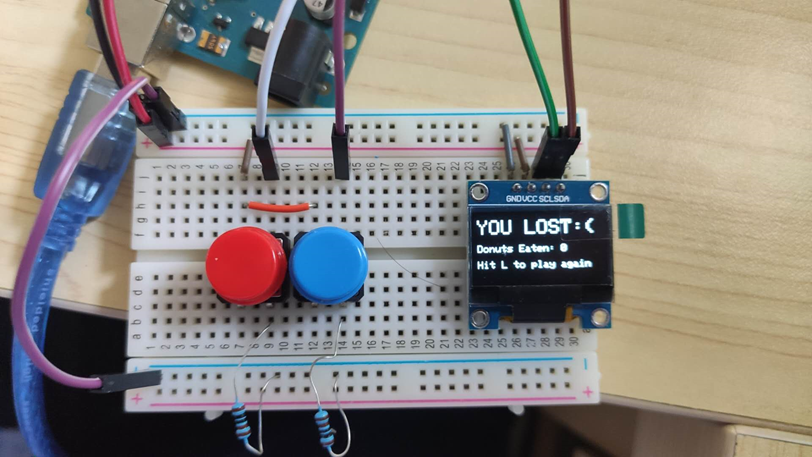
#include <Wire.h>#include <Adafruit_GFX.h>#include <Adafruit_SSD1306.h>//DISPLAY THINGS#define OLED_RESET 4 // Reset pin # (or -1 if sharing Arduino reset pin)#define OLED_ADDRESS 0x3C // I2C address of the display.#define SCREEN_WIDTH 128 // OLED display width, in pixels#define SCREEN_HEIGHT 64 // OLED display height, in pixels//BUTTON THINGS#define LEFT_B_IN A0#define RIGHT_B_IN A1//GAME OPTIONS#define WIN_POINTS 20#define CYCLE_INTERVAL 500#define BUTTON_INTERVAL 400unsigned long previousTime = 0;//---------DISPLAY STUFF---------// Declaration for an SSD1306 display connected to I2C (SDA, SCL pins)Adafruit_SSD1306 display(SCREEN_WIDTH, SCREEN_HEIGHT, &Wire, OLED_RESET);//Draws a square on the 21x10 board//(A 128x64 board reduced to 126x60, each element is 6x6)//x is between 0 and 20 inclusive//y is between 0 and 9 inclusive//thing: 0 = erase, 1 = snake, 2 = food//Could've used a switch statement here...void drawSquare(byte x, byte y, byte thing){if (thing == 1){display.fillRect(6*x+2,6*y+3,4,4,WHITE);return;}if (thing == 2){display.drawRoundRect(6*x+2,6*y+3,4,4,1,WHITE);return;}display.fillRect(6*x+2,6*y+3,4,4,BLACK);}//---------SNAKE STUFF---------//Coordinate struct//With the size of the game board (21x10), you could technically shrink it to//1 byte, but I don't quite know how to do that yet.typedef struct{byte x;byte y;} coord;//THE SNAKE//#Apparently snake[] took up so much space that it interfered with the OLED//#Keep it a reasonable size.coord snake[100];byte snakeLength = 2;short directions[4][2] = {{1,0},{0,1},{-1,0},{0,-1}};short dirIndex = 0;coord foodCoord;//Initializes the snake with an initial length of 2//and initial direction right.void makeSnake(){snakeLength = 2;snake[0] = {1, (byte) random(0,10)};snake[1] = {0, snake[0].y};drawSquare(snake[0].x,snake[0].y,1);drawSquare(snake[1].x,snake[1].y,1);dirIndex = 0;}//Modify direction according to button pressvoid redirect(){unsigned long tempTime = millis();bool R = false;bool L = false;//Listen for button presseswhile (millis()-tempTime < BUTTON_INTERVAL){if (digitalRead(LEFT_B_IN)){L = true;}if (digitalRead(RIGHT_B_IN)){R = true;}}//Ignore double presses and non pressesif (R == L){return;}//If right, increment direction indexif (R){dirIndex++;if (dirIndex > 3){dirIndex = 0;}return;}//If left, decrement direction indexdirIndex--;if (dirIndex < 0){dirIndex = 3;}}//Moves the snakebool moveSnake(){//Calculate the new coordinatesint x = snake[0].x+directions[dirIndex][0];int y = snake[0].y+directions[dirIndex][1];//If out of bounds, exit and lose.if (x > 20 || x < 0 || y > 9 || y < 0){return 1;}coord newHead = {byte(x),byte(y)};//Draw the new headdrawSquare(newHead.x,newHead.y,1);//Did we land on food? / Does the new head line up with the food location?bool onFood = (newHead.x == foodCoord.x && newHead.y == foodCoord.y);//Shift all the snake coords back to make space for the headfor (int i = snakeLength; i != 0; --i){//If the new head contacts any snake coord, exit and loseif (!onFood && newHead.x == snake[i].x && newHead.y == snake[i].y){return 1;}snake[i] = snake[i-1];}//If nothing wrong, set the new head of the snake.snake[0] = newHead;//If no food, erase tailif (!onFood){drawSquare(snake[snakeLength].x,snake[snakeLength].y,0);}//Else dont erase tail, increment length of snake,//and put a new foodelse{snakeLength++;putFood();}return 0;}//Puts a new piece of food on the game board.void putFood(){bool foodOkay = false;//Make sure the food doesnt fall on top of the snakewhile (!foodOkay){foodCoord = {byte(random(0,21)),byte(random(0,10))};foodOkay = true;for (byte i = 0; i < snakeLength; ++i){if (foodCoord.y == snake[i].y && foodCoord.x == snake[i].x){foodOkay = false;break;}}}drawSquare(foodCoord.x,foodCoord.y,2);}void setup(){//Serial.begin(9600);// SSD1306_SWITCHCAPVCC = generate display voltage from 3.3V internallyif(!display.begin(SSD1306_SWITCHCAPVCC, OLED_ADDRESS)) {//Serial.println(F("Oh no"));for(;;);}//Random numbersrandomSeed(analogRead(7));//Set up the buttons//Left buttonpinMode(LEFT_B_IN, INPUT);//Right buttonpinMode(RIGHT_B_IN, INPUT);//Set up the title screendisplay.clearDisplay();display.setTextSize(3);display.setTextColor(WHITE);display.setCursor(20,5);display.println(F("SNAKE"));display.setTextSize(1);display.setCursor(26,40);display.println(F("Hit L to play"));}//Game loopvoid loop() {display.display();//Wait for user inputwhile (!digitalRead(LEFT_B_IN)){}//GAME SETUP//Set up bordersdisplay.clearDisplay();display.fillRect(0,0,128,2,WHITE);display.fillRect(0,62,128,2,WHITE);display.fillRect(0,0,1,64,WHITE);display.fillRect(127,0,1,64,WHITE);//Make the snake and place the foodmakeSnake();putFood();display.display();bool win = false;delay(800);//Start gamefor(;;){//Every cycleif (millis() - previousTime > CYCLE_INTERVAL){previousTime = millis();//Check for direction changeredirect();//Self contact/Out of bounds conditionif (moveSnake()){break;}if (snakeLength == WIN_POINTS+2){win = true;break;}display.display();}}if (win){display.clearDisplay();display.setTextSize(2);display.setTextColor(WHITE);display.setCursor(0,5);display.println(F("YOU WON :)"));}//Show lose screenelse{//Flash the screendisplay.invertDisplay(true);delay(400);display.invertDisplay(false);delay(400);display.invertDisplay(true);delay(400);display.invertDisplay(false);delay(400);//Loss textdisplay.clearDisplay();display.setTextSize(2);display.setTextColor(WHITE);display.setCursor(0,5);display.println(F("YOU LOST:("));}display.setTextSize(1);display.setCursor(0,30);display.print(F("Donuts Eaten: "));display.print(snakeLength-2);display.println();display.println();display.println(F("Hit L to play again"));}

若有收获,就点个赞吧
0 人点赞
