服务发现consul
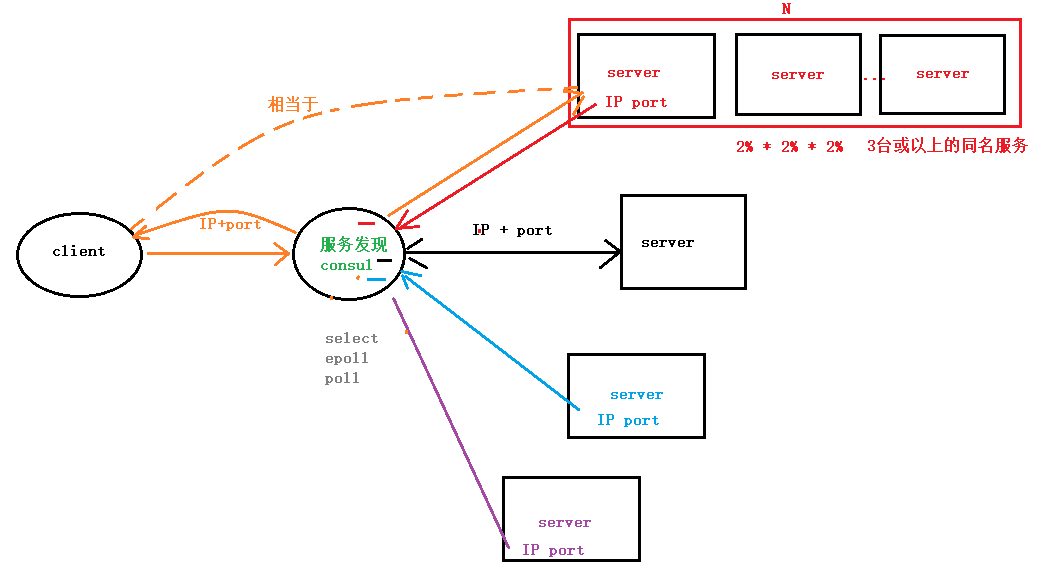
每个服务建立的时候,都会注册到服务发现。服务发现就以K-V的方式记录下,K一般是服务名,V就是IP:PORT。
有服务发现后,client、server工作流程:
- 每个server启动时,都将自己的IP、port 和 服务名 注册给 ”服务发现“
- 当 client 向服务发现发起服务请求时, “服务发现”会自动找一个可用的 服务,将其 IP/port/服务名返回给 client
- client 再借助服务发现,访问 server。
服务发现的种类:
- 服务发现: consul 提供服务, 服务端 主动向 consul 发起注册。
- 健康检查: 定时发送消息,类似于 “心跳包”,保证 客户端获得到的 一定是 健康的服务。
- 键值存储: consul 提供,但是我们使用 redis
- 多数据中心:可以轻松搭建集群。
consul 常用命令
consul agent
- -bind=0.0.0.0 指定 consul所在机器的 IP地址。 默认值:0.0.0.0
- -http-port=8500 consul 自带一个web访问的默认端口:8500
- -client=127.0.0.1 表明哪些机器可以访问consul 。 默认本机。0.0.0.0 所有机器均可访问。
- -config-dir=foo 所有主动注册服务的 描述信息
- -data-dir=path 储存所有注册过来的srv机器的详细信息。
- -dev 开发者模式,直接以默认配置启动 consul
- -node=hostname 服务发现的名字。
- -rejoin consul 启动的时候,加入到的 consul集群
- -server 以服务方式开启consul, 允许其他的consul 连接到开启的 consul上 (形成集群)。如果不加 -server, 表示以 “客户端” 的 方式开启。不能被连接。
- -ui 可以使用 web 页面 来查看服务发现的详情
服务发现讲义
开发的时候,客户端的一个接口可能需要调用N个服务,客户端必须知道所有服务的网络位置(ip+port),如下图所示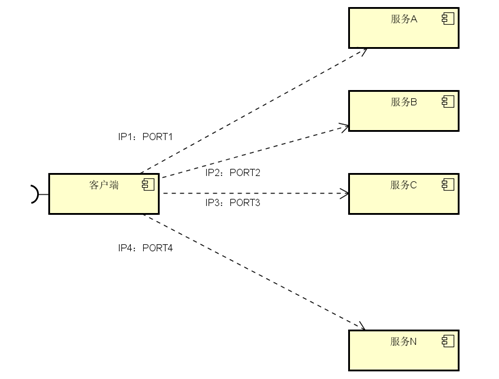
以往的做法是把服务的地址放在配置文件和数据库中,这样就有以下几个问题:
需要配置N个服务的网络位置,加大配置的复杂性
- 服务的网络位置变化,需要改变每个调用者的配置
- 集群的情况下,难以做负载(反向代理的方式除外)
总结起来一句话:服务多了,配置很麻烦,问题一大堆
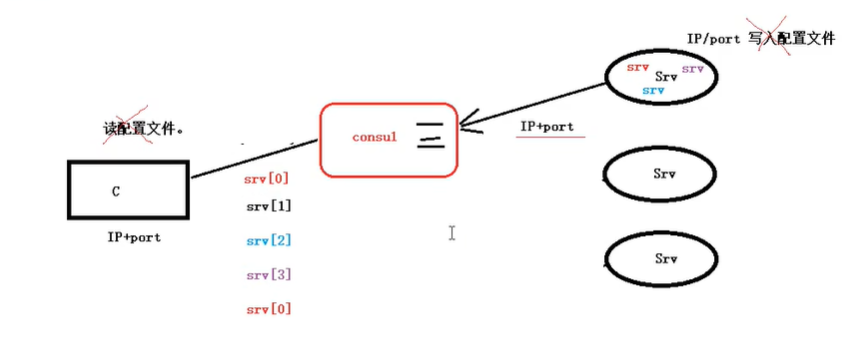
所以现在就选择服务发现来解决这些问题。我们来看一下,服务发现如何解决这个问题,具体设计如下: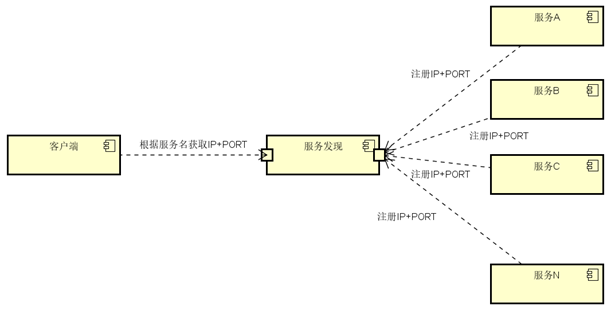
与之前解决方法不同的是,加了个服务发现模块。服务端把当前自己的网络位置注册到服务发现模块(这里注册的意思就是告诉),服务发现就以K-V的方式记录下,K一般是服务名,V就是IP:PORT。服务发现模块定时的轮询查看这些服务能不能访问的了(这就是健康检查)。客户端在调用服务A到N的时候,就跑去服务发现模块问下它们的网络位置,然后再调用它们的服务。这样的方式是不是就可以解决上面的问题了呢?客户端完全不需要记录这些服务的网络位置,客户端和服务端完全解耦!
常见的服务发现框架有:Etcd、Eureka、Consul、Zookeeper
这里我们选择go-micro默认的服务发现框架consul来做一个详细介绍。
了解consul并使用
Consul是HashiCorp公司推出的开源工具,用于实现分布式系统的服务发现与配置。包含多个组件,但是作为一个整体,为你的基础设施提供服务发现和服务配置的工具.他提供以下关键特性:
服务发现:consul通过DNS或者HTTP接口使服务注册和服务发现变的很容易,一些外部服务,例如saas提供的也可以一样注册。
健康检查:健康检测使consul可以快速的告警在集群中的操作。和服务发现的集成,可以防止服务转发到故障的服务上面。(心跳机制)
键/值存储:一个用来存储动态配置的系统。提供简单的HTTP接口,可以在任何地方操作。
多数据中心:无需复杂的配置,即可支持任意数量的区域。
官方建议:最好是三台或者三台以上的consul在运行,同名服务最好是三台或三台以上,默认可以搭建集群
consul安装
Consul用Golang实现,因此具有天然可移植性 (支持 Linux、windows和macOS)。安装包仅包含一个可执行文件。 Consul安装非常简单,只需要下载对应系统的软件包并解压后就可使用。
安装步骤如下:
# 这里以 ubuntu系统为例:$ wget https://releases.hashicorp.com/consul/1.5.2/consul_1.5.2_linux_amd64.zip$ unzip consul_1.5.2_linux_amd64.zip$ sudo mv consul /usr/local/bin/
教室网速原因,用老师给的离线包解压即可
其他系统版本可以在这里下载:https://www.consul.io/downloads.html
安装验证:
安装 Consul后,通过执行 consul命令,你可以看到命令列表的输出,没有报错就成功了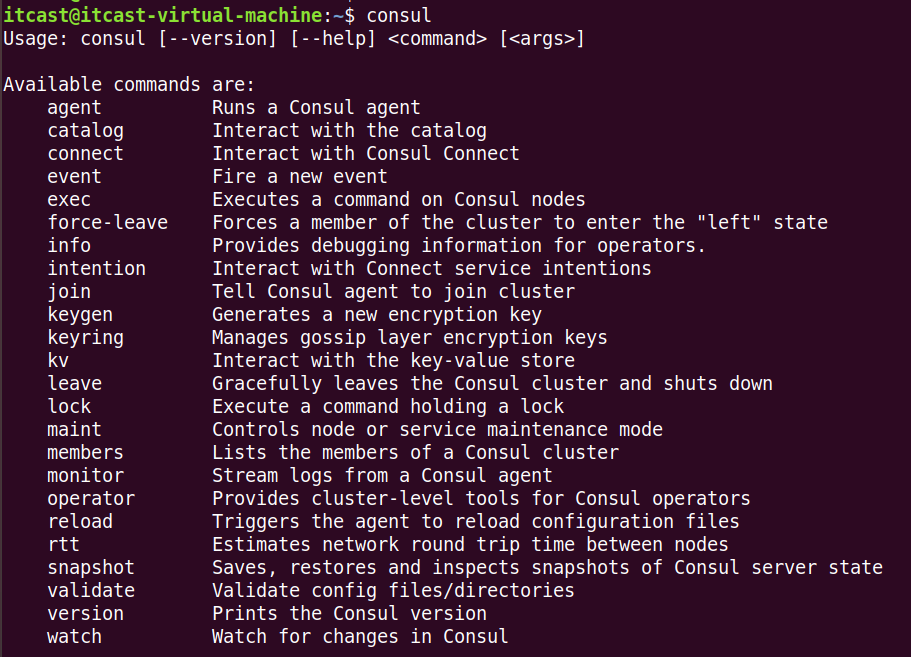
consul安装好之后,我们来使用一下吧。首先我们来看一下consul都有哪些命令。使用命令consul -h可以查看consul支持的所有参数,而且每个参数里面还支持其他参数,下面我们来具体看看。
agent:指令是consul的核心,它运行agent来维护成员的重要信息、运行检查、服务宣布、查询处理等等。
==> Usage: consul agent [options]Starts the Consul agent and runs until an interrupt is received. Theagent represents a single node in a cluster.Options:-advertise=addr Sets the advertise address to use-advertise-wan=addr Sets address to advertise on wan instead ofadvertise addr-bootstrap Sets server to bootstrap mode-bind=0.0.0.0 Sets the bind address for clustercommunication-http-port=8500 Sets the HTTP API port to listen on-bootstrap-expect=0 Sets server to expect bootstrap mode.-client=127.0.0.1 Sets the address to bind for client access.This includes RPC, DNS, HTTP and HTTPS (ifconfigured)-config-file=foo Path to a JSON file to read configurationfrom. This can be specified multiple times.-config-dir=foo Path to a directory to read configurationfiles from. This will read every file endingin ".json" as configuration in thisdirectory in alphabetical order. This can bespecified multiple times.-data-dir=path Path to a data directory to store agentstate-dev Starts the agent in development mode.-recursor=1.2.3.4 Address of an upstream DNS server.Can be specified multiple times.-dc=east-aws Datacenter of the agent (deprecated: use'datacenter' instead).-datacenter=east-aws Datacenter of the agent.-encrypt=key Provides the gossip encryption key-join=1.2.3.4 Address of an agent to join at start time.Can be specified multiple times.-join-wan=1.2.3.4 Address of an agent to join -wan at starttime. Can be specified multiple times.-retry-join=1.2.3.4 Address of an agent to join at start timewith retries enabled. Can be specifiedmultiple times.-retry-interval=30s Time to wait between join attempts.-retry-max=0 Maximum number of join attempts. Defaults to0, which will retry indefinitely.-retry-join-ec2-region EC2 Region to use for discovering servers tojoin.-retry-join-ec2-tag-key EC2 tag key to filter on for serverdiscovery-retry-join-ec2-tag-value EC2 tag value to filter on for serverdiscovery-retry-join-gce-project-name Google Compute Engine project to discoverservers in-retry-join-gce-zone-pattern Google Compute Engine region or zone todiscover servers in (regex pattern)-retry-join-gce-tag-value Google Compute Engine tag value to filterfor server discovery-retry-join-gce-credentials-file Path to credentials JSON file to use withGoogle Compute Engine-retry-join-wan=1.2.3.4 Address of an agent to join -wan at starttime with retries enabled. Can be specifiedmultiple times.-retry-interval-wan=30s Time to wait between join -wan attempts.-retry-max-wan=0 Maximum number of join -wan attempts.Defaults to 0, which will retryindefinitely.-log-level=info Log level of the agent.-node=hostname Name of this node. Must be unique in thecluster-node-meta=key:value An arbitrary metadata key/value pair forthis node.This can be specified multiple times.-protocol=N Sets the protocol version. Defaults tolatest.-rejoin Ignores a previous leave and attempts torejoin the cluster.-server Switches agent to server mode.-syslog Enables logging to syslog-ui Enables the built-in static web UI server-ui-dir=path Path to directory containing the Web UIresources-pid-file=path Path to file to store agent PID
info:指令提供了各种操作时可以用到的debug信息,对于client和server,info有返回不同的子系统信息,目前有以下几个KV信息:agent(提供agent信息),consul(提供consul库的信息),raft(提供raft库的信息),serf_lan(提供LAN gossip pool),serf_wan(提供WAN gossip pool)
leave:指令触发一个优雅的离开动作并关闭agent,节点离开后不会尝试重新加入集群中。运行在server状态的节点,节点会被优雅的删除,这是很严重的,在某些情况下一个不优雅的离开会影响到集群的可用性。
members:指令输出consul agent目前所知道的所有的成员以及它们的状态,节点的状态只有alive、left、failed三种状态。
-detailed:输出每个节点更详细的信息。-rpc-addr:一个rpc地址,agent可以链接上来发送命令,如果没有指定,默认是127.0.0.1:8400。-status:过滤出符合正则规则的节点
reload:指令可以重新加载agent的配置文件。SIGHUP指令在重新加载配置文件时使用,任何重新加载的错误都会写在agent的log文件中,并不会打印到屏幕。
consul简单使用
首先我们要运行consul,运行有两种模式,分别是==server==和==client==,通过下面的命令开启:
consul agent -serverconsul agent
每个数据中心至少必须拥有一个server。一个client是一个非常轻量级的进程.用于注册服务,运行健康检查和转发对server的查询.agent必须在集群中的每个主机上运行.
server模式启动
一个consul:
$ consul agent(代理) -server(以server模式启动) -bootstrap-expect(分布式集群1个) 1-data-dir(指定目录位置) /tmp/consul -node=n1(当前节点名称叫n1)-bind=192.168.6.108(指定 consul所在机器的 IP地址) -ui(可以使用 web 页面 来查看服务发现的详情)-rejoin (consul 启动的时候,加入到的 consul集群)-config-dir=/etc/consul.d/ (所有主动注册服务的描述信息)-client 0.0.0.0(表明哪些机器可以访问consul 。 默认本机。0.0.0.0 所有机器均可访问。)
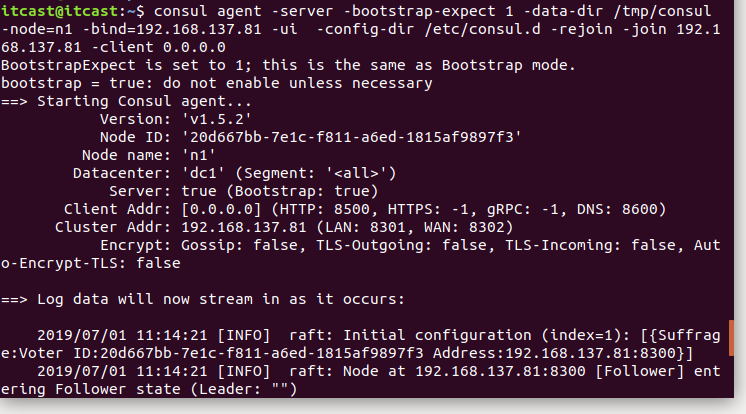
需要先在/etc/下面创建consul.d目录
- -server : 定义agent运行在server模式
- -bootstrap-expect :在一个datacenter中期望提供的server节点数目,当该值提供的时候,consul一直等到达到指定sever数目的时候才会引导整个集群,该标记不能和bootstrap共用
- -bind:该地址用来在集群内部的通讯,集群内的所有节点到地址都必须是可达的,默认是0.0.0.0
- -node:节点在集群中的名称,在一个集群中必须是唯一的,默认是该节点的主机名
- -ui: 启动web界面 :8500
- -rejoin:使consul忽略先前的离开,在再次启动后仍旧尝试加入集群中。
- -config-dir:配置文件目录,里面所有以.json结尾的文件都会被加载
- -client:consul服务侦听地址,这个地址提供HTTP、DNS、RPC等服务,默认是127.0.0.1所以不对外提供服务,如果你要对外提供服务改成0.0.0.0
- data-dir:提供一个目录用来存放agent的状态,所有的agent允许都需要该目录,该目录必须是稳定的,系统重启后都继续存在
client模式启动
运行cosnul agent以client模式,-join 加入到已有的集群中去。$ consul agent -data-dir /tmp/consul -node=n2 -bind=192.168.137.82 -config-dir /etc/consul.d -rejoin -join 192.168.137.81
查看consul成员

停止agent
你可以使用Ctrl-C 关闭Agent. 中断Agent之后你可以看到他离开了集群并关闭.
在退出中,Consul提醒其他集群成员,这个节点离开了.如果你强行杀掉进程.集群的其他成员应该能检测到这个节点失效了.当一个成员离开,他的服务和检测也会从目录中移除.当一个成员失效了,他的健康状况被简单的标记为危险,但是不会从目录中移除.Consul会自动尝试对失效的节点进行重连.允许他从某些网络条件下恢复过来.离开的节点则不会再继续联系.
此外,如果一个agent作为一个服务器,一个优雅的离开是很重要的,可以避免引起潜在的可用性故障影响达成一致性协议.consul优雅的退出:$ consul leave注册服务
搭建好conusl集群后,用户或者程序就能到consul中去查询或者注册服务。可以通过提供服务定义文件或者调用HTTP API来注册一个服务
步骤:
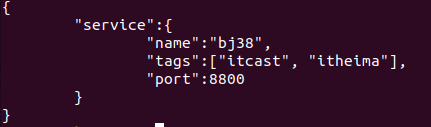
- 进入配置文件路径 cd /etc/consul.d/
- 创建 json 文件。 sudo vim web.json
- 按 json 的语法,填写 服务信息。
重新启动 consul
consul agent -server -bootstrap-expect 1 -data-dir /tmp/consul -node=n1 -bind=192.168.6.108 -ui -rejoin -config-dir=/etc/consul.d/ -client 0.0.0.0
查询 服务
健康检查
健康检查是服务发现的关键组件.预防使用到不健康的服务.和服务注册类似,一个检查可以通过检查定义或HTTP API请求来注册.我们将使用和检查定义来注册检查.和服务类似,因为这是建立检查最常用的方式
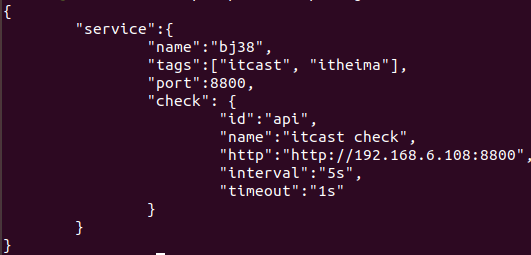
- sudo vim /etc/consul.d/web.json 打开配置文件
- 写入 服务的配置 信息。
- 执行命令,consul reload。 或者,关闭consul 再重启。
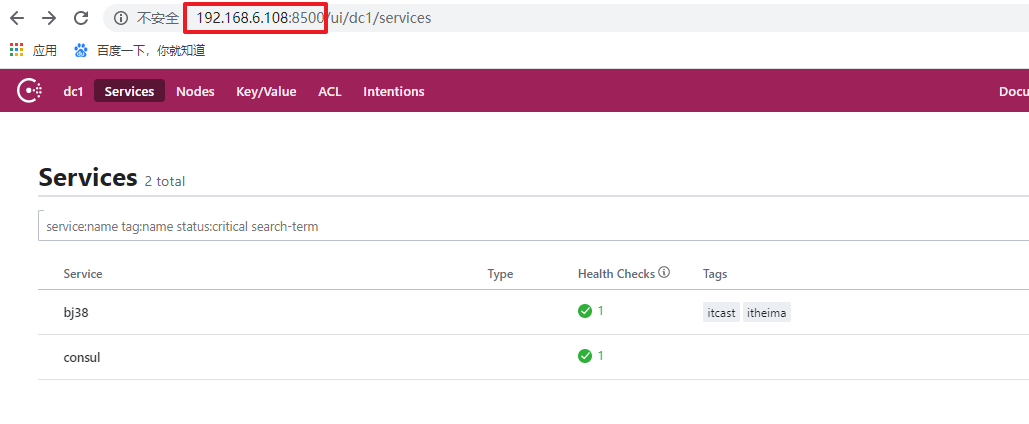
- 使用 浏览器 键入 192.168.6.108:8500 查看 “bj38” 这个服务 的 健康状况
- 不健康!没有服务bj38 给 consul 实时回复!
- 除了 http 实现健康检查外,还可以使用 “脚本”、“tcp”、“ttl” 方式进行健康检查。
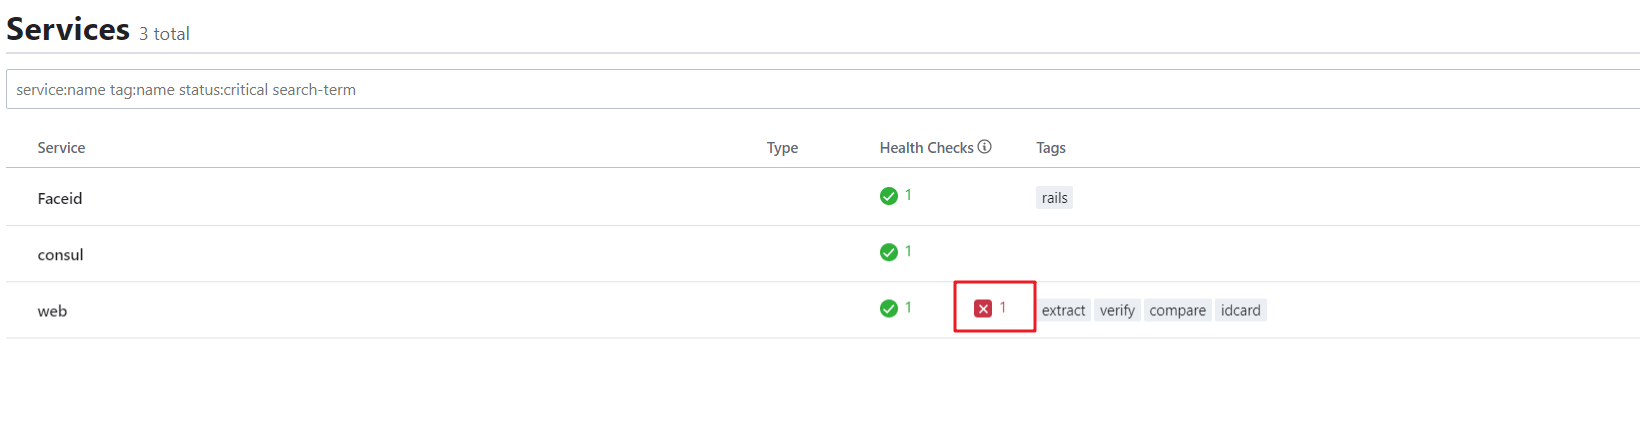
在/etc/consul.d/目录下面创建文件web2.json,内容如下:
{"service": {"name": "web","tags": ["extract", "verify", "compare", "idcard"],"address": "192.168.137.130","port": 9000,"check": {"id": "api",//这个名字无所谓,后面调用"name": "HTTP API on port 9000",//健康检查的名字"http": "http://localhost:9000",//主机ip"interval": "10s",//心跳包发送时常,就是多久发一次心跳包"timeout": "1s"//超过这个时间就认为是不健康的}}}
这时候我们没有开启这个服务,所以这个时候健康检查会出错。打开web界面,如下
consul做健康检查的必须是Script、HTTP、TCP、TTL中的一种。
Script类型需要提供Script脚本和interval变量。具体配置如下:
{"check": {"id": "mem-util","name": "Memory utilization","script": "/usr/local/bin/check_mem.py","interval": "10s","timeout": "1s"}}
通过执行外部应用进行健康检查:这种外部程序具有退出代码,并可能产生一些输出;脚本按照指预置时间间隔来调用(比如,每30秒调用一次),类似于Nagios插件系统,脚本输出限制在4K以内,输出大于4K将截断。默认情况下,脚本超时时间为30秒——可通过timeout来配置。
HTTP类型必须提供http和Interval字段。具体代码如下:
{"check": {"id": "api","name": "HTTP API on port 5000","http": "http://localhost:5000/health","interval": "10s","timeout": "1s"}}
这种检查将按照预设的时间间隔创建一个HTTP “get”请求。HTTP响应代码来标示服务所处状态:任何2xx代码视为正常,429表示警告——有很多请求;其他值表示失败。
这种类型的检查应使用curl或外部程序来处理HTTP操作。默认情况下,HTTP Checks中,请求超时时间等于调用请求的间隔时间,最大10秒。有可能使用客制的HTTP check,可以自由配置timeout时间,输出限制在4K以内,输出大于4K将截断。
TCP类型需要提供tcp和Interval字段。具体代码如下:
{"check": {"id": "ssh","name": "SSH TCP on port 22","tcp": "localhost:22","interval": "10s","timeout": "1s"}}
这种检查将按照预设的时间间隔与指定的IP/Hostname和端口创建一个TCP连接。服务的状态依赖于TCP连接是否成功——如果连接成功,则状态是“success”;否则状态是“critical”。如果一个Hostname解析为一个IPv4和一个IPv6,将尝试连接这两个地址,第一次连接成功则服务状态是“success”。默认情况下,TCP checks中,请求超时时间等于调用请求的间隔时间,最大10秒。也是可以自由配置的。
TTL(Timeto Live生存时间)类型只需提供ttl,具体配置如下:
{"check": {"id": "web-app","name": "Web App Status","notes": "Web app does a curl internally every 10 seconds","ttl": "30s"}}
这种checks为给定TTL保留了最后一种状态,checks的状态必须通过HTTP接口周期性更新,如果外部接口没有更新状态,那么状态就会被认定为不正常。 TTL checks同时会将其最后已知状态更新至磁盘,这允许Agent通过重启后恢复到已知的状态。通过TTL端上一次check来维持健康状态的有效性。
我们也可以通过页面来查看,在浏览器输入网址:http://192.68.130.137:8500
下面这里这个服务没启动,所以不健康。
consul和grpc结合使用
安装 consul 源码包:$ go get -u -v github.com/hashicorp/consul
使用整体流程
- 创建 proto文件, 指定 rpc 服务
- 启动 consul 服务发现(consul agent -dev)
- 启动server
- 获取consul 对象。
- 使用 consul对象,将 server 信息,注册给 consul
- 启动服务
- 启动client
// 参数: service: 服务名。 — 注册服务时,指定该string tag:外名/别名。 如果有多个, 任选一个 passingOnly:是否通过健康检查。 true q:查询参数。 通常传 nil // 返回值: ServiceEntry: 存储服务的切片。 QueryMeta:额外查询返回值。 nil error: 错误信息
proto文件```gosyntax = "proto3";package pb;message Person {string name = 1;int32 age = 2;}// 添加 rpc服务service hello {rpc sayHello (Person) returns (Person);}
服务端
package mainimport ("google.golang.org/grpc""day02/pb""context""net""fmt""github.com/hashicorp/consul/api")// 定义类type Children struct {}// 绑定类方法, 实现借口func (this *Children)SayHello(ctx context.Context, p *pb.Person) (*pb.Person, error) {p.Name = "hello " + p.Namereturn p, nil}func main() {// 把grpc服务,注册到consul上.// 1. 初始化consul 配置consulConfig := api.DefaultConfig()//这个api是github上的一个包// 2. 创建 consul 对象consulClient, err := api.NewClient(consulConfig)if err != nil {fmt.Println("api.NewClient err:", err)return}// 3. 告诉consul, 即将注册的服务的配置信息reg := api.AgentServiceRegistration {ID:"bj38",Tags:[]string{"grcp", "consul"},Name:"grpc And Consul",Address:"127.0.0.1",Port:8800,Check:&api.AgentServiceCheck{CheckID:"consul grpc test",TCP:"127.0.0.1:8800",Timeout:"1s",Interval:"5s",},}// 4. 注册 grpc 服务到 consul 上consulClient.Agent().ServiceRegister(®)//////////////////////以下为 grpc 服务远程调用////////////////////////// 1.初始化 grpc 对象,grpcServer := grpc.NewServer()// 2.注册服务pb.RegisterHelloServer(grpcServer, new(Children))// 3.设置监听, 指定 IP/portlistener, err := net.Listen("tcp", "127.0.0.1:8800")if err != nil {fmt.Println("Listen err:", err)return}defer listener.Close()fmt.Println("服务启动... ")// 4. 启动服务grpcServer.Serve(listener)}
客户端
package mainimport ("google.golang.org/grpc""day02/pb""context""fmt""github.com/hashicorp/consul/api""strconv")func main() {// 初始化 consul 配置consulConfig := api.DefaultConfig()// 创建consul对象 -- (可以重新指定 consul 属性: IP/Port , 也可以使用默认)consulClient, err := api.NewClient(consulConfig)// 服务发现. 从consuL上, 获取健康的服务services, _, err := consulClient.Health().Service("grpc And Consul", "grcp", true, nil)// 简单的负载均衡.addr := services[0].Service.Address + ":" + strconv.Itoa(services[0].Service.Port)//////////////////////以下为 grpc 服务远程调用///////////////////////////// 1. 链接服务//grpcConn, _ := grpc.Dial("127.0.0.1:8800", grpc.WithInsecure())// 使用 服务发现consul 上的 IP/port 来与服务建立链接grpcConn, _ := grpc.Dial(addr, grpc.WithInsecure())// 2. 初始化 grpc 客户端grpcClient := pb.NewHelloClient(grpcConn)var person pb.Personperson.Name = "Andy"person.Age = 18// 3. 调用远程函数p, err := grpcClient.SayHello(context.TODO(), &person)fmt.Println(p, err)}
服务注销
package mainimport "github.com/hashicorp/consul/api"func main() {// 1. 初始化 consul 配置consuConfig := api.DefaultConfig()// 2. 创建 consul 对象consulClient, _ := api.NewClient(consuConfig)// 3. 注销服务consulClient.Agent().ServiceDeregister("bj38")}
学完了consul命令行的使用,接着我们来看一下,在代码中如何通过,这里我们用grpc和consul结合使用。
我们操作consul使用的是github.com/hashicorp/consul/包,我们先来下载一下,命令如下:$ go get -u -v github.com/hashicorp/consul
然后我们先注册一个服务到consul上:
把grpc服务注册到consul上
代码如下:
func main(){//初始化consul配置consulConfig := api.DefaultConfig()//获取consul操作对象registry,_ := api.NewClient(consulConfig)//注册服务,服务的常规配置registerService := api.AgentServiceRegistration{ID:"1",Tags:[]string{"testHello"},Name:"HelloService",Port:8080,Address:"192.168.137.130",Check:&api.AgentServiceCheck{TCP:"192.168.137.130:8080",Timeout:"5s",Interval:"5s",},}//注册服务到consul上registry.Agent().ServiceRegister(®isterService)//获取grpc服务端对象grpcServer := grpc.NewServer()//注册grpc服务pb.RegisterHelloServiceServer(grpcServer,new(HelloService))//设置服务端监听lis,err := net.Listen("tcp",":1234")if err != nil {panic(err)}//在指定端口上提供grpc服务grpcServer.Serve(lis)}
服务发现
func main(){//初始化consul配置, 客户端服务器需要一致consulConfig := api.DefaultConfig()//获取consul操作对象registerClient,_ := api.NewClient(consulConfig)//获取地址serviceEntry,_,_ :=registerClient.Health().Service("HelloService","testHello",false,&api.QueryOptions{})//和grpc服务建立连接conn,err := grpc.Dial(serviceEntry[0].Service.Address+":"+strconv.Itoa(serviceEntry[0].Service.Port),grpc.WithInsecure())if err != nil {panic(err)}defer conn.Close()client := pb.NewHelloServiceClient(conn)reply, err := client.Hello(context.Background(),&pb.Person{Name:"lisi",Age:100})if err != nil {panic(err)}fmt.Println("reply,",reply)}
注销服务
func main(){//初始化consul配置,客户端服务器需要一致consulConfig := api.DefaultConfig()//获取consul操作对象registerClient,_ := api.NewClient(consulConfig)//注销服务client.Agent().ServiceDeregister("1")}
好处
没有服务发现,客户端需要访问固定ip的服务,当服务ip地址发生变化则访问不到,需要更改ip。而服务发现只需要查询相应服务名即可,而且不需要记下来各个服务的ip地址。

若有收获,就点个赞吧
0 人点赞
