官方文档:自动配置、创建自己的自动配置
自动配置分类
- xxx-starter 方式 - 自动配置:
比如:mybatis-spring-boot-starter
它的原理是:引用一个 JAR 包,会扫描该 jar 包 META-INF/spring.factories 中配置的类,然后 spring 容器接管这个类
@EnableXxxx方式 - 模块装配:
比如 spring 官方提供的 @EnableScheduling
它的原理是:spring 会扫描它所管理的所有类上的注解,并且会扫描注解上属否存在 @Import 注解,如果存在则导入指定的自动配置类,一般这个配置类就是上面 starter 方式写的
xxx-starter 方式 - 自动配置
前面说过,它的原理很简单:使用方(Spring io 管理)引用一个 JAR 包,会扫描该 jar 包 META-INF/spring.factories 中配置的类,然后 spring 容器接管这个类
第零步:添加依赖
<!-- 依赖 spring-boot-starter ,用于通用组件的封装 --><dependency><groupId>org.springframework.boot</groupId><artifactId>spring-boot-starter</artifactId></dependency><dependency><groupId>org.springframework.boot</groupId><artifactId>spring-boot-configuration-processor</artifactId><optional>true</optional></dependency>
- spring-boot-starter 作用:一组方便的依赖描述符,简单说可以理解为有它就可以制作自动配置 starter
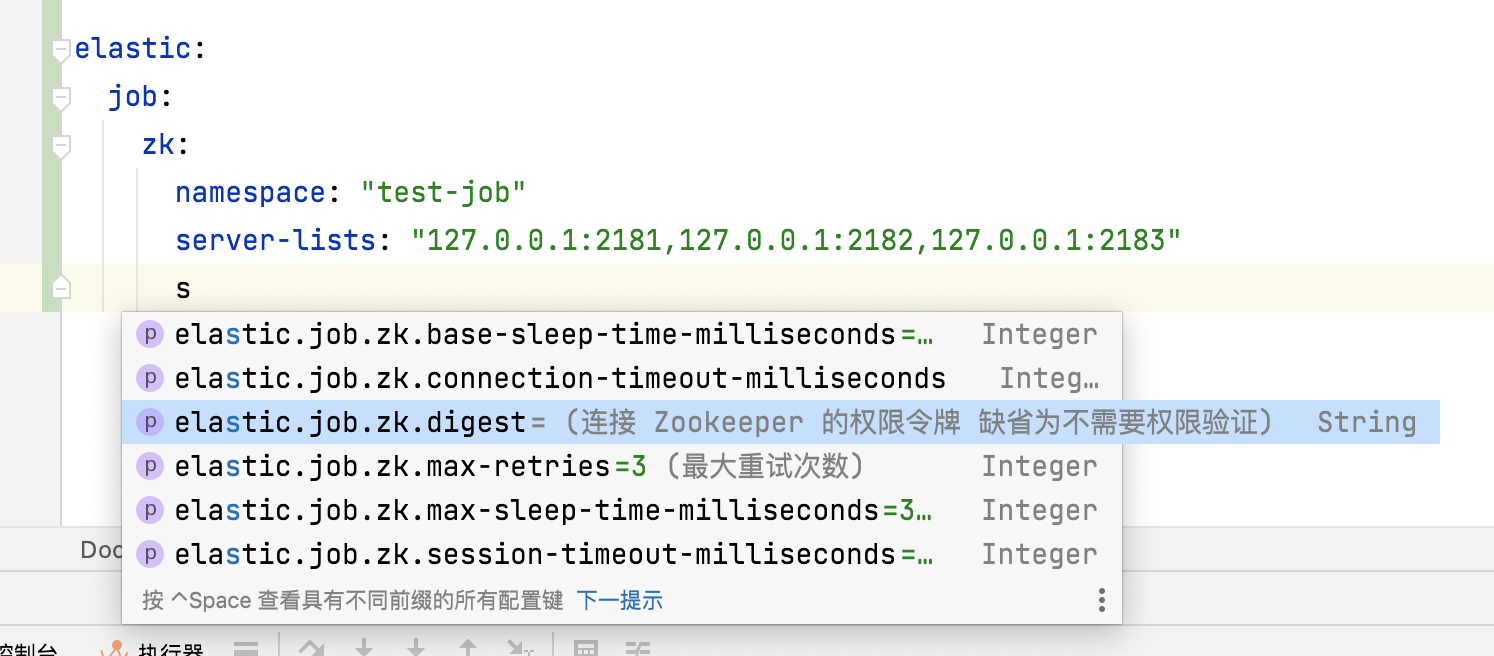
- spring-boot-configuration-processor:不太清楚这个有什么作用,但是有了他之后,在 IDEA 中会有一个图标标识

另外还有一个功能是:@EnableConfigurationProperties({SecuritySimpleProperties.class}) 被扫描到的属性收集类中的属性在你写 yaml 的时候,会有 idea 的提示 ,如下图
那个注释就是 JDK 的 /** */ 注释。这个功能还确实挺有用的
spring-boo 开头的包基本在 spring boot 中有相关的项目,他们都在,spring boot 这个仓库中,以模块形式存在,但是没有发现有更多的描述文档解释他们是做什么的
第一步:提供你的自动配置类
自动配置类 @Configuration 一般会使用 @Conditional (有很多 @ConditionalOnXXXX 的条件注册)注解,通常自动配置类会使用 @ConditionalOnClass 和 @ConditionalOnMissingBean 注解,能确保自动配置仅在找到相关类并且尚未声明自己的 @Configuration 有效。
一个简单的例子如下
// 在配置文件中 application.yml ,出现了 security-simple 配置,且 type=oath 时,该自动配置才会生效@ConditionalOnProperty(prefix = "security-simple", name = "type", havingValue = "oath")@Configuration // 自动配置类// 让收集配置类生效@EnableConfigurationProperties({SecuritySimpleProperties.class})public class SecuritySimpleAutoConfig {@Beanpublic StandardOath2Controller standardOath2Controller() {return new StandardOath2Controller();}
SecuritySimpleProperties 属性收集类
import org.springframework.boot.context.properties.ConfigurationProperties;import java.util.List;import lombok.Data;import lombok.ToString;@Data@ToString// 收集配置文件中以 security-simple 开头的配置项@ConfigurationProperties(prefix = "security-simple")public class SecuritySimpleProperties {private List<String> permitUrls;
:::tips
特别注意:
在 @Bean 注解的方法中,返回 new 出来的对象实例:如果该对象中有 @Autowired 声明的注入属性,spring 框架会处理并注入所声明的对象
也就是说:就算你声明的是一个 controller 都可以在 @Bean 方法中直接 new 返回。也会生效
:::
第二步:暴露自动配置类路径
Spring Boot 会检查 classpath 中 META-INF/spring.factories 文件(一般我们会放在 resources/META-INF/spring.factories 路径),里面需要列出来你的配置文件类路径
比如下面这个,从第二行开始,每一行是一个配置类
org.springframework.boot.autoconfigure.EnableAutoConfiguration=\com.mycorp.libx.autoconfigure.SecuritySimpleProperties,\com.mycorp.libx.autoconfigure.SecuritySimpleProperties2
测试你的配置类
自动配置会受到许多因素的影响:用户配置(@Bean 定义和 Environment 定制)、条件评估(特定库的存在)等。具体来说,每个测试都应该创建一个明确定义的 ApplicationContext 代表这些自定义的组合。 ApplicationContextRunner 提供了一种很好的方法来实现这一目标。
ApplicationContextRunner 通常定义为测试类的一个字段
import org.junit.jupiter.api.Test;import org.springframework.boot.autoconfigure.AutoConfigurations;import org.springframework.boot.autoconfigure.logging.ConditionEvaluationReportLoggingListener;import org.springframework.boot.logging.LogLevel;import org.springframework.boot.test.context.runner.ApplicationContextRunner;import static org.assertj.core.api.Assertions.assertThat;/*** @author mrcode* @date 2021/10/18 21:31*/class SecuritySimpleAutoConfigTest {// 声明 ApplicationContextRunner 实例private final ApplicationContextRunner contextRunner = new ApplicationContextRunner()// 确定使用哪一个配置类,这里写入我们想要测试的配置类// 如果有多个,也可以直接写入,不必手动调整顺序,因为顺序与程序真实运行时一致.withConfiguration(AutoConfigurations.of(SecuritySimpleAutoConfig.class))// 显示日志报告条件的匹配报告,这个报告在正常的 boot 程序启动中你也看到过// 比如这种 - @ConditionalOnProperty (security-simple.type=oath) matched (OnPropertyCondition).withInitializer(new ConditionEvaluationReportLoggingListener(LogLevel.INFO));@Testvoid defaultServiceBacksOff() {this.contextRunner// 笔者暂时只发现了使用这种方式模拟 yml 中的配置,对应的是 SecuritySimpleAutoConfig 中绑定的配置文件.withPropertyValues("security-simple.type=oath").run((context) -> {// 这里获得了 spring 上下文,和正常的 ioc 容器一样,可以检查一些事情,或则获取某个 bean 调用方法等assertThat(context).hasSingleBean(StandardOath2Controller.class);assertThat(context).getBean("standardOath2Controller").isSameAs(context.getBean(StandardOath2Controller.class));});}}
运行后,报告打印如下所示
============================CONDITIONS EVALUATION REPORT============================Positive matches:-----------------SecuritySimpleAutoConfig matched:- @ConditionalOnProperty (security-simple.type=oath) matched (OnPropertyCondition)SecuritySimpleAutoConfig#clientDetailsService matched:- @ConditionalOnMissingBean (types: cn.mrcode.security_simple.oath2.ClientDetailsService; SearchStrategy: all) did not find any beans (OnBeanCondition)
@EnableXxxx 方式 - 模块装配
模块原理是:spring 会扫描它所管理的所有类上的注解,并且会扫描注解上属否存在 @Import 注解,如果存在则导入指定的自动配置类,一般这个配置类就是上面 starter 方式写的
它与 starter 其实是类似的,有一点不同的是,它被发现是 使用方主动,显示的指定的,而 starter 方式是隐式的,因为它通过 META-INF/spring.factories 配置文件的约定方式告知 spring 容器需要加载这些配置类
第一步:定义一个配置类
比如下面实现了一个配置类,和前面实现 starter 方式是类似的配置类
package cn.mrcode.rabbit.task.autoconfigure;import cn.mrcode.rabbit.task.parser.ElasticJobConfParser;import com.dangdang.ddframe.job.reg.zookeeper.ZookeeperConfiguration;import com.dangdang.ddframe.job.reg.zookeeper.ZookeeperRegistryCenter;import lombok.extern.slf4j.Slf4j;import org.springframework.boot.autoconfigure.condition.ConditionalOnProperty;import org.springframework.boot.context.properties.EnableConfigurationProperties;import org.springframework.context.annotation.Bean;import org.springframework.context.annotation.Configuration;/*** 解析 JOB 的配置** @author mrcode* @date 2021/11/24 21:53*/@Slf4j@Configuration@ConditionalOnProperty(prefix = "elastic.job.zk",name = {"namespace", "server-lists"}, // 必须存在这两个属性才生效matchIfMissing = false // 如果属性不存在,条件成立吗?默认就是不成立,也就是不生效)// 当前面的注解条件生效后,该注解才会生效,指定的配置扫描并初始化 JobZookeeperProperties 类@EnableConfigurationProperties(JobZookeeperProperties.class)public class JobParserAutoConfiguration {@Bean(initMethod = "init")public ZookeeperRegistryCenter zookeeperRegistryCenter(JobZookeeperProperties jobZookeeperProperties) {ZookeeperConfiguration zkConfig = new ZookeeperConfiguration(jobZookeeperProperties.getServerLists(),jobZookeeperProperties.getNamespace());zkConfig.setConnectionTimeoutMilliseconds(jobZookeeperProperties.getConnectionTimeoutMilliseconds());zkConfig.setSessionTimeoutMilliseconds(jobZookeeperProperties.getSessionTimeoutMilliseconds());zkConfig.setMaxRetries(jobZookeeperProperties.getMaxRetries());zkConfig.setBaseSleepTimeMilliseconds(jobZookeeperProperties.getBaseSleepTimeMilliseconds());zkConfig.setMaxSleepTimeMilliseconds(jobZookeeperProperties.getMaxSleepTimeMilliseconds());zkConfig.setDigest(jobZookeeperProperties.getDigest());log.info("JOB 注册中心配置成功,zkServerLists={},namespace={}", jobZookeeperProperties.getNamespace(), jobZookeeperProperties.getNamespace());return new ZookeeperRegistryCenter(zkConfig);}@Beanpublic ElasticJobConfParser elasticJobConfParser(JobZookeeperProperties jobZookeeperProperties) {return new ElasticJobConfParser(jobZookeeperProperties);}}
这个配置类,想要 spring 加载,你可以使用 starter 方式,它通过 META-INF/spring.factories 暴露给 spring 扫描到进行加载。而模块装配就不使用 META-INF/spring.factories 方式了。
第二步:实现 EnableXXX 注解
模块装配是使用如下的方式暴露的,定义一个注解
package cn.mrcode.rabbit.task.annotation;import cn.mrcode.rabbit.task.autoconfigure.JobParserAutoConfiguration;import org.springframework.context.annotation.Import;import java.lang.annotation.*;/*** @author mrcode* @date 2021/11/25 20:41*/@Target(ElementType.TYPE) // 作用于类或接口上@Retention(RetentionPolicy.RUNTIME) // 注解会被编译器记录在类文件中,并在运行时由 VM 保留,因此它们可以被反射读取@Documented // 被 javadoc 类似工具记录@Inherited // 自动继承注解类型,如果该注解继承一个注解的话,可以继承超类的注解@Import(JobParserAutoConfiguration.class)public @interface EnableElasticJob {}
关键点是 @Import(JobParserAutoConfiguration.class) ,它指向了刚刚写好的 配置类
第三步骤:使用方使用 EnableXXX 注解
首先你要依赖 这个 JAR 包(但是里面不包含 META-INF/spring.factories 里面的类容(可以有,但是不能配置到 EnableXX 指向的配置类,因为指向了,就被自动加载了,实现不了注解加载了))
可以讲这个注解写在你的 Application 启动类似行,如下所示
package cn.mrcode.test;import cn.mrcode.rabbit.task.annotation.EnableElasticJob;import org.springframework.boot.SpringApplication;import org.springframework.boot.autoconfigure.SpringBootApplication;@SpringBootApplication@EnableElasticJobpublic class Application {public static void main(String[] args) {SpringApplication.run(Application.class, args);}}
拓展阅读
- 框架级初始化: @EnableXXX 方式为入口,然后为自定义的注解创建代理对象
配置注解
@ConditionalOnProperty
指定属性是否存在,或则是否为某个值
// org.springframework.boot.autoconfigure.condition.ConditionalOnProperty@ConditionalOnProperty(prefix = "elastic.job.zk",name = {"namespace", "serverLists"}, // 必须存在这两个属性才生效matchIfMissing = false // 如果属性不存在,条件成立吗?默认就是不成立,也就是不生效)// 在配置文件中 application.yml ,出现了 security-simple 配置,且 type=oath 时,该自动配置才会生效@ConditionalOnProperty(prefix = "security-simple",name = "type",havingValue = "oath")
你看该类源码就明白,它的属性要求在 Environment 对象中(不仅仅是在 application.yml 中 )
@ConditionalOnExpression
可以使用 SpEL 表达式值的条件元素的配置注释
// org.springframework.boot.autoconfigure.condition.ConditionalOnExpression@ConditionalOnExpression
比如下面这个场景
// 获取配置文件中 zookeeper.address 的值,并调用 length() 方法(字符串有 length 方法),// 当数组大于 0 时,该配置生效@Configuration@ConditionalOnExpression("'${zookeeper.address}'.length() > 0")
字符串相等判定:
// 对于布尔值和数字可以直接使用 == 或 != ,比如 @ConditionalOnExpression("${spring.profiles.active == true")、 @ConditionalOnExpression("${spring.profiles.active != 1")// 对于字符串,则需要使用以下方式,单引号将表达式围绕起来,再调用 字符串的方法@ConditionalOnExpression("!'${spring.profiles.active}'.equals('dev')")
@PostConstruct
PostConstruct 注解用于需要在 依赖注入完成后执行任何初始化的方法。 必须在类投入使用之前调用此方法。 所有支持依赖注入的类都必须支持这个注解。 即使类没有请求注入任何资源,也必须调用用 PostConstruct 注释的方法。 这个注解只能注解一种方法。 应用 PostConstruct 注释的方法必须满足以下所有标准(这个标准自己看源码说明,因为一般我们用空参方法)
// javax.annotation.PostConstruct@PostConstruct
比如下面这个场景
import org.springframework.beans.factory.annotation.Autowired;import org.springframework.boot.context.properties.EnableConfigurationProperties;import org.springframework.context.annotation.Configuration;import java.util.List;import javax.annotation.PostConstruct;/*** @author mrcode* @date 2021/11/17 20:27*/@Configuration@EnableConfigurationProperties({ApprovalConfig.class})public class ApprovalConfiguration {@Autowiredprivate ApprovalConfig approvalConfig;// 当 approvalConfig 注入后,对这个 approvalConfig 做一些操作@PostConstructpublic void init() {final List<ApprovalProcessDefine> defines = approvalConfig.getDefines();for (ApprovalProcessDefine define : defines) {approvalConfig.putProcessDefine(define.getDataType(), define);}}}
编程方式将 class 实例化并注册到 spring 容器中
在实现自动配置的时候,比如你实现一个组件,常用的需求就是配置一个 class,你需要将它实例化,并注入到 spring 容器中。
比如:quartz 配置 JOB 的时候,只写了一个 class 名称,这个类里面写着你自己的业务逻辑,quartz 会用 class 实例化它,并且里类里面依赖的 自己的 服务,还能正常的注入。
我们要实现这个功能,可以使用 spring 的 BeanDefinitionBuilder 功能:
import org.springframework.beans.factory.config.BeanDefinition;import org.springframework.beans.factory.support.BeanDefinitionBuilder;import org.springframework.beans.factory.support.DefaultListableBeanFactory;import org.springframework.beans.factory.support.ManagedList;import org.springframework.boot.context.event.ApplicationReadyEvent;import org.springframework.context.ApplicationListener;import org.springframework.context.ConfigurableApplicationContext;// 定义 bean 创建信息BeanDefinitionBuilder factory = BeanDefinitionBuilder.rootBeanDefinition(Job.class);factory.setScope(BeanDefinition.SCOPE_PROTOTYPE); // 单例还是多列factory.addConstructorArgValue(1L); // 构造函数// 这个 jdbcService 是你自己管理的 bean 名称,比如就是你的一个 servicefactory.addConstructorArgReference("jdbcService");
比如这个 JOB 业务类定义如下
public class Job{@Autowiredprivate AccountService accountService;private JdbcService jdbcService;public Job(Long aa,JdbcService jdbcService) {this.jdbcService = jdbcService;}}
注册到 spring 容器中
DefaultListableBeanFactory defaultListableBeanFactory = (DefaultListableBeanFactory) applicationContext.getAutowireCapableBeanFactory();String registerBeanName = "job"; // 定义 bean 名称defaultListableBeanFactory.registerBeanDefinition(registerBeanName,factory.getBeanDefinition());
注册之后,就可以使用 applicationContext 获取到了
(Job) applicationContext.getBean(registerBeanName);
获取 applicationContext 的方式很多,下面是其中一种
@Slf4jpublic class ElasticJobConfParser implements ApplicationListener<ApplicationReadyEvent> {@Overridepublic void onApplicationEvent(ApplicationReadyEvent event) {ConfigurableApplicationContext applicationContext = event.getApplicationContext();}
:::info 上面是简要描述:在这里有一个实战,可以去看看 :::
IDEA 中 yaml 属性自动完成 IDEA 插件
spring-boot-assistant 此插件增加了对 Spring Boot 配置文件(application.yml 等)的自动完成支持。简单说会有 自动配置的提示

