16.1 什么是 Redis
Redis 是目前使用的非常广泛的免费开源内存数据库,是一个高性能的No SQL键值(key-value)数据库。
Redis 支持更丰富的数据结构,例如 hashes, lists, sets 等,同时支持数据持久化。除此之外,Redis 还提供一些类数据库的特性,比如事务,HA,主从库。可以说 Redis 兼具了缓存系统和数据库的一些特性,因此有着丰富的应用场景。
与其他 key-value 缓存(如 Memcached )相比Redis有以下三个特点:
- Redis 支持数据的持久化,它可以将内存中的数据保存在磁盘中,重启的时候可以再次加载进行使用。
- Redis 不仅仅支持简单的 key-value 类型的数据,同时还提供 list,set,zset,hash 等数据结构的存储。
- Redis 支持数据的备份,即 master-slave 模式的数据备份。
Redis 优势如下:
- 性能极高。Redis 能读的速度是 110000 次/s,写的速度是 81000 次/s。
- 丰富的数据类型。Redis 支持二进制案例的 Strings,Lists,Sets 及 Ordered Sets 数据类型操作。
- 原子性。Redis 所有的操作都是原子性的,意思是要么成功执行要么失败完全不执行。单个操作是原子性的,多个操作也是,通过 MULTI 和 EXEC 指令抱起来。
- 丰富的特性。Redis 还支持 publish/subscribe,通知,key 过期等特性。
16.2 集成访问Redis数据
16.2.1 在项目中添加依赖
删除前一节中增加的所有依赖,然后添加下面的依赖:
<dependency><groupId>org.springframework.boot</groupId><artifactId>spring-boot-starter-data-redis</artifactId><version>2.5.6</version></dependency><dependency><groupId>org.apache.commons</groupId><artifactId>commons-pool2</artifactId></dependency>
在MVN Repository可以查看spring-boot-starter-data-redis的最新版本情况。
通常连接 Redis服务器的客户端是Lettuce 和 Jedis (以前SpringBoot 1.5.x版本时默认的Redis客户端是 Jedis,springboot 2.x版本中默认客户端是用 Lettuce)。Jedis 在实现上是直连 redis server,多线程环境下非线程安全,除非使用连接池,为每个 redis实例增加物理连接。而Lettuce 则是一种可伸缩,线程安全,完全非阻塞的Redis客户端,多个线程可以共享一个RedisConnection,它利用Netty NIO 框架来高效地管理多个连接,从而提供了异步和同步数据访问方式,用于构建非阻塞的反应性应用程序。
由于 Spring Boot 2.X 默认集成了Lettuce ,所以无需显式导入。
16.2.2 常见参数配置
下面常见的Redis和Lettuce参数配置
spring:redis:# Redis服务器地址、端口和密码host: 82.156.120.226port: 6379password: 【这里是密码】# Redis数据库索引(默认为0)database: 0# 链接超时时间 单位 ms(毫秒)timeout: 10000lettuce:pool:# 连接池最大连接数(使用负值表示没有限制)默认 8max-active: 8# 连接池最大阻塞等待时间(使用负值表示没有限制)默认 -1max-wait: 10000# 连接池中的最大空闲连接 默认 8max-idle: 8# 连接池中的最小空闲连接 默认 0min-idle: 0# 关闭超时时间shutdown-timeout: 1000
16.2.3 自定义 RedisTemplate
默认的 Redis 模板只支持RedisTemplate<String,String>,只能存入字符串,很多时候,我们需要自定义 RedisTemplate ,这样我们可以很方便的操作实例对象。如下所示:
package com.longser.utils.redis;

import com.fasterxml.jackson.annotation.JsonAutoDetect;
import com.fasterxml.jackson.annotation.PropertyAccessor;
import com.fasterxml.jackson.databind.ObjectMapper;
import com.fasterxml.jackson.databind.jsontype.impl.LaissezFaireSubTypeValidator;
import org.springframework.boot.autoconfigure.condition.ConditionalOnMissingBean;
import org.springframework.context.annotation.Bean;
import org.springframework.context.annotation.Configuration;
import org.springframework.data.redis.connection.RedisConnectionFactory;
import org.springframework.data.redis.connection.lettuce.LettuceConnectionFactory;
import org.springframework.data.redis.core.RedisTemplate;
import org.springframework.data.redis.core.StringRedisTemplate;
import org.springframework.data.redis.serializer.Jackson2JsonRedisSerializer;

@Configuration
public class RedisConfig {

    @Bean
    @ConditionalOnMissingBean(name = "redisTemplate")
    public RedisTemplate<String, Object> redisTemplate(
            RedisConnectionFactory redisConnectionFactory) {

        Jackson2JsonRedisSerializer<Object> jackson2JsonRedisSerializer = new Jackson2JsonRedisSerializer<Object>(Object.class);
        ObjectMapper om = new ObjectMapper();
        om.setVisibility(PropertyAccessor.ALL, JsonAutoDetect.Visibility.ANY);
        om.activateDefaultTyping(LaissezFaireSubTypeValidator.instance,ObjectMapper.DefaultTyping.NON_FINAL);
        jackson2JsonRedisSerializer.setObjectMapper(om);

        RedisTemplate<String, Object> template = new RedisTemplate<String, Object>();
        template.setConnectionFactory(redisConnectionFactory);

        LettuceConnectionFactory jedisConnectionFactory = (LettuceConnectionFactory) template.getConnectionFactory();
        jedisConnectionFactory.setValidateConnection(true);

        template.setKeySerializer(jackson2JsonRedisSerializer);
        template.setValueSerializer(jackson2JsonRedisSerializer);
        template.setHashKeySerializer(jackson2JsonRedisSerializer);
        template.setHashValueSerializer(jackson2JsonRedisSerializer);
        template.afterPropertiesSet();
        return template;
    }

    @Bean
    @ConditionalOnMissingBean(StringRedisTemplate.class)
    public StringRedisTemplate stringRedisTemplate(
            RedisConnectionFactory redisConnectionFactory) {

        StringRedisTemplate template = new StringRedisTemplate();
        template.setConnectionFactory(redisConnectionFactory);

        LettuceConnectionFactory jedisConnectionFactory = (LettuceConnectionFactory) template.getConnectionFactory();
        jedisConnectionFactory.setValidateConnection(true);

        return template;
    }
}
16.2.4 封装Redis访问操作
由于访问Redis的代码有时比较繁琐,并且非常不直观,因此我们通常定义一个类来封装这些操作:
package com.longser.utils.redis;

import org.springframework.data.redis.core.RedisTemplate;
import org.springframework.data.redis.core.StringRedisTemplate;
import org.springframework.stereotype.Component;

import javax.annotation.Resource;

@Component
public class Redis {
    @Resource
    private StringRedisTemplate stringRedisTemplate;
    public void setStringRedisTemplate(StringRedisTemplate stringRedisTemplate) {
        this.stringRedisTemplate = stringRedisTemplate;
    }

    @Resource
    private RedisTemplate<String, Object> redisTemplate;
    public void redisTemplate(RedisTemplate<String, Object> redisTemplate) {
        this.redisTemplate = redisTemplate;
    }

    public String getValue(int id) {
        return this.getValue(String.valueOf(id));
    }

    public String getValue(String key) {
        return stringRedisTemplate.opsForValue().get(key);
    }

    public void setValue(int id, String value) {
        this.setValue(String.valueOf(id), value);
    }

    public void setValue(String key, String value) {
        stringRedisTemplate.opsForValue().set(key, value);
    }

    public void setCounterValue(String key, Long value) {
        this.setValue(key, value.toString());
    }

    public Long getCounterValue(String key) {
        String value = this.getValue(key);
        if (value == null || "".equals(value)) {
            this.setValue(key,"0");
            return 0L;
        }

        return Long.parseLong(value);
    }

    public Long increment(String key) {
        return stringRedisTemplate.opsForValue().increment(key, 1L);
    }

    public Long decrement(String key) {
        return stringRedisTemplate.opsForValue().decrement(key,1L);
    }

    public void delete(int id) {
        delete(String.valueOf(id));
    }

    public void delete(String key) {
        stringRedisTemplate.delete(key);
    }

    public void putHash(int id, String key, Object value) {
        putHash(String.valueOf(id), key, value);
    }

    public void putHash(String hash, String key, Object value) {
        redisTemplate.opsForHash().put(hash, key, value);
    }

    public Object getHash(int id, String key) {
        return getHash(String.valueOf(id), key);
    }

    public Object getHash(String hash, String key) {
        return redisTemplate.opsForHash().get(hash, key);
    }

    public boolean hasItem(int id, String key) {
        return hasItem(String.valueOf(id), key);
    }

    public boolean hasItem(String hash, String key) {
        return redisTemplate.opsForHash().hasKey(hash, key);
    }

    public void deleteHash(int id, String key) {
        deleteHash(String.valueOf(id), key);
    }

    public void deleteHash(String hash, String key) {
        redisTemplate.opsForHash().delete(hash, key);
    }
}
16.2.5 测试及开发范例
下面是测试代码,同时也可作为实际开发的范例:
package com.longser.union.cloud.redis;

import com.longser.utils.redis.Redis;
import org.junit.jupiter.api.Test;
import org.springframework.beans.factory.annotation.Autowired;
import org.springframework.boot.test.context.SpringBootTest;
import java.util.concurrent.ExecutorService;
import java.util.concurrent.Executors;

import static org.junit.jupiter.api.Assertions.*;

@SpringBootTest
public class RedisTest {

    @Autowired
    private Redis redis;

    /**
     * 测试普通值的读写删除
     */
    @Test
    public void testRedis() {
        String sessionKey = "JH3213D73JAE7873D7";

        try {
            redis.putHash("12345ABC", "openid", "9a9b5f5b9e5c9ac9");
            redis.putHash("12345ABC", "session_key", sessionKey);

            String theKey =(String) redis.getHash("12345ABC", "session_key");
            assertEquals(sessionKey, theKey);

            redis.deleteHash("12345ABC","openid");
            redis.deleteHash("12345ABC","session_key");
            assertFalse(redis.hasItem("12345ABC", "openid"));
            assertFalse(redis.hasItem("12345ABC", "session_key"));

            System.out.println(("Redis Hash Test Finished."));

            redis.setValue(18,"The value of 18");
            redis.setValue("PrivateKey","The value of PrivateKey");
            assertEquals("The value of 18", redis.getValue(18));
            assertEquals("The value of PrivateKey", redis.getValue("PrivateKey"));

            redis.delete(18);
            redis.delete("PrivateKey");
            assertNull(redis.getValue(18));
            assertNull(redis.getValue("PrivateKey"));
            System.out.println("Redis String Value Test Finished.");

        } catch(Exception ex) {
            ex.printStackTrace();
        }
    }

    /**
     * 测试计数器
     */
    @Test
    public void testVisitCounter() {
        System.out.println("当前访问次数:" + redis.getCounterValue("pageCounter"));

        // 使用线程池快速发起100次访问
        ExecutorService cachedThreadPool = Executors.newCachedThreadPool();
        for (int i = 0; i < 100; i++) {
            cachedThreadPool.execute(() -> System.out.println(redis.increment("pageCounter")));
        }
    }
}
分别运行两个测试函数,看到如下信息说明测试全部成功完成。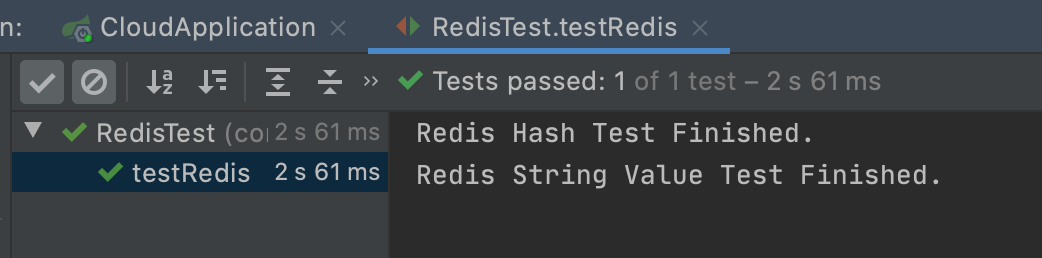
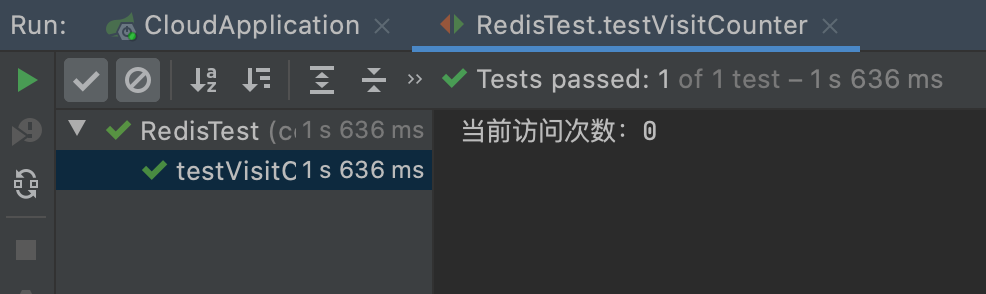
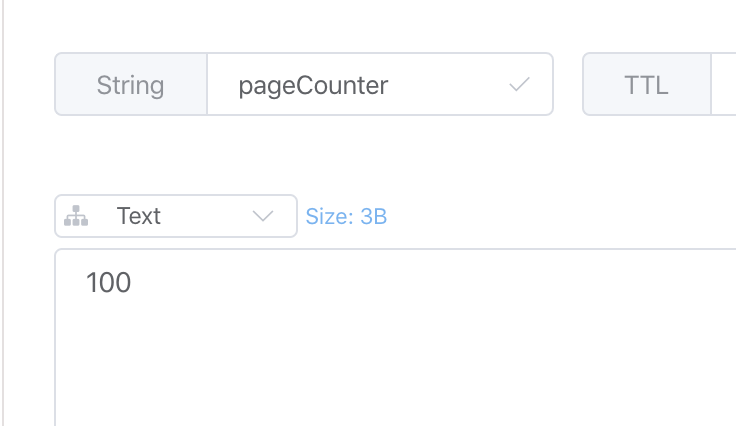
用Another Redis Desktop Manager 可以看到当前的计数器已经变成100
16.3. 使用 Redis 做缓存服务
上一章中使用的Ehcache 依然是 Java 进程内的缓存框架,受限于 JVM 整体的内存分配策略。如果是大型系统,缓存的数据量特别大,且性能要求很高,可以考虑直接使用 Redis 作为缓存。
Redis 可以采用单机、主备、集群等模式,视乎具体项目需求决定即可。目前各大云计算厂商均提供商用版的 Redis 缓存服务,性能卓越且接入简单快速。
本节简单地演示 Spring Boot 中使用 Redis 单机缓存的方法,真实生产环境中建议至少使用主备类型的 Redis 实例。
16.3.1 删除不使用的依赖
因为改用 Redis 缓存,所以我们删除之前为Ehcache添加的4个依赖
16.3.2 修改缓存配置
修改 application.yaml 配置文件如下:
+    # 过期时间
+    redis:
+      time-to-live: 6000s
+    type: redis
-    jcache:
-      config: classpath:ehcache.xml
-    type: jcache
16.3.3 测试Redis缓存
无须额外的代码,再次运行前一章关于缓存的测试代码。cacheTest() 的运行结果和之前的一致,而缓存管理器名称应该为 **org.springframework.data.redis.cache.RedisCacheManager**。
另外我们可以直接使用 Redis 客户端查看生成的缓存信息,如下图: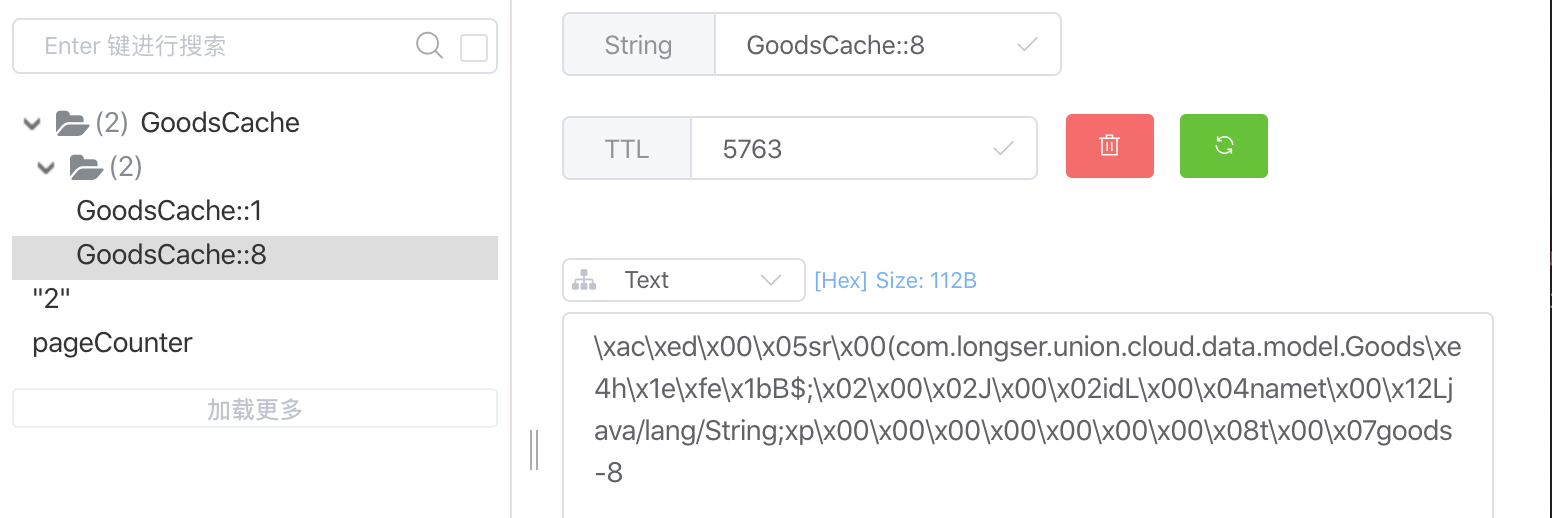
已经有名为 GoodsCache::1和GoodsCache::8 的缓存键存在了。
16.3.4 自定义缓存键值名称规则
前文示例中缓存键值用的是默认设置,在客户端中可以看到它只包括了数据对象类名和参数,这不够直观,区分度也不够。我们可以通过继承CachingConfigurerSupport类来自己定义缓存键值的规则:
package com.longser.utils.redis;

import org.springframework.cache.annotation.CachingConfigurerSupport;
import org.springframework.cache.annotation.EnableCaching;
import org.springframework.cache.interceptor.KeyGenerator;
import org.springframework.context.annotation.Bean;
import org.springframework.context.annotation.Configuration;

import java.lang.reflect.Method;

@Configuration
@EnableCaching
public class RedisCacheConfig extends CachingConfigurerSupport {

    @Bean
    @Override
    public KeyGenerator keyGenerator() {
        return new KeyGenerator() {
            @Override
            public Object generate(Object target, Method method, Object... params) {
                StringBuilder sb = new StringBuilder();
                sb.append(target.getClass().getName());
                sb.append("." + method.getName());
                for (Object obj : params) {
                    sb.append(":" + obj.toString());
                }
                return sb.toString();
            }
        };
    }
}
再次运行测试代码,在Redis客户端软件中,可以看到新的缓存数据: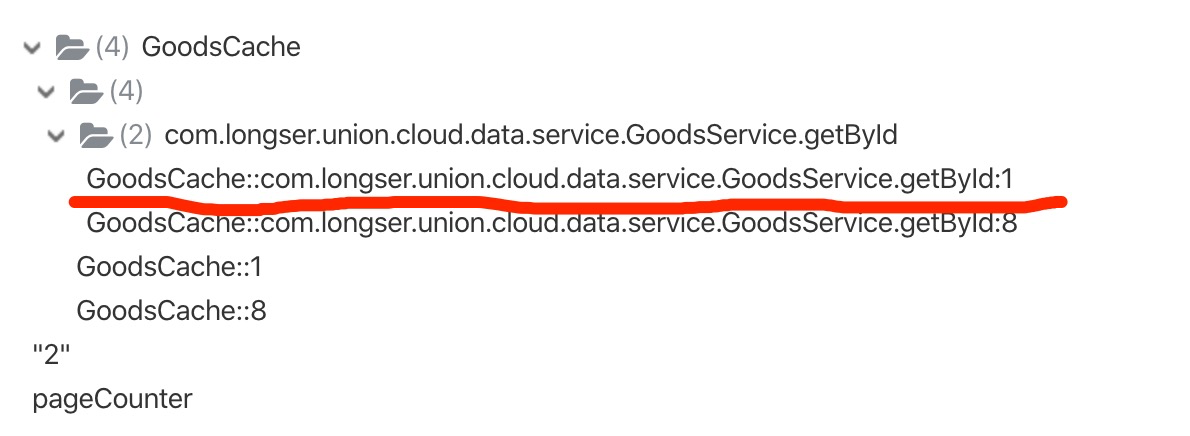
16.4 其他说明
分布式系统中,Session 共享有很多的解决方案,其中托管到Redis缓存中应该是最常用的方案之一(具体的内容不在本章讨论范围)。
作为一个强大、高效的键值数据库,Redis的管理和配置非常复杂,本章只是从集成应用的角度讨论Redis的数据访问操作。有关Redis管理的更多的内容请自行查询有关文档。
版权说明:本文由北京朗思云网科技股份有限公司原创,向互联网开放全部内容但保留所有权力。

若有收获,就点个赞吧
0 人点赞
