1. Lombok标准注解
@Getter/@Setter
可以使用 @Getter 或 @Setter 注释任何类或字段,Lombok 会自动生成默认的 getter/setter 方法。
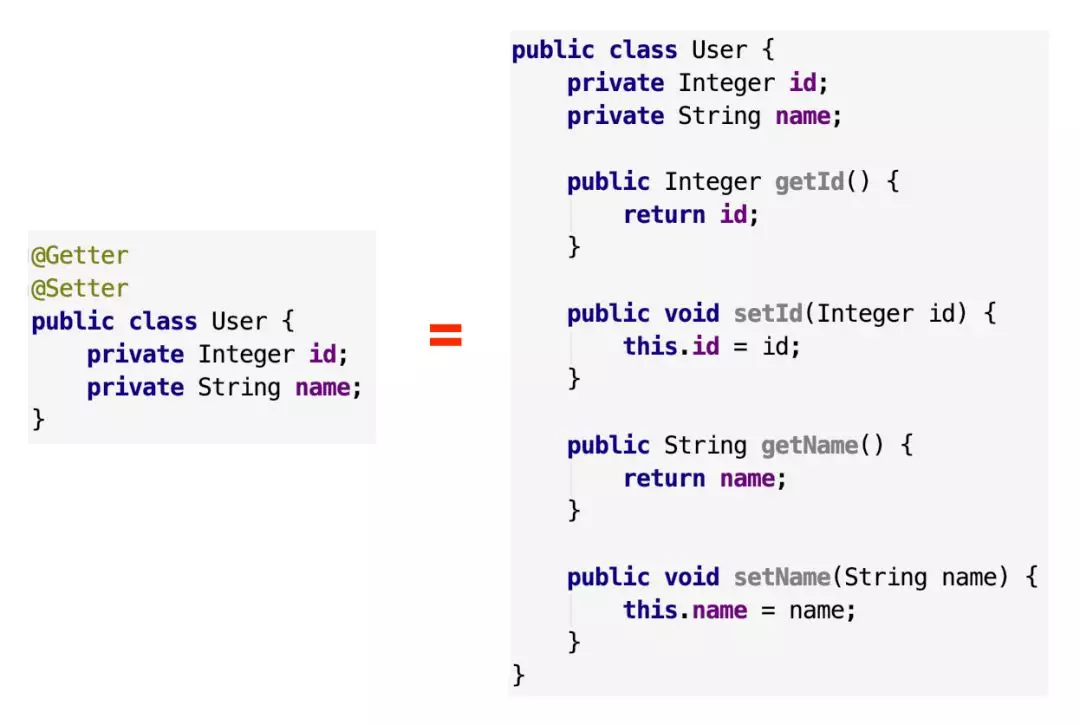
@Getter
生成getter、写在类上会生成该类下所有字段的getter。写在某个字段上就作用与该字段
参数
onMethod:把需要添加的注解写在这
public class Example {@Getter(onMethod_={@Deprecated}) // JDK7写法@Getter(onMethod=@__({@Deprecated}))private int foo;private final String bar = "";}
生成:
public class Example {private int foo;private final String bar = "";public Example() {}/** @deprecated */@Deprecatedpublic int getFoo() {return this.foo;}}
-
@Setter
生成Setter
参数 onMethod:在方法上添加中注解,见@Getter#onMethod
- onParam:在方法的参数上添加注解,见@Getter#onMethod
-
Lazy Getter
@Getter 注解支持一个 lazy 属性,该属性默认为 false。当设置为 true 时,会启用延迟初始化,即当首次调用 getter 方法时才进行初始化。
示例public class LazyGetterDemo {public static void main(String[] args) {LazyGetterDemo m = new LazyGetterDemo();System.out.println("Main instance is created");m.getLazy();}@Getterprivate final String notLazy = createValue("not lazy");@Getter(lazy = true)private final String lazy = createValue("lazy");private String createValue(String name) {System.out.println("createValue(" + name + ")");return null;}}
以上代码经过 Lombok 编译后,会生成如下代码:
public class LazyGetterDemo {private final String notLazy = this.createValue("not lazy");private final AtomicReference<Object> lazy = new AtomicReference();// 已省略部分代码public String getNotLazy() {return this.notLazy;}public String getLazy() {Object value = this.lazy.get();if (value == null) {synchronized(this.lazy) {value = this.lazy.get();if (value == null) {String actualValue = this.createValue("lazy");value = actualValue == null ? this.lazy : actualValue;this.lazy.set(value);}}}return (String)((String)(value == this.lazy ? null : value));}}
通过以上代码可知,调用 getLazy 方法时,若发现 value 为 null,则会在同步代码块中执行初始化操作。
@ToString
自动重写 toString() 方法,会印出所有变量
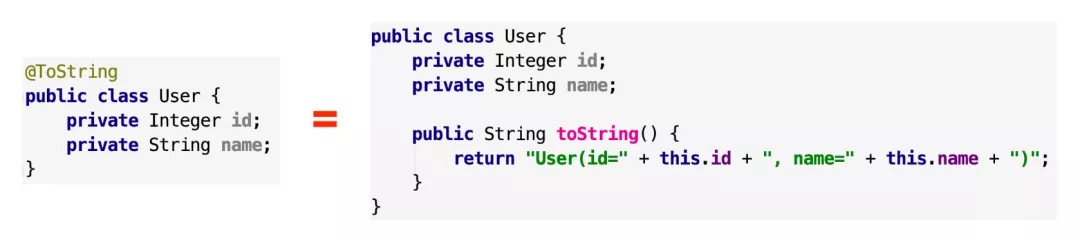
使用 @ToString 注解可以为指定类生成 toString 方法@ToString(exclude = {"dateOfBirth"})public class ToStringDemo {String firstName;String lastName;LocalDate dateOfBirth;}
以上代码经过 Lombok 编译后,会生成如下代码:
public class ToStringDemo {String firstName;String lastName;LocalDate dateOfBirth;public ToStringDemo() {}public String toString() {return "ToStringDemo(firstName=" + this.firstName + ", lastName=" +this.lastName + ")";}}
@EqualsAndHashCode
自动生成 equals(Object other) 和 hashcode() 方法,包括所有非静态变量和非 transient 的变量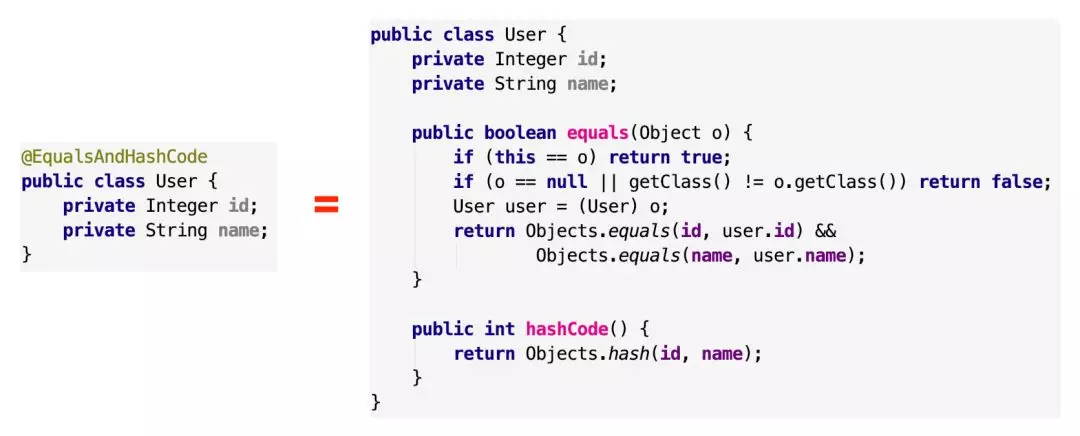
如果某些变量不想要加进判断,可以透过 exclude 排除,也可以使用 of 指定某些字段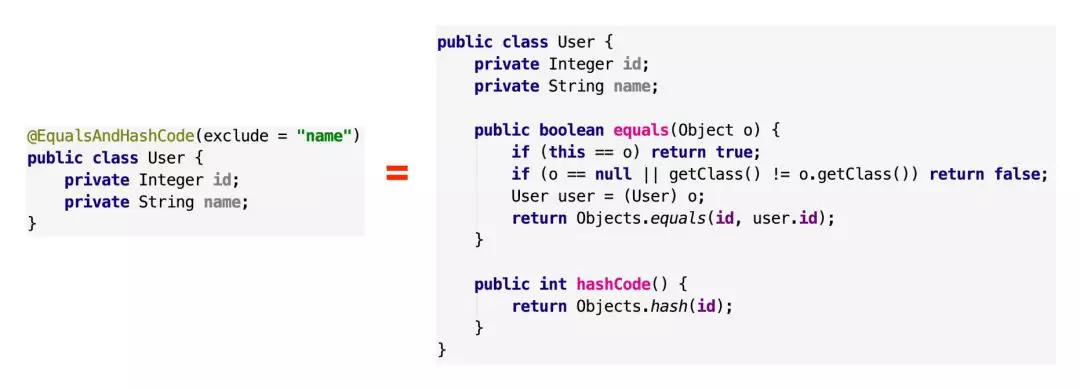
Q : 为什么只有一个整体的 @EqualsAndHashCode 注解,而不是分开的两个 @Equals 和 @HashCode?
A : 在 Java 中有规定,当两个对象 equals 时,他们的 hashcode 一定要相同,反之,当 hashcode 相同时,对象不一定 equals。所以 equals 和 hashcode 要一起实现,免得发生违反 Java 规定的情形发生
作用
生成hashCode()、equals(),效果见@Data
参数
- callSuper:是否调用父类的hashCode(),默认:false
- doNotUseGetters:是否不调用字段的getter,默认如果有getter会调用。设置为true,直接访问字段,不调用getter
- exclude:此处列出的任何字段都不会在生成的equals和hashCode中使用。
- of:与exclude相反,设置of,exclude失效
- onParam:添加注解,参考@Getter#onMethod
使用 @EqualsAndHashCode 注解可以为指定类生成 equals 和 hashCode 方法,
示例
@EqualsAndHashCodepublic class EqualsAndHashCodeDemo {String firstName;String lastName;LocalDate dateOfBirth;}
以上代码经过 Lombok 编译后,会生成如下代码:
public class EqualsAndHashCodeDemo {String firstName;String lastName;LocalDate dateOfBirth;public EqualsAndHashCodeDemo() {}public boolean equals(Object o) {if (o == this) {return true;} else if (!(o instanceof EqualsAndHashCodeDemo)) {return false;} else {EqualsAndHashCodeDemo other = (EqualsAndHashCodeDemo)o;if (!other.canEqual(this)) {return false;} else {// 已省略大量代码}}}public int hashCode() {int PRIME = true;int result = 1;Object $firstName = this.firstName;int result = result * 59 + ($firstName == null ? 43 : $firstName.hashCode());Object $lastName = this.lastName;result = result * 59 + ($lastName == null ? 43 : $lastName.hashCode());Object $dateOfBirth = this.dateOfBirth;result = result * 59 + ($dateOfBirth == null ? 43 : $dateOfBirth.hashCode());return result;}}
构造器
这三个很像,都是在自动生成该类的构造器,差别只在生成的构造器的参数不一样而已
@NoArgsConstructor
生成一个没有参数的构造器
参数
- access:访问权限修饰符
- force:为true时,强制生成构造器,final字段初始化为null
- onConstructor:添加注解,参考@Getter#onMethod
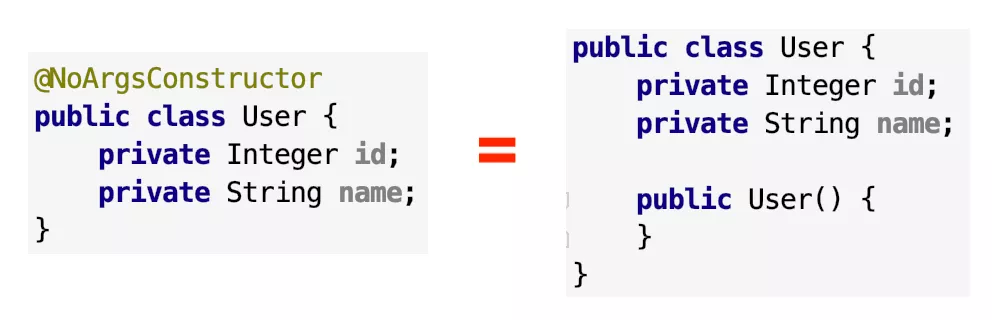
使用 @NoArgsConstructor 注解可以为指定类,生成默认的构造函数,@NoArgsConstructor 注解的定义如下:
@NoArgsConstructor(staticName = "getInstance")public class NoArgsConstructorDemo {private long id;private String name;private int age;}
以上代码经过 Lombok 编译后,会生成如下代码:
public class NoArgsConstructorDemo {private long id;private String name;private int age;private NoArgsConstructorDemo() {}public static NoArgsConstructorDemo getInstance() {return new NoArgsConstructorDemo();}}
@AllArgsConstructor
生成包含所有字段的构造器
参数
- staticName : 不为空的话,生成一个静态方法返回实例,并把构造器设置为private
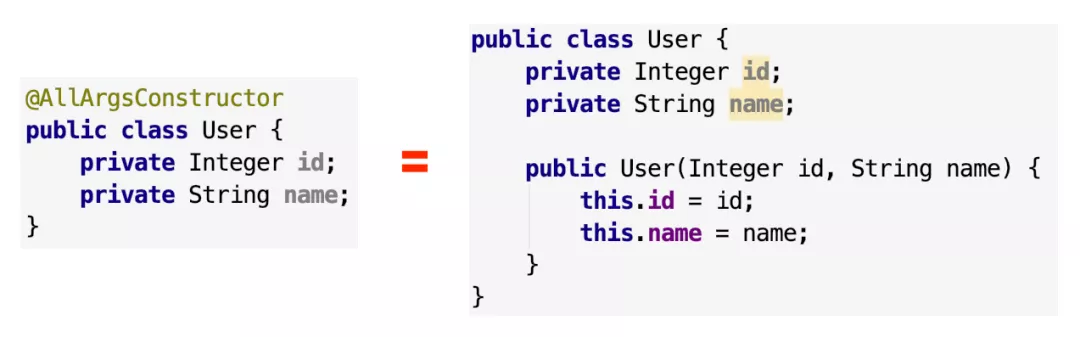
这里注意一个 Java 的小坑,当我们没有指定构造器时,Java 编译器会帮我们自动生成一个没有任何参数的构造器给该类,但是如果我们自己写了构造器之后,Java 就不会自动帮我们补上那个无参数的构造器了
然而很多地方(像是 Spring Data JPA),会需要每个类都一定要有一个无参数的构造器,所以你在加上 @AllArgsConstructor 时,一定要补上 @NoArgsConstrcutor,不然会有各种坑等着你
使用 @AllArgsConstructor 注解可以为指定类,生成包含所有成员的构造函数
@AllArgsConstructor(staticName = "create")public class Example {private int foo;private final String bar;}
生成:
public class Example {private int foo;private final String bar;private Example(int foo, String bar) {this.foo = foo;this.bar = bar;}public static Example create(int foo, String bar) {return new Example(foo, bar);}}
-
@RequiredArgsConstructor
生成一个包含 “特定参数” 的构造器,特定参数指的是那些有加上 final 、@NonNull修饰词的变量。
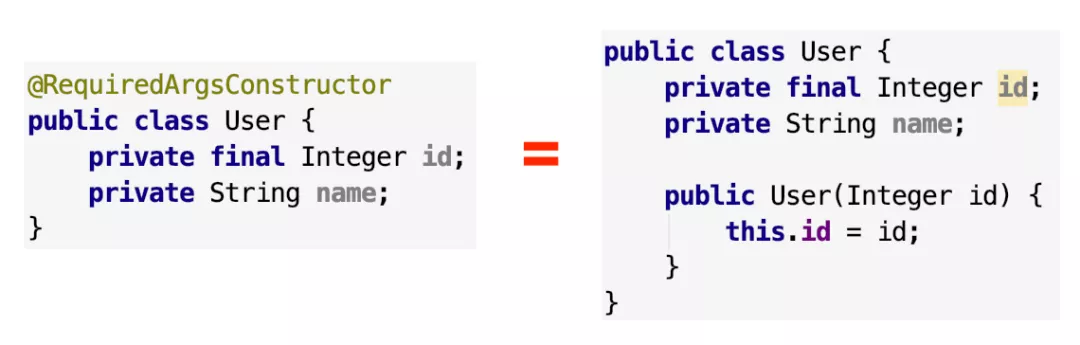
补充一下,如果所有的变量都是正常的,都没有用 final 修饰的话,那就会生成一个没有参数的构造器
使用 @RequiredArgsConstructor 注解可以为指定类必需初始化的成员变量,如 final 成员变量,生成对应的构造函数,@RequiredArgsConstructor 注解的定义如下:@RequiredArgsConstructorpublic class Example {@NonNullprivate Integer foo;private final String bar;}
生成后:
public class Example {@NonNullprivate Integer foo;private final String bar;public Example(@NonNull Integer foo, String bar) {if (foo == null) {throw new NullPointerException("foo is marked @NonNull but is null");} else {this.foo = foo;this.bar = bar;}}}
@Data
整合包,只要加了 @Data 这个注解,等于同时加了以下注解
@Getter/@Setter
- @ToString
- @EqualsAndHashCode
- @RequiredArgsConstructo
注解与同时使用以下的注解的效果是一样的:
@ToString @Getter @Setter @RequiredArgsConstructor @EqualsAndHashCode
生成所有字段的getter、toString()、hashCode()、equals()、所有非final字段的setter、构造器,相当于设置了 @Getter @Setter @RequiredArgsConstructor @ToString @EqualsAndHashCode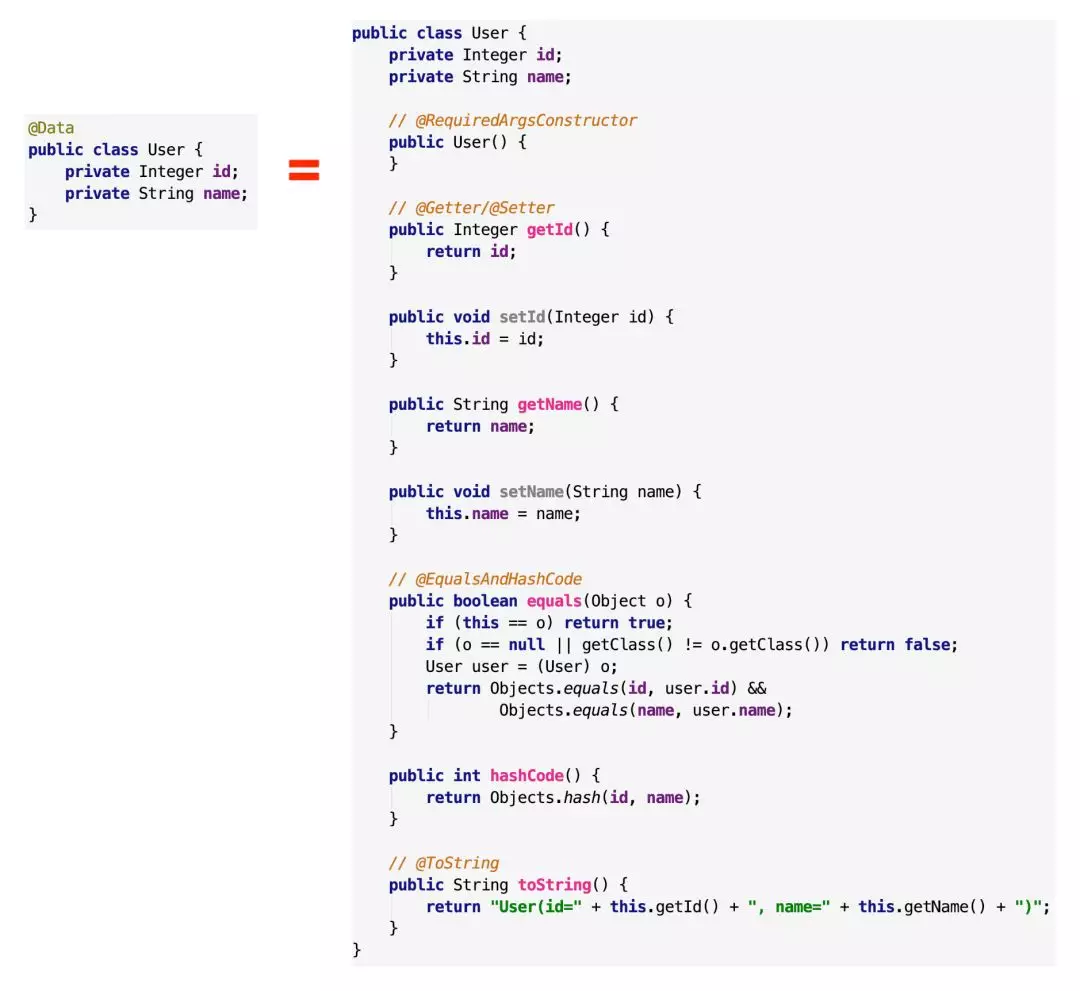
@Data 是使用频率最高的 lombok 注解,通常 @Data 会加在一个值可以被更新的对象上,像是日常使用的 DTO 们、或是 JPA 裡的 Entity 们,就很适合加上 @Data 注解,也就是 @Data for mutable class
@Datapublic class Example {private int foo;private final String bar;}
生成:
public class Example {private int foo;private final String bar;public Example(String bar) {this.bar = bar;}public int getFoo() {return this.foo;}public String getBar() {return this.bar;}public void setFoo(int foo) {this.foo = foo;}public boolean equals(Object o) {if (o == this) {return true;} else if (!(o instanceof Example)) {return false;} else {Example other = (Example)o;if (!other.canEqual(this)) {return false;} else if (this.getFoo() != other.getFoo()) {return false;} else {Object this$bar = this.getBar();Object other$bar = other.getBar();if (this$bar == null) {if (other$bar != null) {return false;}} else if (!this$bar.equals(other$bar)) {return false;}return true;}}}protected boolean canEqual(Object other) {return other instanceof Example;}public int hashCode() {int PRIME = true;int result = 1;int result = result * 59 + this.getFoo();Object $bar = this.getBar();result = result * 59 + ($bar == null ? 43 : $bar.hashCode());return result;}public String toString() {return "Example(foo=" + this.getFoo() + ", bar=" + this.getBar() + ")";}}
@Value
把类声明为final,并添加toString()、hashCode()等方法,也是整合包,但是他会把所有的变量都设成 final 的,其他的就跟 @Data 一样,等于同时加了以下注解
- @Getter (注意没有Setter)
- @ToString
- @EqualsAndHashCode
- @RequiredArgsConstructor
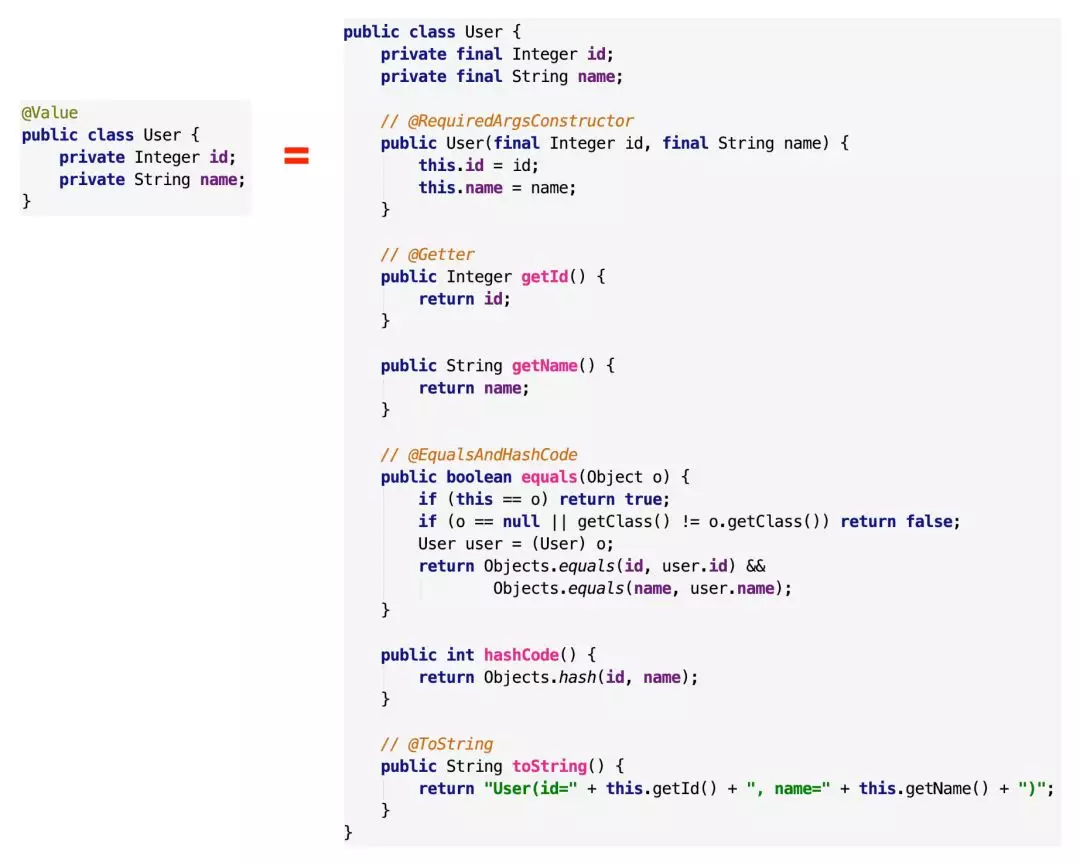
上面那个 @Data 适合用在 POJO 或 DTO 上,而这个 @Value 注解,则是适合加在值不希望被改变的类上,像是某个类的值当创建后就不希望被更改,只希望我们读它而已,就适合加上 @Value 注解,也就是 @Value for immutable class
另外注意一下,此 lombok 的注解 @Value 和另一个 Spring 的注解 @Value 撞名,在 import 时不要 import 错了
@Valuepublic class Example {private Integer foo;}
生成后:
public final class Example {private final Integer foo;public Example(Integer foo) {this.foo = foo;}public Integer getFoo() {return this.foo;}public boolean equals(Object o) {if (o == this) {return true;} else if (!(o instanceof Example)) {return false;} else {Example other = (Example)o;Object this$foo = this.getFoo();Object other$foo = other.getFoo();if (this$foo == null) {if (other$foo != null) {return false;}} else if (!this$foo.equals(other$foo)) {return false;}return true;}}public int hashCode() {int PRIME = true;int result = 1;Object $foo = this.getFoo();int result = result * 59 + ($foo == null ? 43 : $foo.hashCode());return result;}public String toString() {return "Example(foo=" + this.getFoo() + ")";}}
@Builder
生成构建者(Builder)模式,自动生成流式 set 值写法,从此之后再也不用写一堆 setter 了
使用 @Builder 注解可以为指定类实现建造者模式,该注解可以放在类、构造函数或方法上。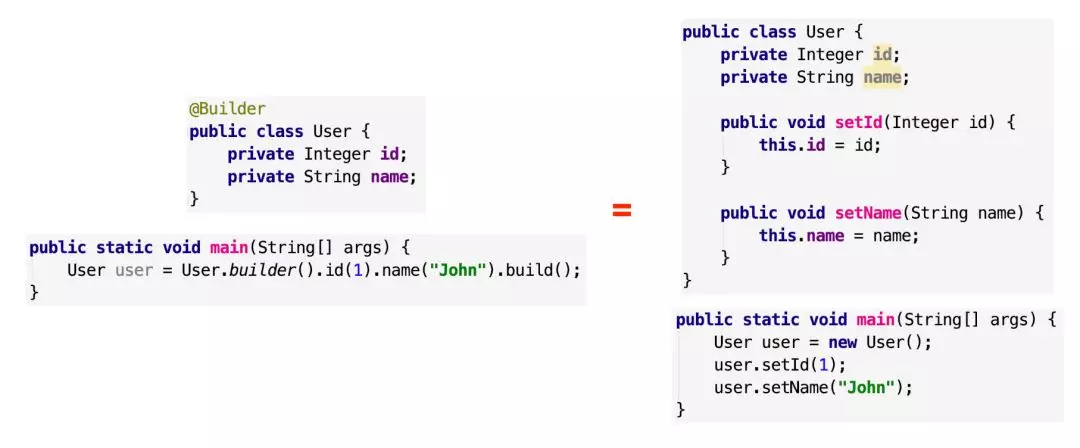
注意,虽然只要加上 @Builder 注解,我们就能够用流式写法快速设定对象的值,但是 setter 还是必须要写不能省略的,因为 Spring 或是其他框架有很多地方都会用到对象的 getter/setter 对他们取值/赋值。所以通常是 @Data 和 @Builder 会一起用在同个类上,既方便我们流式写代码,也方便框架做事。
@Builder
public class Example {
    private int foo;
    private final String bar;
}
生成:
public class Example {
    private int foo;
    private final String bar;

    Example(int foo, String bar) {
        this.foo = foo;
        this.bar = bar;
    }

    public static Example.ExampleBuilder builder() {
        return new Example.ExampleBuilder();
    }

    public static class ExampleBuilder {
        private int foo;
        private String bar;

        ExampleBuilder() {
        }

        public Example.ExampleBuilder foo(int foo) {
            this.foo = foo;
            return this;
        }

        public Example.ExampleBuilder bar(String bar) {
            this.bar = bar;
            return this;
        }

        public Example build() {
            return new Example(this.foo, this.bar);
        }

        public String toString() {
            return "Example.ExampleBuilder(foo=" + this.foo + ", bar=" + this.bar + ")";
        }
    }
}
参数
- builderMethodName : 创建构建器实例的方法名称
- buildMethodName:构建器类中创建构造器实例的方法名称
- builderClassName:构造器类名
- toBuilder:生成toBuilder方法
public Example.ExampleBuilder toBuilder() {
  return (new Example.ExampleBuilder()).foo(this.foo).bar(this.bar);
}
@Slf4j
自动生成该类的 log 静态常量,要打日志就可以直接打,不用再手动 new log 静态常量了
除了 @Slf4j 之外,lombok 也提供其他日志框架的变种注解可以用,像是 @Log、@Log4j…等,他们都是帮我们创建一个静态常量 log,只是使用的库不一样而已
@Log //对应的log语句如下
@Log4j //对应的log语句如下private static final java.util.logging.Logger log = java.util.logging.Logger.getLogger(LogExample.class.getName());
SpringBoot默认支持的就是 slf4j + logback 的日志框架,所以也不用再多做啥设定,直接就可以用在 SpringBoot project上,log 系列注解最常用的就是 @Slf4jprivate static final org.apache.log4j.Logger log = org.apache.log4j.Logger.getLogger(LogExample.class);
若将 @Log 的变体放在类上(适用于日志记录系统的任何一种),之后,将拥有一个静态的 final log 字段,然后就可以使用该字段来输出日志。
@Log private static final java.util.logging.Logger log = java.util.logging.Logger.getLogger(LogExample.class.getName());

@Log4j private static final org.apache.log4j.Logger log = org.apache.log4j.Logger.getLogger(LogExample.class);

@Log4j2 private static final org.apache.logging.log4j.Logger log = org.apache.logging.log4j.LogManager.getLogger(LogExample.class);

@Slf4j private static final org.slf4j.Logger log = org.slf4j.LoggerFactory.getLogger(LogExample.class);

@XSlf4j private static final org.slf4j.ext.XLogger log = org.slf4j.ext.XLoggerFactory.getXLogger(LogExample.class);

@CommonsLog private static final org.apache.commons.logging.Log log = org.apache.commons.logging.LogFactory.getLog(LogExample.class);
@Cleanup
在变量上声明@Cleanup,生成的代码会把变量用try{}包围,并在finallly块中调用close()。
@Clean 注解用于自动管理资源,用在局部变量之前,在当前变量范围内即将执行完毕退出之前会自动清理资源,自动生成 try-finally 这样的代码来关闭流。
public class Example {
    public void copyFile(String in, String out) throws IOException {
        @Cleanup FileInputStream inStream = new FileInputStream(in);
        @Cleanup FileOutputStream outStream = new FileOutputStream(out);
        byte[] b = new byte[65536];

        while (true) {
            int r = inStream.read(b);
            if (r == -1) break;
            outStream.write(b, 0, r);
        }
    }
}
生成后:
public class Example {
    public Example() {
    }

    public void copyFile(String in, String out) throws IOException {
        FileInputStream inStream = new FileInputStream(in);
        try {
            FileOutputStream outStream = new FileOutputStream(out);
            try {
                byte[] b = new byte[65536];
                while(true) {
                    int r = inStream.read(b);
                    if (r == -1) {
                        return;
                    }
                    outStream.write(b, 0, r);
                }
            } finally {
                if (Collections.singletonList(outStream).get(0) != null) {
                    outStream.close();
                }
            }
        } finally {
            if (Collections.singletonList(inStream).get(0) != null) {
                inStream.close();
            }
        }
    }
}
参数
value:被在finally块中调用的方法名,方法体不能带有参数,默认为close
@Generated
这个注解似乎没有实在的作用,就是标记这个类、字段、方法是自动生成的
@NonNull
空检查
可以在方法或构造函数的参数上使用 @NonNull 注解,它将会自动生成非空校验语句。public class Example { @NonNull @Getter @Setter private Integer foo; }生成后:
public class Example {
  @NonNull
  private Integer foo;

  public Example() {
  }

  @NonNull
  public Integer getFoo() {
      return this.foo;
  }

  public void setFoo(
      @NonNull Integer foo) {
      if (foo == null) {
          throw new NullPointerException("foo is marked @NonNull but is null");
      } else {
          this.foo = foo;
      }
  }
}
@Singular
这个注解和@Builder一起使用,为Builder生成字段是集合类型的add方法,字段名不能是单数形式,否则需要指定value值
@Builder
public class Example {
  @Singular
  @Setter
  private List<Integer> foos;
}
生成:
public class Example {
  private List<Integer> foos;

  Example(List<Integer> foos) {
      this.foos = foos;
  }

  public static Example.ExampleBuilder builder() {
      return new Example.ExampleBuilder();
  }

  public void setFoos(List<Integer> foos) {
      this.foos = foos;
  }

  public static class ExampleBuilder {
      private ArrayList<Integer> foos;

      ExampleBuilder() {
      }

      // 这方法是@Singular作用生成的
      public Example.ExampleBuilder foo(Integer foo) {
          if (this.foos == null) {
              this.foos = new ArrayList();
          }
          this.foos.add(foo);
          return this;
      }

      public Example.ExampleBuilder foos(Collection<? extends Integer> foos) {
          if (this.foos == null) {
              this.foos = new ArrayList();
          }
          this.foos.addAll(foos);
          return this;
      }

      public Example.ExampleBuilder clearFoos() {
          if (this.foos != null) {
              this.foos.clear();
          }
          return this;
      }

      public Example build() {
          List foos;
          switch (this.foos == null ? 0 : this.foos.size()) {
              case 0:
                  foos = Collections.emptyList();
                  break;
              case 1:
                  foos = Collections.singletonList(this.foos.get(0));
                  break;
              default:
                  foos = Collections.unmodifiableList(new ArrayList(this.foos));
          }
          return new Example(foos);
      }

      public String toString() {
          return "Example.ExampleBuilder(foos=" + this.foos + ")";
      }
  }
}
@SneakyThrows
@SneakyThrows 注解用于自动抛出已检查的异常,而无需在方法中使用 throw 语句显式抛出。
public class Example {
  @SneakyThrows(UnsupportedEncodingException.class)
  public String utf8ToString(byte[] bytes) {
      return new String(bytes, "UTF-8");
  }
}
生成后:
public class Example {
  public Example() {
  }

  public String utf8ToString(byte[] bytes) {
      try {
          return new String(bytes, "UTF-8");
      } catch (UnsupportedEncodingException var3) {
          throw var3;
      }
  }
}
@Synchronized
生成Synchronized(){}包围代码
@Synchronized 是同步方法修饰符的更安全的变体。与 synchronized 一样,该注解只能应用在静态和实例方法上。它的操作类似于 synchronized 关键字,但是它锁定在不同的对象上。synchronized 关键字应用在实例方法时,锁定的是 this 对象,而应用在静态方法上锁定的是类对象。对于 @Synchronized 注解声明的方法来说,它锁定的是 或lock。
public class Example {
    @Synchronized
    public String utf8ToString(byte[] bytes) {
        return new String(bytes, Charset.defaultCharset());
    }
}
生成后:
public class Example {
    private final Object $lock = new Object[0];

    public Example() {
    }

    public String utf8ToString(byte[] bytes) {
        Object var2 = this.$lock;
        synchronized (this.$lock) {
            return new String(bytes, Charset.defaultCharset());
        }
    }
}
@val
变量声明类型推断
val 用在局部变量前面,相当于将变量声明为 final,此外 Lombok 在编译时还会自动进行类型推断。val 的使用示例:
public class ValExample {
    public String example() {
        @val example = new ArrayList<String>();
        example.add("Hello, World!");
        @val foo = example.get(0);
        return foo.toLowerCase();
    }

    public void example2() {
        @val map = new HashMap<Integer, String>();
        map.put(0, "zero");
        map.put(5, "five");
        for (@val entry : map.entrySet()) {
            System.out.printf("%d: %s\n", entry.getKey(), entry.getValue());
        }
    }
}
生成后:
public class ValExample {
    public ValExample() {
    }

    public String example() {
        ArrayList<String> example = new ArrayList();
        example.add("Hello, World!");
        String foo = (String) example.get(0);
        return foo.toLowerCase();
    }

    public void example2() {
        HashMap<Integer, String> map = new HashMap();
        map.put(0, "zero");
        map.put(5, "five");
        Iterator var2 = map.entrySet().iterator();
        while (var2.hasNext()) {
            Entry<Integer, String> entry = (Entry) var2.next();
            System.out.printf("%d: %s\n", entry.getKey(), entry.getValue());
        }
    }
}
@var
和val一样,官方文档中说区别就是var不加final修饰,但测试的效果是一样的
Experimental注解
@Accessors
默认情况下,没什么作用,需要设置参数
参数
- chain:为true时,setter链式返回,即setter的返回值为this
fluent:为true时,默认设置chain为true,setter的方法名修改为字段名
@Delegate
代理模式,把字段的方法代理给类,默认代理所有方法
参数types:指定代理的方法
- excludes:和types相反
例子
public class Example {
    private interface Add {
        boolean add(String x);

        boolean addAll(Collection<? extends String> x);
    }

    private @Delegate(types = Add.class)
    List<String> strings;
}
生成后:
public class Example {
    private List<String> strings;

    public Example() {
    }

    public boolean add(String x) {
        return this.strings.add(x);
    }

    public boolean addAll(Collection<? extends String> x) {
        return this.strings.addAll(x);
    }

    private interface Add {
        boolean add(String var1);

        boolean addAll(Collection<? extends String> var1);
    }
}
@ExtensionMethod
拓展方法,向现有类型“添加”方法,而无需创建新的派生类型。有点像kotlin的扩展函数。
@ExtensionMethod({Arrays.class, Extensions.class})
public class Example {
    public static void main(String[] args) {
        int[] intArray = {5, 3, 8, 2};
        intArray.sort();
        int num = 1;
        num = num.increase();
        Arrays.stream(intArray).forEach(System.out::println);
        System.out.println("num = " + num);
    }
}

class Extensions {
    public static int increase(int num) {
        return ++num;
    }
}
生成后:
public class Example {
    public Example() {
    }

    public static void main(String[] args) {
        int[] intArray = new int[]{5, 3, 8, 2};
        Arrays.sort(intArray);
        int num = 1;
        int num = Extensions.increase(num);
        IntStream var10000 = Arrays.stream(intArray);
        PrintStream var10001 = System.out;
        System.out.getClass();
        var10000.forEach(var10001::println);
        System.out.println("num = " + num);
    }
}
@FieldDefaults
定义类、字段的修饰符
- AccessLevel:访问权限修饰符
-
@FieldNameConstants
默认生成一个常量,名称为大写字段名,值为字段名
参数 prefix:前缀
suffix:后缀
public class Example {
  @FieldNameConstants(prefix = "PREFIX_", suffix = "_SUFFIX")
  private String foo;
}
生成后:
public class Example {
  public static final String PREFIX_FOO_SUFFIX = "foo";
  private String foo;

  public Example() {
  }
}
@NonFinal
设置不为Final,@FieldDefaults和@Value也有这功能
@PackagePrivate
设置为private,@FieldDefaults和@Value也有这功能
@Wither
生成withXXX方法,返回类实例
@RequiredArgsConstructor
public class Example {
  private @Wither
  final int foo;
}
生成后:
public class Example {
  private final int foo;

  public Example(int foo) {
      this.foo = foo;
  }

  public Example withFoo(int foo) {
      return this.foo == foo ? this : new Example(foo);
  }
}
@With
在类的字段上应用 @With 注解之后,将会自动生成一个 withFieldName(newValue) 的方法,该方法会基于 newValue 调用相应构造函数,创建一个当前类对应的实例。@With 注解的定义如下:
public class WithDemo {
  @With(AccessLevel.PROTECTED)
  @NonNull
  private final String name;
  @With
  private final int age;

  public WithDemo(String name, int age) {
      if (name == null) throw new NullPointerException();
      this.name = name;
      this.age = age;
  }
}
以上代码经过 Lombok 编译后,会生成如下代码:
public class WithDemo {
  @NonNull
  private final String name;
  private final int age;

  public WithDemo(String name, int age) {
      if (name == null) {
          throw new NullPointerException();
      } else {
          this.name = name;
          this.age = age;
      }
  }

  protected WithDemo withName(@NonNull String name) {
      if (name == null) {
          throw new NullPointerException("name is marked non-null but is null");
      } else {
          return this.name == name ? this : new WithDemo(name, this.age);
      }
  }

  public WithDemo withAge(int age) {
      return this.age == age ? this : new WithDemo(this.name, age);
  }
}

若有收获,就点个赞吧
0 人点赞
