29.1 Spring Security 框架概述
Spring Security是一个专注于向Java应用程序提供功能强大且高度可定制的身份验证和授权的安全管理框架。它是保护基于Spring的应用的实际标准。像所有的Srping项目一样,Spring Security的真正力量在于它可以很容易地扩展以满足定制要求
| 在Spring Boot出现之前,Spring Security就已经发展了多年,但是使用的并不多。当时安全管理这个领域一直是 Shiro 的天下。相对于 Shiro,在 SSM 中整合 Spring Security 都是比较麻烦的操作,所以Spring Security 虽然功能比 Shiro 强大,但是使用反而没有 Shiro 多。自从有了 Spring Boot 之后,Spring Boot 对于 Spring Security 提供了自动化配置方案,可以使用更少的配置来使用 Spring Security。 |  |
|---|---|
它有如下的特性:
- Comprehensive and extensible support for both Authentication and Authorization
- Protection against attacks like session fixation, clickjacking, cross site request forgery, etc
- Servlet API integration
- Optional integration with Spring Web MVC
- Much more…
用户认证指的是:验证某个用户是否为系统中的合法主体,也就是说用户能否访问该系统。用户认证一般要求用户提供用户名和密码。系统通过校验用户名和密码来完成认证过程。通俗点说就是系统认为用户是否能登录
用户授权指的是验证某个用户是否有权限执行某个操作。在一个系统中,不同用户所具有的权限是不同的。比如对一个文件来说,有的用户只能进行读取,而有的用户可以进行修改。一般来说,系统会为不同的用户分配一系列的权限。通俗点讲就是系统判断用户是否有权限去做某些事情。
29.2 Spring Security认证原理
关于安全方面的两个主要区域是“认证”(身份识别)和“授权”(访问控制),所以Web 应用的安全都必须包括用户认证(Authentication)和用户授权(Authorization)两个部分,这两点也是 Spring Security 重要核心功能。
Web系统中登录认证(Authentication)的核心就是凭证机制,无论是Session还是JWT,都是在用户成功登录时返回给用户一个凭证,后续用户访问接口需携带凭证来标明自己的身份。后端会对需要进行认证的接口进行安全判断,若凭证没问题则代表已登录就放行接口,若凭证有问题则直接拒绝请求。这个安全判断都是放在认证过滤器(LoginFilter)里统一处理:
登录认证是对用户的身份进行确认,权限授权(Authorization)是对用户能否访问某个资源进行确认,授权发生都认证之后。 和认证一样,这种通用逻辑都是放在授权过滤器(AuthFilter)里进行的统一操作:
LoginFilter先进行登录认证判断,认证通过后再由AuthFilter进行权限授权判断,一层一层没问题后才会执行我们真正的业务逻辑。
所有户请求都会经过Servlet的过滤器链,Spring Security在Servlet过滤器链中添加了一个FilterChainProxy过滤器,这个代理过滤器会创建一套Spring Security自定义的过滤器链,然后执行一系列过滤器。
我们可以大概看一下FilterChainProxy的大致源码:
@Overridepublic void doFilter(ServletRequest request, ServletResponse response,FilterChain chain) throws IOException, ServletException {...省略其他代码// 获取Spring Security的一套过滤器List<Filter> filters = getFilters(request);// 将这一套过滤器组成Spring Security自己的过滤链,并开始执行VirtualFilterChain vfc = new VirtualFilterChain(fwRequest, chain, filters);vfc.doFilter(request, response);...省略其他代码}
SpringSecurity定义了一系列的过滤器形成链条来处理认证和鉴权:
- org.springframework.security.web.context.request.async.WebAsyncManagerIntegrationFilter
- org.springframework.security.web.context.SecurityContextPersistenceFilter
- org.springframework.security.web.header.HeaderWriterFilter
- org.springframework.security.web.csrf.CsrfFilter
- org.springframework.security.web.authentication.logout.LogoutFilter
- org.springframework.security.web.authentication.UsernamePasswordAuthenticationFilter
- org.springframework.security.web.authentication.ui.DefaultLoginPageGeneratingFilter
- org.springframework.security.web.authentication.ui.DefaultLogoutPageGeneratingFilter
- org.springframework.security.web.savedrequest.RequestCacheAwareFilter
- org.springframework.security.web.servletapi.SecurityContextHolderAwareRequestFilter
- org.springframework.security.web.authentication.AnonymousAuthenticationFilter
- org.springframework.security.web.session.SessionManagementFilter
- org.springframework.security.web.access.ExceptionTranslationFilter
- org.springframework.security.web.access.intercept.FilterSecurityInterceptor
💡Spring Security的核心逻辑全在这一套过滤器中,过滤器里会调用各种组件完成功能,掌握了这些过滤器和组件你就掌握了Spring Security!这个框架的使用方式就是对这些过滤器和组件进行扩展。一定要记住这句话,带着这句话去使用和理解Spring Security,你会像站在高处俯瞰,整个框架的脉络一目了然。
这里面我们只需要重点关注下面几个过滤器即可:
- UsernamePasswordAuthenticationFilter 负责登录认证,对/login的POST请求做拦截,校验表单中用户名,密码
- FilterSecurityInterceptor 负责鉴权授权,是一个方法级的权限过滤器,基本位于过滤链的最底部
- ExceptionTranslationFilter 负责异常过滤,用来处理在认证授权过程中抛出的异常
29.3 Spring Security核心组件
不管哪种认证方式和框架,有些核心概念是不会变的,这些核心概念在安全框架中会以各种组件来体现,了解各个组件的同时功能也就跟着了解了框架的功能。29.3.1 UserDetails
UserDetails是个接口,它规范了用户详细信息所拥有的字段,包括用户名、密码、账号是否过期、是否锁定等,在Spring Security中用于获取当前登录的用户的信息。当然实际应用的时候需要在这个接口上面进行扩展,用来对接自己系统的用户。下面是这个接口的源码(注释略有删减): ```java package org.springframework.security.core.userdetails;
import java.io.Serializable; import java.util.Collection;
import org.springframework.security.core.Authentication; import org.springframework.security.core.GrantedAuthority;
/**
Provides core user information. */ public interface UserDetails extends Serializable {
// 用户权限集合,不可以返回null Collection<? extends GrantedAuthority> getAuthorities();
// 用户密码 String getPassword();
// 用户名,不可以返回null String getUsername();
// 用户是否过期 boolean isAccountNonExpired();
// 用户是否已经被锁定 boolean isAccountNonLocked();
// 用户凭据(通常为密码)是否已经过期 boolean isCredentialsNonExpired();
29.3.2 Authentication
Authentication接口继承自Principal类,是最高级别的身份/认证的抽象。它主要包含了用户的详细信息(UserDetails)和用户鉴权时所需要的信息,如用户拥有的权限信息列表、密码、用户细节信息、用户身份信息、认证信息等。不同的鉴权方式对Authentication接口会有不同的实现。 ```java package org.springframework.security.core;
import java.io.Serializable; import java.security.Principal; import java.util.Collection;
import org.springframework.security.authentication.AuthenticationManager; import org.springframework.security.core.context.SecurityContextHolder;
public interface Authentication extends Principal, Serializable {
/*** 返回权限信息列表,默认是GrantedAuthority接口的一些实现类,* 通常是代表权限信息的一系列字符串。*/Collection<? extends GrantedAuthority> getAuthorities();/*** 返回密码信息(用户输入的密码字符串),在认证过后通常会被移除,用于保障安全*/Object getCredentials();/*** 返回细节信息,Web应用中的实现接口通常为 WebAuthenticationDetails,* 它记录了访问者的IP地址和Session ID的值。*/Object getDetails();/*** 这是最重要的身份信息,是常用接口之一,大部分情况下返回的是UserDetails接口的实现类*/Object getPrincipal();boolean isAuthenticated();void setAuthenticated(boolean isAuthenticated) throws IllegalArgumentException;
}
<a name="hZEGi"></a>### 29.3.3 SecurityContext这是定义安全上下文的接口,主要持有**Authentication**对象,**如果用户未鉴权,那Authentication对象将会是空的**。下面是这个接口的源码(注释略有删减):```javapackage org.springframework.security.core.context;import java.io.Serializable;import org.springframework.security.core.Authentication;/*** Interface defining the minimum security information associated with the* current thread of execution.** The security context is stored in a SecurityContextHolder.*/public interface SecurityContext extends Serializable {/*** Obtains the currently authenticated principal, or an authentication* request token.* @return the Authentication or null if no authentication* information is available*/Authentication getAuthentication();/*** Changes the currently authenticated principal, or removes the* authentication information.* @param authentication the new Authentication token, or null* if no further authentication information should be stored*/void setAuthentication(Authentication authentication);}
29.3.4 SecurityContextHolder
SecurityContextHolder它持有的是安全上下文SecurityContext的信息,包括当前操作的用户是谁,该用户是否已经被认证,他拥有哪些权限等。SecurityContextHolder 在管理这个上下文相关对象时使用ThreadLocal来保证一个线程中传递同一个对象,Spring Security在用户登录时自动绑定认证信息到当前线程,在用户退出时,自动清除当前线程的认证信息。
他们的关系如下:
你可以在程序任何地方使用SecurityContextHolder来获得其它的对象:
UserDetails details = SecurityContextHolder
                            .getContext()
                            .getAuthentication()
                            .getDetails();
29.3.5 UserDetailsService
Spring Security 支持多种数据源,例如内存、数据库、LDAP 等,这些不同来源的数据被共同封装成了一个 UserDetailService 接口(比如从数据库中根据用户名获取用户信息和权限),任何实现了该接口的对象都可以作为认证数据源。
从业务系统中获取用户信息和授权信息是在这个接口完成的,因此它非常重要。对于Spring Security来说,它只提供一个loadUserByUsername方法,一般我们都是通过扩展这个接口来获取用户信息,用户登录时传递的用户名和密码也是通过这里这查找出来进后行校验(当然真正的校验不在这里,而是由AuthenticationManager以及AuthenticationProvider负责)。
需要强调的是,如果用户不存在,不应返回NULL,而要抛出异常UsernameNotFoundException。
29.3.6 AuthenticationManager
AuthenticationManager 是一个抽象的用于处理认证请求的认证管理器,也是发起认证的出发点。它只有一个方法:
public interface AuthenticationManager {
    Authentication authenticate(Authentication authentication)
        throws AuthenticationException;

}
这个方法中实现的校验逻辑非常简单:
- 根据用户名(使用UserDetailsService)查询出用户对象(没有查到则抛出异常)
- 将用户对象的密码和传递过来的密码进行校验,密码不匹配则抛出异常
在实际需求中,我们可能会允许用户使用用户名+密码、邮箱+密码,手机号码+密码登录等多种方式登录,所以它一般不直接认证,AuthenticationManager的常用实现类ProviderManager 会在内部维护一个列表存放多种认证方式的AuthenticationProvider:
public class ProviderManager implements AuthenticationManager, MessageSourceAware, InitializingBean {
    ...省略其他代码
    private List<AuthenticationProvider> providers = Collections.emptyList();
    ...省略其他代码
}
这是一种委托者模式(Delegate)的应用。也就是说,核心的认证入口始终是AuthenticationManager,不同的认证方式对应不同的AuthenticationProvider。在默认策略下,ProviderManager 中的List会依照次序去认证,只需要通过一个AuthenticationProvider的认证便立即返回,若认证失败则返回 nul l然后尝试下一个,如果所有认证器都无法成功,则最终会抛出一个ProviderNotFoundException异常。即可被认为是登录成功。
29.3.7 AuthenticationProvider
AuthenticationProvider实现一个具体方式的认证功能,它唯一对应一个Authentication定义
我们可以看下典型的AuthenticationProvider中authenticate方法的逻认证辑:
public Authentication authenticate(Authentication authentication) throws AuthenticationException {
    ...省略其他代码

    // 传递过来的用户名
    String username = authentication.getName();
    // 调用UserDetailService的方法,通过用户名查询出用户对象UserDetail(查询不出来UserDetailService则会抛出异常)
    UserDetails userDetails = this.getUserDetailsService().loadUserByUsername(username);
    String presentedPassword = authentication.getCredentials().toString();

    // 传递过来的密码
    String password = authentication.getCredentials().toString();
    // 使用密码解析器PasswordEncoder传递过来的密码是否和真实的用户密码匹配
    if (!passwordEncoder.matches(password, userDetails.getPassword())) {
        // 密码错误则抛出异常
        throw new BadCredentialsException("错误信息...");
    }

    // 注意哦,这里返回的已认证Authentication,是将整个UserDetails放进去充当Principal
    UsernamePasswordAuthenticationToken result = new UsernamePasswordAuthenticationToken(userDetails,
                authentication.getCredentials(), userDetails.getAuthorities());

    return result;

    ...省略其他代码
}
AuthenticationProvider最常用的一个实现便是DaoAuthenticationProvider,他被定义来处理用户名密码认证,与UsernamePasswordAuthenticationToken唯一对应。这种唯一对应关系时通过如下方法实现的:
    public boolean supports(Class<?> authentication) {
        return UsernamePasswordAuthenticationToken.class.isAssignableFrom(authentication);
    }
在它的retrieveUser方法中,使用一个UserDetailsService对象的loadUserByUsername方法来获得UserDetails对象。然后在additionalAuthenticationChecks方法中完成需要完成UserDetails中密码和UsernamePasswordAuthenticationToken的比对,如果这个void方法没有抛异常,则认为比对成功。
比对密码的过程,用到了PasswordEncoder和SaltSource(密码加密和盐的概念这里不再赘述了,它们为保障安全而设计,都是比较基础的概念)。
上面每一个步骤Spring Security都提供了专门的组件:
- 根据用户名查询出用户对象:用户对象数据可以存在内存中、文件中、数据库中,这部分就是交由
UserDetailsService处理,该接口只有一个方法loadUserByUsername(String username),通过用户名查询用户对象(默认实现是在内存中查询)。 - 用户对象:每个系统中的用户对象数据都不尽相同,Spring Security中的用户数据则是由
UserDetails来体现,该接口中提供了账号、密码等通用属性。 - 对密码进行校验:这个组件
PasswordEncoder,负责密码加密与校验。
UserDetialsService、UserDetails、PasswordEncoder,这三个组件Spring Security都有默认实现,他如果们无法满足我们的实际需求,可以自己定制这些组件。
29.3.8 PasswordEncoder
PasswordEncoder是Spring Security的加密器接口。这个接口很简单,就两个重要方法:
package org.springframework.security.crypto.password;

public interface PasswordEncoder {
    // 表示把参数按照特定的规则进行加密
    String encode(CharSequence rawPassword);

    /**
     * 将未加密的字符串(前端传递来的密码)和存储的已加密字符串进行校验。校验方法是对
     * 未加密字符串加密后与之前以加密的字符串比较。此过程不会解密已加密字符串。
     * 如果密码匹配则返回true;如果不匹配则返回false
     */
    boolean matches(CharSequence rawPassword, String encodedPassword);
}
Spring Security 提供了多种密码加密方案,官方推荐使用 BCryptPasswordEncoder。我们也可以实现此接口定义自己的加密算法。
BCryptPasswordEncoder 使用 BCrypt 强哈希函数,使用时可以选择提供 strength 和 SecureRandom 实例。strength 越大密钥的迭代次数越多,密钥迭代次数为 2^strength。strength 取值在 4~31 之间,默认为 10。
@Bean
public PasswordEncoder passwordEncoder() {
    // 这里我们使用bcrypt加密算法,安全性比较高
    return new BCryptPasswordEncoder();
}
由于应用系统不可以存储明问的密码,只能存储加密后的结果,所以我们在内存中放置用户信息时存储的时此用户的密码是加密后的结果。
29.3.9 完整的认证过程
下图是在Spring Security中使用用户名密码认证的完整过程:
- UsernamePasswordAuthenticationFilter过滤器来拦截用户名密码认证请求,将用户名和密码封装成一个UsernamePasswordToken对象交给AuthenticationManager处理。
- AuthenticationManager挑出一个支持处理该Token类型的AuthenticationProvider(这里具体实现类为DaoAuthenticationProvide)来进行认证。
- DaoAuthenticationProvider调用UserDetailService的
loadUserByUsername方法来处理认证,如果认证通过(即UsernamePasswordToken中的用户名和密码相符)则返回一个UserDetails类型对象,并将认证信息保存到Session中。 - 认证后我们便可以通过Authentication对象获取到认证的信息了。
29.4 默认的身份认证功能
要使用Spring Security肯定是要先引入依赖包。在初始化创建项目选择依赖时可以直接选中Spring Security: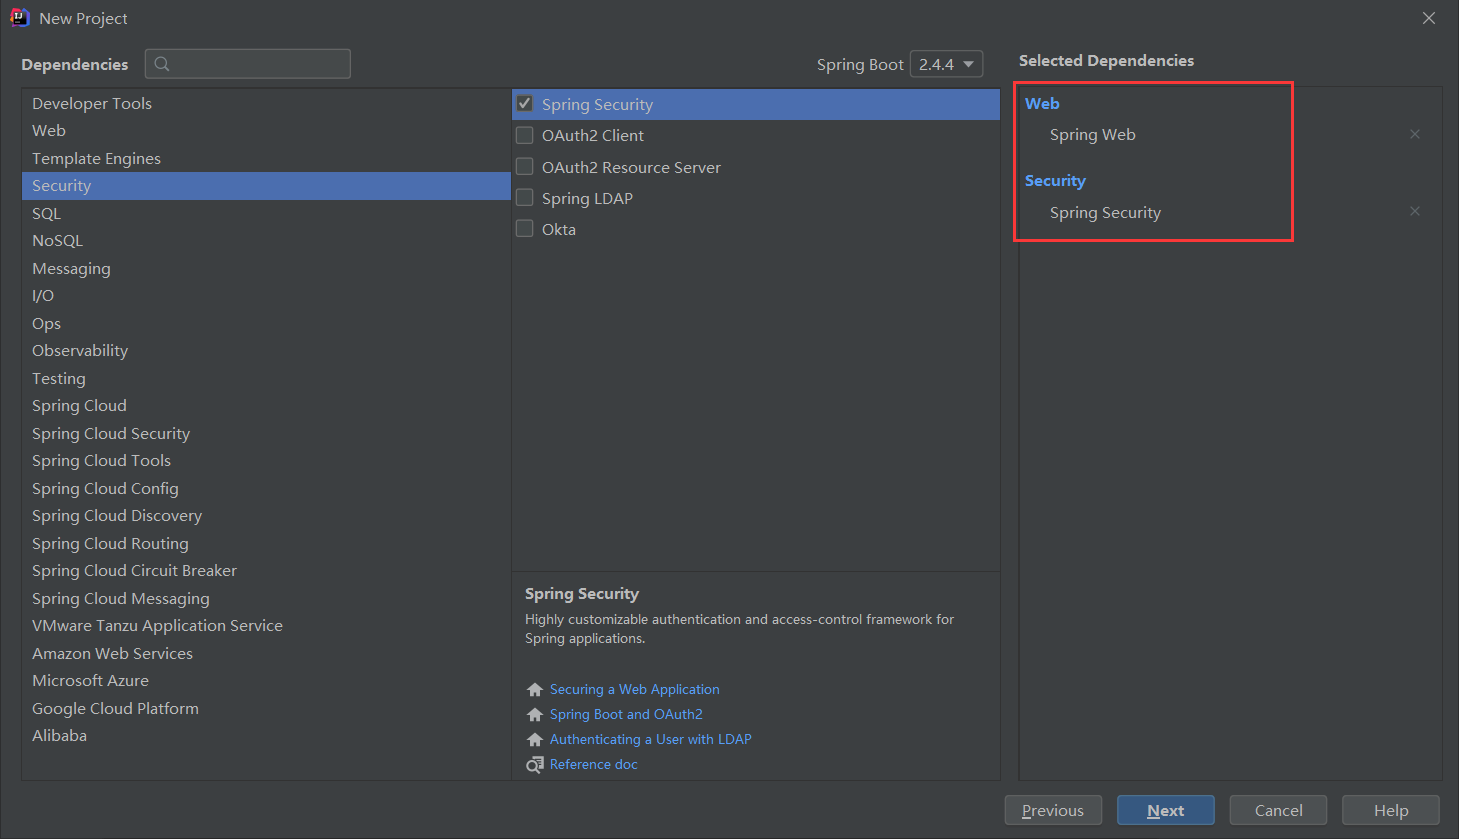
当然,也可以事后在pom.xml中随时添加依赖:
        <dependency>
            <groupId>org.springframework.boot</groupId>
            <artifactId>spring-boot-starter-security</artifactId>
        </dependency>
        <dependency>
            <groupId>org.springframework.security</groupId>
            <artifactId>spring-security-test</artifactId>
            <scope>test</scope>
        </dependency>
依赖包导入后,Spring Security就默认提供了许多功能将整个应用给保护了起来:
- 创建好了默认登录表单
- 生成用户名为user的随机密码并打印在控制台上
- 要求经过身份验证的用户才能与应用程序进行交互
- CSRF攻击防护、Session Fixation攻击防护
重新加载Maven工程并重启应用系统,然后随便访问一个现有的链接就会出现让你登录的页面,这也可以证明Spring Security 已经生效了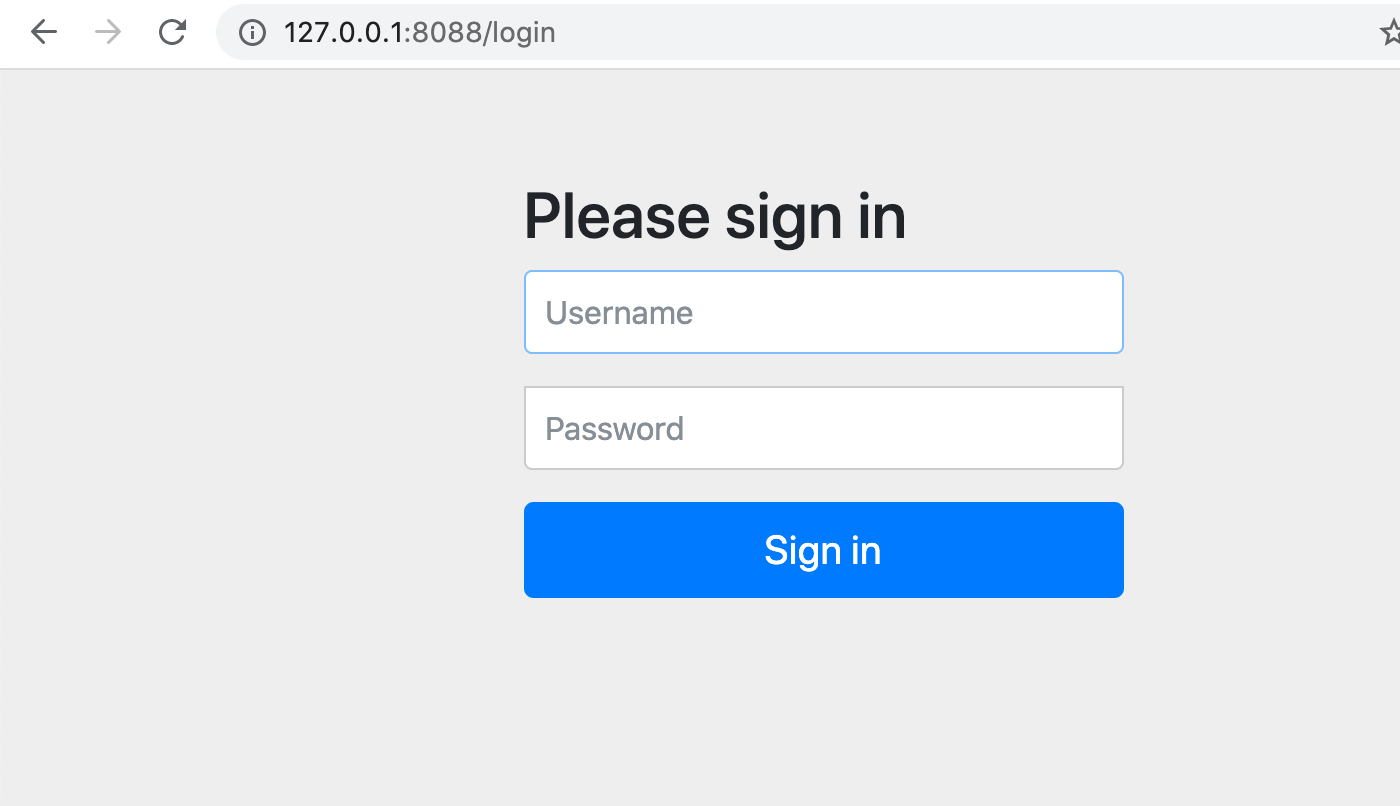
可怎么登录呢?用户名和密码又是什么?
Spring Security默认有一个用户名: user
项目启动的时候会自动生成一个密码(每次启动时随机变化),在控制台输出的信息中可以看到: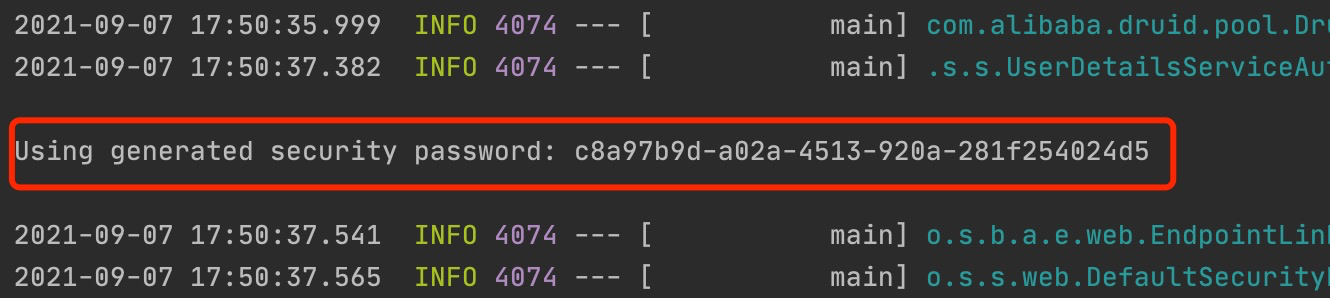
可以看到输入用户名和密码后,可以正常访问请求了。
从上面的实例中可以得知Spring Boot已经自动化地为我们做了很多基础工作。但在实际开发中,这些默认配置好的功能肯定完全不符合我们的实际需求,所以必须自定义一些配置以符合我们要求的的验证和鉴权。
29.5 Spring Securiy基础认证
29.5.1 基础认证流程
认证过程其实就是登录过程,不使用安全框架时的认证过程是这样的:查询用户数据 => 判断账号密码是否正确 => 正确则将用户信息存储到某种上下文环境中。当上下文环境中有了这个对象则代表该用户登录了。
Spring Security的认证流程也是如此:
Authentication authentication = new UsernamePasswordAuthenticationToken(
        用户名, 用户密码, 用户的权限集合);

SecurityContextHolder
    .getContext()
    .setAuthentication(authentication);
和不使用安全框架一样,将认证信息放到上下文中就代表用户已登录。上面伪代码展示的就是Spring Security最简单的认证方式——直接将Authentication对象放置到SecurityContext中就完成了认证。这个流程和 23.3.2 获取当前登录用户的流程自然是相反的:Authentication => SecurityContext => SecurityContextHolder)。
这尽管这个过程看起来过于简单,但对于Spring Security来说,这样确实就完成了用户认证。不过对于实际的应用系统来说还少了重要的一步,那就是判断用户的账号密码是否正确。用户进行登录操作时会传递过来账号密码,必须要用某种内部的方式来判断其是否正确,只有正确的情况下才能将认证信息放到上下文对象中,不正确就直接提示错误:
// 调用service层执行判断业务逻辑
if (!userService.login(用户名, 用户密码)) {
    return "账号密码错误";
}

// 账号密码正确了才将认证信息放到上下文中(用户权限需要再从数据库中获取,后面再说,这里省略)
Authentication authentication = new UsernamePasswordAuthenticationToken(
    用户名, 用户密码, 用户的权限集合);

SecurityContextHolder
    .getContext()
    .setAuthentication(authentication);
这样才算是一个完整的认证过程。这里查询用户信息并校验账号密码是完全由我们自己在业务层编写所有逻辑,其实这一块Spring Security也有组件供我们使用。
29.5.2 配置认证规则
定义Spring Security的配置的类需要继承类WebSecurityConfigurerAdapter。现在新建一个下面的类:
package com.longser.union.cloud.config;

import org.springframework.context.annotation.Bean;
import org.springframework.context.annotation.Configuration;
import org.springframework.security.authentication.AuthenticationManager;
import org.springframework.security.config.annotation.authentication.builders.AuthenticationManagerBuilder;
import org.springframework.security.config.annotation.web.builders.HttpSecurity;
import org.springframework.security.config.annotation.web.configuration.WebSecurityConfigurerAdapter;
import org.springframework.security.crypto.bcrypt.BCryptPasswordEncoder;
import org.springframework.security.crypto.password.PasswordEncoder;
import org.springframework.web.cors.CorsUtils;

@Configuration
public class SecurityConfig extends WebSecurityConfigurerAdapter {

    @Override
    protected void configure(AuthenticationManagerBuilder auth) throws Exception {
        String password = passwordEncoder().encode("123456");
        auth.inMemoryAuthentication()
                .withUser("david")
                .password(password)
                // 注意:这里一定要设置权限或者角色(role),否则会出错
                .authorities("admin");
    }

    @Override
    protected void configure(HttpSecurity http) throws Exception {
        //关闭csrf和frameOptions,如果不关闭会影响前端请求接口(这里不展开细讲了,感兴趣的自行了解)
        http.csrf().disable().headers().frameOptions().disable()
                // 开启跨域以便前端调用接口
                .and().cors();

        // 这是配置的关键,决定哪些接口开启防护,哪些接口绕过防护
        http.authorizeRequests()
                // 注意这里,是允许前端跨域联调的一个必要配置
                .requestMatchers(CorsUtils::isPreFlightRequest).permitAll()
                // 指定某些接口不需要通过验证即可访问。登陆、注册接口肯定是不需要认证的
                .antMatchers("/api/login", "/api/register").permitAll()
                // 这里意思是其它所有接口需要认证才能访问
                .anyRequest().authenticated();
    }

    @Bean
    @Override
    protected AuthenticationManager authenticationManager() throws Exception {
        return super.authenticationManager();
    }

    @Bean
    public PasswordEncoder passwordEncoder() {
        // 这里我们使用bcrypt加密算法,安全性比较高
        return new BCryptPasswordEncoder();
    }
}
29.5.3 自定义身份验证
Spring Security定义了很多过滤器(Filter),它默认的认证逻辑是把过滤器当做入口,改变登录访问地址等操作都通过改变配置来定制过滤器的行为。通常自定义身份验证过程都是通过自定义过滤器来实现的。但我们这里采用直接定义API的控制器的方法。从原理的角度,这两种方法是等价的。
AuthenticationManager 是Spring Security用于执行身份验证的组件,在自定义身份验证的过程中,调主要是用它的authenticate方法完来成认证。下面login方法中和过滤器 UsernamePasswordAuthenticationFilter中的认证过程基本一致:
package com.longser.union.cloud.controller;

import com.longser.restful.result.QueryResult;
import org.slf4j.Logger;
import org.slf4j.LoggerFactory;
import org.springframework.beans.factory.annotation.Autowired;
import org.springframework.security.authentication.AuthenticationManager;
import org.springframework.security.authentication.UsernamePasswordAuthenticationToken;
import org.springframework.security.core.Authentication;
import org.springframework.security.core.context.SecurityContextHolder;
import org.springframework.web.bind.annotation.PostMapping;
import org.springframework.web.bind.annotation.RequestMapping;
import org.springframework.web.bind.annotation.RestController;

import javax.servlet.http.HttpServletRequest;

@RestController
@RequestMapping("/api")
public class LoginController {
    private static final Logger LOGGER =
            LoggerFactory.getLogger(getClass());

    @Autowired
    private AuthenticationManager authenticationManager;

    @PostMapping("/login")
    public QueryResult login(HttpServletRequest request,
                             String username, String password) {
        String remoteAddress = request.getRemoteAddr();

        LOGGER.info("[login] {} 正在尝试登录 {}", username, remoteAddress);

        // 生成一个包含账号密码的认证信息
        UsernamePasswordAuthenticationToken token = new UsernamePasswordAuthenticationToken(username, password);

        AuthenticationDetailsSource<HttpServletRequest, ?> authenticationDetailsSource = new WebAuthenticationDetailsSource();
        token.setDetails(authenticationDetailsSource.buildDetails(request));

        // AuthenticationManager校验这个认证信息,返回一个已认证的Authentication
        Authentication authentication = authenticationManager.authenticate(token);

        // 将返回的Authentication存到上下文中
        SecurityContextHolder.getContext().setAuthentication(authentication);

        LOGGER.info("[login] {} 登录成功 {}", username, remoteAddress);

        return new QueryResult("登录成功");
    }
}
29.5.4 验证登录效果
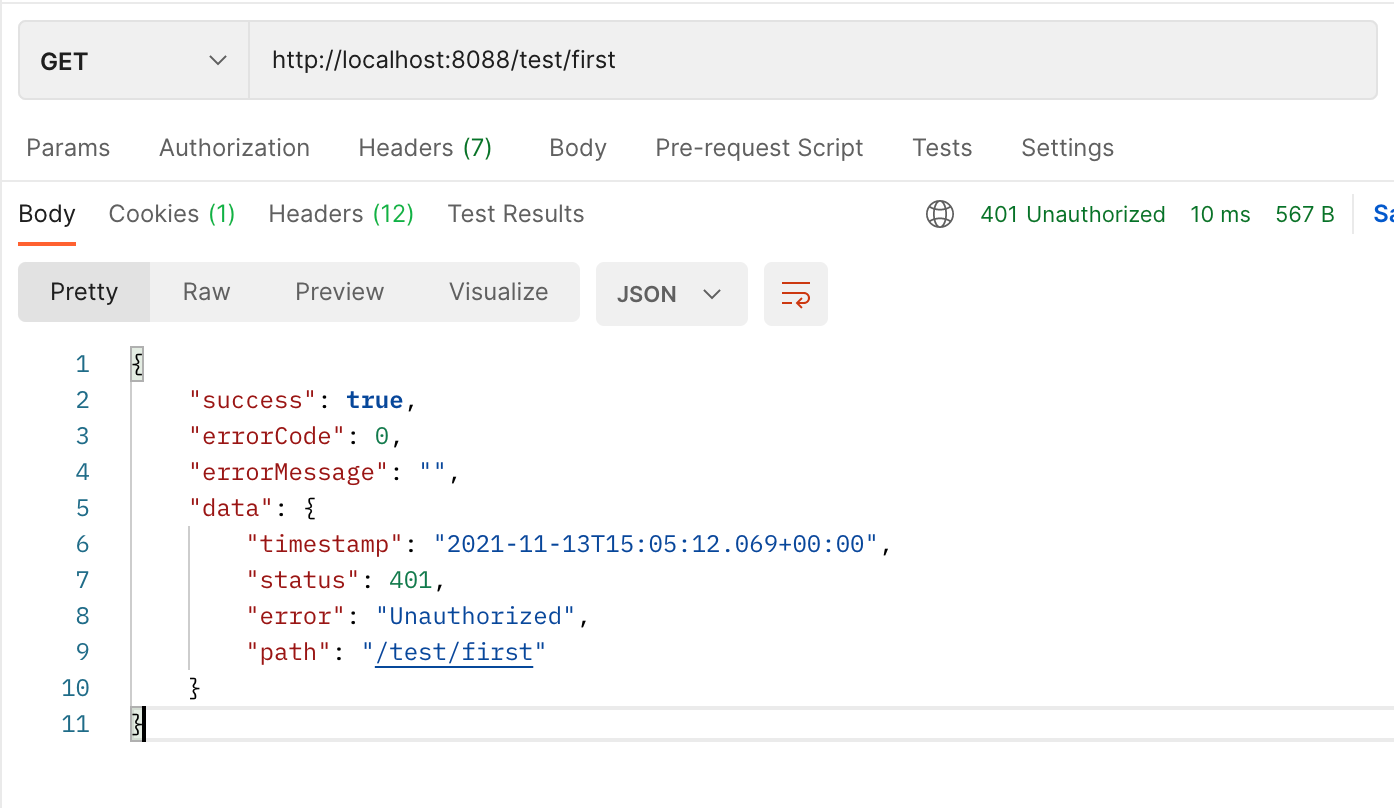
在没有登录的时候再次调用接口看下效果:
表面上看起来还是禁止访问,但细节已经不一样了。响应的状态不在是401 Unauthorized而是403 Forbidden(代餐权限不够)。
现在我们登访问登录接口:
根据影响结果可以看到登录成功的信息,在后端日志中可以看到如下的信息:
[login] david 正在尝试登录 127.0.0.1
[login] david 登录成功 127.0.0.1
如果你用 localhost 访问,上面可能会显示 0:0:0:0:0:0:0:1 的 IPv6的地址
29.5.5 从上下文中读取用户信息
在下面选中的这句代码中
用户登录时的地址(Remote Address)和Session ID被保存在UserDetail了中。如前文所说的,用户登录成功以后,可以随时在全局各处通过SecurityContextHolder获得SecurityContexts进而获得Authentication。现在给 LoginController 增加一个新的接口,从认证的上下文中取出这些信息:
    @GetMapping("/user/web-info")
    public void getUserWebInfo() {
        Authentication authentication = SecurityContextHolder.getContext().getAuthentication();
        System.out.println("用户名:" + authentication.getName());

        WebAuthenticationDetails details = (WebAuthenticationDetails) authentication.getDetails();
        System.out.println(details);

        System.out.println("之前保存的用户登录地址为:" + details.getRemoteAddress());
        System.out.println("之前保存的Session ID:" + details.getSessionId());
    }
重新登录后再次这个接口,在后端控制台可以看到如下的信息:
用户名:david
WebAuthenticationDetails [RemoteIpAddress=127.0.0.1, SessionId=E7D81EC9CF58C6B8F1C319817E8CB182]
之前保存的用户登录地址为:127.0.0.1
之前保存的Session ID:E7D81EC9CF58C6B8F1C319817E8CB182
除了通过SecurityContextHolder以外,控制器中定义了映射的方法还也可以直接在参数中直接获得当前的Authentication实例(如同HttpServletRequest一样)。因此代码也可以改成下面这样:
    @GetMapping("/user/web-info")
    public void getUserWebInfo(Authentication authentication) {
        System.out.println("用户名:" + authentication.getName());

        WebAuthenticationDetails details = (WebAuthenticationDetails) authentication.getDetails();
        System.out.println(details);

        System.out.println("之前保存的用户登录地址为:" + details.getRemoteAddress());
        System.out.println("之前保存的Session ID:" + details.getSessionId());
    }
显然,WebAuthenticationDetails 也可以自己定制,如果我们想保存关于请求的更多信息,就可以通过自定义 来实现。如果我们要定制 WebAuthenticationDetails,还要连同 WebAuthenticationDetailsSource 一起重新定义。
29.5.6 更有效的异常处理
用错误的用户名登录,可以得到下面的结果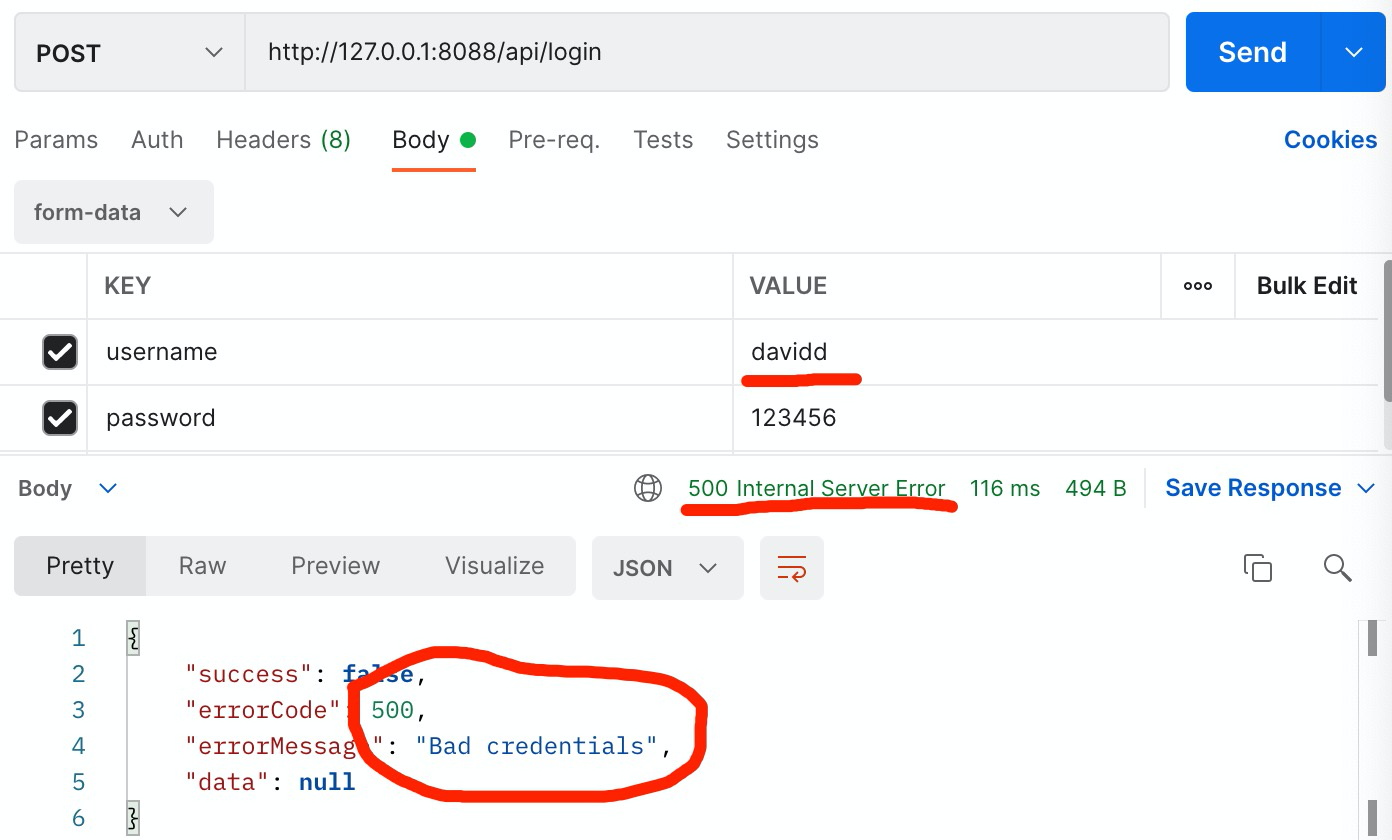
[login] davidd 正在尝试登录 127.0.0.1
[Exception] BadCredentialsException :Bad credentials
org.springframework.security.authentication.BadCredentialsException: Bad credentials
    at org.springframework.security.authentication.dao.AbstractUserDetailsAuthenticationProvider.authenticate(AbstractUserDetailsAuthenticationProvider.java:141)
    at org.springframework.security.authentication.ProviderManager.authenticate(ProviderManager.java:182)
为什么被抛出来的异常 BadCredentialsException 呢?我们来看一下类InMemoryUserDetailsManager中loadUserByUsername的代码
    public UserDetails loadUserByUsername(String username) throws UsernameNotFoundException {
        UserDetails user = (UserDetails)this.users.get(username.toLowerCase());
        if (user == null) {
            throw new UsernameNotFoundException(username);
        } else {
            return new User(user.getUsername(), user.getPassword(), user.isEnabled(), user.isAccountNonExpired(), user.isCredentialsNonExpired(), user.isAccountNonLocked(), user.getAuthorities());
        }
    }
可见当用户名不存在的时候抛出了 UsernameNotFoundException 异常。但实际测试会发现软件最终截获的是 BadCredentialsException。这是因为Spring Security默认截获到UsernameNotFoundException 后会改为抛出BadCredentialsException。处理这个过程体现在类AbstractUserDetailsAuthenticationProvider 的相关代码中
public abstract class AbstractUserDetailsAuthenticationProvider
        implements AuthenticationProvider, InitializingBean, MessageSourceAware {

    ...省略其他代码
    protected boolean hideUserNotFoundExceptions = true;
    ...省略其他代码

    public Authentication authenticate(Authentication authentication) throws AuthenticationException {
    ...省略其他代码
            try {
                user = retrieveUser(username, (UsernamePasswordAuthenticationToken) authentication);
            }
            catch (UsernameNotFoundException ex) {
                this.logger.debug("Failed to find user '" + username + "'");
                if (!this.hideUserNotFoundExceptions) {
                    throw ex;
                }
                throw new BadCredentialsException(this.messages
                        .getMessage("AbstractUserDetailsAuthenticationProvider.badCredentials", "Bad credentials"));
            }
    ...省略其他代码
    }
    ...省略其他代码
}
根据安全规则,不应明确说明是用户名错了还是密码错了(及前文教程提到的“不要泄露技术信息”原则。官方这样设计代码的好处目的就是强迫开发者给一个模糊的异常提示,这样即使是不懂行的新手,也不会将系统置于危险之中。
为便于运维和查错,我们可以谨慎地部分关闭这一设置以在前端输出模糊信息,但在后端记录较为准确的信息。关闭它的方法不止一种,我们选择修改SecurityConfig的设置,自己构造DaoAuthenticationProvider并调用setHideUserNotFoundExceptions(false)关闭这一规则。
在 SecurityConfig 中删除现有的 protected void configure(AuthenticationManagerBuilder auth) 方法,增加如下的代码:
    private final InMemoryUserDetailsManager userDetailsService;
    public SecurityConfig(@Autowired InMemoryUserDetailsManager userDetailsService) {
        this.userDetailsService = userDetailsService;
    }

    @Bean
    protected InMemoryUserDetailsManager inMemoryUserDetailsManager() {
        return new InMemoryUserDetailsManager();
    }

    private DaoAuthenticationProvider authenticationProvider() {
        DaoAuthenticationProvider provider = new DaoAuthenticationProvider();

        userDetailsService.createUser(User.withUsername("david")
                .password(new BCryptPasswordEncoder().encode("123456"))
                .build());

        provider.setHideUserNotFoundExceptions(false);
        provider.setUserDetailsService(userDetailsService);
        provider.setPasswordEncoder(passwordEncoder());

        return provider;
    }

    @Override
    protected void configure(AuthenticationManagerBuilder auth) {
        auth.authenticationProvider(authenticationProvider());
    }
在 ExceptionMessage 中增加 UsernameNotFoundException 的自定义说明
        put("UsernameNotFoundException", "用户名或密码错");
        put("BadCredentialsException", "用户名或密码错");
在 ExceptionStatus 中增加 UsernameNotFoundException 的状态定义
       put("UsernameNotFoundException", HttpStatus.UNAUTHORIZED);
       put("BadCredentialsException", HttpStatus.UNAUTHORIZED);
由于这两个异常的Stack Trace信息既没有实际意义,还会因为出现概率较高而使日志变得复杂,所以我们在 GlobalExceptionHandler 的 SIMPLE_EXCEPTIONS 增加两条,以便用简单的方式显示
    private static final String[] SIMPLE_EXCEPTIONS = {
            "HttpRequestMethodNotSupportedException",
            "MaxUploadSizeExceededException",
            "AccessDeniedException",
            "UsernameNotFoundException",
            "BadCredentialsException",
    };
用错误的用户名和密码分别测试,前端可以获得期望的反馈信息和响应状态(401 Unauthorized ):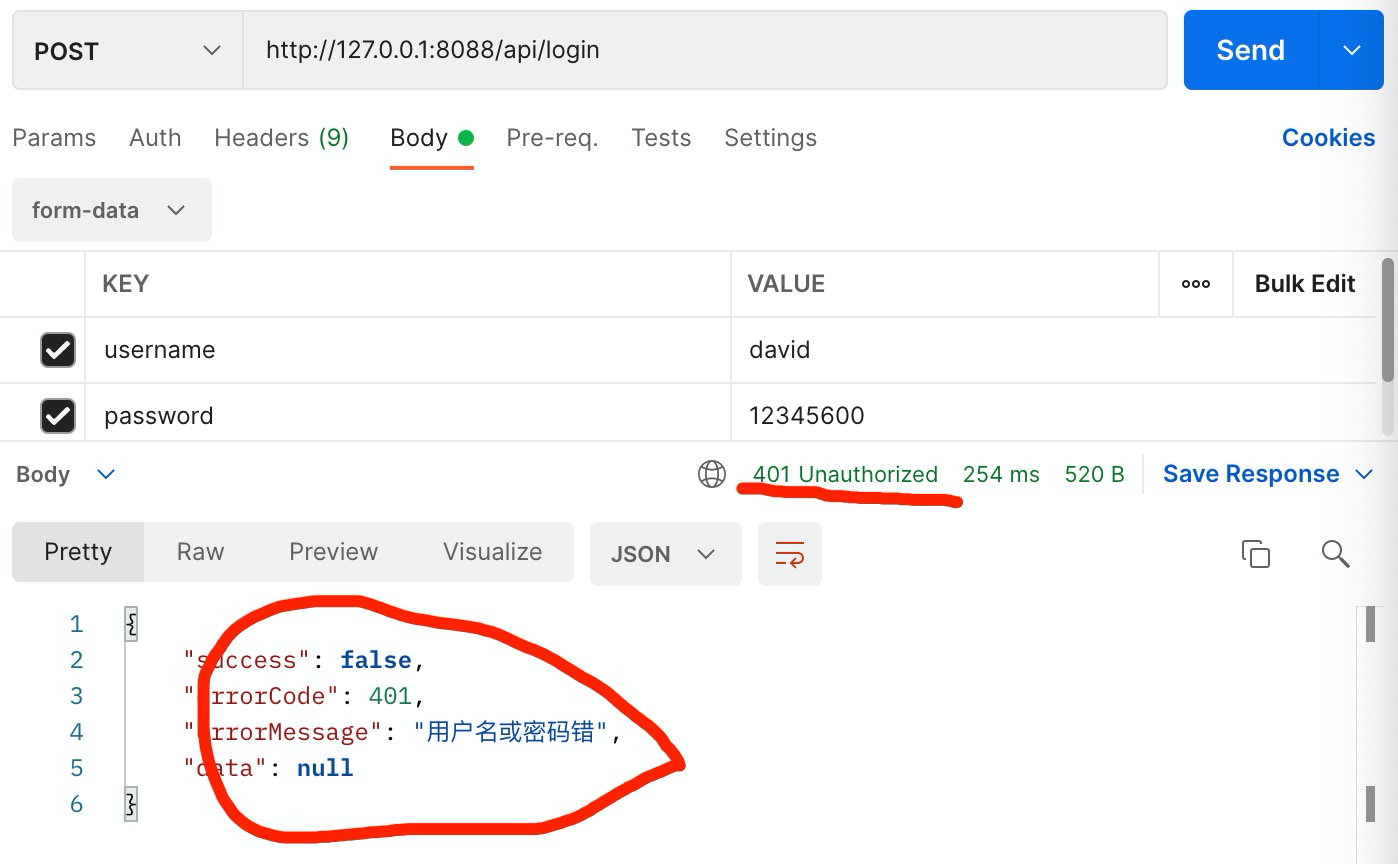
后端的日志中可以分别得到 UsernameNotFoundException 和 BadCredentialsException 的异常信息:
[login] davidd 正在尝试登录 127.0.0.1
[Exception] UsernameNotFoundException :davidd
[login] david 正在尝试登录 127.0.0.1
[Exception] BadCredentialsException :用户名或密码错误
BadCredentialsException 这个异常自己携带的信息就是“用户名或密码错误”,它和我们自定义的不一样
完成这些设计之后,根据异常的不同会有两种情况:
- 当用户名错的的时候,前端得到的信息为“用户名或密码错”,后端控制台上看到的信息为“UsernameNotFoundException:用户名”。
- 当认证失败(密码错误)的时候,前端得到的信息为“用户名或密码错”,后端控制台上看到的信息为“BadCredentialsException:用户名或密码错误”。
29.6 实现注销登录功能
尽管我们可以脱离Spring Security直接定义一个API控制器来执行所有注销登录的操作,但这就违背了我们使用Spring Security框架的初衷。所以我们在这里直接在Spring Security的框架中实现这一功能。29.6.1 注销登录处理器
首先,定义一个注销登录的处理器类: ```java package com.longser.security.authentication.logout;
import org.slf4j.Logger; import org.slf4j.LoggerFactory; import org.springframework.security.core.Authentication; import org.springframework.security.core.context.SecurityContextHolder; import org.springframework.security.web.authentication.logout.LogoutHandler;
import javax.servlet.http.HttpServletRequest; import javax.servlet.http.HttpServletResponse;
public class CloudLogoutHandler implements LogoutHandler { private final Logger LOGGER = LoggerFactory.getLogger(getClass());
@Override
public void logout(
        HttpServletRequest request,
        HttpServletResponse response,
        Authentication authentication) {
    String remoteAddress = request.getRemoteAddr();
    if(authentication == null) {
        LOGGER.warn("[logout] 处于未登录状态,无须操作 {}", remoteAddress);
    } else {
        String userName = authentication.getName();

        SecurityContextHolder.clearContext();
        if (userName == null) {
            LOGGER.info("[logout] 退出登录 {}", remoteAddress);
        } else {
            LOGGER.info("[logout] {} 退出登录  {}", userName, remoteAddress);
        }
    }
}
}
目前我们只在这个类中执行了SecurityContextHolder.clearContext()。在实际的业务开发中,这里还应该增加更多的清理操作。另外需要注意的是,如果在非登录状态下执行logout方法,参数authentication是null,因此在使用它之前必须判断是否非空。
<a name="gjX7E"></a>
### 29.6.2 注销成功处理器
接下来定义一个处理器类来完成注销登录之后的工作(这里我们只是简单地封装结果信息告知前端):
```java
package com.longser.security.authentication.logout;

import com.longser.restful.result.RestfulResult;
import org.springframework.security.core.Authentication;
import org.springframework.security.web.authentication.logout.LogoutSuccessHandler;

import javax.servlet.http.HttpServletRequest;
import javax.servlet.http.HttpServletResponse;
import java.io.IOException;
import java.io.PrintWriter;

public class CloudLogoutSuccessHandler implements LogoutSuccessHandler {
    @Override
    public void onLogoutSuccess(HttpServletRequest request,
                                HttpServletResponse response,
                                Authentication authentication) throws IOException {
        PrintWriter out = response.getWriter();

        if(authentication == null) {
            out.println(RestfulResult.success("处于未登录状态,无须操作"));
        } else {
            out.println(RestfulResult.success("成功退出登录"));
        }
    }
}
29.6.3 组装与规则配置
然后在SecurityConfig做好设置:
    @Bean
    public LogoutHandler logoutHandler() {
        return new CloudLogoutHandler();
    }

    @Bean
    public LogoutSuccessHandler logoutSuccessHandler() {
        return new CloudLogoutSuccessHandler();
    }
用一个字符串数组保存所有允许未登录访问的API地址
    private static final String[] permitedApi = {
            "/api/login",
            "/api/register",
            "/api/logout"
    };
注意:这里不要放行不存在的地址,否则因此而产生的异常状态无法被当前的机制正常处理。
增加注销登录的设置,并且使用刚定义的数组变量
        http.logout().logoutUrl("/api/logout")
                .addLogoutHandler(logoutHandler())
                .logoutSuccessHandler(logoutSuccessHandler())
                .deleteCookies("JSESSIONID")
                .permitAll()
                .and().authorizeRequests()
                // 注意这里,是允许前端跨域联调的一个必要配置
                .requestMatchers(CorsUtils::isPreFlightRequest).permitAll()
                // 指定某些接口不需要通过验证即可访问。登陆、注册接口肯定是不需要认证的
                .antMatchers(permitedApi).permitAll()
                // 这里意思是其它所有接口需要认证才能访问
                .anyRequest().authenticated();
这里有个原则需要说明一下:不要在SecurityConfig中编写实现软件功能的代码。有的Spring Security教程会直接在addLogoutHandler或logoutSuccessHandler的参数位置用lambda格式编写函数代码。尽管这样看似简化了代码总量,但实际上破坏了软各部件的逻辑结构,负责配置的代码和实现软件功能的代码应该分在不同的类中实现。
如果前文编写的拦截器还在工作,你会发现我们本节定义的注销登录功能(即 /api/logout )不会被拦截器拦截到。
29.7 总结
本章详细讨论了Spring Security认证和授权的基本原理,并且给出了具体的应用范例。在范例中,我们使用使用预定义后置入内存管理的用户,这么做有利于避免同时涉及过多细节而干扰对认证过程的理解。
除了用户名、密码这种传统认证以外,Spring Security支持在现有的认证逻辑上附加验证,也支持增加其他的认证方式(多种认证方式可以共存)。将Spring Security和JWT(JSON Web Token)、OAuth (Open Authorization) 2.0等结合,也能够更好地满足实际业务应用场景中对安全认证的要求。
此外,Spring Security支持如内存、数据库、LDAP 等多种数据源。这些内容我们会在后续的章节继续讨论。
版权说明:本文由北京朗思云网科技股份有限公司原创,向互联网开放全部内容但保留所有权力。

若有收获,就点个赞吧
0 人点赞
