31.1 为密码登录增加图形验证码
31.1.1 增加项目依赖
有很多开源项目实现了图形验证码的功能,这里我们使用常见的验证码库 kaptcha,添加依赖如下:
<dependency><groupId>com.github.penggle</groupId><artifactId>kaptcha</artifactId><version>2.3.2</version></dependency>
31.1.2 配置Kaptcha参数
为了让代码逻辑清晰,我们定义一个独立的类来实现 Kaptcha 参数的配置。这段配置很简单,我们就是提供了验证码图片的宽高、字符库以及生成的验证码字符长度,其他使用默认值。
package com.longser.union.cloud.config;import com.google.code.kaptcha.Producer;import com.google.code.kaptcha.impl.DefaultKaptcha;import com.google.code.kaptcha.util.Config;import org.springframework.context.annotation.Bean;import org.springframework.context.annotation.Configuration;import java.util.Properties;@Configurationpublic class KaptchaConfig {@Beanpublic Producer defaultKaptchaConfig() {Properties properties = new Properties();properties.setProperty("kaptcha.image.width", "150");properties.setProperty("kaptcha.image.height", "50");properties.setProperty("kaptcha.textproducer.char.string","abcde2345678gfynmnpwx");properties.setProperty("kaptcha.textproducer.char.length", "5");Config config = new Config(properties);DefaultKaptcha defaultKaptcha = new DefaultKaptcha();defaultKaptcha.setConfig(config);return defaultKaptcha;}}
31.1.3 返回验证码图片的接口
在返回验证码图片的时候我们需要指定验证码的有效时间。为了让软件更加灵活,我们把验证图片有效期(配秒)在配置在application.yml中:
application:authentication:kaptcha:time-to-live: 60
在META-INF/additional-spring-configuration-metadata.json 中增加
    {
      "name": "application.authentication.kaptcha.time-to-live",
      "type": "java.lang.Integer",
      "description": "随机图形验证码的有效期(秒)."
    }
为 LoginController 添加两个属性变量:
    private final Producer producer;

    @Value("${application.authentication.kaptcha.time-to-live:60}")
    Integer kaptchaTimeToLive;
把构造函数修成如下内容
    @Autowired
    public LoginController(
            AuthenticationManager authenticationManager,
            Producer producer
    ) {
        this.authenticationManager = authenticationManager;
        this.producer = producer;
    }
增加返回验证码图片的接口:
@GetMapping("/kaptcha.jpg")
public void getVerifyCode(HttpServletResponse response, HttpSession session)
    throws IOException {
    response.setDateHeader("Expires", 0);
    response.setHeader("Cache-Control", "no-store, no-cache, must-revalidate");
    response.addHeader("Cache-Control", "post-check=0, pre-check=0");
    response.setHeader("Pragma", "no-cache");
    response.setContentType("image/jpeg");

    String text = producer.createText();
    String sessionKey = ((DefaultKaptcha)producer).getConfig().getSessionKey();
    String sessionDate = ((DefaultKaptcha)producer).getConfig().getSessionDate();

    session.setAttribute(sessionKey, text);
    session.setAttribute(sessionDate, LocalTime.now().plusSeconds(kaptchaTimeToLive));

    BufferedImage image = producer.createImage(text);
    try(ServletOutputStream out = response.getOutputStream()) {
        ImageIO.write(image, "jpg", out);
    }
}
这里我们生成验证码图片并将生成的验证码字符存入 HttpSession 中。注意这里用到了 try-with-resources ,可以自动关闭流,如果不清楚它原理可以自己去找资料学习一下。
31.1.4 定义附加验证方法
定义一个类 CloudAuthenticationProvider 继承自 DaoAuthenticationProvider,并重写 additionalAuthenticationChecks 方法:
package com.longser.security.authentication;

import com.google.code.kaptcha.Producer;
import com.google.code.kaptcha.impl.DefaultKaptcha;
import com.longser.utils.SpringContextUtil;
import org.springframework.security.authentication.AuthenticationServiceException;
import org.springframework.security.authentication.UsernamePasswordAuthenticationToken;
import org.springframework.security.authentication.dao.DaoAuthenticationProvider;
import org.springframework.security.core.AuthenticationException;
import org.springframework.security.core.userdetails.UserDetails;
import org.springframework.web.context.request.RequestContextHolder;
import org.springframework.web.context.request.ServletRequestAttributes;

import javax.servlet.http.HttpServletRequest;
import java.time.LocalTime;
import java.util.Objects;

public class CodeAuthenticationProvider extends DaoAuthenticationProvider {

    @Override
    protected void additionalAuthenticationChecks(UserDetails userDetails,
                UsernamePasswordAuthenticationToken authentication)
            throws AuthenticationException {
        HttpServletRequest request = ((ServletRequestAttributes) Objects.requireNonNull(RequestContextHolder
                .getRequestAttributes())).getRequest();

        DefaultKaptcha defaultKaptcha = (DefaultKaptcha)SpringContextUtil.getBean(Producer.class);
        String sessionKey = defaultKaptcha.getConfig().getSessionKey();
        String sessionDate = defaultKaptcha.getConfig().getSessionDate();
        LocalTime kaptchaDate = (LocalTime)request.getSession().getAttribute(sessionDate);

        if(kaptchaDate == null) {
            throw new AuthenticationServiceException("验证码错误");
        }

        if(kaptchaDate.isBefore(LocalTime.now())) {
            throw new AuthenticationServiceException("验证码已过期");
        }

        // 这里要求前端传过来的验证码的名称为 code
        String code = request.getParameter("code");
        String verifyCode = (String) request.getSession().getAttribute(sessionKey);
        if (code == null || !code.equals(verifyCode)) {
            throw new AuthenticationServiceException("验证码错误");
        }

        request.getSession().removeAttribute(sessionKey);
        request.getSession().removeAttribute(sessionDate);
        super.additionalAuthenticationChecks(userDetails, authentication);
    }
}
在 additionalAuthenticationChecks 方法中:
- 首先获取当前请求,注意这种获取方式,在基于 Spring 的 Web 项目中,我们可以随时随地获取到当前请求,获取方式就是上面代码中的方法。
- 构造一个 Kaptcha 的默认配置,取它的 sessionKey 和 sessionDate。这里没有取保存在 KaptchaConfig 生成的 Bean 里面的信息。因为这个类的示例后面是通过 new 而创建的,因而无法在这个类里面用 @Autowire 自动注入 Bean。而这里没有采用动态获取 Bean 的的原因是因为这种方法较为繁琐(有关动态获取 Bean的方法参见附录)。如果你不用默认的 sessionKey 和 sessionDate ,则可以“硬编码”或者写入配置文件(Application.yml)。
- 从当前请求中拿到 code 参数,也就是用户传来的验证码。
- 从 session 中获取生成的验证码字符串和存入的时间。
- 比较时间是否过期,过期则抛出异常
- 没有过期的情况下比较验证码,如果验证码输入错误,则直接抛出异常。
- 最后通过 super 调用父类方法,也就是 DaoAuthenticationProvider 的 additionalAuthenticationChecks 方法,该方法中主要做密码的校验。
31.1.5 组装与规则配置
CloudAuthenticationProvider 定义好之后,接下来主要是如何让它代替 DaoAuthenticationProvider。为实现这一目标,我们把 SecurityConfig 的authenticationProvider方法中生成的 provider 修改成新定义的类: ```diff private DaoAuthenticationProvider authenticationProvider() {
- DaoAuthenticationProvider provider = new DaoAuthenticationProvider();
- CodeAuthenticationProvider provider = new CodeAuthenticationProvider();
同时不要忘了把验证图片的地址设置成开放访问diff private static final String[] permitedApi = { - “/api/kaptcha.jpg”,
“/api/login”,
“/api/register”,
“/api/logout”
};
然后在GlobalExceptionHandler中把这个异常的名字放到简单信息的列表中 ```diff private static final String[] SIMPLE_EXCEPTIONS = { “HttpRequestMethodNotSupportedException”, “MaxUploadSizeExceededException”, “AccessDeniedException”, “UsernameNotFoundException”, “BadCredentialsException”,到这里,我们在不需要修改原生过滤器链的情况下,嵌入了自己的认证逻辑。 <a name="rLLnN"></a> ### 31.1.6 完善异常管理 现在我们完善一下对AuthenticationServiceException异常的管理。首先在ExceptionStatus中增加状态映射 ```java put("AuthenticationServiceException", HttpStatus.UNAUTHORIZED); - “AuthenticationServiceException”,
};
```
31.1.7 测试图形验证码
为了方便,我们直接用 Postman 来测试,首先不提供验证码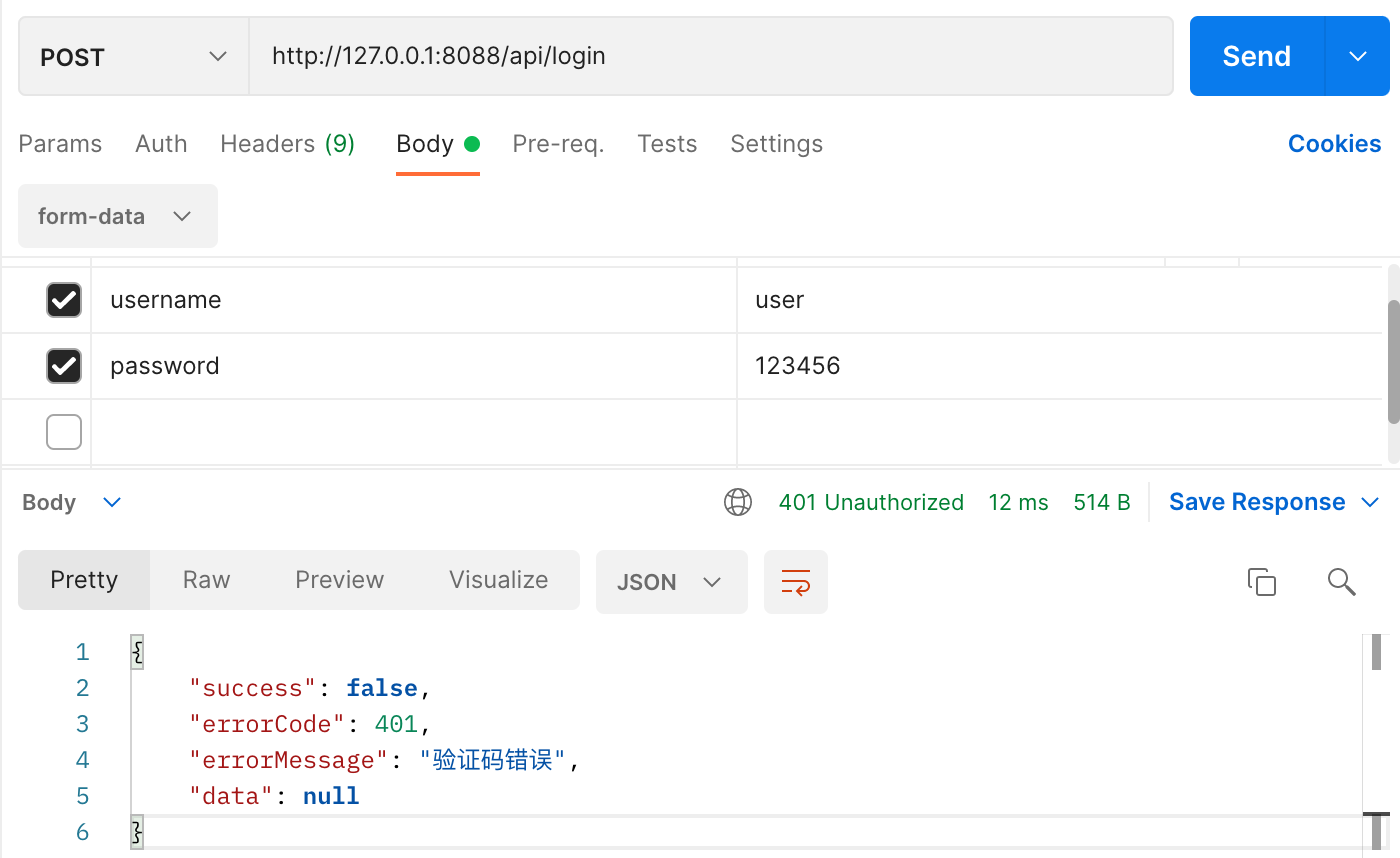
接下来请求验证码: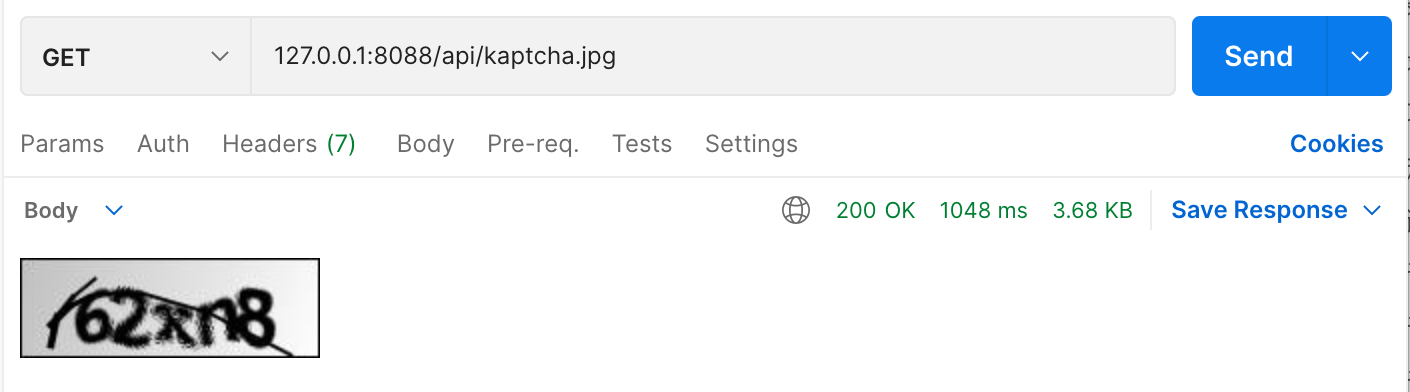
分别输入正确和错误的密码来测试: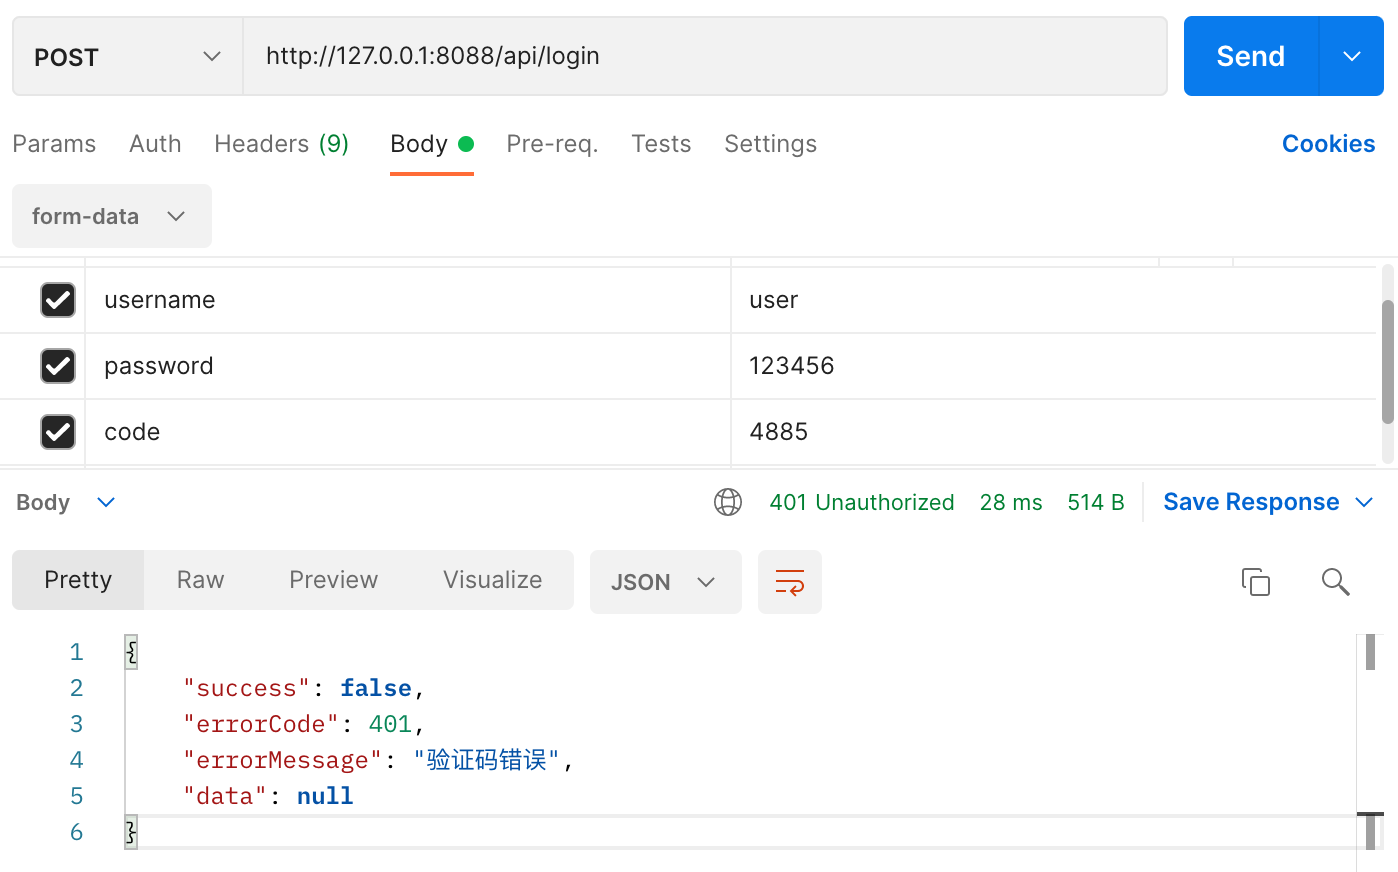
最后,所有的都输入正确,再来看下: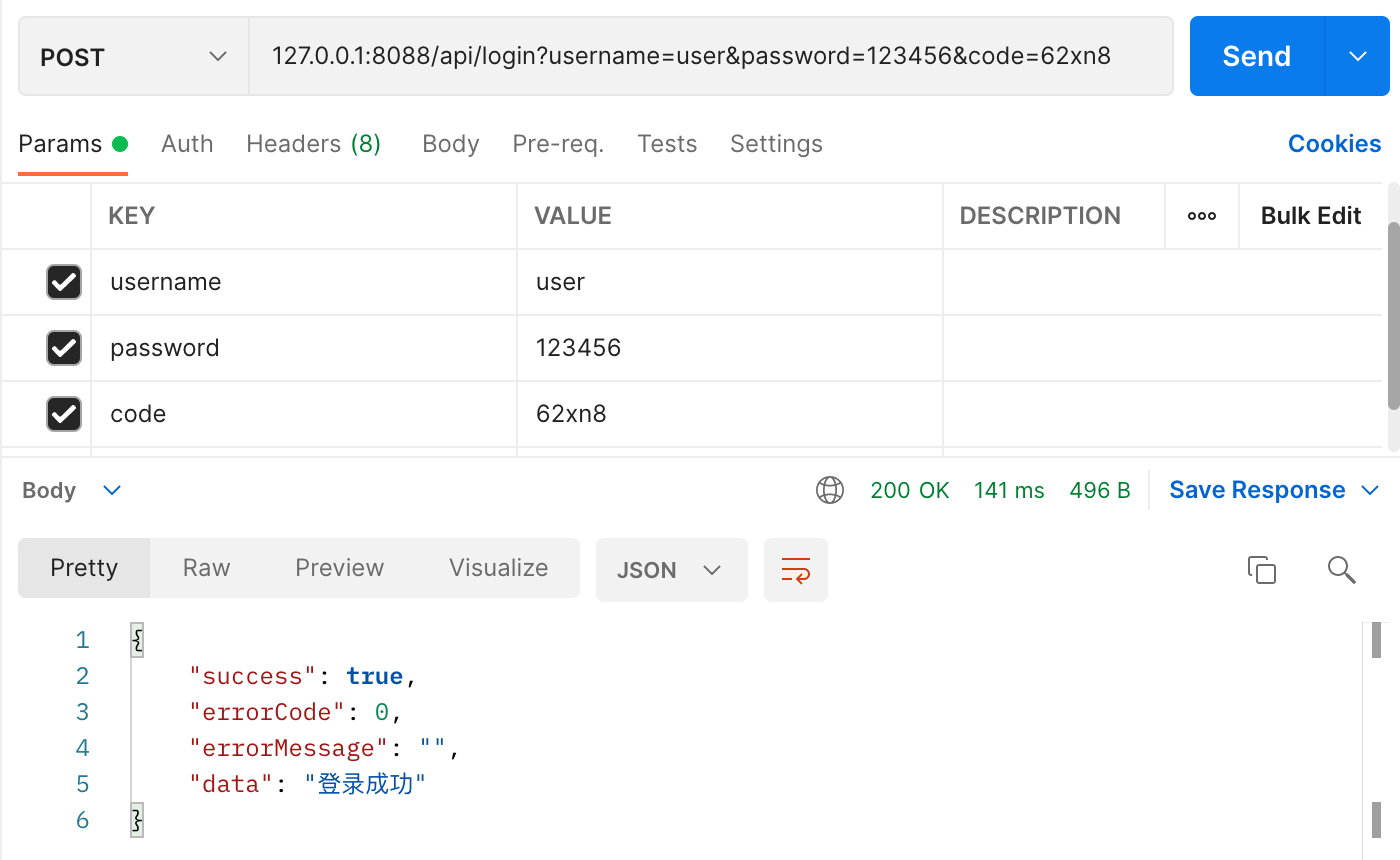
在MacOS上你可能会遇到如下的警告: Warning: the fonts “Times” and “Times” are not available for the Java logical font “Serif”, which may have unexpected appearance or behavior. Re-enable the “Times” font to remove this warning. 解决这个问题的办法是额外安装下面的字体 https://www.freebestfonts.com/yone//down/timr45w.ttf
31.2 增加独立的单次密码认证
在Spring Security添加图形验证码一节中,我们已经为原有的用户名密码登录集成了图形验证码功能。在当前的应用系统中,手机短信息密码(验证码)是另一种非常常见的认证方式。他有时是与用户名密码认证同时存在的辅助手段(类似图形验证码的作用),有时也会以独立的认证方式而存在。
从概念分类来说,手机短信息密码(验证码)是单次密码(OTP,One-Time Password)的一种,本节下文以在Spring Security的支持实现OPT认证为主要讨论内容。
31.2.1 关于认证逻辑的讨论
在前一章中,我们介绍了Spring Security使用用户名密码认证的完整过程:
UsernamePasswordAuthenticationFilter过滤器来拦截用户名密码认证请求,将用户名和密码封装成一个UsernamePasswordToken对象交给AuthenticationManager处理。
AuthenticationManager挑出一个支持处理该Token类型的AuthenticationProvider(这里具体实现类为DaoAuthenticationProvide)来进行认证。
DaoAuthenticationProvider调用UserDetailService的
loadUserByUsername方法来处理认证,如果认证通过(即和UsernamePasswordToken中的用户名和密码相符)则返回一个UserDetails类型对象,并将认证信息保存到Session中。认证后可以通过Authentication对象获取到认证的信息。
仿照上面的流程,下面是自己实现OTP认证的逻辑: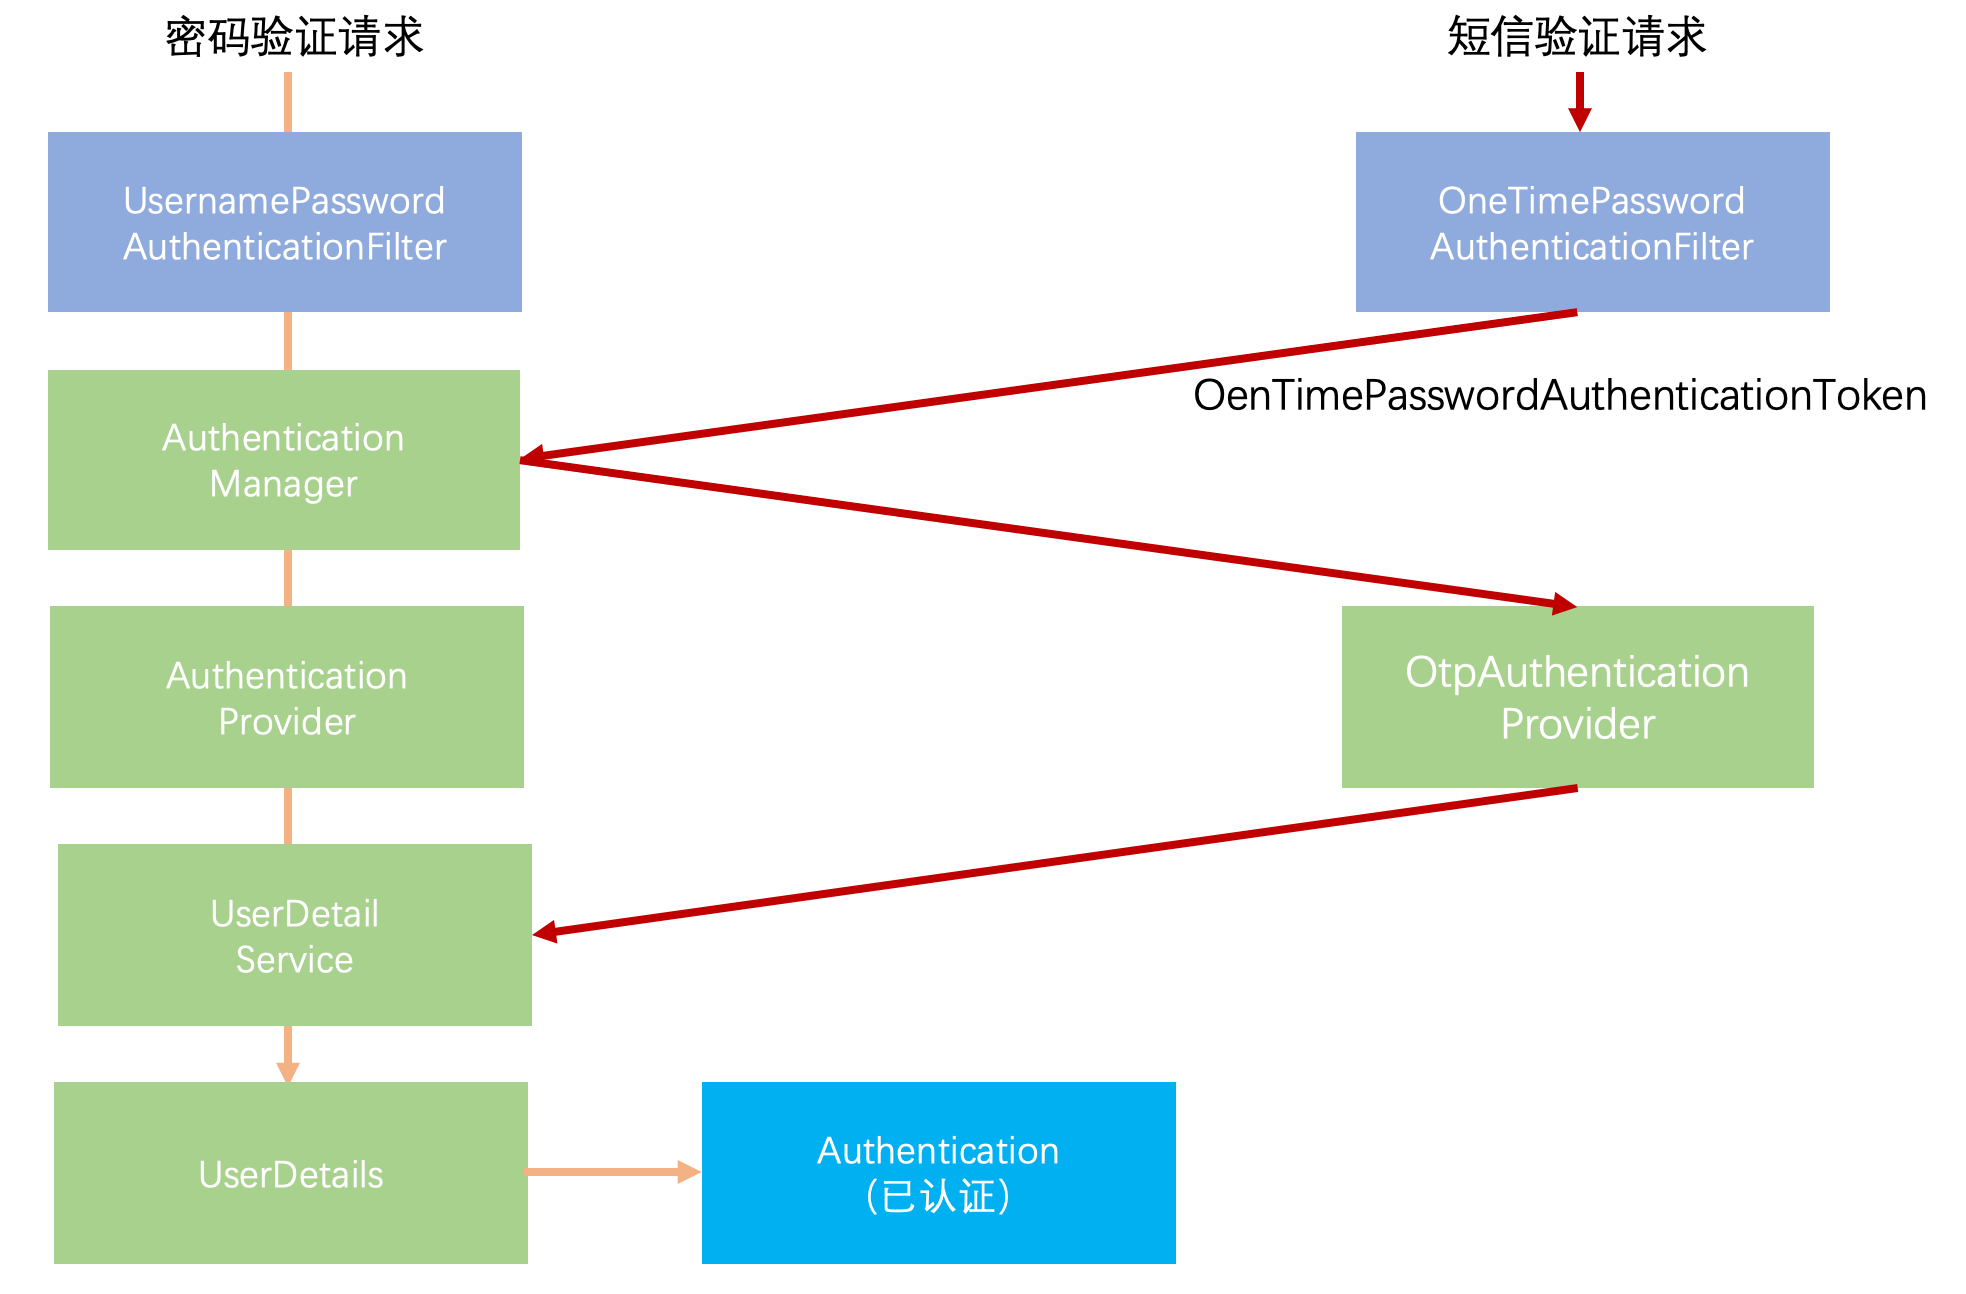
在具体实现的过程中,我们做如下的考虑:
- 依旧使用API控制器代替过滤器作为认证的入口
- 定义OneTimePasswordAuthenticationToken来持有待认证的信息
- 定义实现认证逻辑的OtpAuthenticationProvider,并且把他交给AuthenticationManager管理
- 仍旧使用默认的UserDetailService和UserDetails定义,继续在内存中保存和管理用户信息
- 把动态的单次密码和其有效期明文封装在OneTimePassword类对象并保存在当前Session中
- 全局捕获认证过期异常并且只记录简单信息
31.2.2 持有密码及有效期的类
这个类非常简单,在构造对象的时候即生成随机密码并记录有效期。除了构造方法以外,只有isExpired和getPassword两个对外公开的方法。这个类管理的密码无须加密。
package com.longser.security.authentication.otp;

import javax.servlet.http.HttpSession;
import java.security.NoSuchAlgorithmException;
import java.security.SecureRandom;
import java.time.Instant;

public class OneTimePassword {
    public static final String passwordKey = "longser.one.time.password.";

    private final String password;
    private final Instant expiredInstant;

    public OneTimePassword(HttpSession session, String userName, int seconds)
            throws NoSuchAlgorithmException {

        SecureRandom secureRandom = SecureRandom.getInstance("SHA1PRNG");
        this.password = String.valueOf(secureRandom.nextInt(900000) + 100000);

        // 有效期不能少于60秒,不能多于180秒
        this.expiredInstant = Instant.now().plusSeconds(Math.min(Math.max(seconds,60),180));
        String key =  passwordKey + userName.trim();
        session.setAttribute(key, this);
    }

    public boolean isExpired() {
        return expiredInstant.isAfter(Instant.now());
    }

    public String getPassword() {
        return password;
    }
}
Random 和 DataTimeUtils 是自定义的工具类,具体内容参见附件。
31.2.3 待认证信息的Token类
下面是待认Token的类定义,我们以AbstractAuthenticationToken为基类,模仿UsernamePasswordToken进行设计。和网络上有些人的作法,我们这里把单次密码(验证码)类比做传统密码来管理,这样能够最大限度地应用框架现有的设计。
package com.longser.security.authentication.otp;

import org.slf4j.Logger;
import org.slf4j.LoggerFactory;
import org.springframework.security.authentication.BadCredentialsException;
import org.springframework.security.authentication.CredentialsExpiredException;
import org.springframework.security.authentication.InternalAuthenticationServiceException;
import org.springframework.security.authentication.dao.DaoAuthenticationProvider;
import org.springframework.security.core.Authentication;
import org.springframework.security.core.AuthenticationException;
import org.springframework.security.core.userdetails.UserDetails;
import org.springframework.security.core.userdetails.UsernameNotFoundException;
import org.springframework.util.Assert;
import org.springframework.web.context.request.RequestContextHolder;
import org.springframework.web.context.request.ServletRequestAttributes;

import javax.servlet.http.HttpServletRequest;
import java.util.Objects;

public class OtpAuthenticationProvider extends DaoAuthenticationProvider {
    private static final Logger LOGGER =
            LoggerFactory.getLogger(OtpAuthenticationProvider.class);

    public OtpAuthenticationProvider() {
        super();
        setHideUserNotFoundExceptions(false);
    }

    /**
     * 这个方法基本上就是原样超过来的,它写这么复杂主要是为了使用用户的Cache
     */
    @Override
    public Authentication authenticate(Authentication authentication) throws AuthenticationException {
        Assert.isInstanceOf(OneTimePasswordAuthenticationToken.class, authentication,
                "Only OneTimePasswordAuthenticationToken is supported"
        );
        String username = authentication.getPrincipal() == null ? "NONE_PROVIDED" : authentication.getName();
        boolean cacheWasUsed = true;
        UserDetails user = this.getUserCache().getUserFromCache(username);
        if (user == null) {
            cacheWasUsed = false;

            try {
                user = this.retrieveUser(username);
            } catch (UsernameNotFoundException ex) {
                LOGGER.debug("Failed to find user '" + username + "'");
                if (!this.hideUserNotFoundExceptions) {
                    throw ex;
                }

                throw new BadCredentialsException(this.messages.getMessage("AbstractUserDetailsAuthenticationProvider.badCredentials", "Bad credentials"));
            }

            Assert.notNull(user, "retrieveUser returned null - a violation of the interface contract");
        }

        try {
            this.getPreAuthenticationChecks().check(user);
            this.additionalAuthenticationChecks(user, (OneTimePasswordAuthenticationToken)authentication);
        } catch (AuthenticationException ex) {
            if (!cacheWasUsed) {
                throw ex;
            }

            cacheWasUsed = false;
            user = this.retrieveUser(username);
            this.getPreAuthenticationChecks().check(user);
            this.additionalAuthenticationChecks(user, (OneTimePasswordAuthenticationToken)authentication);
        }

        this.getPostAuthenticationChecks().check(user);
        if (!cacheWasUsed) {
            this.getUserCache().putUserInCache(user);
        }

        Object principalToReturn = user;
        if (this.isForcePrincipalAsString()) {
            principalToReturn = user.getUsername();
        }

        return this.createSuccessAuthentication(principalToReturn, authentication, user);
    }

    /**
     * 这是一定要自己定义的方法,它完成认证工作。这部分关键修改的就是密码是否相当的判断那里
     */
    protected void additionalAuthenticationChecks(UserDetails userDetails,
                                                  OneTimePasswordAuthenticationToken authentication) throws AuthenticationException {

        if (authentication.getCredentials() == null) {
            LOGGER.debug("Failed to authenticate since no credentials provided");
            throw new BadCredentialsException(this.messages
                    .getMessage("AbstractUserDetailsAuthenticationProvider.badCredentials", "Bad credentials"));
        }
        String presentedPassword = authentication.getCredentials().toString();

        // 这里是最大的不同,我们直接比较明文密码
        if (!presentedPassword.equals(getSavedPassword(userDetails.getUsername()))) {
            LOGGER.debug("Failed to authenticate since password does not match stored value");
            throw new BadCredentialsException(this.messages
                    .getMessage("AbstractUserDetailsAuthenticationProvider.badCredentials", "Bad credentials"));
        }
    }

    /**
     * 这个是增加的方法,用来从Session中读取密码对象,判断是否过期,返回明文密码
     */
    private String getSavedPassword(String principal) {
        HttpServletRequest request = ((ServletRequestAttributes) Objects.requireNonNull(RequestContextHolder.getRequestAttributes())).getRequest();

        String sessionPasswordKey = OneTimePassword.passwordKey + principal.trim();
        OneTimePassword oneTimePassword = (OneTimePassword)request.getSession().getAttribute(sessionPasswordKey);

        if(oneTimePassword == null || oneTimePassword.isExpired()) {
            throw new CredentialsExpiredException("密码未生成或已过期");
        }

        return oneTimePassword.getPassword();
    }

    /**
     * 这是一个必须重载的方法,它判断当前Token是否属于自己应该处理的类型
     */
    @Override
    public boolean supports(Class<?> authentication) {
        return (OneTimePasswordAuthenticationToken.class.isAssignableFrom(authentication));
    }

    /**
     * 这的方法的代码也是原样超过来的。其中最关键的就是
     *      getUserDetailsService().loadUserByUsername(username)
     * 如果从你自己定义的用户数据源读信息,应该自定义UserDetailsServer,而不是在这里改。
     */
    protected final UserDetails retrieveUser(String username) throws AuthenticationException {
        try {
            UserDetails loadedUser = this.getUserDetailsService().loadUserByUsername(username);
            if (loadedUser == null) {
                throw new InternalAuthenticationServiceException("UserDetailsService returned null, which is an interface contract violation");
            } else {
                return loadedUser;
            }
        } catch (UsernameNotFoundException | InternalAuthenticationServiceException ex) {
            throw ex;
        } catch (Exception ex) {
            throw new InternalAuthenticationServiceException(ex.getMessage(), ex);
        }
    }
}
31.2.4 执行认证的Provider类
我们以DaoAuthenticationProvider为基类定义认证单次密码的 Provider 。需要重载 authenticate 和 supports 两个方法,并且定义新的 additionalAuthenticationChecks和retrieveUser 方法。Authentication Manager 会根据待认证对象的类型选择合适的Provider,选择的依据就是各Provider的supports方法的运行结果。
由于我们在 Session 中保存的是密码明文,这使认证过程有较多简化。决定保存密码明文的原因除了因为在Session 中的数据较为安全以外,还因为单次密码的有效期较短。如果你在实现其他认证方式中使用了长期保存的密码,则必须加密处理。并且在实现 Provider 的过程中必须设计应对 Timing Attack 的逻辑——即遇到不存在的用户也不要立即返回。请详细阅读DaoAuthenticationProvider的源代码,以及官方SEC-2056的解释 来了解具体的实现原理。
package com.longser.security.authentication.otp;

import org.slf4j.Logger;
import org.slf4j.LoggerFactory;
import org.springframework.security.authentication.BadCredentialsException;
import org.springframework.security.authentication.CredentialsExpiredException;
import org.springframework.security.authentication.InternalAuthenticationServiceException;
import org.springframework.security.authentication.dao.DaoAuthenticationProvider;
import org.springframework.security.core.Authentication;
import org.springframework.security.core.AuthenticationException;
import org.springframework.security.core.userdetails.UserDetails;
import org.springframework.security.core.userdetails.UsernameNotFoundException;
import org.springframework.util.Assert;
import org.springframework.web.context.request.RequestContextHolder;
import org.springframework.web.context.request.ServletRequestAttributes;

import javax.servlet.http.HttpServletRequest;
import java.util.Objects;

public class OtpAuthenticationProvider extends DaoAuthenticationProvider {
    private static final Logger LOGGER =
            LoggerFactory.getLogger(OtpAuthenticationProvider.class);

    public OtpAuthenticationProvider() {
        super();
        setHideUserNotFoundExceptions(false);
    }

    /**
     * 这个方法基本上就是原样超过来的,它写这么复杂主要是为了使用用户的Cache
     */
    @Override
    public Authentication authenticate(Authentication authentication) throws AuthenticationException {
        Assert.isInstanceOf(OneTimePasswordAuthenticationToken.class, authentication,
                "Only OneTimePasswordAuthenticationToken is supported"
        );
        String username = authentication.getPrincipal() == null ? "NONE_PROVIDED" : authentication.getName();
        boolean cacheWasUsed = true;
        UserDetails user = this.getUserCache().getUserFromCache(username);
        if (user == null) {
            cacheWasUsed = false;

            try {
                user = this.retrieveUser(username);
            } catch (UsernameNotFoundException ex) {
                LOGGER.debug("Failed to find user '" + username + "'");
                if (!this.hideUserNotFoundExceptions) {
                    throw ex;
                }

                throw new BadCredentialsException(this.messages.getMessage("AbstractUserDetailsAuthenticationProvider.badCredentials", "Bad credentials"));
            }

            Assert.notNull(user, "retrieveUser returned null - a violation of the interface contract");
        }

        try {
            this.getPreAuthenticationChecks().check(user);
            this.additionalAuthenticationChecks(user, (OneTimePasswordAuthenticationToken)authentication);
        } catch (AuthenticationException ex) {
            if (!cacheWasUsed) {
                throw ex;
            }

            cacheWasUsed = false;
            user = this.retrieveUser(username);
            this.getPreAuthenticationChecks().check(user);
            this.additionalAuthenticationChecks(user, (OneTimePasswordAuthenticationToken)authentication);
        }

        this.getPostAuthenticationChecks().check(user);
        if (!cacheWasUsed) {
            this.getUserCache().putUserInCache(user);
        }

        Object principalToReturn = user;
        if (this.isForcePrincipalAsString()) {
            principalToReturn = user.getUsername();
        }

        return this.createSuccessAuthentication(principalToReturn, authentication, user);
    }

    /**
     * 这是一定要自己定义的方法,它完成认证工作。这部分关键修改的就是密码是否相当的判断那里
     */
    protected void additionalAuthenticationChecks(UserDetails userDetails,
                                                  OneTimePasswordAuthenticationToken authentication) throws AuthenticationException {

        if (authentication.getCredentials() == null) {
            LOGGER.debug("Failed to authenticate since no credentials provided");
            throw new BadCredentialsException(this.messages
                    .getMessage("AbstractUserDetailsAuthenticationProvider.badCredentials", "Bad credentials"));
        }
        String presentedPassword = authentication.getCredentials().toString();

        // 这里是最大的不同,我们直接比较明文密码
        if (!presentedPassword.equals(getSavedPassword(userDetails.getUsername()))) {
            LOGGER.debug("Failed to authenticate since password does not match stored value");
            throw new BadCredentialsException(this.messages
                    .getMessage("AbstractUserDetailsAuthenticationProvider.badCredentials", "Bad credentials"));
        }
    }

    /**
     * 这个是增加的方法,用来从Session中读取密码对象,判断是否过期,返回明文密码
     */
    private String getSavedPassword(String principal) {
        HttpServletRequest request = ((ServletRequestAttributes) Objects.requireNonNull(RequestContextHolder.getRequestAttributes())).getRequest();

        String sessionPasswordKey = OneTimePassword.passwordKey + principal.trim();
        OneTimePassword oneTimePassword = (OneTimePassword)request.getSession().getAttribute(sessionPasswordKey);

        if(oneTimePassword == null || oneTimePassword.isExpired()) {
            throw new CredentialsExpiredException("密码未生成或已过期");
        }

        return oneTimePassword.getPassword();
    }

    /**
     * 这是一个必须重载的方法,它判断当前Token是否属于自己应该处理的类型
     */
    @Override
    public boolean supports(Class<?> authentication) {
        return (OneTimePasswordAuthenticationToken.class.isAssignableFrom(authentication));
    }

    /**
     * 这的方法的代码也是原样超过来的。其中最关键的就是
     *      getUserDetailsService().loadUserByUsername(username)
     * 如果从你自己定义的用户数据源读信息,应该自定义UserDetailsServer,而不是在这里改。
     */
    protected final UserDetails retrieveUser(String username) throws AuthenticationException {
        try {
            UserDetails loadedUser = this.getUserDetailsService().loadUserByUsername(username);
            if (loadedUser == null) {
                throw new InternalAuthenticationServiceException("UserDetailsService returned null, which is an interface contract violation");
            } else {
                return loadedUser;
            }
        } catch (UsernameNotFoundException | InternalAuthenticationServiceException ex) {
            throw ex;
        } catch (Exception ex) {
            throw new InternalAuthenticationServiceException(ex.getMessage(), ex);
        }
    }
}
31.2.5 处理密码过期等异常
如果单次密码已经过期,会抛出类型为CredentialsExpiredException的异常,此种异常对应的状态为401 Unauthorized,并且不需要打印Stack。本节的代码重还涉及到了InternalAuthenticationServiceException。并且我们还有其它一些不常见的认证异常尚未专门处理,这里一并加到全局异常处理定义中。
在ExceptionStatus类中增加映射
put("InternalAuthenticationServiceException", HttpStatus.UNAUTHORIZED);
put("CredentialsExpiredException", HttpStatus.UNAUTHORIZED);
put("LockedException", HttpStatus.UNAUTHORIZED);
put("DisabledException", HttpStatus.UNAUTHORIZED);
put("AccountExpiredException", HttpStatus.UNAUTHORIZED);
在ExceptionMessage类中增加映射
put("InternalAuthenticationServiceException", "用户权限错误,请与软件管理员联系");
put("LockedException", "用户状态错误,请与软件管理员联系");
put("DisabledException", "用户状态错误,请与软件管理员联系");
put("AccountExpiredException","用户状态错误,请与软件管理员联系");
在GlobalExceptionHandler类中增加对声明
    private static final String[] SIMPLE_EXCEPTIONS = {
+           "InternalAuthenticationServiceException",
+           "CredentialsExpiredException",
+           "LockedException",
+           "DisabledException",
+           "AccountExpiredException",
LockedException、DisabledException、AccountExpiredException这几个异常可能会在在AbstractUserDetailsAuthenticationProvider的DefaultPreAuthenticationChecks.check方法抛出。·
31.2.6 生成单次密码的API
为了灵活配置,我们在Application.yml中放一个定义单次密码的有效期的属性(单位为秒)
application:
  authentication:
    otp:
      time-to-live: 120
在META-INF/additional-spring-configuration-metadata.json 中增加配置
        {
      "name": "application.authentication.otp.time-to-live",
      "type": "java.lang.Integer",
      "description": "单次有效密码的有效期(秒)."
    }
在实际应用场景中,生成的单次密码要以某种安全可靠的方法(如手机短信息或者电子邮件)告知用户。我们这里只是讨论的核心实现逻辑,所以直接把生成结果输出到控制台。下面是 LoginController 中增加的相关内容
@Value("${application.authentication.otp.time-to-live:120}")
Integer otpTimeToLive;

@GetMapping("/sendcode")
public String sendOneTimePassword(@NotBlank @RequestParam(value = "phone") String phoneNumber,
                 HttpSession session) throws NoSuchAlgorithmException {
    OneTimePassword oneTimePassword = new OneTimePassword(session,
                phoneNumber, otpTimeToLive);

    //Todo 这里应该有代码发送手机短信息但还要考虑防止猜测存在用户的攻击

    System.out.println("The one time password is " + oneTimePassword.getPassword());

    return "一次性密码发送成功";
}
在代码中有这样一句话:“这里应该有代码发送手机短信息或者电子邮件(如果是邮件验证)但还要考虑防止猜测存在用户的攻击”。这里是做了两个方面的提示:
- 实际的应用开发要在这里地方调用手机短信息或服务把单次密码发送出去。
在发送前,应该判断发送目标(手机号码)是否为已经存在的用户,如果不是已经存在的用户,不能直接反馈“用户不存在”之类的信息(这是基本的安全规则),但也没必要做真实的发送。正确的作法应试是对于不存在的用户,做一个耗时适中的操作(比如给固定的地址发个邮件),然后返回发送成功的信息。注意,什么都不做立即返回也不符合安全规则,因为无法应对Timing Attack(也就是可以根据返回的速度来判断是否真的发了手机短信息。
31.2.7 定义认证登录入口
如前文说所,我们使用API控制器而不是过滤器作为入口。这里的认证过程和前一章中的用户名密码认证几乎完全一样,唯一的重要差别就是这里的待认证对象是OneTimePasswordAuthenticationToken类型。
 @PostMapping("/smslogin")
 public String smsLogin(HttpServletRequest request,
                        @RequestParam(value = "phone") String phoneNumber, String password) {

     String remoteAddress = request.getRemoteAddr();

     LOGGER.info("[smslogin] {} 正在尝试登录 {}", phoneNumber, remoteAddress);

     // 生成一个包含账号密码的认证信息
     OneTimePasswordAuthenticationToken token = new OneTimePasswordAuthenticationToken(phoneNumber, password);

     AuthenticationDetailsSource<HttpServletRequest, ?> authenticationDetailsSource = new WebAuthenticationDetailsSource();
     token.setDetails(authenticationDetailsSource.buildDetails(request));

     // AuthenticationManager校验这个认证信息,返回一个已认证的Authentication
     Authentication authentication = authenticationManager.authenticate(token);

     // 将返回的Authentication存到上下文中
     SecurityContextHolder.getContext().setAuthentication(authentication);

     LOGGER.info("[smslogin] {} 登录成功 {}", phoneNumber, remoteAddress);

     return "登录成功";
 }
31.2.8 组装与规则配置
在SecurityConfig中,我们首先需要定义一个方法返回OtpAuthenticationProvider对象:
private OtpAuthenticationProvider otpAuthenticationProvider() { OtpAuthenticationProvider provider = new OtpAuthenticationProvider(); // 这段写在这里或者和创建其他用户的在一起都可以,都是放进了userDetailsService userDetailsService.createUser(User.withUsername("13808885678") .password("{noop}password") .roles("user","write") .build()); provider.setUserDetailsService(userDetailsService); return provider; }把这个对象交给AuthenticationManager去管理
 protected void configure(AuthenticationManagerBuilder auth) {
     auth.authenticationProvider(authenticationProvider())
          .authenticationProvider(otpAuthenticationProvider());
 }
最后不要忘了让两个新的API可以被直接访问 ```diff private static final String[] permitedApi = {
"/api/kaptcha.jpg",
- “/api/sendcode”,
- “/api/smslogin”,
“/api/login”,
“/api/register”,
“/api/logout”
};
[smslogin] 13808885678 正在尝试登录 127.0.0.1 [Exception] CredentialsExpiredException :密码未生成或已过期 The one time password is 431936 [smslogin] 13808885678 正在尝试登录 127.0.0.1 [smslogin] 13808885678 登录成功 127.0.0.1 The one time password is 524268 [smslogin] 13808885678 正在尝试登录 127.0.0.1 [Exception] CredentialsExpiredException :密码未生成或已过期 ```<a name="dAWpn"></a> ### 31.2.9 简要测试结果 这里我们不再给出用Postman测试的截图。下面是测试过程中在后端看到的信息:31.2.10 小结
本节全面展示了自定义单次密码认证方法的全过程。为了突出主体认证逻辑,我们仍旧继续使用在内存中管理用户信息,并且没有涉及任何发送手机短信息或者电子邮件的过程。
这里的单次密码是作为可独立工作的认证方式而存在的。如果是要作为和上一章图片验证码类似的辅助手段,那么就要去掉定义Provider的部分,把核心的验证过程改成和图片验证码近似的逻辑。
在网络上也会经常见到与本节目标类似的文章,这里和他们的主要区别有以下几点:
- 我们选择定义API控制器而不是自定义过滤器来实现认证入口
- 有人会在DetailsService中实现认证逻辑,种作法是错误的,认证应该在Provider中实现
- 我们仍旧使用现有用户名密码认证逻辑,这样可以最大化应用框架已经完成的工作。
此外,我们这里有个过于简化的地方在于把用来标识用户身份的手机号码和用户名混在了一起。在正式的应用系统中,这两个应该是不同的数据项(字段)。
版权说明:本文由北京朗思云网科技股份有限公司原创,向互联网开放全部内容但保留所有权力。

若有收获,就点个赞吧
0 人点赞
