30.1 控制不同的访问权限
在Spring Security中有两种定义、表示访问权限的类型,分别是Authority(权限)和Role(角色)。从字面和我们常识角度,这两者应该是不同的事情,通常我们会认为一个角色是又多个权限构成的。但出乎很多人意料的是,在Spring Security里面,这两种定义其实并没有本质的区别(甚至于可以说完全一样)。他们主要的区别在于Role类型的名称会被自动加上ROLE_前缀,而有的权限注解需要手工加上这个前缀。本节选择按照Authority(权限)的名义定义,在后续章节可以看到这个选择的有更加通用的优点。
本节和下一节我们都以常见的用户(user)和管理员(admin)两种权限来讨论具体的应用方法:
30.1.1 准备测试用户
首先我们在当前的 authenticationProvider 的方法中增加2个新的用户
private DaoAuthenticationProvider authenticationProvider() {DaoAuthenticationProvider provider = new DaoAuthenticationProvider();userDetailsService.createUser(User.withUsername("david").password(new BCryptPasswordEncoder().encode("123456")).authorities("admin").build());+ userDetailsService.createUser(User.withUsername("admin")+ .password(new BCryptPasswordEncoder().encode("123456"))+ .authorities("admin")+ .build());++ userDetailsService.createUser(User.withUsername("user")+ .password(new BCryptPasswordEncoder().encode("123456"))+ .authorities("user")+ .build());+provider.setHideUserNotFoundExceptions(false);provider.setUserDetailsService(userDetailsService);provider.setPasswordEncoder(passwordEncoder());return provider;}
30.1.2 准备测试接口
然后我们准备3个用来测试的接口:
package com.longser.union.cloud.controller;import com.longser.restful.annotation.IgnoreRestful;import org.springframework.web.bind.annotation.GetMapping;import org.springframework.web.bind.annotation.RequestMapping;import org.springframework.web.bind.annotation.RestController;@RestController@RequestMapping("/test/authorities")public class DemoAuthorizeController {@IgnoreRestful@GetMapping("/hello")public String hello() {return "hello";}@IgnoreRestful@GetMapping("/admin")public String admin() {return "admin";}@IgnoreRestful@GetMapping("/user")public String user() {return "user";}}
这三个测试接口,我们的规划是这样的:
| /test/authorities/hello | 任何登录用户都可以访问的接口 |
|---|---|
| /test/authorities/admin | 具有 admin 权限的人才能访问的接口 |
| /test/authorities/user | 具有 user 权限的人才能访问的接口 |
此外,我们希望所有 user 能够访问的资源admin 都能够访问。
30.1.3 配置认证规则
接下来我们来配置权限的拦截规则,在 Spring Security 的 configure(HttpSecurity http) 方法中,代码如下:
                .antMatchers(permitedApi).permitAll()

+               .antMatchers("/test/authorities/user/**").hasAuthority("user")
+               .antMatchers("/test/authorities/admin/**").hasAuthority("admin")

                // 这里意思是其它所有接口需要认证才能访问
                .anyRequest().authenticated();
这里的匹配规则我们采用了 Ant 风格的路径匹配符,Ant 风格的路径匹配符在 Spring 家族中使用非常广泛,它的匹配规则也非常简单:
| 通配符 | 含义 |
|---|---|
| ** | 匹配多层路径 |
| * | 匹配一层路径 |
| ? | 匹配任意单个字符 |
上面配置的含义是:
- 如果请求路径满足 /demo/admin/** 格式,则用户需要具备 admin 权限。
- 如果请求路径满足 /demo/user/** 格式,则用户需要具备 user 权限。
- 剩余的其他格式的请求路径,只需要认证(登录)后就可以访问。
注意代码中配置的三条规则的顺序非常重要,和 Shiro 类似,Spring Security 在匹配的时候也是按照从上往下的顺序来匹配,一旦匹配到了就不继续匹配了,所以拦截规则的顺序不能写错。
30.1.4 测试权限控制效果
项目启动成功后,我们首先不做登录访问三个接口,显然全部无法访问。然后以user身份登录后,分别访问三个接口,可以得到如下的结果:
| user | admin | |
|---|---|---|
| /test/authorities/hello |  |
 |
| /test/authorities/admin |  |
 |
| /test/authorities/user |  |
 |
对于 user 来说,他的权限结果是正确的,但 admin 的权限不正确,无法访问 /test/authorities/user
30.1.5 多权限授组合权
我们用 admin 用户访问需要 user 权限的资源时失败了。尽管有时确实会有这样的设计,但我们这里是希望admin 都能够访问所有user权限的资源,可见还有工作尚未完成。
要实现admin 能够访问所有 user 权限资源,这就需要做组合授权。这在实际开发中非常有用。下面我们把 hasAuthority() 方法改成 hasAnyAuthority():
-               .antMatchers("/test/authorities/user/**").hasAuthority("user")
+               .antMatchers("/test/authorities/user/**").hasAnyAuthority ("user","admin")
配置完成后,重启项目,此时我们发现 admin 也能访问 /test/authorities/user 这个接口了。
30.2 规范无权访问的异常处理
30.2.1 问题的提出
在常见的讲述 Spring Security 登录功能的文章中往往会使用下面的代码来指定登录页面的地址
http.forLogin().loginPage(“/login”)
它的目的是访问 Spring Security 保护的请求时候如果发现没有登录,就会跳转到指定页面(如果不定义这个则跳转到一个现成的默认登录页面)。但在前后端分离的应用系统中,应该是给出状态信息而不是指定跳转的方向。
在我们现在已经完成的软件中,未登录的时候,能够得到正确的403 Forbidden的响应状态,但返回的状态是执行成功,并且把出错的情况封装在访问成功的数据中,在日志中也没有记录相关的信息。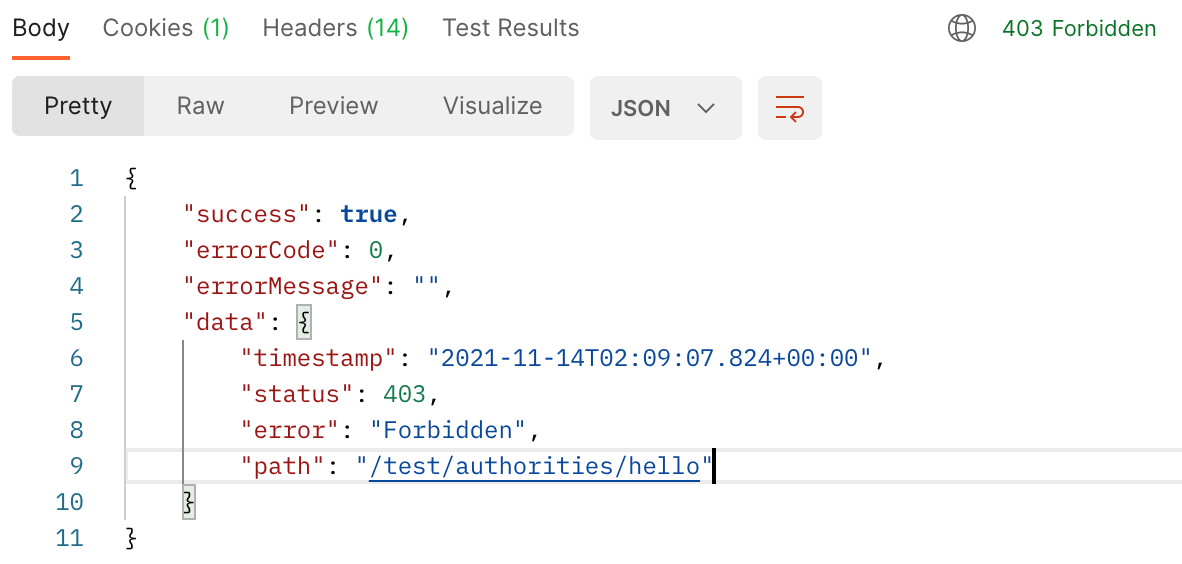
30.2.2 公共异常状态信息类
为解决这个问题,首先定义一个公共的类,用来返回各种异常状态和信息
package com.longser.restful.exception;

import com.longser.restful.result.RestfulResult;
import org.slf4j.Logger;
import org.slf4j.LoggerFactory;
import org.springframework.http.HttpStatus;
import org.springframework.security.core.Authentication;
import org.springframework.security.core.context.SecurityContextHolder;

import javax.servlet.http.HttpServletRequest;
import javax.servlet.http.HttpServletResponse;
import java.io.IOException;
import java.io.PrintWriter;

public class ExceptionResponse {
    private static final Logger LOGGER = LoggerFactory.getLogger(ExceptionResponse.class);

    public static void handle(
            HttpServletRequest request,
            HttpServletResponse response,
            Exception ex,
            HttpStatus status,
            String message) throws IOException {

        LOGGER.warn("[Exception] " + ex.getClass().getSimpleName() + ":" + ex.getMessage());

        String remoteAddr = request.getRemoteAddr();
        String requestUri = request.getRequestURI();

        Authentication auth
                = SecurityContextHolder.getContext().getAuthentication();
        if (auth != null) {
            LOGGER.warn("[{}] {} {}  {} {}", status.getReasonPhrase(), message, auth.getName(),
                    requestUri, remoteAddr);
        } else {
            LOGGER.warn("[{}] {}  {} {}", status.getReasonPhrase(),  message, requestUri, remoteAddr);
        }

        response.setContentType("application/json;charset=UTF-8");
        response.setCharacterEncoding("UTF-8");
        response.setStatus( status.value());

        PrintWriter out = response.getWriter();
        out.println(RestfulResult.fail(status.value(), message));
    }
}
30.2.3 未登录异常处理
然后定义一个继承自AuthenticationEntryPoint的类来反馈401状态信息:
package com.longser.security.authority.forbidden;
import com.longser.restful.exception.ExceptionResponse;
import org.springframework.http.HttpStatus;
import org.springframework.security.core.AuthenticationException;
import org.springframework.security.web.AuthenticationEntryPoint;
import javax.servlet.http.HttpServletRequest;
import javax.servlet.http.HttpServletResponse;
import java.io.IOException;
public class Http401UnauthorizedEntryPoint implements AuthenticationEntryPoint {
@Override
public void commence(HttpServletRequest request,
HttpServletResponse response,
AuthenticationException authException) throws IOException {
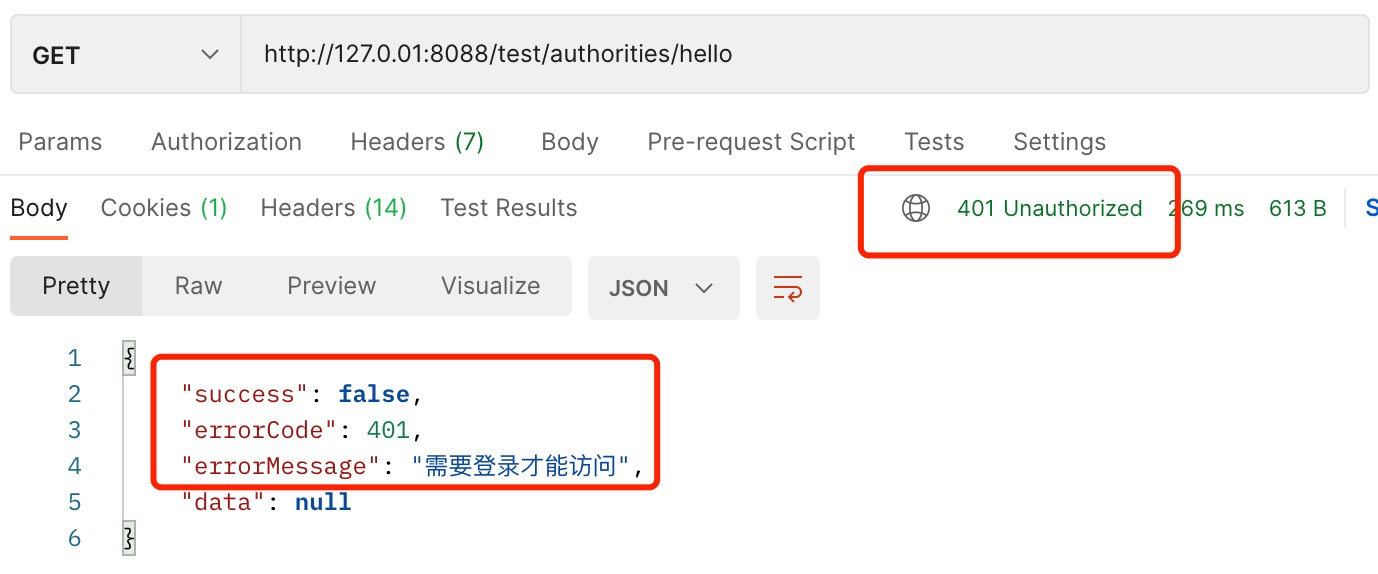
ExceptionResponse.handle(request, response, authException, HttpStatus.UNAUTHORIZED,"需要登录才能访问");
}
}
从代码中可以想到,当未登录用户访问受控资源时会调用这个类的方法。
30.2.4 无权限异常处理
另外再定义另外一个功能近似的方法:
package com.longser.security.authority.forbidden;
import com.longser.restful.exception.ExceptionResponse;
import org.springframework.http.HttpStatus;
import org.springframework.security.access.AccessDeniedException;
import org.springframework.security.web.access.AccessDeniedHandler;
import javax.servlet.http.HttpServletRequest;
import javax.servlet.http.HttpServletResponse;
import java.io.IOException;
public class Http403AccessDeniedHandler implements AccessDeniedHandler {
@Override
public void handle(HttpServletRequest request,
HttpServletResponse response,
AccessDeniedException accessDeniedException) throws IOException {
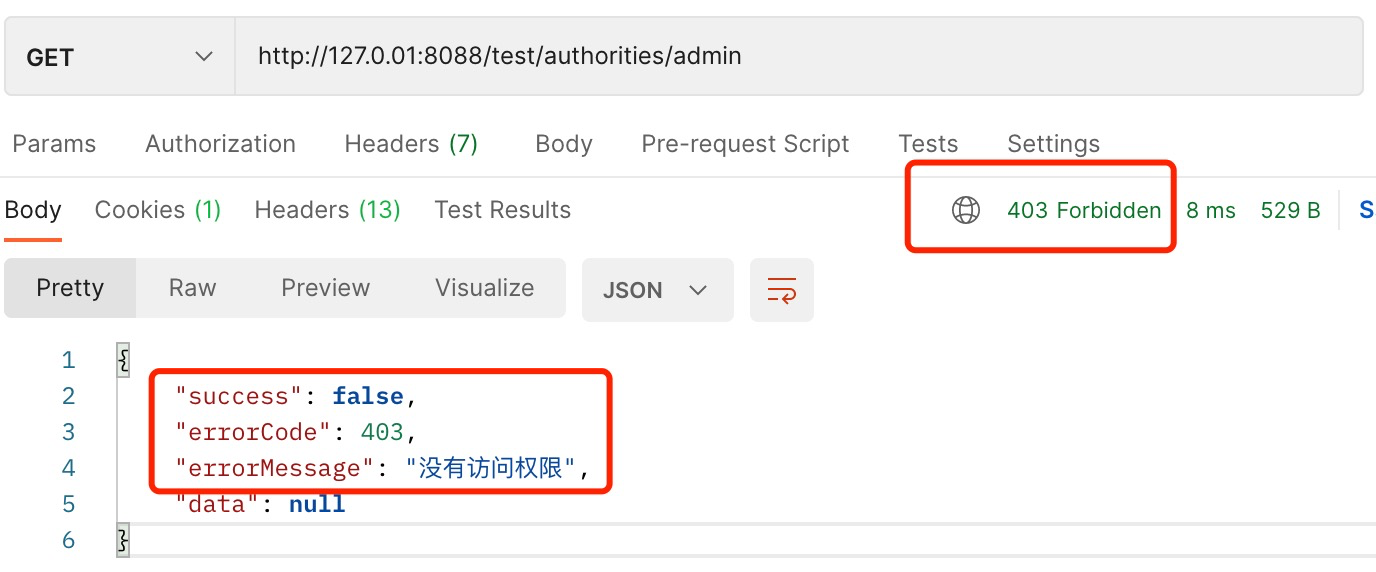
ExceptionResponse.handle(request, response, accessDeniedException, HttpStatus.FORBIDDEN, "没有访问权限");
}
}
从代码中可以猜测到,当已经登录的用户访问自己没有权限的资源时会调用这个类的方法。
30.2.5 配置与组装
在 SecurityConfig 中注定义2个方法并注册它们:
    @Bean
    public AuthenticationEntryPoint http401UnauthorizedEntryPoint(){
        return new Http401UnauthorizedEntryPoint();
    }

    @Bean
    public AccessDeniedHandler http403AccessDeniedHandler(){
        return new Http403AccessDeniedHandler();
    }
-               .anyRequest().authenticated();
+                               .anyRequest().authenticated()
+               .and().exceptionHandling()
+               .authenticationEntryPoint(http401UnauthorizedEntryPoint())
+               .accessDeniedHandler(http403AccessDeniedHandler());
30.2.6 测试新的异常处理
再次尝试分别在未登录的状态和用user登录后访问 /demo/admin/hello,可以分别得到我们期望的结果:
在后端能够得到更详细的信息
[Exception] InsufficientAuthenticationException:Full authentication is required to access this resource
[Unauthorized] 需要登录才能访问  /test/authorities/hello 127.0.0.1
[login] user 正在尝试登录 127.0.0.1
[login] user 登录成功 127.0.0.1
[Exception] AccessDeniedException:Access is denied
[Forbidden] 没有访问权限 user  /test/authorities/admin 127.0.0.1
30.3 用注解定义权限控制
在配置程序中定义权限规则的方法比较适合能够使用路径通配符的场景。对于无法使用通配符、API经常增减以及需要区分读写等细化权限时,在配置程序中管理权限的方式使得权限数量成倍增加,维护工作不直观、工作量大。针对对于这些场景,Spring Security支持使用注解的方式在类和方法级别上实施权限控制。在此机制上,我们可以直接在任意层的任意类和方法上加入权限注解,维护直观且方便。加入注解的方法将自动被Spring Security保护起来,仅仅允许特定的用户访问,从而还到权限控制的目的。
30.3.1 常用访问控制注解的区别
在Spring security中通常采用的三个注解做访问控制: @Secured、 @PreAuthorize 及 @RolesAllowed。如果用roles()给用户定义角色,那么这三个注解都可以使用,但如果用的是authorities()权限定义方法,则只能使用@PreAuthorize 注解。
其实@PreAuthorize 是这三个注解里面功能最强的,因为他可以使用Spring的逻辑表达式(SpEL)。
30.3.2 使用@PreAuthorize 注解
@PreAuthorize注解是Spring Security定义的,和@Secured注解最大的区别在于他支持SpEL(Spring Express Language)。
使用@PreAuthorize注解需要给@EnableGlobalMethodSecurity注解设置参数prePostEnabled = true
@Configuration
+@EnableGlobalMethodSecurity(prePostEnabled = true)
public class SecurityConfig extends WebSecurityConfigurerAdapter {
现在我们把user用户的权限改成user_read
        userDetailsService.createUser(User.withUsername("user")
                .password(new BCryptPasswordEncoder().encode("123456"))
                .authorities("user::read")
                .build());
然后定义一个用来测试的一个新的控制器类
package com.longser.union.cloud.controller;

import com.longser.restful.annotation.IgnoreRestful;
import org.springframework.security.access.prepost.PreAuthorize;
import org.springframework.web.bind.annotation.GetMapping;
import org.springframework.web.bind.annotation.RequestMapping;
import org.springframework.web.bind.annotation.RestController;

@RestController
@RequestMapping("/test/annotation")
public class DemoAnnotationAuthorizeController {
    @IgnoreRestful
    @PreAuthorize("hasAuthority('admin')")
    @GetMapping("/admin")
    public String admin() {
        return "admin";
    }

    @IgnoreRestful
    @PreAuthorize("hasAnyAuthority('user::read','user::write','admin')")
    @GetMapping("/user/read")
    public String userRead() {
        return "user read";
    }

    @IgnoreRestful
    @PreAuthorize("hasAnyAuthority('user::write', 'admin')")
    @GetMapping("/user/write")
    public String userWrite() {
        return "user write";
    }
}
通过上面的代码可以看到,我们期望的权限关系如下:
| admin | use::write | user::read | |
|---|---|---|---|
| /test/annotation/user/read |  |
 |
 |
| /test/annotation/user/write |  |
 |
 |
| /test/annotation/admin |  |
 |
 |
这里我们不再展示测试的结果,你可以自行测试。
初步看起来,@PreAuthorize比@Secured繁琐,但由于他支持Spring Security表达式,所以功能更加强大。比如我们可以定义权限之间“与”的关系,也就是必须同时具备多个权限才允许访问。
我们先修改一下用户的权限,让david用户同时具有DBA权限,并且修改user用户具有user和read权限:
        userDetailsService.createUser(User.withUsername("david")
                .password(new BCryptPasswordEncoder().encode("123456"))
                .authorities("admin","DBA")
                .build());

        userDetailsService.createUser(User.withUsername("admin")
                .password(new BCryptPasswordEncoder().encode("123456"))
                .authorities("admin")
                .build());

        userDetailsService.createUser(User.withUsername("user")
                .password(new BCryptPasswordEncoder().encode("123456"))
                .authorities("user","read")
                .build());
修改各API要求的权限逻辑定义:
- /test/annotation/admin 需要同时具有admin和DBA权限的用户才可以访问
- /test/annotation/user/read 有user或admin权限的用户都可以访问
/test/annotation/user/write 有admin权限或者同时具有user和write权限的用户可以访问
  @IgnoreRestful
  @PreAuthorize("hasAuthority('admin') and hasAuthority('DBA')")
  @GetMapping("/admin")
  public String admin() {
      return "admin";
  }

  @IgnoreRestful
  @PreAuthorize("hasAnyAuthority('user', 'admin')")
  @GetMapping("/user/read")
  public String userRead() {
      return "user read";
  }

  @IgnoreRestful
  @PreAuthorize("hasAuthority('user') and hasAuthority('write') or hasAuthority('admin')")
  @GetMapping("/user/write")
  public String userWrite() {
      return "user write";
  }
@PreAuthorize 的功能并不限于这个简单例子所展现的。它的 String 类型参数是一个 Spring EL 表达式,能够借助于表达式来实现更加负责灵活的访问决策,编写出更高级的安全性约束。例如,类似微博这样的应用程序的一般用户只能写 140 个字以内的 ,信息而付费用户不限制字数, @PreAuthorize 注解恰好能够适用于这种场景:
@PreAuthorize("hasAuthority('SPITTER') and #spittle.text.length() <= 140 or hasAuthority('PREMIUN')")
public void addSpittle(Spittle spittle) {
// ...
}
下面是另外一种复杂的形式,它限制了只有当username参数的值与当前系统登录用户的用户名相同时,才允许访问该方法:
@PreAuthorize("#username == authentication.principal.username") @GetMapping("/detail") public String getDetail(String username) { return "The username is " + username; }当然,让面两个示例只是展示@PreAuthorize注解的能力,真正实现应用系统的的时候没必要这样设计。
下面的示例表示该方法允许所有登录的用户访问,当权限数量较多时,使用permitAll比在hasAnyAuthority中列出全部权限更加高效
    @PreAuthorize("permitAll")
    @GetMapping("/user/detail")
    public String getDetail() {
        Authentication authentication = SecurityContextHolder.getContext().getAuthentication();

        return "The username is " + authentication.getName();
    }
这个示例非常适合于类似修改当前用户密码或者查看当前用户信息这样的API。
下面是@PreAuthorize注解常用表达式(省略了hasRole和hasAnyRole这样的):
| 表达式 | 备注 |
|---|---|
| hasAuthority([auth1]) | 如果有当前权限则返回 true |
| hasAnyAuthority([auth1, auth2]) | 如果有任一权限即可通过校验返回true |
| principal | 获取当前用户的 principal 主体对象 |
| authentication | 获取当前用户的 authentication 对象, |
| permitAll | 总是返回 true, 表示全部允许 |
| denyAll | 总是返回 false, 代表全部拒绝 |
| isAnonymous() | 如果是匿名访问, 返回true |
| isRememberMe() | 如果是remember-me 自动认证, 则返回 true |
| isAuthenticated() | 如果不是匿名访问, 则返回true |
| isFullAuthenticated() | 如果不是匿名访问或remember-me认证登陆, 则返回true |
30.3.3 自定义元注解
如果我们需要在多个方法中使用相同的安全注解,可以通过创建元注解的方式来提升项目的可维护性(修改权限定义只需要修改元注解定义。
比如创建以下元注解定义个有写权限的用户:
package com.longser.union.cloud.security;

import org.springframework.security.access.prepost.PreAuthorize;

import java.lang.annotation.ElementType;
import java.lang.annotation.Retention;
import java.lang.annotation.RetentionPolicy;
import java.lang.annotation.Target;

@Target(ElementType.METHOD)
@Retention(RetentionPolicy.RUNTIME)
@PreAuthorize("hasAuthority('user') and hasAuthority('write') or hasAuthority('admin')")
public @interface HasWriteAuthority {
}
然后可以直接将该注解添加到对应的方法上
    @IgnoreRestful
    @HasWriteAuthority
    @GetMapping("/user/write")
    public String userWrite() {
        return "user write";
    }
在生产项目中,由于元注解分离了业务逻辑与安全框架,大大增加了程序的可扩展性,降低了维护的工作量。
30.3.4 在类上使用安全注解
如果一个类中的所有的方法我们全部都是应用的同一个安全注解,那么此时则应该把安全注解提升到类的级别上。如果同时在方法上也定义了安全注解,则它的权限定义将完全代替在类层级的定义。
30.3.5 关于权限注解的重要提示
在此结合通常的使用经验,给出以下两点提示:
默认情况下,在方法中使用安全注解是由Spring AOP代理实现的,这意味着:如果我们在
方法1中去调用同类中的使用安全注解的方法2,则方法2上的安全注解将失效。所以不要随便去调用被安全注解标注的方法(除非你确认被调用方法的安全限制与调用者一致)。@PreAuthorize("hasAuthority('admin') and hasAuthority('DBA')") @GetMapping("/admin/hello") public String admin() { return "admin"; } @PreAuthorize("hasAnyAuthority('user','admin')") @GetMapping("/user/read") public String userRead() { //这里调用admin()时不会执行安全验证 return admin() + " user read"; }Spring Security上下文是线程绑定的,这意味着:安全上下文将不会传递给子线程。
版权说明:本文由北京朗思云网科技股份有限公司原创,向互联网开放全部内容但保留所有权力。

若有收获,就点个赞吧
0 人点赞
