1、Linux下MySQL的安装与使用
1.1使用通用二进制文件在UNIX/Linux上安装MySQL
1 下载系统对应的二进制文件
地址:5.7Linux 环境的地址 https://downloads.mysql.com/archives/get/p/23/file/mysql-5.7.37-linux-glibc2.12-x86_64.tar.gz
2 在Linux 上下载对应的二进制文件
wget https://downloads.mysql.com/archives/get/p/23/file/mysql-5.7.37-linux-glibc2.12-x86_64.tar.gz
3 卸载系统⾃带的MARIADB(如果有)
如果系统之前⾃带 Mariadb ,可以先卸载之。
rpm -qa|grep mariadb
⾸先查询已安装的 Mariadb 安装包: 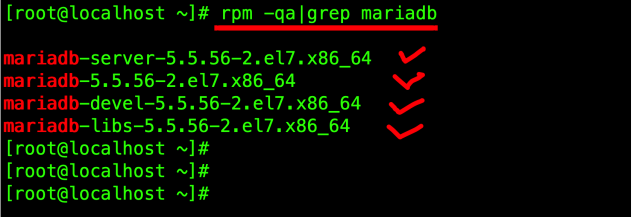
将其均卸载之:
yum -y remove mariadb-server-5.5.56-2.el7.x86_64
yum -y remove mariadb-5.5.56-2.el7.x86_64
yum -y remove mariadb-devel-5.5.56-2.el7.x86_64
yum -y remove mariadb-libs-5.5.56-2.el7.x86_64
4解压MYSQL安装包
将上⾯准备好的 MySQL 安装包解压到 /usr/local/ ⽬录,
tar -zxvf mysql-5.7.37-linux-glibc2.12-x86_64.tar.gz -C /usr/local/
并重命名为 mysql
mv mysql-5.7.37-linux-glibc2.12-x86_64/ mysql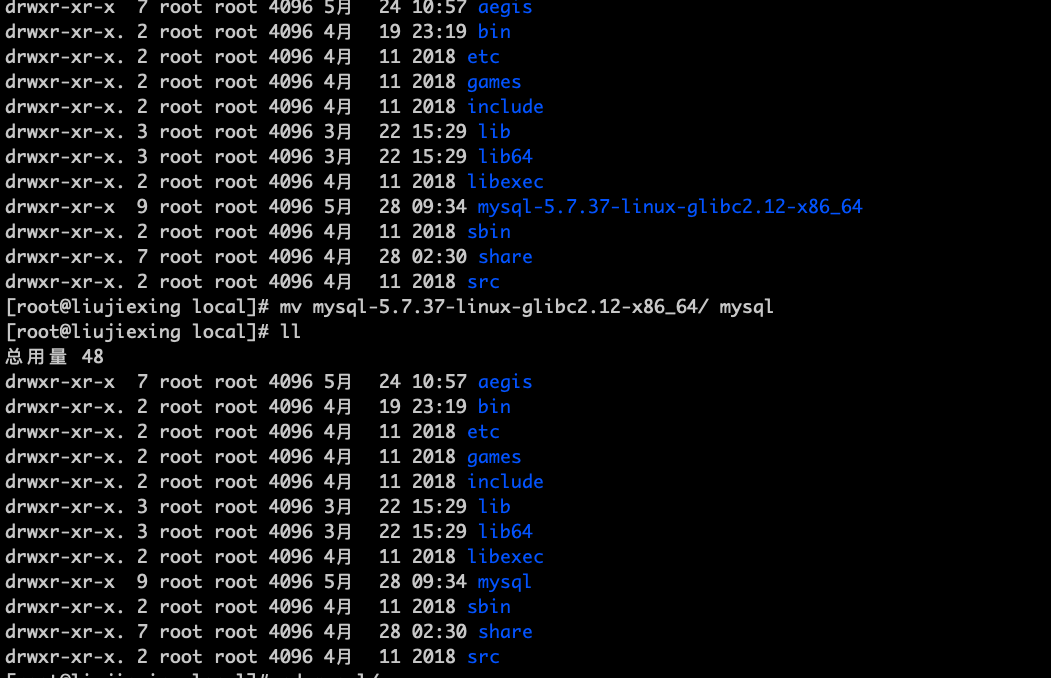
5 创建用户组、用户
groupadd mysql
useradd -g mysql mysql
建议数据不要放在安装目录下
同时新建 /usr/local/mysql/data ⽬录,后续备⽤
6 修改MYSQL⽬录的归属⽤户
7 准备MYSQL的配置⽂件
[mysqld]skip-name-resolve#设置3306端⼝port = 3306socket=/var/lib/mysql/mysql.sock# 设置mysql的安装⽬录basedir=/usr/local/mysql# 设置mysql数据库的数据的存放⽬录datadir=/usr/local/mysql/data# 允许最⼤连接数max_connections=20:0# 服务端使⽤的字符集默认为8⽐特编码的latin1字符集character-set-server=utf8# 创建新表时将使⽤的默认存储引擎default-storage-engine=INNODBlower_case_table_names=1max_allowed_packet=16M
8 同时使⽤如下命令创建 /var/lib/mysql ⽬录,并修改权限 作为安装目录
mkdir /var/lib/mysql
chmod 777 /var/lib/mysql
9 安装
cd /usr/local/mysql
./bin/mysqld --initialize --user=mysql --basedir=/usr/local/mysql   --datadir=/usr/local/mysql/data
安装成功后显示
2022-05-28T02:37:08.988668Z 0 [Warning] InnoDB: New log files created, LSN=45790
2022-05-28T02:37:09.113376Z 0 [Warning] InnoDB: Creating foreign key constraint system tables.
2022-05-28T02:37:09.174871Z 0 [Warning] No existing UUID has been found, so we assume that this is the first time that this server has been started. Generating a new UUID: 123226f8-de2f-11ec-a40d-00163e0afde3.
2022-05-28T02:37:09.176449Z 0 [Warning] Gtid table is not ready to be used. Table 'mysql.gtid_executed' cannot be opened.
2022-05-28T02:37:10.044338Z 0 [Warning] A deprecated TLS version TLSv1 is enabled. Please use TLSv1.2 or higher.
2022-05-28T02:37:10.044356Z 0 [Warning] A deprecated TLS version TLSv1.1 is enabled. Please use TLSv1.2 or higher.
2022-05-28T02:37:10.044963Z 0 [Warning] CA certificate ca.pem is self signed.
2022-05-28T02:37:10.096774Z 1 [Note] A temporary password is generated for root@localhost: &pjEeWll/6Ju
10复制启动脚本到资源⽬录
cp ./support-files/mysql.server /etc/init.d/mysqld
并修改 /etc/init.d/mysqld ,修改其 basedir 和 datadir 为实际对应⽬录:
vim /etc/init.d/mysqld
basedir=/usr/local/mysql
datadir=/usr/local/mysql/data
11 设置MYSQL系统服务并开启⾃启
⾸先增加 mysqld 服务控制脚本执⾏权限:
chmod +x /etc/init.d/mysqld
同时将 mysqld 服务加⼊到系统服务:
chkconfig —add mysqld
最后检查 mysqld 服务是否已经⽣效即可:
chkconfig —list mysqld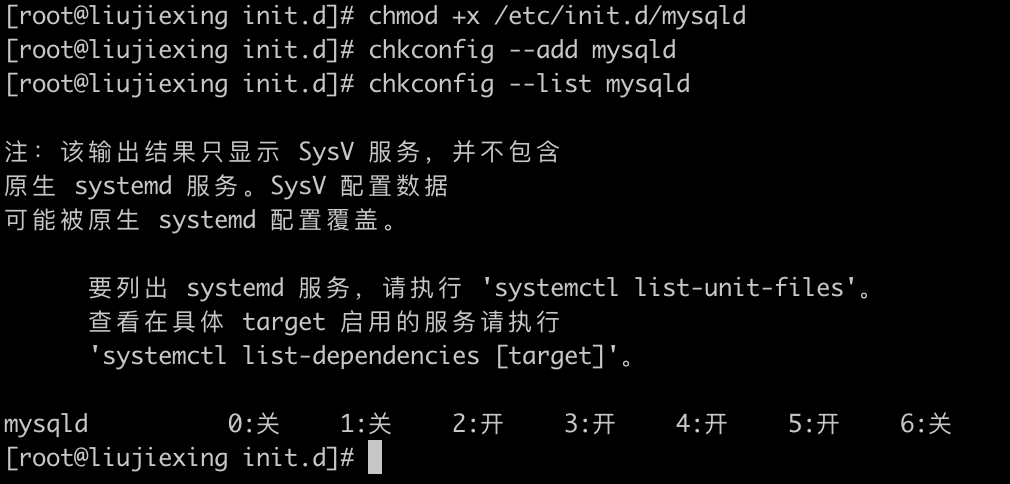
12启动MYSQLD
判断服务是否启动
systemctl status mysql
● mysqld.service - LSB: start and stop MySQL
   Loaded: loaded (/etc/rc.d/init.d/mysqld; bad; vendor preset: disabled)
   Active: inactive (dead)
     Docs: man:systemd-sysv-generator(8)
systemctl status mysql
● mysqld.service - LSB: start and stop MySQL
   Loaded: loaded (/etc/rc.d/init.d/mysqld; bad; vendor preset: disabled)
   Active: active (exited) since 六 2022-05-28 18:09:53 CST; 4s ago
     Docs: man:systemd-sysv-generator(8)
  Process: 9455 ExecStart=/etc/rc.d/init.d/mysqld start (code=exited, status=0/SUCCESS)

5月 28 18:09:53 liujiexing systemd[1]: Starting LSB: start and stop MySQL...
5月 28 18:09:53 liujiexing mysqld[9455]: Starting MySQL SUCCESS!
5月 28 18:09:53 liujiexing systemd[1]: Started LSB: start and stop MySQL.
5月 28 18:09:53 liujiexing mysqld[9455]: 2022-05-28T10:09:53.166057Z mysqld...s
Hint: Some lines were ellipsized, use -l to show in full.
加入系统自动启动,先查询状态
systemctl list-unit-files|grep mysqld.service
13 将 MYSQL 的 BIN ⽬录加⼊ PATH 环境变量
这样⽅便以后在任意⽬录上都可以使⽤ mysql 提供的命令。
编辑 ~/.bash_profile ⽂件,在⽂件末尾处追加如下信息
export PATH=$PATH:/usr/local/mysql/bin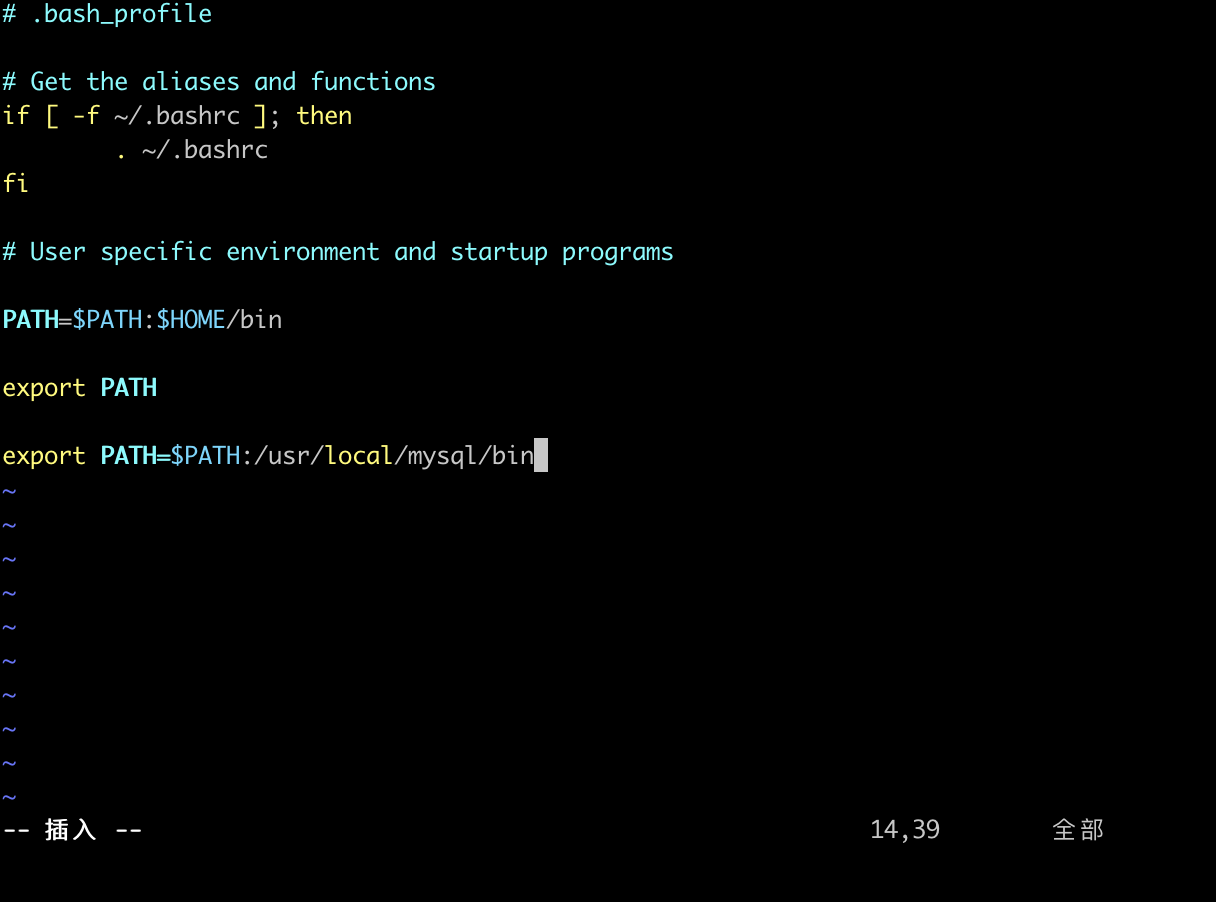
最后执⾏如下命令使环境变量⽣效
source ~/.bash_profile
14 接下来修改ROOT账户密码
alter user user() identified by “liujiexing”;
flush privileges;
15 设置远程主机登录
use mysql;
update user set user.Host=’%’ where user.User=’root’;
flush privileges;
1.2 使用 Oracle 的 RPM 包在 Linux 上安装 MySQL
官方安装连接 https://dev.mysql.com/doc/refman/8.0/en/linux-installation-rpm.html
1、下在安装包
https://cdn.mysql.com//Downloads/MySQL-8.0/mysql-8.0.29-1.el7.x86_64.rpm-bundle.tar
解压 tar -xvf mysql-8.0.29-1.el7.x86_64.rpm-bundle.tar
-rw-r--r-- 1 root root  823879680 3月  24 20:01 mysql-8.0.29-1.el7.x86_64.rpm-bundle.tar
-rw-r--r-- 1 7155 31415  14668996 3月  24 19:43 mysql-community-client-8.0.29-1.el7.x86_64.rpm
-rw-r--r-- 1 7155 31415   2574424 3月  24 19:43 mysql-community-client-plugins-8.0.29-1.el7.x86_64.rpm
-rw-r--r-- 1 7155 31415    648680 3月  24 19:43 mysql-community-common-8.0.29-1.el7.x86_64.rpm
-rw-r--r-- 1 7155 31415 445936940 3月  24 19:44 mysql-community-debuginfo-8.0.29-1.el7.x86_64.rpm
-rw-r--r-- 1 7155 31415   1949700 3月  24 19:44 mysql-community-devel-8.0.29-1.el7.x86_64.rpm
-rw-r--r-- 1 7155 31415   4214948 3月  24 19:44 mysql-community-embedded-compat-8.0.29-1.el7.x86_64.rpm
-rw-r--r-- 1 7155 31415   2216040 3月  24 19:45 mysql-community-icu-data-files-8.0.29-1.el7.x86_64.rpm
-rw-r--r-- 1 7155 31415   1575404 3月  24 19:45 mysql-community-libs-8.0.29-1.el7.x86_64.rpm
-rw-r--r-- 1 7155 31415    683148 3月  24 19:45 mysql-community-libs-compat-8.0.29-1.el7.x86_64.rpm
-rw-r--r-- 1 7155 31415  55984868 3月  24 19:45 mysql-community-server-8.0.29-1.el7.x86_64.rpm
-rw-r--r-- 1 7155 31415  22960584 3月  24 19:46 mysql-community-server-debug-8.0.29-1.el7.x86_64.rpm
-rw-r--r-- 1 7155 31415 270450256 3月  24 19:47 mysql-community-test-8.0.29-1.el7.x86_64.rpm
[root@ljx65 download]#
2 检查MySQL 的的依赖
检查临时安装目录权限
chmod -R 777 /tmp
安装前检查依赖
rpm -qa|grep libiao
没有 yum install -y libaio
rpm -qa|grep net-tools
3 安装
安装顺序,按以下顺序执行
rpm -ivh mysql-community-common-8.0.29-1.el7.x86_64.rpm
rpm -ivh mysql-community-client-plugins-8.0.29-1.el7.x86_64.rpm
rpm -ivh mysql-community-libs-8.0.29-1.el7.x86_64.rpm
警告:mysql-community-libs-8.0.29-1.el7.x86_64.rpm: 头V4 RSA/SHA256 Signature, 密钥 ID 3a79bd29: NOKEY
错误:依赖检测失败:
    mariadb-libs 被 mysql-community-libs-8.0.29-1.el7.x86_64 取代

  # 出现上述错误 执行以下
  rpm -e mariadb-libs --nodeps
  yum remove mysql-libs
rpm -ivh mysql-community-client-8.0.29-1.el7.x86_64.rpm
rpm -ivh mysql-community-icu-data-files-8.0.29-1.el7.x86_64.rpm
rpm -ivh mysql-community-server-8.0.29-1.el7.x86_64.rpm
错误:依赖检测失败:
    mysql-community-icu-data-files = 8.0.29-1.el7 被 mysql-community-server-8.0.29-1.el7.x86_64 需要
  # 错误先安装
  rpm  -ivh   mysql-community-icu-data-files-8.0.29-1.el7.x86_64.rpm
rpm Redhat package manage 通过包管理
-i —install 安装
-v —verbase 更多详细信息输出
-h —hash 安装时列出hash标记
4 查看安装版本
mysqladmin --version
5 服务的初始化
mysqld --initialize --user=mysql
查看密码
cat        /var/log/mysqld.log
2022-05-29T02:31:03.183407Z 0 [System] [MY-013169] [Server] /usr/sbin/mysqld (mysqld 8.0.29) initializing of server in progress as process 2097
2022-05-29T02:31:03.190573Z 1 [System] [MY-013576] [InnoDB] InnoDB initialization has started.
2022-05-29T02:31:03.761053Z 1 [System] [MY-013577] [InnoDB] InnoDB initialization has ended.
2022-05-29T02:31:05.014837Z 6 [Note] [MY-010454] [Server] A temporary password is generated for root@localhost: bIEW9n_/#os-
6 查看MySQL 的状态
# systemctl status mysqld
● mysqld.service - MySQL Server
   Loaded: loaded (/usr/lib/systemd/system/mysqld.service; enabled; vendor preset: disabled)
   Active: inactive (dead)
     Docs: man:mysqld(8)
           http://dev.mysql.com/doc/refman/en/using-systemd.html
-- 启动mysql
# systemctl start mysqld
-- 查看是否时开机启动
# systemctl list-unit-files|grep mysqld.service
mysqld.service                                enabled
-- 不是 enabled  设置为 enabled
# systemctl enable mysqld.service
7 测试
# mysql  -uroot -p
Enter password:
Welcome to the MySQL monitor.  Commands end with ; or \g.
Your MySQL connection id is 8
Server version: 8.0.29

Copyright (c) 2000, 2022, Oracle and/or its affiliates.

Oracle is a registered trademark of Oracle Corporation and/or its
affiliates. Other names may be trademarks of their respective
owners.

Type 'help;' or '\h' for help. Type '\c' to clear the current input statement.

mysql> show databases;
ERROR 1820 (HY000): You must reset your password using ALTER USER statement before executing this statement.

-- 需要重新设置密码

mysql> alert user 'root'@'localhost' identified by 'liujiexing';
ERROR 1064 (42000): You have an error in your SQL syntax; check the manual that corresponds to your MySQL server version for the right syntax to use near 'alert user 'root'@'localhost' identified by 'liujiexing'' at line 1
mysql>  alter user 'root'@'localhost' identified by 'liujiexing';
Query OK, 0 rows affected (0.00 sec)

mysql> quit
Bye
[root@ljx65 ~]# mysql  -uroot -p
Enter password:
Welcome to the MySQL monitor.  Commands end with ; or \g.
Your MySQL connection id is 9
Server version: 8.0.29 MySQL Community Server - GPL

Copyright (c) 2000, 2022, Oracle and/or its affiliates.

Oracle is a registered trademark of Oracle Corporation and/or its
affiliates. Other names may be trademarks of their respective
owners.

Type 'help;' or '\h' for help. Type '\c' to clear the current input statement.

mysql> show databases;
+--------------------+
| Database           |
+--------------------+
| information_schema |
| mysql              |
| performance_schema |
| sys                |
+--------------------+
4 rows in set (0.00 sec)

mysql>
8 远程连接
远程连接失败,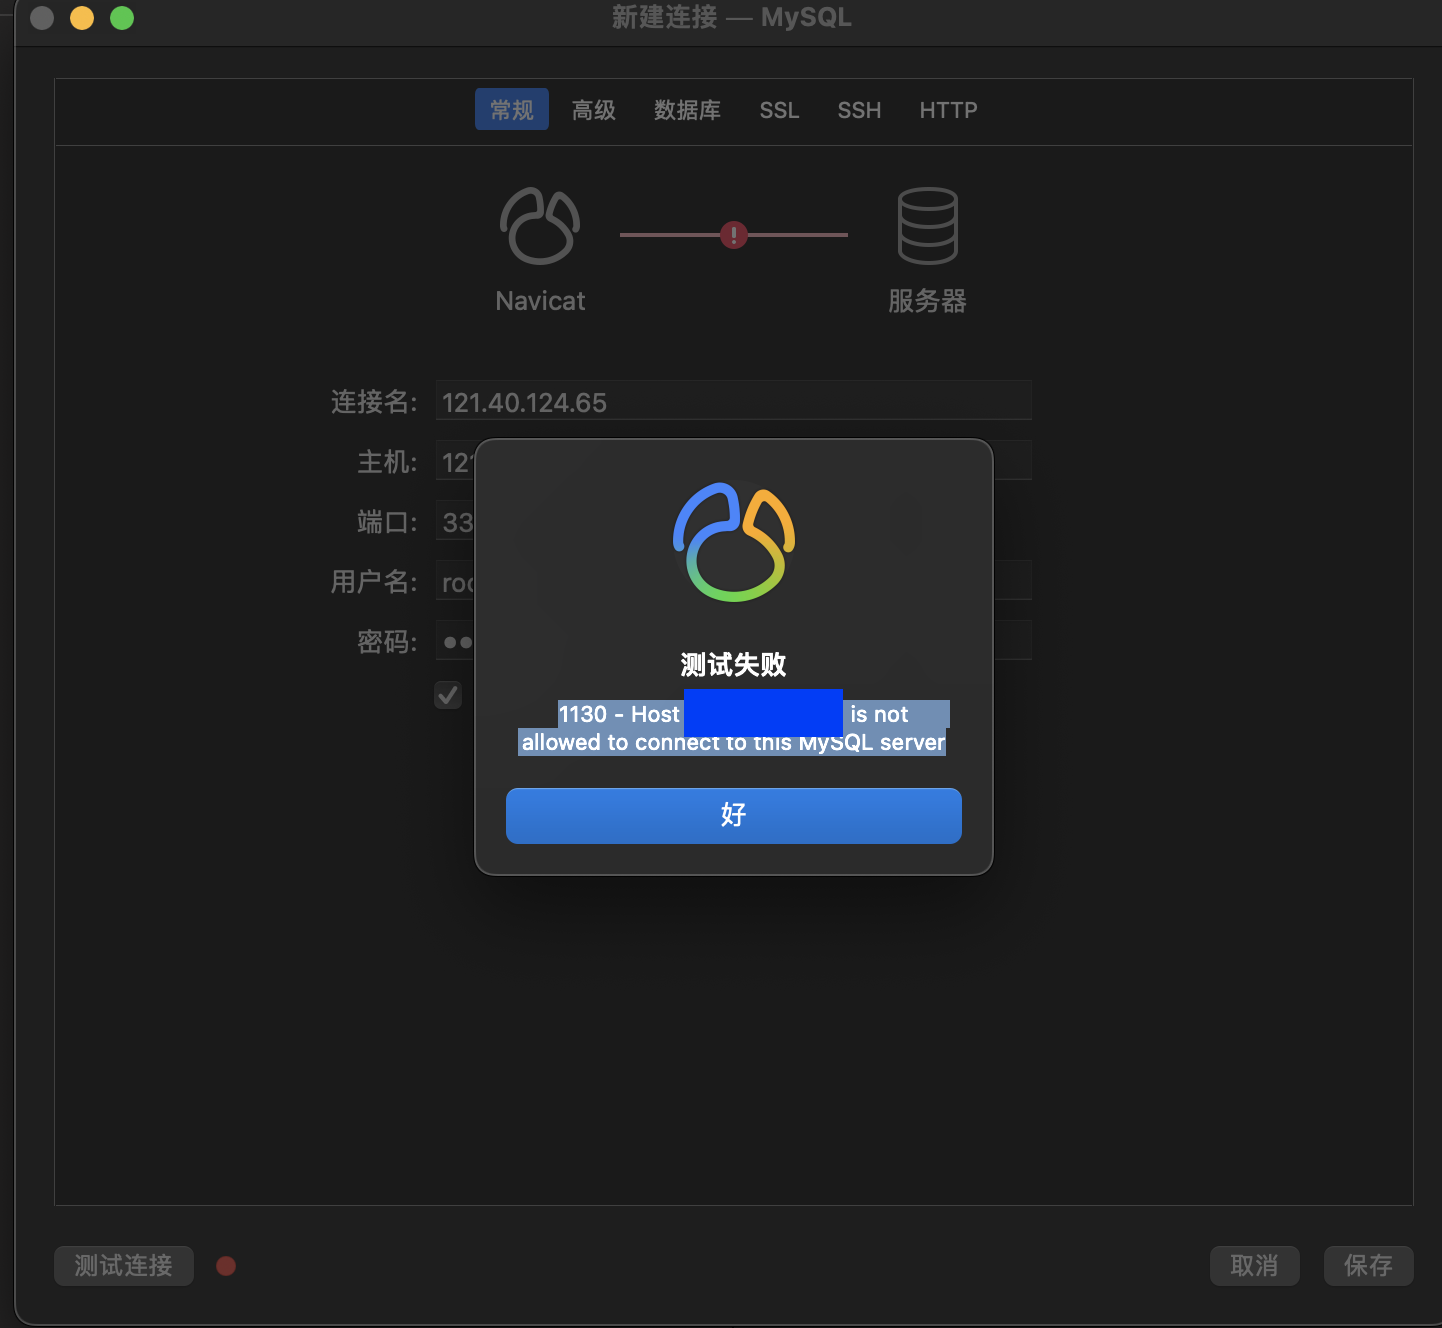
mysql> use mysql;
Reading table information for completion of table and column names
You can turn off this feature to get a quicker startup with -A

Database changed
mysql> update user set host = '%' where user = 'root';
Query OK, 1 row affected (0.00 sec)
Rows matched: 1  Changed: 1  Warnings: 0

mysql> select host, user from user;
+-----------+------------------+
| host      | user             |
+-----------+------------------+
| %         | root             |
| localhost | mysql.infoschema |
| localhost | mysql.session    |
| localhost | mysql.sys        |
+-----------+------------------+
4 rows in set (0.00 sec)

-- 记得操作次步骤
mysql> FLUSH PRIVILEGES
    -> ;
Query OK, 0 rows affected (0.00 sec)

mysql>
1.3 设置字符集
1 、8.0 的字符集处理
默认是 utf8mb4 无需修改
mysql> show variables like '%character%';
+--------------------------+--------------------------------+
| Variable_name            | Value                          |
+--------------------------+--------------------------------+
| character_set_client     | utf8mb4                        |
| character_set_connection | utf8mb4                        |
| character_set_database   | utf8mb4                        |
| character_set_filesystem | binary                         |
| character_set_results    | utf8mb4                        |
| character_set_server     | utf8mb4                        |
| character_set_system     | utf8mb3                        |
| character_sets_dir       | /usr/share/mysql-8.0/charsets/ |
+--------------------------+--------------------------------+
8 rows in set (0.01 sec)

mysql>
2、5.7的字符集处理
mysql> show variables like '%character%';
+--------------------------+----------------------------------+
| Variable_name            | Value                            |
+--------------------------+----------------------------------+
| character_set_client     | utf8                             |
| character_set_connection | utf8                             |
| character_set_database   | utf8                             |
| character_set_filesystem | binary                           |
| character_set_results    | utf8                             |
| character_set_server     | utf8                             |
| character_set_system     | utf8                             |
| character_sets_dir       | /usr/local/mysql/share/charsets/ |
+--------------------------+----------------------------------+
8 rows in set (0.00 sec)

-- 如果是 latin1
修改 /etc/my.cnf 文件
[mysql]
# 设置mysql客户端默认字符集
default-character-set=utf8
socket=/var/lib/mysql/mysql.sock
[mysqld]
skip-name-resolve
#设置3306端⼝
port = 3306
socket=/var/lib/mysql/mysql.sock
# 设置mysql的安装⽬录
basedir=/usr/local/mysql
# 设置mysql数据库的数据的存放⽬录
datadir=/usr/local/mysql/data
# 允许最⼤连接数
max_connections=200
# 服务端使⽤的字符集默认为8⽐特编码的latin1字符集
character-set-server=utf8
# 创建新表时将使⽤的默认存储引擎
default-storage-engine=INNODB

lower_case_table_names=1
max_allowed_packet=16M
重启mysql
systemctl restart mysqld.service
1.4 sql_mode的设置
| ONLY_FULL_GROUP_BY | 对于GROUPBY聚合操作,如果在SELECT中的列,没有在GROUP BY中出现,那么这个SQL是不合法的,因为列不在GROUP BY从句中。 |
|---|---|
| NO_AUTO_VALUE_ON_ZERO | 该值影响自增长列的插入。默认设置下,插入0或NULL代表生成下一个自增长值。如果用户希望插入的值为o,而该列又是自增长的,那么这个选项就有用了。 |
| STRICT_TRANS_TABLES | 在该模式下,如果一个值不能插入到一个事务表中,则中断当前的操作,对非事务表不做限制。 |
| NO_ZERO_IN_DATE | 在严格模式下,不允许日期和月份为零。 |
| NO_ZERO_DATE | 设置该值,mysql数据库不允许插入零日期,插入零日期会抛出错误而不是警告。 |
| ERROR_FOR_DIVISION_BY_ZERO | 在INSERT或UPDATE过程中,如果数据被零除,则产生错误而非警告。如果未给出该模式,那么数据被零除时MySQL返回NULL |
| NO_AUTO_CREATE_USER | 禁止GRANT创建密码为空的用户 |
| NO_ENGINE_SUBSTITUTION | 如果需要的存储引擎被禁用或未编译,那么抛出错误。不设置此值时,用默认的存储引整替代并抛出一个异堂 |
| PIPES_AS_CONCAT | 将”||”视为字符串的连接操作符而非或运算符,这和Oracle数据库是一样的,也和字符串的拼接函数Concat相类似 |
| ANSI_QUOTES | 启用ANSI_QUOTES后,不能用双引号来引用字符串,因为它被解释为识别符 |
2、MySQL的数据目录
2.1、MySQL8的主要目录结构
1.1、 数据库文件的存放路径
[root@ljx65 ~]# find  / -name mysql
/usr/lib64/mysql
/usr/bin/mysql
/etc/logrotate.d/mysql
/etc/selinux/targeted/active/modules/100/mysql
/var/lib/mysql
/var/lib/mysql/mysql
[root@ljx65 ~]# cd /var/lib/mysql
[root@ljx65 mysql]# ll
总用量 188876
-rw-r----- 1 mysql mysql       56 5月  29 10:31 auto.cnf
-rw-r----- 1 mysql mysql     1433 5月  29 11:47 binlog.000001
-rw-r----- 1 mysql mysql       16 5月  29 11:16 binlog.index
-rw------- 1 mysql mysql     1676 5月  29 10:31 ca-key.pem
-rw-r--r-- 1 mysql mysql     1112 5月  29 10:31 ca.pem
-rw-r--r-- 1 mysql mysql     1112 5月  29 10:31 client-cert.pem
-rw------- 1 mysql mysql     1680 5月  29 10:31 client-key.pem
-rw-r----- 1 mysql mysql   196608 5月  29 11:47 #ib_16384_0.dblwr
-rw-r----- 1 mysql mysql  8585216 5月  29 10:31 #ib_16384_1.dblwr
-rw-r----- 1 mysql mysql     5944 5月  29 10:31 ib_buffer_pool
-rw-r----- 1 mysql mysql 12582912 5月  29 11:45 ibdata1
-rw-r----- 1 mysql mysql 50331648 5月  29 11:47 ib_logfile0
-rw-r----- 1 mysql mysql 50331648 5月  29 10:31 ib_logfile1
-rw-r----- 1 mysql mysql 12582912 5月  29 11:16 ibtmp1
drwxr-x--- 2 mysql mysql     4096 5月  29 11:16 #innodb_temp
drwxr-x--- 2 mysql mysql     4096 5月  29 10:31 mysql
-rw-r----- 1 mysql mysql 25165824 5月  29 11:45 mysql.ibd
srwxrwxrwx 1 mysql mysql        0 5月  29 11:16 mysql.sock
-rw------- 1 mysql mysql        5 5月  29 11:16 mysql.sock.lock
drwxr-x--- 2 mysql mysql     4096 5月  29 10:31 performance_schema
-rw------- 1 mysql mysql     1676 5月  29 10:31 private_key.pem
-rw-r--r-- 1 mysql mysql      452 5月  29 10:31 public_key.pem
-rw-r--r-- 1 mysql mysql     1112 5月  29 10:31 server-cert.pem
-rw------- 1 mysql mysql     1676 5月  29 10:31 server-key.pem
drwxr-x--- 2 mysql mysql     4096 5月  29 10:31 sys
-rw-r----- 1 mysql mysql 16777216 5月  29 11:47 undo_001
-rw-r----- 1 mysql mysql 16777216 5月  29 11:31 undo_002
[root@ljx65 mysql]#
[root@ljx65 ~]# mysql -uroot -p
Enter password:
Welcome to the MySQL monitor.  Commands end with ; or \g.
Your MySQL connection id is 33
Server version: 8.0.29 MySQL Community Server - GPL

Copyright (c) 2000, 2022, Oracle and/or its affiliates.

Oracle is a registered trademark of Oracle Corporation and/or its
affiliates. Other names may be trademarks of their respective
owners.

Type 'help;' or '\h' for help. Type '\c' to clear the current input statement.
mysql> show variables like 'datadir';
+---------------+-----------------+
| Variable_name | Value           |
+---------------+-----------------+
| datadir       | /var/lib/mysql/ |
+---------------+-----------------+
1 row in set (0.00 sec)

mysql>
1.2、 相关命令目录
1.3 配置文件目录
2.2、数据库和文件系统的关系
2.1、查看默认数据库
2.2、数据库在文件系统中的表示
.frm 存储表结构
.ibd 存储数据 5.7 默认是在.ibd 中
2.3 表在文件系统中的表示
2.4 小结
2.5、视图在文件系统中的表示
2.6、其他的文件
3、用户与权限管理
3.1用户管理
1、登录MySQL服务器
2、创建用户
3、修改用户
4、删除用户
5、设置当前用户密码
6、修改其它用户密码
7、MySQL8密码管理(了解)
3.2 权限管理
1、权限列表
2、授予权限的原则
3、授予权限
4、查看权限
5、收回权限
3.3 权限表
1、user表
2、db表
3、tables_priv表和columns_priv表
4、procs_priv表
3.4 访问控制(了解)
1、链接核实阶段
2、请求核实阶段
3.5角色管理
1、角色的理解
2、创建角色
3、给角色赋予权限
4、查看角色的权限
5、回收角色的权限
6、删除角色
7、给用户赋予角色
8、激活角色
9、撤销用户的角色
10、设置强制角色(mandatory )
3.6 配置文件的使用
1、配置文件格式
2、启动命令与选项组
3、特定MySQL版本的专用选项组
4、同一个配置文件中多个的优先级
5、命令行和配置文件中启动选项的区别
4、逻辑架构
4.1、逻辑机构剖析
1、服务器处理客户请求
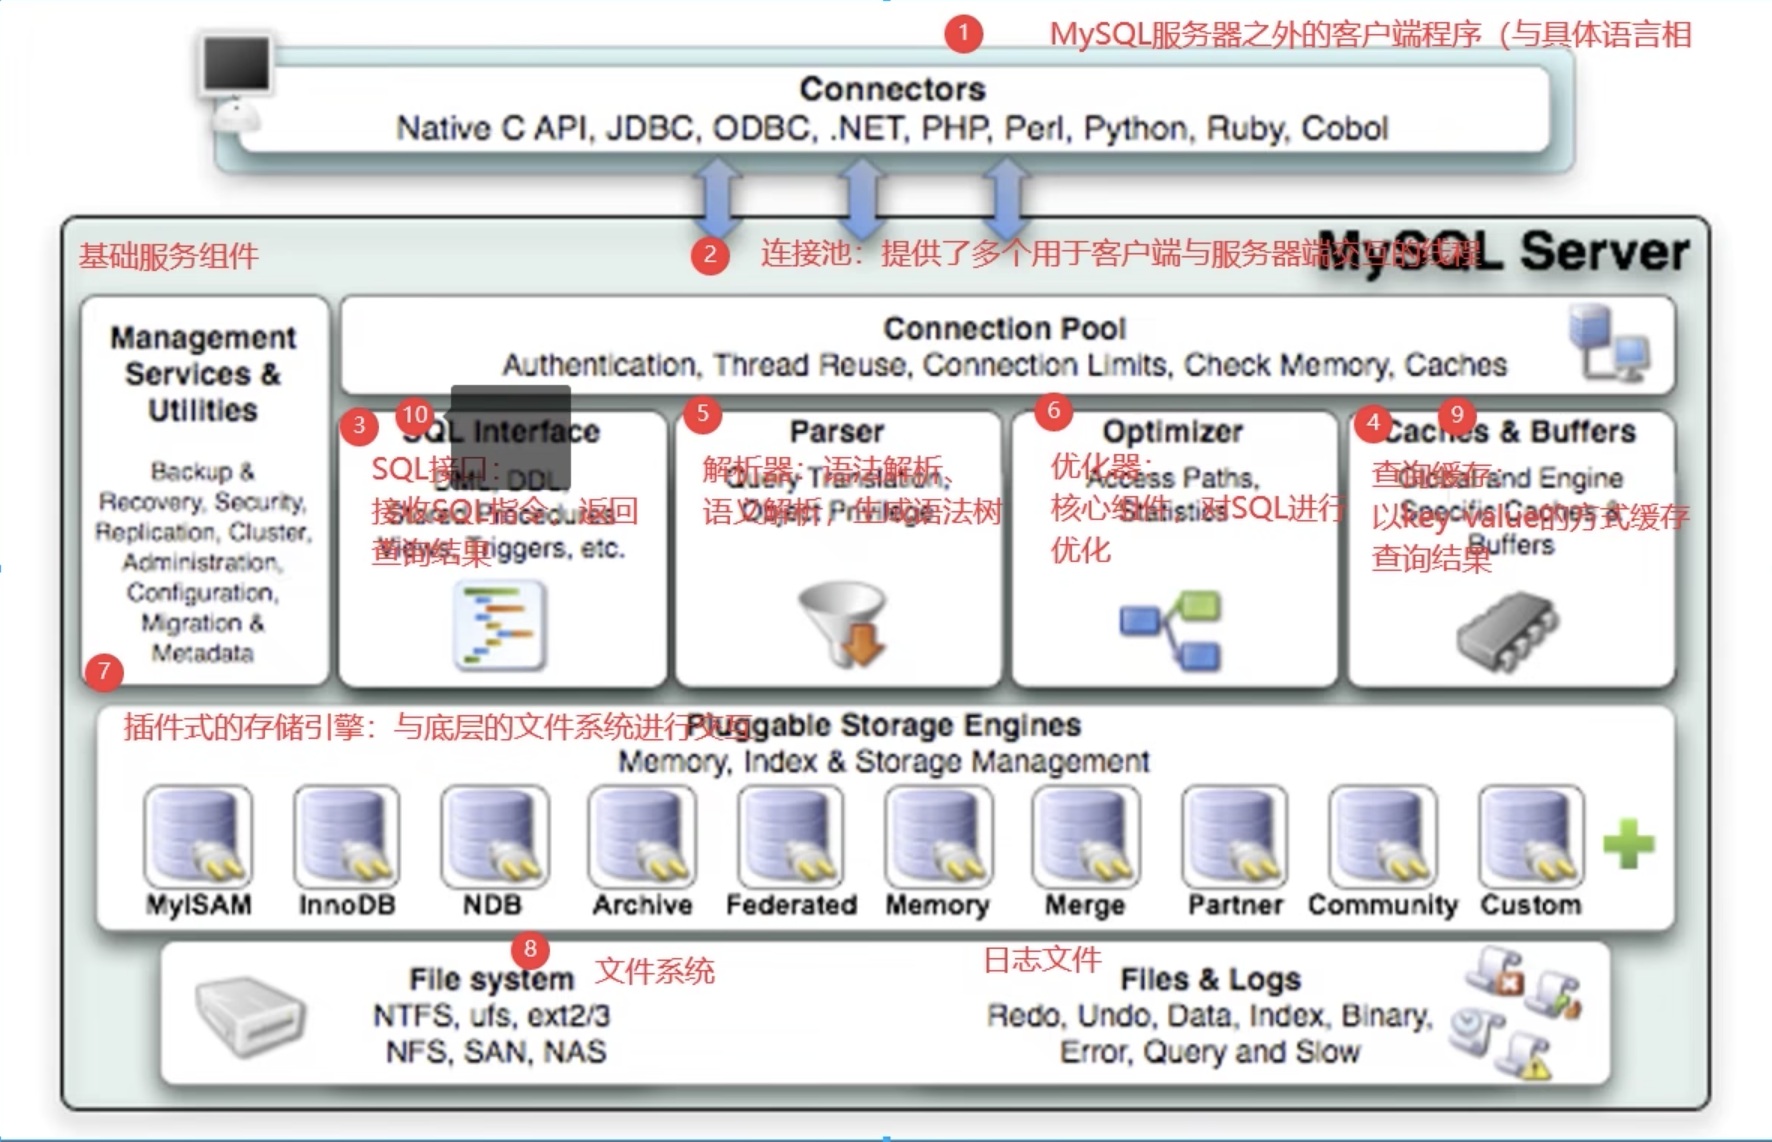
首先MySQL是典型的c/S架构,即C1ient/Server架构,服务器端程序使用的mysqld。不论客户端进程和服务器进程是采用哪种方式进行通信,最后实现的效果都是:客户端进程向服务器进程发送一段文本($QL语句),服务器进程处理后再向客户端进程发送一段文本(处理结果)。那服务器进程对客户端进程发送的请求做了什么处理,才能产生最后的处理结果呢?这里以查询请求为例展示:
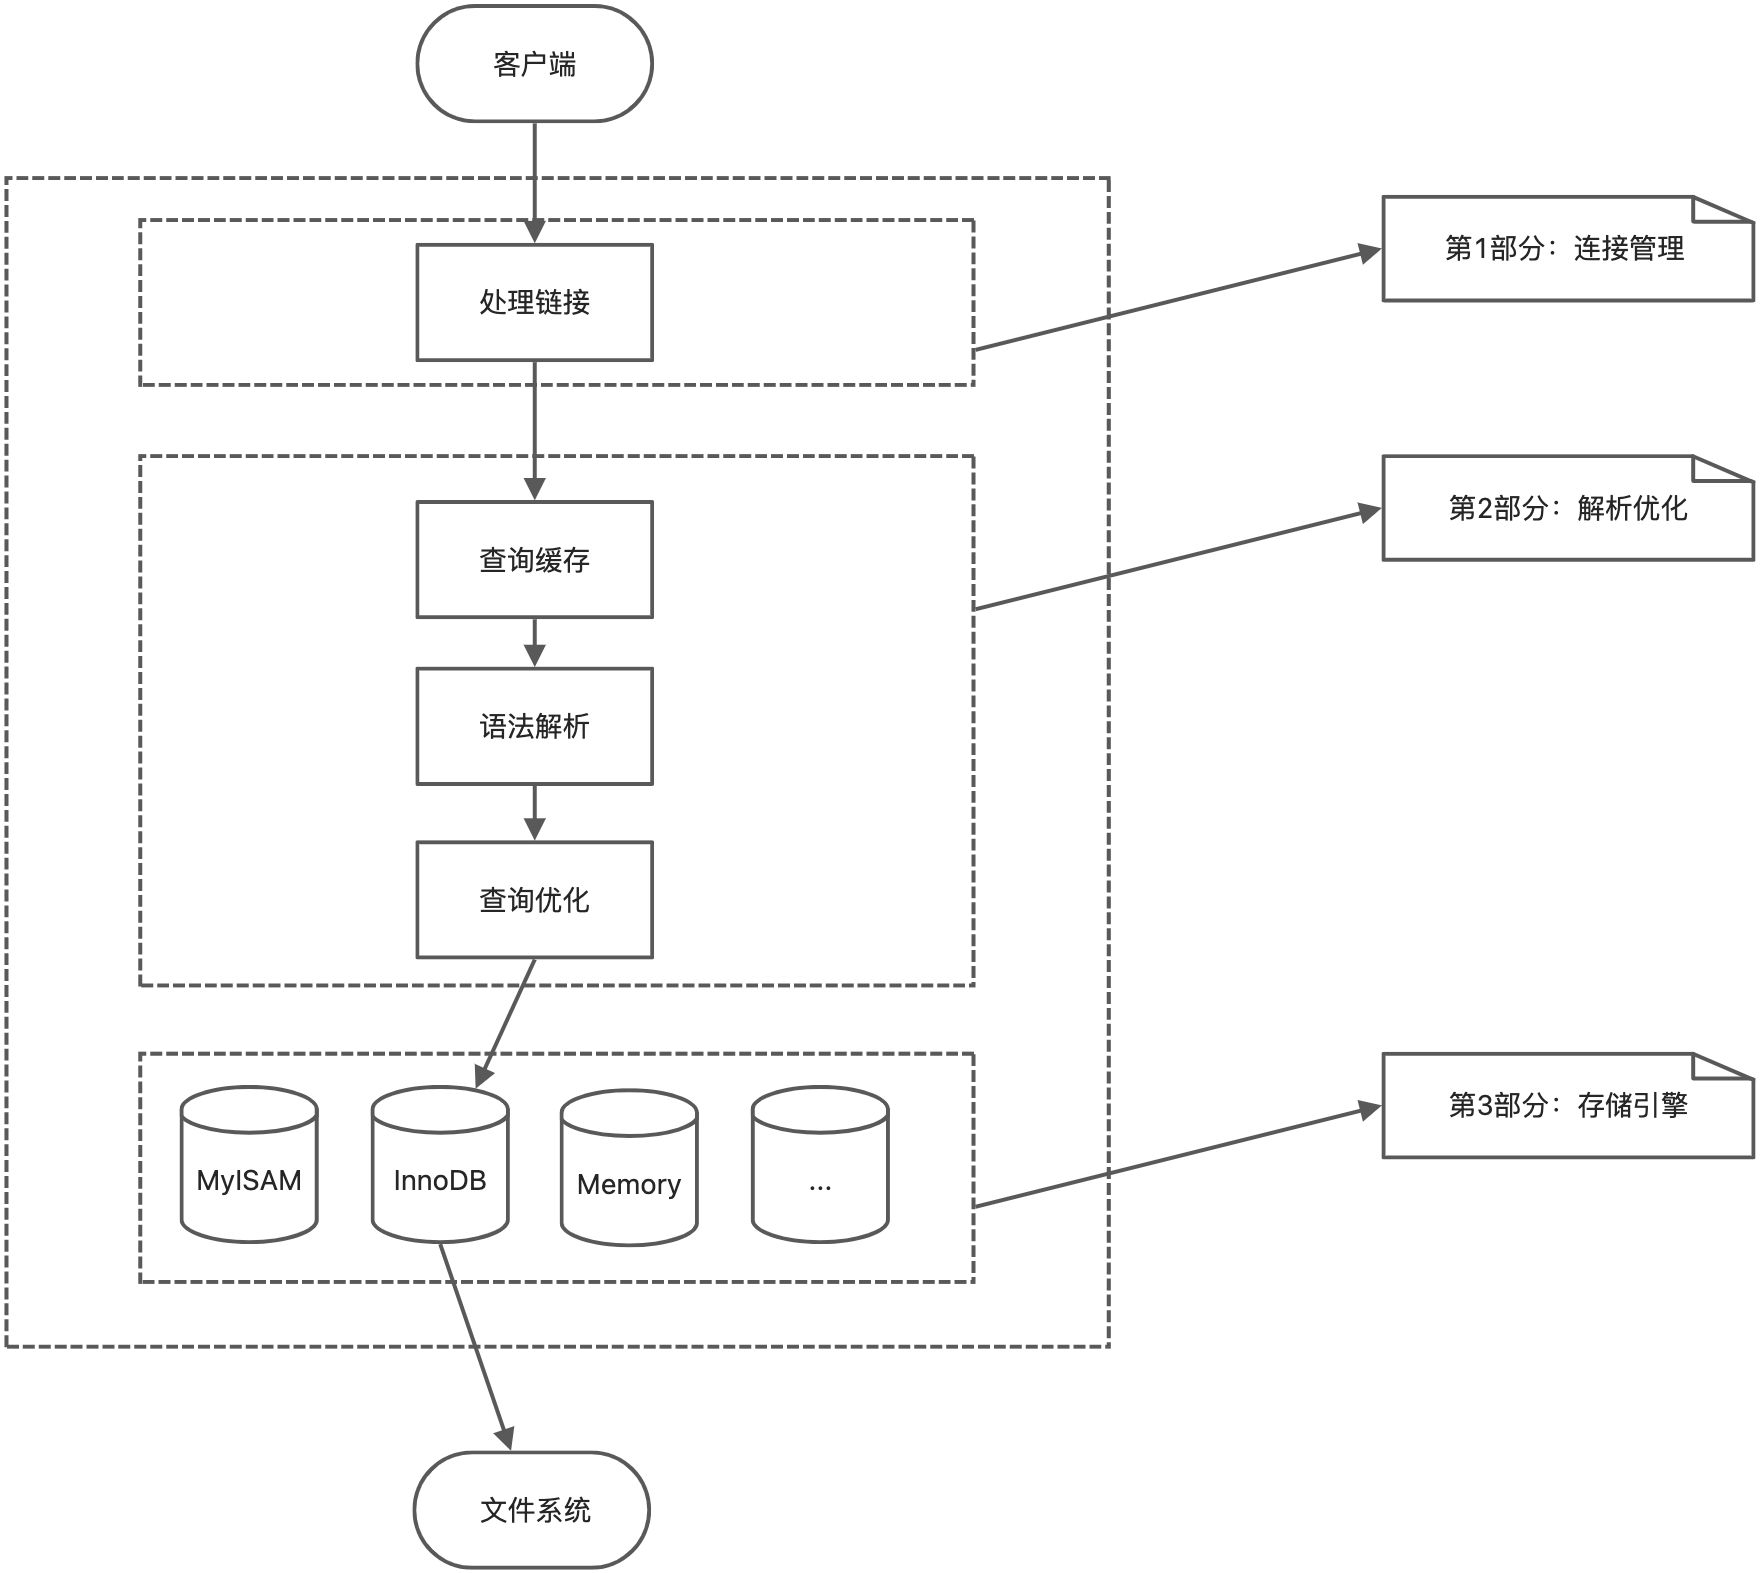
2、Connecors
3、第1层:连接层
4、第2层:服务层
5、第3层:引擎层
6、存储层
7、小结
4.2、SQL执行流程
1、MySQL中的SQL执行流程

2、MySQL中SQL执行原理
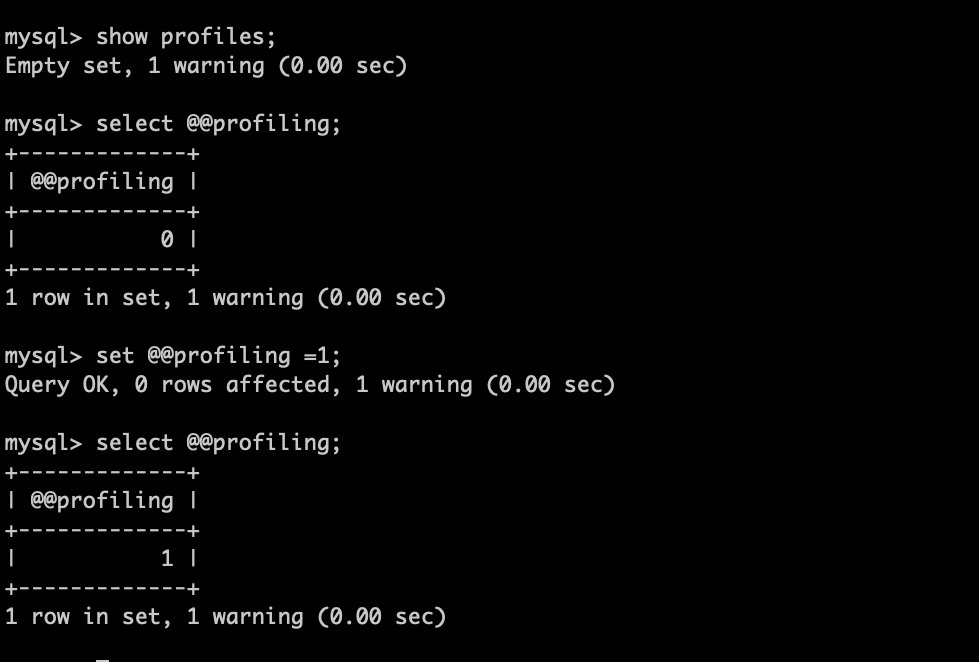
2.1、确认profiling(是否记录SQL执行语句)是否开启
select @@profiling;
show variables like 'profiling';

set profiling=1;
8.0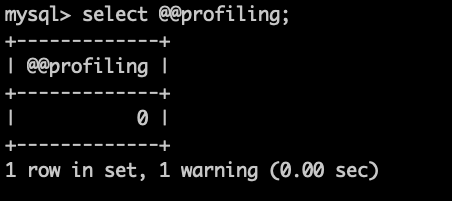
5.7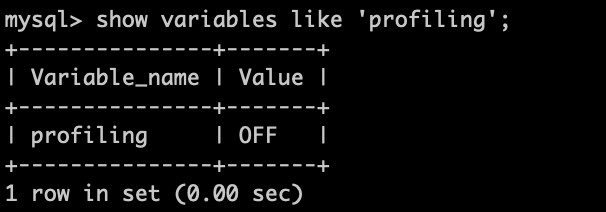
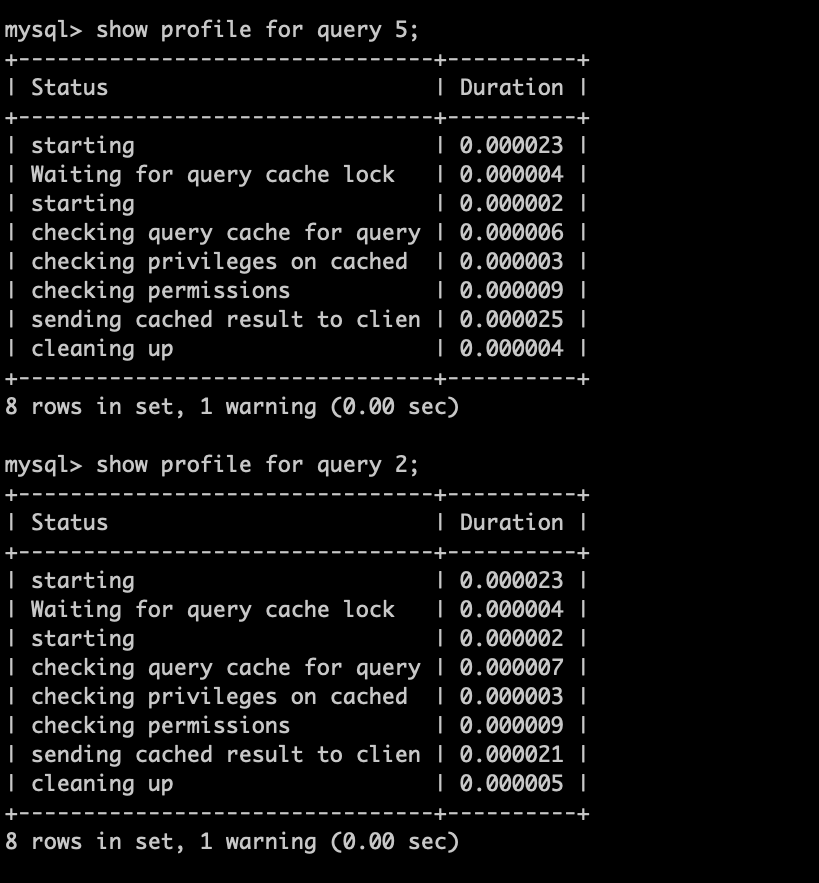
2.2、多次执行相同SQL查询
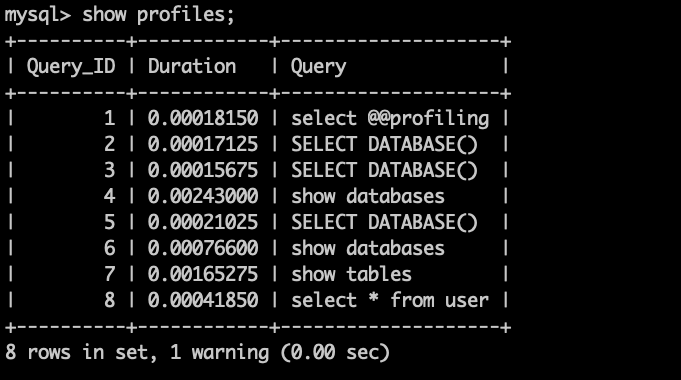
2.3、查看profiles
show profiles;
2.4、查看profile
# 默认查询最近一条
show profile;

# 查询指定 条的SQL的执行过程
show profile for query 8;
3、MySQL5.7中SQL执行原理
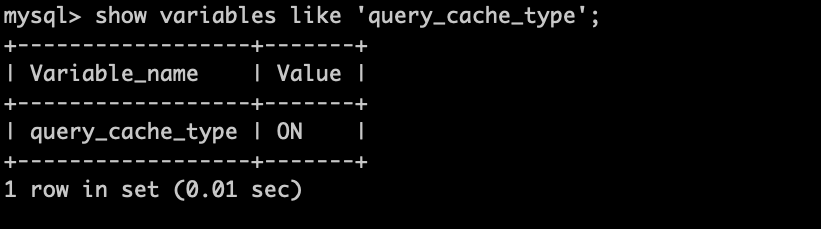
1、配置文件中开启查询缓存
# 字符集
# character_set_server=utf8

#是否开启缓存 0 ,1 , NO
# query_cache_type=1
2、重启mysql服务
3、开启查询执行计划
4、执行语句两次
5、查看profiles
select @@profiling;
set @@profiling =1;
6、查看profile
4、SQL语法顺序
5、Oracle中的SQL执行流程(了解)
6、数据库缓冲池(buffer pool)
3、查看、设置缓冲池的大小
mysql> show variables like 'innodb_buffer_pool_size';
+-------------------------+-----------+
| Variable_name           | Value     |
+-------------------------+-----------+
| innodb_buffer_pool_size | 134217728 |
+-------------------------+-----------+
1 row in set (0.00 sec)
4、多个Buffer Pool实例
mysql> show variables like 'innodb_buffer_pool_instances';
+------------------------------+-------+
| Variable_name                | Value |
+------------------------------+-------+
| innodb_buffer_pool_instances | 1     |
+------------------------------+-------+
1 row in set (0.00 sec)
5、存储引擎
1、查看存储引擎
show engines;
mysql> show engines;
+--------------------+---------+----------------------------------------------------------------+--------------+------+------------+
| Engine             | Support | Comment                                                        | Transactions | XA   | Savepoints |
+--------------------+---------+----------------------------------------------------------------+--------------+------+------------+
| MRG_MYISAM         | YES     | Collection of identical MyISAM tables                          | NO           | NO   | NO         |
| CSV                | YES     | CSV storage engine                                             | NO           | NO   | NO         |
| InnoDB             | DEFAULT | Supports transactions, row-level locking, and foreign keys     | YES          | YES  | YES        |
| BLACKHOLE          | YES     | /dev/null storage engine (anything you write to it disappears) | NO           | NO   | NO         |
| MyISAM             | YES     | MyISAM storage engine                                          | NO           | NO   | NO         |
| PERFORMANCE_SCHEMA | YES     | Performance Schema                                             | NO           | NO   | NO         |
| ARCHIVE            | YES     | Archive storage engine                                         | NO           | NO   | NO         |
| MEMORY             | YES     | Hash based, stored in memory, useful for temporary tables      | NO           | NO   | NO         |
| FEDERATED          | NO      | Federated MySQL storage engine                                 | NULL         | NULL | NULL       |
+--------------------+---------+----------------------------------------------------------------+--------------+------+------------+
9 rows in set (0.00 sec)
2、设置系统默认的存储引擎
mysql> show variables  like '%storage_engine%';
+---------------------------------+-----------+
| Variable_name                   | Value     |
+---------------------------------+-----------+
| default_storage_engine          | InnoDB    |
| default_tmp_storage_engine      | InnoDB    |
| disabled_storage_engines        |           |
| internal_tmp_mem_storage_engine | TempTable |
+---------------------------------+-----------+
4 rows in set (0.01 sec)
3、设置表的存储引擎
1、创建表时制定存储引擎
2、修改表的存储引擎
4、引擎介绍
1、InnoDB引擎:具备外键支持功能的事务存储引擎
2、MyISAM引擎:主要的非事务处理存储引擎
3、Archive引擎:用于数据存档
4、Blackhole 引擎:丢弃写操作,读操作会返回空内容
5、CSV引擎:存储数据时,以逗号分隔各个数据项
6、Memory引擎:置于内存的表
7、Federated引擎:访问远程表
8、Merge引擎:管理多个MyISAM表结构的表集合
9、NDB引擎:MySQL集群专用存储引擎
10、引擎对比
5 、MyISAM 与 InnoDB
| 对比项 | MyISAM | InnoDB |
|---|---|---|
| 外键 | 不支持 | 支持 |
| 事务 | 不支持 | 支持 |
| 行表锁 | 表锁,即使操作一条记录也会锁住整个表,不适合高并发的操作 | 行锁,操作时只锁某一行,不对其它行有影响,适合高并发的操作 |
| 缓存 | 只缓存索引,不缓存真实数据 | 不仅缓存索引还要缓存真实数据,对内存要求较高,而且内存大小对性能有决定性的影响 |
| 自带系统表使用 | Y | N |
| 关注点 | 性能:节省资源,消耗少,简单业务 | 事务:并发写、事务、更大资源 |
| 默认安装 | Y | Y |
| 默认使用 | N | Y |

若有收获,就点个赞吧
0 人点赞
