一、SpringMVC 简介
3、SpringMVC的特点
- Spring 家族原生产品
- 基于原生的Servlet,通过功能强大的前端控制器 DispatcherServlet,对请求和响应进行统一处理
- 内部组件化程度高,可插拔式组件即插即用
二、HelloWorld
1、开发环境
IDE ; ieda
构建工具:maven
服务器:tomcat7
Spring版本:5.3.1
2、搭建maven项目
2.1 配置pom.xml
<?xml version="1.0" encoding="UTF-8"?><project xmlns="http://maven.apache.org/POM/4.0.0"xmlns:xsi="http://www.w3.org/2001/XMLSchema-instance"xsi:schemaLocation="http://maven.apache.org/POM/4.0.0 http://maven.apache.org/xsd/maven-4.0.0.xsd"><parent><artifactId>spring-mvc</artifactId><groupId>groupId</groupId><version>1.0-SNAPSHOT</version></parent><modelVersion>4.0.0</modelVersion><groupId>com.wujing.mvc</groupId><artifactId>HelloWorld</artifactId><packaging>war</packaging><dependencies><!-- SpringMVC Web包--><dependency><groupId>org.springframework</groupId><artifactId>spring-webmvc</artifactId><version>5.3.6</version></dependency><!-- 日志包 --><dependency><groupId>ch.qos.logback</groupId><artifactId>logback-classic</artifactId><version>1.2.3</version></dependency><!-- ServletApI--><dependency><groupId>javax.servlet</groupId><artifactId>javax.servlet-api</artifactId><version>4.0.1</version><scope>provided</scope></dependency><!-- Spring5 和 Thymeleaf 整合 --><dependency><groupId>org.thymeleaf</groupId><artifactId>thymeleaf-spring5</artifactId><version>3.0.11.RELEASE</version></dependency></dependencies><properties><maven.compiler.source>8</maven.compiler.source><maven.compiler.target>8</maven.compiler.target></properties></project>
2.2 创建项目结构文件web.xml

3、配置web.xml
注册SpringMVC的前端控制器DispatcherServlet
3.1 默认配置方式
在此配置作用下,SpringMVC的配置文件默认位于WEB-INF 下,默认名称为
    <!-- 配置SpringMVC 的前端控制器,对浏览器发送的请求统一进行处理 -->
    <servlet>
        <servlet-name>springMVC</servlet-name>
        <servlet-class>org.springframework.web.servlet.DispatcherServlet</servlet-class>
    </servlet>

    <servlet-mapping>
        <servlet-name>springMVC</servlet-name>
        <!-- 所有的请求
            但是/不能匹配.jsp路径的请求-->
        <url-pattern>/</url-pattern>
    </servlet-mapping>
3.2 扩展配置方式
<?xml version="1.0" encoding="UTF-8"?>
<web-app xmlns="http://xmlns.jcp.org/xml/ns/javaee"
         xmlns:xsi="http://www.w3.org/2001/XMLSchema-instance"
         xsi:schemaLocation="http://xmlns.jcp.org/xml/ns/javaee http://xmlns.jcp.org/xml/ns/javaee/web-app_4_0.xsd"
         version="4.0">
    <!-- 默认 配置方式 开始 -->
    <!-- 配置SpringMVC 的前端控制器,对浏览器发送的请求统一进行处理 -->
    <servlet>
        <servlet-name>springMVC</servlet-name>
        <servlet-class>org.springframework.web.servlet.DispatcherServlet</servlet-class>
        <init-param>
            <!-- 配置SpringMVC 的配置位置和名称-->
            <param-name>contextConfigLocation</param-name>
            <param-value>classpath:springmvc.xml</param-value>
        </init-param>
        <!--将前端控制器DispatcherServlet 的初始化时间提前到服务器启动时-->
        <load-on-startup>1</load-on-startup>
    </servlet>
    <servlet-mapping>
        <servlet-name>springMVC</servlet-name>
        <!-- 所有的请求
            但是/不能匹配.jsp路径的请求-->
        <url-pattern>/</url-pattern>
    </servlet-mapping>
    <!-- 默认 配置方式 结束 -->
</web-app>
3.3 创建请求控制器
package com.wujing.mvc.controller

import org.springframework.stereotype.Controller

/**
 *@ClassName: HelloController
 *@Description: 测试
 *@Author liujiexin
 *@Date 2021/10/25 11:52 下午
 */

@Controller
public class HelloController {
}
3.4 配置springmvc.xml 配置文件,增加包扫描、视图解析器
<?xml version="1.0" encoding="UTF-8"?>
<beans xmlns="http://www.springframework.org/schema/beans"
       xmlns:xsi="http://www.w3.org/2001/XMLSchema-instance"
       xmlns:context="http://www.springframework.org/schema/context"
       xsi:schemaLocation="http://www.springframework.org/schema/beans http://www.springframework.org/schema/beans/spring-beans.xsd http://www.springframework.org/schema/context https://www.springframework.org/schema/context/spring-context.xsd">

    <!--包扫描-->
    <context:component-scan base-package="com.wujing.mvc.controller" ></context:component-scan>

    <!-- 配置 Thymeleaf 试图解析器 -->
    <bean id="viewResolver" class="org.thymeleaf.spring5.view.ThymeleafViewResolver">
        <property name="order" value="1" />
        <property name="characterEncoding" value="UTF-8" />
        <property name="templateEngine" >
            <bean class="org.thymeleaf.spring5.SpringTemplateEngine">
                <property name="templateResolver">
                    <bean class="org.thymeleaf.spring5.templateresolver.SpringResourceTemplateResolver">
                        <!--视图前缀-->
                        <property name="prefix" value="/WEB-INF/templates/" />
                        <!--视图后缀-->
                        <property name="suffix" value=".html" />
                        <property name="templateMode" value="HTML5" />
                        <property name="characterEncoding" value="UTF-8" />
                    </bean>
                </property>
            </bean>
        </property>

    </bean>

</beans>
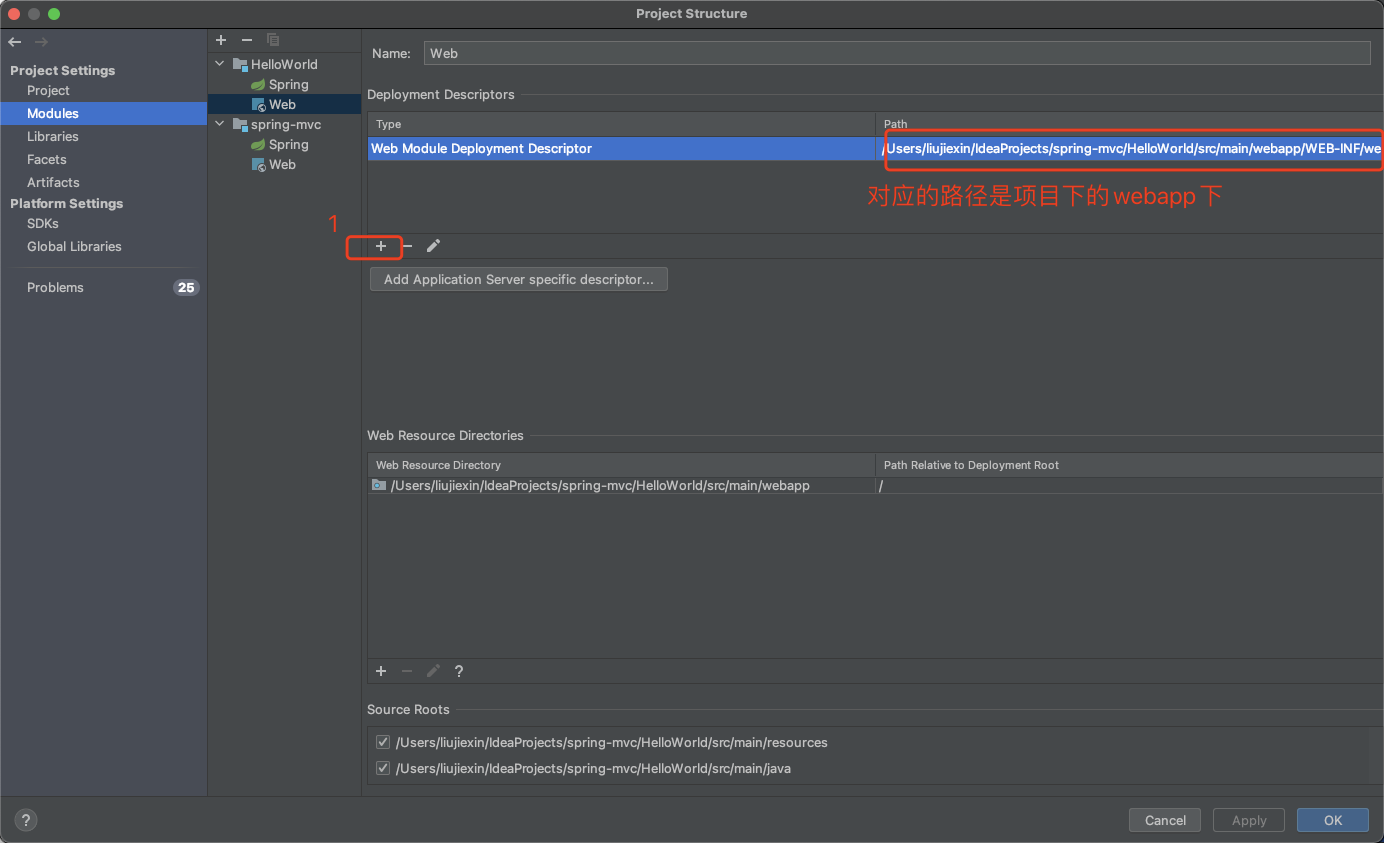
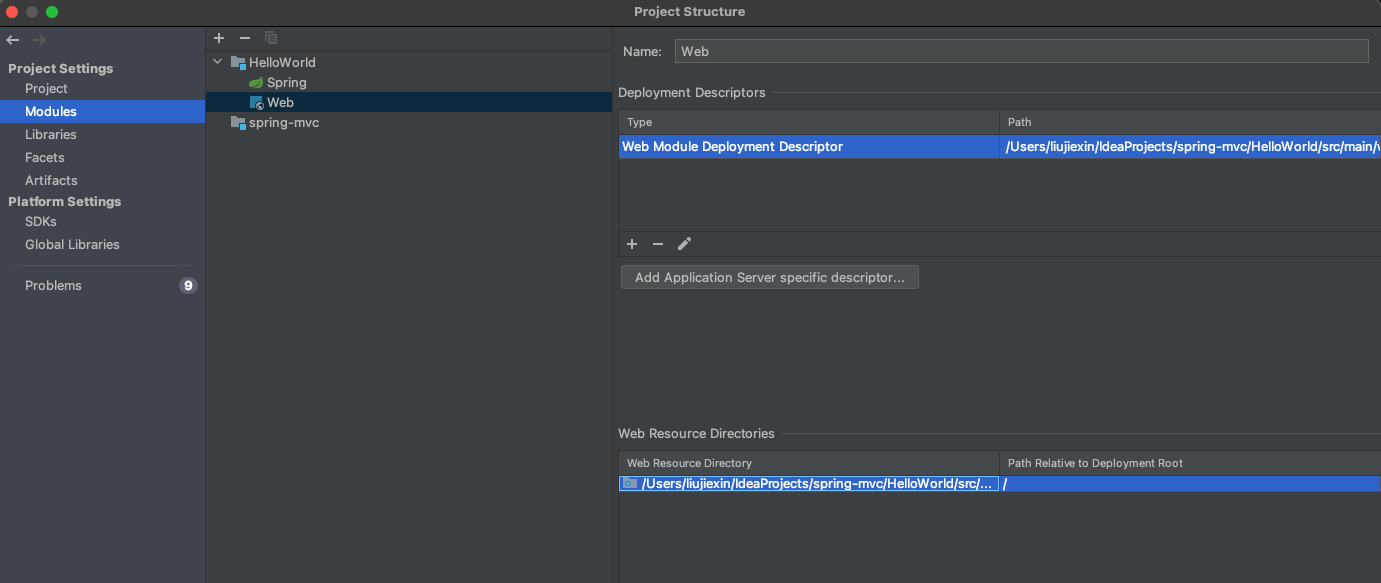
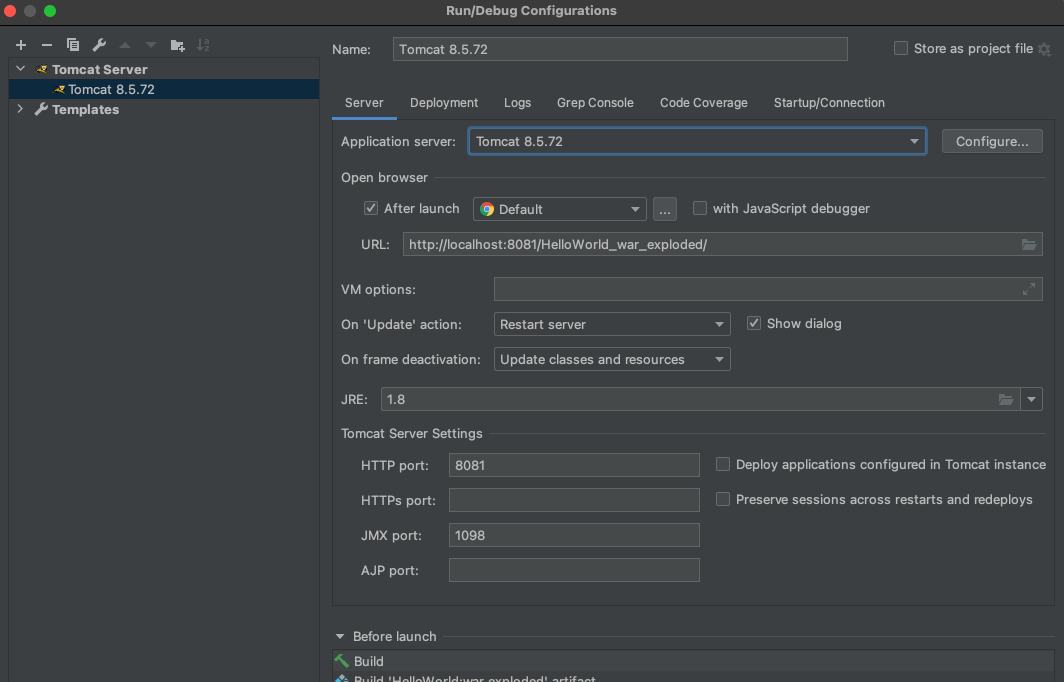
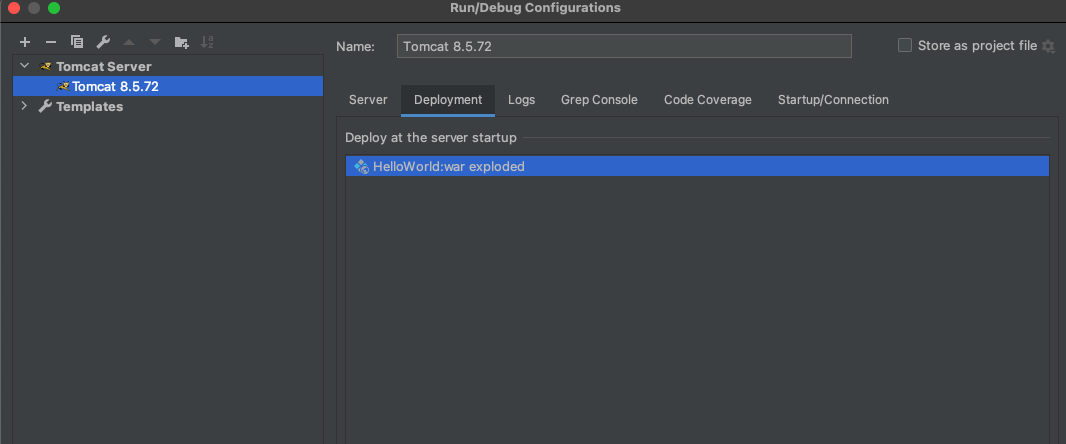
3.5 idea 配置 tomcat 以及启动springMVC 项目

三、@RequestMapping注解
1、@RequestMapping 注解的功能
@RequestMapping 是将请求和处理请求的控制器映射
2、@RequestMapping 注解的位置
//
// Source code recreated from a .class file by IntelliJ IDEA
// (powered by FernFlower decompiler)
//

package org.springframework.web.bind.annotation;

import java.lang.annotation.Documented;
import java.lang.annotation.ElementType;
import java.lang.annotation.Retention;
import java.lang.annotation.RetentionPolicy;
import java.lang.annotation.Target;
import org.springframework.core.annotation.AliasFor;

@Target({ElementType.TYPE, ElementType.METHOD})
@Retention(RetentionPolicy.RUNTIME)
@Documented
@Mapping
public @interface RequestMapping {
    String name() default "";

    @AliasFor("path")
    String[] value() default {};

    @AliasFor("value")
    String[] path() default {};

    RequestMethod[] method() default {};

    String[] params() default {};

    String[] headers() default {};

    String[] consumes() default {};

    String[] produces() default {};
}
package java.lang.annotation;

/**
 * The constants of this enumerated type provide a simple classification of the
 * syntactic locations where annotations may appear in a Java program. These
 * constants are used in {@link Target java.lang.annotation.Target}
 * meta-annotations to specify where it is legal to write annotations of a
 * given type.
 *
 * <p>The syntactic locations where annotations may appear are split into
 * <em>declaration contexts</em> , where annotations apply to declarations, and
 * <em>type contexts</em> , where annotations apply to types used in
 * declarations and expressions.
 *
 * <p>The constants {@link #ANNOTATION_TYPE} , {@link #CONSTRUCTOR} , {@link
 * #FIELD} , {@link #LOCAL_VARIABLE} , {@link #METHOD} , {@link #PACKAGE} ,
 * {@link #PARAMETER} , {@link #TYPE} , and {@link #TYPE_PARAMETER} correspond
 * to the declaration contexts in JLS 9.6.4.1.
 *
 * <p>For example, an annotation whose type is meta-annotated with
 * {@code @Target(ElementType.FIELD)} may only be written as a modifier for a
 * field declaration.
 *
 * <p>The constant {@link #TYPE_USE} corresponds to the 15 type contexts in JLS
 * 4.11, as well as to two declaration contexts: type declarations (including
 * annotation type declarations) and type parameter declarations.
 *
 * <p>For example, an annotation whose type is meta-annotated with
 * {@code @Target(ElementType.TYPE_USE)} may be written on the type of a field
 * (or within the type of the field, if it is a nested, parameterized, or array
 * type), and may also appear as a modifier for, say, a class declaration.
 *
 * <p>The {@code TYPE_USE} constant includes type declarations and type
 * parameter declarations as a convenience for designers of type checkers which
 * give semantics to annotation types. For example, if the annotation type
 * {@code NonNull} is meta-annotated with
 * {@code @Target(ElementType.TYPE_USE)}, then {@code @NonNull}
 * {@code class C {...}} could be treated by a type checker as indicating that
 * all variables of class {@code C} are non-null, while still allowing
 * variables of other classes to be non-null or not non-null based on whether
 * {@code @NonNull} appears at the variable's declaration.
 *
 * @author  Joshua Bloch
 * @since 1.5
 * @jls 9.6.4.1 @Target
 * @jls 4.1 The Kinds of Types and Values
 */
public enum ElementType {
    /** Class, interface (including annotation type), or enum declaration */
    TYPE,

    /** Field declaration (includes enum constants) */
    FIELD,

    /** Method declaration */
    METHOD,

    /** Formal parameter declaration */
    PARAMETER,

    /** Constructor declaration */
    CONSTRUCTOR,

    /** Local variable declaration */
    LOCAL_VARIABLE,

    /** Annotation type declaration */
    ANNOTATION_TYPE,

    /** Package declaration */
    PACKAGE,

    /**
     * Type parameter declaration
     *
     * @since 1.8
     */
    TYPE_PARAMETER,

    /**
     * Use of a type
     *
     * @since 1.8
     */
    TYPE_USE
}
package java.lang.annotation;

/**
 * Annotation retention policy.  The constants of this enumerated type
 * describe the various policies for retaining annotations.  They are used
 * in conjunction with the {@link Retention} meta-annotation type to specify
 * how long annotations are to be retained.
 *
 * @author  Joshua Bloch
 * @since 1.5
 */
public enum RetentionPolicy {
    /**
     * Annotations are to be discarded by the compiler.
     */
    SOURCE,

    /**
     * Annotations are to be recorded in the class file by the compiler
     * but need not be retained by the VM at run time.  This is the default
     * behavior.
     */
    CLASS,

    /**
     * Annotations are to be recorded in the class file by the compiler and
     * retained by the VM at run time, so they may be read reflectively.
     *
     * @see java.lang.reflect.AnnotatedElement
     */
    RUNTIME
}
3、@RequestMapping 注解的method属性
//
// Source code recreated from a .class file by IntelliJ IDEA
// (powered by FernFlower decompiler)
//

package org.springframework.web.bind.annotation;

public enum RequestMethod {
    GET,
    HEAD,
    POST,
    PUT,
    PATCH,
    DELETE,
    OPTIONS,
    TRACE;

    private RequestMethod() {
    }
}
衍生四个注解
@GetMapping 、@PostMapping 、@PutMapping 、@DeleteMapping
4、@RequestMapping 注解的params属性
例如:params=”username”:表示发送过来的请求参数中要包含username
params=”!username”:表示发送过来的请求参数中不能包含username
params=”username=admin”:表示发送过来的请求参数中要包含username=admin
params=”username!=admin”:表示发送过来的请求参数中要包含username!=admin
params={“username”,”age!=12”}:表示发送过来的请求参数中要包含username并且age不等12的参
5、SpringMVC支持ant风格的路径
?: 表示任意的单个字符
:表示任意的0个或多个字符
*:表示任意的一层或多层目录
6、SpringMVC支持路径中的占位符(重点)
原始方式:/deleteUser?id=1
rest方式:/deleteUser/1
    @RequestMapping(value = "/restful/{id}/{name}")
    public void restful(@PathVariable("id") String id,
                          @PathVariable("name") String name){
        System.out.println(id);
        System.out.println(name);
    }
四、SpringMVC获取请求参数
1、通过ServletAPI 获取
 @RequestMapping(value = "/testServletAPI")
    public String testServletAPI(HttpServletRequest httpServletRequest){
        Object userName = httpServletRequest.getParameter("userName");
        Object password = httpServletRequest.getParameter("password");
        System.out.println(userName);
        System.out.println(password);
        return "test_param";
    }
2、通过控制器的方法的形参获取请求参数
@RequestMapping(value = "/testParam")
    public String testParam(String userName, String password){
        System.out.println(userName);
        System.out.println(password);
        return "test_param";
    }

    @RequestMapping(value = "/testParams")
    public String testParams(String userName, String password, String hobby){
        System.out.println(userName);
        System.out.println(password);
        System.out.println(hobby);
        return "test_param";
    }

    @RequestMapping(value = "/testGetRequestParam")
    public String testParams(@RequestParam("type_id") String typeId, String userName, String password, String hobby){
        System.out.println(typeId);
        System.out.println(userName);
        System.out.println(password);
        System.out.println(hobby);
        return "test_param";
    }
3、@RequestParam
解释:@RequestParam 是将请求参数和控制器方法的形参创建映射关系
value :指定形参赋值的请求参数的参数名
required:设置是否必须传输此请求参数,默认值 true
若为true时,当前请求必须传输value所指定的请求参数,若没有传输该请求参数,且没有设置defaultValue属性,则页面报错404,若设置为false,则当前请求不是必须传输value 所指定的请求参数,若没有传输,则注解所标识的形参的值null
defaultValue: 不管required属性值为true或false,当value所指定的请求参数没有传输或传输的值为“” 时,则使用默认值为形参。
//
// Source code recreated from a .class file by IntelliJ IDEA
// (powered by FernFlower decompiler)
//

package org.springframework.web.bind.annotation;

import java.lang.annotation.Documented;
import java.lang.annotation.ElementType;
import java.lang.annotation.Retention;
import java.lang.annotation.RetentionPolicy;
import java.lang.annotation.Target;
import org.springframework.core.annotation.AliasFor;

@Target({ElementType.PARAMETER})
@Retention(RetentionPolicy.RUNTIME)
@Documented
public @interface RequestParam {
    @AliasFor("name")
    String value() default "";

    @AliasFor("value")
    String name() default "";

    boolean required() default true;

    String defaultValue() default "\n\t\t\n\t\t\n\ue000\ue001\ue002\n\t\t\t\t\n";
}
4、@RequestHeader
5、@CookieValue
解释:是将Cookie数据和控制器方法的形参创建映射关系
6、通过POJO获取请求参数
7、解决服务器乱码问题
CharacterEncodingFilter
父类 OncePerRequestFilter 类的源码
public final void doFilter(ServletRequest request, ServletResponse response, FilterChain filterChain) throws ServletException, IOException {
        if (request instanceof HttpServletRequest && response instanceof HttpServletResponse) {
            HttpServletRequest httpRequest = (HttpServletRequest)request;
            HttpServletResponse httpResponse = (HttpServletResponse)response;
            String alreadyFilteredAttributeName = this.getAlreadyFilteredAttributeName();
            boolean hasAlreadyFilteredAttribute = request.getAttribute(alreadyFilteredAttributeName) != null;
            if (!this.skipDispatch(httpRequest) && !this.shouldNotFilter(httpRequest)) {
                if (hasAlreadyFilteredAttribute) {
                    if (DispatcherType.ERROR.equals(request.getDispatcherType())) {
                        this.doFilterNestedErrorDispatch(httpRequest, httpResponse, filterChain);
                        return;
                    }

                    filterChain.doFilter(request, response);
                } else {
                    request.setAttribute(alreadyFilteredAttributeName, Boolean.TRUE);

                    try {
                        this.doFilterInternal(httpRequest, httpResponse, filterChain);
                    } finally {
                        request.removeAttribute(alreadyFilteredAttributeName);
                    }
                }
            } else {
                filterChain.doFilter(request, response);
            }

        } else {
            throw new ServletException("OncePerRequestFilter just supports HTTP requests");
        }
    }
web.xml 配置filter
    <filter>
        <filter-name>CharacterEncodingFilter</filter-name>
        <filter-class>org.springframework.web.filter.CharacterEncodingFilter</filter-class>
        <init-param>
            <param-name>encoding</param-name>
            <param-value>UTF-8</param-value>
        </init-param>
        <init-param>
            <param-name>forceResponseEncoding</param-name>
            <param-value>true</param-value>
        </init-param>
    </filter>
    <filter-mapping>
        <filter-name>CharacterEncodingFilter</filter-name>
        <url-pattern>/*</url-pattern>
    </filter-mapping>
五、域对象共享数据
1、使用servltAPI 向 requset域 对象共享数据
2、使用ModelAndView向request域对象共享数据
3、使用Model向request 域对象共享数据
4、使用map向request 域对象共享数据
5、使用ModelMap向request 域对象共享数据
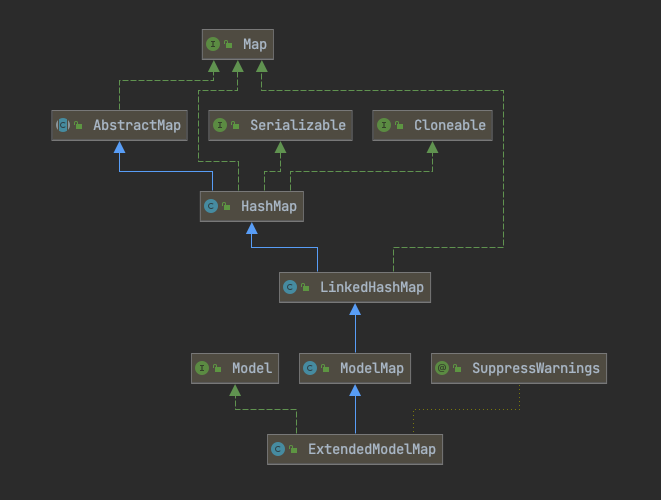
6、Model、ModelMap、Map 的关系
public interface Model {}
public class ModelMap extends LinkedHashMap<String, Object> {}
public class LinkedHashMap<K,V> extends HashMap<K,V> implements Map<K,V>{}
public class ExtendedModelMap extends ModelMap implements Model {}
public class BindingAwareModelMap extends ExtendedModelMap {}
public interface Map<K,V> {}
源码解析
org.springframework.web.servlet.DispatcherServlet
protected void doDispatch(HttpServletRequest request, HttpServletResponse response) throws Exception {
        HttpServletRequest processedRequest = request;
        HandlerExecutionChain mappedHandler = null;
        boolean multipartRequestParsed = false;
        WebAsyncManager asyncManager = WebAsyncUtils.getAsyncManager(request);

        try {
            try {
                ModelAndView mv = null;
                Object dispatchException = null;

                try {
                    processedRequest = this.checkMultipart(request);
                    multipartRequestParsed = processedRequest != request;
                    mappedHandler = this.getHandler(processedRequest);
                    if (mappedHandler == null) {
                        this.noHandlerFound(processedRequest, response);
                        return;
                    }

                    HandlerAdapter ha = this.getHandlerAdapter(mappedHandler.getHandler());
                    String method = request.getMethod();
                    boolean isGet = "GET".equals(method);
                    if (isGet || "HEAD".equals(method)) {
                        long lastModified = ha.getLastModified(request, mappedHandler.getHandler());
                        if ((new ServletWebRequest(request, response)).checkNotModified(lastModified) && isGet) {
                            return;
                        }
                    }

                    if (!mappedHandler.applyPreHandle(processedRequest, response)) {
                        return;
                    }

                    mv = ha.handle(processedRequest, response, mappedHandler.getHandler());
                    if (asyncManager.isConcurrentHandlingStarted()) {
                        return;
                    }

                    this.applyDefaultViewName(processedRequest, mv);
                    mappedHandler.applyPostHandle(processedRequest, response, mv);
                } catch (Exception var20) {
                    dispatchException = var20;
                } catch (Throwable var21) {
                    dispatchException = new NestedServletException("Handler dispatch failed", var21);
                }

                this.processDispatchResult(processedRequest, response, mappedHandler, mv, (Exception)dispatchException);
            } catch (Exception var22) {
                this.triggerAfterCompletion(processedRequest, response, mappedHandler, var22);
            } catch (Throwable var23) {
                this.triggerAfterCompletion(processedRequest, response, mappedHandler, new NestedServletException("Handler processing failed", var23));
            }

        } finally {
            if (asyncManager.isConcurrentHandlingStarted()) {
                if (mappedHandler != null) {
                    mappedHandler.applyAfterConcurrentHandlingStarted(processedRequest, response);
                }
            } else if (multipartRequestParsed) {
                this.cleanupMultipart(processedRequest);
            }

        }
    }
7、向session域共享数据
8、向application域共享数据
六、SpringMVC的视图
简介
SpringMVC中的视图是View接口,视图的作用渲染数据,将模Moddel中的数据展示给用户,SpringMVC视图的种类很多,默认有转发视图和重定向视图。
当工程引入jstl的依赖,转发视图会自动转换为jstlView
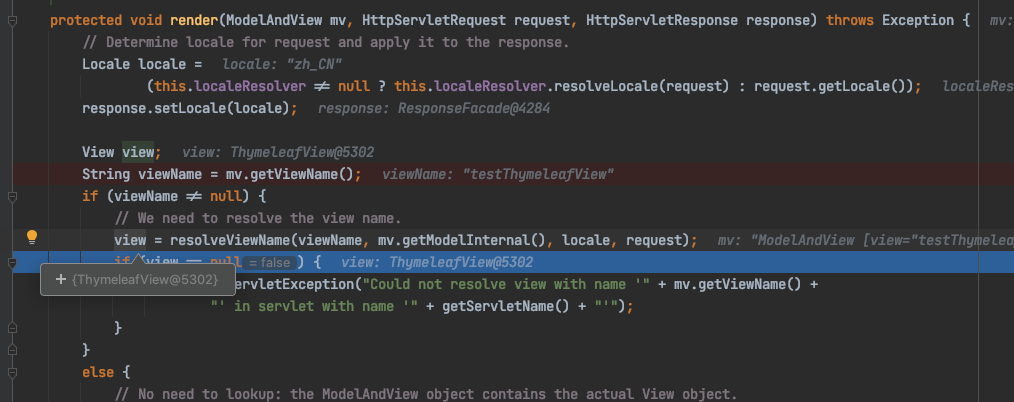
1、ThymeleafView
当控制器方法中所设置的视图名称没有前缀时,此时的视图名称会被SpringMVC配置文件中所配置的视图解析器解析,视图名称拼接视图前缀和视图后缀所得到的最终路径,会通过转发的方式实现跳转。
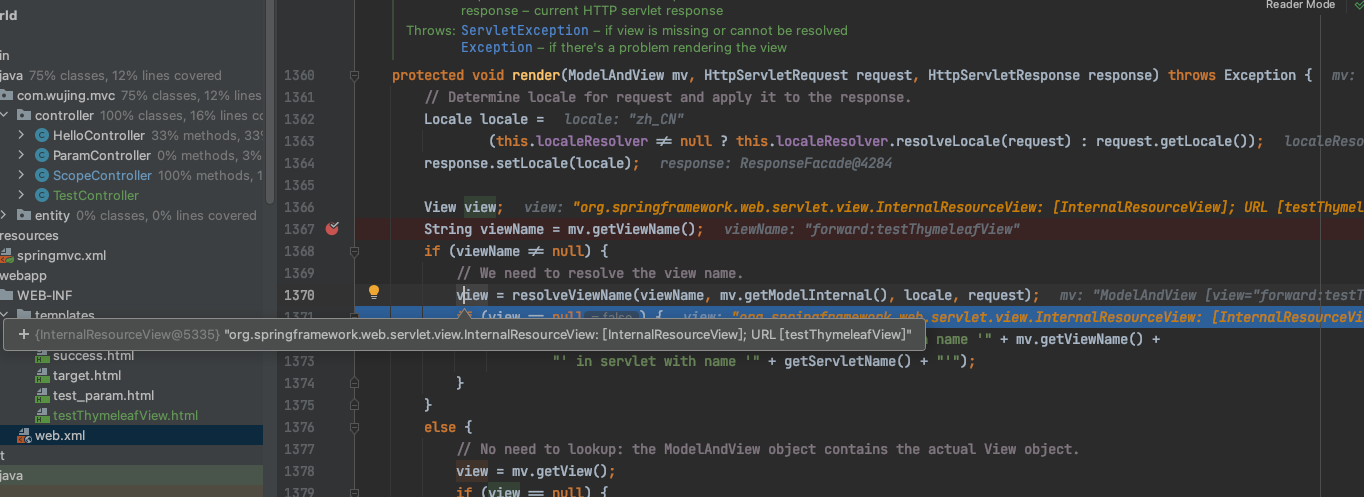
2、转发视图
SpringMVC中默认的转发视图是 InternalResourceView
创建转发视图的情况是:
当控制器方法中所设置的视图名称以“forward:” 为前缀时,创建InternalResourceView 视图,此时的视图名称不会被SpringMVC配置文件中所配置的视图解析器解析,而是会将前缀“forward:” 去掉,剩余部分作为最终路径通过转发的方式实现跳转。
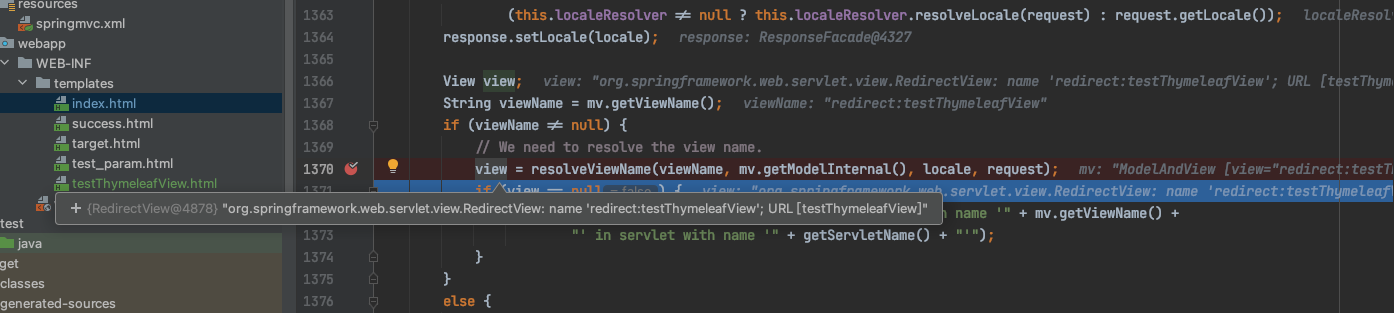
3、重定向视图
SpringMVC中默认的重定向视图是RedirectView
当控制器方法中所设置的视图名称以:“redirect:” 为前缀时,创建RedirectView视图,此时的视图名称不会被SpringMVC配置文件中所配置的视图解析器解析,而是会将前缀“redirect:” 去掉,剩余部分作为最终路径通过重定向的方式实现跳转。
4、视图控制器view-controller
七、RESTFul风格
八、HttpMessageConverter
简介
HttpMessageConverter 报文信息转化器,将请求报文转换为Java对象,或将Java对象转换为响应报文。
HttpMessageConverter 提供两个注解和类型:@RequestBody、@ResponseBody, RequestEntity、ResponseEntity
1、@RequestBody
@RequestBody 可以获取请求体,需要在控制器方法设置一个形参,使用@RequestBody进行标识,当前请求的请求体就会为当前注解所标识的形参赋值。
2、RequestEntity
RequestEntity 封装请求报文的一种类型,需要在控制器方法的形参中设置类型的形参,当前请求的请求报文就会赋值给该形参,可以通过getHeader()获取请求头信息,通过getBody()获取请求体信息。
3、@ResponseBody (源码 解析)
@ResponseBody 用于标识一个控制器方法,可以将该方法的返回值直接作为响应报文的响应体响应到浏览器
4、@RestController
@RestController 相当于 为类添加了@Controller 注解,并且为其中的每个方法添加了@ResponseBody注解
5、ResponseEntity
用于控制器方法的返回值类型,该控制器方法的返回值就是响应到浏览器的响应报文
九、文件下载
1、下载
2、上传
    <!-- 上传文件配置  -->
    <bean id="multipartResolver" class="org.springframework.web.multipart.commons.CommonsMultipartResolver" ></bean>
十、拦截器
1、拦截器配置
SpringMVC 中的拦截器用于拦截控制器方法的执行
SpringMVC 中的拦截器需要实现HandlerInterceptor 或者继承 HandlerInterceptorAdapter 类
配置文件中进行配置
<!-- 配置拦截器  以下配置都是对 DispatcherServlet 所有处理的请求进行拦截  -->
    <mvc:interceptors>
        <!-- 方式一 : 直接配置拦截对应的类  -->
        <bean class="com.wujing.mvc.interceptor.FirstInterceptor" ></bean>
    </mvc:interceptors>


  <!-- 配置拦截器  注意要开启 @Component扫描 要能扫描到 firstInterceptor -->
  <context:component-scan base-package="com.wujing.mvc" ></context:component-scan>

<mvc:interceptors>
  <!-- 方式二 : 直接使用 注入bean ,此时需要在原有的 拦截器类标注为一个组件  @Component -->
  <ref bean="firstInterceptor"></ref>
</mvc:interceptors>


    <mvc:interceptors>
        <!-- 方式三 :  -->
        <mvc:interceptor>
           <!-- 设置需要拦截的请求 :  -->
            <mvc:mapping path="/*"/>
          <!-- 设置 不需要拦截的请求:  -->
            <mvc:exclude-mapping path="/"/>
            <ref bean="firstInterceptor" ></ref>
        </mvc:interceptor>
    </mvc:interceptors>
// DispatcherServlet.doDispatch 方法
if (!mappedHandler.applyPreHandle(processedRequest, response)) {
    return;
}


// HandlerExecutionChain.applyPreHandle 方法
boolean applyPreHandle(HttpServletRequest request, HttpServletResponse response) throws Exception {
    for (int i = 0; i < this.interceptorList.size(); i++) {
        HandlerInterceptor interceptor = this.interceptorList.get(i);
        if (!interceptor.preHandle(request, response, this.handler)) {
            triggerAfterCompletion(request, response, null);
            return false;
        }
        this.interceptorIndex = i;
    }
    return true;
}
拦截器实现的接口
package org.springframework.web.servlet;

import javax.servlet.http.HttpServletRequest;
import javax.servlet.http.HttpServletResponse;

import org.springframework.lang.Nullable;
import org.springframework.web.method.HandlerMethod;

public interface HandlerInterceptor {


    default boolean preHandle(HttpServletRequest request, HttpServletResponse response, Object handler)
            throws Exception {

        return true;
    }


    default void postHandle(HttpServletRequest request, HttpServletResponse response, Object handler,
            @Nullable ModelAndView modelAndView) throws Exception {
    }

    default void afterCompletion(HttpServletRequest request, HttpServletResponse response, Object handler,
            @Nullable Exception ex) throws Exception {
    }

}
2、拦截器的三个抽象方法
// 拦截器执行前的方法,返回值表示是否拦截或方行 true 为方行, false 为拦截, 不调用控制器方法
@Override
public boolean preHandle(HttpServletRequest request, HttpServletResponse response, Object handler) throws Exception {
System.out.println(“自定义 拦截器 preHandle”);
return true;
}
// 控制器方法执行 之后执行
@Override
public void postHandle(HttpServletRequest request, HttpServletResponse response, Object handler, ModelAndView modelAndView) throws Exception {
System.out.println(“自定义 拦截器 postHandle”);
}
// 处理完视图和模型数据, 渲染视图完毕之后执行
@Override
public void afterCompletion(HttpServletRequest request, HttpServletResponse response, Object handler, Exception ex) throws Exception {
System.out.println(“自定义 拦截器 afterCompletion”);
}
3、多个拦截器的执行顺序
a>若每个拦截器的preHandle)都返回true此时多个拦截器的执行顺序和拦截器在SpringMVC的配置文件的配置顺序有关:
preHandle()会按照配置的顺序执行,而postHandle()和afterComplation()会按照配置的反序执行
b>若某个拦截器的preHandle(返回了false
preHandle()返回false和它之前的拦截器的preHandle()都会执行, postHandle()都不执行,返回false的拦截器之前的拦截器的afterComplation()会执行
十一、异常处理
1、基于配置的异常处理
SpringMVC 提供了一个处理控制器方法执行过程中所出现的异常接口:HandlerExceptionResolver
HandlerExceptionResolver 的实现类有: HandlerExceptionResolverComposite
SimpleMappingExceptionResolver、DefaultHandlerExceptionResolver
SpringMVC 提供了自定义的异常处理器SimpleMappingExceptionResolver
配置如下
<bean class="org.springframework.web.servlet.handler.SimpleMappingExceptionResolver">
        <property name="exceptionMappings" >
            <props>
                <prop key="java.lang.ArithmeticException">error</prop>
            </props>

        </property>
        <property name="exceptionAttribute" value="ex"></property>
    </bean>
2、基于注解的异常
package com.wujing.mvc.exception;

import org.springframework.ui.Model;
import org.springframework.web.bind.annotation.ControllerAdvice;
import org.springframework.web.bind.annotation.ExceptionHandler;

/**
 * @ClassName: ExceptionController
 * @Description: 注解异常
 * @Author liujiexin
 * @Date 2021/11/19 11:54 下午
 */
@ControllerAdvice
public class ExceptionHandlerController
{
    @ExceptionHandler(value = {ArithmeticException.class, NullPointerException.class})
    public String testException(Exception ex, Model model){
        System.out.println("异常处理");
        model.addAttribute("ex", ex);
        return "error";
    }
}
十二、注解配置SpringMVC
1、创建配置类,代替web.xml 对应文件 - WebInit
在Servlet3.0环境中,容器会在类路径中查找实现javax.servlet.ServletContainerlnitializer接口的类,如果找到的话就用它来配置Servlet容器。
Spring提供了这个接口的实现,名为SpringServletContainerInitializer,这个类反过来又会查找实现WebApplicationlnitializer的类并将配置的任务交给它们来完成。
Spring3.2引入了一个便利的WebApplicationlnitializer基础实现,名为AbstractAnnotationConfigDispatcherServletinitializer,当我们的类扩展了AbstractAnnotationConfigDispatcherServletInitializer并将其部署到Servlet3.0容器的时候,容器会自动发现它,并用它来配置Servlet上下文。
2、创建SpringConfig 配置类,代替Spring 配置文件
3、创建WebConfig配置类,代替SpringMVC的配置文件 -参考文件WebConfig.java
十三、SpringMVC执行流程
1、SpringMVC 常用用组件
DispatcherServlet : 前端控制器,
作用: 统一处理请求和响应,整个流程控制的中心,由它调度其他组件处理用户的请求
HandlerMapping:处理器映射器,
作用: 根据请求的url、method等信息查找handler, 即控制器方法
Handler : 处理器,需要工程师开发
作用:在DispatchServlet 的控制下Handler对具体的用户请求进行处理
HandlerAdapter:处理器适配器,框架提供
作用:通过HandlerAdapter: 对处理器(控制方法)进行执行
ViewResolver: 视图解析器,框架提供
作用:进行视图解析,得到响应的视图,例如:ThymeleafView、InternalResourceView、RedirectView
View: 视图,框架提供
作用:将模型数据通过页面展示给用户
2、DispatcherServlet初始化过程
DispatcherServlet 本质上是一个Servlet, 所以天然的遵循Servlet的生命周期,所以宏观上是Servlet生命周期来调度。

3、DispatcherServlet调用组件处理请求
4、SpringMVC的执行过程

若有收获,就点个赞吧
0 人点赞
