1.1 服务器市场主流磁盘类型及接口
主流磁盘类型:SSD、SAS、SATA硬盘。
主流磁盘接口类型:SCSI、SATA、SAS
1.2 企业生产工作中磁盘的选型:
1)企业级SAS硬盘(默认):
企业里常见的SAS硬盘是15000转/分(这里就是主轴的转数)。当前主流300G、600G
1000G,从具体的业务需求及性价比考虑,oldboy在工作中多用300-600G的SAS硬盘,
一般选6300G,6600G,单排容量不要太大,除非纯备份!
用途:用于提供生产线上的普通对外提供服务的业务服务器;
例如:生产线的数据库业务、存储业务、图片业务及高并发业务(web http,cache服务),
总的来说,如果没有特殊业务需求,SAS磁盘是生产环境首选的磁盘配置。
2)企业级SATA硬盘:
企业级SATA硬盘,7200-10000转/分,常见的容量为1T和2T,4T,6T,优点是经济实惠,
容量大,从具体的业务需求及性价比考虑,oldboy在工作中多用SATA磁盘做线下不提供服务的数据存储或者并发业务访问不是很大的业务应用。
比如站点程序及数据库、图片的线下备份等。
特性:容量性价比高,一般2T的SATA磁盘较佳。
磁盘选购小结:
- 线上的业务,用SAS磁盘。
- 线下的业务,用SATA磁盘,磁带库。
- 线上高并发、小容量的业务,SSD磁盘。
- 思想:根据数据的访问热度,只能分析分层存储。SATA+SSD
特别注意:
千万不要用SATA磁盘来做在线高并发服务的数据存储或数据业务,这是有血的教训的。
某公司采用SATA做数据库的存储盘,结果导致数据库连续宕机一个月。5台SATA盘+RAID5。
解决:重新买5台(做数据迁移),把磁盘从SATA(RAID5)换成SAS(RAID10)。6个月内没事。
1.3 磁盘相关名词翻译
| 英文 | 汉语 |
|---|---|
| Disk | 磁盘 |
| Head | 磁头 |
| Sector | 扇区 |
| Track | 磁道 |
| Units | 单元快(一个柱面的大小) |
| Block | 数据块 |
| Inode | 索引节点 |
磁道:每个盘片有两个面,都可记录信息。盘片表面以盘片中心为圆心,用于记
录数据的不同半径的圆形磁化轨迹的称为磁道。磁化轨迹是磁化区域,是看不见的。磁道看起来是一个平面圆周形。
扇区:盘面由圆心向四周画直线,不同的磁道被执行分成许多扇形(弧形)的区域,每个弧形的区域叫做扇区,每个扇区大小一般为512字节,扇区看起来就是圆弧或扇形。
柱面:磁盘中,不同的盘片(或盘面)相同半径的磁道轨迹从上到下所组成的圆柱形区域就称为柱面,柱面看起来是一个圆柱形。
1.4 磁盘容量的计算方式
每个盘片有两个面,每个面有一个读写磁头,因此,一般我们习惯用磁头号来区分盘面。扇区
磁道(或柱面)和磁头数构成了磁盘结构的基本参数,通过这些参数可以得到
磁盘容量:
第一种算法:
盘面大小=磁道大小磁道数
磁盘大小=盘面大小磁头数
磁盘大小=磁道大小(512字节扇区数)磁道数磁头数
磁盘大小=512字节扇区数磁道数磁头数
第二种计算方式:
磁盘大小=柱面大小
柱面大小=磁道大小磁头数
磁盘大小=柱面大小柱面数磁道数
512字节扇区数磁头数磁道数
[root@oldboy ~]#fdisk -l
Disk /dev/sdb: 21.5 GB, 21474836480 bytes
255 heads, 63(每磁道扇区数)sectors/track, 2610 cylinders
Units = cylinders of 16065 512 = 8225280 bytes
单元Units(柱面单位)=255 heads63 sectors/track=16065 512 = 8225280 bytes
(盘面数)(每磁道扇区数)
计算公式:
63 512 255 2610 /1000 /1000 /1000.00
每磁道扇区数 每扇区大小 磁头数 * 柱面数 除以1000 除以1000 除以1000
这里等于柱面大小
计算例子: (63512255*2610)/1000/1000/1000=21.4679808
计算结果:
[root@oldboy ~]# python
Python 2.6.6 (r266:84292, Jul 23 2015, 15:22:56)
[GCC 4.4.7 20120313 (Red Hat 4.4.7-11)] on linux2
Type “help”, “copyright”, “credits” or “license” for more information.
>>> (63512255*2610)/1000/1000/1000.00
21.466999999999999
1.5 机械磁盘读写磁盘数据的原理小结:
1)磁盘是按照柱面为单位读写数据的,即先读取同一个盘面的某一个磁道,读完之后,如果
数据没有读完,磁头也不会切换到其它的磁道,而是选择切换磁头,读取下一个盘面的相同半径的磁道,直到所有盘面的相同半径的磁道读取完成之后,如果数据还没有读写完成,才会切换到其它不同半径的磁道,这个切换磁道的过程称为寻道。
2)不同磁头间的切换是电子切换,而不同磁道间的切换需要磁头做径向运动,这个径向运动
需要步进电机调节,这个动作是机械的切换。
. 磁头寻道是机械运动,切换磁头是电子切换。
1.6 分区工具-fdisk
1.6.1 fdisk
fdisk 是Linux系统下常用的分区工具,一般是装完系统后进行分区。装系统之前的分区,多数都是系统ISO里面的分区工具进行分区,或者RAID里面的分小磁盘。
运行fdisk分区命令必须是root权限才能执行,适合于对装系统后的剩余空间进行分区,例如:安装系统时没有全部分区,或者安装系统后添加新磁盘。
1.6.2 fdisk分区的实质
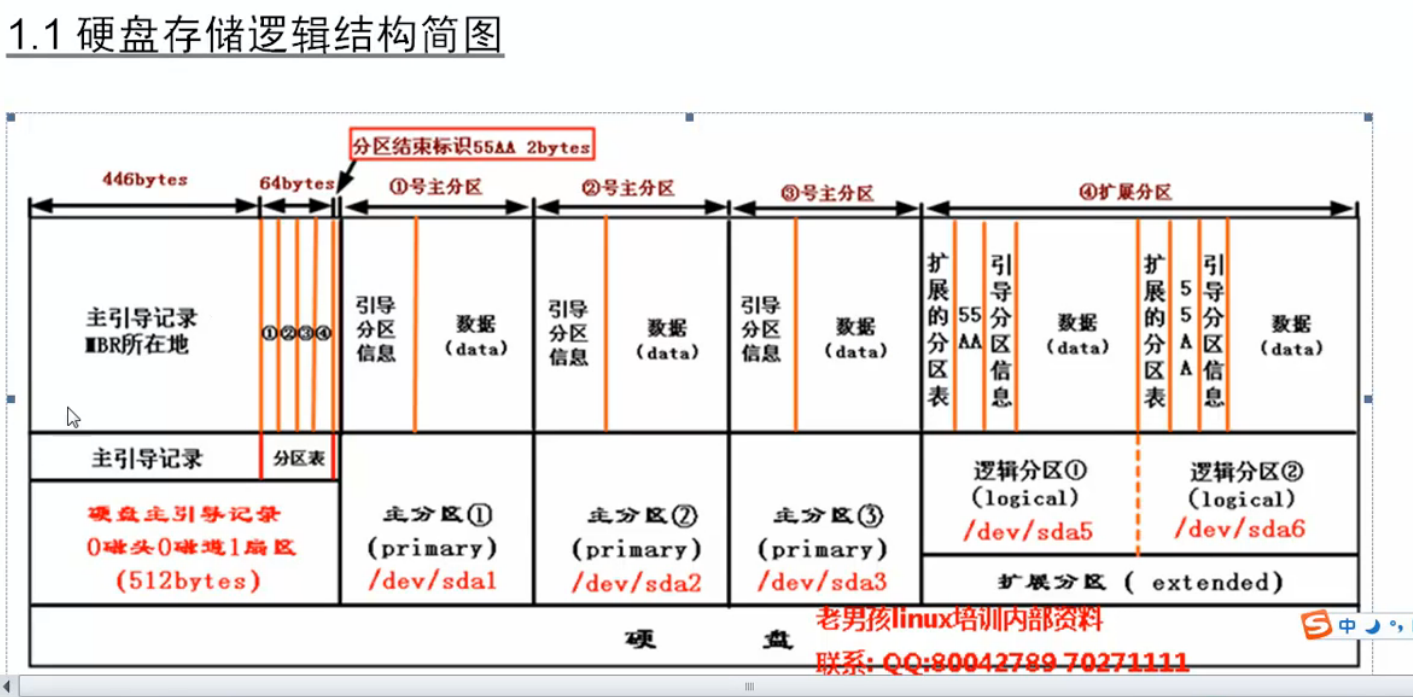
用fdisk分区的实质,就是修改0磁头0磁道1扇区的前446字节之后的64字节的分区表信息。
可以使用fdisk分区的磁盘大小必须小于2T,如果大于2T,只能使用parted(gpt)工具进行分区。
1.6.3 查看磁盘分区信息
fdisk -l 【设备名称】
参数 -l: 输出后面设备所有分区的内容,若后面不接设备名称侧会列出系统能够找到的所有分区。
例子:
[root@oldboy ~]# fdisk -l
Disk /dev/sda: 10.7 GB, 10737418240 bytes
255 heads, 63 sectors/track, 1305 cylinders
Units = cylinders of 16065 * 512 = 8225280 bytes
Sector size (logical/physical): 512 bytes / 512 bytes
I/O size (minimum/optimal): 512 bytes / 512 bytes
Disk identifier: 0x0002a4fe
Device Boot Start End Blocks Id System
/dev/sda1 * 1 26 204800 83 Linux
Partition 1 does not end on cylinder boundary.
/dev/sda2 26 222 1572864 82 Linux swap / Solaris
Partition 2 does not end on cylinder boundary.
/dev/sda3 222 1306 8707072 83 Linux
1.6.4 Fdisk分区例子
[root@oldboy ~]# **fdisk -cu /dev/sdb**
Command (m for help): **n**
Command action
e extended
p primary partition (1-4)**p**
Partition number (1-4): **1**
First sector (2048-41943039, default 2048): <=这里直接回车
Using default value 2048
Last sector, +sectors or +size{K,M,G} (2048-41943039, default 41943039): <=这里直接回车
Using default value 41943039
Command (m for help): **p**
Disk /dev/sdb: 21.5 GB, 21474836480 bytes
255 heads, 63 sectors/track, 2610 cylinders, total 41943040 sectors
Units = sectors of 1 * 512 = 512 bytes
Sector size (logical/physical): 512 bytes / 512 bytes
I/O size (minimum/optimal): 512 bytes / 512 bytes
Disk identifier: 0x00038437
Device Boot Start End Blocks Id System
/dev/sdb1 2048 41943039 20970496 83 Linux <=这是刚刚创建好的分区
Command (m for help): **w ** <=写入分区表并退出
The partition table has been altered!
Calling ioctl() to re-read partition table.
Syncing disks.
[root@oldboy ~]# **mkfs.ext4 /dev/sdb1** <=格式化刚才创建的分区
mke2fs 1.41.12 (17-May-2010)
Filesystem label=
OS type: Linux
Block size=4096 (log=2)
Fragment size=4096 (log=2)
Stride=0 blocks, Stripe width=0 blocks
1310720 inodes, 5242624 blocks
262131 blocks (5.00%) reserved for the super user
First data block=0
Maximum filesystem blocks=4294967296
160 block groups
32768 blocks per group, 32768 fragments per group
8192 inodes per group
Superblock backups stored on blocks:
32768, 98304, 163840, 229376, 294912, 819200, 884736, 1605632, 2654208,
4096000
Writing inode tables: done
Creating journal (32768 blocks): done
Writing superblocks and filesystem accounting information: done
This filesystem will be automatically checked every 21 mounts or
180 days, whichever comes first. Use tune2fs -c or -i to override.
[root@oldboy ~]# **partprobe** <=通知系统内核,分区表有变。之后即可正常挂载使用
1.7 分区工具-parted
1.7.1 parted
parted是一个磁盘分区管理工具,它比fdisk更加灵活,功能更丰富,同时还支持GUID分区表。
传统的MBR分区方式,有一个局限性,无法支持超过2TB的硬盘的分区(或单个分区超过2TB)。如果大于2T就用GPT分区的概念,GPT分区表很好的解决了传统MBR无法逾越2TB的限制。但是在linux中,传统的fdisk命令无法支持GPT分区方式。
1.7.2 分区例子:
1、查看磁盘列表
[root@oldboy ~]# fdisk -l
2、创建GPT分区
[root@oldboy ~]# parted /dev/sdc <= 后面接要分区的硬盘编号
GNU Parted 2.1
Using /dev/sdc
Welcome to GNU Parted! Type ‘help’ to view a list of commands.
(parted) mklabel gpt <=将硬盘转换为gpt格式
(parted) print <=打印磁盘信息
Model: VMware, VMware Virtual S (scsi)
Disk /dev/sdc: 4295GB <=此处显示磁盘大小信息
Sector size (logical/physical): 512B/512B
Partition Table: gpt
Number Start End Size File system Name Flags
(parted) mkpart primary 0 4295GB <=开始分区 并输入大小
Warning: The resulting partition is not properly aligned for best performance.
Ignore/Cancel? Ignore <=输入Ignoer忽略
(parted) print <=打印磁盘信息
Model: VMware, VMware Virtual S (scsi)
Disk /dev/sdc: 4295GB
Sector size (logical/physical): 512B/512B
Partition Table: gpt
Number Start End Size File system Name Flags
1 17.4kB 4295GB 4295GB primary <=这是刚刚创建好的分区
(parted) quit <=退出
Information: You may need to update /etc/fstab.
[root@oldboy ~]#

3、查看分区
[root@oldboy ~]#fdisk -l
Disk /dev/sdc: 4295.0 GB, 4294967296000 bytes
255 heads, 63 sectors/track, 522166 cylinders
Units = cylinders of 16065 * 512 = 8225280 bytes
Sector size (logical/physical): 512 bytes / 512 bytes
I/O size (minimum/optimal): 512 bytes / 512 bytes
Disk identifier: 0x00000000
Device Boot Start End Blocks Id System
/dev/sdc1 1 267350 2147483647+ ee GPT
1.8 格式化分区
[root@oldboy ~]# mkfs.ext4 -T largefile /dev/sdc1
mke2fs 1.41.12 (17-May-2010)
Filesystem label=
OS type: Linux
Block size=4096 (log=2)
Fragment size=4096 (log=2)
Stride=0 blocks, Stripe width=0 blocks
4096000 inodes, 1048575991 blocks
52428799 blocks (5.00%) reserved for the super user
First data block=0
Maximum filesystem blocks=4294967296
32000 block groups
32768 blocks per group, 32768 fragments per group
128 inodes per group
Superblock backups stored on blocks:
32768, 98304, 163840, 229376, 294912, 819200, 884736, 1605632, 2654208,
4096000, 7962624, 11239424, 20480000, 23887872, 71663616, 78675968,
102400000, 214990848, 512000000, 550731776, 644972544
Writing inode tables: done
Creating journal (32768 blocks): done
Writing superblocks and filesystem accounting information: done
This filesystem will be automatically checked every 30 mounts or
180 days, whichever comes first. Use tune2fs -c or -i to override.
1.9 分区挂载
1.9.1 挂载分区到/data 目录下
创建data目录
[root@oldboy ~]# mkdir /data
[root@oldboy ~]# ll -d /data
drwxr-xr-x 2 root root 4096 Aug 29 22:32 /data
把磁盘挂载信息追加到fstab尾部
[root@oldboy ~]# echo "/dev/sdc1 /data ext4 defaults 0 0">>/etc/fstab
[root@oldboy ~]# tail -1 /etc/fstab
/dev/sdc1 /data ext4 defaults 0 0
[root@oldboy ~]# **partprobe** <=通知系统内核,分区表有变化了
[root@oldboy ~]# mount -a
[root@oldboy ~]# df -h
Filesystem Size Used Avail Use% Mounted on
/dev/sda3 8.1G 1.7G 6.1G 22% /
tmpfs 491M 0 491M 0% /dev/shm
/dev/sda1 190M 33M 147M 19% /boot
/dev/sdc1 4.0T 67M 3.8T 1% /data <=看到这行证明挂载成功
1.10 swap分区的构建
1.10.1 使用物理分区构建
1.创建分区
[root@oldboy ~]# fdisk -cu /dev/sdb
Command (m for help): n
Command action
e extended
p primary partition (1-4)p
Partition number (1-4): 1
First sector (2048-41943039, default 2048):
Using default value 2048
Last sector, +sectors or +size{K,M,G} (2048-41943039, default 41943039):
Using default value 41943039
Command (m for help): p
Disk /dev/sdb: 21.5 GB, 21474836480 bytes
255 heads, 63 sectors/track, 2610 cylinders, total 41943040 sectors
Units = sectors of 1 * 512 = 512 bytes
Sector size (logical/physical): 512 bytes / 512 bytes
I/O size (minimum/optimal): 512 bytes / 512 bytes
Disk identifier: 0x00038437
Device Boot Start End Blocks Id System
/dev/sdb1 2048 41943039 20970496 83 Linux <=创建好的分区
Command (m for help): w
The partition table has been altered!
Calling ioctl() to re-read partition table.
Syncing disks.
2、格式化成swap分区
[root@oldboy ~]# mkswap /dev/sdb1
Setting up swapspace version 1, size = 20970492 KiB
no label, UUID=9b57fcad-6efd-406e-92f3-44b486da8091
3、加入到swap分区
[root@oldboy ~]# free
total used free shared buffers cached
Mem: 1004136 114964 889172 176 9320 25660
-/+ buffers/cache: 79984 924152
Swap: 1572860 0 1572860
[root@oldboy ~]# swapon /dev/sdb1
[root@oldboy ~]# free
total used free shared buffers cached
Mem: 1004136 130076 874060 176 9332 25652
-/+ buffers/cache: 95092 909044
Swap: 22543352 0 22543352
1.10.2 使用文件构建swap分区
1.构造分区
[root@oldboy ~]# dd if=/dev/zero of=/tmp/swap bs=1M count=128
128+0 records in
128+0 records out
134217728 bytes (134 MB) copied, 1.19615 s, 112 MB/s
2.格式化成swap分区类型
[root@oldboy ~]# mkswap /tmp/swap
mkswap: /tmp/swap: warning: don’t erase bootbits sectors
on whole disk. Use -f to force.
Setting up swapspace version 1, size = 131068 KiB
no label, UUID=c7361d63-7aeb-46de-afa4-54e198201d8c
[root@oldboy ~]# free
total used free shared buffers cached
Mem: 1004136 265592 738544 176 9428 156812
-/+ buffers/cache: 99352 904784
Swap: 22543352 0 22543352
3、激活swap分区
[root@oldboy ~]# swapon /tmp/swap
[root@oldboy ~]# free
total used free shared buffers cached
Mem: 1004136 265452 738684 176 9428 156812
-/+ buffers/cache: 99212 904924
Swap: 22674420 0 22674420
1.10.3 关闭swap分区
关闭/dev/sdb1物理swap分区:
[root@oldboy ~]# swapoff /dev/sdb1
[root@oldboy ~]# free
total used free shared buffers cached
Mem: 1004136 250340 753796 176 9440 156812
-/+ buffers/cache: 84088 920048
Swap: 1703928 0 1703928
关闭文件构造的swap分区
[root@oldboy ~]# swapoff /tmp/swap
1.10.4 swap企业案例
swap在工作中,特别是java环境,程序写的有问题,会发生内存泄漏,swap可能会占用。
解决方法:让开发改程序,运维临时加大swap空间。

若有收获,就点个赞吧
0 人点赞
