this问题
先有以下规律:
- 在函数体中,非显式或隐式地简单调用函数时,在严格模式下,函数体内的this会被绑定到undefined上,在非严格模式下则会被绑定到全局对象window/global上。
- 一般使用new方法调用构造函数时,构造函数内的this会被绑定到新创建的对象上。
- 一般通过call/apply/bind方法显示调用函数时,函数体内的this会被绑定到指定参数的对象上。
- 一般通过上下文对象调用函数时,函数体内的this会被绑定到该对象上。
- 在剪头函数中,this指向的是外层(函数或全局)作用域。
例题分析1:全局环境中的this
function f1() {console.log(this)}function f2() {'use strict'console.log(this)}f1() //windowf2() //undefined
变题:
const foo = {bar: 10,fn() {console.log(this) //调用时才确定console.log(this.bar)}}let fn1 = foo.fnfn1() //window undefined 因为fn1在全局环境下调用// 如果用以下方式调用foo.fn()//{bar:10,fn:f}//10
例题分析2:上下文对象调用中的this
const student = {name:'zzd',fn() {return this}}console.log(student.fn() === student) //true
当存在更复杂的调用关系时,this会指向最后调用它的对象。
const person = {name:'zzd',brother:{name:'mike',fn() {return this.name}}}console.log(person.brother.fn()) //mike
const o1 = {text:'o1',fn() {return this.text}}const o2 = {text:'o2',fn() {return o1.fn()}}const o3 = {text:'o3',fn() {let fn = o1.fnreturn fn()}}console.log(o1.fn()) //o1console.log(o2.fn()) //o1console.log(o3.fn()) //undefined
第二个最终还是调用的o1.fn(),所以this还是指向o1;第三个o3.fn()通过let fn = o1.fn的赋值进行了“裸奔”调用(前面没有调用者),o3.fn()返回了因此this指向window。
追问:如果要让console.log(o2.fn())输出o2,该怎么做?
可以用bind等方法,还可以用:
const o2 = {text:'o2',fn: o1.fn}
因此,this指向最终调用它的对象。上面代码中,我们提前将fn挂载到o2对象,所以this指向o2。
例题分析3:bind、call、apply改变this指向
call和apply是直接进行相关函数调用的;bind不会执行相关函数,而是返回一个新的函数,这个新的函数已经自动绑定了新的this指向。
//以下三个相等const target = {}fn.call(target, 'arg1', 'arg2')fn.apply(target, ['arg1', 'arg2'])fn.bind(target,'arg1','arg2')()
例题分析4:构造函数和this
function F00() {this.bar = 'zzd'}const instance = new Foo()console.log(instance.bar)
new做了什么?
- 创建了一个新对象
- 把新对象的[[proto]]指向构造函数内的原型对象
- 让构造函数的this指向新对象并调用构造函数,添加属性方法
- 返回这个对象
上面代码等价于:
let obj = {}obj.__proto__ = Foo.prototypeFoo.call(obj)
例题分析5:箭头函数中的this
箭头函数中的this指向是由其所属函数或全局作用域决定的。
下面这段代码,this出现在setTimeout的匿名函数中,因此this指向window对象。
setTimeout中函数内的this是指向了window对象,这是由于setTimeout()调用的代码运行在与所在函数完全分离的执行环境上。这会导致这些代码中包含的 this 关键字会指向 window (或全局)对象。
const foo = {fn() {setTimeout(function () {console.log(this)})}}console.log(foo.fn()) //window
如果需要让this指向foo这个对象,则可以巧用箭头函数来解决:
const foo = {fn() {setTimeout( () => {console.log(this)})}}console.log(foo.fn()) //{fn:f} 外层作用域
例题分析6:this优先级
常常把通过call、apply、bind、new对this进行绑定的情况称为显式绑定,而把根据调用关系确定this指向的情况称为隐式绑定。
那么显式绑定和隐式绑定哪个优先级更高呢?
function foo(a) {console.log(this.a)}const obj1 = {a:1,foo:foo}const obj2 = {a:2,foo:foo}obj1.foo.call(obj2) //2obj2.foo.call(obj1) //1
说明显式绑定一般来说优先级更高。
function foo(a) {this.a = a}const obj1 = {}let bar = foo.bind(obj1)bar(2)console.log(obj1.a)
上面代码通过bind将bar函数中的this绑定为obj1对象。执行bar(2)后,obj1.a值为2。
当再使用bar作为构造函数时,会输出3:
let baz = new bar(3)console.log(baz.a)
bar函数本身是通过bind方法构造的函数,其内部已经将this绑定为obj1,当它再次作为构造函数通过new被调用时,返回的实例就已经与obj1解绑了。也就是说,new绑定修改了bind绑定中的this指向,因此new绑定的优先级比显示bind绑定的高。
function foo() {return a => {console.log(this.a)};}let obj1 = { a:2 }let obj2 = { a:3 }const bar = foo.call(obj1)console.log(bar.call(obj2)) //2
由于foo中的this绑定到了obj1上,所以bar(引用箭头函数)中的this也会绑定到obj1上,箭头函数的绑定无法被修改。
如果将foo完全写成如下箭头函数的形式,则会输出undefined,因为let声明的变量不会挂载到window全局对象上。
let a = 123let obj1 = { a:2 }let obj2 = { a:3 }const foo = () => a => {console.log(this.a)}let bar = foo.call(obj1)console.log(bar.call(obj2))
闭包
作用域
作用域可以理解为某种规则下的限定范围,该规则用于在特定场景下查找变量。
函数作用域和全局作用域
执行以下foo函数时,变量a在函数foo的作用域内,因此可以在函数体内正常访问该变量:
function foo() {let a = 'bar'console.log(a)}foo()
如果改为如下形式,foo在自身函数作用域内没找到b,就会向外找,在全局作用域找到b:
let b = 'bar'function foo() {console.log(b)}foo()
总结:在js执行某个函数时,如果遇见变量且需要读取其值,就会就近先在函数内部查找该变量的声明和赋值情况。没找到就沿作用域链一层一层查找。
块级作用域和暂时性死区
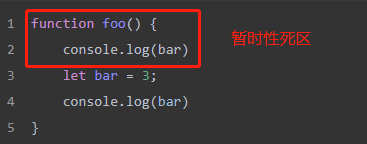
块级作用域指作用域范围限制在代码块中。暂时性死区指的是我们在使用let、const声明变量时会针对这个变量形成一个封闭的块级作用域,在这个块级作用域中,如果在声明变量前访问该变量就会报错。
function foo() {console.log(bar)let bar = 3;console.log(bar)}foo() //Uncaught ReferenceError:bar is not defined
暂时性死区起始于函数开头,终止于相关变量声明语句的所在行。
对于上图的暂时性死区,有一种极端情况是,函数的参数默认值设置也会受到它的影响:
function foo(arg1 = arg2, arg2) { //默认参数console.log(`${arg1} ${arg2}`)}foo('arg1','arg2')//返回arg1 arg2
在上面的foo函数中,如果没有传第一个参数,则会使用第二个参数作为第一个实参。但是当第一个参数为默认值时,执行arg1=arg2会被当做暂时性死区处理。也就是说,不要在形参中提前使用未定义的变量。
foo(undefined,'arg2')//Uncaught ReferenceError:arg2 is not defined
function foo(arg1) { //这里已经声明let arg1;}foo('arg1')//Uncaught SyntaxError:Identifier 'arg1' has already been declared
执行上下文和调用栈
执行上下文就是当前代码的执行环境/作用域,和前文介绍的作用域链相辅相成,但又是完全不同的两个概念。直观上看,执行上下文包含了作用域链,有了作用域链,才会有执行上下文的一部分。
代码执行的两个阶段
- 代码预编译阶段
- 代码执行阶段
预编译阶段是前置阶段,这一阶段编译器将js代码编译成可执行的代码。注意,这里与传统的编译不同,传统的编译非常复杂,涉及分词、解析、代码生成等过程。这里的预编译是js的独特概念,虽然js是解释性语言,编译一行执行一行。但是在代码执行前,js引擎确实会做一些预先准备工作。
执行阶段的主要任务是执行代码逻辑,执行上下文在这个阶段会全部创建完成。
在通过语法分析,确认语法无误之后,便会在预编译阶段对js代码中变量的内存空间进行分配,变量提升过程便是在此阶段完成。
预编译过程的细节,应注意3点:
- 在预编译阶段进行变量声明。
- 对变量声明进行提升,值是undefined。
- 对所有非表达式的函数声明进行提升。
函数提升要比变量提升的优先级要高一些,且不会被变量声明覆盖,但是会被变量赋值之后覆盖。
function bar() {console.log('bar1')}var bar = function () {console.log('bar2')}bar() //bar2
var bar = function () {console.log('bar2')}function bar() {console.log('bar1')}bar() //bar2
都是输出bar2,因为在预编译阶段虽然对变量bar进行了声明,但是不会对其进行赋值;函数bar则被创建并被提升。在代码执行阶段,变量bar才会(通过表达式)被赋值,赋值的内容会打印bar2。
foo(10)function foo(num) {console.log(foo)foo = num;console.log(foo)var foo}console.log(foo)foo = 1console.log(foo)
输出:
undefined10foo(num) {console.log(foo)foo = num;console.log(foo)var foo}1
在foo(10)执行时,会在函数体内进行变量提升,此时执行函数体内的第一行会输出undefined,执行函数体内的第三行会输出foo。接着运行代码,运行到函数体外第九行会输出foo函数的内容。
上题结论是,作用域在预编译阶段确定,但是作用域链是在执行上下文的创建阶段完全生成的,因为函数在调用时才会开始创建对应的执行上下文。执行上下文包括变量对象、作用域链、this指向。
代码执行的整个过程就像一条流水线。首先是在预编译阶段创建变量对象,此时只是创建还未赋值;然后是代码执行阶段,变量对象会转为激活对象。此时作用域链也将被确定,它由当前执行环境的变量对象和所有外层已经完成的激活对象组成,保证了变量和函数的有序访问,即如果在当前作用域找不到变量会继续向上直到全局作用域。
调用栈
在执行函数时,如果这个函数又调用了另一个函数,而这另一个函数又调用了另一个函数,这样便形成了一系列的调用栈:
function foo1() {foo2()}function foo2() {foo3()}function foo3() {foo4()}function foo4() {console.log('foo4')}foo1()
具体过程:foo1先入栈,foo2入栈,foo3入栈,以此类推,直到foo4执行完,foo4先出栈,以此类推。形成调用栈。
在函数执行完毕并出栈时,函数内的局部变量在下一个垃圾回收节点会被回收,该函数对应的执行上下文将会被销毁,这也是我们在外界无法访问函数内定义的变量的原因。也就是说,只有在函数执行时,相关函数才可以访问该变量,该变量会在预编译阶段被创建,在执行阶段被激活,在函数执行完毕后,其相关上下文会被销毁。
闭包
函数嵌套函数时,内层函数引用了外层函数作用域下的变量,并且内层函数在全局环境下可访问,进而形成闭包。
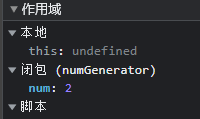
function numGenerator() {let num = 1;num++;return () => {console.log(num)}}let getNum = numGenerator()getNum()
numGenerator创建了一个变量num,接着返回打印num值的匿名函数,这个函数引用了num,使得在外部可以通过调用getNum方法访问变量num,因此在numGenerator执行完毕后,即相关调用栈出栈后,num变量不会消失,仍有机会被外界访问。
在正常情况下外界是无法访问函数内部变量的,函数执行完,上下文即被销毁。但是在外层函数中返回了另一个函数,且这个函数使用了外层函数的变量,那么外界便能通过这个返回的函数获取原外层函数内部的变量值。这就是闭包的基本原理。
内存管理
指对内存生命周期的管理,即分配、读写、释放内存。
let foo = 'bar' //分配alert(foo) //读写foo=null //释放
基本概念
内存空间可以分为栈和堆。
- 栈空间:一般由开发者分配释放,关于这部分空间要考虑垃圾回收的问题。
- 堆空间:由操作系统自动分配释放,存放函数的参数值、局部变量的值等。
js数据类型中的基本数据类型按照值保存在栈空间中,占有固定大小的内存空间;引用类型保存在堆空间中,内存空间大小不固定,需要按引用情况进行访问(栈中指针)。
内存泄漏是指内存空间已经不再被使用,但由于某种原因并没有被释放的现象。会导致程序运行缓慢甚至崩溃。
内存泄漏场景举例
let element = document.getElementById("element");element.mark = "marked";function remove() {element.parentNode.removeChild(element)}
在上面代码中,我们只是把id为element的节点移除了,但是变量element还在,该节点占有的内存无法被释放。为了解决这一问题,我们需要在remove方法中添加element=null。
let element = document.getElementById('element');element.innerHTML = '<button id="button">点击</button>'let button = document.getElementById('button')button.addEventListener('click', function () {})element.innerHTML = ''
执行第5行,button已经从DOM中移除了,但由于其事件处理句柄还在,所以该节点依然无法被回收。因此还需添加removeEventListener函数,防止内存泄露。
function foo() {let name = 'zzd'window.setInterval(function () {console.log(name)},1000)}foo()
由于存在window.setInterval,所以name内存空间始终无法被释放,如果不是业务要求的话,记得要在合适的时候使用clearInterval清理。
例题分析1
const foo = (function () {let v = 0return () => {return v++}}())for (let i = 0; i < 10; i++) {foo()}console.log(foo()) //10
foo是一个立即执行函数,是一个箭头函数,在循环执行foo时,引用自由变量10次,v自增10次,最后执行foo时,得到10。这里的自由变量是指没有在相关函数作用域中声明,但却被使用了的变量。
例题分析2
const foo = () => {let arr = []let ifor(i = 0; i < 10; i++) {arr[i] = function () {console.log(i)}}return arr[0]}foo()() //10
本题中自由变量为i,执行foo返回arr[0],是一个函数,其中变量i的值为10,如果i在for循环里声明,就是0。
例题分析3
let fn = nullconst foo = () => {let a = 2function innerFoo() {console.log(a)}fn = innerFoo}const bar = () => {fn()}foo()bar() //2
正常来讲,foo执行完毕后,其执行环境生命周期会结束,所占用的内存会被垃圾收集器释放,上下文消失。但是通过innerFoo函数赋值给全局变量fn,foo的变量a也会被保留下来。所以,函数fn在函数bar内部执行时,依然可以访问这个被保留下来的变量对象。
例题分析4
将以上代码稍加修改
let fn = nullconst foo = () => {let a = 2function innerFoo() {console.log(c)console.log(a)}fn = innerFoo}const bar = () => {let c = 100fn()}foo()bar()
会报错,其实bar中执行fn时,fn已经被复制为innerFoo,变量c并不在其作用域链上,c只是bar函数的内部变量,因此会报错,c没有定义。
JavaScript高频考点及基础题库
数据类型及其判断
null、undefined、string、number、Boolean、Symbol、bigint、object(function、array、date等)
常见判断方法有以下四种:
- typeof xx
返回一个字符串(小写),用来判断:Undefined、String、Number、Boolean、Symbol、Object、Function,无法检测引用类型里的Array
优点:可区分Object与Function
缺点:(1)对于 Null ,返回 object 类型
原因:Null类型只有一个null值,该值表示一个空对象指针(出自JavaScript高级程序设计)
typeof的检测原理:不同的对象在底层都表示为二进制,在js中二进制前(低)三位存储其类型信息为:000: Object、100:String、110: Boolean、1: Number。null的二进制表示全为0,自然前三位也是0,所以执行typeof时会返回”object”。
(2) 对于Array、Date、RegExp都会返回object,不能更详细的区分
console.log(typeof '12');// stringconsole.log(typeof 12);// numberconsole.log(typeof undefined);// underfinedconsole.log(typeof true);// booleanconsole.log(typeof null);// object
- xx instanceof xx
返回true/false,只能判断引用类型 ,无法检测基本类型
a instanceof B的判断原理:a是否为B的实例,即a的原型链上是否存在B的构造函数。
原理模拟:
const instanceofMock = (L, R) => {if (typeof L !=='object') {return false}while (true) {if (L === null) {//已经遍历到了顶端return false}if (R.prototype === L.__proto__) {return true}L = L.__proto__}}
缺点:只能用来判断两个对象是否属于实例关系, 而不能判断一个对象实例具体属于哪种类型(原型链上的都会返回true)
console.log('abc' instanceof String);// falseconsole.log(String('abc') instanceof String);// trueconsole.log(12 instanceof Number);// falseconsole.log(new Number(12) instanceof Number);// trueconsole.log(true instanceof Boolean);// falseconsole.log(new Boolean(true) instanceof Boolean);// trueconsole.log({name:'yy'} instanceof Object);// trueconsole.log(new Object({name:'yy'}) instanceof Object);// trueconsole.log(['12','123'] instanceof Object);// trueconsole.log(['12','123'] instanceof Array);// trueconsole.log(new Array('12',32) instanceof Object);// trueconsole.log(new Array('12',32) instanceof Array);// trueconsole.log(function(){} instanceof Object);// trueconsole.log(function(){} instanceof Function);// trueconsole.log(new Function() instanceof Function);// trueconsole.log(new Date() instanceof Object);// trueconsole.log(new RegExp instanceof Object);// trueconsole.log(new String('abc') instanceof Object);// trueconsole.log(new Number(12) instanceof Object);// true
- xx.constructor === xx
返回true/false,判断原理:
p.constructor === Person.prototype.constructor //继承
当一个函数F被定义时,JS引擎会为F添加prototype原型,然后再在prototype上添加一个constructor属性,并让其指向F的引用
具体来说:当 var f = new F() 时,F被当成了构造函数,f是F的实例对象,此时F原型上的constructor传递到了f上,因此f.constructor === F
缺点:不可判断Null、Undefined是无效的对象,没有constructor存在
constructor 是不稳定的,如创建的对象更改了原型,无法检测到最初的类型
console.log(''.constructor === String);//trueconsole.log(new Number(1).constructor === Number);//trueconsole.log([].constructor === Array);//trueconsole.log(true.constructor === Boolean);//trueconsole.log(new Function().constructor === Function;);//trueconsole.log(new Date().constructor === Date);//trueconsole.log(document.constructor === HTMLDocument);//true
- Object.prototype.toString.call(xx)
返回“[object type]”(字符串),能判断所有类型,万金油方法
判断原理:JS中的所有对象都是继承自Object对象的,通过call方法(显式绑定)改变this指向,利用Object.prototype上的原生toString()方法判断数据类型
console.log(Object.prototype.toString.call(123));//[object Number]console.log(Object.prototype.toString.call('123'));//[object String]console.log(Object.prototype.toString.call(undefined));//[object Undefined]console.log(Object.prototype.toString.call(true));//[object Boolean]console.log(Object.prototype.toString.call({}));//[object Object]console.log(Object.prototype.toString.call([]));//[object Array]console.log(Object.prototype.toString.call(function(){}));//[object Function]
数据类型及其转换
对于加法操作,如果加号两边都是number类型,则规则如下:
- 加号两边存在NaN,结果为NaN(typeof NaN 为number)
- Infinity+Infinity = Infinity
- -Infinity+(-Infinity) = -Infinity
- Infinity+(-Infinity) = NaN
如果加号两边至少有一个字符串:
- 都是字符串则拼接
- 一个是字符串则将另外的值转换为字符串再拼接
- 有一个值是字符串,另一个值是对象则调用valueof或toString方法取得值,将其转换为基本数据类型再进行拼接。
函数参数传递
let foo = 1const bar = value => {value = 2;console.log(value);}bar(foo) //2console.log(foo) //1
当参数是基本数据类型时,函数体内会复制一份参数值,而不会影响原参数的实际值。
let foo = {bar:1}const func = obj => {obj.bar = 2;console.log(obj.bar)}func(foo) //2console.log(foo) //{bar:2}
函数参数是引用类型时,那么当在函数体内修改这个引用类型参数的某个属性值时,也将对原来的参数进行修改,因为此时函数体内的引用地址指向了原来的参数。
但是如果在函数体内直接修改对参数的引用则情况又不一样:
let foo = {bar:1}const func = obj => {obj = 2;console.log(obj)}func(foo) //2console.log(foo) //{bar:1}
总结:
- 函数参数为基本数据类型时,函数体内复制了一份参数值,任何操作都不会影响原参数的实际值。
- 函数参数是引用类型时,当在函数体内修改这个值的某个属性时,将会对原来的参数进行修改。
- 函数参数是引用类型时,如果直接修改这个值的引用地址,则相当于在函数体内新创建了一个引用,不会影响原参数的实际值。
异步
移动元素
移动页面上的元素target(document.querySelectorAll(‘#man’)[0]),先从原点出发向左移动20px,再向上移动50px,最后向左移动30px,请把运动路径动画实现出来。
我们将移动过程封装成一个walk函数,接收3个参数。
- direction:字符串,表示移动方向,这里简化为left、top两种。
- distance:整形,可正可负。
- callback:执行动作后的回调。
回调方案
每一个任务都是相互联系的:当前任务结束后将会马上进入下一个流程,如何将这些流程串联起来呢,这里采用最简单的回调来明确指示下一个任务。
const target = document.querySelectorAll('#man')[0]target.style.cssText = `position:absolute;left:0px;top:0px`const walk = (direction, distance, callback) => {setTimeout(() => {let currentLeft = parseInt(target.style.left, 10)let currentTop = parseInt(target.style.top, 10)const shouldFinish = (direction === 'left' && currentLeft === -distance) ||(direction === 'top' && currentTop === -distance)if (shouldFinish) {//任务执行结束,执行下一个回调callback &&callback()} else {if(direction === 'left') {currentLeft--target.style.left = `${currentLeft}px`}else if (direction === 'top') {currentTop--target.style.top = `${currentTop}px`}walk(direction, distance, callback)}}, 20)}walk('left',20,() =>{walk('top',50,() => {walk('left',30,Function.prototype)})})
Promise方案
const target = document.querySelectorAll('#man')[0]target.style.cssText = `position:absolute;left:0px;top:0px`const walk = (direction, distance) => {return new Promise((resolve, reject) => {const innerWalk = () => {setTimeout(() => {let currentLeft = parseInt(target.style.left,10)let currentTop = parseInt(target.style.top,10)const shouldFinish = (direction === 'left' && currentLeft === -distance) ||(direction === 'top' && currentTop === -distance)if (shouldFinish) {resolve()}else {if(direction === 'left') {currentLeft--target.style.left = `${currentLeft}px`}else if (direction === 'top') {currentTop--target.style.top = `${currentTop}px`}innerWalk()}},20)}innerWalk()})}walk('left',20).then(() => walk('top',50)).then(() => walk('left',30))
async/await方案
walk函数定义同上,现在只需执行task函数即可。
const task = async function() {await walk('left',20)await walk('top',50)await walk('left',30)}
红绿灯任务控制
红灯3s亮一次,绿灯1s亮一次,黄灯2s亮一次,如何让3个灯不断交替重复地亮呢?
已知3个亮灯函数已经存在:
function red() {console.log('red');}function green() {console.log('green')}function yellow() {console.log('yellow')}
回调方案
const task = (timer, light, callback) => {setTimeout(() => {if (light === 'red') {red()}else if (light === 'green') {green()}else if (light === 'yellow') {yellow()}callback()}, timer)}task(3000, 'red', () => {task(1000, 'green', () => {task(2000, 'yellow', Function.prototype)})})
上面代码有一个bug,代码只完成了一次交替亮灯,那么如何交替重复亮灯呢?可以通过递归使灯交替被点亮。
const step = () => {task(3000, 'red', () => {task(1000, 'green', () => {task(2000, 'yellow', step) //循环亮灯})})}step()
Promise方案
const task = (timer, light) => {return new Promise((resolve, reject) => {setTimeout(() => {if (light === 'red') {red()} else if (light === 'green') {green()} else if (light === 'yellow') {yellow()}resolve()}, timer)})}const step = () => {task(3000, 'red').then(() => task(1000, 'green')).then(() => task(2000, 'yellow')).then(step)}step()
async/await方案
const taskRunner = async () => {await task(3000, 'red')await task(1000, 'green')await task(2000, 'yellow')taskRunner()}taskRunner()
请求图片进行预加载
假设urlIds数组预先就存在,数组中的每一项都可以按照规则拼接成一个完整的图片地址,那么请根据这个数组,依次请求图片进行预加载。
先实现一个请求图片的方法:
const loadImg = urlId => {const url = `https://www.image.com/${urlId}`return new Promise((resolve, reject) => {const img = new Image()img.onerror = function () {reject(urlId)}img.onload = function () {resolve(urlId)}img.src = url})}
该方法进行过Promise化处理,在图片成功加载时执行resolve,失败时执行reject。
根据图片urlId,依次请求图片:
const urlIds = [1,2,3,4,5]urlIds.reduce((prevPromise, urlId) => {return prevPromise.then(() => loadImg(urlId))}, Promise.resolve())
或者用面向过程的方法实现:
const urlIds = [1,2,3,4,5]const loadImgOneByOne = index => {const length = urlIds.lengthloadImg(urlIds[index]).then(() => {if (index === length - 1) { return }else {loadImgOneByOne(++index)}})}loadImgOneByOne(0)
还可以用async/await实现:
const urlIds = [1,2,3,4,5]const loadImgOneByOne = async () => {for (i of urlIds) {await loadImg(urlIds[i])}}loadImgOneByOne()
上述代码的请求是依次执行的,只有成功加载完第一张图片,才能继续加载下一张。
如果想提高效率,将所有图片的请求一次性发出,应该:
const urlIds = [1,2,3,4,5]const promiseArray = urlIds.map(urlId => loadImg(urlId))Promise.all(promiseArray).then(() => {console.log('finish load all')}).catch(() => {console.log('promise all catch')})
setTimeout相关考查
setTimeout(() => {console.log('setTimeout block')}, 100)while (true) {}console.log('end here')
以上代码不会得到输出,因为while一直循环,主线程将被占用。但执行以下代码将会打印end here。
setTimeout(() => {console.log('setTimeout block')while (true) {}}, 0)console.log('end here')
这段代码执行后,再执行任何语句都不会得到响应。
由此可以延伸出,JavaScript中的任务分为同步和异步任务。
- 同步任务:当前主线程将要执行的任务,这些任务一起形成执行栈。
- 异步任务:不进入主线程,进入任务队列,不会马上执行的任务。
当同步任务全部执行,主线程空闲时,即执行栈为空时,会执行任务队列里的异步任务。
这样的机制保证了:虽然JavaScript是单线程的,但是对于一些耗时的任务,我们可以将其丢入任务队列中,这样就不会阻碍其他同步代码的执行。
宏任务和微任务
任务队列中的异步任务分为宏任务和微任务。
宏任务包括:
- script(整体代码)
- setTimeout
- setInterval
- I/O
- 事件
- postMessage
- requestAnimationFrame
- UI渲染
微任务包括:
- Promise
- MutationObserver
- Process.nextTick
console.log('start here')const foo = () => (new Promise((resolve, reject) => {console.log('first promise constructor')let promise1 = new Promise((resolve1, reject1) => {console.log('second promise constructor')setTimeout(() => {console.log('setTimeout here')}, 0)resolve1('promise1')})resolve('promise0')promise1.then(arg => {console.log(arg)})}))foo().then(arg => {console.log(arg)})console.log('end here')
- 首先打印第一行,再执行foo函数,同步输出first promise constructor。
- 继续执行foo函数,遇见promise1,执行promise1的构造函数,同步输出second promise constructor及end here。同时,按照顺序依次执行以下操作,setTimeout回调进入任务队列(宏任务),promise1的完成处理函数进入任务队列(微任务)。
- 虽然setTimeout的回调先进入任务队列,但是引擎会优先执行微任务,按照微任务的顺序输出promise1的结果,在输出promise0的结果。
- 此时,微任务都处理完了,开始执行宏任务,输出setTimeout here。
由上分析可知,每次主线程执行栈为空的时候,引擎会优先处理微任务队列,处理完微任务队列里的所有任务,再处理宏任务。
console.log('start here')setTimeout(() => {console.log('setTimeout')}, 0)new Promise((resolve, reject) => {resolve('promise result')}).then(value => {console.log(value)})console.log('end here')//start here//end here//promise result//setTimeout
真的要手写Promise吗?
Promise雏形
Promise其实就是一个构造函数,它只有一个参数,叫做executor,它是函数类型的参数。这个函数又自动具有resolve、reject两个方法作为参数。

Promise构造函数返回一个Promise实例对象,这个返回的Promise对象具有一个then方法(在Promise的原型对象上)。在then方法中,可以定义onfulfilled和onrejected两个函数类型的参数。onfulfilled通过参数可以获取Promise对象经过resolve处理后的值,onrejected可以获取Promise经过reject处理后的值。通过这个值来处理异步操作完成后的逻辑。
先添加then方法
function PromiseMock(executor) {}PromiseMock.prototype.then = function (onfulfilled, onrejected) {}
let promise1 = new Promise((resolve, reject) => {resolve('data')})promise1.then(data => console.log(data))
(resolve, reject) => {resolve('data')} //这一整个会被传到构造函数作为executor
在使用new调用Promise构造函数时,在合适的时机(往往是异步操作结束时)调用executor的参数resolve,并将resolve处理后的值作为resolve的函数参数执行,这个值便可以在后续then方法的第一个函数参数onfulfilled中拿到,reject同理。
因此我们在实现Promise时,应该有两个变量,分别存储经过resolve处理后的值,以及经过reject处理后的值(当然,因为promise状态的唯一性,不可能同时存在经过resolve、reject处理后的值,因此用一个变量存储也可以;同时还需存在一个状态,这个状态就是promise实例的状态(pending、fulfilled、rejected);最后要提供resolve方法和reject方法,这两个方法需要作为executor的参数提供给开发者使用:
function PromiseMock(executor) {this.status = 'pending';this.value = null;this.reason = null;const resolve = value => {this.value = value;}const reject = reason => {this.reason = reason}executor(resolve,reject) //在合适的时机调用!}PromiseMock.prototype.then = function (onfulfilled = Function.prototype, onrejected = Function.prototype) {onfulfilled(this.value) //拿到resolve()处理后的值onrejected(this.reason)}
注意:因为resolve的最终调用是由开发者在不确定的环境下(往往是全局中)直接调用的,因此为了在resolve函数中能够拿到promise实例的值,需要用self对this进行保存,也可以用箭头函数保证this准确性。
Promise实现状态完善
Promise实例的状态只能从pending变为fulfilled,或者从pending变为rejected。状态一旦发生改变就不可变化。下面对状态进行判断和完善。
function PromiseMock(executor) {this.status = 'pending';this.value = null;this.reason = null;const resolve = value => {if (this.status === 'pending') {this.value = value;this.status = 'fulfilled'}}const reject = reason => {if (this.status === 'pending') {this.reason = reason;this.status = 'rejected'}}executor(resolve,reject)}PromiseMock.prototype.then = function (onfulfilled, onrejected) {onfulfilled = typeof onfulfilled === 'function' ? onfulfilled : data => dataonrejected = typeof onrejected === 'function' ? onrejected : error =>{ throw error }if(this.status === 'fulfilled') {onfulfilled(this.value)}if (this.status === 'rejected') {onrejected(this.reason)}}
Promise异步实现完善
到现在实现的promise是同步的:
let promise1 = new PromiseMock((resolve, reject) => {setTimeout(() => {resolve('data')}, 2000)})promise1.then(data => {console.log(data)}) //没有任何输出
实例化PromiseMock时,会在setTimeout中调用resolve,也就是说,2s之后才会调用resolve方法,更改promise实例状态。而结合我们的实现,then方法中的onfulfilled是同步执行的,它在执行时this.status仍然为pending。这时我们的then方法还没有添加pending的判断。
所以我们应该在合适的时间去调用onfulfilled方法,这个合适的时间应该是调用resolve的时刻,那么我们先在状态为pending时把开发者传进来的onfulfilled方法存起来,再在resolve方法中执行即可,也就是在pending时保存onfulfilled、onrejected,等到上面的定时器走完,要改变状态之后再执行:
function PromiseMock(executor) {this.status = 'pending';this.value = null;this.reason = null;this.onFullfilledFunc = Function.prototype;this.onRejectedFunc = Function.prototype;const resolve = value => {if (this.status === 'pending') {this.value = value;this.status = 'fulfilled'this.onFullfilledFunc(this.value)}}const reject = reason => {if (this.status === 'pending') {this.reason = reason;this.status = 'rejected'this.onRejectedFunc(this.reason)}}executor(resolve,reject)}PromiseMock.prototype.then = function (onfulfilled, onrejected) {onfulfilled = typeof onfulfilled === 'function' ? onfulfilled : data => dataonrejected = typeof onrejected === 'function' ? onrejected : error =>{ throw error }if(this.status === 'fulfilled') {onfulfilled(this.value)}if (this.status === 'rejected') {onrejected(this.reason)}if (this.status === 'pending') {this.onFullfilledFunc = onfulfilledthis.onRejectedFunc = onrejected}}
此时代码已经能支持异步执行了,但还有问题:
let promise1 = new PromiseMock((resolve, reject) => {resolve('data')})promise1.then(data => {console.log(data)})console.log(1) //先输出了data然后是1,与实际相反。
因此需要将resolve、reject的执行放到任务队列中。这里姑且先放到setTimeout中,保证异步执行(这并不严谨,为了保证promise属于微任务,很多promise库用了mutationObserver来模仿nextTick)。
const resolve = value => {if (value instanceof Promise) {return value.then(resolve, reject)}setTimeout(() => {if (this.status === 'pending') {this.value = value;this.status = 'fulfilled'this.onFullfilledFunc(this.value)}})}const reject = reason => {setTimeout(() => {if (this.status === 'pending') {this.reason = reason;this.status = 'rejected'this.onRejectedFunc(this.reason)}})}executor(resolve,reject)
这样一来,在执行到executor(resolve,reject)时,也能保证在nextTick中才执行Promise被决议后的任务,不会阻塞同步任务。同时,我们在resolve中加入了对value值是否为一个promise实例的判断语句。
Promise细节完善
在promise实例状态变更之前添加多个then方法:
let promise = new Promise((resolve, reject) => {setTimeout(() => {resolve('data')}, 2000)})promise.then(data => {console.log(`1:${data}`)})promise.then(data => {console.log(`2:${data}`)})
会输出:1:data 2:data
而我们的实现只会输出2:data,这是因为第二个then方法中的onFulfilledFunc会覆盖第一个then中的onFulfilledFunc。
只需要将所有then方法中的onFulfilledFunc储存到一个数组onFulfilledArray中,在当前Promise被决议时依次执行onFulfilledArray数组内的方法即可。(等同步代码执行完再去决议promise时)
function PromiseMock(executor) {this.status = 'pending';this.value = null;this.reason = null;this.onFullfilledArray = [];this.onRejectedArray = [];const resolve = value => {if (value instanceof Promise) {return value.then(resolve, reject)}setTimeout(() => {if (this.status === 'pending') {this.value = value;this.status = 'fulfilled'this.onFullfilledArray.forEach(func => {func(value)})}})}const reject = reason => {setTimeout(() => {if (this.status === 'pending') {this.reason = reason;this.status = 'rejected'this.onRejectedArray.forEach(func => {func(reason)})}})}executor(resolve,reject)}PromiseMock.prototype.then = function (onfulfilled, onrejected) {onfulfilled = typeof onfulfilled === 'function' ? onfulfilled : data => dataonrejected = typeof onrejected === 'function' ? onrejected : error =>{ throw error }if(this.status === 'fulfilled') {onfulfilled(this.value)}if (this.status === 'rejected') {onrejected(this.reason)}if (this.status === 'pending') {this.onFullfilledArray.push(onfulfilled)this.onRejectedArray.push(onrejected)}}
另外一个细节是,在构造函数中如果出错,将会自动触发Promise实例状态变为rejected。因此我们用try/catch块对executor进行包裹:
try {executor(resolve,reject)} catch (e) {reject(e)}
到目前为止,我们已经实现了基本的Promise。下面总结一下:
- Promise状态具有凝固性。
- Promise可以在then方法第二个参数中进行错误处理。
- Promise实例可以添加多个then处理场景。
Promise then的链式调用
一个Promise实例then方法的onfullfilled函数和onrejected函数是支持再次返回一个promise实例的,也支持返回一个非promise实例的普通值;并且,返回的这个promise实例或这个非promise实例的普通值将会传给下一个then方法的onfulfilled或onrejected函数,这样then方法就支持链式调用了。
初步实现
在前面实现的then方法中,我们可以创建一个新的promise实例,即promise2并最终将这个promise2返回:
PromiseMock.prototype.then = function (onfulfilled, onrejected) {onfulfilled = typeof onfulfilled === 'function' ? onfulfilled : data => dataonrejected = typeof onrejected === 'function' ? onrejected : error =>{ throw error }// 将promise2作为then方法的返回值。let promise2if(this.status === 'fulfilled') {return promise2 = new PromiseMock((resolve, reject) => {setTimeout(() => {try {//这个新的promise2 resolved的值为onfulfilled的执行结果let result = onfulfilled(this.value)resolve(result)}catch (e) {reject(e)}})})}}
当然,别忘了this.status === ‘rejected’状态和this.status === ‘pending’状态也要加入相同的逻辑:
if (this.status === 'rejected') {return promise2 = new PromiseMock((resolve, reject) => {setTimeout(() => {try {//这个新的promise2 reject的值为onrejected的执行结果let result = onrejected(this.reason)resolve(result)}catch (e) {reject(e)}})})}if (this.status === 'pending') {return promise2 = new PromiseMock((resolve, reject) => {this.onFullfilledArray.push(() => {try {let result = onfulfilled(this.value)resolve(result)}catch (e) {reject(e)}})this.onRejectedArray.push(() => {try {let result = onrejected(this.reason)resolve(result)}catch (e) {reject(e)}})})}}
这里要重点理解this.status === ‘pending’判断分支中的逻辑,当使用promise实例调用其then方法时,应该返回一个promise实例,返回的就是this.status === ‘pending’判断分支中返回的promise2。那么这个promise2什么时候被决议呢?应该是在异步处理结束后,依次执行onFullfilledArray或onRejectedArray数组中的函数时。里面的函数需要切换promise2的状态并进行决议。
完善实现
如果onfulfilled函数和onrejected函数返回一个普通值的情况,需要在之前实现的let result = onfulfilled(this.value)语句和let result = onrejected(this.reason)语句中,使变量result由一个普通值变为一个promise实例。为此我们抽象出resolvePromise方法进行统一处理。
const resolvePromise = (promise2, result, resolve, reject) => {}PromiseMock.prototype.then = function (onfulfilled, onrejected) {// 将promise2作为then方法的返回值let promise2if(this.status === 'fulfilled') {return promise2 = new PromiseMock((resolve, reject) => {setTimeout(() => {try {//这个新的promise2 resolved的值为onfulfilled的执行结果let result = onfulfilled(this.value)resolvePromise(promise2, result, resolve,reject)}catch (e) {reject(e)}})})}if (this.status === 'rejected') {return promise2 = new PromiseMock((resolve, reject) => {setTimeout(() => {try {//这个新的promise2 reject的值为onrejected的执行结果let result = onrejected(this.value)resolvePromise(promise2, result, resolve,reject)}catch (e) {reject(e)}})})}if (this.status === 'pending') {return promise2 = new PromiseMock((resolve, reject) => {this.onFullfilledArray.push(() => {try {let result = onfulfilled(this.value)resolvePromise(promise2, result, resolve,reject)}catch (e) {reject(e)}})this.onRejectedArray.push(() => {try {let result = onrejected(this.value)resolvePromise(promise2, result, resolve,reject)}catch (e) {reject(e)}})})}}
resolvePromise函数接收以下4个参数。
- promise2:返回的promise实例。
- result:onfullfilled或inrejected函数的返回值。
- resolve:promise2的resolve方法。
- reject:promise2的reject方法。
const resolvePromise = (promise2, result, resolve, reject) => {//当result和promise2相等时,也就是在onfullfilled返回promise2时,执行rejectif (result === promise2) {reject(new TypeError('error due to circular reference'))}//是否已经执行过onfullfilled或onrejectedlet consumed = falselet thenableif (result instanceof Promise) {if(result.status === 'pending') {result.then(function (data) {resolvePromise(promise2,data,resolve,reject)},reject)} else {result.then(resolve,reject)}return}let isComplexResult = target => (typeof target === 'function' || typeof target === 'object')&& (target !== null)//如果返回的是疑似promise类型if (isComplexResult(result)) {try {thenable = result.then//判断返回值是否是promise类型if (typeof thenable === 'function') {thenable.call(result, function (data) {if (consumed) returnconsumed = truereturn resolvePromise(promise2,data,resolve,reject)}, function (error) {if (consumed) returnconsumed = truereturn reject(error)})}else {resolve(result)}} catch (e) {if(consumed) returnconsumed = truereturn reject(e)}}else {resolve(result)}}
第一步是对死循环进行处理,并在发生死循环时抛出错误new TypeError(‘error due to circular reference’)。怎么理解这个错误呢?promise实现规范中,出现死循环的情况如下:
const promise = new Promise((resolve, reject) => {setTimeout(() => {resolve('zzd')}, 2000)})promise.then(onfulfilled = data => {console.log(data)return onfulfilled(data)}).then(data => {console.log(data)})
接着,对于onfulfilled函数返回的结果result:如果result不是promise实例,不是对象也不是函数,而是一个普通值的话(isComplexResult函数用于对此进行判断),则直接对promise2进行决议。
对于onfulfilled函数返回的结果result:如果result含有then属性方法,那么我们称该属性方法为thenable,说明是一个promise实例,当执行该实例的then方法时,返回结果还可能是一个promise实例类型,也可能是一个普通值,因此还要递归调用resolvePromise。
let promise = new PromiseMock((resolve, reject) => {setTimeout(() => {resolve('zzd')}, 2000)})promise.then(data => {console.log(data)return new PromiseMock((resolve, reject) => {setTimeout(() => {resolve(`${data} next then`)}, 4000)}).then(data => {return new PromiseMock((resolve,reject) => {setTimeout(() => {resolve(`${data} next then`)}, 4000)})})}).then(data => {console.log(data)})
以上代码会在2s输出zzd,10s输出zzd next then next then。
Promise穿透实现
给then函数传递非函数值作为其参数时,实际上会被解析成then(null),这时,上一个promise对象的决议结果便会穿透到下一个then方法的参数中。
其实我们已经实现了,在then方法的实现中,我们已经为onfulfilled、onrejected函数加上了如下判断:
PromiseMock.prototype.then = function (onfulfilled, onrejected) {onfulfilled = typeof onfulfilled === 'function' ? onfulfilled : data => dataonrejected = typeof onrejected === 'function' ? onrejected : error =>{ throw error }...}
如果onfulfilled不是函数类型则给一个默认值,该默认值是返回其参数的函数。
Promise静态方法和其他方法实现
promise.prototype.catch实现
PromiseMock.prototype.catch = function (catchFunc) {return this.then(null, catchFunc)}
Promise.resolve实现
PromiseMock.resolve = function (value) {return new PromiseMock((resolve, reject) => {resolve(value)})}PromiseMock.reject = function (value) {return new PromiseMock((resolve, reject) => {reject(value)})}
Promise.all实现
Promise.all(iterable)方法返回一个promise实例,此实例在iterable参数内的所有promise实例都resolved或参数不包含promise实例时完成回调(resolve);如果参数中有一个Promise失败(rejected),则此实例回调失败(reject),失败原因是第一个promise实例失败的原因。
PromiseMock.all = function (promiseArray) {if (!Array.isArray(promiseArray)) {throw new TypeError('The arguments should be an array!')}return new PromiseMock((resolve, reject) => {try {let resultArray = []const length = promiseArray.lengthfor (let i = 0; i < length; i++) {promiseArray[i].then(data => {resultArray.push(data)if (resultArray.length === length) {resolve(resultArray)}}, reject)}} catch (e) {reject(e)}})}
先对promiseArray类型进行判断,对非数组类型参数进行报错。Promise.all返回一个promise实例,这个实例将会在PromiseArray中的所有实例被决议后进行决议,决议结果是一个数组,存有所有实例的决议值。
Promise.race实现
PromiseMock.race = function (promiseArray) {if (!Array.isArray(promiseArray)) {throw new TypeError('The arguments should be an array!')}return new PromiseMock((resolve, reject) => {try {const length = promiseArray.lengthfor (let i = 0; i < length; i++) {promiseArray[i].then(resolve, reject)}} catch (e) {reject(e)}})}
使用for循环同步执行数组中的所有promise实例的then方法,第一个resolve的实例会触发新的promise实例的resolve方法。
Promise ES6版
基础版Promise
- 首先我们在调用 Promise 时,会返回一个 Promise 对象。
- 构建 Promise 对象时,需要传入一个 executor 函数,Promise 的主要业务流程都在 executor 函数中执行。
- 如果运行在 executor 函数中的业务执行成功了,会调用 resolve 函数;如果执行失败了,则调用 reject 函数。
- Promise 的状态不可逆,同时调用 resolve 函数和 reject 函数,默认会采取第一次调用的结果。
以上简单介绍了 Promise 的一些主要的使用方法,结合 Promise/A+ 规范,我们可以分析出 Promise 的基本特征:
- promise 有三个状态:
pending,fulfilled,rejected;「规范 Promise/A+ 2.1」new promise时, 需要传递一个executor()执行器,执行器立即执行;executor接受两个参数,分别是resolve和reject;- promise 的默认状态是
pending;- promise 有一个
value保存成功状态的值,可以是undefined/thenable/promise;「规范 Promise/A+ 1.3」- promise 有一个
reason保存失败状态的值;「规范 Promise/A+ 1.5」- promise 只能从
pending到rejected, 或者从pending到fulfilled,状态一旦确认,就不会再改变;- promise 必须有一个
then方法,then 接收两个参数,分别是 promise 成功的回调 onFulfilled, 和 promise 失败的回调 onRejected;「规范 Promise/A+ 2.2」- 如果调用 then 时,promise 已经成功,则执行
onFulfilled,参数是promise的value;- 如果调用 then 时,promise 已经失败,那么执行
onRejected, 参数是promise的reason;- 如果 then 中抛出了异常,那么就会把这个异常作为参数,传递给下一个 then 的失败的回调
onRejected;
class PromiseMockES6 {static PENDING = 'pending';static FULFILLED = 'fulfilled';static REJECTED = 'rejected'constructor(executor) {//默认状态this.status = PromiseMockES6.PENDING;//存放resolve成功状态的值this.value = null;//存放reject失败状态的值this.reason = null;//如果在executor执行出错了,比如用了不存在的变量,所以用try catch包裹//new的时候会自动调用executortry {executor(this.resolve.bind(this), this.reject.bind(this))} catch (e) {this.reject(e)}}//调用此方法就是成功resolve(value) {//状态等于pending才调用,防止 executor 中调用了两次 resovle/reject 方法if (this.status === PromiseMockES6.PENDING) {//改变状态,之后就不能再改了this.status = PromiseMockES6.FULFILLED;//把值给value,之后then方法就能拿到this.value = value;}}reject(reason) {if (this.status === PromiseMockES6.PENDING) {this.status = PromiseMockES6.REJECTED;this.reason = reason;}}then(onFulfilled, onRejected){if (this.status === PromiseMockES6.FULFILLED) {onFulfilled(this.value)}if (this.status === PromiseMockES6.REJECTED) {onRejected(this.reason)}}}
写完测试一下:
const promise = new PromiseMockES6((resolve, reject) => {resolve('成功');}).then(data => {console.log('success', data)},err => {console.log('faild', err)})
控制台输出:
"success 成功"
异步实现完善
现在我们已经实现了一个基础版的 Promise,这里我们只处理了同步操作的 promise。如果在 executor()中传入一个异步操作的话呢,我们试一下:
const promise = new PromiseMockES6((resolve, reject) => {// 传入一个异步操作setTimeout(() => {resolve('成功');},1000);}).then((data) => {console.log('success', data)},(err) => {console.log('faild', err)})
执行测试脚本后发现,promise 没有任何返回。
因为 promise 调用 then 方法时,当前的 promise 并没有成功,一直处于 pending 状态。所以如果当调用 then 方法时,当前状态是 pending,我们需要先将成功和失败的回调分别存放起来,在executor()的异步任务被执行时,触发 resolve 或 reject,依次调用成功或失败的回调。
结合这个思路,我们优化一下代码:
class PromiseMockES6 {static PENDING = 'pending';static FULFILLED = 'fulfilled';static REJECTED = 'rejected'constructor(executor) {//默认状态this.status = PromiseMockES6.PENDING;//存放resolve成功状态的值this.value = null;//存放reject失败状态的值this.reason = null;// 存放成功的回调this.onFulfilledArray = [];// 存放失败的回调this.onRejectedArray= [];//如果在executor执行出错了,比如用了不存在的变量,所以用try catch包裹//new的时候会自动调用executortry {executor(this.resolve.bind(this), this.reject.bind(this))} catch (e) {this.reject(e)}}//调用此方法就是成功resolve(value) {//状态等于pending才调用,防止 executor 中调用了两次 resolve/reject 方法if (this.status === PromiseMockES6.PENDING) {//改变状态,之后就不能再改了this.status = PromiseMockES6.FULFILLED;//把值给value,之后then方法就能拿到this.value = value;//依次执行对应的函数this.onFulfilledArray.forEach(fn => fn(value));}}reject(reason) {if (this.status === PromiseMockES6.PENDING) {this.status = PromiseMockES6.REJECTED;this.reason = reason;//依次执行对应的函数this.onRejectedArray.forEach(fn => fn(reason));}}then(onFulfilled, onRejected){if (this.status === PromiseMockES6.FULFILLED) {onFulfilled(this.value)}if (this.status === PromiseMockES6.REJECTED) {onRejected(this.reason)}if (this.status === PromiseMockES6.PENDING) {// 如果promise的状态是 pending,需要将 onFulfilled 和 onRejected 函数存放起来,等待状态确定后,再依次将对应的函数执行this.onFulfilledArray.push(onFulfilled)this.onRejectedArray.push(onRejected)}}}
测试一下:
const promise = new PromiseMockES6((resolve, reject) => {setTimeout(() => {resolve('成功');},1000);}).then((data) => {console.log('success', data)},(err) => {console.log('failed', err)})
控制台等待 1s 后输出:
"success 成功"
此时代码已经能支持异步执行了,但还有问题:
let promise1 = new PromiseMock((resolve, reject) => {resolve('data')})promise1.then(data => {console.log(data)})console.log(1) //先输出了data然后是1,与实际相反。
因此需要将resolve、reject的执行放到任务队列中。这里姑且先放到setTimeout中,保证异步执行(这并不严谨,为了保证promise属于微任务,很多promise库用了mutationObserver来模仿nextTick)。
//调用此方法就是成功resolve(value) {setTimeout(() => {//状态等于pending才调用,防止 executor 中调用了两次 resolve/reject 方法if (this.status === PromiseMockES6.PENDING) {//改变状态,之后就不能再改了this.status = PromiseMockES6.FULFILLED;//把值给value,之后then方法就能拿到this.value = value;//依次执行对应的函数this.onFulfilledArray.forEach(fn => fn(value));}})}
这样一来,在执行到executor(resolve,reject)时,也能保证在nextTick中才执行Promise被决议后的任务,不会阻塞同步任务。
现在已经实现了异步操作。熟悉设计模式的同学,应该意识到了这其实是一个发布订阅模式,这种收集依赖 -> 触发通知 -> 取出依赖执行的方式,被广泛运用于发布订阅模式的实现。
then 的链式调用&值穿透特性
我们都知道,promise 的优势在于可以链式调用。在我们使用 Promise 的时候,当 then 函数中 return 了一个值,不管是什么值,我们都能在下一个 then 中获取到,这就是所谓的then 的链式调用。而且,当我们不在 then 中放入参数,例:promise.then().then(),那么其后面的 then 依旧可以得到之前 then 返回的值,这就是所谓的值的穿透。那具体如何实现呢?简单思考一下,如果每次调用 then 的时候,我们都重新创建一个 promise 对象,并把上一个 then 的返回结果传给这个新的 promise 的 then 方法,不就可以一直 then 下去了么?那我们来试着实现一下。这也是手写 Promise 源码的重中之重。
有了上面的想法,我们再结合 Promise/A+ 规范梳理一下思路:
- then 的参数
onFulfilled和onRejected可以缺省,如果onFulfilled或者onRejected不是函数,将其忽略,且依旧可以在下面的 then 中获取到之前返回的值;「规范 Promise/A+ 2.2.1、2.2.1.1、2.2.1.2」- promise 可以 then 多次,每次执行完 promise.then 方法后返回的都是一个“新的promise”;「规范 Promise/A+ 2.2.7」
- 如果 then 的返回值是一个普通值,那么就会把这个结果作为参数,传递给下一个 then 的成功的回调中;
- 如果 then 中抛出了异常,那么就会把这个异常作为参数,传递给下一个 then 的失败的回调中;「规范 Promise/A+ 2.2.7.2」
- 如果 then 的返回值是一个 promise,那么会等这个 promise 执行完,promise 如果成功,就走下一个 then 的成功;如果失败,就走下一个 then 的失败;如果抛出异常,就走下一个 then 的失败;「规范 Promise/A+ 2.2.7.3、2.2.7.4」
- 如果 then 的返回值和 promise 是同一个引用对象,造成循环引用,则抛出异常,把异常传递给下一个 then 的失败的回调中;「规范 Promise/A+ 2.3.1」
- 如果 then 的返回值 x 是一个 promise,且 x 同时调用 resolve 函数和 reject 函数,则第一次调用优先,其他所有调用被忽略;「规范 Promise/A+ 2.3.3.3.3」
我们可以创建一个新的promise实例,即promise2并最终将这个promise2返回:
class PromiseMockES6 {static PENDING = 'pending';static FULFILLED = 'fulfilled';static REJECTED = 'rejected'constructor(executor) {//默认状态this.status = PromiseMockES6.PENDING;//存放resolve成功状态的值this.value = null;//存放reject失败状态的值this.reason = null;// 存放成功的回调this.onFulfilledArray = [];// 存放失败的回调this.onRejectedArray= [];//如果在executor执行出错了,比如用了不存在的变量,所以用try catch包裹//new的时候会自动调用executortry {executor(this.resolve.bind(this), this.reject.bind(this))} catch (e) {this.reject(e)}}//调用此方法就是成功resolve(value) {//状态等于pending才调用,防止 executor 中调用了两次 resolve/reject 方法if (this.status === PromiseMockES6.PENDING) {//改变状态,之后就不能再改了this.status = PromiseMockES6.FULFILLED;//把值给value,之后then方法就能拿到this.value = value;//依次执行对应的函数this.onFulfilledArray.forEach(fn => fn(value));}}reject(reason) {if (this.status === PromiseMockES6.PENDING) {this.status = PromiseMockES6.REJECTED;this.reason = reason;//依次执行对应的函数this.onRejectedArray.forEach(fn => fn(reason));}}then(onFulfilled, onRejected){//解决 onFulfilled,onRejected 没有传值的问题//Promise/A+ 2.2.1 / Promise/A+ 2.2.5 / Promise/A+ 2.2.7.3 / Promise/A+ 2.2.7.4onFulfilled = typeof onFulfilled === 'function' ? onFulfilled : data => data//因为错误的值要让后面访问到,所以这里也要抛出个错误,不然会在之后 then 的 resolve 中捕获onRejected = typeof onRejected === 'function' ? onRejected : error => {throw error}// 将promise2作为then方法的返回值。每次调用 then 都返回一个新的 promise Promise/A+ 2.2.7let promise2 = new PromiseMockES6((resolve, reject) => {if (this.status === PromiseMockES6.FULFILLED) {setTimeout(() => {try {//这个新的promise2 resolve的值为onFulfilled的执行结果let result = onFulfilled(this.value)resolve(result)} catch (e) {reject(e)}})}if (this.status === PromiseMockES6.REJECTED) {setTimeout(() => {try {//这个新的promise2 reject的值为onRejected的执行结果let result = onRejected(this.reason)resolve(result)}catch (e) {reject(e)}})}if (this.status === PromiseMockES6.PENDING) {// 如果promise的状态是 pending,需要将 onFulfilled 和 onRejected 函数存放起来,等待状态确定后,再依次将对应的函数执行this.onFulfilledArray.push(() => {try {//这个新的promise2 resolve的值为onFulfilled的执行结果let result = onFulfilled(this.value)resolve(result)} catch (e) {reject(e)}})this.onRejectedArray.push(() => {try {//这个新的promise2 reject的值为onRejected的执行结果let result = onRejected(this.reason)resolve(result)}catch (e) {reject(e)}})}})}}
这里要重点理解this.status === ‘pending’判断分支中的逻辑,当使用promise实例调用其then方法时,应该返回一个promise实例,返回的就是this.status === ‘pending’判断分支中返回的promise2。那么这个promise2什么时候被决议呢?应该是在异步处理结束后,依次执行onFullfilledArray或onRejectedArray数组中的函数时。里面的函数需要切换promise2的状态并进行决议。
完善实现
如果onfulfilled函数和onrejected函数返回一个普通值的情况,需要在之前实现的let result = onfulfilled(this.value)语句和let result = onrejected(this.reason)语句中,使变量result由一个普通值变为一个promise实例。为此我们抽象出resolvePromise方法进行统一处理。
resolvePromise函数接收以下4个参数。
- promise2:返回的promise实例。
- result:onfullfilled或onrejected函数的返回值。
- resolve:promise2的resolve方法。
- reject:promise2的reject方法。
完整代码:
const resolvePromise = (promise2, result, resolve, reject) => {// 自己等待自己完成是错误的实现,用一个类型错误,结束掉 promise Promise/A+ 2.3.1if (result === promise2) {reject(new TypeError('error due to circular reference'))}//是否已经执行过onfullfilled或onrejected/A+ 2.3.3.3.3 只能调用一次let consumed = falselet thenableif (result instanceof PromiseMock) {if(result.status === 'pending') {result.then(function (data) {resolvePromise(promise2,data,resolve,reject)},reject)} else {result.then(resolve,reject)}return}let isComplexResult = target => (typeof target === 'function' || typeof target === 'object')&& (target !== null)//如果返回的是疑似promise类型if (isComplexResult(result)) {try {thenable = result.then//判断返回值是否是promise类型if (typeof thenable === 'function') {thenable.call(result, function (data) {if (consumed) returnconsumed = true// 递归解析的过程(因为可能 promise 中还有 promise) Promise/A+ 2.3.3.3.1return resolvePromise(promise2,data,resolve,reject)}, function (error) {// 只要失败就失败 Promise/A+ 2.3.3.3.2if (consumed) returnconsumed = truereturn reject(error)})}else {// 如果 x.then 是个普通值就直接返回 resolve 作为结果 Promise/A+ 2.3.3.4resolve(result)}} catch (e) {//Promise/A+ 2.3.3.2if(consumed) returnconsumed = truereturn reject(e)}}else {// 如果 x 是个普通值就直接返回 resolve 作为结果 Promise/A+ 2.3.3.4resolve(result)}}class PromiseMockES6 {static PENDING = 'pending';static FULFILLED = 'fulfilled';static REJECTED = 'rejected'constructor(executor) {//默认状态this.status = PromiseMockES6.PENDING;//存放resolve成功状态的值this.value = null;//存放reject失败状态的值this.reason = null;// 存放成功的回调this.onFulfilledArray = [];// 存放失败的回调this.onRejectedArray= [];//如果在executor执行出错了,比如用了不存在的变量,所以用try catch包裹//new的时候会自动调用executortry {executor(this.resolve.bind(this), this.reject.bind(this))} catch (e) {this.reject(e)}}//调用此方法就是成功resolve(value) {//状态等于pending才调用,防止 executor 中调用了两次 resolve/reject 方法if (this.status === PromiseMockES6.PENDING) {//改变状态,之后就不能再改了this.status = PromiseMockES6.FULFILLED;//把值给value,之后then方法就能拿到this.value = value;//依次执行对应的函数this.onFulfilledArray.forEach(fn => fn(value));}}reject(reason) {if (this.status === PromiseMockES6.PENDING) {this.status = PromiseMockES6.REJECTED;this.reason = reason;//依次执行对应的函数this.onRejectedArray.forEach(fn => fn(reason));}}then(onFulfilled, onRejected){//解决 onFulfilled,onRejected 没有传值的问题//Promise/A+ 2.2.1 / Promise/A+ 2.2.5 / Promise/A+ 2.2.7.3 / Promise/A+ 2.2.7.4onFulfilled = typeof onFulfilled === 'function' ? onFulfilled : data => data//因为错误的值要让后面访问到,所以这里也要抛出个错误,不然会在之后 then 的 resolve 中捕获onRejected = typeof onRejected === 'function' ? onRejected : error => {throw error}// 将promise2作为then方法的返回值。每次调用 then 都返回一个新的 promise Promise/A+ 2.2.7let promise2 = new PromiseMockES6((resolve, reject) => {if (this.status === PromiseMockES6.FULFILLED) {setTimeout(() => {try {//这个新的promise2 resolve的值为onFulfilled的执行结果let result = onFulfilled(this.value)resolvePromise(promise2, result, resolve, reject);} catch (e) {reject(e)}})}if (this.status === PromiseMockES6.REJECTED) {setTimeout(() => {try {//这个新的promise2 reject的值为onRejected的执行结果let result = onRejected(this.reason)resolvePromise(promise2, result, resolve, reject);}catch (e) {reject(e)}})}if (this.status === PromiseMockES6.PENDING) {// 如果promise的状态是 pending,需要将 onFulfilled 和 onRejected 函数存放起来,等待状态确定后,再依次将对应的函数执行this.onFulfilledArray.push(() => {setTimeout(() => {try {//这个新的promise2 resolve的值为onFulfilled的执行结果let result = onFulfilled(this.value)resolvePromise(promise2, result, resolve, reject);} catch (e) {reject(e)}})})this.onRejectedArray.push(() => {setTimeout(() => {try {//这个新的promise2 reject的值为onRejected的执行结果let result = onRejected(this.reason)resolvePromise(promise2, result, resolve, reject);}catch (e) {reject(e)}})})}})return promise2}}
第一步是对死循环进行处理,并在发生死循环时抛出错误new TypeError(‘error due to circular reference’)。怎么理解这个错误呢?promise实现规范中,出现死循环的情况如下:
const promise = new Promise((resolve, reject) => {setTimeout(() => {resolve('zzd')}, 2000)})promise.then(onfulfilled = data => {console.log(data)return onfulfilled(data)}).then(data => {console.log(data)})
接着,对于onfulfilled函数返回的结果result:如果result不是promise实例,不是对象也不是函数,而是一个普通值的话(isComplexResult函数用于对此进行判断),则直接对promise2进行决议。
对于onfulfilled函数返回的结果result:如果result含有then属性方法,那么我们称该属性方法为thenable,说明是一个promise实例,当执行该实例的then方法时,返回结果还可能是一个promise实例类型,也可能是一个普通值,因此还要递归调用resolvePromise。
测试一下:
const promise = new PromiseMockES6((resolve, reject) => {reject('失败');}).then().then().then(data=>{console.log(data);},err=>{console.log('err',err);})
控制台输出:
"失败 err"
至此,我们已经完成了 promise 最关键的部分:then 的链式调用和值的穿透。搞清楚了 then 的链式调用和值的穿透,你也就搞清楚了 Promise。
Promise 的 API
虽然上述的 promise 源码已经符合 Promise/A+ 的规范,但是原生的 Promise 还提供了一些其他方法,如:
- Promise.resolve()
- Promise.reject()
- Promise.prototype.catch()
- Promise.prototype.finally()
- Promise.all()
- Promise.race()
下面具体说一下每个方法的实现:
Promise.resolve
默认产生一个成功的 promise。
static resolve(data){return new PromiseMockES6((resolve,reject)=>{resolve(data);})}
这里需要注意的是,promise.resolve 是具备等待功能的。如果参数是 promise 会等待这个 promise 解析完毕,在向下执行,所以这里需要在 resolve 方法中做一个小小的处理:
resolve(value) {// ======新增逻辑======// 如果 value 是一个promise,那我们的库中应该也要实现一个递归解析if(value instanceof PromiseMockES6){// 递归解析return value.then(resolve,reject)}// ===================if (this.status === PromiseMockES6.PENDING) {//改变状态,之后就不能再改了this.status = PromiseMockES6.FULFILLED;//把值给value,之后then方法就能拿到this.value = value;//依次执行对应的函数this.onFulfilledArray.forEach(fn => fn(value));}}
测试一下:
PromiseMockES6.resolve(new PromiseMockES6((resolve, reject) => {setTimeout(() => {resolve('ok');}, 3000);})).then(data=>{console.log(data,'success')}).catch(err=>{console.log(err,'error')})
控制台等待 3s 后输出:
"ok success"
Promise.reject
默认产生一个失败的 promise,Promise.reject 是直接将值变成错误结果。
static reject(reason){return new PromiseMockES6((resolve,reject)=>{reject(reason);})}
Promise.prototype.catch
Promise.prototype.catch 用来捕获 promise 的异常,就相当于一个没有成功的 then。
PromiseMockES6.prototype.catch = function(errCallback){return this.then(null,errCallback)}
Promise.prototype.finally
finally 表示不是最终的意思,而是无论如何都会执行的意思。 如果返回一个 promise 会等待这个 promise 也执行完毕。如果返回的是成功的 promise,会采用上一次的结果;如果返回的是失败的 promise,会用这个失败的结果,传到 catch 中。
PromiseMockES6.prototype.finally = function(callback) {return this.then((value)=>{return PromiseMockES6.resolve(callback()).then(()=>value)},(reason)=>{return PromiseMockES6.resolve(callback()).then(()=>{throw reason})})}
测试一下:
PromiseMockES6.resolve(456).finally(()=>{return new PromiseMockES6((resolve,reject)=>{setTimeout(() => {resolve(123)}, 3000);})}).then(data=>{console.log(data,'success')}).catch(err=>{console.log(err,'error')})
控制台等待 3s 后输出:
"456 success"
Promise.all
promise.all 是解决并发问题的,多个异步并发获取最终的结果(如果有一个失败则失败)。
PromiseMockES6.all = function(values) {if (!Array.isArray(values)) {const type = typeof values;return new TypeError(`TypeError: ${type} ${values} is not iterable`)}return new PromiseMockES6((resolve, reject) => {let resultArr = [];let orderIndex = 0;const processResultByKey = (value, index) => {resultArr[index] = value;if (++orderIndex === values.length) {resolve(resultArr)}}for (let i = 0; i < values.length; i++) {let value = values[i];if (value && typeof value.then === 'function') {value.then((value) => {processResultByKey(value, i);}, reject);} else {processResultByKey(value, i);}}});}
测试一下:
let p1 = new PromiseMockES6((resolve, reject) => {setTimeout(() => {resolve('ok1');}, 1000);})let p2 = new PromiseMockES6((resolve, reject) => {setTimeout(() => {reject('ok2');}, 1000);})PromiseMockES6.all([1,2,3,p1,p2]).then(data => {console.log('resolve', data);}, err => {console.log('reject', err);})
控制台等待 1s 后输出:
"resolve [ 1, 2, 3, 'ok1', 'ok2' ]"
Promise.race
Promise.race 用来处理多个请求,采用最快的(谁先完成用谁的)。
PromiseMockES6.race = function(promises) {return new PromiseMockES6((resolve, reject) => {// 一起执行就是for循环for (let i = 0; i < promises.length; i++) {let val = promises[i];if (val && typeof val.then === 'function') {val.then(resolve, reject);} else { // 普通值resolve(val)}}});}
HTML语义化
HTML语义化就是根据结构化的内容选择合适的标签。
好处:
- 有利于SEO。
- 开发维护体验更好。
- 用户体验更好。(比如用alt标签解释图片信息)。
- 更好的可访问性,方便任何设备(如盲人阅读器)对代码进行解析。
BFC
BFC是什么
Block Formatting Context(块级格式上下文)。它会创建一个特殊的区域,在这个区域中,只有block box参与布局;而BFC的一系列特点和规则规定了在这个特殊的区域中如何进行布局,如何进行定位,区域内元素的相互关系和相互作用是怎样的。这个区域不受外界影响。
block box是指display属性为block、list-item、table的元素。
如何形成BFC
- 根元素或其他包含根元素的元素。
- 浮动元素。
- 绝对定位元素。
- 内联块(display:inline-block)
- 表格单元块(display:table-cell)
- 表格标题(display:table-capiton)
- 具有overflow且值不是visible的块元素
- 含有样式属性display:flow-root的元素
- 含有样式属性column-span:all的元素
BFC决定了什么
- 内部的box将会独占高度,且在垂直方向上一个接一个排列。
- box在垂直方向上的间距由margin决定,但是同一个BFC的两个相邻box的margin会出现边距折叠现象。
- 每个box在水平方向上的左边缘与BFC的左边缘相对齐,即使存在浮动也是如此。
- BFC区域不会与浮动元素重叠,而是依次排列。
- BFC区域是一个独立的渲染容器,容器内的元素和BFC区域外的元素不会有任何干扰。
- 浮动元素的高度也参与BFC的高度计算。
例题1
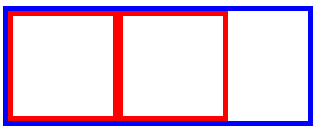
<style>body {width: 600px;position: relative;}.left {width: 80px;height: 150px;float: left;background: blue;}.right {height: 200px;background: red;}</style><body><div class="left"></div><div class="right"></div></body>

请在不修改已有内容的情况下加入样式,实现自适应(.left宽度固定,.right占满剩下的宽度)两栏布局。
BFC有一条布局规则:每个在box水平方向上的左边缘与BFC的左边缘相对齐,即使存在浮动也是如此。因此.left会和.right的左边相接触。
再想一条BFC布局规则:BFC区域不会与浮动元素重叠,而是会依次排列。因此我们可以使.right形成BFC,来实现自适应两栏布局。可以添加overflow: hidden形成。

例题2
<style>.root {border: 5px solid blue;width: 300px;}.child {border: 5px solid red;width: 100px;height: 100px;float: left;}</style><body><div class="root"><div class="child child1"></div><div class="child child2"></div></div></body>
问:.root的高度是多少?

.child为浮动元素,因此会造成高度塌陷,.root高度为0。
如何解决呢?根据BFC规则,浮动元素的高度也参与BFC的高度计算,因此使.root形成BFC就可以,加个overflow:hidden。
例题3
<style>p {color: blue;background: red;width: 400px;line-height: 100px;text-align: center;margin: 40px;}</style><body><p>paragraph 1</p><p>paragraph 2</p></body>
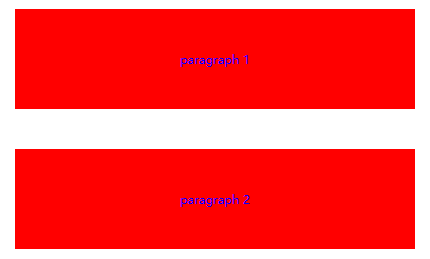
两段之间的垂直距离是多少?根据BFC规则:box在垂直方向上的间距由margin属性决定,但是同一个BFC的两个相邻box的margin会出现边距折叠现象。所以为40px。
解决:最简单的就是给一个p包裹一个div,并触发这个div形成BFC,那么这两个p就不再属于同一个BFC了。

多种方式实现居中
<style>.wp {border: 1px solid red;width: 300px;height: 300px;}.box {background: green;}.fixed-size {width: 100px;height: 100px;}</style><body><div class="wp"><div class="box fixed-size">text</div></div></body>
如何将其中没有居中的部分居中呢?
居中元素定宽高
- absolute + 负margin
.wp {position: relative;}.box {position: absolute;top: 50%;left: 50%;margin-left: -50px;margin-top: -50px;}
- absolute + margin auto
.wp {position: relative;}.box {position: absolute;top: 0;left: 0;right: 0;bottom: 0;margin: auto;}
- absolute + calc
.wp {position: relative;}.box {position: absolute;top:calc(50% - 50px);left:calc(50% - 50px);}
居中元素不定宽高
<style>.wp {border: 1px solid red;width: 300px;height: 300px;}.box {background: green;}</style><body><div class="wp"><div class="box">text</div></div></body>
- absolute + transform
.wp {position: relative;}.box {position: absolute;top: 50%;left: 50%;transform: translate(-50%, -50%);}
- flex
.wp {display: flex;justify-content: center;align-items: center;}
- grid
.wp {display: grid;}.box {align-slef: center;justify-self: cent}
Vue
MVC和MVVM
MVC:MVC是应用最广泛的软件架构之一,一般分为:Model(模型),View(视图),Controller(控制器)。 这主要是基于分层的目的,让彼此的职责分开。View一般通过Controller来和Model进行联系。Controller是Model和View的协调者,View和Model不直接联系。基本都是单向联系。
模型代表应用程序的数据以及用于访问控制和修改这些业务逻辑的规则。当模型发生改变时,它会通知视图,并为视图提供查询模型相关状态的能力。同时,它也为控制器提供访问封装在模型内部的应用程序功能的能力。
视图用来组织模型的内容。它从模型获得数据并指定这些数据如何表现。当模型变化时,视图负责维护数据表现的一致性。视图同时将用户的请求通知控制器。
控制器定义了应用程序的行为。它负责对来自视图的用户请求进行解释,并把这些请求映射成相应的行为,这些行为由模型负责实现。在一个web应用程序中,它们的表现形式可能是一些来自客户端的GET或POST的HTTP请求。模型所实现的行为包括处理业务和修改模型的状态。根据用户请求和模型行为的结果,控制器选择一个视图作为对用户请求的响应。
MVVM:MVVM模式的核心是数据驱动,即ViewModel。ViewModel是view和model的关系映射。是一个值转换器,负责转换model中的数据对象,使数据变得更加易于管理和使用。view和model是不可以直接去通信的,它们之间存在着VM这个中介,充当观察者的角色。MVVM模式最核心的特性是双向数据绑定,当用户操作view时,VM感知到变化,然后通知model发生了相应改变;反之,model发生了改变,VM感知到变化,然后通知view进行更新。VM向上与view进行双向数据绑定,向下与model通过接口请求进行数据交互。
View 是视图层,也就是用户界面。前端主要由 HTML 和 CSS 来构建 。
Model 是指数据模型,泛指后端进行的各种业务逻辑处理和数据操控,对于前端来说就是后端提供的 api 接口。ViewModel 是由前端开发人员组织生成和维护的视图数据层。在这一层,前端开发者对从后端获取的 Model 数据进行转换处理,做二次封装,以生成符合 View 层使用预期的视图数据模型。需要注意的是 ViewModel 所封装出来的数据模型包括视图的状态和行为两部分,而 Model 层的数据模型是只包含状态的,比如页面的这一块展示什么,而页面加载进来时发生什么,点击这一块发生什么,这一块滚动时发生什么这些都属于视图行为(交互),视图状态和行为都封装在了 ViewModel 里。这样的封装使得 ViewModel 可以完整地去描述 View 层。

MVVM和MVC的区别:
- MVC中Controller演变成MVVM中的ViewModel
- MVVM通过数据来显示视图层而不是节点操作
- MVVM主要解决了MVC中大量的dom操作使页面渲染性能降低,加载速度变慢,影响用户体验
CDN
CDN(Content Delivery Network,内容分发网络)是构建在现有网络基础之上的智能虚拟网络,依靠部署在各地的边缘服务器,通过中心平台的负载均衡、内容分发、调度等功能模块,使用户就近获取所需内容,降低网络拥塞,提高用户访问的响应速度和命中率。
CDN系统能够实时地根据网络流量和各节点的连接、负载状况,以及到用户的距离和响应时间等综合信息,将用户的请求导向离用户最近的服务节点上。对于普通的Internet用户,每个CDN节点就相当于一个放置在它周围的web服务器。通过全局负载均衡DNS的控制,用户的请求被透明地指向离它最近的节点,节点中的CDN服务器会像网站的原始服务器一样,响应用户的请求。由于它离用户更近,因而响应速度会更快。
CDN的基本工作原理是广泛采用各种缓存服务器,并将这些缓存服务器分布到用户访问相对集中的地区或网络。就像电商在各地的仓库一样。当不同地域的用户访问网络中的内容时,CDN首先利用全局负载技术将用户的访问指向距离最近的缓存服务器,再由缓存服务器直接响应用户的请求。
vue2响应式数据/双向数据绑定原理
vue数据双向绑定主要是指:数据变化更新视图、视图变化更新数据。其中,view变化更新Data可以通过事件监听的方式实现,所以主要是如何根据Data变化更新view。
数据的双向绑定是通过数据劫持结合发布订阅实现的。利用Object.defineproperty()方法将各个属性的getter和setter方法改写。当数据发生改变的时候,通知订阅者,并触发对应的回调函数,重新渲染数据。
简述:当你把一个普通的js对象传入vue实例作为data选项,vue将遍历此对象所有的属性,并使用Object.defineProperty把这些属性全部添加getter、setter。这些getter、setter对用户来说是不可见的,但是在內部它们让vue能够追踪依赖,在属性被访问和修改时通知变更。每个组件实例都对应一个watcher实例,它会在组件渲染的过程中把接触过的数据属性记录为依赖。之后当依赖项的setter触发时,会通知watcher,从而使它关联的组件重新渲染。
深入理解:
监听器observer:对数据对象进行遍历,包括子属性对象的属性,利用Object.defineProperty对属性都加上getter、setter。这样,给对象属性赋值就会触发setter,就能监听数据变了。
解析器Compile:解析vue模板指令,将模板中的变量都替换成数据,然后初始化渲染页面视图,并将每个指令对应的节点绑定更新函数,添加监听数据的订阅者,一旦数据有变动,收到通知,调用更新函数进行数据更新。
订阅者Watcher:Watcher是Observer和Compile之间通信的桥梁,主要任务是订阅Observer中的属性值变化的消息,当收到属性值变化的消息时,触发解析器Compile中对应的更新函数。每个组件实例都有相应的Watcher,它会在组件渲染的过程中把属性记录为依赖,之后当依赖项的setter触发时,会通知watcher重新计算,从而使它关联的组件重新渲染。
订阅器Dep:订阅器采用发布-订阅的设计模式,用来收集订阅者Watcher,对监听器Observer和订阅者Watcher进行统一管理。
数据劫持
Object.defineProperty()
控制一个对象属性的一些特有操作,比如读写权、是否可以枚举
通过get和set方法对data里的每个属性进行劫持
发布者-订阅者模式
监听器Observer 用来劫持并监听所有属性,如果有变动的,就通知订阅者。
订阅者Watcher 可以收到属性的变化通知并执行相应的函数,从而更新视图
解析器Compile 可以扫描和解析每个节点的相关指令,并根据初始化模板数据以及初始化相应的订阅器
订阅器Dep 订阅者(watcher)是有很多个,所以我们需要有一个消息订阅器Dep来专门收集这些订阅者
每一个对象属性中存储了一个 Dep,Dep 中收集了该对象对应的 watcher,当该属性值发生变化,会触发的 Dep 中保存的 watcher 进行遍历(notify),进而更新视图。
数据劫持/数据代理
感知数据变化的方法很直接,就是进行数据劫持或数据代理。通过Object.defineProperty来实现。
let data = {stage:'abc',course:{title:'aaa',author:'bbb',publishTime:'ccc'}}Object.keys(data).forEach(key => {let currentValue = data[key]Object.defineProperty(data, key, {enumerable: true,configurable: false,get() {console.log(`getting ${key} value now, getting value is:`, currentValue)return currentValue},set(value) {currentValue = valueconsole.log(`setting ${key} value now,setting value is`, currentValue)}})})
这段代码对data数据的getter、setter方法进行了定义拦截,当我们读取或改变data的值时,便可以监听到。
这样实现有一个问题,比如下列代码:
data.course.title = 'qwe'//getting course value now, getting value is: { title: 'aaa', author: 'bbb', publishTime: 'ccc' }
因为我们只实现了一层Object.defineProperty,也就是只对data的第一层属性实现了监听。为了达到深层拦截的目的,可以将Object.defineProperty的逻辑抽象为observe函数,并改用递归实现:
const observe = (data) => {if (!data || typeof data !== 'object') {return}Object.keys(data).forEach(key => {let currentValue = data[key]observe(currentValue)Object.defineProperty(data, key, {enumerable: true,configurable: false,get() {console.log(`getting ${key} value now, getting value is:`, currentValue)return currentValue},set(value) {currentValue = valueconsole.log(`setting ${key} value now,setting value is`, currentValue)}})})}observe(data)
这样就实现了深层数据拦截,但是我们在代理set行为时,并没有对value为复杂类型的情况再次递归调用observe(value)。也就是说,如果给data.course.title赋值为一个引用类型,则无法实现对数据的观察。
在尝试对data.course.title进行赋值时,首先会读取data.course,输出getting course value now, getting value is: { … };赋值后会触发data.course.title的setter,然后输出setting title value now,setting value is…
监听数组变化
我们将上述数据中的某一项变为数组:
let data = {stage:'abc',course:{title:'aaa',author: ['AAA', 'BBB'],publishTime:'ccc'}}const observe = data => {if (!data || typeof data !== 'object') {return}Object.keys(data).forEach(key => {let currentValue = data[key]observe(currentValue)Object.defineProperty(data, key, {enumerable: true,configurable: false,get() {console.log(`getting ${key} value now, getting value is:`, currentValue)return currentValue},set(value) {currentValue = valueconsole.log(`setting ${key} value now,setting value is`, currentValue)}})})}observe(data)data.course.author.push('zzd')
此时我们只监听了对data.course及data.course.author的读取,而数组所产生的行为并没有被拦截。这是因为Array.prototype上挂载的方法并不能触发data.course.author属性值的setter,这并不属于赋值操作,而是调用数组的push方法。
Vue的解决方案是将数组的常用方法进行重写,进而覆盖掉原生的数组方法,重写之后的数组方法需要能够被拦截。实现逻辑如下:
const arrExtend = Object.create(Array.prototype)const arrMethods = ['push','pop','shift','unshift','splice','sort','reverse']arrMethods.forEach(method => {const oldMethod = Array.prototype[method]const newMethod = function (...args) {oldMethod.apply(this,args)console.log(`${method}方法被执行了`)}arrExtend[method] = newMethod})
对数组的方法进行重写,核心操作还是调用原生方法oldMethod.apply(this,args),除此之外还可以在调用时加入我们需要的逻辑。
在上面的基础上,我们调用数组的push方法会得到以下结果:
Array.prototype = Object.assign(Array.prototype,arrExtend)let array = [1,2,3]array.push(4)//push方法被执行了
模板编译原理介绍
模板变量是通过{{}}的表达方式进行输出的。最终输出的HTML内容应该被合适的数据进行填充替换,因此还需要进行编译。模板编译就是使用“正则+遍历”的方式,有时需要一些算法知识,但是在这里的场景中,只需要对#app节点下的内容进行替换,通过正则表达式识别出模板变量,获取对应的数据即可:
compile(document.querySelector('#app'), data)function compile(el, data) {let fragment = document.createDocumentFragment()while (child = el.firstChild) {fragment.appendChild(child)}//对el中的内容进行替换function replace(fragment) {Array.from(fragment.childNodes).forEach(node => {let textContent = node.textContentlet reg = /\{\{(.*?)\}\}/gif (node.nodeType === 3 && reg.test(textContent)) {const nodeTextContent = node.textContentconst replaceText = () => {node.textContent = nodeTextContent.replace(reg, (matched, placeholder) => {return placeholder.split('.').reduce((prev,key) => {return prev[key]}, data)})}replaceText()}//如果还有子节点则继续递归replaceif (node.childNodes && node.childNodes.length) {replace(node)}})}replace(fragment)el.appendChild(fragment)return el}
我们使用fragment变量储存生成的真实HTML节点中的内容。通过replace方法对{{变量}}进行数据替换,同时{{变量}}的表达只会出现在nodeType === 3的文本类型节点中,因此对于符合node.nodeType === 3 && reg.test(textContent)条件的情况,可以进行数据获取和填充。接下来借助replace方法的第二个参数对字符串进行一次性替换,此时对于形如{{data.course.title}}的深层数据,可以通过reduce方法获得正确的值。
因为DOM结构可能是多层的,所以对存在子节点的节点依然使用递归对replace进行替换。
这个编译过程比较简单,没有考虑边界情况,只是单纯完成了从模板变量到真实DOM的转换。
双向绑定实现
上述实现是单向的,通过数据变化引起了视图变化,那么页面中存在一个输入框时该如何触发数据变化呢?
<input v-model="inputData" type="text">
比如对于以上语句,我们需要在模板编译时对存在v-model属性的node进行事件监听,在输入框有内容输入时,改变v-model属性值对应的数据即可。为了满足输入内容的同时修改数据源的需求,我们只需要增加compile中的replace方法逻辑。对于node.nodeType === 1的DOM类型,实现的伪代码如下:
if (node.nodeType === 1) {let attributeArray = node.attributesArray.from(attributeArray).forEach(attr => {let attributeName = attr.namelet attributeValue = attr.valueif (name.includes('v-')) {node.value = data[attributeValue]}node.addEventListener('input', e => {let newVal = e.target.valueOf()data[attributeValue] = newVal//...//更改数据源,触发setter//...})})}
发布/订阅模式简单应用
事件驱动理念,即事件发布/订阅模式。JS本身就是事件驱动型语言。比如应用中对一个button进行了事件绑定,点击之后就会触发click事件。这是因为此时有特定程序正在监听这个事件,随之触发相关的处理程序。
这个模式的一个好处在于能够对代码进行解耦,实现高内聚、低耦合的理念。这种模式对于框架的设计同样也不可或缺。
class Notify {constructor() {this.subscribers = []}add(handler) {this.subscribers.push(handler)}emit() {this.subscribers.forEach(subscriber => subscriber())}}let notify = new Notify()notify.add(() => {console.log('emit here')})notify.emit()//emit here
这是一个简单的事件发布/订阅模式实现,没有进行事件名设置和其他API。
MVVM融会贯通
将MVVM整个过程串联起来就是:首先对数据进行深度拦截或代理,对每一个属性的getter和setter进行加工。换句话说,我们需要在模板初次编译时,解析指令并进行依赖收集({{变量}}),订阅数据变化。
这里的依赖收集过程具体指:当调用compile中的replace方法时,我们会读取数据进行模板变量的替换,“读取数据时”需要做一个标记,用来表示我们依赖这一项数据,因此我们要订阅这个属性值的变化。Vue中是通过定义一个Watcher类表示观察订阅依赖的。这就是整个依赖收集过程。换个思路复述一遍:我们知道模板编译过程中会读取数据,进而触发数据源属性值的getter,因此上面所说的数据代理的加工就是在数据监听的getter中记录这个依赖,同时在setter触发数据变化时执行依赖相应的操作,最终触发模板中的数据变化。
虚拟DOM
虚拟DOM就是用数据结构表示DOM结构,它并没有真实挂载到DOM上,因此被叫做虚拟DOM。
好处:操作数据结构远比通过和浏览器交互去操作DOM快。
但虚拟DOM最终还是要挂载到浏览器上成为真实DOM节点的,因此使用虚拟DOM并不能使操作DOM的次数减少,但能够精确地获取最小的、最必要的操作DOM的集合。
这样一来,我们抽象表示DOM,每次通过DOM diff计算出视图前后更新的最小差异,再把最小差异应用到真实DOM上的做法更加可靠。
<ul id="chapterList"><li class="chapter">chapter1</li><li class="chapter">chapter2</li><li class="chapter">chapter3</li></ul>
用js表示:
const chapterListVirtualDom = {tagName: 'ul',attributes: {id: 'chapterList'},children: [{tagName: 'li', attributes: { class: 'chapter1' }, children: ['chapter1'] },{tagName: 'li', attributes: { class: 'chapter2' }, children: ['chapter2'] },{tagName: 'li', attributes: { class: 'chapter3' }, children: ['chapter3'] },]}
下面来实现一个虚拟DOM生成类,用于生产虚拟DOM:
class Element {constructor(tagName, attributes = {}, children = []) {this.tagName = tagName;this.attributes = attributes;this.children = children;}}function element(tagName,attributes,children) {return new Element(tagName,attributes,children)}
上述虚拟DOM可以采用如下方法生成:
const chapterListVirtualDom = element('ul', {id:'list'}, [element('li', { class: 'chapter' }, ['chapter1']),element('li', { class: 'chapter' }, ['chapter2']),element('li', { class: 'chapter' }, ['chapter3']),])
下面继续将虚拟DOM生成真实DOM节点。首先实现一个setAttribute方法,后续的代码都将使用setAttribute方法来对DOM节点进行属性设置:
const setAttribute = (node, key, value) => {switch(key) {case 'style':node.style.cssText = valuebreak;case 'value':let tagName = node.tagName || ''tagName = tagName.toLowerCase()if (tagName === 'input' || tagName === 'textarea') {node.value = value} else {//如果节点不是input或textarea,则使用setAttribute设置属性node.setAttribute(key, value)}breakdefault:node.setAttribute(key, value)break}}
下面在Element类中加入render原型方法,该方法目的是根据虚拟DOM生成真实DOM片段:
class Element {constructor(tagName, attributes = {}, children = []) {this.tagName = tagName;this.attributes = attributes;this.children = children;}render() {let element = document.createElement(this.tagName)let arrtibutes = this.attributesfor(let key in attributes) {setAttribute(element,key,attributes[key])}let children = this.childrenchildren.forEach(child => {let childElement = child instanceof Element ? child.render() : document.createTextNode(child)})return element}}function element(tagName,attributes,children) {return new Element(tagName,attributes,children)}
总结:通过setAttribute进行属性的创建;对children每一项类型进行判断,如果是Element实例,则递归调用child的render方法,直到遇见文本节点类型,进行内容渲染。
有了真实DOM,然后通过renderDom渲染到浏览器上:
const renderDom = (element, target) => {target.appendChild(element)}
虚拟DOM diff
从直观上看,因为虚拟DOM是个树形结构,所以我们需要对两份虚拟DOM进行递归比较,并将变化存储到变量patches中:
const diff = (oldVirtualDom, newVirtualDom) => {let patches = {}//递归树,将比较后的结果存储到patches中walkTodiff(oldVirtualDom, newVirtualDom, 0, patches)//返回diff结果return patches}
walkTodiff中的前两个参数是需要比较的虚拟DOM对象;第三个参数用来记录nodeIndex,在删除节点时会使用,初始值为0;第四个参数是一个闭包变量,用来记录diff结果。
let initialIndex = 0const WalkToDiff = (oldVirtualDom, newVirtualDom, index, patches) => {let diffResult = []//如果newVirtualDom不存在,则说明该节点已经被移除,接着可以将type为REMOVE的对象推进diffResult变量,并记录indexif (!newVirtualDom) {diffResult.push({type:'REMOVE',index})}//如果新旧节点都是文本节点else if (typeof oldVirtualDom === 'string' && typeof newVirtualDom === 'string') {//比较文本中的内容是否相同,如果不同则记录新的结果if (oldVirtualDom !== newVirtualDom) {diffResult.push({type: 'MODIFY_TEXT',data: newVirtualDom,index})}}//如果新旧节点类型相同else if (oldVirtualDom.tagName === newVirtualDom.tagName) {//比较属性是否相同let diffAttributeResult = {}for (let key in oldVirtualDom) {if (oldVirtualDom[key] !== newVirtualDom[key]) {diffAttributeResult[key] = newVirtualDom[key]}}for (let key in newVirtualDom) {//旧节点不存在的属性if (!oldVirtualDom.hasOwnProperty(key)) {diffAttributeResult[key] = newVirtualDom[key]}}if (Object.keys(diffAttributeResult).length > 0) {diffResult.push({type:'MODIFY_ATTRIBUTES',diffAttributeResult})}//如果有子节点则遍历子节点oldVirtualDom.children.forEach((child, index) => {walkToDiff(child, newVirtualDom.children[index],++initialIndex,patches)})}//如果节点类型不同,已经被直接替换了,则直接将新的结果放入diffResult数组else {diffResult.push({type:'REPLACE',newVirtualDom})}if (!oldVirtualDom) {diffResult.push({type:'REPLACE',newVirtualDom})}if(diffResult.length) {patches[index] = diffResult}}
最小差异化应用
我们已经通过Element class生成了虚拟DOM,通过diff方法对任意两个虚拟DOM进行比对,得到差异。那么,如何将这个差异更新到现有的DOM节点中呢,应该要用patch方法:
const patch = (node, patches) => {let walker = { index: 0 }walk(node, walker, patches)}
patch接收一个真实的DOM节点,一个最小化差异集合,对接diff方法返回的结果。walk函数如下:
const walk = (node, walker, patches) => {let currentPatch = patches[walker.index]let childNodes = node.childNodeschildNodes.forEach(child => {walker.index++walk(child,walker,patches)})if (currentPatch) {doPatch(node,currentPatch)}}
walk函数会进行自身递归,对当前节点的差异调用doPatch方法进行更新:
const doPatch = (node, patches) => {patches.forEach(patch => {switch (patch.type) {case 'MODIFY_ATTRIBUTES':const attributes = patch.diffAttributeResult.attributesfor (let key in attributes) {if (node.nodeType !== 1) returnconst value = attributes[key]if (value) {setAttribute(node, key, value)} else {node.removeAttribute(key)}}breakcase 'MODIFY_TEXT':node.textContent = patch.databreakcase 'REPLACE':let newNode = (patch.newNode instanceof Element) ? render(patch.newNode) : document.createTextNode(patch.newNode)node.parentNode.removeChild(newNode,node)breakcase 'REMOVE':node.parentNode.removeChild(node)breakdefault:break}})}
vue3响应式数据原理
- Vue3.x改用Proxy替代Object.defineProperty。
因为Proxy可以直接监听对象和数组的变化,并且有多达13种拦截方法。并且作为新标准将受到浏览器厂商重点持续的性能优化。
Proxy只会代理对象的第一层,Vue3是怎样处理这个问题的呢?
- 判断当前Reflect.get的返回值是否为Object,如果是则再通过reactive方法做代理,这样就实现了深度观测。
- 监测数组的时候可能触发多次get/set,那么如何防止触发多次呢?我们可以判断key是否为当前被代理对象target自身属性,也可以判断旧值与新值是否相等,只有满足以上两个条件之一时,才有可能执行trigger。
数据结构
数据结构是计算机组织和存储数据的特定方式,目的是方便且高效地对数据进行访问和修改。
通常将数据结构分为8类:数组、堆栈、队列、链表、树、图、字典树、散列表。
栈和队列
栈和队列是一种操作受限的线性结构。
栈的实现遵循后进先出原则:
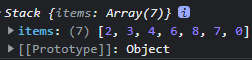
//封装一个栈function Stack() {//数组来保存栈里的元素this.items = [];}//向栈添加元素Stack.prototype.push = function (...element) {this.items.push(...element);}//从栈移除元素Stack.prototype.pop = function (element) {return this.items.pop()}//查看栈顶元素Stack.prototype.peek = function () {return this.items[this.items.length - 1]}//检查栈是否为空Stack.prototype.isEmpty = function () {return this.items.length === 0;}//清空和打印栈元素Stack.prototype.clear = function () {this.items = []}Stack.prototype.print = function () {return this.items;}let stack = new Stack();stack.push(2,3,4,6,8,7,0);console.log(stack.print())console.log(stack.pop());console.log(stack.print());console.log(stack.peek());console.log(stack.isEmpty());stack.clear();console.log(stack.print())
ES6版本:
class Stack {constructor(...args) {this.items = [...args]}push(...elements) {this.items.push(...elements);}....}
items变量是公共的,我们希望用户只能访问暴露给类的方法,否则就有可能从栈的中间移除元素(因为我们用数组来存储其值),这不是我们希望看到的。
let a = new Stack();a.items = [1,2,3,4,5]a.items.splice(1,2)console.log(a); //Stack { items: [ 1, 4, 5 ] }
所以我们要创建私有属性:
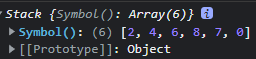
// 1.用ES6的限定作用域Symbol实现类let _items = Symbol();class Stack {constructor() {this[_items] = []}}
这个方法创建了一个假的私有属性,因为ES6的Object.getOwnPropertySymbols方法能够取到类里面声明的所有Symbol属性。下面是一个破坏Stack类的例子:
let stack = new Stack();stack.push(5);stack.push(8);let objectSymbols = Object.getOwnPropertySymbols(stack);console.log(objectSymbols.length); //1console.log(objectSymbols); //[Symbol()]console.log(objectSymbols[0].push(1));stack.print(); //5,8,1
// 2.用ES6的WeakMap实现类// 有一种数据类型可以确保属性是私有的,这就是WeakMap,可以存储键值对,键是对象,值可以是任意数据类型const items = new WeakMap();class Stack{constructor() {items.set(this,[]);}push(element) {let s = items.get(this);s.push(element);}pop() {let s = items.get(this);let r = s.pop();return r;}...}
现在items是真正的私有属性了,但还有一件事要做。items现在仍然是在Stack类以外声明的,因此谁都可以改动他。我们要用一个闭包把Stack类包起来,这样就只能在这个函数里访问WeakMap:
let Stack = (function() {const items = new WeakMap();class Stack{constructor() {items.set(this,[]);}...}return Stack;})();
然而用这种方法的话,扩展类无法继承私有属性。
用栈解决问题
从十进制到二进制:
function dec2bin(decNumber) {let stack = new Stack()while (decNumber > 0 ) {stack.push(decNumber % 2)decNumber = Math.floor(decNumber / 2)}let binaryString = ''while(!stack.isEmpty()) {binaryString += stack.pop()}return binaryString}console.log(dec2bin(100)); //1100100
队列
//封装一个队列function Queue(...args) {this.items = [...args]}Queue.prototype.enqueue = function (...args) {this.items.push(...args)}//从队列移除元素Queue.prototype.dequeue = function (element) {return this.items.shift()}//查看队列头元素Queue.prototype.front = function () {return this.items[0]}//检查队列是否为空Queue.prototype.isEmpty = function () {return this.items.length === 0;}//清空和打印队列元素Queue.prototype.clear = function () {this.items = []}Queue.prototype.print = function () {return this.items;}
优先队列
实现一个优先队列有两种选项:设置优先级,然后在正确的位置添加元素;或者用入列操作添加元素,然后按照优先级移除它们。在这个示例中,我们将会在正确的位置添加元素,因此可以对他们使用默认的出列操作:
function PriorityQueue() {let items = [];function QueueElement(element, priority) {this.element = element;this.priority = priority;}this.enqueue = function(element, priority) {let queueElement = new QueueElement(element, priority);let added = false;for(let i = 0; i<items.length; i++){if(queueElement.priority < items[i].priority) {items.splice(i,0,queueElement);added = true;break;}}if (!added){items.push(queueElement);}};this.print = function() {for(let i = 0; i<items.length; i++) {console.log(`${items[i].element} -${items[i].priority}`);}};//其他方法和默认的Queue实现相同}
和默认类实现上的区别是,要向PriorityQueue添加元素,需要创建一个特殊的元素,这个元素包含了要添加到队列的元素及其在队列中的优先级。
如果队列为空,可以直接将元素入列。否则就需要比较该元素与其他元素的优先级。当找到一个比要添加的元素的priority值更大(优先级更低)的项时,就把新元素插入到他之前。如果要添加的元素的priority值大于任何已有的元素,把它添加到队列的末尾就行了。
循环队列—击鼓传花
孩子么围成一圈,把花尽快地传递给旁边的人,某一时刻传花停止,这个时候花在谁手里,谁就退出圆圈结束游戏。重复这个过程直到只剩一个人。
function hotPotato(nameList, num) {let queue = new Queue();for(let i = 0;i<nameList.length;i++){queue.enqueue(nameList[i]);}let eliminated = '';while(queue.size() > 1) {for(let i = 0; i<num; i++) {queue.enqueue(queue.dequeue());}eliminated = queue.dequeue();console.log(eliminated + '被淘汰');}return queue.dequeue();}let names = ['A','C','D','E','S'], winner = hotPotato(names,7);console.log('winner is ' + winner);D被淘汰C被淘汰S被淘汰E被淘汰winner is A
先把名字加入队列,给定一个数字然后迭代队列。从队列开头移除一项再将其添加到末尾。一旦传递数字达到给定的数字,拿着花的那人就被淘汰。
栈和队列的应用场景
- 浏览器的历史记录,因为回退总是回退到上一个最近的页面,所以遵循栈的原则。
- 任何undo/redo操作。
- 应用递归产生的调用栈。
- 浏览器抛出异常时抛出调用栈信息。
- 进制转换、括号匹配、表达式求值。
- 队列的应用有宏任务、微任务。
- 消息队列。
链表
链表也是按一定的顺序存储数组元素的,不同的地方在于链表不能通过下标对元素进行访问,而是通过每个元素指向其下一个元素的方式进行访问。
优点:
- 链表的插入和删除操作的时间复杂度是常数级的,我们只需要改变相关节点的指针指向即可。
- 链表可以像数组一样顺序访问元素,查找元素的时间复杂度是线性的。
分类:
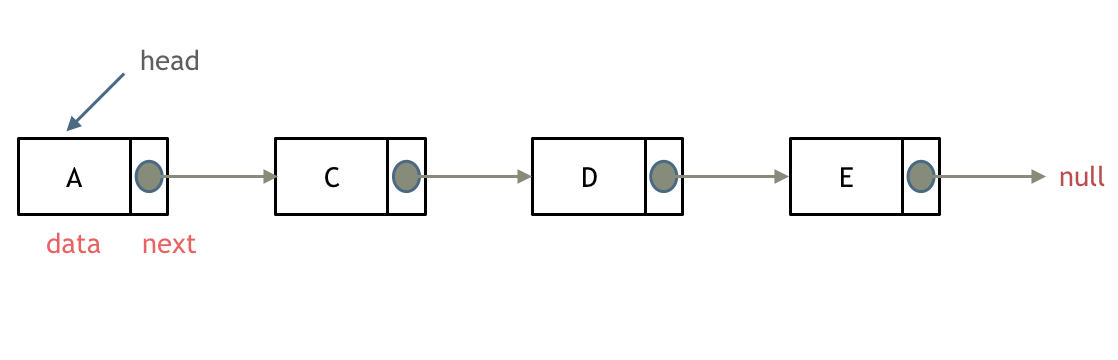
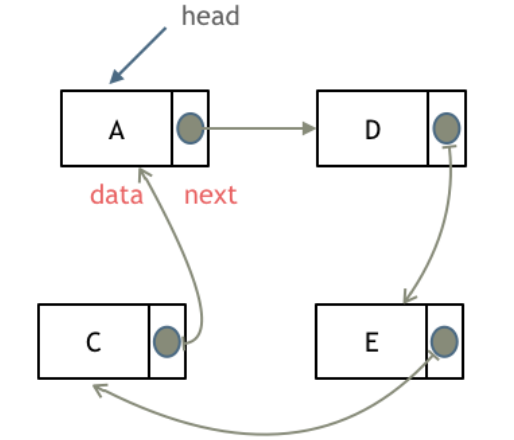
- 单向链表:单向链表是维护一系列节点的数据结构,其特点是每个节点都包含数据,同时包含指向链表中下一个节点的指针。
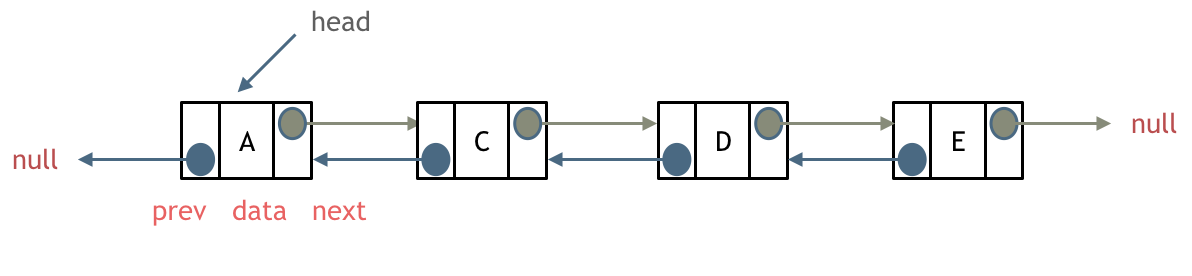
- 双向链表:每个节点除了包含其数据,还包含分别指向其前驱节点和后继节点的指针。
- 循环链表:链表首尾相连。
实现节点类
//封装一个节点类class Node {constructor(data) {//data为当前节点所存储的数据this.data = data;//next指向下一个节点this.next = null;}}
创建链表
//创建链表class LinkedList {constructor() {this.length = 0;//链表开头this.head = null;}}
向链表尾部添加元素
push(element) {const node = new Node(element);let current;if (this.head === null) {this.head = node;} else {current = this.head;while (current.next != null) {//获得最后一项current = current.next;}//将其next赋为新元素,建立连接current.next = node;}//更新链表长度this.length++;}
从链表中移除元素
//从特定位置移出一个元素removeAt(index) {//检查越界值if (index >= 0 && index < this.length) {let current = this.head;//移除第一项if (index === 0) {this.head = current.next;} else {let previous;for (let i = 0; i < index; i++) {previous = current;current = current.next;}//将previous于current的下一项连接起来:跳过current,从而移除他previous.next = current.next;}this.length--;return current.data;}return undefined}
循环迭代链表直到目标位置
把迭代整个链表直到找到目标索引封装成一个方法。
//循环迭代链表直到目标位置getElementAt(index) {if (index >= 0 && index <=this.length) {let node = this.head;for (let i = 0; i < index && node != null; i++) {node = node.next}return node;}return undefined}
重构removeAt方法
removeAt(index) {//检查越界值if (index >= 0 && index < this.length) {let current = this.head;//移除第一项if (index === 0) {this.head = current.next;} else {const previous = this.getElementAt(index - 1);current = previous.next;previous.next = current.next}this.length--;return current.element;}return undefined}
在任意位置插入元素
insert(element, index) {if (index >= 0 && index <= this.length) {const node = new Node(element);let current = this.head;if (index === 0) { //在第一个位置添加node.next = current;this.head = node;} else {const previous = this.getElementAt(index - 1);const current = previous.next;node.next = current;previous.next = node;}this.length++;return true;}return false}
返回一个元素的位置
//返回一个元素的位置indexOf(element) {let current = this.head;for (let i = 0; i < this.length && current != null; i++) {if (current.data === element) {return i}current = current.next}return -1}
按值移除元素
//从链表中移除元素(按值)remove(element) {const index = this.indexOf(element);return this.removeAt(index);}
其他方法
size() {return this.length}isEmpty() {return this.length === 0}getHead() {return this.head;}toString() {if (this.head == null) {return ''}let objString = `${this.head.data}`;let current = this.head.next;for (let i = 1; i < this.length && current != null; i++) {objString = `${objString},${current.data}`;current = current.next}return objString}
双向链表
先设计节点类和双向链表类
class DoublyNode extends Node {constructor(data, next, prev) {super(data, next);this.prev = prev; //新增的}}class DoublyLinkedList extends LinkedList {constructor() {super();this.tail = null; //新增的,保存对链表最后一个元素的引用}}
从任意位置插入元素
insert(element, index) {if (index >= 0 && index <= this.length) {const node = new DoublyNode(element);let current = this.head;if (index === 0) {if (this.head == null) { //新增的this.head = node;this.tail = node;} else {node.next = this.head;current.prev = node; //新增的this.head = node;}} else if (index === this.length){ //最后一项,新增的current = this.tail;current.next = node;this.tail = node;node.prev = current;} else {const previous = this.getElementAt(index - 1);current = previous.next;node.next = current;previous.next = nodenode.prev = previous.next; //新增的current.prev = node; //新增的}this.length++;return true}return false}
从任意位置删除元素
removeAt(index) {//检查越界值if (index >= 0 && index < this.length) {let current = this.head;//移除第一项if (index === 0) {this.head = current.next;// 如果只有一项,更新tailif (this.length === 1) {this.tail = undefined;} else {this.head.prev = undefined;}} else if(index === this.length - 1) {current = this.tail;this.tail = current.prev;this.tail.next = undefined;} else {current = this.getElementAt(index);const previous = current.next;previous.next = current.next;current.next.prev = previous;}this.length--;return current.data;}return undefined}
树
特性:
- 除了根节点,所有的节点都有一个父节点。
- 每一个节点都可以有若干个子节点,如果没有子节点,那么就称此节点为叶子节点。
- 一个节点所拥有的叶子节点的个数被称为该节点的度,因此叶子节点的度为0.
- 在所有的节点中,最大的度为整棵树的度。
- 树的最大层次被称为树的深度。
调用栈
每当一个函数被一个算法调用时,该函数会进入调用栈的顶部。当使用递归的时候,每个函数调用都会堆叠在调用栈的顶部,这是因为每个调用都可能依赖前一个调用的结果。

当n的值为1时,调用栈有三个factorial函数的调用,如果继续执行,会看到factorial(1)被返回(1)后,调用栈开始弹出factorial的调用。
二叉搜索树的实现和遍历
二叉树是最基本的树,因为它的结构简单,每个节点最多包含两个子节点。可以延伸出二叉搜索树、平衡二叉搜索树、红黑树等。
二叉搜索树特性:
- 左子树所有节点的值均小于或等于它的根节点的值。
- 右子树所有节点的值均大于或等于它的根节点的值。
- 左、右子树也分别为二叉搜索树。
根据其特性实现二叉搜索树时,应该先构造一个节点类:
class Node {constructor(key) {this.left = null;this.right = null;this.key = key;}}class BinarySearchTree {constructor() {this.root = null; //Node类型的根节点}}
插入一个键:
insert(key) {if (this.root == null) {this.root = new Node(key);} else {this.insertNode(this.root, key)}}
先验证有没有根节点;有的话就插入其他位置,需要insertNode方法:
insertNode(node, key) {if (key < node.key) {if (node.left == null) {node.left = new Node(key);} else {this.insertNode(node.left, key)}} else {if (node.right == null) {node.right = new Node(key);} else {this.insertNode(node.right, key)}}}
中序遍历:
是一种以上行顺序访问BST所有节点的遍历方式,也就是从小到大的顺序访问所有节点。一种应用就是对树进行排序操作。实现:
inOrderTraverse(callback) {this.inOrderTraverseNode(this.root, callback)}
inOrderTraverse方法接收一个回调函数,用来定义我们对遍历到的每个节点进行的操作。inOrderTraverseNode:
inOrderTraverseNode(node, callback) {if (node != null) {this.inOrderTraverseNode(node.left, callback);callback(node.key);this.inOrderTraverseNode(node.right, callback);}}
首先检查以参数形式传入的节点是否为null,这就是停止递归的条件。然后递归调用相同的函数来访问左侧子节点。接着对根节点进行一些操作,然后再访问右侧子节点。
试着执行打印的方法:
const tree = new BinarySearchTree();tree.insert(11);tree.insert(7);tree.insert(15);tree.insert(5);const printNode = (value) => console.log(value);tree.inOrderTraverse(printNode) //5 7 11 15
先序遍历:
是以优先于后代节点的顺序访问访问每个节点的。一种应用是打印一个结构化的文档。实现:
preOrderTraverse(callback) {this.preOrderTraverseNode(this.root,callback)}preOrderTraverseNode(node, callback) {if (node != null) {callback(node.key);this.preOrderTraverseNode(node.left, callback)this.preOrderTraverseNode(node.right, callback)}}
后序遍历:
是先访问节点的后代节点,再访问节点本身。一种应用是计算一个目录中所有文件所占空间的大小。实现:
postOrderTraverse(callback) {this.postOrderTraverseNode(this.root,callback)}postOrderTraverseNode(node, callback) {if (node != null) {this.postOrderTraverseNode(node.left, callback)this.postOrderTraverseNode(node.right, callback)callback(node.key);}}
搜索树中的值
搜索最小值和最大值:
min() {return this.minNode(this.root)}minNode(node) {let current = node;while (current != null && current.left != null) {current = current.left}return current}max() {return this.maxNode(this.root)}maxNode(node) {let current = node;while (current != null && current.right != null) {current = current.right}return current}
搜索一个特定值:
search(key) {return this.searchNode(this.root, key)}searchNode(node, key) {if (node == null) {return false}if (key < node.key) {return this.searchNode(node.left, key)} else if (key > node.key) {return this.searchNode(node.right, key)} else {return true}}
移除一个节点:
remove(key) {this.root = this.removeNode(this.root, key);}removeNode(node, key) {if (node == null) {return null;}if (key < node.key) {node.left = this.removeNode(node.left, key)return node;} else if (key > node.key) {node.right = this.removeNode(node.right, key)return node;} else {//键等于node.key//第一种情况if (node.left == null && node.right == null) {node = null;return node}//第二种情况if (node.left == null) {node = node.right;return node} else if (node.right == null) {node = node.left;return node;}//第三种情况const aux = this.minNode(node.right);node.key = aux.key;node.right = this.removeNode(node.right, aux.key);return node;}}
图
图的相关术语
图是网络结构的抽象模型。图是一组由边连接的节点。由一条边连接在一起的顶点称为相邻顶点。一个顶点的度是其相邻顶点的数量。路径是顶点的一个连续序列。简单路径要求不包含重复的顶点。环是除去最后一个顶点的简单路径。如果图中每两个顶点之间都存在路径,则该图是连通的。
有向图和无向图
图可以是无向的或是有向的。如果图中每两个顶点间在双向上都存在路径,则该图是强连通的。图还可以是未加权的或是加权的。
图的表示
邻接矩阵
图最常见的实现是邻接矩阵。每个节点都和一个整数相关联,该整数将作为数组的索引。我们用一个二维数组来表示顶点之间的连接。如果索引为i的节点和索引为j的节点相邻,则array[i][j] === 1,否则为0。
不是强连通的图如果用邻接矩阵来表示,则矩阵中将会有很多0,这意味着我们浪费了计算机存储空间来表示根本不存在的边。
邻接表
邻接表由图中每个顶点的相邻顶点列表所组成。可以用列表、链表、散列表、字典来表示相邻顶点列表。
关联矩阵
在关联矩阵中,矩阵的行表示顶点,列表示边。通常用于边的数量比顶点多的情况,以节省空间和内存。
创建Graph类
接收一个参数来表示图是否有向,默认情况下,图是无向的。用一个数组来存储图中所有顶点的名字,用字典来存储邻接表。字典将会使用顶点的名字作为键,邻接顶点列表作为值。
class Graph {constructor(isDirected = false) { //用一个参数表示图是否有向this.isDirected = isDirected;this.vertices = []; //存储所有节点名字this.adjList = new Map(); //存储邻接表}//接着实现两个方法,一个用来向图中添加一个新的顶点,一个用来添加顶点之间的边。addVertex(v) {if(!this.vertices.includes(v)) {this.vertices.push(v);this.adjList.set(v, []);}}addEdge(v, w) {if(!this.adjList.get(v)) {this.addVertex(v);}if(!this.adjList.get(w)) {this.addVertex(w);}this.adjList.get(v).push(w);if(!this.isDirected) { //无向图需要添加两条边this.adjList.get(w).push(v);}}//取值方法getVertices() {return this.vertices;}getAdjList() {return this.adjList;}toString() {let s = '';for(let i = 0; i < this.vertices.length; i++) {s += `${this.vertices[i]} -> `;const neighbors = this.adjList.get(this.vertices[i]);for(let j = 0; j < neighbors.length; j++) {s += `${neighbors[j]}`;}s += '\n';}return s;}}let graph = new Graph();graph.addVertex('A');graph.addVertex('B');graph.addVertex('C');graph.addVertex('D');graph.addEdge('A','B')console.log(graph.toString())

接下来就是遍历图。
图遍历算法的思想是必须追踪每个第一次访问的节点,并且追踪有哪些节点还没有被完全探索。对于两种图遍历算法,都需要明确指出第一个被访问的顶点。
完全探索一个顶点要求我们查看该顶点的每一条边。对于每一条边所连接的没有被访问过的顶点,将其标注为被发现的,并将其加进待访问顶点列表中。
为了保证算法效率,务必访问每个顶点至多两次。连通图中每条边和顶点都会被访问到。
广度优先搜索和深度优先搜寻基本相同,只有一点不同,那就是待访问顶点的数据结构。
| 算法 | 数据结构 | 描述 |
|---|---|---|
| 深度优先搜寻 | 栈 | 将顶点存入栈,顶点是沿着路径被搜索的,存在新的相邻顶点去访问。 |
| 广度优先搜索 | 队列 | 将顶点存入队列,最先入队列的顶点先被搜索。 |
当要标注已经访问过的顶点时,我们用三种颜色反映它们的状态。
白色:表示该顶点还没有被访问。
灰色:被访问过,但并未被搜索过。
黑色:被访问且完全探索过。
这就是之前提到的务必访问每个顶点最多两次的原因。
为了有助于在广度优先和深度优先中标记顶点,我们要使用Colors变量(作为一个枚举器):
const Colors = {WHITE:0,GREY:1,BLACK:2}
两个算法还需要一个辅助对象来帮助存储顶点是否被访问过。在每个算法开头,所有的顶点会被标记为未访问(白色)。我们要用下面的函数初始化每个顶点的颜色。
const initializeColor = vertices => {const color = {};for(let i = 0; i < vertices.length; i++) {color[vertices[i]] = Colors.WHITE;}return color;};
广度优先搜索
会从指定的第一个顶点开始遍历图,先访问其所有的邻点(相邻顶点),就像一次访问图的一层。换句话说就是先宽后深地访问顶点。
以下是从顶点v开始的广度优先搜索算法所遵循的步骤。
- 创建一个队列Q。
- 标注v为被发现的(灰色),并将v入队列Q。
- 如果Q非空,则运行以下步骤:
- 将u从Q中出队列;
- 标注u为被发现的(灰色);
- 将u所有未被访问过的邻点(白色)入队列;
- 标注u为已被搜索的(黑色)。
export const breadthFirstSearch = (graph, startVertex, callback) => {const vertices = graph.getVertices();const adjList = graph.getAdjList();const color = initializeColor(vertices);const queue = new Queue();queue.enqueue(startVertex);while(!queue.isEmpty()) {const u = queue.dequeue();const neighbors = adjList.get(u);color[u] = Colors.GREY;for(let i = 0; i<neighbors.length; i++) {const w = neighbors[i];if(color[w] === Colors.WHITE) {color[w] = Colors.GREY;queue.enqueue(w);}}color[u] = Colors.BLACK;if(callback) {callback(u);}}}
1.使用BFS寻找最短路径
考虑如何解决以下问题:给定一个图G和源顶点v,找出每个顶点u和v之间最短路径的距离(以边的数量计)。
对于给定顶点v,广度优先搜索会访问所有与其距离为1的顶点,接着是距离为2的顶点,以此类推。所以,可以用广度优先算法解决这个问题,可以修改上面的算法:
从v到u的距离distances[u];前溯点predecessors[u],用来推导出从v到其他每个顶点u的最短路径。
const BFS = (graph, startVertex) => {const vertices = graph.getVertices();const adjList = graph.getAdjList();const color = initializeColor(vertices);const queue = new Queue();const distances = {};const predecessors = {};queue.enqueue(startVertex);for(let i = 0; i < vertices.length; i++) {//用0初始化数组distances[vertices[i]] = 0;predecessors[vertices[i]] = null;}while(!queue.isEmpty()) {const u = queue.dequeue();const neighbors = adjList.get(u);color[u] = Colors.GREY;for(let i = 0; i<neighbors.length; i++) {if(color[w] === Colors.WHITE) {color[w] = Colors.GREY;distances[w] = distances[u] + 1;predecessors[w] = u;queue.enqueue(w);}}color[u] = Colors.BLACK;}return {distances, predecessors};}
深度优先搜寻
深度优先搜寻会从第一个指定的顶点开始遍历图,沿着路径直到这条路径最后一个顶点被访问了,接着原路回退并探索下一条路径。换句话说,它是先深度后广度地访问顶点。
深度优先搜索不需要一个源顶点,若图中顶点v未访问,则访问该顶点v。
要访问顶点v,需要:
- 标注v为被发现的(灰色);
- 对于v的所有未访问(白色)的邻点w,访问顶点w;
- 标注v为已被探索的(黑色)。
深度优先搜索的步骤是递归的,这意味着深度优先搜索算法使用栈来存储函数调用。
//深度优先搜索const depthFirstSearch = (graph, callback) => {const vertices = graph.getVertices();const adjList = graph.getAdjList();const color = initializeColor(vertices);for (let i = 0; i < vertices.length; i++) {if (color[vertices[i]] === Colors.WHITE) {depthFirstSearchVisit(vertices[i], color, adjList, callback);}}};const depthFirstSearchVisit = (u, color, adjList, callback) => {color[u] = Colors.GREY;if (callback) {callback(u);}const neighbors = adjList.get(u);for (let i = 0; i < neighbors.length; i++) {const w = neighbors[i];if (color[w] === Colors.WHITE) {depthFirstSearchVisit(w, color, adjList, callback);}}color[u] = Colors.BLACK;};
散列表
散列算法的作用是尽可能快地在数据结构中找到一个值。之前如果要在数据结构中获得一个值(使用get方法),需要迭代整个数据结构来找到它。使用散列函数就能知道值的具体位置,因此能够快速检索到该值。散列函数的作用是给定一个键值,然后返回值在表中的地址。
class HashTable {constructor() {this.table = []}//实现一个散列函数,它是类的一个私有方法//给定一个key参数,就能根据组成key的每个字符的ASCII码值的和得到一个数字。//为了得到比较小的数值,我们会使用hash值和一个任意数做除法的余数。loseloseHashCode(key) {let hash = 0;for (let i = 0; i < key.length; i++) {hash += key.charCodeAt(i);}return hash % 37;};//首先根据给定的key,我们需要根据散列函数计算出它在表中的位置put(key, value) {let position = this.loseloseHashCode(key);// console.log(position + ' - ' + key);this.table[position] = value;};get(key) {return this.table[this.loseloseHashCode(key)];};//不需要将位置也移除。由于元素分布于整个数组范围内,一些位置会没有任何元素占据,并默认为undefined。//不能将位置本身从数组中移除(这会改变其他元素位置),否则当下次需要获得或移除一个元素时,这个元素会不在//我们用散列函数求出的位置上。remove(key) {this.table[this.loseloseHashCode(key)] = undefined;};print() {for (let i = 0; i < this.table.length; ++i) {if (this.table[i] !== undefined) {console.log(i + ": " + this.table[i]);}}};}let hash = new HashTable();hash.put('Candalf', 'gandalf@email.com');hash.put('John', 'johnsnow@email.com');hash.put('Tyrion', 'tyrion@email.com');console.log(hash.get('Candalf'));//gandalf@email.com
处理散列表中的冲突
有时候,一些键会有相同的散列值。不同的值在散列表中对应相同位置的时候,我们称其为冲突。后面添加的元素会覆盖前面的。处理冲突主要有:分离链接、线性探查、双散列法。
分离链接
分离链接法包括为散列表的每一个位置创建一个链表并将元素存储在里面。是处理冲突的简单方法,但是还需要额外的存储空间。
要创建一个新的辅助类来表示将其加入LinkedList实例的元素,叫他ValuePair类:
class ValuePair {constructor(key, value) {this.key = key;this.value = value;}toString() {return '[' + this.key + ' - ' + this.value + ']';}}class HashTableSeparateChaining {constructor() {this.table = []}loseloseHashCode(key) {let hash = 0;for (let i = 0; i < key.length; i++) {hash += key.charCodeAt(i);}return hash % 37;};put(key, value) {let position = this.loseloseHashCode(key);if (this.table[position] === undefined) {this.table[position] = new LinkedList(); //创建一个链表}this.table[position].push(new ValuePair(key, value));};get(key) {let position = this.loseloseHashCode(key);if (this.table[position] !== undefined) {let current = this.table[position].getHead();//遍历链表来寻找键/值while (current.next) {if (current.element.key === key) {return current.element.value;}current = current.next;}//检查元素在链表第一个或最后一个节点的情况if (current.element.key === key) {return current.element.value;}}return undefined}remove(key) {let position = this.loseloseHashCode(key);if (this.table[position] !== undefined) {let current = this.table[position].getHead();while (current.next) {if (current.element.key === key) {this.table[position].remove(current.element);if (this.table[position].isEmpty()) {this.table[position] = undefined;}return true}current = current.next;}//检查是否为第一个或最后一个元素if (current.element.key === key) {this.table[position].remove(current.element);if (this.table[position].isEmpty()) {this.table[position] = undefined;}return true;}}return false;}}
线性探查
当向表中某个位置加入一个新元素的时候,如果索引为index的位置已经被占,就尝试index+1,+2。。。
//put方法put(key,value){let position = this.loseloseHashCode(key);if(this.table[position] == undefined) {this.table[position] = new ValuePair(key, value);} else {let index = ++position;while (this.table[index] != undefined){index++;}this.table[index] = new ValuePair(key, value);}};//get方法get(key){let position = this.loseloseHashCode(key);if(this.table[position] !== undefined) {if(this.table[position].key === key) {return this.table[position].value;} else {let index = ++position;while(this.table[index] === undefined || this.table[index].key !== key) {index++;}if(this.table[index].key === key) {return this.table[index].value;}}}return undefined;};//remove方法remove(key){let position = this.loseloseHashCode(key);if(this.table[position] !== undefined) {if(this.table[position].key === key) {this.table[index] = undefined;} else {let index = ++position;while(this.table[index] === undefined || this.table[index].key !== key) {index++;}if(this.table[index].key === key) {this.table[index] = undefined;}}}return undefined;};
创建更好的散列函数
我们实现的loselose散列函数并不是一个良好的散列函数,因为它会产生太多的冲突。下面实现一个djb2:
let djb2HashCode = function(key) {let hash = 5381;for(let i = 0; i<key.length; i++) {hash = hash * 33 + key.charCodeAt(i);}return hash % 1013;}
他包括初始化一个hash变量并赋值为一个质数(大多数实现都使用5381),然后迭代参数key,将hash与33相乘(用来当做一个魔力数),并和当前迭代到的字符的ASCII码值相加。最后使用相加的和与另一个随机质数相除的余数。
排序和搜索算法
排序算法
冒泡排序
是比较所有相邻的两个项,如果第一个比第二个大,则交换它们。元素项向上移动至正确的顺序,就好像气泡升至表面一样。
function bubbleSort(array) {for (let i = 0; i < array.length; i++) {for (let j = 0; j < array.length - 1; j++) {if (array[j] > array[j + 1]) {swap(array, j, j + 1);}}}return array;}function swap(array, a, b) {// const temp = array[a];// array[a] = array[b];// array[b] = temp; 经典方式[array[a], array[b]] = [array[b], array[a]]; //ES2015方式}function createNonSortedArray(size) {const array = [];for(let i = size; i > 0; i--) {array.push(i);}return array;}let array = createNonSortedArray(5);console.log(array.join()); //5,4,3,2,1array = bubbleSort(array);console.log(array.join()); //1,2,3,4,5
注意当算法执行外循环的第二轮的时候,数字4 5已经是正确排序的了。尽管如此,在后续比较中,他们还一直进行着比较,即使这是不必要的。因此可以稍稍改进一下算法:
function modifiedBubbleSort(array) {for (let i = 0; i < array.length; i++) {for (let j = 0; j < array.length - 1 - i; j++) {if (array[j] > array[j + 1]) {swap(array, j, j + 1);}}}return array;}
在正确位置上的数字没有被比较。因为每次外层循环都能确定一个数字的位置。
选择排序
选择排序是一种原址比较排序算法。选择排序大致的思路是找到数据结构中的最小值并将其放置在第一位,接着找到第二小的值并将其放在第二位,以此类推。
function selectionSort(array) {let indexMin;for(let i = 0; i < array.length - 1; i++) {indexMin = i;for(let j = i+; j < array.length; j++) {if(array[indexMin] > array[j]) {indexMin = j;}}if(i !== indexMin) {swap(array,i,indexMin);}}return array;}
首先声明变量,接着外循环迭代数组。控制迭代轮次。我们假设本迭代轮次的第一个值为数组最小值。然后从当前i的值开始至数组结束,我们比较是否位置j的值比当前最小值小;如果是,则改变最小值至新最小值。当内循环结束,将得出数组第n小的值。最后,如果该最小值和原最小值不同,则交换其值。
插入排序
每次排一个数组项,以此方式构建最后的排序数组。假定第一项已经排序了,接着它和第二项进行比较——第二项是应该待在原位还是插入到第一项之前呢?这样,头两项就已正确排序,接着和第三项比较,以此类推。
function insertionSort(array) {let temp;for(let i = 1; i < array.length; i++) {let j = i;temp = array[i];while(j > 0 && array[j - 1] > temp) {array[j] = array[j - 1];j--;}array[j] = temp;}return array;};
迭代数组来给第i项找到正确的位置,用i的值来初始化一个辅助变量并也将其值存储在一个临时变量中,便于之后将其插入到正确的位置上。下一步是要找到正确的位置来插入项目。只要变量j比0大(因为数组的第一个索引是0,没有负值的索引)并且数组中前面的值比待比较的值大,我们就把这个值移到当前位置上并减小j。
归并排序

归并排序是第一个可以实际使用的排序算法,复杂度为O(nlog(n))。是一种分而治之算法。其思想是将原始数组切分成较小的数组,直到每个小数组只有一个位置,接着将小数组归并成较大的数组,直到最后只有一个排序完毕的大数组。
由于是分治法,归并排序也是递归的。我们要将算法分为两个函数:第一个负责将一个大数组分为多个小数组并调用用来排序的辅助函数。
function mergeSort(array) {if(array.length > 1) {const middle = Math.floor(length / 2);const left = mergeSort(array.slice(0, middle));const right = mergeSort(array.slice(middle, length));array = merge(left, right);}return array;}
递归的停止条件是判断数组的长度是否为1,如果是则直接返回这个数组,因为他已经排序了。
如果数组长度大于1,就将其分成小数组。为此首先要找到数组的中间位,然后将数组分为left、right两个小数组。调用自身直到数组大小小于等于1.
下面是merge函数,负责合并和排序小数组来产生大数组,直到回到原始数组并已排序完成。
function merge(left, right) {let i = 0;let j = 0;const result = [];while(i < left.length && j < right.length) {result.push(left[i]<right[j] ? left[i++] : right[j++]);}return result.concat(i < left.length ? left.slice(i) : right.slice(j));}
merge函数接收两个数组作为参数,并将它们归并为一个大数组。排序发生在归并过程中。首先需要声明归并过程要创建的新数组以及用来迭代两个数组left和right所需的两个变量。迭代两个数组的过程中,我们比较left数组的项是否比来自right数组的项小。如果是,将该项从left数组添加至归并结果数组,并递增用于迭代数组的控制变量,否则,从right数组添加项并递增用于迭代数组的控制变量。
接下来将left数组所有剩余的项添加到归并数组中,right数组也是一样,最后将归并数组作为结果返回。
快速排序
复杂度为O(nlog(n)),且性能较好。使用分而治之的方法,将原始数组分为较小的数组。
- 首先从数组中选择一个值作为主元(pivot),也就是数组中间的那个值。
- 创建两个指针(引用),左边一个指向数组第一个值,右边一个指向数组最后一个值。移动左指针直到我们找到一个比主元大的值,接着移动右指针直到找到一个比主元小的值,然后交换它们,重复这个过程,直到左指针超过了右指针。这个过程将使得比主元小的值都排在主元之前,比主元大的值都排在主元之后。这一步叫划分(partition)操作。
- 接着,算法对划分后的小数组(较主元小的值组成子数组,较主元大的值组成的子数组)重复之前的两个步骤,直到数组已完全排序。
function quickSort(array) {return quick(array, 0, array.length - 1);}
声明一个主方法来调用递归函数,传递待排序数组,以及索引0及其最末的位置作为参数。
function quick(array, left, right) {//用于划分更小的数组let index;if(array.length > 1) {index = partition(array, left, right);if(left < index - 1) {quick(array, left, index - 1);}if(index < right) {quick(array, index, right);}}return array;}
首先声明index,该变量能帮助我们将子数组分离为较小值数组和较大值数组。这样就能再次递归地调用quick函数了。partition函数返回值将赋值给index。
1.划分过程
首先要选择主元,有好几种方式,最简单的一种是选择数组的第一个值。然而,研究表明对于已排序的数组,这不是一个好选择,它将导致该算法的最差表现。另一种方式是随机选择数组的一个值或是选择中间的值。
function partition(array, left, right) {const pivot = array[Math.floor((right + left) / 2)];let i = left;let j = right;while(i <= j) {while(array[i] < pivot) {i++};while(array[j] > pivot) {j--};if(i <= j) {swap(array, i, j);i++;j--;}}//返回左指针的索引,用来在quick函数中创建子数组。return i;}
在本实现中,我们选择中间值作为主元。我们初始化两个指针:left,初始化为数组第一个元素;right,初始化为数组最后一个元素。
只要left和right指针没有相互交错,就执行划分操作。首先移动left指针直到找到一个比主元大的元素,移动right指针直到找到一个比主元小的元素的。
当左指针指向的元素比主元大且右指针指向的元素比主元小,并且此时左指针索引没有右指针索引大时就交换它们。
划分结束后返回左指针的索引,用来在quick函数中创建子数组。
搜索算法
顺序搜索
将每一个数据结构中的元素和我们要找的元素作比较,是一种低效的搜索算法。
const DOES_NOT_EXIST = -1;function sequentialSearch(array, value) {for(let i = 0; i < array.length; i++) {if(value == array[i]){return i;}}return DOES_NOT_EXIST}
二分搜索
要求数据结构已排序。
function binarySearch(array, value) {//开始先要对数组排序,这里选择了快速排序const sortedArray = quickSort(array);//设置边界指针let low = 0;let high = sortedArray.length - 1;while(low <= hign) {const mid = Math.floor((low + hign) / 2);const element = sortedArray[mid];if(element < value) {low = mid + 1;} else if(element > value) {hign = mid - 1;} else {return mid;}}return DOES_NOT_EXIST;}
内插搜索
是二分搜索的改良版,二分搜索总是检查mid位置上的值,而内插搜索可能会根据要搜索的值检查数组中的不同地方。
- 使用position公式选中一个值;
- 如果这个值是待搜索值,那么算法执行完毕;
- 如果待搜索值比选中值要小,则返回步骤1并在选中值左边的子数组中寻找;
- 如果待搜索值比选中值要大,则返回步骤1并在选中值右边的子数组中寻找;
function interpolationSearch(array,value) {let low = 0;let hign = array.length - 1;let position = -1;let delta = -1;while(low <= hign && value >= array[low] && value <= array[hign]) {}}

若有收获,就点个赞吧
0 人点赞
