https://www.cnblogs.com/haoxianrui/p/16090029.html
https://panjiachen.gitee.io/vue-element-admin-site/zh/
项目简介
vue3-element-admin 是基于 vue-element-admin 升级的 Vue3 + Element Plus 版本的后台管理前端解决方案,是 有来技术团队 继 youlai-mall 全栈开源商城项目的又一开源力作。
项目使用 Vue3 + Vite2 + TypeScript + Element Plus + Vue Router + Pinia + Volar 等前端主流技术栈,基于此项目模板完成有来商城管理前端的 Vue3 版本。
本篇先对本项目功能、技术栈进行整体概述,再细节的讲述从0到1搭建 vue3-element-admin,在希望大家对本项目有个完完整整整了解的同时也能够在学 Vue3 + TypeScript 等技术栈少花些时间,少走些弯路,这样团队在毫无保留开源才有些许意义。
功能清单
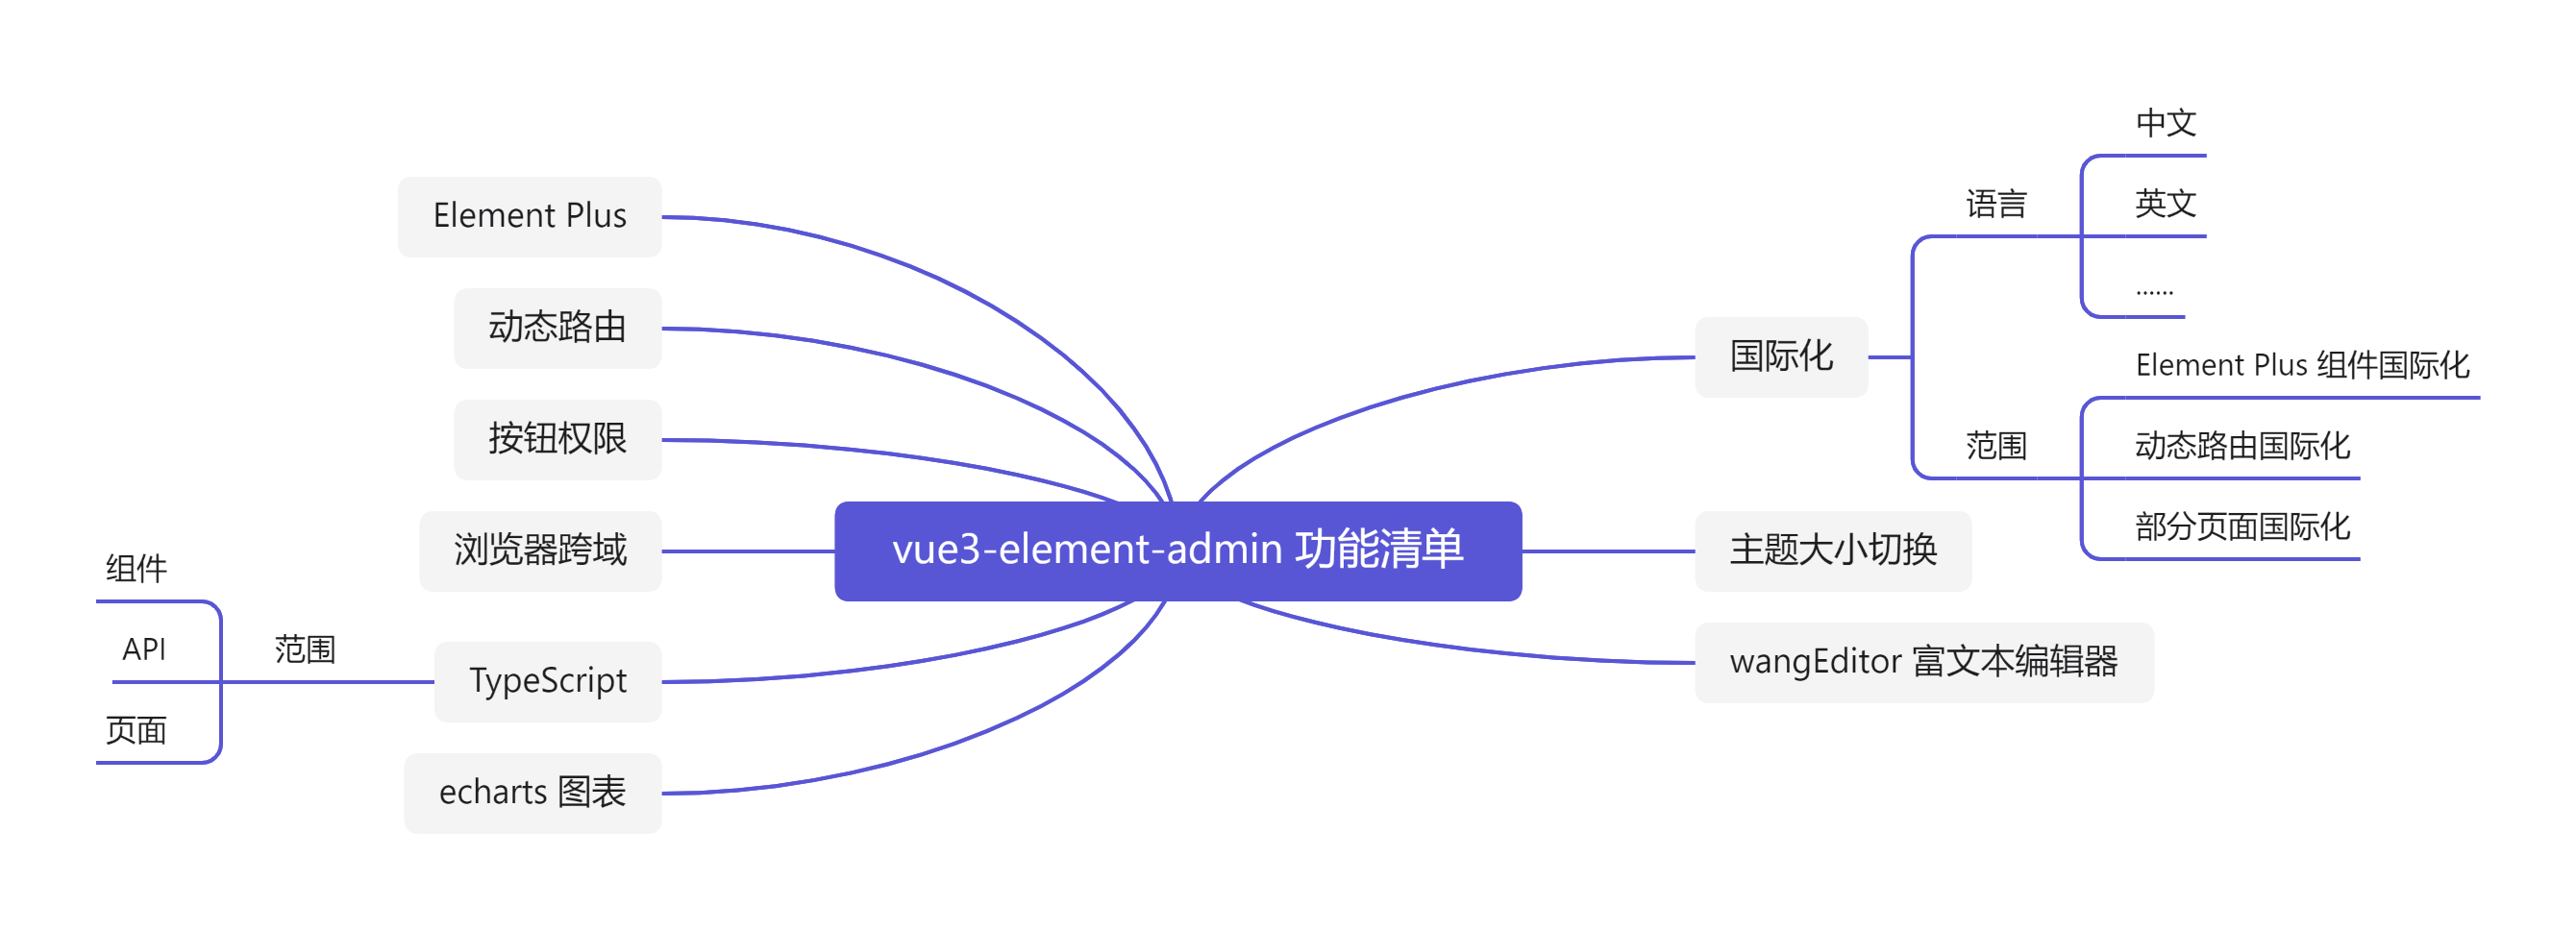
技术栈清单
| 技术栈 | 描述 | 官网 |
|---|---|---|
| Vue3 | 渐进式 JavaScript 框架 | https://v3.cn.vuejs.org/ |
| TypeScript | 微软新推出的一种语言,是 JavaScript 的超集 | https://www.tslang.cn/ |
| Vite2 | 前端开发与构建工具 | https://cn.vitejs.dev/ |
| Element Plus | 基于 Vue 3,面向设计师和开发者的组件库 | https://element-plus.gitee.io/zh-CN/ |
| Pinia | 新一代状态管理工具 | https://pinia.vuejs.org/ |
| Vue Router | Vue.js 的官方路由 | https://router.vuejs.org/zh/ |
| wangEditor | Typescript 开发的 Web 富文本编辑器 | https://www.wangeditor.com/ |
| Echarts | 一个基于 JavaScript 的开源可视化图表库 | https://echarts.apache.org/zh/ |
项目预览
在线预览地址:vue3.youlai.tech
以下截图是来自有来商城管理前端 mall-admin-web ,是基于 vue3-element-admin 为基础开发的具有一套完整的系统权限管理的商城管理系统,数据均为线上真实的而非Mock。
启动部署
- 项目启动
npm install npm run dev
浏览器访问 http://localhost:3000
- 项目部署
npm run build:prod
生成的静态文件在工程根目录 dist 文件夹
项目从0到1构建
安装第三方插件请注意项目源码的package.json版本号,有些升级不考虑兼容性的插件在 install 的时候我会带上具体版本号,例如 npm install vue-i18n@9.1.9 和 npm i vite-plugin-svg-icons@2.0.1 -D
环境准备
1. 运行环境Node
Node下载地址: http://nodejs.cn/download/
根据本机环境选择对应版本下载,安装过程可视化操作非常简便,静默安装即可。
安装完成后命令行终端 node -v 查看版本号以验证是否安装成功:
2. 开发工具VSCode
下载地址:https://code.visualstudio.com/Download
3. 必装插件Volar
VSCode 插件市场搜索 Volar (就排在第一位的骷髅头),且要禁用默认的 Vetur.
项目初始化
1. Vite 是什么?
Vite是一种新型前端构建工具,能够显著提升前端开发体验。
Vite 官方中文文档:https://cn.vitejs.dev/guide/
2. 初始化项目
npm init vite@latest vue3-element-admin —template vue-ts
- vue3-element-admin:项目名称
- vue-ts : Vue + TypeScript 的模板,除此还有vue,react,react-ts模板

3. 启动项目
cd vue3-element-admin npm install npm run dev
浏览器访问: http://localhost:3000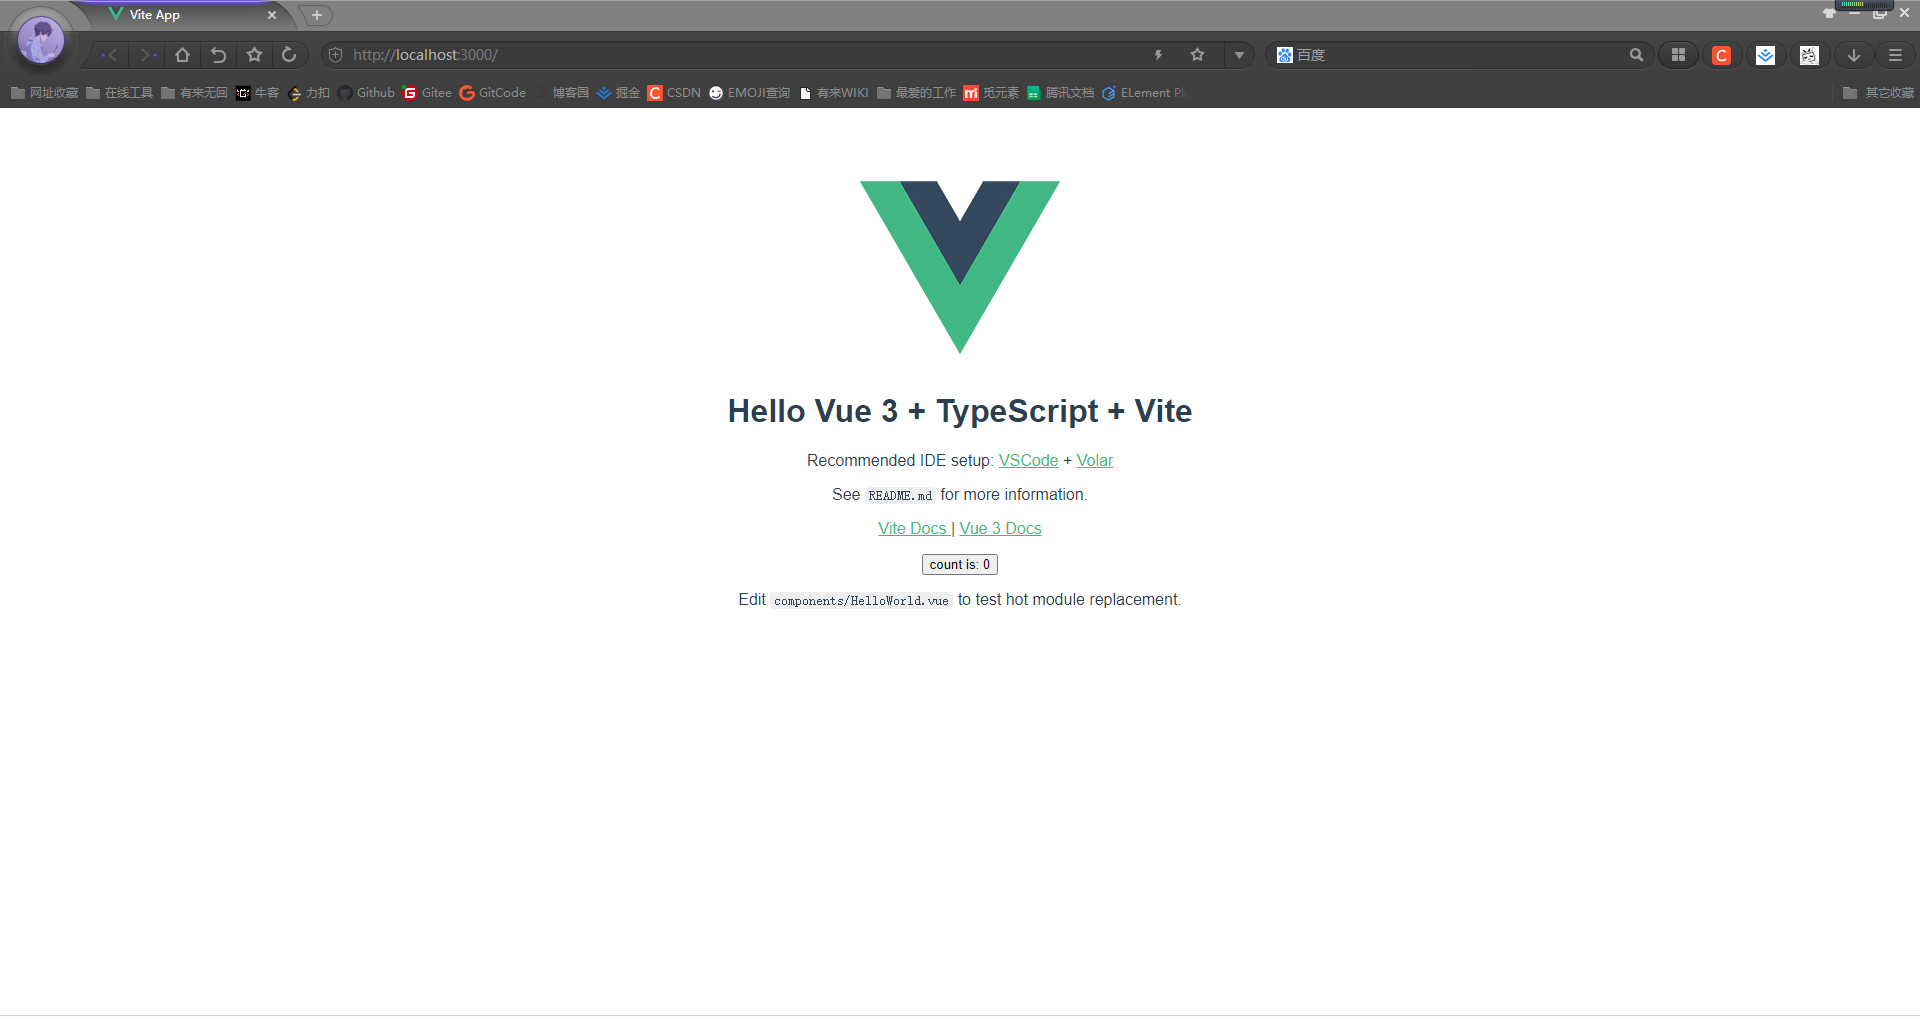
整合Element-Plus
1.本地安装Element Plus和图标组件
npm install element-plusnpm install @element-plus/icons-vue
2.全局注册组件
// main.tsimport ElementPlus from 'element-plus'import 'element-plus/theme-chalk/index.css'createApp(App).use(ElementPlus).mount('#app')
3. Element Plus全局组件类型声明
// tsconfig.json{"compilerOptions": {// ..."types": ["element-plus/global"]}}
4. 页面使用 Element Plus 组件和图标
<!-- src/App.vue --><template><img alt="Vue logo" src="./assets/logo.png"/><HelloWorld msg="Hello Vue 3 + TypeScript + Vite"/><div style="text-align: center;margin-top: 10px"><el-button :icon="Search" circle></el-button><el-button type="primary" :icon="Edit" circle></el-button><el-button type="success" :icon="Check" circle></el-button><el-button type="info" :icon="Message" circle></el-button><el-button type="warning" :icon="Star" circle></el-button><el-button type="danger" :icon="Delete" circle></el-button></div></template><script lang="ts" setup>import HelloWorld from '/src/components/HelloWorld.vue'import {Search, Edit,Check,Message,Star, Delete} from '@element-plus/icons-vue'</script>

路径别名配置
1. Vite配置
// vite.config.tsimport {defineConfig} from 'vite'import vue from '@vitejs/plugin-vue'import path from 'path'export default defineConfig({plugins: [vue()],resolve: {alias: {"@": path.resolve("./src") // 相对路径别名配置,使用 @ 代替 src}}})
2. 安装@types/node
import path from ‘path’编译器报错:TS2307: Cannot find module ‘path’ or its corresponding type declarations.
本地安装 Node 的 TypeScript 类型描述文件即可解决编译器报错
npm install @types/node --save-dev
3. TypeScript 编译配置
同样还是import path from ‘path’ 编译报错: TS1259: Module ‘“path”‘ can only be default-imported using the ‘allowSyntheticDefaultImports’ flag
因为 typescript 特殊的 import 方式 , 需要配置允许默认导入的方式,还有路径别名的配置
// tsconfig.json
{
  "compilerOptions": {
    "baseUrl": "./", // 解析非相对模块的基地址,默认是当前目录
    "paths": { //路径映射,相对于baseUrl
      "@/*": ["src/*"]
    },
    "allowSyntheticDefaultImports": true // 允许默认导入
  }
}
4.别名使用
// App.vue
import HelloWorld from '/src/components/HelloWorld.vue'
                                                ↓
import HelloWorld from '@/components/HelloWorld.vue'
环境变量
官方教程: https://cn.vitejs.dev/guide/env-and-mode.html
1. env配置文件
项目根目录分别添加 开发、生产和模拟环境配置
开发环境配置:.env.development
# 变量必须以 VITE_ 为前缀才能暴露给外部读取
VITE_APP_TITLE = 'vue3-element-admin'
VITE_APP_PORT = 3000
VITE_APP_BASE_API = '/dev-api'
生产环境配置:.env.production
VITE_APP_TITLE = 'vue3-element-admin'
VITE_APP_PORT = 3000
VITE_APP_BASE_API = '/prod-api'
模拟生产环境配置:.env.staging
VITE_APP_TITLE = 'vue3-element-admin'
VITE_APP_PORT = 3000
VITE_APP_BASE_API = '/prod--api'
2.环境变量智能提示
添加环境变量类型声明 ```typescript // src/ env.d.ts // 环境变量类型声明 interface ImportMetaEnv { VITE_APP_TITLE: string, VITE_APP_PORT: string, VITE_APP_BASE_API: string }
interface ImportMeta { readonly env: ImportMetaEnv }
后面在使用自定义环境变量就会有智能提示,环境变量使用请参考下一节。
<a name="BsoYB"></a>
### 浏览器跨域处理
**1. 跨域原理**<br />浏览器同源策略: 协议、域名和端口都相同是同源,浏览器会限制非同源请求读取响应结果。<br />解决浏览器跨域限制大体分为后端和前端两个方向:

- 后端:开启 CORS 资源共享;
- 前端:使用反向代理欺骗浏览器误认为是同源请求;

**2. 前端反向代理解决跨域**<br />Vite 配置反向代理解决跨域,因为需要读取环境变量,故写法和上文的出入较大,这里贴出完整的 vite.config.ts 配置。
```typescript
// vite.config.ts
import {UserConfig, ConfigEnv, loadEnv} from 'vite'
import vue from '@vitejs/plugin-vue'
import path from 'path'

export default ({command, mode}: ConfigEnv): UserConfig => {
    // 获取 .env 环境配置文件
    const env = loadEnv(mode, process.cwd())

    return (
        {
            plugins: [
                vue()
            ],
            // 本地反向代理解决浏览器跨域限制
            server: {
                host: 'localhost',
                port: Number(env.VITE_APP_PORT),
                open: true, // 启动是否自动打开浏览器
                proxy: {
                    [env.VITE_APP_BASE_API]: {
                        target: 'https://api.youlai.tech', // 有来商城线上接口地址
                        changeOrigin: true,
                        rewrite: path => path.replace(new RegExp('^' + env.VITE_APP_BASE_API), '')
                    }
                }
            },
            resolve: {
                alias: {
                    "@": path.resolve("./src") // 相对路径别名配置,使用 @ 代替 src
                }
            }
        }
    )
}
SVG图标
官方教程: https://github.com/vbenjs/vite-plugin-svg-icons/blob/main/README.zh_CN.md
Element Plus 图标库往往满足不了实际开发需求,可以引用和使用第三方例如 iconfont 的图标,本节通过整合 vite-plugin-svg-icons 插件使用第三方图标库。
1. 安装 vite-plugin-svg-icons
npm i fast-glob@3.2.11 -D
npm i vite-plugin-svg-icons@2.0.1 -D
2. 创建图标文件夹
项目创建 src/assets/icons 文件夹,存放 iconfont 下载的 SVG 图标
3. main.ts 引入注册脚本
// main.ts
import 'virtual:svg-icons-register';
4. vite.config.ts 插件配置
// vite.config.ts
import {UserConfig, ConfigEnv, loadEnv} from 'vite'
import vue from '@vitejs/plugin-vue'
import { createSvgIconsPlugin } from 'vite-plugin-svg-icons';

export default ({command, mode}: ConfigEnv): UserConfig => {
    // 获取 .env 环境配置文件
    const env = loadEnv(mode, process.cwd())

    return (
        {
            plugins: [
                vue(),
                createSvgIconsPlugin({
                    // 指定需要缓存的图标文件夹
                    iconDirs: [path.resolve(process.cwd(), 'src/assets/icons')],
                    // 指定symbolId格式
                    symbolId: 'icon-[dir]-[name]',
                })
            ]
        }
    )
}
5. TypeScript支持
// tsconfig.json
{
  "compilerOptions": {
    "types": ["vite-plugin-svg-icons/client"]
  }
}
6. 组件封装
<!-- src/components/SvgIcon/index.vue -->
<template>
  <svg aria-hidden="true" class="svg-icon">
    <use :xlink:href="symbolId" :fill="color" />
  </svg>
</template>

<script setup lang="ts">
import { computed } from 'vue';

const props=defineProps({
  prefix: {
    type: String,
    default: 'icon',
  },
  iconClass: {
    type: String,
    required: true,
  },
  color: {
    type: String,
    default: ''
  }
})

const symbolId = computed(() => `#${props.prefix}-${props.iconClass}`);
</script>

<style scoped>
.svg-icon {
  width: 1em;
  height: 1em;
  vertical-align: -0.15em;
  overflow: hidden;
  fill: currentColor;
}
</style>
7. 使用案例
<template>
  <svg-icon icon-class="menu"/>
</template>

<script setup lang="ts">
    import SvgIcon from '@/components/SvgIcon/index.vue';
</script>
Pinia状态管理
1. 安装Pinia
npm install pinia
2. Pinia全局注册
// src/main.ts
import { createPinia } from "pinia"
app.use(createPinia())
   .mount('#app')
3. Pinia模块封装
// src/store/modules/user.ts
// 用户状态模块
import { defineStore } from "pinia";
import { UserState } from "@/types"; // 用户state的TypeScript类型声明,文件路径 src/types/store/user.d.ts

const useUserStore = defineStore({
    id: "user",
    state: (): UserState => ({
        token:'',
        nickname: ''
    }),
    actions: {
      getUserInfo() {
          return new Promise(((resolve, reject) => {
          ...
          resolve(data)
          ...
        }))
      }
    }
})

export default useUserStore;
// src/store/index.ts
import useUserStore from './modules/user'
const useStore = () => ({
    user: useUserStore()
})
export default useStore
4. 使用Pinia
import useStore from "@/store";

const { user } = useStore()
// state
const token = user.token
// action
user.getUserInfo().then(({data})=>{
    console.log(data)
})
Axios网络请求库封装
1. axios工具封装
//  src/utils/request.ts
import axios, { AxiosRequestConfig, AxiosResponse } from "axios";
import { ElMessage, ElMessageBox } from "element-plus";
import { localStorage } from "@/utils/storage";
import useStore from "@/store"; // pinia

// 创建 axios 实例
const service = axios.create({
    baseURL: import.meta.env.VITE_APP_BASE_API,
    timeout: 50000,
    headers: { 'Content-Type': 'application/json;charset=utf-8' }
})

// 请求拦截器
service.interceptors.request.use(
    (config: AxiosRequestConfig) => {
        if (!config.headers) {
            throw new Error(`Expected 'config' and 'config.headers' not to be undefined`);
        }
        const { user } = useStore()
        if (user.token) {
            config.headers.Authorization = `${localStorage.get('token')}`;
        }
        return config
    }, (error) => {
        return Promise.reject(error);
    }
)

// 响应拦截器
service.interceptors.response.use(
    (response: AxiosResponse) => {
        const { code, msg } = response.data;
        if (code === '00000') {
            return response.data;
        } else {
            ElMessage({
                message: msg || '系统出错',
                type: 'error'
            })
            return Promise.reject(new Error(msg || 'Error'))
        }
    },
    (error) => {
        const { code, msg } = error.response.data
        if (code === 'A0230') {  // token 过期
            localStorage.clear(); // 清除浏览器全部缓存
            window.location.href = '/'; // 跳转登录页
            ElMessageBox.alert('当前页面已失效,请重新登录', '提示', {})
                .then(() => {
                })
                .catch(() => {
                });
        } else {
            ElMessage({
                message: msg || '系统出错',
                type: 'error'
            })
        }
        return Promise.reject(new Error(msg || 'Error'))
    }
);

// 导出 axios 实例
export default service
2. API封装
以登录成功后获取用户信息(昵称、头像、角色集合和权限集合)的接口为案例,演示如何通过封装的 axios 工具类请求后端接口,其中响应数据
// src/api/system/user.ts
import request from "@/utils/request";
import { AxiosPromise } from "axios";
import { UserInfo } from "@/types"; // 用户信息返回数据的TypeScript类型声明,文件路径 src/types/api/system/user.d.ts

/**
 * 登录成功后获取用户信息(昵称、头像、权限集合和角色集合)
 */
export function getUserInfo(): AxiosPromise<UserInfo> {
    return request({
        url: '/youlai-admin/api/v1/users/me',
        method: 'get'
    })
}
3. API调用
// src/store/modules/user.ts
import { getUserInfo } from "@/api/system/user";

// 获取登录用户信息
getUserInfo().then(({ data }) => {
    const { nickname, avatar, roles, perms } = data
  ...
})
动态权限路由
官方文档: https://router.vuejs.org/zh/api/
1. 安装 vue-router
npm install vue-router@next
2. 创建路由实例
创建路由实例并导出,其中包括静态路由数据,动态路由后面将通过接口从后端获取并整合用户角色的权限控制。
// src/router/index.ts
import { createRouter, createWebHashHistory, RouteRecordRaw } from 'vue-router'
import useStore from "@/store";

export const Layout = () => import('@/layout/index.vue')

// 静态路由
export const constantRoutes: Array<RouteRecordRaw> = [
    {
        path: '/redirect',
        component: Layout,
        meta: { hidden: true },
        children: [
            {
                path: '/redirect/:path(.*)',
                component: () => import('@/views/redirect/index.vue')
            }
        ]
    },
    {
        path: '/login',
        component: () => import('@/views/login/index.vue'),
        meta: { hidden: true }
    },
    {
        path: '/404',
        component: () => import('@/views/error-page/404.vue'),
        meta: { hidden: true }
    },
    {
        path: '/401',
        component: () => import('@/views/error-page/401.vue'),
        meta: { hidden: true }
    },
    {
        path: '/',
        component: Layout,
        redirect: '/dashboard',
        children: [
            {
                path: 'dashboard',
                component: () => import('@/views/dashboard/index.vue'),
                name: 'Dashboard',
                meta: { title: 'dashboard', icon: 'dashboard', affix: true }
            }
        ]
    }
]

// 创建路由实例
const router = createRouter({
    history: createWebHashHistory(),
    routes: constantRoutes as RouteRecordRaw[],
    // 刷新时,滚动条位置还原
    scrollBehavior: () => ({ left: 0, top: 0 })
})

// 重置路由
export function resetRouter() {
    const { permission } = useStore()
    permission.routes.forEach((route) => {
        const name = route.name
        if (name) {
            router.hasRoute(name) && router.removeRoute(name)
        }
    })
}

export default router
3. 路由实例全局注册
// main.ts
import router from "@/router";

app.use(router)
   .mount('#app')
4. 动态权限路由
// src/permission.ts
import router from "@/router";
import { ElMessage } from "element-plus";
import useStore from "@/store";
import NProgress from 'nprogress';
import 'nprogress/nprogress.css'
NProgress.configure({ showSpinner: false }) // 进度环显示/隐藏


// 白名单路由
const whiteList = ['/login', '/auth-redirect']

router.beforeEach(async (to, from, next) => {
    NProgress.start()
    const { user, permission } = useStore()
    const hasToken = user.token
    if (hasToken) {
        // 登录成功,跳转到首页
        if (to.path === '/login') {
            next({ path: '/' })
            NProgress.done()
        } else {
            const hasGetUserInfo = user.roles.length > 0
            if (hasGetUserInfo) {
                next()
            } else {
                try {
                    await user.getUserInfo()
                    const roles = user.roles
                    // 用户拥有权限的路由集合(accessRoutes)
                    const accessRoutes: any = await permission.generateRoutes(roles)
                    accessRoutes.forEach((route: any) => {
                        router.addRoute(route)
                    })
                    next({ ...to, replace: true })
                } catch (error) {
                    // 移除 token 并跳转登录页
                    await user.resetToken()
                    ElMessage.error(error as any || 'Has Error')
                    next(`/login?redirect=${to.path}`)
                    NProgress.done()
                }
            }
        }
    } else {
        // 未登录可以访问白名单页面(登录页面)
        if (whiteList.indexOf(to.path) !== -1) {
            next()
        } else {
            next(`/login?redirect=${to.path}`)
            NProgress.done()
        }
    }
})

router.afterEach(() => {
    NProgress.done()
})
其中 const accessRoutes: any = await permission.generateRoutes(roles)是根据用户角色获取拥有权限的路由(静态路由+动态路由),核心代码如下:
// src/store/modules/permission.ts
import { constantRoutes } from '@/router';
import { listRoutes } from "@/api/system/menu";

const usePermissionStore = defineStore({
    id: "permission",
    state: (): PermissionState => ({
        routes: [],
        addRoutes: []
    }),
    actions: {
        setRoutes(routes: RouteRecordRaw[]) {
            this.addRoutes = routes
              // 静态路由 + 动态路由
            this.routes = constantRoutes.concat(routes)
        },
        generateRoutes(roles: string[]) {
            return new Promise((resolve, reject) => {
                  // API 获取动态路由
                listRoutes().then(response => {
                    const asyncRoutes = response.data
                    let accessedRoutes = filterAsyncRoutes(asyncRoutes, roles)
                    this.setRoutes(accessedRoutes)
                    resolve(accessedRoutes)
                }).catch(error => {
                    reject(error)
                })
            })
        }
    }
})

export default usePermissionStore;
按钮权限
1. Directive 自定义指令
// src/directive/permission/index.ts

import useStore from "@/store";
import { Directive, DirectiveBinding } from "vue";

/**
 * 按钮权限校验
 */
export const hasPerm: Directive = {
    mounted(el: HTMLElement, binding: DirectiveBinding) {
        // 「超级管理员」拥有所有的按钮权限
        const { user } = useStore()
        const roles = user.roles;
        if (roles.includes('ROOT')) {
            return true
        }
        // 「其他角色」按钮权限校验
        const { value } = binding;
        if (value) {
            const requiredPerms = value; // DOM绑定需要的按钮权限标识

            const hasPerm = user.perms.some(perm => {
                return requiredPerms.includes(perm)
            })

            if (!hasPerm) {
                el.parentNode && el.parentNode.removeChild(el);
            }
        } else {
            throw new Error("need perms! Like v-has-perm=\"['sys:user:add','sys:user:edit']\"");
        }
    }
};
2. 自定义指令全局注册
// src/main.ts

const app = createApp(App)
// 自定义指令
import * as directive from "@/directive";

Object.keys(directive).forEach(key => {
    app.directive(key, (directive as { [key: string]: Directive })[key]);
});
3. 指令使用
// src/views/system/user/index.vue
<el-button v-hasPerm="['sys:user:add']">新增</el-button>
<el-button v-hasPerm="['sys:user:delete']">删除</el-button>
Element-Plus国际化
官方教程:https://element-plus.gitee.io/zh-CN/guide/i18n.html
Element Plus 官方提供全局配置 Config Provider实现国际化
//  src/App.vue
<template>
  <el-config-provider :locale="locale">
    <router-view />
  </el-config-provider>
</template>

<script setup lang="ts">
import { computed, onMounted, ref, watch } from "vue";
import { ElConfigProvider } from "element-plus";

import useStore from "@/store";

// 导入 Element Plus 语言包
import zhCn from "element-plus/es/locale/lang/zh-cn";
import en from "element-plus/es/locale/lang/en";

// 获取系统语言
const { app } = useStore();
const language = computed(() => app.language);

const locale = ref();

watch(
  language,
  (value) => {
    if (value == "en") {
      locale.value = en;
    } else { // 默认中文
      locale.value = zhCn;
    }
  },
  {
    // 初始化立即执行
    immediate: true
  }
);
</script>
自定义国际化
i18n 英文全拼 internationalization ,国际化的意思,英文 i 和 n 中间18个英文字母
1. 安装 vue-i18n
npm install vue-i18n@9.1.9
2. 语言包
创建 src/lang 语言包目录,中文语言包 zh-cn.ts,英文语言包 en.ts
// src/lang/en.ts
export default {
    // 路由国际化
    route: {
        dashboard: 'Dashboard',
        document: 'Document'
    },
    // 登录页面国际化
    login: {
        title: 'youlai-mall management system',
        username: 'Username',
        password: 'Password',
        login: 'Login',
        code: 'Verification Code',
        copyright: 'Copyright © 2020 - 2022 youlai.tech All Rights Reserved. ',
        icp: ''
    },
    // 导航栏国际化
    navbar:{
        dashboard: 'Dashboard',
        logout:'Logout',
        document:'Document',
        gitee:'Gitee'
    }
}
3. 创建i18n实例
// src/lang/index.ts

// 自定义国际化配置
import {createI18n} from 'vue-i18n'
import {localStorage} from '@/utils/storage'

// 本地语言包
import enLocale from './en'
import zhCnLocale from './zh-cn'

const messages = {
    'zh-cn': {
        ...zhCnLocale
    },
    en: {
        ...enLocale
    }
}

/**
 * 获取当前系统使用语言字符串
 *
 * @returns zh-cn|en ...
 */
export const getLanguage = () => {
    // 本地缓存获取
    let language = localStorage.get('language')
    if (language) {
        return language
    }
     // 浏览器使用语言
    language = navigator.language.toLowerCase()
    const locales = Object.keys(messages)
    for (const locale of locales) {
        if (language.indexOf(locale) > -1) {
            return locale
        }
    }
    return 'zh-cn'
}

const i18n = createI18n({
    locale: getLanguage(),
    messages: messages
})

export default i18n
4. i18n 全局注册
// main.ts

// 国际化
import i18n from "@/lang/index";

app.use(i18n)
   .mount('#app');
5. 静态页面国际化
$t 是 i18n 提供的根据 key 从语言包翻译对应的 value 方法
<h3 class="title">{{ $t("login.title") }}</h3>
6. 动态路由国际化
i18n 工具类,主要使用 i18n 的 te (判断语言包是否存在key) 和 t (翻译) 两个方法
//  src/utils/i18n.ts
import i18n from "@/lang/index";

export function generateTitle(title: any) {
    // 判断是否存在国际化配置,如果没有原生返回
    const hasKey = i18n.global.te('route.' + title)
    if (hasKey) {
        const translatedTitle = i18n.global.t('route.' + title)
        return translatedTitle
    }
    return title
}
页面使用
// src/components/Breadcrumb/index.vue
<template>
     <a v-else @click.prevent="handleLink(item)">
       {{ generateTitle(item.meta.title) }}
    </a>
</template>

<script setup lang="ts">
import {generateTitle} from '@/utils/i18n'
</script>
wangEditor富文本编辑器
推荐教程:Vue3 官方示例
1. 安装wangEditor和Vue3组件
npm install @wangeditor/editor --save
npm install @wangeditor/editor-for-vue@next --save
2. wangEditor组件封装
<!-- src/components/WangEditor/index.vue -->
<template>
  <div style="border: 1px solid #ccc">
    <!-- 工具栏 -->
    <Toolbar :editor="editorRef" :defaultConfig="toolbarConfig" style="border-bottom: 1px solid #ccc" :mode="mode" />
    <!-- 编辑器 -->
    <Editor :defaultConfig="editorConfig" v-model="defaultHtml" @onChange="handleChange"
      style="height: 500px; overflow-y: hidden;" :mode="mode" @onCreated="handleCreated" />
  </div>
</template>

<script setup lang="ts">
import { onBeforeUnmount, shallowRef, reactive, toRefs } from 'vue'
import { Editor, Toolbar } from '@wangeditor/editor-for-vue'

// API 引用
import { uploadFile } from "@/api/system/file";

const props = defineProps({
  modelValue: {
    type: [String],
    default: ''
  },
})

const emit = defineEmits(['update:modelValue']);

// 编辑器实例,必须用 shallowRef
const editorRef = shallowRef()

const state = reactive({
  toolbarConfig: {},
  editorConfig: {
    placeholder: '请输入内容...',
    MENU_CONF: {
      uploadImage: {
        // 自定义图片上传
        async customUpload(file: any, insertFn: any) {
          console.log("上传图片")
          uploadFile(file).then(response => {
            const url = response.data
            insertFn(url)
          })
        }
      }
    }
  },
  defaultHtml: props.modelValue,
  mode: 'default'
})

const { toolbarConfig, editorConfig, defaultHtml, mode } = toRefs(state)


const handleCreated = (editor: any) => {
  editorRef.value = editor // 记录 editor 实例,重要!
}


function handleChange(editor: any) {
  emit('update:modelValue', editor.getHtml())
}

// 组件销毁时,也及时销毁编辑器
onBeforeUnmount(() => {
  const editor = editorRef.value
  if (editor == null) return
  editor.destroy()
})

</script>

<style src="@wangeditor/editor/dist/css/style.css">
</style>
3. 使用案例
<template>
  <div class="component-container">
      <editor v-model="modelValue.detail" style="height: 600px" />
  </div>
</template>

<script setup lang="ts">
    import Editor from "@/components/WangEditor/index.vue";
</script>
Echarts图表
1. 安装 Echarts
npm install echarts
2. Echarts 自适应大小工具类
侧边栏、浏览器窗口大小切换都会触发图表的 resize() 方法来进行自适应
// src/utils/resize.ts
import { ref } from 'vue'
export default function() {
    const chart = ref<any>()
    const sidebarElm = ref<Element>()

    const chartResizeHandler = () => {
        if (chart.value) {
            chart.value.resize()
        }
    }

    const sidebarResizeHandler = (e: TransitionEvent) => {
        if (e.propertyName === 'width') {
            chartResizeHandler()
        }
    }

    const initResizeEvent = () => {
        window.addEventListener('resize', chartResizeHandler)
    }

    const destroyResizeEvent = () => {
        window.removeEventListener('resize', chartResizeHandler)
    }

    const initSidebarResizeEvent = () => {
        sidebarElm.value = document.getElementsByClassName('sidebar-container')[0]
        if (sidebarElm.value) {
            sidebarElm.value.addEventListener('transitionend', sidebarResizeHandler as EventListener)
        }
    }

    const destroySidebarResizeEvent = () => {
        if (sidebarElm.value) {
            sidebarElm.value.removeEventListener('transitionend', sidebarResizeHandler as EventListener)
        }
    }

    const mounted = () => {
        initResizeEvent()
        initSidebarResizeEvent()
    }

    const beforeDestroy = () => {
        destroyResizeEvent()
        destroySidebarResizeEvent()
    }

    const activated = () => {
        initResizeEvent()
        initSidebarResizeEvent()
    }

    const deactivated = () => {
        destroyResizeEvent()
        destroySidebarResizeEvent()
    }

    return {
        chart,
        mounted,
        beforeDestroy,
        activated,
        deactivated
    }
}
3. Echarts使用
官方示例: https://echarts.apache.org/examples/zh/index.html
官方的示例文档丰富和详细,且涵盖了 JavaScript 和 TypeScript 版本,使用非常简单。
<!-- src/views/dashboard/components/Chart/BarChart.vue -->
<!-- 线 + 柱混合图 -->
<template>
  <div
      :id="id"
      :class="className"
      :style="{height, width}"
  />
</template>

<script setup lang="ts">
import {nextTick, onActivated, onBeforeUnmount, onDeactivated, onMounted} from "vue";
import {init, EChartsOption} from 'echarts'
import * as echarts from 'echarts';
import resize from '@/utils/resize'

const props = defineProps({
  id: {
    type: String,
    default: 'barChart'
  },
  className: {
    type: String,
    default: ''
  },
  width: {
    type: String,
    default: '200px',
    required: true
  },
  height: {
    type: String,
    default: '200px',
    required: true
  }
})

const {
  mounted,
  chart,
  beforeDestroy,
  activated,
  deactivated
} = resize()

function initChart() {
  const barChart = init(document.getElementById(props.id) as HTMLDivElement)

  barChart.setOption({
    title: {
      show: true,
      text: '业绩总览(2021年)',
      x: 'center',
      padding: 15,
      textStyle: {
        fontSize: 18,
        fontStyle: 'normal',
        fontWeight: 'bold',
        color: '#337ecc'
      }
    },
    grid: {
      left: '2%',
      right: '2%',
      bottom: '10%',
      containLabel: true
    },
    tooltip: {
      trigger: 'axis',
      axisPointer: {
        type: 'cross',
        crossStyle: {
          color: '#999'
        }
      }
    },
    legend: {
      x: 'center',
      y: 'bottom',
      data: ['收入', '毛利润', '收入增长率', '利润增长率']
    },
    xAxis: [
      {
        type: 'category',
        data: ['上海', '北京', '浙江', '广东', '深圳', '四川', '湖北', '安徽'],
        axisPointer: {
          type: 'shadow'
        }
      }
    ],
    yAxis: [
      {
        type: 'value',
        min: 0,
        max: 10000,
        interval: 2000,
        axisLabel: {
          formatter: '{value} '
        }
      },
      {
        type: 'value',
        min: 0,
        max: 100,
        interval: 20,
        axisLabel: {
          formatter: '{value}%'
        }
      }
    ],
    series: [
      {
        name: '收入',
        type: 'bar',
        data: [
          8000, 8200, 7000, 6200, 6500, 5500, 4500, 4200, 3800,
        ],
        barWidth: 20,
        itemStyle: {
          color: new echarts.graphic.LinearGradient(0, 0, 0, 1, [
            { offset: 0, color: '#83bff6' },
            { offset: 0.5, color: '#188df0' },
            { offset: 1, color: '#188df0' }
          ])
        }
      },
      {
        name: '毛利润',
        type: 'bar',
        data: [
          6700, 6800, 6300, 5213, 4500, 4200, 4200, 3800
        ],
        barWidth: 20,
        itemStyle: {
          color: new echarts.graphic.LinearGradient(0, 0, 0, 1, [
            { offset: 0, color: '#25d73c' },
            { offset: 0.5, color: '#1bc23d' },
            { offset: 1, color: '#179e61' }
          ])
        }
      },
      {
        name: '收入增长率',
        type: 'line',
        yAxisIndex: 1,
        data: [65, 67, 65, 53, 47, 45, 43, 42, 41],
        itemStyle: {
          color: '#67C23A'
        }
      },
      {
        name: '利润增长率',
        type: 'line',
        yAxisIndex: 1,
        data: [80, 81, 78, 67, 65, 60, 56,51, 45 ],
        itemStyle: {
          color: '#409EFF'
        }
      }
    ]
  } as EChartsOption)
  chart.value = barChart
}

onBeforeUnmount(() => {
  beforeDestroy()
})

onActivated(() => {
  activated()
})

onDeactivated(() => {
  deactivated()
})

onMounted(() => {
  mounted()
  nextTick(() => {
    initChart()
  })
})

</script>
源码剖析
首先看下main.ts:
import { createApp, Directive } from 'vue';
import App from './App.vue';
import router from '@/router';

import { createPinia } from 'pinia';

import ElementPlus from 'element-plus';
import 'element-plus/theme-chalk/index.css';
// 分页组件
import Pagination from '@/components/Pagination/index.vue';
import '@/permission';   // 引入权限,根据权限生成动态路由

import 'default-passive-events';

// 引入svg注册脚本
import 'virtual:svg-icons-register';

// 国际化
import i18n from '@/lang/index';

// 自定义样式
import '@/styles/index.scss';

// 根据字典编码获取字典列表全局方法
import { listDictItemsByTypeCode } from '@/api/dict';

const app = createApp(App);

// 自定义指令
import * as directive from '@/directive';
// 注册自定义指令
Object.keys(directive).forEach(key => {
  app.directive(key, (directive as { [key: string]: Directive })[key]);
});

// 全局方法
app.config.globalProperties.$listDictItemsByTypeCode = listDictItemsByTypeCode;

// 注册全局组件
app
  .component('Pagination', Pagination)
  .use(createPinia())
  .use(router)
  .use(ElementPlus)
  .use(i18n)
  .mount('#app');
看下App.vue:
<template>
  <!-- 全局配置,翻译文本对象和全局组件大小 -->
  <el-config-provider :locale="locale" :size="size">
    <router-view />
  </el-config-provider>
</template>

<script setup lang="ts">
import { computed, ref, watch } from 'vue';
import { ElConfigProvider } from 'element-plus';

// 总的store
import useStore from '@/store';

// 导入 Element Plus 语言包
import zhCn from 'element-plus/es/locale/lang/zh-cn';
import en from 'element-plus/es/locale/lang/en';

// 解构出useAppStore()
const { app } = useStore();

// 计算得到app.language
const language = computed(() => app.language);
const size: any = computed(() => app.size);

const locale = ref();

watch(
  // 监视一个计算属性
  language,
  value => {
    locale.value = value == 'en' ? en : zhCn;
  },
  {
    // 初始化立即执行
    immediate: true
  }
);
</script>
看一下路由:
import { createRouter, createWebHashHistory, RouteRecordRaw } from 'vue-router';
import useStore from '@/store';

// 布局组件
export const Layout = () => import('@/layout/index.vue');

// 参数说明: https://panjiachen.github.io/vue-element-admin-site/guide/essentials/router-and-nav.html
// 静态路由
export const constantRoutes: Array<RouteRecordRaw> = [
  {
    path: '/redirect',
    component: Layout,
    meta: { hidden: true },
    children: [
      {
        path: '/redirect/:path(.*)',
        component: () => import('@/views/redirect/index.vue')
      }
    ]
  },
  {
    path: '/login',
    component: () => import('@/views/login/index.vue'),
    meta: { hidden: true }
  },
  {
    path: '/404',
    component: () => import('@/views/error-page/404.vue'),
    meta: { hidden: true }
  },

  {
    path: '/',
    component: Layout,
    redirect: '/dashboard',
    children: [
      {
        path: 'dashboard',
        component: () => import('@/views/dashboard/index.vue'),
        name: 'Dashboard',
        meta: { title: 'dashboard', icon: 'homepage', affix: true }
      },
      {
        path: '401',
        component: () => import('@/views/error-page/401.vue'),
        meta: { hidden: true }
      },
    ]
  }

  // 外部链接
  /*{
        path: '/external-link',
        component: Layout,
        children: [
            {
                path: 'https://www.cnblogs.com/haoxianrui/',
                meta: { title: '外部链接', icon: 'link' }
            }
        ]
    }*/
  // 多级嵌套路由
  /* {
         path: '/nested',
         component: Layout,
         redirect: '/nested/level1/level2',
         name: 'Nested',
         meta: {title: '多级菜单', icon: 'nested'},
         children: [
             {
                 path: 'level1',
                 component: () => import('@/views/nested/level1/index.vue'),
                 name: 'Level1',
                 meta: {title: '菜单一级'},
                 redirect: '/nested/level1/level2',
                 children: [
                     {
                         path: 'level2',
                         component: () => import('@/views/nested/level1/level2/index.vue'),
                         name: 'Level2',
                         meta: {title: '菜单二级'},
                         redirect: '/nested/level1/level2/level3',
                         children: [
                             {
                                 path: 'level3-1',
                                 component: () => import('@/views/nested/level1/level2/level3/index1.vue'),
                                 name: 'Level3-1',
                                 meta: {title: '菜单三级-1'}
                             },
                             {
                                 path: 'level3-2',
                                 component: () => import('@/views/nested/level1/level2/level3/index2.vue'),
                                 name: 'Level3-2',
                                 meta: {title: '菜单三级-2'}
                             }
                         ]
                     }
                 ]
             },
         ]
     }*/
];

// 创建路由
const router = createRouter({
  history: createWebHashHistory(),
  routes: constantRoutes as RouteRecordRaw[],
  // 刷新时,滚动条位置还原
  scrollBehavior: () => ({ left: 0, top: 0 })
});

// 重置路由
export function resetRouter() {
  const { permission } = useStore();
  permission.routes.forEach(route => {
    const name = route.name;
    if (name && router.hasRoute(name)) {
      router.removeRoute(name);
    }
  });
}

export default router;
动态路由的逻辑
动态路由数据: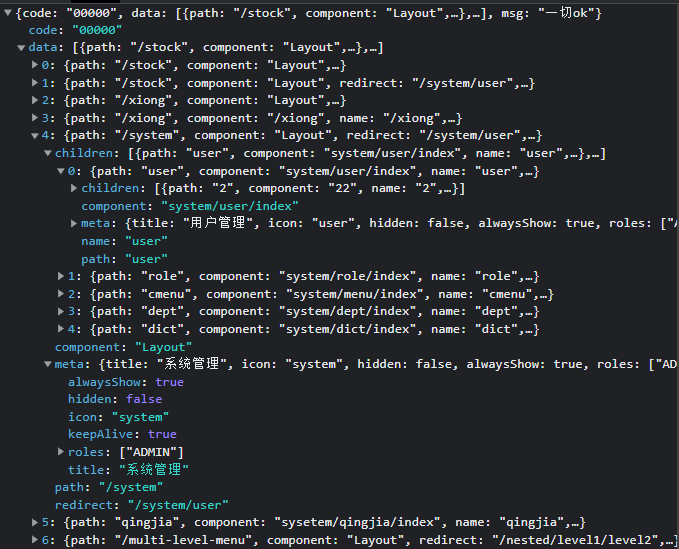
在main.ts中引入了permission.ts,在每次进入路由前从store中取出user、permission。
先判断user是否有token,如果有且要去的页面是/login,就跳到/dashboard页面;去的不是登录页就判断是否已经取得user.roles,如果有且要去的页面有对应的路由则放行,没有对应的路由就跳到来的路由,没有来的路由就跳到404;如果没有用户信息,则调用getUserInfo获取用户信息,获取user.roles,然后调用permission store中的generateRoutes方法生成动态路由。
import router from '@/router';
import { ElMessage } from 'element-plus';
import useStore from '@/store';
import NProgress from 'nprogress';
import 'nprogress/nprogress.css';
NProgress.configure({ showSpinner: false }); // 进度环显示/隐藏

// 白名单路由
const whiteList = ['/login'];

router.beforeEach(async (to, from, next) => {
  // 进度条开始
  NProgress.start();
  const { user, permission } = useStore();
  // 判断是否有token
  const hasToken = user.token;
  if (hasToken) {
    // 登录成功,跳转到首页
    if (to.path === '/login') {
      next({ path: '/' });
      // 进度条结束
      NProgress.done();
    } else {
      // 如果去的不是登录页
      // 判断是否已经取得用户信息,刚登陆进来是没有的,所以要获取
      const hasGetUserInfo = user.roles.length > 0;
      if (hasGetUserInfo) {
        // 如果去的页面没有对应的路由,则判断当前页面的名字,跳到当前页面,否则到401
        if (to.matched.length === 0) {
          from.name ? next({ name: from.name as any }) : next('/401');
        } else {
          // 如果匹配到了路由则放行
          next();
        }
      } else {
        try {
          // 获取用户信息
          await user.getUserInfo();
          const roles = user.roles;
          console.log(roles);
          // 动态路由,用户拥有权限的路由集合
          const accessRoutes: any = await permission.generateRoutes(roles);
          accessRoutes.forEach((route: any) => {
            router.addRoute(route);
          });
          next({ ...to, replace: true });
        } catch (error) {
          // 移除 token 并跳转登录页
          await user.resetToken();
          ElMessage.error((error as any) || 'Has Error');
          next(`/login?redirect=${to.path}`);
          NProgress.done();
        }
      }
    }
  } else {
    // 没有token,未登录可以访问白名单页面(登录页面)
    if (whiteList.indexOf(to.path) !== -1) {
      // 访问的就是登录页面则放行
      next();
    } else {
      next(`/login?redirect=${to.path}`);
      NProgress.done();
    }
  }
});

router.afterEach(() => {
  NProgress.done();
});
来看一下store中的permission.ts,上面提到调用了generateRoutes方法,它会向后端获取动态路由列表,然后调用filterAsyncRoutes方法拿到roles拥有的权限路由并调用setRoute方法放到state中。
filterAsyncRoutes方法遍历获取的全部路由,用hasPermission方法判断每个路由是否有权限,并向每个路由的component字段赋予相应的组件。
hasPermission方法判断route.meta.roles里是否包含了当前的roles。
import { PermissionState } from '@/types/store/permission';
import { RouteRecordRaw } from 'vue-router';
import { defineStore } from 'pinia';
import { constantRoutes } from '@/router';
import { listRoutes } from '@/api/menu';

const modules = import.meta.glob('../../views/**/**.vue');
export const Layout = () => import('@/layout/index.vue');

const hasPermission = (roles: string[], route: RouteRecordRaw) => {
  if (route.meta && route.meta.roles) {
    // 有权限
    if (roles.includes('ROOT')) {
      return true;
    }
    // console.log(roles);
    // console.log(route.meta.roles);
    return roles.some(role => {
      if (route.meta?.roles !== undefined) {
        return (route.meta.roles as string[]).includes(role);
      }
    });
  }
  return false;
};

export const filterAsyncRoutes = (
  routes: RouteRecordRaw[],
  roles: string[]
) => {
  const res: RouteRecordRaw[] = [];
  routes.forEach(route => {
    const tmp = { ...route } as any;
    if (hasPermission(roles, tmp)) {
      if (tmp.component == 'Layout') {
        tmp.component = Layout;
      } else {
        const component = modules[`../../views/${tmp.component}.vue`] as any;
        if (component) {
          tmp.component = modules[`../../views/${tmp.component}.vue`];
        } else {
          tmp.component = modules[`../../views/error-page/404.vue`];
        }
      }
      res.push(tmp);

      if (tmp.children) {
        tmp.children = filterAsyncRoutes(tmp.children, roles);
      }
    }
  });
  // console.log(res);
  return res;
};

const usePermissionStore = defineStore({
  id: 'permission',
  state: (): PermissionState => ({
    routes: [],
    addRoutes: []
  }),
  actions: {
    setRoutes(routes: RouteRecordRaw[]) {
      this.addRoutes = routes;
      // 静态路由加上动态路由
      this.routes = constantRoutes.concat(routes);
    },
    generateRoutes(roles: string[]) {
      return new Promise((resolve, reject) => {
        // 获取路由列表
        listRoutes()
          .then(response => {
            // console.log(response);
            const asyncRoutes = response.data;
            // 从全部路由中挑出有权限的路由
            const accessedRoutes = filterAsyncRoutes(asyncRoutes, roles);
            // console.log(roles);    ADMIN
            console.log(accessedRoutes);
            this.setRoutes(accessedRoutes);
            resolve(accessedRoutes);
          })
          .catch(error => {
            reject(error);
          });
      });
    }
  }
});

export default usePermissionStore;
主页面
首页
声明了一个变量WIDTH,用watchEffect监视它,当窗口宽度小于WIDTH时,用useAppStore里的toggleDevice方法,切换设备为手机;closeSideBar方法向localStorage里存个sidebarStatus,值为0,关闭sidebar,withoutAnimation值设为true。
从useSettingStore里拿出设置来决定是否展示对应的节点。
<template>
  <div :class="classObj" class="app-wrapper">
    <!-- 手机端的侧边栏,点击外部会关闭 -->
    <div
      v-if="device === 'mobile' && sidebar.opened"
      class="drawer-bg"
      @click="handleClickOutside"
    />
    <!-- 侧边栏组件 -->
    <Sidebar class="sidebar-container" />

    <!-- 右侧头部和tagsview、主页面和设置面板 -->
    <div :class="{ hasTagsView: needTagsView }" class="main-container">
      <div :class="{ 'fixed-header': fixedHeader }">
        <navbar />
        <!-- 是否开启tagsview -->
        <tags-view v-if="needTagsView" />
      </div>

      <!--主页面-->
      <app-main />

      <!-- 设置面板 -->
      <RightPanel v-if="showSettings">
        <settings />
      </RightPanel>
    </div>
  </div>
</template>

<script setup lang="ts">
import { computed, watchEffect } from 'vue';
import { useWindowSize } from '@vueuse/core';
import { AppMain, Navbar, Settings, TagsView } from './components/index';
import Sidebar from './components/Sidebar/index.vue';
import RightPanel from '@/components/RightPanel/index.vue';

import useStore from '@/store';

const { width } = useWindowSize();
const WIDTH = 992;

const { app, setting } = useStore();

const sidebar = computed(() => app.sidebar);
const device = computed(() => app.device);
const needTagsView = computed(() => setting.tagsView);
const fixedHeader = computed(() => setting.fixedHeader);
const showSettings = computed(() => setting.showSettings);

const classObj = computed(() => ({
  hideSidebar: !sidebar.value.opened,
  openSidebar: sidebar.value.opened,
  withoutAnimation: sidebar.value.withoutAnimation,
  mobile: device.value === 'mobile'
}));

watchEffect(() => {
  if (width.value < WIDTH) {
    app.toggleDevice('mobile');
    app.closeSideBar(true);
  } else {
    app.toggleDevice('desktop');
  }
});

function handleClickOutside() {
  app.closeSideBar(false);
}
</script>

<style lang="scss" scoped>
@import '@/styles/mixin.scss';
@import '@/styles/variables.module.scss';

.app-wrapper {
  @include clearfix;
  position: relative;
  height: 100%;
  width: 100%;

  &.mobile.openSidebar {
    position: fixed;
    top: 0;
  }
}

.drawer-bg {
  background: #000;
  opacity: 0.3;
  width: 100%;
  top: 0;
  height: 100%;
  position: absolute;
  z-index: 999;
}

.fixed-header {
  position: fixed;
  top: 0;
  right: 0;
  z-index: 9;
  width: calc(100% - #{$sideBarWidth});
  transition: width 0.28s;
}

.hideSidebar .fixed-header {
  width: calc(100% - 54px);
}

.mobile .fixed-header {
  width: 100%;
}
</style>
这里用到了很多useAppStore里的属性,来看一下:
import { AppState } from '@/types/store/app';
import { localStorage } from '@/utils/storage';
import { defineStore } from 'pinia';
import { getLanguage } from '@/lang/index';

const useAppStore = defineStore({
  id: 'app',
  state: (): AppState => ({
    // 设备
    device: 'desktop',
    sidebar: {
      // localStorage有sidebarStatus就将数字转为布尔,没有就把opend设为true
      opened: localStorage.get('sidebarStatus')
        ? !!+localStorage.get('sidebarStatus')
        : true,
      withoutAnimation: false,
    },
    // 获取系统时间
    language: getLanguage(),
    // 组件大小
    size: localStorage.get('size') || 'default',
  }),
  actions: {
    // 切换sidebar
    toggleSidebar() {
      this.sidebar.opened = !this.sidebar.opened;
      this.sidebar.withoutAnimation = false;
      if (this.sidebar.opened) {
        localStorage.set('sidebarStatus', 1);
      } else {
        localStorage.set('sidebarStatus', 0);
      }
    },
    // 关闭sidebar
    closeSideBar(withoutAnimation: any) {
      localStorage.set('sidebarStatus', 0);
      this.sidebar.opened = false;
      this.sidebar.withoutAnimation = withoutAnimation;
    },
    // 切换设备
    toggleDevice(device: string) {
      this.device = device;
    },
    // 设置大小
    setSize(size: string) {
      this.size = size;
      localStorage.set('size', size);
    },
    // 设置语言
    setLanguage(language: string) {
      this.language = language;
      localStorage.set('language', language);
    },
  },
});

export default useAppStore;
还用到了useSettingStore,来看一下:
import { defineStore } from 'pinia';
import { SettingState } from '@/types/store/setting';
import defaultSettings from '../../settings';
import { localStorage } from '@/utils/storage';

// 默认设置,从下面获取
// const defaultSettings: DefaultSettings = {
//   title: 'vue3-element-admin',
//   showSettings: true,
//   tagsView: true,
//   fixedHeader: false,
//   // 是否显示Logo
//   sidebarLogo: true,
//   errorLog: 'production'
// };
const { showSettings, tagsView, fixedHeader, sidebarLogo } = defaultSettings;
const el = document.documentElement;

export const useSettingStore = defineStore({
  id: 'setting',
  state: (): SettingState => ({
    // 主题
    theme:
      localStorage.get('theme') ||
      getComputedStyle(el).getPropertyValue(`--el-color-primary`),
    // 显示设置
    showSettings: showSettings,
    tagsView:
      localStorage.get('tagsView') != null
        ? localStorage.get('tagsView')
        : tagsView,
    // 固定header
    fixedHeader: fixedHeader,
    // 侧边栏logo
    sidebarLogo: sidebarLogo,
  }),
  actions: {
    // 改变设置
    async changeSetting(payload: { key: string; value: any }) {
      const { key, value } = payload;
      switch (key) {
        case 'theme':
          this.theme = value;
          break;
        case 'showSettings':
          this.showSettings = value;
          break;
        case 'fixedHeader':
          this.fixedHeader = value;
          break;
        case 'tagsView':
          this.tagsView = value;
          localStorage.set('tagsView', value);
          break;
        case 'sidebarLogo':
          this.sidebarLogo = value;
          break;
        default:
          break;
      }
    },
  },
});

export default useSettingStore;
Sidebar组件
<template>
  <div :class="{ 'has-logo': showLogo }">
    <logo v-if="showLogo" :collapse="isCollapse" />
    <el-scrollbar>
      <!--
        default-active是页面加载时默认激活菜单的index
        collapse-transition是否开启折叠动画
        unique-opened是否只保持一个子菜单的展开
      -->
      <el-menu
        :default-active="activeMenu"
        :collapse="isCollapse"
        :background-color="variables.menuBg"
        :text-color="variables.menuText"
        :active-text-color="variables.menuActiveText"
        :unique-opened="false"
        :collapse-transition="false"
        mode="vertical"
      >
        <!-- 每一项路由 -->
        <sidebar-item
          v-for="route in routes"
          :item="route"
          :key="route.path"
          :base-path="route.path"
          :is-collapse="isCollapse"
        />
      </el-menu>
    </el-scrollbar>
  </div>
</template>

<script setup lang="ts">
import { computed } from 'vue';
import { useRoute } from 'vue-router';

import SidebarItem from './SidebarItem.vue';
import Logo from './Logo.vue';
import variables from '@/styles/variables.module.scss';
import useStore from '@/store';

const { permission, setting, app } = useStore();

const route = useRoute();
// 静态路由和有权限的动态路由
const routes = computed(() => permission.routes);
// 是否展示logo
const showLogo = computed(() => setting.sidebarLogo);
// 是否折叠
const isCollapse = computed(() => !app.sidebar.opened);

// 当前激活的menu项
const activeMenu = computed(() => {
  const { meta, path } = route;
  // if set path, the sidebar will highlight the path you set
  if (meta.activeMenu) {
    return meta.activeMenu as string;
  }
  return path;
});
</script>
用到了logo组件、Link组件、sidebarItem组件。
logo组件:
<template>
  <div class="sidebar-logo-container" :class="{ collapse: collapse }">
  <!-- 过渡效果 -->
    <transition name="sidebarLogoFade">
      <!-- 折叠状态下显示的 -->
      <router-link
        v-if="collapse"
        key="collapse"
        class="sidebar-logo-link"
        to="/"
      >
        <!-- 有logo就显示logo,没有就显示文字 -->
        <img v-if="logo" :src="logo" class="sidebar-logo" />
        <h1 v-else class="sidebar-title">vue3-element-admin</h1>
      </router-link>
      <!-- 展开状态下显示的 -->
      <router-link v-else key="expand" class="sidebar-logo-link" to="/">
        <img v-if="logo" :src="logo" class="sidebar-logo" />
        <h1 class="sidebar-title">vue3-element-admin</h1>
      </router-link>
    </transition>
  </div>
</template>

<script setup lang="ts">
import { reactive, toRefs } from 'vue';

const props = defineProps({
  collapse: {
    type: Boolean,
    required: true
  }
});

const state = reactive({
  isCollapse: props.collapse,
  logo: new URL(`../../../assets/logo.png`, import.meta.url).href
});

// 要在模板里单独使用,就要用toRefs解构出来
const { logo } = toRefs(state);
</script>

<style lang="scss" scoped>
.sidebarLogoFade-enter-active {
  transition: opacity 1.5s;
}

.sidebarLogoFade-enter,
.sidebarLogoFade-leave-to {
  opacity: 0;
}

.sidebar-logo-container {
  position: relative;
  width: 100%;
  height: 50px;
  line-height: 50px;
  background: #2b2f3a;
  text-align: center;
  overflow: hidden;

  & .sidebar-logo-link {
    height: 100%;
    width: 100%;

    & .sidebar-logo {
      width: 20px;
      height: 20px;
      vertical-align: middle;
    }

    & .sidebar-title {
      display: inline-block;
      margin: 0;
      color: #fff;
      font-weight: 600;
      line-height: 50px;
      font-size: 14px;
      font-family: Avenir, Helvetica Neue, Arial, Helvetica, sans-serif;
      vertical-align: middle;
      margin-left: 12px;
    }
  }

  &.collapse {
    .sidebar-logo {
      margin-right: 0px;
    }
  }
}
</style>
link组件:
<template>
  <!--
    export function isExternal(path: string) {
      const isExternal = /^(https?:|http?:|mailto:|tel:)/.test(path);
      return isExternal;
    }
  -->
  <!--
    超链接a标签的rel="noopener noreferrer"属性是一种新特性,它能让网站更安全,
    超链接添加rel="noopener noreferrer"来防止钓鱼网站,因为它获取的window.opener的值为null。
  -->
  <a v-if="isExternal(to)" :href="to" target="_blank" rel="noopener">
    <!-- 插槽安置处 -->
    <slot />
  </a>
  <div v-else @click="push">
    <slot />
  </div>
</template>

<script lang="ts">
import { computed, defineComponent } from 'vue';
import { isExternal } from '@/utils/validate';
import { useRouter } from 'vue-router';

import useStore from '@/store';

const { app } = useStore();

const sidebar = computed(() => app.sidebar);
const device = computed(() => app.device);

export default defineComponent({
  props: {
    to: {
      type: String,
      required: true
    }
  },
  setup(props) {
    const router = useRouter();
    const push = () => {
      // 设备是手机且侧边栏是打开情况下,则关闭侧边栏
      if (device.value === 'mobile' && sidebar.value.opened == true) {
        app.closeSideBar(false);
      }
      // 跳转
      router.push(props.to).catch(err => {
        console.log(err);
      });
    };
    return {
      push,
      isExternal
    };
  }
});
</script>
sidebarItem组件:
item是每项路由route:
<template>
  <!-- 展示有路由元信息或hidden为false的路由 -->
  <div v-if="!item.meta || !item.meta.hidden">
    <!-- 只有一个子路由(自身)时展示的 -->
    <template
      v-if="
        hasOneShowingChild(item.children, item) &&
        (!onlyOneChild.children || onlyOneChild.noShowingChildren) &&
        (!item.meta || !item.meta.alwaysShow)
      "
    >
      <app-link v-if="onlyOneChild.meta" :to="resolvePath(onlyOneChild.path)">
        <!-- isNest是嵌套的 -->
        <el-menu-item
          :index="resolvePath(onlyOneChild.path)"
          :class="{ 'submenu-title-noDropdown': !isNest }"
        >
          <svg-icon
            v-if="onlyOneChild.meta && onlyOneChild.meta.icon"
            :icon-class="onlyOneChild.meta.icon"
          />
          <template #title>
            {{ generateTitle(onlyOneChild.meta.title) }}
            <!-- {{ onlyOneChild }} -->
          </template>
        </el-menu-item>
      </app-link>
    </template>
    <!-- 有多个子路由时展示的 -->
    <el-sub-menu v-else :index="resolvePath(item.path)" popper-append-to-body>
      <!-- popper-append-to-body -->
      <template #title>
        <svg-icon
          v-if="item.meta && item.meta.icon"
          :icon-class="item.meta.icon"
        ></svg-icon>
        <span v-if="item.meta && item.meta.title">{{
          generateTitle(item.meta.title)
        }}</span>
      </template>
      <!-- 递归展示子路由 -->
      <sidebar-item
        v-for="child in item.children"
        :key="child.path"
        :item="child"
        :is-nest="true"
        :base-path="resolvePath(child.path)"
        class="nest-menu"
      />
    </el-sub-menu>
  </div>
</template>

<script setup lang="ts">
import { ref } from 'vue';
import path from 'path-browserify';
import { isExternal } from '@/utils/validate';
import AppLink from './Link.vue';

import { generateTitle } from '@/utils/i18n';
import SvgIcon from '@/components/SvgIcon/index.vue';

const props = defineProps({
  // 父组件传过来的每一项路由route
  item: {
    type: Object,
    required: true
  },
  isNest: {
    type: Boolean,
    required: false
  },
  // 路由的path
  basePath: {
    type: String,
    required: true
  }
});
// console.log(props.item);

const onlyOneChild = ref();

function hasOneShowingChild(children = [] as any, parent: any) {
  // children是子路由数组,没有就设为空数组
  if (!children) {
    children = [];
  }
  // 找出有子路由且不被隐藏的路由
  const showingChildren = children.filter((item: any) => {
    // 隐藏的路由不需要展示
    if (item.meta && item.meta.hidden) {
      return false;
    } else {
      // Temp set(will be used if only has one showing child)
      onlyOneChild.value = item;
      // console.log(onlyOneChild);

      return true;
    }
  });
  // console.log(showingChildren);

  // 只有一个子路由的话就返回
  // When there is only one child router, the child router is displayed by default
  if (showingChildren.length === 1) {
    return true;
  }

  // 没有子路由的话就展示自身
  // Show parent if there are no child router to display
  if (showingChildren.length === 0) {
    onlyOneChild.value = { ...parent, path: '', noShowingChildren: true };
    return true;
  }

  return false;
}

function resolvePath(routePath: string) {
  // isExternal是外部的
  if (isExternal(routePath)) {
    return routePath;
  }
  if (isExternal(props.basePath)) {
    return props.basePath;
  }
  return path.resolve(props.basePath, routePath);
}
</script>

<style lang="scss" scoped></style>
RightPanel组件
<template>
  <div ref="rightPanel" :class="{ show: show }">
    <div class="right-panel-background" />
    <div class="right-panel">
      <div
        class="right-panel__button"
        :style="{ top: buttonTop + 'px', 'background-color': theme }"
        @click="show = !show"
      >
        <Close class="icon" v-show="show" />
        <Setting class="icon" v-show="!show" />
      </div>
      <div class="right-panel__items">
        <!-- 设置面板 -->
        <slot />
      </div>
    </div>
  </div>
</template>

<script setup lang="ts">
import { computed, onBeforeUnmount, onMounted, ref, watch } from 'vue';

import { addClass, removeClass } from '@/utils/index';

import useStore from '@/store';

// 图标依赖
import { Close, Setting } from '@element-plus/icons-vue';
import { ElColorPicker } from 'element-plus';

const { setting } = useStore();

const theme = computed(() => setting.theme);
const show = ref(false);

defineProps({
  buttonTop: {
    default: 250,
    type: Number
  }
});

// 监视show,为true就添加点击事件和样式,false就移除样式
watch(show, value => {
  if (value) {
    addEventClick();
  }
  if (value) {
    addClass(document.body, 'showRightPanel');
  } else {
    removeClass(document.body, 'showRightPanel');
  }
});

function addEventClick() {
  // 设置面板打开时给window添加点击事件
  window.addEventListener('click', closeSidebar, { passive: true });
}

function closeSidebar(evt: any) {
  // 主题选择点击不关闭
  // closest这个方法会从当前元素开始,遍历 DOM 树,而且返回和给定参数匹配的最近的祖先
  let parent = evt.target.closest('.theme-picker-dropdown');
  console.log(parent);  // 颜色选择器的下拉框
  // 点击下拉框直接返回
  if (parent) {
    return;
  }
  // 点的不是下拉框,而是其他位置,就看有没有类名为right-panel的节点,没有就说明在设置面板外面
  parent = evt.target.closest('.right-panel');
  // console.log(parent);
  // 关闭点击事件
  if (!parent) {
    show.value = false;
    window.removeEventListener('click', closeSidebar);
  }
}

// 颜色挑选器
const rightPanel = ref(ElColorPicker);

function insertToBody() {
  const elx = rightPanel.value as any;
  const body = document.querySelector('body') as any;
  // 在body最前面插入颜色挑选器
  body.insertBefore(elx, body.firstChild);
}

onMounted(() => {
  insertToBody();
});

onBeforeUnmount(() => {
  const elx = rightPanel.value as any;
  elx.remove();
});
</script>

<style>
.showRightPanel {
  overflow: hidden;
  position: relative;
  width: calc(100% - 15px);
}
</style>

<style lang="scss" scoped>
.right-panel-background {
  position: fixed;
  top: 0;
  left: 0;
  opacity: 0;
  transition: opacity 0.3s cubic-bezier(0.7, 0.3, 0.1, 1);
  background: rgba(0, 0, 0, 0.2);
  z-index: -1;
}

.right-panel {
  width: 100%;
  max-width: 300px;
  height: 100vh;
  position: fixed;
  top: 0;
  right: 0;
  box-shadow: 0px 0px 15px 0px rgba(0, 0, 0, 0.05);
  transition: all 0.25s cubic-bezier(0.7, 0.3, 0.1, 1);
  transform: translate(100%);
  background: #fff;
  z-index: 199;

  .icon {
    width: 1em;
    height: 1em;
    vertical-align: middle;
  }
}

.show {
  transition: all 0.3s cubic-bezier(0.7, 0.3, 0.1, 1);

  .right-panel-background {
    z-index: 99;
    opacity: 1;
    width: 100%;
    height: 100%;
  }

  .right-panel {
    transform: translate(0);
  }
}

.right-panel__button {
  width: 48px;
  height: 48px;
  position: absolute;
  left: -48px;
  text-align: center;
  font-size: 24px;
  border-radius: 6px 0 0 6px !important;
  z-index: 0;
  pointer-events: auto;
  cursor: pointer;
  color: #fff;
  line-height: 48px;

  i {
    font-size: 24px;
    line-height: 48px;
  }
}
</style>
Settings组件
<template>
  <div class="drawer-container">
    <h3 class="drawer-title">系统布局配置</h3>
    <div class="drawer-item">
      <span>主题颜色</span>
      <div style="float: right; height: 26px; margin: -3px 8px 0 0">
        <theme-picker @change="themeChange" />
      </div>
    </div>

    <div class="drawer-item">
      <span>开启 Tags-View</span>
      <el-switch v-model="tagsView" class="drawer-switch" />
    </div>

    <div class="drawer-item">
      <span>固定 Header</span>
      <el-switch v-model="fixedHeader" class="drawer-switch" />
    </div>

    <div class="drawer-item">
      <span>侧边栏 Logo</span>
      <el-switch v-model="sidebarLogo" class="drawer-switch" />
    </div>

    <el-divider>导航栏模式</el-divider>

    <ul class="navbar">
      <el-tooltip content="左侧模式" placement="bottom">
        <li class="navbar__item navbar__item--left">
          <div />
          <div />
        </li>
      </el-tooltip>
      <el-tooltip content="顶部模式" placement="bottom">
        <li class="navbar__item navbar__item--top">
          <div />
          <div />
        </li>
      </el-tooltip>
      <el-tooltip content="混合模式" placement="bottom">
        <li class="navbar__item navbar__item--mix">
          <div />
          <div />
        </li>
      </el-tooltip>
    </ul>
  </div>
</template>

<script setup lang="ts">
import { reactive, toRefs, watch } from 'vue';

import ThemePicker from '@/components/ThemePicker/index.vue';

import useStore from '@/store';

const { setting } = useStore();

const state = reactive({
  fixedHeader: setting.fixedHeader,
  tagsView: setting.tagsView,
  sidebarLogo: setting.sidebarLogo
});

const { fixedHeader, tagsView, sidebarLogo } = toRefs(state);

function themeChange(val: any) {
  setting.changeSetting({ key: 'theme', value: val });
}

// 比较简单,监视属性,变换调方法传入不同参数改值
watch(
  () => state.fixedHeader,
  value => {
    setting.changeSetting({ key: 'fixedHeader', value: value });
  }
);

watch(
  () => state.tagsView,
  value => {
    setting.changeSetting({ key: 'tagsView', value: value });
  }
);

watch(
  () => state.sidebarLogo,
  value => {
    setting.changeSetting({ key: 'sidebarLogo', value: value });
  }
);
</script>

<style lang="scss" scoped>
.drawer-container {
  padding: 24px;
  font-size: 14px;
  line-height: 1.5;
  word-wrap: break-word;

  .drawer-title {
    margin-bottom: 12px;
    color: rgba(0, 0, 0, 0.85);
    font-size: 14px;
    line-height: 22px;
  }

  .drawer-item {
    color: rgba(0, 0, 0, 0.65);
    font-size: 14px;
    padding: 12px 0;
  }

  .drawer-switch {
    float: right;
  }

  .job-link {
    display: block;
    position: absolute;
    width: 100%;
    left: 0;
    bottom: 0;
  }
}

.navbar {
  display: flex;
  flex-wrap: wrap;
  justify-content: space-around;
  width: 100%;
  height: 50px;
  padding: 0;

  &__item {
    width: 18%;
    height: 45px;
    background: #f0f2f5;
    position: relative;
    overflow: hidden;
    cursor: pointer;
    border-radius: 4px;
    box-shadow: 0 1px 2.5px 0 rgb(0 0 0 / 18%);

    &--left {
      div {
        &:nth-child(1) {
          width: 30%;
          height: 100%;
          background: #1b2a47;
        }

        &:nth-child(2) {
          width: 70%;
          height: 30%;
          top: 0;
          right: 0;
          background: #fff;
          box-shadow: 0 0 1px #888;
          position: absolute;
        }
      }
    }

    &--top {
      div {
        &:nth-child(1) {
          width: 100%;
          height: 30%;
          background: #1b2a47;
          box-shadow: 0 0 1px #888;
        }
      }
    }

    &--mix {
      div {
        &:nth-child(1) {
          width: 100%;
          height: 30%;
          background: #1b2a47;
          box-shadow: 0 0 1px #888;
        }

        &:nth-child(2) {
          width: 30%;
          height: 70%;
          bottom: 0;
          left: 0;
          background: #fff;
          box-shadow: 0 0 1px #888;
          position: absolute;
        }
      }
    }
  }
}
</style>
TagsView组件

由于这里用到了useTagsViewStore,先看一下它:
import { defineStore } from 'pinia';
import { TagsViewState } from '@/types/store/tagsview';

const useTagsViewStore = defineStore({
  id: 'tagsView',
  state: (): TagsViewState => ({
    visitedViews: [], // 加载过的页面
    cachedViews: [], //  keepAlive 缓存页面
  }),
  actions: {
    addVisitedView(view: any) {
      // console.log(view);
      // 添加的路由如果visitedViews里有就直接返回
      if (this.visitedViews.some((v) => v.path === view.path)) return;
      // affix,它是固定的
      if (view.meta && view.meta.affix) {
        // 从visitedViews的开头添加固定的页面
        this.visitedViews.unshift(
          Object.assign({}, view, {
            title: view.meta?.title || 'no-name',
          })
        );
      } else {
        // 其他就push进去
        this.visitedViews.push(
          Object.assign({}, view, {
            title: view.meta?.title || 'no-name',
          })
        );
      }
    },
    addCachedView(view: any) {
      // 缓存里有就直接返回
      if (this.cachedViews.includes(view.name)) return;
      // console.log(view);
      // keepAlive为真就添加到cachedViews
      if (view.meta.keepAlive) {
        this.cachedViews.push(view.name);
      }
    },
    delVisitedView(view: any) {
      return new Promise((resolve) => {
        for (const [i, v] of this.visitedViews.entries()) {
          if (v.path === view.path) {
            this.visitedViews.splice(i, 1);
            break;
          }
        }
        resolve([...this.visitedViews]);
      });
    },
    delCachedView(view: any) {
      return new Promise((resolve) => {
        const index = this.cachedViews.indexOf(view.name);
        index > -1 && this.cachedViews.splice(index, 1);
        resolve([...this.cachedViews]);
      });
    },
    // 删掉其他人,只留下自己
    delOtherVisitedViews(view: any) {
      return new Promise((resolve) => {
        this.visitedViews = this.visitedViews.filter((v) => {
          return v.meta?.affix || v.path === view.path;
        });
        resolve([...this.visitedViews]);
      });
    },
    delOtherCachedViews(view: any) {
      return new Promise((resolve) => {
        const index = this.cachedViews.indexOf(view.name);
        if (index > -1) {
          this.cachedViews = this.cachedViews.slice(index, index + 1);
        } else {
          // if index = -1, there is no cached tags
          this.cachedViews = [];
        }
        resolve([...this.cachedViews]);
      });
    },

    updateVisitedView(view: any) {
      for (let v of this.visitedViews) {
        if (v.path === view.path) {
          v = Object.assign(v, view);
          break;
        }
      }
    },
    // 添加路由
    addView(view: any) {
      this.addVisitedView(view);
      this.addCachedView(view);
    },
    // 关掉看过的和缓存的view
    delView(view: any) {
      return new Promise((resolve) => {
        this.delVisitedView(view);
        this.delCachedView(view);
        resolve({
          visitedViews: [...this.visitedViews],
          cachedViews: [...this.cachedViews],
        });
      });
    },
    delOtherViews(view: any) {
      return new Promise((resolve) => {
        this.delOtherVisitedViews(view);
        this.delOtherCachedViews(view);
        resolve({
          visitedViews: [...this.visitedViews],
          cachedViews: [...this.cachedViews],
        });
      });
    },
    delLeftViews(view: any) {
      return new Promise((resolve) => {
        const currIndex = this.visitedViews.findIndex(
          (v) => v.path === view.path
        );
        if (currIndex === -1) {
          return;
        }
        this.visitedViews = this.visitedViews.filter((item, index) => {
          // affix:true 固定tag,例如“首页”
          if (index >= currIndex || (item.meta && item.meta.affix)) {
            return true;
          }

          const cacheIndex = this.cachedViews.indexOf(item.name as string);
          if (cacheIndex > -1) {
            this.cachedViews.splice(cacheIndex, 1);
          }
          return false;
        });
        resolve({
          visitedViews: [...this.visitedViews],
        });
      });
    },
    delRightViews(view: any) {
      return new Promise((resolve) => {
        const currIndex = this.visitedViews.findIndex(
          (v) => v.path === view.path
        );
        if (currIndex === -1) {
          return;
        }
        this.visitedViews = this.visitedViews.filter((item, index) => {
          // affix:true 固定tag,例如“首页”
          if (index <= currIndex || (item.meta && item.meta.affix)) {
            return true;
          }

          const cacheIndex = this.cachedViews.indexOf(item.name as string);
          if (cacheIndex > -1) {
            this.cachedViews.splice(cacheIndex, 1);
          }
          return false;
        });
        resolve({
          visitedViews: [...this.visitedViews],
        });
      });
    },
    delAllViews() {
      return new Promise((resolve) => {
        const affixTags = this.visitedViews.filter((tag) => tag.meta?.affix);
        this.visitedViews = affixTags;
        this.cachedViews = [];
        resolve({
          visitedViews: [...this.visitedViews],
          cachedViews: [...this.cachedViews],
        });
      });
    },
    // 只留下固定的,删掉其他看过的页面
    delAllVisitedViews() {
      return new Promise((resolve) => {
        const affixTags = this.visitedViews.filter((tag) => tag.meta?.affix);
        this.visitedViews = affixTags;
        resolve([...this.visitedViews]);
      });
    },
    delAllCachedViews() {
      return new Promise((resolve) => {
        this.cachedViews = [];
        resolve([...this.cachedViews]);
      });
    },
  },
});

export default useTagsViewStore;
TagsView组件用到了scrollpane组件和一个鼠标右键打开的列表,通过插槽向子组件传递数据。
TagsView组件在onMounted里初始化tags,从usePermissionStore()里拿出permission.routes,也就是有权限的路由,传入filterAffixTags函数。
filterAffixTags找出固定的且有tag name的路由添加到store的visitedViews,即浏览过的路由。
<template>
  <div class="tags-view__container">
    <scroll-pane
      ref="scrollPaneRef"
      class="tags-view__wrapper"
      @scroll="handleScroll"
    >
      <!-- 点击鼠标中键,如果不是固定的就关闭选择的tag -->
      <!-- 点击鼠标右键打开菜单 -->
      <router-link
        v-for="tag in visitedViews"
        :key="tag.path"
        :data-path="tag.path"
        :class="isActive(tag) ? 'active' : ''"
        :to="{ path: tag.path, query: tag.query }"
        class="tags-view__item"
        @click.middle="!isAffix(tag) ? closeSelectedTag(tag) : ''"
        @contextmenu.prevent="openMenu(tag, $event)"
      >
        {{ generateTitle(tag.meta.title) }}
        <!-- isAffix: 是固定的 -->
        <!-- 关闭的图标 -->
        <span
          v-if="!isAffix(tag)"
          class="icon-close"
          @click.prevent.stop="closeSelectedTag(tag)"
        >
          <svg-icon icon-class="close" />
        </span>
      </router-link>
    </scroll-pane>
    <ul
      v-show="visible"
      :style="{ left: left + 'px', top: top + 'px' }"
      class="tags-view__menu"
    >
      <li @click="refreshSelectedTag(selectedTag)">
        <svg-icon icon-class="refresh" />
        刷新
      </li>
      <li v-if="!isAffix(selectedTag)" @click="closeSelectedTag(selectedTag)">
        <svg-icon icon-class="close" />
        关闭
      </li>
      <li @click="closeOtherTags">
        <svg-icon icon-class="close_other" />
        关闭其它
      </li>
      <li v-if="!isFirstView()" @click="closeLeftTags">
        <svg-icon icon-class="close_left" />
        关闭左侧
      </li>
      <li v-if="!isLastView()" @click="closeRightTags">
        <svg-icon icon-class="close_right" />
        关闭右侧
      </li>
      <li @click="closeAllTags(selectedTag)">
        <svg-icon icon-class="close_all" />
        关闭所有
      </li>
    </ul>
  </div>
</template>

<script setup lang="ts">
import {
  computed,
  getCurrentInstance,
  nextTick,
  ref,
  watch,
  onMounted,
  ComponentInternalInstance
} from 'vue';

import path from 'path-browserify';

import { RouteRecordRaw, useRoute, useRouter } from 'vue-router';
import { TagView } from '@/types/store/tagsview';

import ScrollPane from './ScrollPane.vue';
import SvgIcon from '@/components/SvgIcon/index.vue';
import { generateTitle } from '@/utils/i18n';
import useStore from '@/store';

const { tagsView, permission } = useStore();

const { proxy } = getCurrentInstance() as ComponentInternalInstance;
const router = useRouter();
const route = useRoute();
// 看过的页面
const visitedViews = computed<any>(() => tagsView.visitedViews);

const routes = computed<any>(() => permission.routes);

const affixTags = ref([]);
const visible = ref(false);
const selectedTag = ref({});
const scrollPaneRef = ref();
const left = ref(0);
const top = ref(0);

watch(
  route,
  () => {
    addTags();
    moveToCurrentTag();
  },
  {
    //初始化立即执行
    immediate: true
  }
);

// 打开菜单时,点击其他区域可关闭
watch(visible, value => {
  if (value) {
    document.body.addEventListener('click', closeMenu);
  } else {
    document.body.removeEventListener('click', closeMenu);
  }
});

// 找出固定的路由
function filterAffixTags(routes: any[], basePath = '/') {
  let tags: TagView[] = [];

  routes.forEach(route => {
    // 筛选出固定的路由存入tags数组
    if (route.meta && route.meta.affix) {
      const tagPath = path.resolve(basePath, route.path);
      tags.push({
        fullPath: tagPath,
        path: tagPath,
        name: route.name,
        meta: { ...route.meta }
      });
    }
    // 递归
    if (route.children) {
      const childTags = filterAffixTags(route.children, route.path);
      if (childTags.length >= 1) {
        tags = tags.concat(childTags);
      }
    }
  });
  return tags;
}

// 初始化
function initTags() {
  // console.log(routes);  有权限的路由
  // 找出固定的路由
  const res = filterAffixTags(routes.value) as [];
  // 添加到affixTags
  affixTags.value = res;
  for (const tag of res) {
    // Must have tag name
    // 将固定的且有tagname的路由添加到store的visitedViews
    if ((tag as TagView).name) {
      tagsView.addVisitedView(tag);
    }
  }
}
// 添加tagview
function addTags() {
  if (route.name) {
    tagsView.addView(route);
  }
}
// 移动到当前的tag
function moveToCurrentTag() {
  nextTick(() => {
    for (const r of visitedViews.value) {
      if (r.path === route.path) {
        scrollPaneRef.value.moveToTarget(r);
        // when query is different then update
        if (r.fullPath !== route.fullPath) {
          tagsView.updateVisitedView(route);
        }
      }
    }
  });
}

// 激活的tag
function isActive(tag: TagView) {
  return tag.path === route.path;
}

// 固定的页面
function isAffix(tag: TagView) {
  return tag.meta && tag.meta.affix;
}

function isFirstView() {
  try {
    return (
      (selectedTag.value as TagView).fullPath ===
        visitedViews.value[1].fullPath ||
      (selectedTag.value as TagView).fullPath === '/index'
    );
  } catch (err) {
    return false;
  }
}

function isLastView() {
  try {
    return (
      (selectedTag.value as TagView).fullPath ===
      visitedViews.value[visitedViews.value.length - 1].fullPath
    );
  } catch (err) {
    return false;
  }
}

function refreshSelectedTag(view: TagView) {
  tagsView.delCachedView(view);
  const { fullPath } = view;
  nextTick(() => {
    router.replace({ path: '/redirect' + fullPath }).catch(err => {
      console.warn(err);
    });
  });
}

// 选择最后一个页面,有路由就跳过去,没有就跳到首页
function toLastView(visitedViews: TagView[], view?: any) {
  const latestView = visitedViews.slice(-1)[0];
  if (latestView && latestView.fullPath) {
    router.push(latestView.fullPath);
  } else {
    // now the default is to redirect to the home page if there is no tags-view,
    // you can adjust it according to your needs.
    if (view.name === 'Dashboard') {
      // to reload home page
      router.replace({ path: '/redirect' + view.fullPath });
    } else {
      router.push('/');
    }
  }
}

// 关闭选择的tag,如果是在关掉tag的页面,就跳到最后一个页面
function closeSelectedTag(view: TagView) {
  tagsView.delView(view).then((res: any) => {
    if (isActive(view)) {
      toLastView(res.visitedViews, view);
    }
  });
}

function closeLeftTags() {
  tagsView.delLeftViews(selectedTag.value).then((res: any) => {
    if (
      !res.visitedViews.find((item: any) => item.fullPath === route.fullPath)
    ) {
      toLastView(res.visitedViews);
    }
  });
}
function closeRightTags() {
  tagsView.delRightViews(selectedTag.value).then((res: any) => {
    if (
      !res.visitedViews.find((item: any) => item.fullPath === route.fullPath)
    ) {
      toLastView(res.visitedViews);
    }
  });
}

function closeOtherTags() {
  router.push(selectedTag.value);
  tagsView.delOtherViews(selectedTag.value).then(() => {
    moveToCurrentTag();
  });
}

function closeAllTags(view: TagView) {
  tagsView.delAllViews().then((res: any) => {
    toLastView(res.visitedViews, view);
  });
}
// 打开菜单
function openMenu(tag: TagView, e: MouseEvent) {
  const menuMinWidth = 105;
  const offsetLeft = proxy?.$el.getBoundingClientRect().left; // container margin left
  const offsetWidth = proxy?.$el.offsetWidth; // container width
  const maxLeft = offsetWidth - menuMinWidth; // left boundary
  const l = e.clientX - offsetLeft + 15; // 15: margin right

  if (l > maxLeft) {
    left.value = maxLeft;
  } else {
    left.value = l;
  }

  top.value = e.clientY;
  visible.value = true;
  selectedTag.value = tag;
}
// 关闭菜单
function closeMenu() {
  visible.value = false;
}

// 自定义事件scroll的处理函数
function handleScroll() {
  closeMenu();
}

onMounted(() => {
  initTags();
});
</script>

<style lang="scss" scoped>
.tags-view__container {
  height: 34px;
  width: 100%;
  background: #fff;
  border-bottom: 1px solid #d8dce5;
  box-shadow: 0 1px 3px 0 rgba(0, 0, 0, 0.12), 0 0 3px 0 rgba(0, 0, 0, 0.04);

  .tags-view__wrapper {
    .tags-view__item {
      display: inline-block;
      position: relative;
      cursor: pointer;
      height: 26px;
      line-height: 26px;
      border: 1px solid #d8dce5;
      color: #495060;
      background: #fff;
      padding: 0 8px;
      font-size: 12px;
      margin-left: 5px;
      margin-top: 4px;

      &:first-of-type {
        margin-left: 15px;
      }

      &:last-of-type {
        margin-right: 15px;
      }

      &:hover {
        color: var(--el-color-primary);
      }

      &.active {
        background-color: var(--el-color-primary);
        color: var(--el-color-primary-light-9);
        border-color: var(--el-color-primary);
        &::before {
          content: '';
          background: #fff;
          display: inline-block;
          width: 8px;
          height: 8px;
          border-radius: 50%;
          position: relative;
          margin-right: 5px;
        }
      }

      .icon-close {
        border-radius: 50%;
        text-align: center;

        &:hover {
          background-color: #ccc;
          color: #fff;
        }
      }
    }
  }

  .tags-view__menu {
    margin: 0;
    background: #fff;
    z-index: 3000;
    position: absolute;
    list-style-type: none;
    padding: 5px 0;
    border-radius: 4px;
    font-size: 12px;
    font-weight: 400;
    color: #333;
    box-shadow: 2px 2px 3px 0 rgba(0, 0, 0, 0.3);

    li {
      margin: 0;
      padding: 7px 16px;
      cursor: pointer;

      &:hover {
        background: #eee;
      }
    }
  }
}
</style>
看一下Scrollpane组件:
<template>
  <el-scrollbar
    ref="scrollContainer"
    :vertical="false"
    class="scroll-container"
    @wheel.prevent="handleScroll"
  >
    <slot />
  </el-scrollbar>
</template>

<script setup lang="ts">
import {
  ref,
  computed,
  onMounted,
  onBeforeUnmount,
  getCurrentInstance,
} from 'vue';
import { TagView } from '@/types/store/tagsview';
import useStore from '@/store';

const tagAndTagSpacing = ref(4);
const { proxy } = getCurrentInstance() as any;

const emits = defineEmits(['scroll']);
const emitScroll = () => {
  emits('scroll');
};

const { tagsView } = useStore();

const visitedViews = computed(() => tagsView.visitedViews);

const scrollWrapper = computed(() => proxy?.$refs.scrollContainer.$refs.wrap$);

onMounted(() => {
  scrollWrapper.value.addEventListener('scroll', emitScroll, true);
});
onBeforeUnmount(() => {
  scrollWrapper.value.removeEventListener('scroll', emitScroll);
});

function handleScroll(e: WheelEvent) {
  const eventDelta = (e as any).wheelDelta || -e.deltaY * 40;
  scrollWrapper.value.scrollLeft =
    scrollWrapper.value.scrollLeft + eventDelta / 4;
}

function moveToTarget(currentTag: TagView) {
  const $container = proxy.$refs.scrollContainer.$el;
  const $containerWidth = $container.offsetWidth;
  const $scrollWrapper = scrollWrapper.value;

  let firstTag = null;
  let lastTag = null;

  // find first tag and last tag
  if (visitedViews.value.length > 0) {
    firstTag = visitedViews.value[0];
    lastTag = visitedViews.value[visitedViews.value.length - 1];
  }

  if (firstTag === currentTag) {
    $scrollWrapper.scrollLeft = 0;
  } else if (lastTag === currentTag) {
    $scrollWrapper.scrollLeft = $scrollWrapper.scrollWidth - $containerWidth;
  } else {
    const tagListDom = document.getElementsByClassName('tags-view__item');
    const currentIndex = visitedViews.value.findIndex(
      (item) => item === currentTag
    );
    let prevTag = null;
    let nextTag = null;
    for (const k in tagListDom) {
      if (k !== 'length' && Object.hasOwnProperty.call(tagListDom, k)) {
        if (
          (tagListDom[k] as any).dataset.path ===
          visitedViews.value[currentIndex - 1].path
        ) {
          prevTag = tagListDom[k];
        }
        if (
          (tagListDom[k] as any).dataset.path ===
          visitedViews.value[currentIndex + 1].path
        ) {
          nextTag = tagListDom[k];
        }
      }
    }

    // the tag's offsetLeft after of nextTag
    const afterNextTagOffsetLeft =
      (nextTag as any).offsetLeft +
      (nextTag as any).offsetWidth +
      tagAndTagSpacing.value;

    // the tag's offsetLeft before of prevTag
    const beforePrevTagOffsetLeft =
      (prevTag as any).offsetLeft - tagAndTagSpacing.value;
    if (afterNextTagOffsetLeft > $scrollWrapper.scrollLeft + $containerWidth) {
      $scrollWrapper.scrollLeft = afterNextTagOffsetLeft - $containerWidth;
    } else if (beforePrevTagOffsetLeft < $scrollWrapper.scrollLeft) {
      $scrollWrapper.scrollLeft = beforePrevTagOffsetLeft;
    }
  }
}

defineExpose({
  moveToTarget,
});
</script>

<style lang="scss" scoped>
.scroll-container {
  .el-scrollbar__bar {
    bottom: 0px;
  }

  .el-scrollbar__wrap {
    height: 49px;
  }
}

.scroll-container {
  white-space: nowrap;
  position: relative;
  overflow: hidden;
  width: 100%;
}
</style>
AppMain.vue组件
<template>
  <section class="app-main">
    <!-- 作用域插槽 -->
    <router-view v-slot="{ Component, route }">
      <transition name="router-fade" mode="out-in">
                <!--白名单里的才会被缓存 -->
        <keep-alive :include="cachedViews">
          <component :is="Component" :key="route.fullPath" />
        </keep-alive>
      </transition>
    </router-view>
  </section>
</template>

<script setup lang="ts">
import { computed } from 'vue';
import useStore from '@/store';

const { tagsView } = useStore();
// 需要缓存的路由
const cachedViews = computed(() => tagsView.cachedViews);
</script>

<style lang="scss" scoped>
.app-main {
  /* 50= navbar  50  */
  min-height: calc(100vh - 50px);
  width: 100%;
  position: relative;
  overflow: hidden;
}

.fixed-header + .app-main {
  padding-top: 50px;
}

.hasTagsView {
  .app-main {
    /* 84 = navbar + tags-view = 50 + 34 */
    min-height: calc(100vh - 84px);
  }

  .fixed-header + .app-main {
    padding-top: 84px;
  }
}
</style>

<style lang="scss">
// fix css style bug in open el-dialog
.el-popup-parent--hidden {
  .fixed-header {
    padding-right: 15px;
  }
}
</style>
NavBar组件

NavBar用到了Breadcrumb、Hamburger、Screenfull、SizeSelect、LangSelect组件。
<template>
  <div class="navbar">
    <hamburger
      id="hamburger-container"
      :is-active="sidebar.opened"
      class="hamburger-container"
      @toggleClick="toggleSideBar"
    />

    <breadcrumb id="breadcrumb-container" class="breadcrumb-container" />

    <div class="right-menu">
      <template v-if="device !== 'mobile'">
        <!--        <search id="header-search" class="right-menu-item" />
                <error-log class="errLog-container right-menu-item hover-effect" />-->
        <screenfull id="screenfull" class="right-menu-item hover-effect" />
        <el-tooltip content="布局大小" effect="dark" placement="bottom">
          <size-select id="size-select" class="right-menu-item hover-effect" />
        </el-tooltip>
        <lang-select class="right-menu-item hover-effect" />
      </template>

      <el-dropdown
        class="avatar-container right-menu-item hover-effect"
        trigger="click"
      >
        <div class="avatar-wrapper">
          <img :src="avatar + '?imageView2/1/w/80/h/80'" class="user-avatar" />
          <CaretBottom style="width: 0.6em; height: 0.6em; margin-left: 5px" />
        </div>

        <template #dropdown>
          <el-dropdown-menu>
            <router-link to="/">
              <el-dropdown-item>{{ $t('navbar.dashboard') }}</el-dropdown-item>
            </router-link>
            <a target="_blank" href="https://github.com/hxrui">
              <el-dropdown-item>Github</el-dropdown-item>
            </a>
            <a target="_blank" href="https://gitee.com/haoxr">
              <el-dropdown-item>{{ $t('navbar.gitee') }}</el-dropdown-item>
            </a>
            <a target="_blank" href="https://www.cnblogs.com/haoxianrui/">
              <el-dropdown-item>{{ $t('navbar.document') }}</el-dropdown-item>
            </a>
            <el-dropdown-item divided @click="logout">
              {{ $t('navbar.logout') }}
            </el-dropdown-item>
          </el-dropdown-menu>
        </template>
      </el-dropdown>
    </div>
  </div>
</template>
<script setup lang="ts">
import { computed } from 'vue';
import { useRoute, useRouter } from 'vue-router';
import { ElMessageBox } from 'element-plus';

import useStore from '@/store';

// 组件依赖
import Breadcrumb from '@/components/Breadcrumb/index.vue';
import Hamburger from '@/components/Hamburger/index.vue';
import Screenfull from '@/components/Screenfull/index.vue';
import SizeSelect from '@/components/SizeSelect/index.vue';
import LangSelect from '@/components/LangSelect/index.vue';

// 图标依赖
import { CaretBottom } from '@element-plus/icons-vue';

const { app, user, tagsView } = useStore();

const route = useRoute();
const router = useRouter();

const sidebar = computed(() => app.sidebar);
const device = computed(() => app.device);
const avatar = computed(() => user.avatar);

function toggleSideBar() {
  app.toggleSidebar();
}

function logout() {
  ElMessageBox.confirm('确定注销并退出系统吗?', '提示', {
    confirmButtonText: '确定',
    cancelButtonText: '取消',
    type: 'warning'
  }).then(() => {
    user
      .logout()
      .then(() => {
        tagsView.delAllViews();
      })
      .then(() => {
        router.push(`/login?redirect=${route.fullPath}`);
      });
  });
}
</script>

<style lang="scss" scoped>
ul {
  list-style: none;
  margin: 0;
  padding: 0;
}
.navbar {
  height: 50px;
  overflow: hidden;
  position: relative;
  background: #fff;
  box-shadow: 0 1px 4px rgba(0, 21, 41, 0.08);

  .hamburger-container {
    line-height: 46px;
    height: 100%;
    float: left;
    cursor: pointer;
    transition: background 0.3s;
    -webkit-tap-highlight-color: transparent;

    &:hover {
      background: rgba(0, 0, 0, 0.025);
    }
  }

  .breadcrumb-container {
    float: left;
  }

  .right-menu {
    float: right;
    height: 100%;
    line-height: 50px;

    &:focus {
      outline: none;
    }

    .right-menu-item {
      display: inline-block;
      padding: 0 8px;
      height: 100%;
      font-size: 18px;
      color: #5a5e66;
      vertical-align: text-bottom;

      &.hover-effect {
        cursor: pointer;
        transition: background 0.3s;

        &:hover {
          background: rgba(0, 0, 0, 0.025);
        }
      }
    }

    .avatar-container {
      margin-right: 30px;

      .avatar-wrapper {
        margin-top: 5px;
        position: relative;

        .user-avatar {
          cursor: pointer;
          width: 40px;
          height: 40px;
          border-radius: 10px;
        }

        .el-icon-caret-bottom {
          cursor: pointer;
          position: absolute;
          right: -20px;
          top: 25px;
          font-size: 12px;
        }
      }
    }
  }
}
</style>
Hamburger.vue,给汉堡加了个点击事件,点击就发送一个自定义事件通知navbar,在navbar里调用app.toggleSidebar()控制sidebar;传了一个isActive props,sidebar激活时给汉堡包旋转180度。
<template>
  <div style="padding: 0 15px" @click="toggleClick">
    <svg
      :class="{ 'is-active': isActive }"
      class="hamburger"
      viewBox="0 0 1024 1024"
      xmlns="http://www.w3.org/2000/svg"
      width="64"
      height="64"
    >
      <path
        d="M408 442h480c4.4 0 8-3.6 8-8v-56c0-4.4-3.6-8-8-8H408c-4.4 0-8 3.6-8 8v56c0 4.4 3.6 8 8 8zm-8 204c0 4.4 3.6 8 8 8h480c4.4 0 8-3.6 8-8v-56c0-4.4-3.6-8-8-8H408c-4.4 0-8 3.6-8 8v56zm504-486H120c-4.4 0-8 3.6-8 8v56c0 4.4 3.6 8 8 8h784c4.4 0 8-3.6 8-8v-56c0-4.4-3.6-8-8-8zm0 632H120c-4.4 0-8 3.6-8 8v56c0 4.4 3.6 8 8 8h784c4.4 0 8-3.6 8-8v-56c0-4.4-3.6-8-8-8zM142.4 642.1L298.7 519a8.84 8.84 0 0 0 0-13.9L142.4 381.9c-5.8-4.6-14.4-.5-14.4 6.9v246.3a8.9 8.9 0 0 0 14.4 7z"
      />
    </svg>
  </div>
</template>

<script setup lang="ts">
defineProps({
  isActive: {
    required: true,
    type: Boolean,
    default: false
  }
});

const emit = defineEmits(['toggleClick']);

function toggleClick() {
  emit('toggleClick');
}
</script>

<style scoped>
.hamburger {
  display: inline-block;
  vertical-align: middle;
  width: 20px;
  height: 20px;
}

.hamburger.is-active {
  transform: rotate(180deg);
}
</style>
Breadcrumb组件,首先在onBeforeMount里调用getBreadcrumb方法拿到面包屑然后渲染。
<template>
  <el-breadcrumb class="app-breadcrumb" separator-class="el-icon-arrow-right">
    <transition-group name="breadcrumb">
      <el-breadcrumb-item v-for="(item, index) in breadcrumbs" :key="item.path">
        <!-- 最后一项不能点击 -->
        <span
          v-if="
            item.redirect === 'noredirect' || index === breadcrumbs.length - 1
          "
          class="no-redirect"
          >{{ generateTitle(item.meta.title) }}</span
        >
        <a v-else @click.prevent="handleLink(item)">
          {{ generateTitle(item.meta.title) }}
        </a>
      </el-breadcrumb-item>
    </transition-group>
  </el-breadcrumb>
</template>

<script setup lang="ts">
import { onBeforeMount, ref, watch } from 'vue';
import { useRoute, RouteLocationMatched } from 'vue-router';
import { compile } from 'path-to-regexp';
import router from '@/router';
import { generateTitle } from '@/utils/i18n';

const currentRoute = useRoute();
// 解析路径
const pathCompile = (path: string) => {
  const { params } = currentRoute;
  const toPath = compile(path);
  return toPath(params);
};

const breadcrumbs = ref([] as Array<RouteLocationMatched>);

// 拿到面包屑
function getBreadcrumb() {
  // 在匹配的路由中找到有meta和meta.title的路由
  // console.log(currentRoute);

  let matched = currentRoute.matched.filter(
    item => item.meta && item.meta.title
  );
  // console.log(matched);
  // /system
  // /system/user

  const first = matched[0];
  // 看路由是不是Dashboard,不是就合并数组
  if (!isDashboard(first)) {
    matched = [
      { path: '/dashboard', meta: { title: 'dashboard' } } as any
    ].concat(matched);
  }
  // 找出有title且breadcrumb !== false的路由
  breadcrumbs.value = matched.filter(item => {
    // console.log(item.meta.breadcrumb);  // undefined

    return item.meta && item.meta.title && item.meta.breadcrumb !== false;
  });
  // console.log(breadcrumbs);
}
// 判断是不是dashboard
function isDashboard(route: RouteLocationMatched) {
  // 如果路由没有名字返回false
  const name = route && route.name;
  if (!name) {
    return false;
  }
  return (
    name.toString().trim().toLocaleLowerCase() ===
    'Dashboard'.toLocaleLowerCase()
  );
}

// 点击跳转
function handleLink(item: any) {
  const { redirect, path } = item;
  if (redirect) {
    router.push(redirect).catch(err => {
      console.warn(err);
    });
    return;
  }
  router.push(pathCompile(path)).catch(err => {
    console.warn(err);
  });
}

watch(
  () => currentRoute.path,
  path => {
    if (path.startsWith('/redirect/')) {
      console.log('redirect');
      return;
    }
    getBreadcrumb();
  }
);

onBeforeMount(() => {
  getBreadcrumb();
});
</script>

<style lang="scss" scoped>
.el-breadcrumb__inner,
.el-breadcrumb__inner a {
  font-weight: 400 !important;
}

.app-breadcrumb.el-breadcrumb {
  display: inline-block;
  font-size: 14px;
  line-height: 50px;
  margin-left: 8px;

  .no-redirect {
    color: #97a8be;
    cursor: text;
  }
}
</style>
Screenfull组件,用了vueuse库。
<template>
  <div>
    <svg-icon
      :icon-class="isFullscreen ? 'exit-fullscreen' : 'fullscreen'"
      @click="toggle"
    />
  </div>
</template>

<script setup lang="ts">
import { useFullscreen } from '@vueuse/core';
import SvgIcon from '@/components/SvgIcon/index.vue';

const { isFullscreen, toggle } = useFullscreen();
</script>
SizeSelect组件,点击下拉菜单改变useAppStore里的值。LangSelect同理。
<template>
  <!-- command    点击菜单项触发的事件回调 -->
  <el-dropdown class="size-select" trigger="click" @command="handleSetSize">
    <div class="size-select__icon">
      <svg-icon class-name="size-icon" icon-class="size" />
    </div>
    <template #dropdown>
      <el-dropdown-menu>
        <el-dropdown-item
          v-for="item of sizeOptions"
          :key="item.value"
          :disabled="(size || 'default') == item.value"
          :command="item.value"
        >
          {{ item.label }}
        </el-dropdown-item>
      </el-dropdown-menu>
    </template>
  </el-dropdown>
</template>

<script setup lang="ts">
import { ref, computed } from 'vue';
import { ElMessage } from 'element-plus';

import useStore from '@/store';
import SvgIcon from '@/components/SvgIcon/index.vue';

const { app } = useStore();
const size = computed(() => app.size);

const sizeOptions = ref([
  { label: '默认', value: 'default' },
  { label: '大型', value: 'large' },
  { label: '小型', value: 'small' }
]);

function handleSetSize(size: string) {
  app.setSize(size);
  ElMessage.success('切换布局大小成功');
}
</script>

<style lang="scss" scoped>
.size-select__icon {
  line-height: 50px;
}
</style>
其它公共组件
分页组件
Pagination.vue:
<template>
  <div :class="{ hidden: hidden }" class="pagination-container">
    <!-- background    是否为分页按钮添加背景色
    current-page    当前页数,支持 v-model 双向绑定
    page-size    每页显示条目个数,支持 v-model 双向绑定
    layout    组件布局,子组件名用逗号分隔
    total    总条目数
    page-sizes    每页显示个数选择器的选项设置
    size-change    page-size 改变时触发
    current-change    current-page 改变时触发 -->
    <el-pagination
      :background="background"
      v-model:current-page="currentPage"
      v-model:page-size="pageSize"
      :layout="layout"
      :page-sizes="pageSizes"
      :total="total"
      @size-change="handleSizeChange"
      @current-change="handleCurrentChange"
    />
  </div>
</template>

<script setup lang="ts">
import { computed, PropType } from 'vue';
import { scrollTo } from '@/utils/scroll-to';

const props = defineProps({
  total: {
    required: true,
    type: Number as PropType<number>,
    default: 0
  },
  page: {
    type: Number,
    default: 1
  },
  limit: {
    type: Number,
    default: 20
  },
  pageSizes: {
    type: Array as PropType<number[]>,
    default() {
      return [10, 20, 30, 50];
    }
  },
  layout: {
    type: String,
    default: 'total, sizes, prev, pager, next, jumper'
  },
  background: {
    type: Boolean,
    default: true
  },
  autoScroll: {
    type: Boolean,
    default: true
  },
  hidden: {
    type: Boolean,
    default: false
  }
});

// update:xxx 是v-model绑定的
const emit = defineEmits(['update:page', 'update:limit', 'pagination']);

// 当前页
const currentPage = computed<number | undefined>({
  get: () => props.page,
  set: value => {
    emit('update:page', value);
  }
});

// 页数限制
const pageSize = computed<number | undefined>({
  get() {
    return props.limit;
  },
  set(val) {
    emit('update:limit', val);
  }
});

// 每页显示多少条数据改变时
function handleSizeChange(val: number) {
  // 自定义事件,把当前页和最大页限制传给父组件
  emit('pagination', { page: currentPage, limit: val });
  if (props.autoScroll) {
    scrollTo(0, 800);
  }
}
// 当前页改变时
function handleCurrentChange(val: number) {
  currentPage.value = val;
  emit('pagination', { page: val, limit: props.limit });
  if (props.autoScroll) {
    scrollTo(0, 800);
  }
}
</script>

<style scoped>
.pagination-container {
  background: #fff;
  padding: 32px 16px;
}

.pagination-container.hidden {
  display: none;
}
</style>
图标组件
SvgIcon.vue:
<template>
  <svg
    aria-hidden="true"
    class="svg-icon"
    :style="'width:' + size + ';height:' + size"
  >
    <use :xlink:href="symbolId" :fill="color" />
  </svg>
</template>

<script setup lang="ts">
import { computed } from 'vue';

const props = defineProps({
  prefix: {
    type: String,
    default: 'icon'
  },
  iconClass: {
    type: String,
    required: false
  },
  color: {
    type: String
  },
  size: {
    type: String,
    default: '1em'
  }
});

const symbolId = computed(() => `#${props.prefix}-${props.iconClass}`);
</script>

<style scoped>
.svg-icon {
  vertical-align: -0.15em;
  overflow: hidden;
  fill: currentColor;
}
</style>
dashboard页面
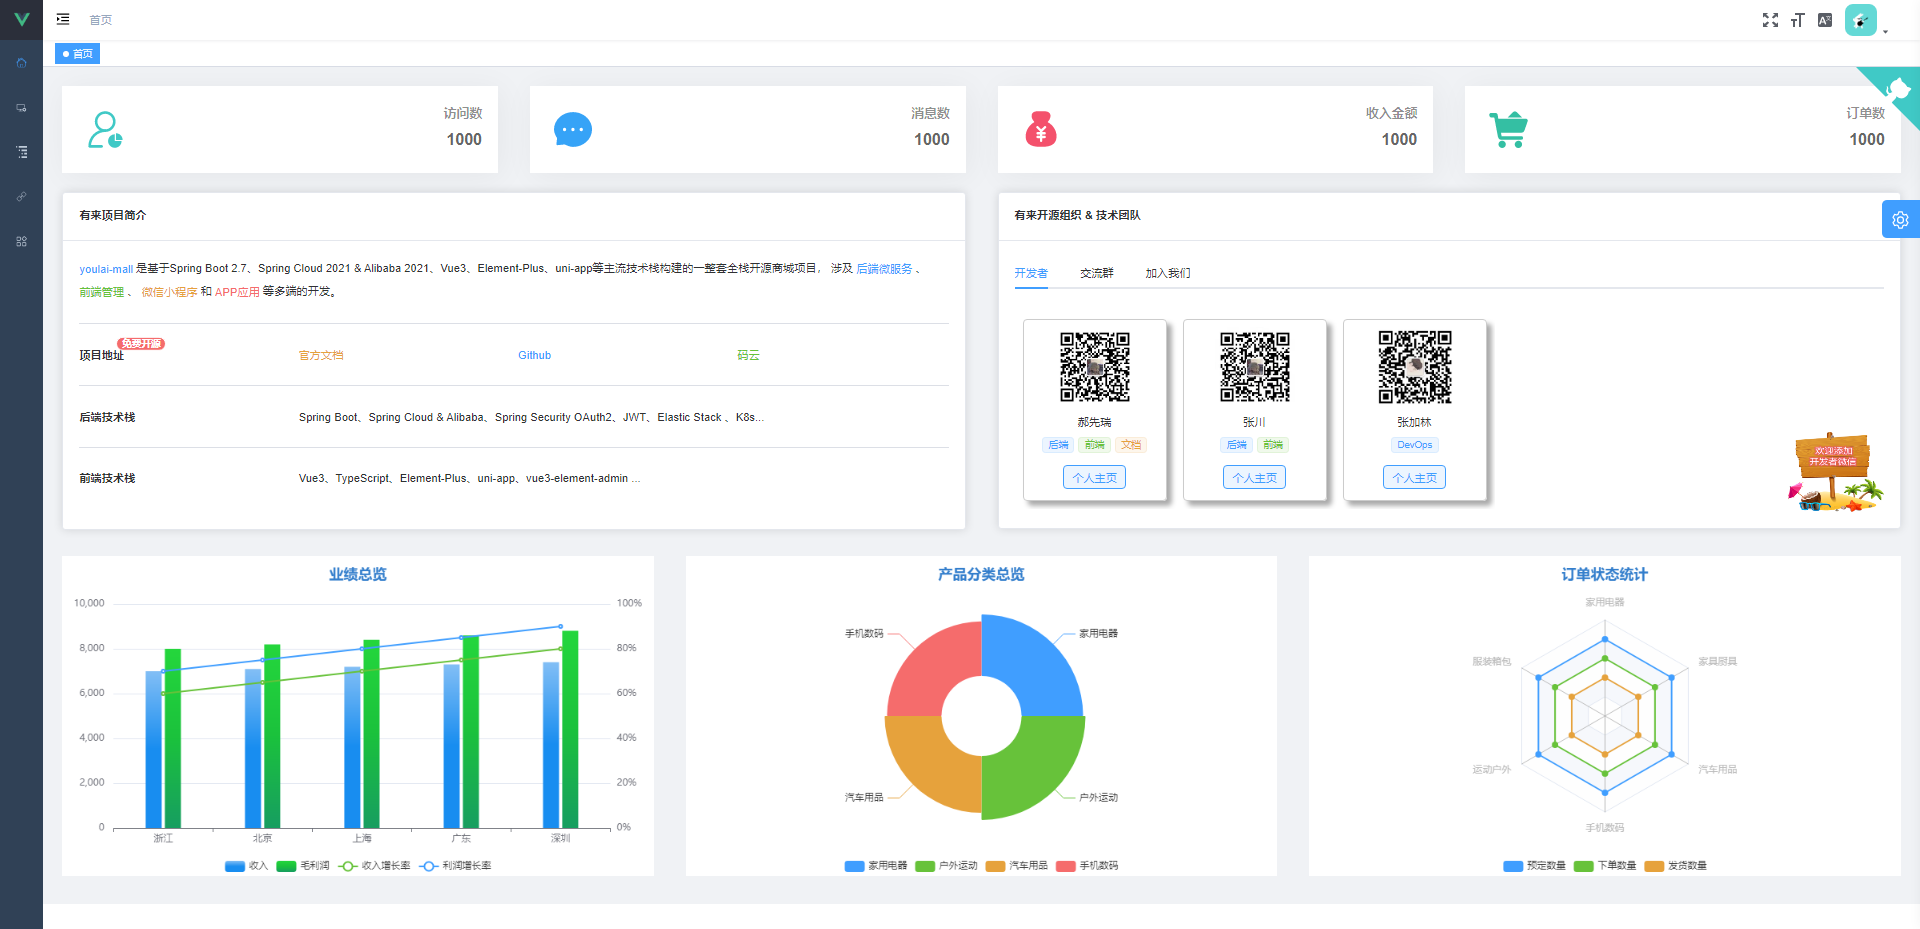
<script lang="ts">
export default { name: 'Dashboard' };
</script>

<script setup lang="ts">
// 组件引用
import GithubCorner from '@/components/GithubCorner/index.vue';
import SvgIcon from '@/components/SvgIcon/index.vue';
import BarChart from './components/Chart/BarChart.vue';
import PieChart from './components/Chart/PieChart.vue';
import RadarChart from './components/Chart/RadarChart.vue';

import Project from './components/Project/index.vue';
import Team from './components/Team/index.vue';
</script>

<template>
  <div class="dashboard-container">
    <github-corner class="github-corner" />

    <!-- 数据 -->
    <el-row :gutter="40" class="card-panel__col">
      <el-col :xs="24" :sm="12" :lg="6" class="card-panel__col">
        <div class="card-panel">
          <div class="card-panel-icon-wrapper icon-user">
            <svg-icon icon-class="uv" size="4em" />
          </div>
          <div class="card-panel-description">
            <div class="card-panel-text">访问数</div>
            <div class="card-panel-num">1000</div>
          </div>
        </div>
      </el-col>

      <el-col :xs="24" :sm="12" :lg="6" class="card-panel__col">
        <div class="card-panel">
          <div class="card-panel-icon-wrapper icon-message">
            <svg-icon icon-class="message" size="4em" />
          </div>
          <div class="card-panel-description">
            <div class="card-panel-text">消息数</div>
            <div class="card-panel-num">1000</div>
          </div>
        </div>
      </el-col>

      <el-col :xs="24" :sm="12" :lg="6" class="card-panel__col">
        <div class="card-panel">
          <div class="card-panel-icon-wrapper icon-money">
            <svg-icon icon-class="money" size="4em" />
          </div>
          <div class="card-panel-description">
            <div class="card-panel-text">收入金额</div>
            <div class="card-panel-num">1000</div>
          </div>
        </div>
      </el-col>
      <el-col :xs="24" :sm="12" :lg="6" class="card-panel__col">
        <div class="card-panel">
          <div class="card-panel-icon-wrapper icon-shopping">
            <svg-icon icon-class="shopping" size="4em" />
          </div>
          <div class="card-panel-description">
            <div class="card-panel-text">订单数</div>
            <div class="card-panel-num">1000</div>
          </div>
        </div>
      </el-col>
    </el-row>

    <!-- 项目 + 团队成员介绍 -->
    <el-row :gutter="40">
      <!-- 项目介绍 -->
      <el-col :md="12" :lg="12" class="card-panel__col">
        <Project />
      </el-col>

      <!-- 团队介绍 -->
      <el-col :md="12" :lg="12" class="card-panel__col">
        <Team />
      </el-col>
    </el-row>

    <!-- Echarts 图表 -->
    <el-row :gutter="40" style="margin-top: 20px">
      <el-col :sm="24" :lg="8" class="card-panel__col">
        <BarChart
          id="barChart"
          height="400px"
          width="100%"
          class="chart-container"
        />
      </el-col>

      <el-col :xs="24" :sm="12" :lg="8" class="card-panel__col">
        <PieChart
          id="pieChart"
          height="400px"
          width="100%"
          class="chart-container"
        />
      </el-col>

      <el-col :xs="24" :sm="12" :lg="8" class="card-panel__col">
        <RadarChart
          id="radarChart"
          height="400px"
          width="100%"
          class="chart-container"
        />
      </el-col>
    </el-row>
  </div>
</template>

<style lang="scss" scoped>
.dashboard-container {
  padding: 24px;
  background-color: rgb(240, 242, 245);
  position: relative;

  .github-corner {
    position: absolute;
    top: 0px;
    border: 0;
    right: 0;
    z-index: 99;
  }

  .box-center {
    margin: 0 auto;
    display: table;
  }

  .user-profile {
    .box-center {
      padding-top: 10px;
    }

    .user-role {
      padding-top: 10px;
      font-weight: 400;
      font-size: 14px;
    }

    .box-social {
      padding-top: 30px;

      .el-table {
        border-top: 1px solid #dfe6ec;
      }
    }

    .user-follow {
      padding-top: 20px;
    }
  }

  .card-panel__col {
    margin-bottom: 12px;
  }

  .card-panel {
    height: 108px;
    cursor: pointer;
    font-size: 12px;
    position: relative;
    overflow: hidden;
    color: #666;
    background: #fff;
    box-shadow: 4px 4px 40px rgba(0, 0, 0, 0.05);
    border-color: rgba(0, 0, 0, 0.05);

    .icon-message {
      color: #36a3f7;
    }

    .icon-user {
      color: #40c9c6;
    }

    .icon-money {
      color: #f4516c;
    }

    .icon-shopping {
      color: #34bfa3;
    }

    &:hover {
      .card-panel-icon-wrapper {
        color: #fff;
      }

      .icon-user {
        background: #40c9c6;
      }

      .icon-message {
        background: #36a3f7;
      }

      .icon-money {
        background: #f4516c;
      }

      .icon-shopping {
        background: #34bfa3;
      }
    }

    .card-panel-icon-wrapper {
      float: left;
      margin: 14px 0 0 14px;
      padding: 16px;
      transition: all 0.38s ease-out;
      border-radius: 6px;
    }

    .card-panel-description {
      float: right;
      font-weight: bold;
      margin: 26px 20px 0;

      .card-panel-text {
        line-height: 18px;
        color: rgba(0, 0, 0, 0.45);
        font-size: 16px;
        margin-bottom: 12px;
      }

      .card-panel-num {
        font-size: 20px;
        text-align: right;
      }
    }
  }

  .chart-container {
    background: #ffffff;
  }
}
</style>
用到了GithubCorner、SvgIcon、BarChart、PieChart、RadarChart、Project、Team这些组件。
GithubCorner组件
<template>
  <a
    href="https://github.com/hxrui"
    target="_blank"
    class="github-corner"
    aria-label="View source on Github"
  >
    <svg
      width="80"
      height="80"
      viewBox="0 0 250 250"
      style="fill: #40c9c6; color: #fff"
      aria-hidden="true"
    >
      <path d="M0,0 L115,115 L130,115 L142,142 L250,250 L250,0 Z" />
      <path
        d="M128.3,109.0 C113.8,99.7 119.0,89.6 119.0,89.6 C122.0,82.7 120.5,78.6 120.5,78.6 C119.2,72.0 123.4,76.3 123.4,76.3 C127.3,80.9 125.5,87.3 125.5,87.3 C122.9,97.6 130.6,101.9 134.4,103.2"
        fill="currentColor"
        style="transform-origin: 130px 106px"
        class="octo-arm"
      />
      <path
        d="M115.0,115.0 C114.9,115.1 118.7,116.5 119.8,115.4 L133.7,101.6 C136.9,99.2 139.9,98.4 142.2,98.6 C133.8,88.0 127.5,74.4 143.8,58.0 C148.5,53.4 154.0,51.2 159.7,51.0 C160.3,49.4 163.2,43.6 171.4,40.1 C171.4,40.1 176.1,42.5 178.8,56.2 C183.1,58.6 187.2,61.8 190.9,65.4 C194.5,69.0 197.7,73.2 200.1,77.6 C213.8,80.2 216.3,84.9 216.3,84.9 C212.7,93.1 206.9,96.0 205.4,96.6 C205.1,102.4 203.0,107.8 198.3,112.5 C181.9,128.9 168.3,122.5 157.7,114.1 C157.9,116.9 156.7,120.9 152.7,124.9 L141.0,136.5 C139.8,137.7 141.6,141.9 141.8,141.8 Z"
        fill="currentColor"
        class="octo-body"
      />
    </svg>
  </a>
</template>

<style scoped>
.github-corner:hover .octo-arm {
  animation: octocat-wave 560ms ease-in-out;
}

@keyframes octocat-wave {
  0%,
  100% {
    transform: rotate(0);
  }
  20%,
  60% {
    transform: rotate(-25deg);
  }
  40%,
  80% {
    transform: rotate(10deg);
  }
}

@media (max-width: 500px) {
  .github-corner:hover .octo-arm {
    animation: none;
  }
  .github-corner .octo-arm {
    animation: octocat-wave 560ms ease-in-out;
  }
}
</style>
BarChart.vue组件:
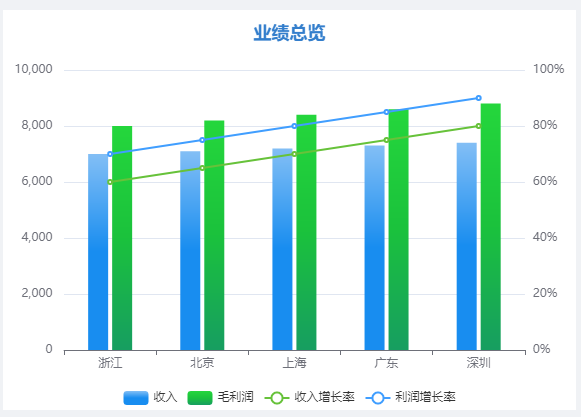
组件用到了utils/resize.ts里的工具方法,先看一下。它导出了一个函数,函数返回了一个对象,有chart、mounted、beforeDestroy、activated、deactivated这些属性。
import { ref } from 'vue';

// 默认导出一个函数
export default function () {
  const chart = ref<any>();
  const sidebarElm = ref<Element>();

  // 调resize方法
  const chartResizeHandler = () => {
    if (chart.value) {
      chart.value.resize();
    }
  };

  const sidebarResizeHandler = (e: TransitionEvent) => {
    if (e.propertyName === 'width') {
      chartResizeHandler();
    }
  };

  // 给window加个resize事件,调chartResizeHandler方法
  const initResizeEvent = () => {
    window.addEventListener('resize', chartResizeHandler, {passive:true});
  };
  // 移除相关事件
  const destroyResizeEvent = () => {
    window.removeEventListener('resize', chartResizeHandler);
  };

  // 有sidebar-container属性的元素加个transitionend事件
  const initSidebarResizeEvent = () => {
    sidebarElm.value = document.getElementsByClassName('sidebar-container')[0];
    if (sidebarElm.value) {
      sidebarElm.value.addEventListener(
        'transitionend',
        sidebarResizeHandler as EventListener,
        {passive:true}
      );
    }
  };
  // 移除相关事件
  const destroySidebarResizeEvent = () => {
    if (sidebarElm.value) {
      sidebarElm.value.removeEventListener(
        'transitionend',
        sidebarResizeHandler as EventListener
      );
    }
  };

  // 挂载后使用
  const mounted = () => {
    initResizeEvent();
    initSidebarResizeEvent();
  };

  // 销毁前使用
  const beforeDestroy = () => {
    destroyResizeEvent();
    destroySidebarResizeEvent();
  };

  // 激活前使用
  const activated = () => {
    initResizeEvent();
    initSidebarResizeEvent();
  };
  // 失活后使用
  const deactivated = () => {
    destroyResizeEvent();
    destroySidebarResizeEvent();
  };

  return {
    chart,
    mounted,
    beforeDestroy,
    activated,
    deactivated
  };
}
首先在onMounted中调用mounted、initChart方法;mounted里调了initResizeEvent、initSidebarResizeEvent方法,前者给window添加了一个resize事件,会触发chartResizeHandler方法,触发会调用chart的resize方法;后者会找有没有类名是sidebar-container的元素,有就添加个transitionend事件,宽度变化时会调用chartResizeHandler方法。然后在nextTick()里调用initChart方法初始化表格赋值给chart。
<!--  线 + 柱混合图 -->
<template>
  <div :id="id" :class="className" :style="{ height, width }" />
</template>

<script setup lang="ts">
import {
  nextTick,
  onActivated,
  onBeforeUnmount,
  onDeactivated,
  onMounted,
} from 'vue';
import { init, EChartsOption } from 'echarts';
import * as echarts from 'echarts';
import resize from '@/utils/resize';

const props = defineProps({
  id: {
    type: String,
    default: 'barChart',
  },
  className: {
    type: String,
    default: '',
  },
  width: {
    type: String,
    default: '200px',
    required: true,
  },
  height: {
    type: String,
    default: '200px',
    required: true,
  },
});

const { mounted, chart, beforeDestroy, activated, deactivated } = resize();

function initChart() {
  const barChart = init(document.getElementById(props.id) as HTMLDivElement);

  barChart.setOption({
    title: {
      show: true,
      text: '业绩总览',
      x: 'center',
      padding: 15,
      textStyle: {
        fontSize: 18,
        fontStyle: 'normal',
        fontWeight: 'bold',
        color: '#337ecc',
      },
    },
    grid: {
      left: '2%',
      right: '2%',
      bottom: '10%',
      containLabel: true,
    },
    tooltip: {
      trigger: 'axis',
      axisPointer: {
        type: 'cross',
        crossStyle: {
          color: '#999',
        },
      },
    },
    legend: {
      x: 'center',
      y: 'bottom',
      data: ['收入', '毛利润', '收入增长率', '利润增长率'],
    },
    xAxis: [
      {
        type: 'category',
        data: [ '浙江', '北京', '上海', '广东','深圳'],
        axisPointer: {
          type: 'shadow',
        },
      },
    ],
    yAxis: [
      {
        type: 'value',
        min: 0,
        max: 10000,
        interval: 2000,
        axisLabel: {
          formatter: '{value} ',
        },
      },
      {
        type: 'value',
        min: 0,
        max: 100,
        interval: 20,
        axisLabel: {
          formatter: '{value}%',
        },
      },
    ],
    series: [
      {
        name: '收入',
        type: 'bar',
        data: [7000, 7100, 7200, 7300,7400],
        barWidth: 20,
        itemStyle: {
          color: new echarts.graphic.LinearGradient(0, 0, 0, 1, [
            { offset: 0, color: '#83bff6' },
            { offset: 0.5, color: '#188df0' },
            { offset: 1, color: '#188df0' },
          ]),
        },
      },
      {
        name: '毛利润',
        type: 'bar',
        data: [ 8000,8200, 8400, 8600, 8800],
        barWidth: 20,
        itemStyle: {
          color: new echarts.graphic.LinearGradient(0, 0, 0, 1, [
            { offset: 0, color: '#25d73c' },
            { offset: 0.5, color: '#1bc23d' },
            { offset: 1, color: '#179e61' },
          ]),
        },
      },
      {
        name: '收入增长率',
        type: 'line',
        yAxisIndex: 1,
        data: [  60,65, 70, 75, 80],
        itemStyle: {
          color: '#67C23A',
        },
      },
      {
        name: '利润增长率',
        type: 'line',
        yAxisIndex: 1,
        data: [  70,75, 80, 85, 90],
        itemStyle: {
          color: '#409EFF',
        },
      },
    ],
  } as EChartsOption);
  chart.value = barChart;
}

onBeforeUnmount(() => {
  beforeDestroy();
});

onActivated(() => {
  activated();
});

onDeactivated(() => {
  deactivated();
});

onMounted(() => {
  mounted();
  nextTick(() => {
    initChart();
  });
});
</script>
<!-- 饼图 -->
<template>
  <div :id="id" :class="className" :style="{ height, width }" />
</template>

<script setup lang="ts">
import {
  nextTick,
  onActivated,
  onBeforeUnmount,
  onDeactivated,
  onMounted
} from 'vue';
import { init, EChartsOption } from 'echarts';
import resize from '@/utils/resize';

const props = defineProps({
  id: {
    type: String,
    default: 'pieChart'
  },
  className: {
    type: String,
    default: ''
  },
  width: {
    type: String,
    default: '200px',
    required: true
  },
  height: {
    type: String,
    default: '200px',
    required: true
  }
});

const { mounted, chart, beforeDestroy, activated, deactivated } = resize();

function initChart() {
  const pieChart = init(document.getElementById(props.id) as HTMLDivElement);

  pieChart.setOption({
    title: {
      show: true,
      text: '产品分类总览',
      x: 'center',
      padding: 15,
      textStyle: {
        fontSize: 18,
        fontStyle: 'normal',
        fontWeight: 'bold',
        color: '#337ecc'
      }
    },
    grid: {
      left: '2%',
      right: '2%',
      bottom: '10%',
      containLabel: true
    },
    legend: {
      top: 'bottom'
    },
    series: [
      {
        name: 'Nightingale Chart',
        type: 'pie',
        radius: [50, 130],
        center: ['50%', '50%'],
        roseType: 'area',
        itemStyle: {
          borderRadius: 1,
          color: function (params: any) {
            //自定义颜色
            const colorList = ['#409EFF', '#67C23A', '#E6A23C', '#F56C6C'];
            return colorList[params.dataIndex];
          }
        },
        data: [
          { value: 26, name: '家用电器' },
          { value: 27, name: '户外运动' },
          { value: 24, name: '汽车用品' },
          { value: 23, name: '手机数码' }
        ]
      }
    ]
  } as EChartsOption);

  chart.value = pieChart;
}

onBeforeUnmount(() => {
  beforeDestroy();
});

onActivated(() => {
  activated();
});

onDeactivated(() => {
  deactivated();
});

onMounted(() => {
  mounted();
  nextTick(() => {
    initChart();
  });
});
</script>

<style lang="scss" scoped></style>
<!-- 雷达图 -->
<template>
  <div :id="id" :class="className" :style="{ height, width }" />
</template>

<script setup lang="ts">
import {
  nextTick,
  onActivated,
  onBeforeUnmount,
  onDeactivated,
  onMounted
} from 'vue';
import { init, EChartsOption } from 'echarts';
import resize from '@/utils/resize';

const props = defineProps({
  id: {
    type: String,
    default: 'radarChart'
  },
  className: {
    type: String,
    default: ''
  },
  width: {
    type: String,
    default: '200px',
    required: true
  },
  height: {
    type: String,
    default: '200px',
    required: true
  }
});

const { mounted, chart, beforeDestroy, activated, deactivated } = resize();

function initChart() {
  const radarChart = init(document.getElementById(props.id) as HTMLDivElement);

  radarChart.setOption({
    title: {
      show: true,
      text: '订单状态统计',
      x: 'center',
      padding: 15,
      textStyle: {
        fontSize: 18,
        fontStyle: 'normal',
        fontWeight: 'bold',
        color: '#337ecc'
      }
    },
    grid: {
      left: '2%',
      right: '2%',
      bottom: '10%',
      containLabel: true
    },
    legend: {
      x: 'center',
      y: 'bottom',
      data: ['预定数量', '下单数量', '发货数量']
    },
    radar: {
      // shape: 'circle',
      radius: '60%',
      indicator: [
        { name: '家用电器' },
        { name: '服装箱包' },
        { name: '运动户外' },
        { name: '手机数码' },
        { name: '汽车用品' },
        { name: '家具厨具' }
      ]
    },
    series: [
      {
        name: 'Budget vs spending',
        type: 'radar',
        itemStyle: {
          borderRadius: 6,
          color: function (params: any) {
            //自定义颜色
            const colorList = ['#409EFF', '#67C23A', '#E6A23C', '#F56C6C'];
            return colorList[params.dataIndex];
          }
        },
        data: [
          {
            value: [400, 400, 400, 400, 400, 400],
            name: '预定数量'
          },
          {
            value: [300, 300, 300, 300, 300, 300],
            name: '下单数量'
          },
          {
            value: [200, 200, 200, 200, 200, 200],
            name: '发货数量'
          }
        ]
      }
    ]
  } as EChartsOption);

  chart.value = radarChart;
}

onBeforeUnmount(() => {
  beforeDestroy();
});

onActivated(() => {
  activated();
});

onDeactivated(() => {
  deactivated();
});

onMounted(() => {
  mounted();
  nextTick(() => {
    initChart();
  });
});
</script>

<style lang="scss" scoped></style>
Project.vue组件
<template>
  <div class="component-container">
    <el-card class="project-card">
      <template #header>
        <span class="fw-b">有来项目简介</span>
      </template>
      <div class="project-card__main">
        <!-- 项目简介 -->
        <el-link target="_blank" type="primary" href="https://gitee.com/haoxr">
          youlai-mall
        </el-link>
        是基于Spring Boot 2.7、Spring Cloud 2021 & Alibaba
        2021、Vue3、Element-Plus、uni-app等主流技术栈构建的一整套全栈开源商城项目,
        涉及
        <el-link
          target="_blank"
          type="primary"
          href="https://gitee.com/youlaitech/youlai-mall"
          >后端微服务</el-link
        >
        、
        <el-link
          target="_blank"
          type="success"
          href="https://gitee.com/youlaitech/youlai-mall-admin"
          >前端管理</el-link
        >
        、
        <el-link
          target="_blank"
          type="warning"
          href="https://gitee.com/youlaitech/youlai-mall-weapp"
          >微信小程序
        </el-link>
        和
        <el-link
          target="_blank"
          type="danger"
          href="https://gitee.com/youlaitech/youlai-mall-weapp"
          >APP应用</el-link
        >
        等多端的开发。
        <el-divider />

        <!-- 源码地址 -->
        <el-row :gutter="10">
          <el-col :span="6">
            <el-badge value="免费开源" class="fw-b"> 项目地址 </el-badge>
          </el-col>
          <el-col :span="6">
            <el-link
              target="_blank"
              type="warning"
              href="https://www.youlai.tech/"
              >官方文档</el-link
            >
          </el-col>
          <el-col :span="6">
            <el-link
              target="_blank"
              type="primary"
              href="https://github.com/youlaitech"
              >Github</el-link
            >
          </el-col>
          <el-col :span="6">
            <el-link
              target="_blank"
              type="success"
              href="https://gitee.com/youlaiorg"
              >码云</el-link
            >
          </el-col>
        </el-row>
        <el-divider />
        <!-- 技术栈 -->
        <el-row :gutter="10">
          <el-col :span="6" class="fw-b"> 后端技术栈 </el-col>
          <el-col :span="18">
            Spring Boot、Spring Cloud & Alibaba、Spring Security
            OAuth2、JWT、Elastic Stack 、K8s...
          </el-col>
        </el-row>
        <el-divider />
        <el-row :gutter="10">
          <el-col :span="6" class="fw-b"> 前端技术栈 </el-col>
          <el-col :span="18">
            Vue3、TypeScript、Element-Plus、uni-app、vue3-element-admin ...
          </el-col>
        </el-row>
      </div>
    </el-card>
  </div>
</template>

<script lang="ts">
export default {
  name: 'index'
};
</script>

<style lang="scss" scoped>
.component-container {
  .project-card {
    font-size: 14px;

    &__main {
      line-height: 28px;
      height: 320px;
      overflow-y: auto;
      overflow-x: hidden;
    }
  }

  .fw-b {
    font-weight: bold;
  }
}
</style>
Team.vue组件
<!-- 团队介绍 -->
<template>
  <div class="component-container">
    <el-card class="team-card">
      <template #header>
        <span class="fw-b">有来开源组织 & 技术团队</span>
      </template>
      <el-tabs v-model="teamActiveName">
        <el-tab-pane label="开发者" name="1">
          <div class="developer" ref="dev_wrapper">
            <ul class="developer__container">
              <li
                class="developer__item"
                v-for="(item, index) in developers"
                :key="index"
              >
                <div class="developer__inner">
                  <el-image
                    class="developer__img"
                    :src="item.imgUrl"
                    :preview-src-list="[item.imgUrl]"
                  ></el-image>
                  <div class="developer__info">
                    <span class="developer__nickname">{{ item.nickname }}</span>
                    <div class="developer__position">
                      <el-tag
                        v-for="(position, i) in item.positions"
                        :type="(colors[i % colors.length] as any)"
                        :class="i !== 0 ? 'f-ml' : ''"
                        size="small"
                        :key="i"
                        >{{ position }}</el-tag
                      >
                    </div>
                    <div class="developer__homepage">
                      <a :href="item.homepage" target="_blank">个人主页</a>
                    </div>
                  </div>
                </div>
              </li>
            </ul>
            <el-image class="developer__indicator" :src="indicatorImgUrl" />
          </div>
        </el-tab-pane>

        <el-tab-pane label="交流群" name="2">
          <div class="group">
            <el-image
              class="group-img"
              src="https://www.youlai.tech/files/blog/youlaiqun.png"
              :preview-src-list="[
                'https://www.youlai.tech/files/blog/youlaiqun.png'
              ]"
            />
            <div class="group-tip">
              群二维码过期可添加开发者微信由其拉入群,备注「有来」即可。
            </div>
          </div>
        </el-tab-pane>

        <el-tab-pane label="加入我们" name="3">
          <div class="join">
            <p>1. 人品良好、善于思考、执行力强;</p>
            <p>2. 熟悉项目,且至少给项目提交(过)一个PR;</p>
            <p>3. Git代码库活跃,个人主页或博客完善者优先;</p>
            <p>4. 过分优秀者我们会主动联系您...</p>
            <div class="join__desc">申请加入方式: 添加开发者微信申请即可。</div>
          </div>
        </el-tab-pane>
      </el-tabs>
    </el-card>
  </div>
</template>

<script setup lang="ts">
import { nextTick, onMounted, reactive, ref, toRefs, watchEffect } from 'vue';
import BScroll from 'better-scroll';

const state = reactive({
  teamActiveName: '1',
  developers: [
    {
      imgUrl: 'https://s2.loli.net/2022/04/06/yRx8uzj4emA5QVr.jpg',
      nickname: '郝先瑞',
      positions: ['后端', '前端', '文档'],
      homepage: 'https://www.cnblogs.com/haoxianrui/'
    },
    {
      imgUrl: 'https://s2.loli.net/2022/04/06/cQihGv9uPsTjXk1.jpg',
      nickname: '张川',
      positions: ['后端', '前端'],
      homepage: 'https://blog.csdn.net/qq_41595149'
    },
    {
      imgUrl: 'https://s2.loli.net/2022/04/07/2IiOYBHnRGKgCSd.jpg',
      nickname: '张加林',
      positions: ['DevOps'],
      homepage: 'https://gitee.com/ximy'
    }
  ],
  colors: ['', 'success', 'warning', 'danger'],
  indicatorImgUrl: new URL(
    `../../../../assets/index/indicator.png`,
    import.meta.url
  ).href
});

const { teamActiveName, developers, colors, indicatorImgUrl } = toRefs(state);

let bScroll = reactive({});

const dev_wrapper = ref<HTMLElement | any>(null);

onMounted(() => {
  bScroll = new BScroll(dev_wrapper.value, {
    mouseWheel: true, //开启鼠标滚轮
    disableMouse: false, //启用鼠标拖动
    scrollX: true //X轴滚动启用
  });
});

watchEffect(() => {
  nextTick(() => {
    bScroll && (bScroll as any).refresh();
  });
});
</script>

<style lang="scss" scoped>
.component-container {
  .team-card {
    font-size: 14px;

    .el-tabs__content {
      .el-tab-pane {
        height: 265px;
      }
    }

    .developer {
      width: 100%;
      overflow: hidden;

      &__container {
        display: inline-flex;
        overflow: hidden;
        justify-content: flex-start;
        padding: 10px;

        .developer__item {
          &:not(:first-child) {
            margin-left: 20px;
          }

          align-items: center;
          list-style: none;
          width: 180px;
          min-width: 180px;

          .developer__inner {
            border: 1px solid #cccccc;
            border-radius: 5px;
            box-shadow: 6px 6px 6px #aaa;
            padding: 8px;
            text-align: center;

            .developer__img {
              height: 100px;
              width: 100px;
            }

            .developer__info {
              padding: 6px;
              font-size: 14px;

              .developer__position {
                margin-top: 10px;
              }

              .developer__homepage {
                margin-top: 16px;

                a {
                  display: inline-block;
                  padding: 4px 10px;
                  color: #409eff;
                  border: 1px solid #409eff;
                  border-radius: 5px;
                  background: #ecf5ff;

                  &:hover {
                    background: #409eff;
                    color: #ffffff;
                  }
                }
              }
            }
          }
        }
      }

      &__indicator {
        position: absolute;
        right: 0;
        bottom: 0;
        width: 120px;
        height: 100px;
      }
    }

    .join {
      overflow: hidden;
      p {
        font-weight: bold;
      }

      &__desc {
        margin-top: 20px;
        color: #409eff;
        font-weight: bold;
      }
    }

    .group {
      &-img {
        height: 200px;
        width: 200px;
      }
    }
  }

  .fw-b {
    font-weight: bold;
  }

  .f-ml {
    margin-left: 5px;
  }
}
</style>

若有收获,就点个赞吧
0 人点赞
