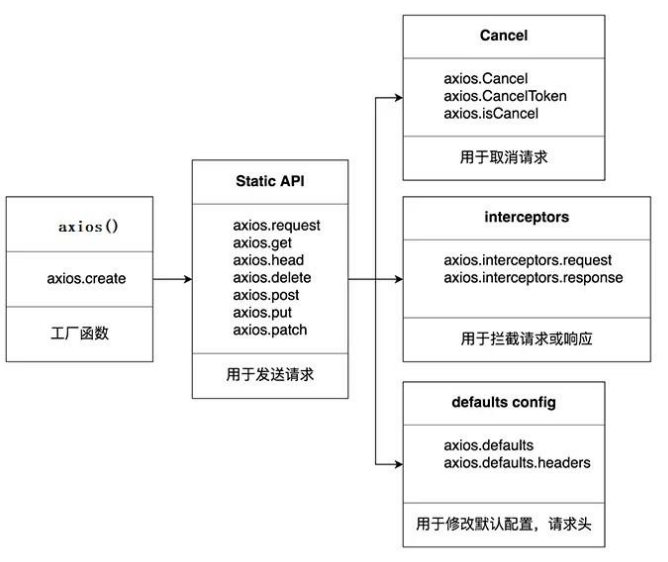
参考文档:https://gitee.com/hongjilin/hongs-study-notes/blob/master/%E7%BC%96%E7%A8%8B_%E5%89%8D%E7%AB%AF%E5%BC%80%E5%8F%91%E5%AD%A6%E4%B9%A0%E7%AC%94%E8%AE%B0/Ajax%E3%80%81Axios%E5%AD%A6%E4%B9%A0%E7%AC%94%E8%AE%B0/Axios%E5%85%A5%E9%97%A8%E4%B8%8E%E6%BA%90%E7%A0%81%E8%A7%A3%E6%9E%90%E7%AC%94%E8%AE%B0.md
1. json-server
json-server用于模拟服务端接口数据, 可以根据json数据建立一个完整的web服务。
参考文档:https://blog.csdn.net/weixin_39415598/article/details/122035661
1.1 安装json-server
安装:npm install -g json-server
查看版本号: json-server -v
1.2 创建db.json
{"posts": [{ "id": 1, "title": "json-server", "author": "typicode" }],"comments": [{ "id": 1, "body": "some comment", "postId": 1 }],"profile": { "name": "typicode" }}
1.3 启动json-serve
2. axios是什么
Axios,是一个基于promise的网络请求库, 作用域node.js和浏览器中, 同一套代码可以运行在浏览器和node.js中。在服务端它使用原生的node.js模块, 而在客户端(浏览器)则使用XMLHttpRequest。
Axios是一个基于promise的HTTP库,可以用在浏览器和node.js中。
Axios本质上也是对XHR的封装, 只不过它是Promise的实现版本, 符合最新的ES规范。
3. axios的特点
- 从浏览器创建XMLHttpRequests
- 从node.js创建http请求
- 支持Promise API
- 拦截请求和响应
- 转换请求和响应数据
- 取消请求
- 自动转换JSON数据
-
4. axios常用方法
4.1 get
const btn = document.querySelectorAll('button')btn[0].onclick = function() {axios({method: 'GET',url: 'http://localhost:3000/posts',}).then((res) => {console.log(res.data)})}
4.2 post
btn[1].onclick = function() {axios({method: 'POST',url: 'http://localhost:3000/profile',data:[{name:'IRIC'},{name:'OPPO'}]}).then((res) => {console.log(res.data)})}
4.3 PUT
btn[2].onclick = function () {axios({method: 'PUT',url: 'http://localhost:3000/posts/3',data: {id: 3,title: 'REact',author: 'node',},}).then((res) => {console.log(res.data)})}
4.4 DELETE
btn[3].onclick = function () {axios({method: 'DELETE',url: 'http://localhost:3000/posts/3',}).then((res) => {console.log(res.data)})}
5. axios的其他使用方法
axios(config): 通用/最本质的发任意类型请求的方式
- axios(url[, config]): 可以只指定 url 发 get 请求
- axios.request(config): 等同于 axios(config)
- axios.get(url[, config]): 发 get 请求
- axios.delete(url[, config]): 发 delete 请求
- axios.post(url[, data, config]): 发 post 请求
- axios.put(url[, data, config]): 发 put 请求
- axios.defaults.xxx: 请求的默认全局配置
- axios.interceptors.request.use(): 添加请求拦截器
- axios.interceptors.response.use(): 添加响应拦截器
- axios.create([config]): 创建一个新的 axios(它没有下面的功能)
- axios.Cancel(): 用于创建取消请求的错误对象
- axios.CancelToken(): 用于创建取消请求的 token 对象
- axios.isCancel(): 是否是一个取消请求的错误
- axios.all(promises): 用于批量执行多个异步请求
axios.spread(): 用来指定接收所有成功数据的回调函数的方法 ```javascript //get btn[0].onclick = () => { axios.request({
method: 'GET',url: 'http://localhost:3000/posts',
}).then(res => {
console.log(res)
}) }
btn[0].onclick = () => { axios.get(‘http://localhost:3000/posts',).then(res => {
console.log(res.data)
}) }
//post btn[0].onclick = () => { axios.post(‘http://localhost:3000/profile',{
name:"test"
}).then(res => {
console.log(res.data)
}) }
<a name="yzmXX"></a>## 5.1 axios config参数配置```javascriptconst config = {url: '/user', //请求地址method: 'get', // default 请求类型baseURL: 'https://some-domain.com/api/', //baseUrl基础路径transformRequest: [function (data, headers) { //对请求数据做处理, 把处理后的结果向服务器发送return data;}],transformResponse: [function (data) { //对响应结果做一些处理,return data;}],headers: {'X-Requested-With': 'XMLHttpRequest'},//设置头信息params: { //设定URL参数,ID: 12345},paramsSerializer: { //对请求的参数做序列化, 转化为字符串indexes: null},data: { //请求体设置 有2种形式 1.对象形式2. 字符串形式firstName: 'Fred'},data: 'Country=Brasil&City=Belo Horizonte',timeout: 1000, // default is `0` (no timeout) //超时时间withCredentials: false, // defaultadapter: function (config) {/* ... */},auth: { //请求基础验证username: 'janedoe',password: 's00pers3cret'},responseType: 'json', // defaultresponseEncoding: 'utf8', // defaultxsrfCookieName: 'XSRF-TOKEN', // default 安全设置xsrfHeaderName: 'X-XSRF-TOKEN', // default 安全设置onUploadProgress: function (progressEvent) { //上传时的回调},onDownloadProgress: function (progressEvent) {//下载时的回调},maxContentLength: 2000,maxBodyLength: 2000,validateStatus: function (status) {return status >= 200 && status < 300; // default},maxRedirects: 21, // default 最大跳转次数beforeRedirect: (options, { headers }) => {if (options.hostname === "example.com") {options.auth = "user:password";}},socketPath: null, // default socket路径httpAgent: new http.Agent({ keepAlive: true }),httpsAgent: new https.Agent({ keepAlive: true }),proxy: {//代理protocol: 'https',host: '127.0.0.1',port: 9000,auth: {username: 'mikeymike',password: 'rapunz3l'}},cancelToken: new CancelToken(function (cancel) {}),signal: new AbortController().signal,decompress: true, // defaultinsecureHTTPParser: undefined, // defaulttransitional: {silentJSONParsing: true, // default value for the current Axios versionforcedJSONParsing: true,clarifyTimeoutError: false,},env: {FormData: window?.FormData || global?.FormData},formSerializer: {visitor: (value, key, path, helpers)=> {}; // custom visitor funaction to serrialize form valuesdots: boolean; // use dots instead of brackets formatmetaTokens: boolean; // keep special endings like {} in parameter keyindexes: boolean; // array indexes format null - no brackets, false - empty brackets, true - brackets with indexes}}
5.2 原理图
5.3 axios.create(config)
- 根据指定配置创建一个新的axios, 也就是每个新axios都有自己的配置;
- 新axios只是没有取消和批量发送请求的方法, 其他所有语法都是一致的;
- 这个语法的作用:
- 需求: 项目中有部分接口需要的配置与另一部分接口需要的配置不太一样,如何处理?
- 解决: 创建2个新axiso,每个都有自己特有的配置, 分别应用到不同要求的接口请求中。
//创建实例对象 /getJokeconst duanzi = axios.create({baseURL: 'https://api.apiopen.top',timeout: 2000});const onather = axios.create({baseURL: 'https://b.com',timeout: 2000});//这里 duanzi 与 axios 对象的功能几近是一样的// duanzi({// url: '/getJoke',// }).then(response => {// console.log(response);// });duanzi.get('/getJoke').then(response => {console.log(response.data)})
5.4 配置默认的配置
```javascript //默认配置 axios.defaults.method = ‘GET’;//设置默认的请求类型为 GET axios.defaults.baseURL = ‘http://localhost:3000';//设置基础 URL axios.defaults.params = {id:100}; axios.defaults.timeout = 3000;//
btns[0].onclick = function(){ axios({ url: ‘/posts’ }).then(response => { console.log(response); }) }
<a name="YpVnk"></a># 6. 请求拦截与请求响应:::success1. 说明: 调用**axios()**并不是立即发送**ajax**请求, 而是需要经过一个较长的**流程**2. 流程: 请求拦截器2 =》 请求拦截器1=》响应拦截器1=》响应拦截器2 =》请求的回调3. 注意: 此流程是通过**promise串联**起来的, 请求**拦截器**的是**config**, **响应拦截器**的是**response**:::```javascript<script>const btn = document.querySelectorAll('button')axios.interceptors.request.use((config) => {console.log('请求拦截成功---1号')return config},(error) => {console.log('请求拦截失败---1号')})axios.interceptors.response.use((res) => {console.log('响应拦截成功---1号')console.log(res)return res},(error) => {console.log('响应拦截器失败 ----1号', error)})axios.defaults.tomeout = 3000btn[0].onclick = () => {axios.get('http://localhost:3000/posts').then((res) => {console.log(res)})}</script>
7. 取消请求
- 基本流程 cancelToken对象
- 缓存用于取消请求的cancel函数
- 在后面特定时机调用cancel函数取消请求
- 在错误回调中判断如果error是cancel,做相应处理
- 实现功能,点击按钮,取消某个蒸菜请求中的请求
- 实现功能点击按钮,取消某个正在请求中的请求
const btn = document.querySelectorAll('button')let cancel = null //声明全局变量//发送请求btn[0].onclick = () => {console.log(1231321)//判断上一次的请求是否已经完成if (cancel !== null) {cancel()}axios({method: 'GET',url: 'http://localhost:3000/posts',// 1. 添加配置对象的属性cancelToken: new axios.CancelToken((c) => {//2.将c的值赋值给cancelcancel = c}),}).then((res) => {//将cancel的值初始化cancel = nullconsole.log(res)})}
如果存在未完成的请求, 继续请求的时候, 会把上一次的 请求取消掉。


