MenuButton(菜单按钮)
JavaFX MenuButton 控件的工作方式与常规的 Button(按钮)类似,只是它提供了用户可以选择单击的选项列表。这些选项中的每一个都像一个单独的按钮一样起作用 —— 这意味着您的应用程序可以监听点击并单独响应每个选项。在某种程度上,JavaFX MenuButton 的工作方式有点像 MenuBar。
The JavaFX MenuButton control works like a regular Button except it provides a list of options which the user can choose to click. Each of these options function like a separate button - meaning your application can listen for clicks and respond individually to each option. In a way, a JavaFX MenuButton works a bit like a MenuBar.
JavaFX MenuButton 可以显示或隐藏菜单项。当在 MenuButton 中单击一个小箭头按钮时,通常会显示菜单项。JavaFX MenuButton 控件由 javafx.scene.control.MenuButton 类表示。
The JavaFX MenuButton can show or hide the menu items. The menu items are usually shown when a little arrow button is clicked in the MenuButton. The JavaFX MenuButton control is represented by the class javafx.scene.control.MenuButton.
MenuButton、ChoiceBox 和 ComboBox 的对比
MenuButton 看起来类似于 ChoiceBox(选择框)和 ComboBox(组合框),但不同之处在于 MenuButton 旨在在您选择其中一个菜单选项时触发操作,而 ChoiceBox 和 ComboBox 旨在仅在内部记录选择了哪个选项,以便稍后读取。
The MenuButton looks similar to a ChoiceBox and ComboBox, but the difference is, that the MenuButton is designed to trigger an action when you select one of its menu options, whereas ChoiceBox and ComboBox are designed to just note internally what option was selected so it can be read later.
创建 MenuButton
您可以通过创建 MenuButton 类的实例来创建 JavaFX MenuButton。MenuButton 构造器有一个按钮文本和按钮图形的形参。您可以为文本和 / 或图形传递 null,以得到一个没有文本或图形的 MenuButton。下面是创建一个只有文本标签的 JavaFX MenuButton 的示例:
You create a JavaFX MenuButton by creating an instance of the MenuButton class. The MenuButton constructor takes a button text and a button graphic. You can pass null for the text and / or the graphic, in case you want a MenuButton without either text or graphic. Here is an example of creating a JavaFX MenuButton with only a text label:
MenuItem menuItem1 = new MenuItem("Option 1");MenuItem menuItem2 = new MenuItem("Option 2");MenuItem menuItem3 = new MenuItem("Option 3");MenuButton menuButton = new MenuButton("Options", null, menuItem1, menuItem2, menuItem3);
首先,3 个 MenuItem 实例被创建,每个实例都有不同的文本。然后创建一个 MenuButton 实例,将按钮文本、图形图标(null)和 3 个 MenuItem 实例作为参数传递给 MenuButton 构造函数。
First 3 MenuItem instances are created, each with a different text. Then a MenuButton instance is created, passing a button text, a graphic icon (null) and the 3 MenuItem instances as parameter to the MenuButton constructor.
MenuButton 的构造器的第二个参数类型是一个 Node,用作显示在 MenuButton 文本旁边的图标。您可以使用 ImageView(图像视图)控件在 MenuButton 文本旁边显示图像。只需创建一个 ImageView 实例并将将实例的引用传递给 MenuButton 构造器即可,而不是传递 null 值。这是一个示例:
The second MenuButton constructor parameter is a Node which is used as a graphic icon which is shown next to the MenuButton text. You could use an ImageView control to display an an image next to the MenuButton text. Just create an ImageView instance and pass a reference to that to the MenuButton constructor, instead of null. Here is an example:
MenuItem menuItem1 = new MenuItem("Option 1");MenuItem menuItem2 = new MenuItem("Option 2");MenuItem menuItem3 = new MenuItem("Option 3");FileInputStream input = new FileInputStream("resources/images/iconmonstr-menu-5-32.png");Image image = new Image(input);ImageView imageView = new ImageView(image);MenuButton menuButton = new MenuButton("Options", imageView, menuItem1, menuItem2, menuItem3);
在场景图中添加 MenuButton
要使 MenuButton 可见,您必须将其添加到 JavaFX 场景图中。这意味着将其添加到 Scene,或作为附加到 Scene 对象的布局组件的子节点。
To make a MenuButton visible you must add it to the JavaFX scene graph. This means adding it to a Scene, or as child of a layout which is attached to a Scene object.
这是一个将 JavaFX MenuButton 添加到场景图的示例:
Here is an example that attaches a JavaFX MenuButton to the scene graph:
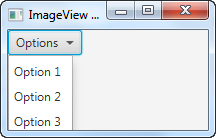
package com.jenkov.javafx.controls;import javafx.application.Application;import javafx.scene.Scene;import javafx.scene.control.MenuButton;import javafx.scene.control.MenuItem;import javafx.scene.layout.HBox;import javafx.stage.Stage;import java.io.FileInputStream;public class MenuButtonExperiments extends Application {@Overridepublic void start(Stage primaryStage) throws Exception {primaryStage.setTitle("ImageView Experiment 1");MenuItem menuItem1 = new MenuItem("Option 1");MenuItem menuItem2 = new MenuItem("Option 2");MenuItem menuItem3 = new MenuItem("Option 3");MenuButton menuButton = new MenuButton("Options", null, menuItem1, menuItem2, menuItem3);HBox hbox = new HBox(menuButton);Scene scene = new Scene(hbox, 200, 100);primaryStage.setScene(scene);primaryStage.show();}public static void main(String[] args) {Application.launch(args);}}
以下是上述示例应用程序的外观:
Here is how the application resulting from the above example looks:
MenuButton 字体
您可以指定应使用什么字体呈现 JavaFX MenuButton 上的文本标签。您可以通过 MenuButton 的 setFont() 方法设置字体。下面是通过 setFont() 设置 JavaFX MenuButton 字体的示例:
You can specify what font the text label on a JavaFX MenuButton should be rendered with. You set the font via the MenuButton setFont() method. Here is an example of setting the font of a JavaFX MenuButton via setFont():
MenuItem menuItem1 = new MenuItem("Option 1");MenuItem menuItem2 = new MenuItem("Option 2");MenuButton menuButton = new MenuButton("Options", null, menuItem1, menuItem2);Font font = Font.font("Courier New", FontWeight.BOLD, 36);menuButton.setFont(font);
MenuButton 图标
JavaFX MenuButton 使您能够添加一个图形图标,然后显示在菜单文本旁边 —— 就像您可以使用常规 Button(按钮)一样。创建一个 MenuButton 部分中的第二个示例显示了如何创建菜单按钮并通过构造器传递图标。但是,也可以通过其 setGraphic() 方法设置 MenuButton 的图形图标。这是上一节中的示例,但通过其 setGraphic() 方法添加图标到MenuButton:
The JavaFX MenuButton enables you to add a graphical icon which is then displayed next to the menu text - just like you can do with a regular Button. The second example in the Create a MenuButton section shows how to create a MenuButton and pass the graphical icon via the constructor. However, it is also possible to set the graphical icon of a MenuButton via its setGraphic() method. Here is how the example from the previous section would look with a graphic icon added to the MenuButton via its setGraphic() method:
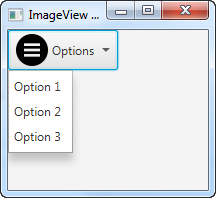
package com.jenkov.javafx.controls;import javafx.application.Application;import javafx.scene.Scene;import javafx.scene.control.MenuButton;import javafx.scene.control.MenuItem;import javafx.scene.image.Image;import javafx.scene.image.ImageView;import javafx.scene.layout.HBox;import javafx.stage.Stage;import java.io.FileInputStream;public class MenuButtonExperiments extends Application {@Overridepublic void start(Stage primaryStage) throws Exception {primaryStage.setTitle("ImageView Experiment 1");MenuItem menuItem1 = new MenuItem("Option 1");MenuItem menuItem2 = new MenuItem("Option 2");MenuItem menuItem3 = new MenuItem("Option 3");MenuButton menuButton = new MenuButton("Options", null, menuItem1, menuItem2, menuItem3);FileInputStream input = new FileInputStream("resources/images/iconmonstr-menu-5-32.png");Image image = new Image(input);ImageView imageView = new ImageView(image);menuButton.setGraphic(imageView);HBox hbox = new HBox(menuButton);Scene scene = new Scene(hbox, 200, 160);primaryStage.setScene(scene);primaryStage.show();}public static void main(String[] args) {Application.launch(args);}}
以下是上述示例应用程序的外观:
Here is how the application resulting from the above example looks:
响应菜单项选择事件
要在用户选择菜单项时做出响应,请将 OnAction 事件侦听器添加到相应的 MenuItem 对象。下面是一个示例,向您展示如何将动作事件侦听器添加到 MenuItem 对象:
To respond to when a user selects a menu item, add an OnAction event listener to the corresponding MenuItem object. Here is an example showing you how to add an action event listener to a MenuItem object:
:::: code-group ::: code-group-item 匿名实现类
MenuItem menuItem3 = new MenuItem("Option 3");menuItem3.setOnAction(new EventHandler<ActionEvent>() {@Overridepublic void handle(ActionEvent event) {System.out.println("Option 3 selected");}});
::: ::: code-group-item Lambda 表达式
MenuItem menuItem3 = new MenuItem("Option 3");menuItem3.setOnAction(event -> {System.out.println("Option 3 selected via Lambda");});
::::

若有收获,就点个赞吧
0 人点赞
