一、环境说明
实验环境
OS CentOS5.4
192.168.0.14 proxy
192.168.0.24 web1
192.168.0.64 web2

官方地址:http://haproxy.1wt.eu/
下载地址:http://haproxy.1wt.eu/download/1.4/src/haproxy-1.4.24.tar.gz
二、软件安装
[root@cacti src]# tar xzvf haproxy-1.4.24.tar.gz[root@cacti haproxy-1.4.24]# make TARGET=linux26 PREFIX=/usr/local/haproxy[root@cacti haproxy-1.4.24]# make install PREFIX=/usr/local/haproxy
三、创建配置文件 haproxy 默认是没有配置文件的,需要自己手机创建
vim /etc/haproxy.cfg
globallog 127.0.0.1 local3maxconn 20480chroot /usr/local/haproxyuid 1004 #1004为haproxy 用户的uid ,haproxy用户需要自己手动创建gid 1004daemonquietnbproc 1pidfile /var/run/haproxy.piddefaultslog globalmode httpmaxconn 20480option httplogoption httpcloseoption forwardforoption dontlognulloption redispatchretries 3balance roundrobincontimeout 5000clitimeout 50000srvtimeout 50000listen web_poll 192.168.0.14:80mode httpoption httplogoption dontlognulloption logasapoption forwardforoption httpclose# option httpchk GET /index.htmlserver web1 192.168.0.24:80 cookie 1 check inter 2000 rise 3 fall 3server web2 192.168.0.64:80 cookie 1 check inter 2000 rise 3 fall 3listen status 192.168.0.14:8080stats enablestats uri /statsstats auth admin:123456stats realm (Haproxy\ statistic)
四、添加日志
[root@cacti ~]# vim /etc/syslog.conf添加:local3.* /var/log/haproxy.loglocal0.* /var/log/haproxy.log[root@cacti ~]# vim /etc/sysconfig/syslog修改:SYSLOGD_OPTIONS="-r -m 0"service syslog restart
五、创建haproxy启动脚本
[root@cacti ~]# vim /etc/init.d/haproxy#!/bin/bash## haproxy## chkconfig: 35 85 15# description: HAProxy is a free, very fast and reliable solution \# offering high availability, load balancing, and \# proxying for TCP and HTTP-based applications# processname: haproxy# config: /etc/haproxy.cfg# pidfile: /var/run/haproxy.pid# Source function library.. /etc/rc.d/init.d/functions# Source networking configuration.. /etc/sysconfig/network# Check that networking is up.[ "$NETWORKING" = "no" ] && exit 0config="/etc/haproxy.cfg"exec="/usr/local/haproxy/sbin/haproxy"prog=$(basename $exec)[ -e /etc/sysconfig/$prog ] && . /etc/sysconfig/$proglockfile=/var/lock/subsys/haproxycheck() {$exec -c -V -f $config}start() {$exec -c -q -f $configif [ $? -ne 0 ]; thenecho "Errors in configuration file, check with $prog check."return 1fiecho -n $"Starting $prog: "# start it up here, usually something like "daemon $exec"daemon $exec -D -f $config -p /var/run/$prog.pidretval=$?echo[ $retval -eq 0 ] && touch $lockfilereturn $retval}stop() {echo -n $"Stopping $prog: "# stop it here, often "killproc $prog"killproc $progretval=$?echo[ $retval -eq 0 ] && rm -f $lockfilereturn $retval}restart() {$exec -c -q -f $configif [ $? -ne 0 ]; thenecho "Errors in configuration file, check with $prog check."return 1fistopstart}reload() {$exec -c -q -f $configif [ $? -ne 0 ]; thenecho "Errors in configuration file, check with $prog check."return 1fiecho -n $"Reloading $prog: "$exec -D -f $config -p /var/run/$prog.pid -sf $(cat /var/run/$prog.pid)retval=$?echoreturn $retval}force_reload() {restart}fdr_status() {status $prog}case "$1" instart|stop|restart|reload)$1;;force-reload)force_reload;;checkconfig)check;;status)fdr_status;;condrestart|try-restart)[ ! -f $lockfile ] || restart;;*)echo $"Usage: $0 {start|stop|status|checkconfig|restart|try-restart|reload|force-reload}"exit 2esac
六、启动
[root@cacti etc]# /etc/init.d/haproxy startStarting haproxy: [ OK ][root@cacti etc]# ps -ef | grep haproxy100 2305 1 0 17:55 ? 00:00:00 /usr/local/sbin/haproxy -D -f /etc/haproxy.cfg -p /var/run/haproxy.pidroot 2308 774 0 17:55 pts/0 00:00:00 grep haproxy[root@cacti etc]#
报错:
[root@cacti ~]# /etc/init.d/haproxy startStarting haproxy: [ALERT] 177/105503 (18602) : Starting proxy cacti: cannot bind socket[FAILED]产生这个错误可能有两个原因,1)没有加入内核参数 (net.ipv4.ip_nonlocal_bind=1)2)端口冲突
查看状态页面
http://192.168.0.14:8080/stats
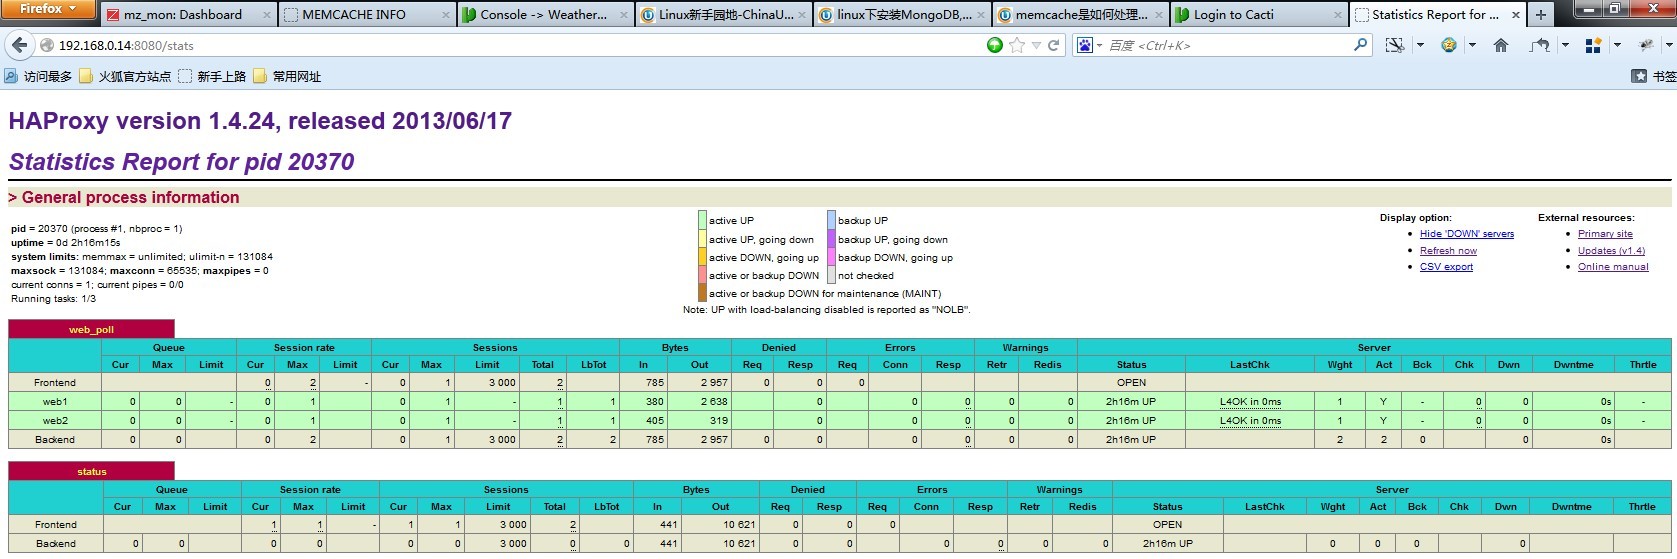
测试: 打开http:192.168.0.14 可以轮询到两个web服务器上。
haproxy 配置文件说明 来源http://www.linuxidc.com/Linux/2012-07/65350.htm
####################全局配置信息###############################参数是进程级的,通常和操作系统(OS)相关#########globalmaxconn 20480 #默认最大连接数log 127.0.0.1 local3 #[err warning info debug]chroot /var/haproxy #chroot运行的路径uid 99 #所属运行的用户uidgid 99 #所属运行的用户组daemon #以后台形式运行haproxynbproc 1 #进程数量(可以设置多个进程提高性能)pidfile /var/run/haproxy.pid #haproxy的pid存放路径,启动进程的用户必须有权限访问此文件ulimit-n 65535 #ulimit的数量限制#####################默认的全局设置########################这些参数可以被利用配置到frontend,backend,listen组件##defaultslog globalmode http #所处理的类别 (#7层 http;4层tcp )maxconn 20480 #最大连接数option httplog #日志类别http日志格式option httpclose #每次请求完毕后主动关闭http通道option dontlognull #不记录健康检查的日志信息option forwardfor #如果后端服务器需要获得客户端真实ip需要配置的参数,可以从Http Header中获得客户端ipoption redispatch #serverId对应的服务器挂掉后,强制定向到其他健康的服务器option abortonclose #当服务器负载很高的时候,自动结束掉当前队列处理比较久的连接stats refresh 30 #统计页面刷新间隔retries 3 #3次连接失败就认为服务不可用,也可以通过后面设置balance roundrobin #默认的负载均衡的方式,轮询方式#balance source #默认的负载均衡的方式,类似nginx的ip_hash#balance leastconn #默认的负载均衡的方式,最小连接contimeout 5000 #连接超时clitimeout 50000 #客户端超时srvtimeout 50000 #服务器超时timeout check 2000 #心跳检测超时####################监控页面的设置#######################listen admin_status #Frontend和Backend的组合体,监控组的名称,按需自定义名称bind 0.0.0.0:65532 #监听端口mode http #http的7层模式log 127.0.0.1 local3 err #错误日志记录stats refresh 5s #每隔5秒自动刷新监控页面stats uri /admin?stats #监控页面的urlstats realm itnihao\ itnihao #监控页面的提示信息stats auth admin:admin #监控页面的用户和密码admin,可以设置多个用户名stats auth admin1:admin1 #监控页面的用户和密码admin1stats hide-version #隐藏统计页面上的HAproxy版本信息stats admin if TRUE #手工启用/禁用,后端服务器(haproxy-1.4.9以后版本)errorfile 403 /etc/haproxy/errorfiles/403.httperrorfile 500 /etc/haproxy/errorfiles/500.httperrorfile 502 /etc/haproxy/errorfiles/502.httperrorfile 503 /etc/haproxy/errorfiles/503.httperrorfile 504 /etc/haproxy/errorfiles/504.http#################HAProxy的日志记录内容设置###################capture request header Host len 40capture request header Content-Length len 10capture request header Referer len 200capture response header Server len 40capture response header Content-Length len 10capture response header Cache-Control len 8#######################网站监测listen配置################################此用法主要是监控haproxy后端服务器的监控状态############listen site_statusbind 0.0.0.0:1081 #监听端口mode http #http的7层模式log 127.0.0.1 local3 err #[err warning info debug]monitor-uri /site_status #网站健康检测URL,用来检测HAProxy管理的网站是否可以用,正常返回200,不正常返回503acl site_dead nbsrv(server_web) lt 2 #定义网站down时的策略当挂在负载均衡上的指定backend的中有效机器数小于1台时返回trueacl site_dead nbsrv(server_blog) lt 2acl site_dead nbsrv(server_bbs) lt 2monitor fail if site_dead #当满足策略的时候返回503,网上文档说的是500,实际测试为503monitor-net 192.168.16.2/32 #来自192.168.16.2的日志信息不会被记录和转发monitor-net 192.168.16.3/32########frontend配置#################注意,frontend配置里面可以定义多个acl进行匹配操作########frontend http_80_inbind 0.0.0.0:80 #监听端口,即haproxy提供web服务的端口,和lvs的vip端口类似mode http #http的7层模式log global #应用全局的日志配置option httplog #启用http的logoption httpclose #每次请求完毕后主动关闭http通道,HA-Proxy不支持keep-alive模式option forwardfor #如果后端服务器需要获得客户端的真实IP需要配置次参数,将可以从Http Header中获得客户端IP########acl策略配置#############acl itnihao_web hdr_reg(host) -i ^(www.itnihao.cn|ww1.itnihao.cn)$#如果请求的域名满足正则表达式中的2个域名返回true -i是忽略大小写acl itnihao_blog hdr_dom(host) -i blog.itnihao.cn#如果请求的域名满足www.itnihao.cn返回true -i是忽略大小写#acl itnihao hdr(host) -i itnihao.cn#如果请求的域名满足itnihao.cn返回true -i是忽略大小写#acl file_req url_sub -i killall=#在请求url中包含killall=,则此控制策略返回true,否则为false#acl dir_req url_dir -i allow#在请求url中存在allow作为部分地址路径,则此控制策略返回true,否则返回false#acl missing_cl hdr_cnt(Content-length) eq 0#当请求的header中Content-length等于0时返回true########acl策略匹配相应##############block if missing_cl#当请求中header中Content-length等于0阻止请求返回403#block if !file_req || dir_req#block表示阻止请求,返回403错误,当前表示如果不满足策略file_req,或者满足策略dir_req,则阻止请求use_backend server_web if itnihao_web#当满足itnihao_web的策略时使用server_web的backenduse_backend server_blog if itnihao_blog#当满足itnihao_blog的策略时使用server_blog的backend#redirect prefix http://blog.itniaho.cn code 301 if itnihao#当访问itnihao.cn的时候,用http的301挑转到http://192.168.16.3default_backend server_bbs#以上都不满足的时候使用默认server_bbs的backend##########backend的设置###############下面我将设置三组服务器 server_web,server_blog,server_bbs##################backend server_web####################backend server_webmode http #http的7层模式balance roundrobin #负载均衡的方式,roundrobin平均方式cookie SERVERID #允许插入serverid到cookie中,serverid后面可以定义option httpchk GET /index.html #心跳检测的文件server web1 192.168.16.2:80 cookie web1 check inter 1500 rise 3 fall 3 weight 1#服务器定义,cookie 1表示serverid为web1,check inter 1500是检测心跳频率rise 3是3次正确认为服务器可用,#fall 3是3次失败认为服务器不可用,weight代表权重server web2 192.168.16.3:80 cookie web2 check inter 1500 rise 3 fall 3 weight 2#服务器定义,cookie 1表示serverid为web2,check inter 1500是检测心跳频率rise 3是3次正确认为服务器可用,#fall 3是3次失败认为服务器不可用,weight代表权重###################backend server_blog######################backend server_blogmode http #http的7层模式balance roundrobin #负载均衡的方式,roundrobin平均方式cookie SERVERID #允许插入serverid到cookie中,serverid后面可以定义option httpchk GET /index.html #心跳检测的文件server blog1 192.168.16.2:80 cookie blog1 check inter 1500 rise 3 fall 3 weight 1#服务器定义,cookie 1表示serverid为blog1,check inter 1500是检测心跳频率rise 3是3次正确认为服务器可用,fall 3是3次失败认为服务器不可用,weight代表权重server blog2 192.168.16.3:80 cookie blog2 check inter 1500 rise 3 fall 3 weight 2#服务器定义,cookie 1表示serverid为blog2,check inter 1500是检测心跳频率rise 3是3次正确认为服务器可用,fall 3是3次失败认为服务器不可用,weight代表权重##################backend server_bbs########################backend server_bbsmode http #http的7层模式balance roundrobin #负载均衡的方式,roundrobin平均方式cookie SERVERID #允许插入serverid到cookie中,serverid后面可以定义option httpchk GET /index.html #心跳检测的文件server bbs1 192.168.16.2:80 cookie bbs1 check inter 1500 rise 3 fall 3 weight 1#服务器定义,cookie 1表示serverid为bbs1,check inter 1500是检测心跳频率rise 3是3次正确认为服务器可用,fall 3是3次失败认为服务器不可用,weight代表权重server bbs2 192.168.16.3:80 cookie bbs2 check inter 1500 rise 3 fall 3 weight 2#服务器定义,cookie 1表示serverid为bbs2,check inter 1500是检测心跳频率rise 3是3次正确认为服务器可用,fall 3是3次失败认为服务器不可用,weight代表权重

若有收获,就点个赞吧
0 人点赞
