补充上一篇文章的内容:
Lucene & ElasticSearch
分页查询
GET /test/goods/_search{"query": {"match": {"title": "小米"}},"sort": [{"price": {"order": "asc"}},{"_score": {"order": "desc"}}],"from": 0, //从0开始"size": 2 //显示的个数}
高亮显示
服务端搜索数据,得到搜索结果。
把搜索结果中,搜索关键词都加上约定好的标签
前端页面提前写好标签的CSS样式,即可高亮
GET /test/goods/_search{"query": {"match": {"title": "小米"}},"highlight": {"pre_tags": "<em>","post_tags": "</em>","fields": {"title": {} //指定要高亮的字段}}}
聚合aggregations
聚合可以让我们及其方便的实现对数据的同级、分析:
- 什么品牌的手机最受欢迎
- 这些手机的平均架构、最高价格、最低价格
- 这个手机每月的销售量情况如何?
实现这些停机功能比数据库的SQL要方便的多,而且查询速度非常快,可以实现近实时搜索效果。
Elasticsearch中的聚合,包含多种类型,最常用的两种:桶(类似group by)和度量.
桶的作用:是按照某种方式对数据进行分组,每一组数据在ES中称为一个桶。
划分桶的方式有很多:
- DateHistogram Aggregation: 根据日期阶梯分组,例如给定阶梯为周,会自动每周分为一组
度量:相当于聚合的结果,分组完成以后,一般会对组中的数据求和、平均值
如下例子,创建数据:
索引库:
PUT /car{"mappings":{"orders":{"properties":{"color":{"type":"keyword"},"make":{"type":"keyword"}}}}}
新增文档数据
POST /car/orders/_bulk{"index":{}}{"price":10000,"color":"红","make":"本田","sold":"2020-10-28"}{"index":{}}{"price":20000,"color":"红","make":"本田","sold":"2020-11-05"}{"index":{}}{"price":30000,"color":"绿","make":"福特","sold":"2020-05-18"}{"index":{}}{"price":15000,"color":"蓝","make":"丰田","sold":"2020-07-02"}{"index":{}}{"price":12000,"color":"绿","make":"丰田","sold":"2020-08-19"}{"index":{}}{"price":20000,"color":"红","make":"本田","sold":"2020-11-05"}{"index":{}}{"price":80000,"color":"红","make":"宝马","sold":"2020-01-01"}{"index":{}}{"price":25000,"color":"蓝","make":"福特","sold":"2020-02-12"}
桶划分数据:按照汽车的颜色color来划分桶
GET /car/_search{"size":0,"aggs":{"popular_colors": {"terms": {"field": "color"}}}}
运行结果如下图:doc_count表示有几个document文档数据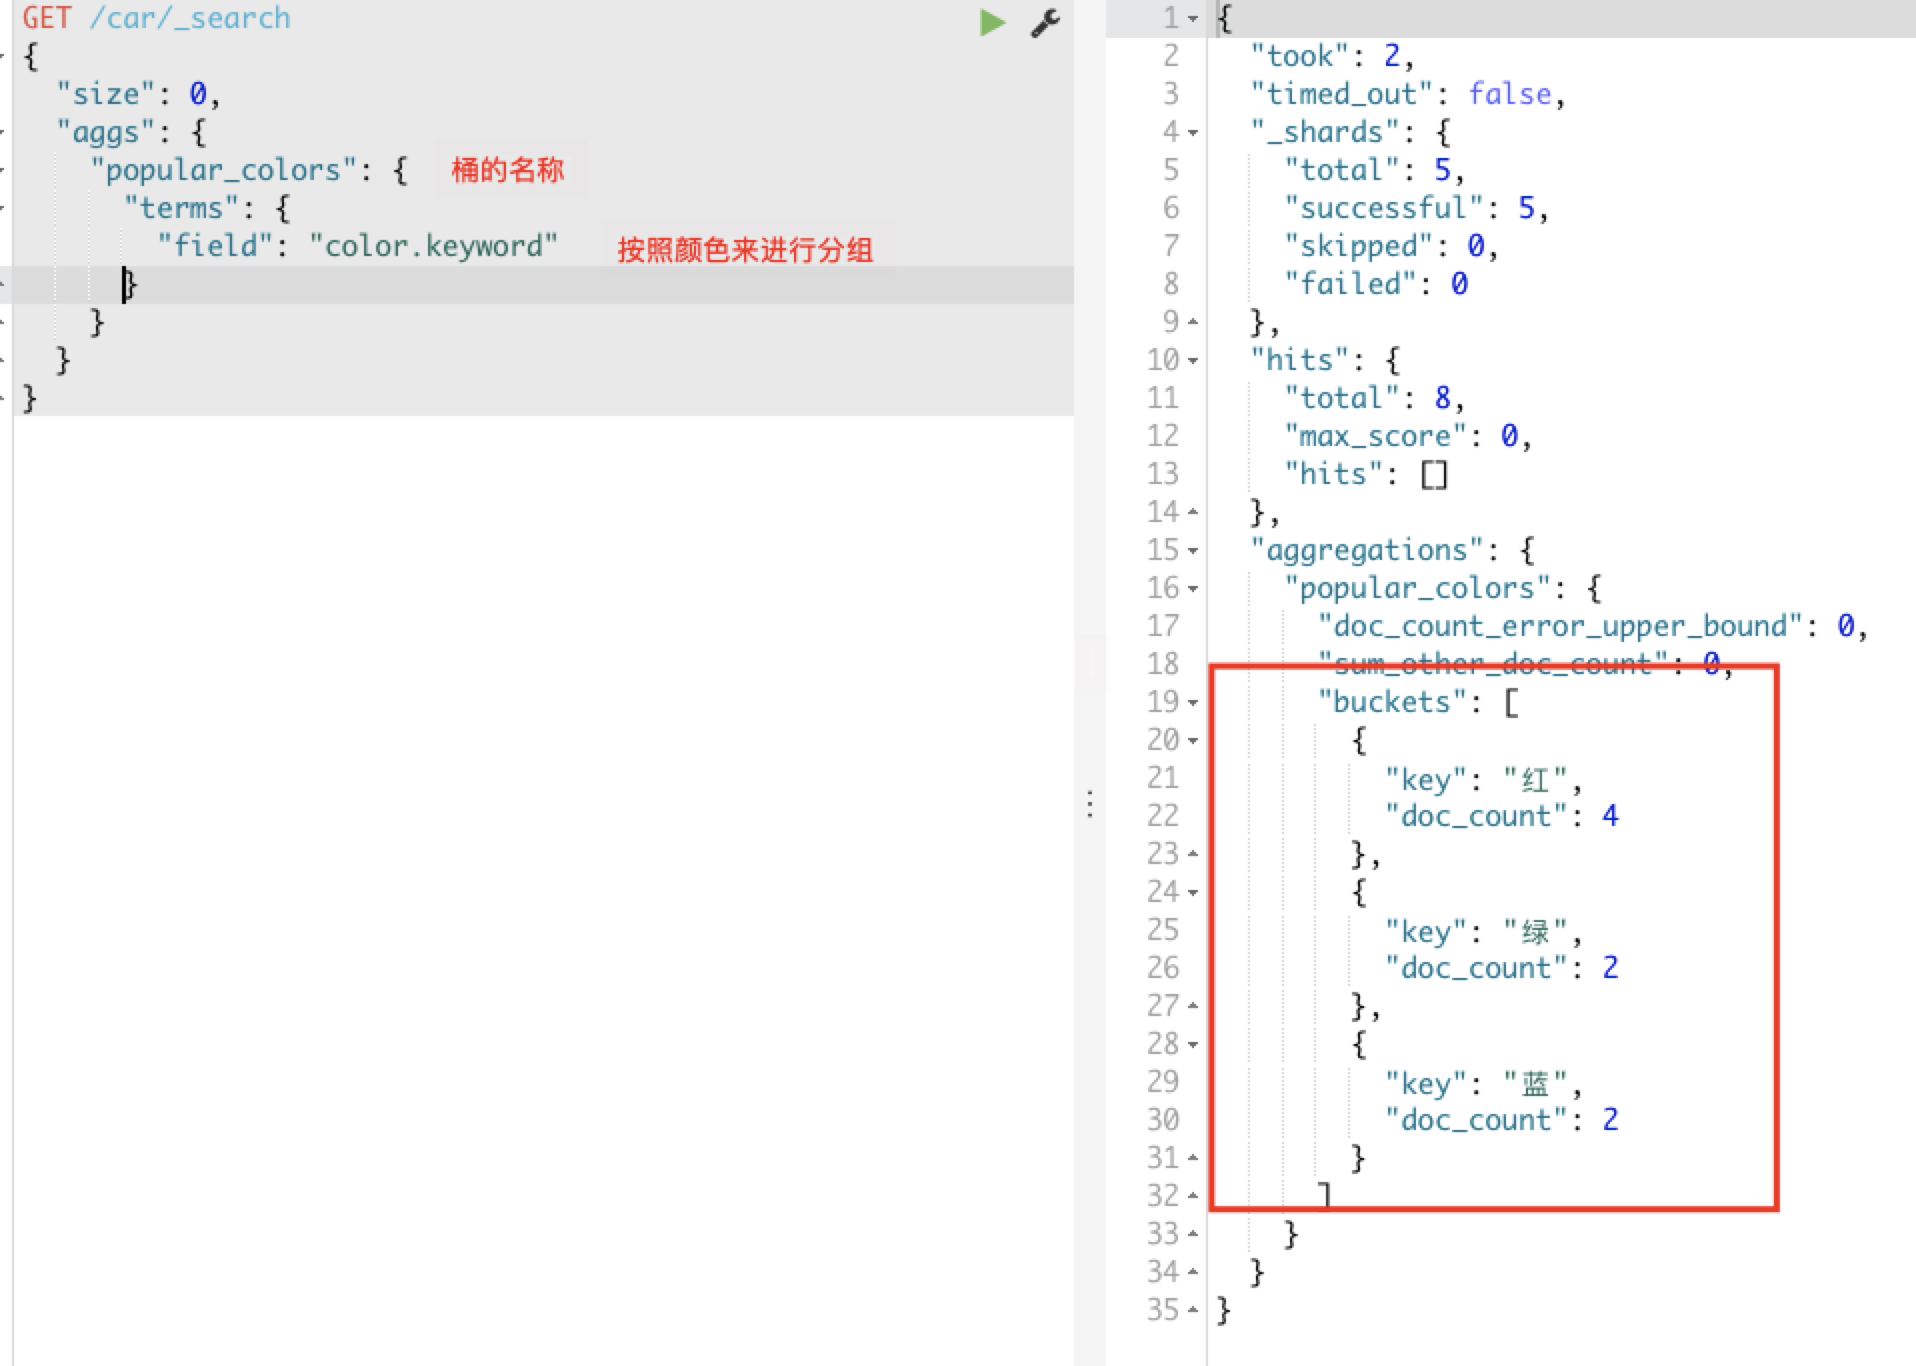
桶内度量,对上述的聚合结果,求价格的平均值:
创建的聚合函数:
aggs:我们在上一个aggs(popular_colors)中添加新的aggs。可见度量也是一个聚合
avg_price:聚合的名称
avg:度量的类型,这里是求平均值
field:度量运算的字段
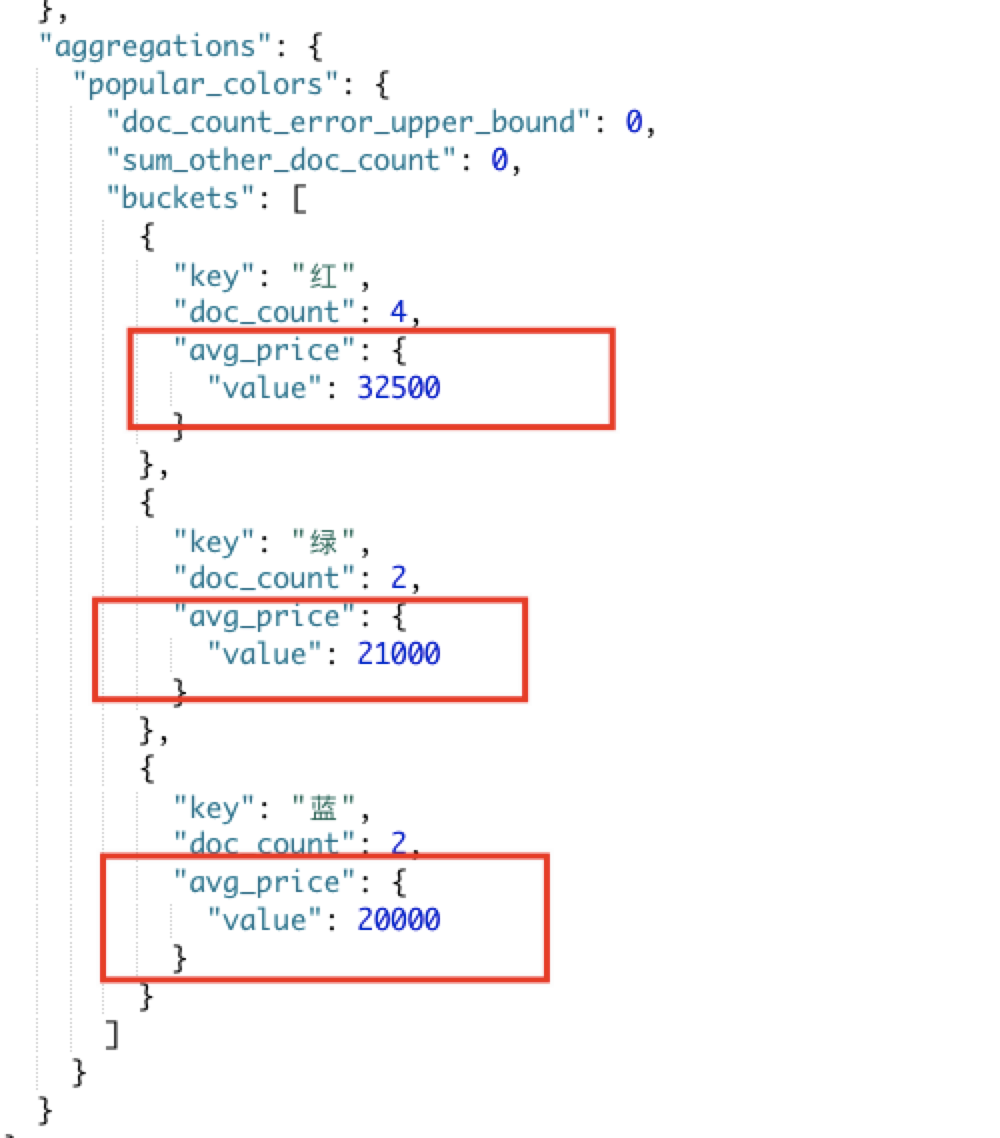
GET /car/_search{"size": 0,"aggs": {"popular_colors": {"terms": {"field": "color.keyword"},"aggs": {"avg_price": {"avg": {"field": "price"}}}}}}
Elasticsearch 集群
单点Elasticsearch存在的问题:
- 单台机器存储容量有限,无法实现高存储
- 单服务器容易出现单点故障,无法实现高可用
- 单服务的并发处理能力有限,无法实现高并发
集群的结构
- 数据分片
把数据拆分成多份,每一份存储到不同机器节点,从而实现减少每个节点数据量的目的。这就是数据的分布式存储:数据分片(shard)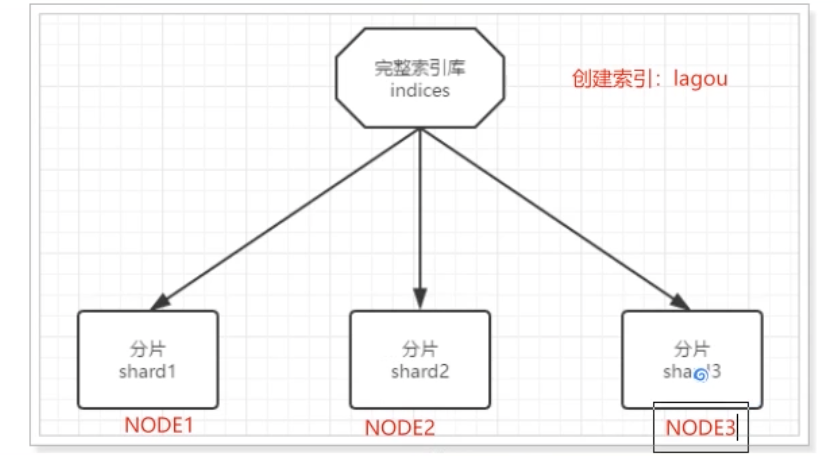
但是如果某个节点故障了,因为每个分片是单独的一份,那么索引库的数据就不完整了。
- 数据备份
数据备份:给每个分片数据进行备份,存储到其他节点,防止数据丢失,也叫数据副本。
数据备份可以保证高可用,但是每个分片备份一份,所需要的节点数量就会翻一倍,成本太高了。
为了高可用和成本间寻求平衡,我们可以这样做:
首先对数据分片,存储到不同节点。
然后对每个分片进行备份,当到对方节点,完成互相备份。
在这个集群中,如果出现单节点故障,并不会导致数据缺失,保证了集群的高可用,同时也减少了节点中数据存储量。并且因为多个节点存储数据,因此用户请求也会分发到不同服务器,并发能力也得到了一定的提升、
搭建集群
集群需要多台机器,这里我们用一台机器来模拟,需要在一台虚拟机中部署多个Elasticsearch节点,每个ES的端口都必须不一样。
一台机器进行模拟:将我们的ES的安装包复制三份,修改端口号,data和log存放位置的不同。
实际开发中:将每个ES节点放在不同的服务器上。
我们计划集群名称为:lagou-elastic,部署3个elasticsearch节点,分别是:
node-01:http端口9201,TCP端口9301
node-02:http端口9202,TCP端口9302
node-03:http端口9203,TCP端口9303
http:表示使用http协议进行访问时使用端口,elasticsearch-head、kibana、postman,默认端口号
是9200。
tcp:集群间的各个节点进行通讯的端口,默认9300
修改每一个节点的配置文件 config下的elasticsearch.yml,下面已第一份配置文件为例
三个节点的配置文件几乎一致,除了:node.name、path.data、path.log、http.port、
transport.tcp.port
node-01:
node-02:
node-03:
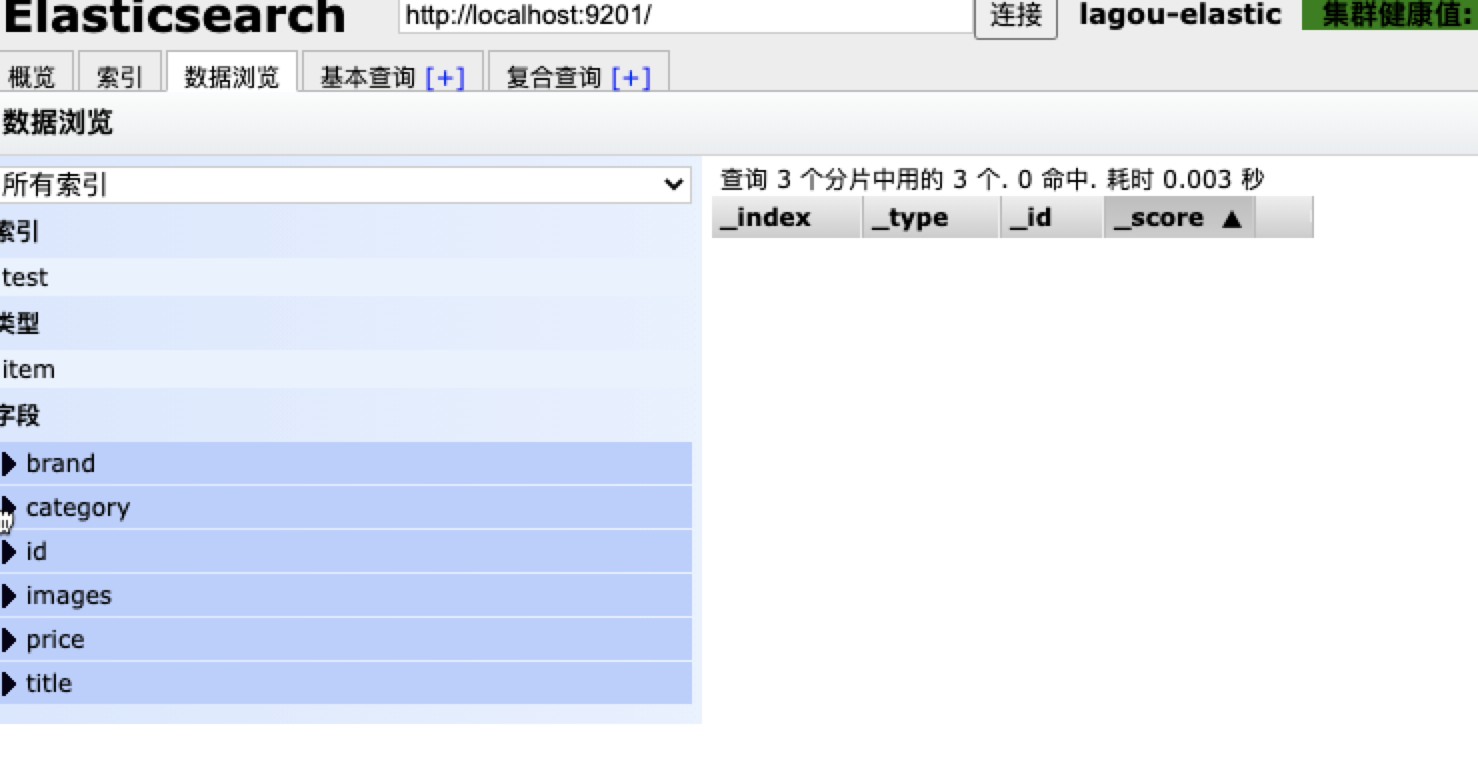
依次运行启动ES,启动成功后使用Elasticsearch-head打开,输入:http://localhost:9201/ 连接,就可以看到我们的一个集群的信息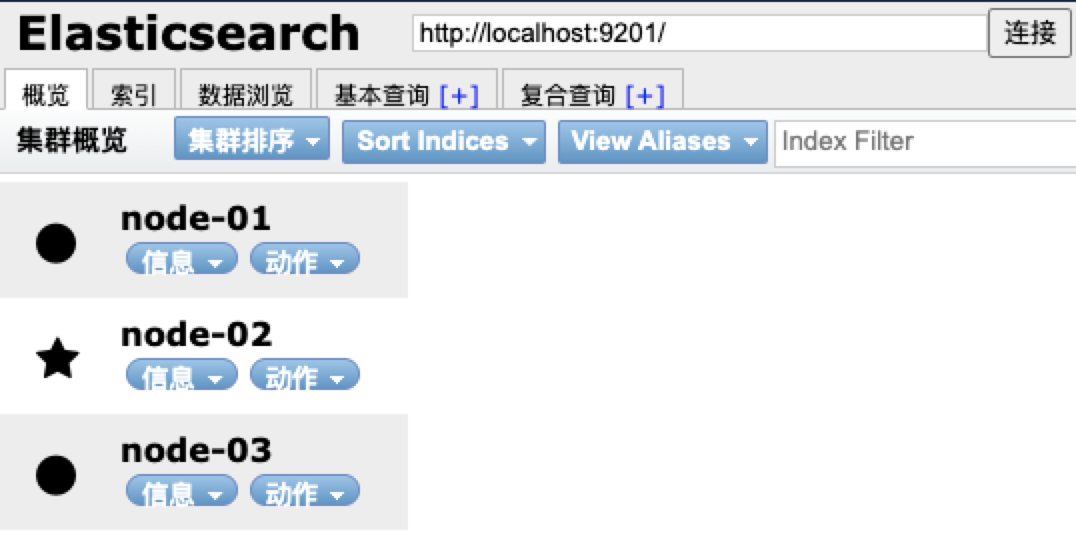
使用Elasticsearch-head创建索引:
注意新建索引时,报错{“error”:”Content-Type header [application/x-www-form-urlencoded] is not supported”,”status”:406}
解决方法:
进入head安装目录编辑vendor.js 共有两处①. 6886行 contentType: "application/x-www-form-urlencoded改成contentType: "application/json;charset=UTF-8"②. 7573行 var inspectData = s.contentType === "application/x-www-form-urlencoded" &&改成var inspectData = s.contentType === "application/json;charset=UTF-8" &&
如下看该索引库在ES集群的分布情况,其中红色表示分片数据,黄色表示副本数据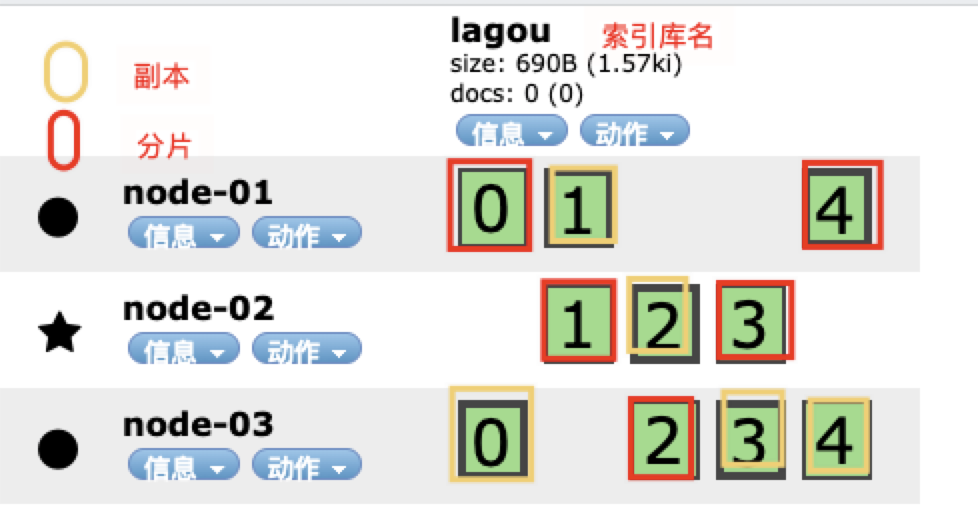
集群工作原理
shad与replica机制
- 一个index包含多个shard,也就是一个index存在多个服务器上
- 每个shard都是一个最小工作单元,承载部分数据,比如有三台服务器,现在有三条数据,者三条数据在三台服务器上各方一条
- 增减节点时,shard会自动再nodes中负载均衡
- primary shard(主分片)和replica shard(副本分片),每个document肯定只存在某一个primary shard以及其对应的replica shard中,不可能存在于多个primary shard
- replica shard是primary shard的副本,负责容错,以及承担读请求负载。
- primary shard的数量在创建索引的时候就固定了,replica shard的数量可以随时修改。
- primary shard的默认数量是5,replica默认是1也就是每个主分片有一个副本分片,默认有10个shard,5个primary shard和
5个replica shard.
- primary shard不能和自己的replica shard放在同一个节点上,否则节点宕机,primary shard和replica shard都丢失,起不到容错的作用,但是可以喝其他primary shard的replica shard放在同一个节点上。
集群写入数据
- 客户端选择一个node节点发送请求过去,这个node就是coordinating node(协调节点)
- coordination node,对document进行路由,将请求转发给对应的node(根据一定的算法选择对应节点进行存储)
- 实际上的node节点上的primary shard处理请求,将数据保存在本地,然后将数据同步到replica node.
- coordinating node如果发现primary node和所有的replica node都搞定之后,就会返回请求到客户端。
这个路由简单的说就是取模算法,比如说现在有三个服务器,这时候传递过来的id是5那么5%3=2,就会将document放在第2台服务骑上。
ES查询数据
查询有个算法叫做倒排序:通过分词把词语出现的id进行记录下来,再查询的时候先去查到哪些id包含这个数据,然后在根据id把数据查出来。
查询过程如下:
- 客户端发送一个请求给coordinate node
- 协调节点将搜索的请求转发给所有的shard对应的primary shard或replica shard
- query phase(查询阶段):每个shard将自己搜索的结果(其实也是一些唯一标识),返回给协调节点,由协调节点进行数据的合并,排序、分页等操作,产出最后的结果。
fetch phase(获取阶段):接着由协调节点,根据唯一标识去各个节点进行拉取数据,最终返回给客户端
Elasticsearch整合springboot
创建springboot工程,引入如下的依赖:
<dependencies>
     <dependency>
         <groupId>org.springframework.boot</groupId>
         <artifactId>spring-boot-starter-web</artifactId>
     </dependency>

     <dependency>
         <groupId>org.springframework.boot</groupId>
         <artifactId>spring-boot-devtools</artifactId>
         <scope>runtime</scope>
         <optional>true</optional>
     </dependency>
     <dependency>
         <groupId>org.projectlombok</groupId>
         <artifactId>lombok</artifactId>
         <optional>true</optional>
     </dependency>
     <dependency>
         <groupId>org.springframework.boot</groupId>
         <artifactId>spring-boot-starter-test</artifactId>
         <scope>test</scope>
         <exclusions>
             <exclusion>
                 <groupId>org.junit.vintage</groupId>
                 <artifactId>junit-vintage-engine</artifactId>
             </exclusion>
         </exclusions>
     </dependency>
     <dependency>
         <groupId>junit</groupId>
         <artifactId>junit</artifactId>
         <version>4.12</version>
         <scope>test</scope>
     </dependency>
     <dependency>
         <groupId>org.springframework.boot</groupId>
         <artifactId>spring-boot-starter-logging</artifactId>
     </dependency>
     <dependency>
         <groupId>com.google.code.gson</groupId>
         <artifactId>gson</artifactId>
         <version>2.8.5</version>
     </dependency>
     <dependency>
         <groupId>org.apache.commons</groupId>
         <artifactId>commons-lang3</artifactId>
         <version>3.8.1</version>
     </dependency>
     <!--Apache开源组织提供的用于操作JAVABEAN的工具包-->
     <dependency>
         <groupId>commons-beanutils</groupId>
         <artifactId>commons-beanutils</artifactId>
         <version>1.9.1</version>
     </dependency>
     <!--ES高级RestClient-->
     <dependency>
         <groupId>org.elasticsearch.client</groupId>
         <artifactId>elasticsearch-rest-high-level-client</artifactId>
         <version>6.4.3</version>
     </dependency>
 </dependencies>
下面我们来通过代码的方式去创建索引库,查询索引数据等等操作。
如下,使用一个商品数据为例来创建索引库 ```java @Data public class Product { private Long id; private String title;//标题 private String category;//分类 private String brand;//品牌 private Double price;//价格 private String images;//图片地址 }
编写映射配置:在kibana中执行,注意将kibana的配置修改`elasticsearch.url: "http://localhost:9201"` 为集群的地址,否则会启动失败
```json
PUT /test
{
  "settings": {
    "number_of_shards": 3,
    "number_of_replicas": 1
  },
  "mappings": {
    "item": {
      "properties": {
        "id":{
          "type": "keyword"
        },
        "title":{
          "type": "text",
          "analyzer": "ik_max_word"
        },
        "category":{
          "type": "keyword"
        },
        "brand":{
          "type": "keyword"
        },
        "images":{
          "type": "keyword",
          "index": false
        },
        "price":{
          "type": "double"
        }
      }
    }
  }
}
操作索引数据
首先,我们需要在测试类中准备,ES的链接客户端
@RunWith(SpringRunner.class)
@SpringBootTest
public class EsdemoApplicationTests {

    private RestHighLevelClient restHighLevelClient;

    /**
     * 初始化客户端
     */
    @Before
    public void init() {
        //传递集群的信息
        RestClientBuilder restClientBuilder = RestClient.builder(
                new HttpHost("127.0.0.1", 9201, "http"),
                new HttpHost("127.0.0.1", 9202, "http"),
                new HttpHost("127.0.0.1", 9203, "http"));
        restHighLevelClient = new RestHighLevelClient(restClientBuilder);
    }

    /**
     * 查看是否连接成功
     */
    @Test
    public void testConnection() {
        System.out.println(restHighLevelClient);
    }

    /**
     * 释放资源
     */
    @After
    public void close() throws IOException {
        restHighLevelClient.close();
    }

}
遇到的异常情况:
需要引入如下依赖都必须存在,才可以创建:RestHighLevelClient
        <dependency>
            <groupId>org.elasticsearch</groupId>
            <artifactId>elasticsearch</artifactId>
            <version>6.4.3</version>
        </dependency>

        <dependency>
            <groupId>org.elasticsearch.client</groupId>
            <artifactId>elasticsearch-rest-client</artifactId>
            <version>6.4.3</version>
        </dependency>

        <dependency>
            <groupId>org.elasticsearch.client</groupId>
            <artifactId>elasticsearch-rest-high-level-client</artifactId>
            <version>6.4.3</version>
        </dependency>
同时在运行测试类的时候发生了一个小插曲:
一定要注意@Test 必须是org.junit.Test; 包下的,否则运行测试方法会报错。
测试是否连接成功,运行测试方法:日志如下,则说明创建客户端成功了。
新增索引数据
    /**
     * 插入文档
     */
    @Test
    public void testInsert() throws IOException {
        //1. 文档数据
        Product product = new Product();
        product.setBrand("小米");
        product.setCategory("手机");
        product.setId(1L);
        product.setImages("http://image.huawei.com/1.jpg");
        product.setPrice(5999.99);
        product.setTitle("小米11 plus");

        //2. 文档数据转换为json格式
        String source = gson.toJson(product);

        //3. 创建索引请求对象 访问索引库 Type 指定文档id
        //String index, String type, String id
        IndexRequest request = new IndexRequest("test", "item", product.getId().toString());
        request.source(source, XContentType.JSON);//设置数据源
        //4. 发出请求
        IndexResponse indexResponse = restHighLevelClient.index(request, RequestOptions.DEFAULT);
        //5. 接收响应信息
        System.out.println(indexResponse);
    }
运行测试方法返回的信息:
IndexResponse[index=test,type=item,id=1,version=1,
              result=created,seqNo=0,primaryTerm=1,
              shards={"total":2,"successful":2,"failed":0}
             ]

查看文档
    @Test
    public void testFindIndex() throws IOException {
        //创建get请求
        GetRequest request = new GetRequest("test", "item", "1");
        //执行查询
        GetResponse getResponse = restHighLevelClient.get(request, RequestOptions.DEFAULT);
        //获取数据
        String source = getResponse.getSourceAsString();
        Product product = gson.fromJson(source, Product.class);
        System.out.println(product);
    }
修改文档和新增文档一样如果id存在为修改,如果id不存在为新增
删除文档
    @Test
    public void testDeleteIndex() throws IOException {
        DeleteRequest deleteRequest = new DeleteRequest("test", "item", "1");
        DeleteResponse delete = restHighLevelClient.delete(deleteRequest, RequestOptions.DEFAULT);
        System.out.println(delete);
    }
搜索数据
查询所有match_all
    @Test
    public void matchAll() throws IOException {
        //创建搜索请求对象
        SearchRequest searchRequest = new SearchRequest();
        //查询构建工具
        SearchSourceBuilder sourceBuilder = new SearchSourceBuilder();
        //添加查询条件 指定查询类型
        sourceBuilder.query(QueryBuilders.matchAllQuery());//借助QueryBuilders 构建查询条件
        searchRequest.source(sourceBuilder);
        //执行查询
        SearchResponse response = restHighLevelClient.search(searchRequest, RequestOptions.DEFAULT);
        //获取查询结果
        SearchHits hits = response.getHits();
        //获得文档数据
        SearchHit[] hitsHits = hits.getHits();
        for (SearchHit hit : hitsHits) {
            //获得json串
            String json = hit.getSourceAsString();
            Product product = gson.fromJson(json, Product.class);
            System.out.println(product);
        }
    }
关键字搜索match
代码封装,把查询条件作为参数传递:
    public void basicQuery(SearchSourceBuilder sourceBuilder) throws IOException {
        //创建搜索请求对象
        SearchRequest searchRequest = new SearchRequest();
        //查询构建工具
        searchRequest.source(sourceBuilder);
        //执行查询
        SearchResponse response = restHighLevelClient.search(searchRequest, RequestOptions.DEFAULT);
        //获取查询结果
        SearchHits hits = response.getHits();
        //获得文档数据
        SearchHit[] hitsHits = hits.getHits();
        for (SearchHit hit : hitsHits) {
            //获得json串
            String json = hit.getSourceAsString();
            Product product = gson.fromJson(json, Product.class);
            System.out.println(product);
        }
    }
    @Test
    public void match() throws IOException {
        SearchSourceBuilder sourceBuilder = new SearchSourceBuilder();
        sourceBuilder.query(QueryBuilders.matchQuery("title", "手机"));
        basicQuery(sourceBuilder);
    }
Spring Data Elasticsearch
spring提供的Elasticsearch组件:Spring Data Elasticsearch。 SDE是SpringData项目的一个子模块

