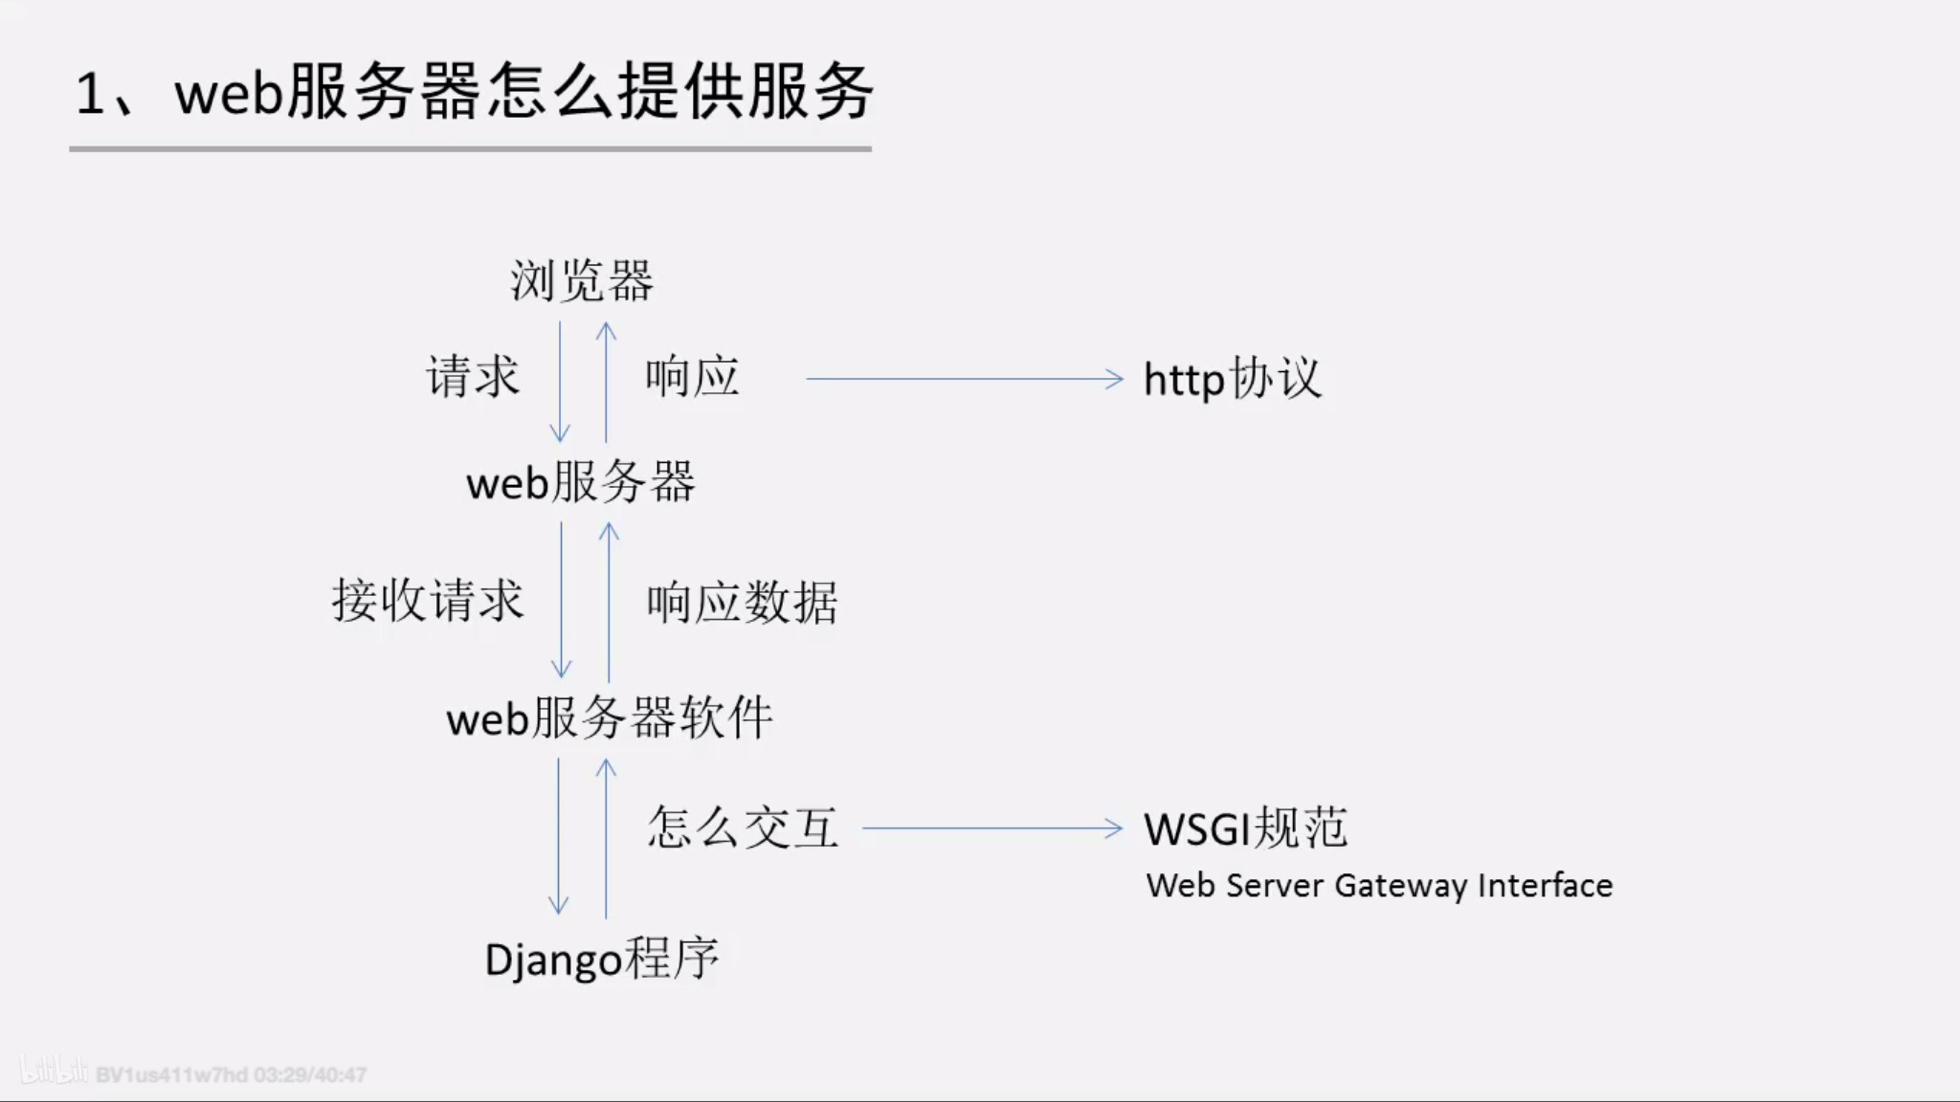
Web应用的本质:
- 浏览器发送一个http请求;
- 服务器收到请求,生成一个html文档;
- 服务器把html文档作为http响应的Body发送给浏览器;
- 浏览器收到http响应,从http body取出html文档并显示。
最简单的web application就是把html用文件保存。用一个现成的http服务器软件接受用户请求,然后从文件中读取html返回给用户。这种静态服务器软件主要有Apace、Nginx、Lighttpd。正确的做法是接受解析发送http请求响应等底层代码由专门的服务器软件实现。python专注于生成html文档,所以需要一个同意的接口让我们专心用python编写web业务。
WSGI (the Python Web Server Gateway Interface)
是为python语言定义的Web服务器和Web应用程序或框架之间的一种简单而通用的接口。作为一种Web服务器与Web应用程序或应用框架之间的一种低级别的接口,以提升可移植性Web应用开发的共同点。基于现存的CGI(Common Gateway Interface,外部扩展应用程序与Web服务器交互的标准接口)标准设计。很多框架自带了用于测试的WSGI Server,发布时一般使用生产环境的WSGI Server或者联合Nginx做uwsgi。也就是说,WSGI就像是一座桥梁,一边连着web服务器,另一边连着用户的应用。但是呢,这个桥的功能很弱,有时候还需要别的桥来帮忙才能进行处理。WSGI 的作用如图所示:
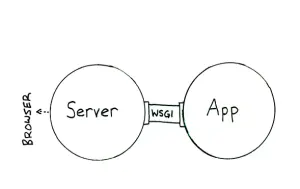
WSGI的两端分别为Server/Gateway 和 Application/Frame。服务器调用应用方,提供环境信息,以及一个回调函数(提供给application来传递消息到server),并接受Web内容作为返回值。
WSGI中间件同时实现了API的两方,因此可以在WSGI服务和WSGI应用之间起调解作用:从WSGI服务器的角度来说,中间件扮演应用程序,而从应用程序的角度来说,中间件扮演服务器。“中间件”组件可以执行以下功能:
1. 重写环境变量后,根据目标URL,将请求消息路由到不同的应用对象。2. 允许在一个进程中同时运行多个应用程序或应用框架。3. 负载均衡和远程处理,通过在网络上转发请求和响应消息。4.进行内容后处理,例如应用XSLT样式表。
Linux常见的web服务器软件:Apache、Nginx
Apache: 模块多,功能强大,内置了对php、python、Perl和其他语言的支持 Nginx(Engine-x) 轻量级、抗高并发、速度快
1. 使用Apache+mod——wsgi部署
1.1 安装Apache
apt-get install apache2    # apache 2.4

apt-get install libapache2-mod-wsgi-py3 # 安装mod-wsgi
进入/etc/apache2配置目录
root@hecs-x-medium-2-linux-20200704093014:/etc/apache2# ls
apache2.conf    conf-enabled  magic           mods-enabled  sites-available
conf-available  envvars       mods-available  ports.conf    sites-enabled
a2+按两下tab 查看a2指令
root@hecs-x-medium-2-linux-20200704093014:/etc/apache2# a2
a2disconf  a2dismod   a2dissite  a2enconf   a2enmod    a2ensite   a2query
mods-enabled已启动的模块 mods-available已安装模块
查看可用模块
ls mods-available/
...
wsgi.conf     deflate.load
proxy_connect.load     wsgi.load
...
1.2 编译mod_Wsgi
如何在Apache和Django中使用Django和mod_wsgi
对于大多数Linux发行版,Apache 2.X的“ dev”软件包是“ apache2-dev”,而相应的Apache软件包是“ apache2”。但是,某些系统会根据Apache使用的MPM来区分“ dev”软件包。这样,它也可以称为“ apache2-worker-dev”或“ apache2-prefork-dev”。如果使用Apache 2.X,请勿混淆并错误地安装“ apache-dev”,这是Apache 1.3的“ dev”软件包,仅称为“ apache”。
aot-get update
apt-get install apache2-dev
解压源代码
可以从以下位置获取源代码tar:
进入home目录,将源码与项目相关文件放在同一根目录方便管理.
cd ~/home
wget https://github.com/GrahamDumpleton/mod_wsgi/archive/4.7.1.tar.gz    # 下载

root@hecs-x-medium-2-linux-20200704093014:/home# ls
4.7.1.tar.gz

tar xvfz 4.7.1.tar.gz    # 解压

root@hecs-x-medium-2-linux-20200704093014:/home# ls
4.7.1.tar.gz        mod_wsgi-4.7.1
配置源代码
要设置准备好构建的软件包,请从源代码目录中运行“配置”脚本:
./configure
配置脚本将尝试通过在各个标准位置中搜索发行版随附的称为“ apxs2”或“ apxs”的Apache构建工具来标识要使用的Apache安装。如果在这些标准位置中没有找到,将搜索您的PATH。
使用哪种Python安装将通过在PATH中查找“ python”可执行文件来确定。
如果这些程序不在标准位置,则无法在PATH中找到它们,或者您希望使用找到的替代版本, 可以将--with-apxs和--with-python选项与“配置”脚本结合使用:
root@hecs-x-medium-2-linux-20200704093014:/home# whereis apxs
apxs: /usr/bin/apxs /usr/share/man/man1/apxs.1.gz

root@hecs-x-medium-2-linux-20200704093014:/home# whereis python

root@hecs-x-medium-2-linux-20200704093014:/home# cd ./mod_wsgi-4.7.1
root@hecs-x-medium-2-linux-20200704093014:/home/mod_wsgi-4.7.1# ./configure --with-apxs=/usr/bin/apxs --with-python=/usr/bin/python3.6

make # 编译
make install # 生成文件

Libraries have been installed in:
   /usr/lib/apache2/modules

ls /usr/lib/apache2/modules # 查看文件
cd /etc/apache2/
ls
apache2.conf    conf-enabled  magic           mods-enabled  sites-available
conf-available  envvars       mods-available  ports.conf    sites-enabled
# sites 为站点配置文件夹
root@hecs-x-medium-2-linux-20200704093014:/etc/apache2# a2enmod wsgi    # 查看mod是否启用
Module wsgi already enabled

cd sites-available
ls
000-default.conf  default-ssl.conf
1.3 配置与启动
root@hecs-x-medium-2-linux-20200704093014:/etc/apache2/sites-available# vim proj_lab.conf
<VirtualHost *:80>    # 80port
        # using mod_wsgi daemon mode
        # WSGIDaemonProcess example.com (custom ,can use your django-project name) python-home=your virtualenv_path python-path=your proj_path
        WSGIDaemonProcess proj_lab python-home=/home/py36_django python-path=/home/proj_lab
        # WSGIProcessGroup example.com (custom ,can use your django-project name)
        WSGIProcessGroup proj_lab
        # The first bit in the WSGIScriptAlias line is the base URL path you want to serve your application at (/ indicates the root url),
        # and the second is the location of a "WSGI file" -- see below -- on your system, usually inside of your project package (mysite in this example).
        # This tells Apache to serve any request below the given URL using the WSGI application defined in that file.
        WSGIScriptAlias / /home/proj_lab/proj_lab/wsgi.py
        # The <Directory> piece just ensures that Apache can access your wsgi.py file.
        <Directory /home/proj_lab/proj_lab>
                <Files wsgi.py>
                        Require all granted
                </Files>
        </Directory>

</VirtualHost>
启动站点
root@hecs-x-medium-2-linux-20200704093014:/etc/apache2/sites-available# a2ensite proj_lab.conf
Enabling site proj_lab.
To activate the new configuration, you need to run:
  systemctl reload apache2

# 先cd到 site-enabled查看已启动的其他站点并关闭
root@hecs-x-medium-2-linux-20200704093014:/etc/apache2# cd sites-available
root@hecs-x-medium-2-linux-20200704093014:/etc/apache2/sites-available# ls
# 关闭默认站点
root@hecs-x-medium-2-linux-20200704093014:/etc/apache2/sites-available# a2dissite 000-default.conf
Site 000-default disabled.
To activate the new configuration, you need to run:
  systemctl reload apache2
# 启动自己的站点
root@hecs-x-medium-2-linux-20200704093014:/etc/apache2/sites-available# a2ensite proj_lab.conf
Site proj_lab already enabled
root@hecs-x-medium-2-linux-20200704093014:/etc/apache2/sites-available# apache2ctl configtest
Syntax OK
root@hecs-x-medium-2-linux-20200704093014:/etc/apache2/sites-available# apache2ctl restart
ERROR apache default page
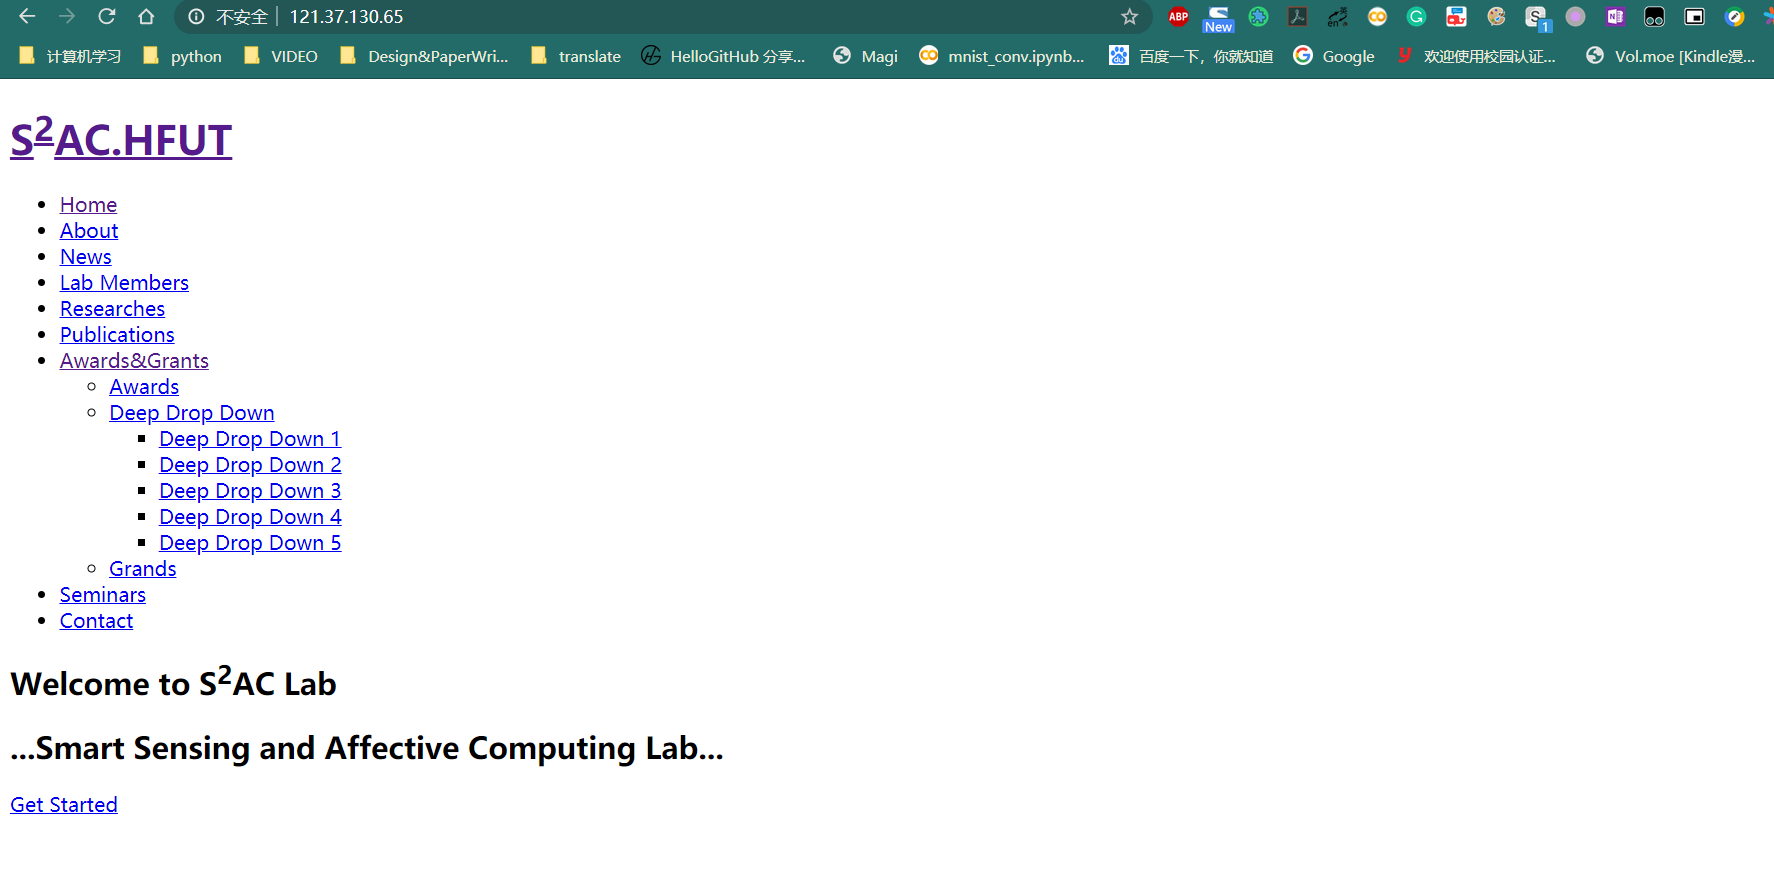
输入站点ip地址121.37.130.65。如果显示的是Apache Ubuntu Default Page而不是django项目主页。说明没有断开000-default.conf的连接。重新输入上述关闭激活重启的三条指令。成功打开站点。打开了一个没有绑定静态文件的站点。
This example sets up Django at the site root, but serves robots.txt, favicon.ico, and anything in the /static/ and /media/ URL space as a static file. All other URLs will be served using mod_wsgi:
Alias /robots.txt /path/to/mysite.com/static/robots.txt
Alias /favicon.ico /path/to/mysite.com/static/favicon.ico

Alias /media/ /path/to/mysite.com/media/
Alias /static/ /path/to/mysite.com/static/

<Directory /path/to/mysite.com/static>
Require all granted
</Directory>

<Directory /path/to/mysite.com/media>
Require all granted
</Directory>

WSGIScriptAlias / /path/to/mysite.com/mysite/wsgi.py

<Directory /path/to/mysite.com/mysite>
<Files wsgi.py>
Require all granted
</Files>
</Directory>
<VirtualHost *:80>
        # using mod_wsgi daemon mode
        # WSGIDaemonProcess example.com (custom ,can use your django-project name) python-home=your virtualenv_path python-path=your proj_path
        WSGIDaemonProcess proj_lab python-home=/home/py36_django python-path=/home/proj_lab
        # WSGIProcessGroup example.com (custom ,can use your django-project name)
        WSGIProcessGroup proj_lab
        # The first bit in the WSGIScriptAlias line is the base URL path you want to serve your application at (/ indicates the root url),
        # and the second is the location of a "WSGI file" -- see below -- on your system, usually inside of your project package (mysite in this example).
        # This tells Apache to serve any request below the given URL using the WSGI application defined in that file.
        WSGIScriptAlias / /home/proj_lab/proj_lab/wsgi.py
        # The <Directory> piece just ensures that Apache can access your wsgi.py file.
        <Directory /home/proj_lab/proj_lab>
                <Files wsgi.py>
                        Require all granted
                </Files>
        </Directory>

        # setting static directory
        Alias /static/ /homt/proj_lab/static/
        <Directory /home/proj_lab/static>
                Require all granted
        </Directory>

        # setting upload media
        Alias /meida/ /home/proj_lab/meida/
        <Directory /home/proj_lab/media>
                Require all granted
        </Directory>
</VirtualHost>
重新断开站点激活并启动站点。若还是无静态文件,一般是文件目录写错。ls查看项目文件夹。
若没有问题。查看apache的日志文件cat /var/log/apache2/error.log
[Thu Jul 09 02:09:18.765083 2020] [authz_core:error] [pid 11577:tid 140206640387840] [client 36.63.96.72:11995] AH01630: client denied by server configuration: /homt, referer: http://121.37.130.65/
发现文件目录home写成了homt。vim修改后重复上述步骤。成功加载。但是还有部分页面static加载失败,这是因为我们的static文件并不都是在同一个目录中,所以需要收集static文件到一个目录中。

编辑settings.py 一般不推荐在服务器修改。在本地修改上传到github比较符合规定
# Static files (CSS, JavaScript, Images)
# https://docs.djangoproject.com/en/2.0/howto/static-files/
# 在这里输入下面一行代码
STATIC_ROOT = os.path.join(BASE_DIR,'static_root')
STATIC_URL = '/static/'
STATICFILES_DIRS = [
    os.path.join(BASE_DIR, 'static')
]
激活虚拟环境,进入项目文件夹。
输入python manage.py help查看指令
[staticfiles]
    collectstatic    # 收集static文件到settings中指定的static_root文件夹
输入python manage.py collectstatic
(py36_django) root@hecs-x-medium-2-linux-20200704093014:/home/proj_lab# ls
comment  data.json  db.sqlite3  manage.py  media  proj_lab  README.md  read_statistics  requirenment.txt  s2aclab  static  static_root  templates
# 项目文件夹多了一个static_root文件夹
然后再次输入vim /etc/apache2/sites-available/proj_lab.conf修改static目录
Alias /static/ /homt/proj_lab/static_root/
<Directory /home/proj_lab/static_root>

WEll DONE~~
2 用Nginx+uWSGI部署
2.1安装uWSGI
pip -V    # 查看你的pip的python版本是否是和开发环境一致。若不是pyhon3.x请用下述指令
pip3 -V

pip install uwsgi # 安装到公共环境,需安装python的开发包 python3-dev
2.2测试uWSGI
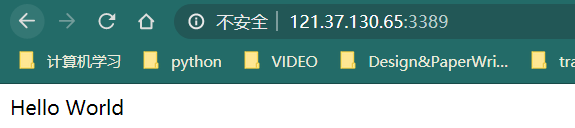
创建一个名为 test.py 文件:
cd /home
vim test.py
# test.py
def application(env, start_response):
    start_response('200 OK', [('Content-Type','text/html')])
    return [b"Hello World"] # python3 bytes()字节流
    #return ["Hello World"] # python2
uwsgi --http :3389 --wsgi-file test.py
...
*** WARNING: you are running uWSGI as root !!! (use the --uid flag) ***
*** uWSGI is running in multiple interpreter mode ***
spawned uWSGI worker 1 (and the only) (pid: 13509, cores: 1)
ctrl+c关闭uwsgi进程
或者
ps -aux|grep uwsgi |awk '{print $2}' |xargs kill -9
配置Django与uwsgi
这是启动uWSGI服务器的示例命令:
uwsgi --chdir=/path/to/your/project \
    --module=mysite.wsgi:application \
    --env DJANGO_SETTINGS_MODULE=mysite.settings \
    --master --pidfile=/tmp/project-master.pid \
    --socket=127.0.0.1:49152 \      # can also be a file
    --processes=5 \                 # number of worker processes
    --uid=1000 --gid=2000 \         # if root, uwsgi can drop privileges
    --harakiri=20 \                 # respawn processes taking more than 20 seconds
    --max-requests=5000 \           # respawn processes after serving 5000 requests
    --vacuum \                      # clear environment on exit
    --home=/path/to/virtual/env \   # optional path to a virtualenv
    --daemonize=/var/log/uwsgi/yourproject.log      # background the process
Django特定的选项如下:
chdir:需要在Python的导入路径上的目录路径-即包含mysite软件包的目录。module:要使用的WSGI模块-可能mysite.wsgi是startproject创建的模块。env:应该至少包含DJANGO_SETTINGS_MODULE。home:项目virtualenv的可选路径。
uwsgi --chdir /home/proj_lab --home /home/py36_django/ --http :3389
# --chdir 项目目录 -- home 虚拟环境 --http 端口号
报错 Internal Server Error
--- no python application found, check your startup logs for errors ---
# 没有指定uwsgi文件

# 指定uwsgi文件
uwsgi --chdir /home/proj_lab home /home/py36_django/ --http :3389 --module proj_lab.wsgi:application
报错 : Not found : xxx static 没有绑定静态文件
uwsgi提供动态服务,所以需要Web服务器软件处理静态文件。
2.3 安装Nginx
先关闭apache服务释放端口。
apache2ctl stop
安装Nginx
apt-get update
apt-get install nginx
2.4 配置与启动
为Django配置Nginx
/home# cd /etc/nginx/
/etc/nginx# ls
conf.d          koi-win            nginx.conf       sites-enabled
fastcgi.conf    mime.types         proxy_params     snippets
fastcgi_params  modules-available  scgi_params      uwsgi_params
koi-utf         modules-enabled    sites-available  win-utf

/etc/nginx# cd sites-available/
/etc/nginx/sites-available# ls
default
/etc/nginx/sites-available# cd .. && cd sites-enabled/
/etc/nginx/sites-enabled# ls
default
/etc/nginx/sites-enabled# cd .. && cd sites-available
你会需要 uwsgi_params 文件,可用在uWSGI发行版本的 nginx 目录下,或者从 https://github.com/nginx/nginx/blob/master/conf/uwsgi_params 找到。
将其拷贝到你的项目目录中。一会儿,我们将告诉nginx引用它。或者自行设置文件,我们选择自己设置文件。
现在,创建一个名为yoursite_nginx.conf的文件,下面为通用模板:
# mysite_nginx.conf

# the upstream component nginx needs to connect to
upstream django {
    # server unix:///path/to/your/mysite/mysite.sock; # for a file socket
    server 127.0.0.1:8001; # for a web port socket (we'll use this first)
}

# configuration of the server
server {
    # the port your site will be served on
    listen      8000;
    # the domain name it will serve for
    server_name .example.com; # substitute your machine's IP address or FQDN (Fully Qualified Domain Name)全限定域名
    charset     utf-8;

    # max upload size
    client_max_body_size 75M;   # adjust to taste

    # Django media
    location /media  {
        alias /path/to/your/mysite/media;  # your Django project's media files - amend as required
    }

    location /static {
        alias /path/to/your/mysite/static; # your Django project's static files - amend as required
    }

    # Finally, send all non-media requests to the Django server.
    location / {
        uwsgi_pass  django;
        include     /path/to/your/mysite/uwsgi_params; # the uwsgi_params file you installed
    }
}
设置proj_lab_uwsgi.conf文件
:/etc/nginx/sites-available# vim proj_lab.conf
server{
        listen 80;
        server_name proj_lab;
        charset utf-8;

        client_max_body_size 75M;       # max upload size

        location /static {
                alias /home/proj_lab/static_root;
        }
        location /media {
                alias /home/proj_lab/media;
        }
        # Finally, send all non-media requests to the Django server.
        location / {
                # socket transmit
                uwsgi_pass 127.0.0.1:8001;
                # the uwsgi_params file you installe
                include /etc/nginx/uwsgi_params;
        }

}
创建新目录存放一些uwsgi配置
示例ini配置文件:
[uwsgi]
chdir=/path/to/your/project
module=mysite.wsgi:application
master=True
pidfile=/tmp/project-master.pid
vacuum=True
max-requests=5000
daemonize=/var/log/uwsgi/yourproject.log
ini配置文件用法示例:
uwsgi --ini uwsgi.ini
/home# mkdir proj_lab_uwsgi
/home/proj_lab_uwsgi# vim proj_lab_uwsgi.ini
home = /home/py36_django
module = proj_lab.wsgi:application

master = True
# the number of worker processes
processes = 4
# respwan processes taking more than 60s
harakiri = 60
# respwan processes after serving 5000 requests
max-requests = 5000

socket = 127.0.0.1:8001
# user identifier
uid = 1000
# group identifier
gid = 2000

# process identification number
pidfile = /home/proj_lab_uwsgi/master.pid
# log
daemonize = /home/proj_lab_uwsgi/proj_lab_uwsgi.log
# server closed recycle
vacuum = True
启动.ini文件
/home/proj_lab_uwsgi# uwsgi --ini proj_lab_uwsgi.ini
realpath() of proj_lab_uwsgi.ini failed: No such file or directory [core/utils.c line 3662]
# 启动失败 原因是 前面vim的.ini的名字写错了。。。复制一份以正确的名称报错并删除错误文件。
/home/proj_lab_uwsgi# cp prj_lab_uwsgi.ini proj_lab_uwsgi.ini
/home/proj_lab_uwsgi# ls
prj_lab_uwsgi.ini  proj_lab_uwsgi.ini
/home/proj_lab_uwsgi# rm prj_lab_uwsgi.ini

/home/proj_lab_uwsgi# uwsgi --ini proj_lab_uwsgi.ini
[uWSGI] getting INI configuration from proj_lab_uwsgi.ini
# 查看进程是否启动
/home/proj_lab_uwsgi#  ps -aux |grep uwsgi
1000     14618  0.3  1.9 145408 39548 ?        S    23:38   0:00 uwsgi --ini proj_lab_uwsgi.ini
1000     14620  0.0  1.4 145408 29720 ?        S    23:38   0:00 uwsgi --ini proj_lab_uwsgi.ini
1000     14621  0.0  1.4 145408 29720 ?        S    23:38   0:00 uwsgi --ini proj_lab_uwsgi.ini
1000     14622  0.0  1.4 145408 29720 ?        S    23:38   0:00 uwsgi --ini proj_lab_uwsgi.ini
1000     14623  0.0  1.4 145408 29720 ?        S    23:38   0:00 uwsgi --ini proj_lab_uwsgi.ini
root     14625  0.0  0.0  14424  1084 pts/1    S+   23:39   0:00 grep --color=auto uwsgi
# 若只有一个进程说明启动失败。
在sites-enabled中创建软连接
/home/proj_lab_uwsgi# cd /etc/nginx
/etc/nginx# ls
conf.d          koi-win            nginx.conf       sites-enabled
fastcgi.conf    mime.types         proxy_params     snippets
fastcgi_params  modules-available  scgi_params      uwsgi_params
koi-utf         modules-enabled    sites-available  win-utf
/etc/nginx# ln -s /etc/nginx/sites-available/proj_lab.conf /etc/nginx/sites-enabled/proj_lab.conf
/etc/nginx# cd sites-enabled/
/etc/nginx/sites-enabled# ls
default  proj_lab.conf

# 查看配置是否正确
/etc/nginx/sites-enabled# nginx -t
nginx: the configuration file /etc/nginx/nginx.conf syntax is ok
nginx: configuration file /etc/nginx/nginx.conf test is successful
重启nginx服务
service nginx restart
若出现Apache default page 。关闭apache 默认服务。
/etc/apache2/sites-available# a2dissite 000-default.conf
Site 000-default already disabled
或者是/etc/nginx/sites-enabled/中存在default文件。删除它rm default,再重新启动nginx服务。

WELL DONE~~
uwsgi --reload /home/proj_lab_uwsgi/master.pid 重启进程
uwsgi --stop /... 结束进程

查看Nginx的版本号:nginx -V

启动Nginx:start nginx

快速停止或关闭Nginx:nginx -s stop

正常停止或关闭Nginx:nginx -s quit

配置文件修改重装载命令:nginx -s reload

若有收获,就点个赞吧
0 人点赞
