资源链接
或者用 --help 查看帮助文档
git --helpgit clone --help
Git教程 @廖雪峰
http://www.liaoxuefeng.com/wiki/0013739516305929606dd18361248578c67b8067c8c017b000
另一份教程 @geeeeeeeeek
https://github.com/geeeeeeeeek/git-recipes/wiki
Git基础教程整理
创建版本库
初始化一个Git仓库,使用git init命令。
添加文件到Git仓库,分两步:
- 第一步,使用命令
git add <file>,注意,可反复多次使用,添加多个文件; - 第二步,使用命令git commit,完成。
每次修改,如果不add到暂存区,那就不会加入到commit中。
- 要随时掌握工作区的状态,使用git status命令。
- 如果git status告诉你有文件被修改过,用git diff可以查看修改内容。
版本回退
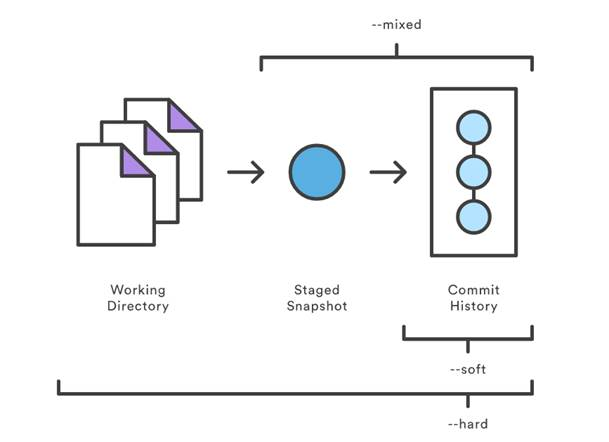
- HEAD指向的版本就是当前版本,因此,Git允许我们在版本的历史之间穿梭,使用命令
git reset --hard commit_id。 - 穿梭前,用
git log可以查看提交历史,以便确定要回退到哪个版本。 - 要重返未来,用
git reflog查看命令历史,以便确定要回到未来的哪个版本。( 回到未来也是用git reset命令 )

图片来源:
https://github.com/geeeeeeeeek/git-recipes/wiki
5.2-代码回滚:Reset、Checkout、Revert的选择
管理修改
场景1:当你改乱了工作区某个文件的内容,想直接丢弃工作区的修改时,用命令git checkout -- file (从stage里恢复到工作区,若stage空则从版本库恢复)
场景2:当你不但改乱了工作区某个文件的内容,还添加到了暂存区时,想丢弃修改,分两步,第一步用命令git reset HEAD file,就回到了场景1,第二步按场景1操作。
(或者git checkout HEAD <file> 直接从版本库 恢复到 stage和工作区)
场景3:已经提交了不合适的修改到版本库时,想要撤销本次提交,参考版本回退一节,不过前提是没有推送到远程库。
删除文件: 命令 git rm 用于确实地从版本库中删除一个文件
如果工作区中误删了文件可以从版本库中恢复:
git checkout --test.txt
远程仓库
要关联一个远程库,使用命令git remote add origin git@server-name:path/repo-name.git
( 添加后,远程库的名字就是origin)
关联后,使用命令git push -u origin master第一次推送master分支的所有内容;
此后,每次本地提交后,只要有必要,就可以使用命令git push origin master推送最新修改;
克隆远程仓库
要克隆一个仓库,首先必须知道仓库的地址,然后使用git clone命令克隆。
Git支持多种协议,包括https,但通过ssh支持的原生git协议速度最快。
创建与合并分支
- 查看分支:
git branch - 创建分支:
git branch <name> - 切换分支:
git checkout <name> - 创建+切换分支:
git checkout -b <name> 合并某分支到当前分支:
git merge <name>直接merge是fast forward模式,看不到分支历史加上--no-ff可以保留分支历史
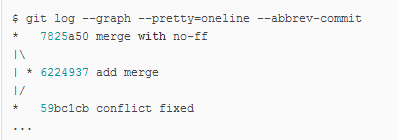
git merge --no-ff -m "merge with no-ff" dev
分支历史形式如下:

删除分支:
git branch -d <name>用 -d 只能删除被合并过的分支,删除还没合并的分支会报错如果要丢弃一个没有被合并过的分支,可以通过`git branch -D <name>`强行删除。
解决冲突
当Git无法自动合并分支时,就必须首先解决冲突。解决冲突后,再提交,合并完成。
用git log --graph命令可以看到分支合并图。
分支策略
在实际开发中,我们应该按照几个基本原则进行分支管理:
首先,master分支应该是非常稳定的,也就是仅用来发布新版本,平时不能在上面干活;
那在哪干活呢?干活都在dev分支上,也就是说,dev分支是不稳定的,到某个时候,比如1.0版本发布时,再把dev分支合并到master上,在master分支发布1.0版本;
你和你的小伙伴们每个人都在dev分支上干活,每个人都有自己的分支,时不时地往dev分支上合并就可以了。
所以,团队合作的分支看起来就像这样:

bug分支
git stash 保存当前工作现场
stash保存当前工作后可新建分支来修复bug,修复完成后merge掉bug分支,继续之前的工作
git stash list 查看stash状态
git stash apply 恢复现场,但是stash内容不删除
git stash drop 删除stash内容
git stash pop 恢复现场,并且删除stash
多人协作
从远程库clone时,默认情况下,在本地只能看到本地的master分支
要在dev分支上开发,就必须创建远程origin的dev分支到本地
本地和远程分支的名称最好一致
git checkout -b dev origin/dev
在dev分支上开发,并不时push到远程
git push origin dev
push时有可能会与别人push的内容冲突,这时需要pull获取远程的最新提交 ,然后处理冲突
git pull
若 git pull失败,提示没有指定本地dev分支与远程origin/dev分支的链接,设置连接:
git branch --set-upstream dev origin/dev
查看远程库信息,使用 git remote -v
标签管理
- 命令
git tag <name>用于新建一个标签,默认为HEAD,也可以指定一个commit id; git tag -a <tagname> -m "blablabla..."可以指定标签信息;git tag -s <tagname> -m "blablabla..."可以用PGP签名标签;- 命令
git tag可以查看所有标签。 git tag -d <name>删除标签git push origin <tagname>推送某个标签到远程git push origin --tags全部尚未推送到远程的本地标签
删除远程标签: 先删除本地标签,然后 git push origin :refs/tags/<tagname>
配置别名
例:
git config --global alias.lg "log --color --graph --pretty=format:'%Cred%h%Creset -%C(yellow)%d%Creset %s %Cgreen(%cr) %C(bold blue)<%an>%Creset' --abbrev-commit"
--global 表示针对当前用户起作用的,如果不加,只针对当前的仓库起作用
然后可以直接 git lg

cherry-pick
文档 https://git-scm.com/docs/git-cherry-pick
一篇博文 https://juejin.im/post/5925a2d9a22b9d0058b0fd9b
就是像捡樱桃, 从别的 branch 捡几个 commit 过来, 不需要是连续的 commit
git cherry-pick <commit-id>git cherry-pick -x <commit_id> # 表示保留原提交的作者信息git cherry_pick <start-commit-id>…<end-commit-id> # (左开,右闭] 的区间, 不包含start-commitgit cherry-pick <start-commit-id>^...<end-commit-id> # [左闭,右闭] 的区间# 更多写法见文档
远程仓库
创建远程仓库
mkdir -p gitrepos/test/cd gitrepos/test/git init --bare
远程仓库创建成功:

或者将一个现有仓库变更为远程仓库:
git config --bool core.bare true
作为远程仓库的目录下, 不能进行git add等操作, 会提示如下错误:
fatal: This operation must be run in a work tree

关联远程仓库
将某个已有目录初始化为git仓库, 并关联远程仓库:
cd <path>git initgit remote add <远程仓库名> ssh://<IP>/<path>/git remote -v //查看关联上的远程仓库
远程仓库名可以随便取, 一般用origin

然后就可以push和pull等操作了
git add .git commit -m "xxx"git push <远程仓库名> <分支名>

或者, clone该远程仓库:

需要输入用户密码.
可以使用 git config --global credential.helper store 记住密码
更改远程仓库关联URL
https://help.github.com/articles/changing-a-remote-s-url/
git remote set-url origin https://github.com/<USERNAME>/<REPOSITORY>.git
或者
git remote set-url origin git@github.com:<USERNAME>/<REPOSITORY>.git
远程分支
clone远程分支
git clone默认会把远程仓库整个给clone下来
但只会在本地默认创建一个master分支
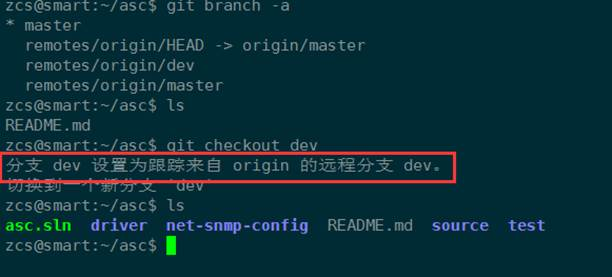
如果远程还有其他的分支,此时用git branch -a查看所有分支
git checkout <branch-name>
本地库已经有这个分支则切换到这个分支, 本地库没有而远程分支里有的话, 会创建一个本地与其关联的分支并切换过去

其他: git ckeckout --track remotes/orgin/<branch>等用法,
参考链接: https://git-scm.com/docs/git-checkout
或者使用命令git checkout --help查看帮助文档
删除远程分支
http://www.cnblogs.com/wangkongming/p/4164516.html
git push origin (空格):<要删除的远程分支>
与本地分支的关联
查看关联:
git branch -vv
或者可通过查看仓库.git目录下的config文件来知道关联情况
建立关联:
http://blog.csdn.net/netwalk/article/details/21088405
git branch --set-upstream debug origin/debug

若无关联,push会在远程新建同名分支,pull会出现以上提示
git branch --set-upstream-to=origin/<branch> <local_branch>git checkout --track origin/serverfix
The —set-upstream flag is deprecated and will be removed. Consider using —track or —set-upstream-to
fetch 和 pull
https://ruby-china.org/topics/15729
区别
git fetch 拿到了远程所有分支的更新,用 cat .git/FETCH_HEAD 可以看到其状态
git pull = git fetch + merge, 若git fetch后FETCH_HEAD 都是 not-for-merge 则不会有接下来的 merge 动作
merge 动作的默认目标是当前分支,若要切换目标,可以直接切换分支
merge 动作的来源则取决于你是否有 tracking,若有则读取配置自动完成,若无则请指明【来源】
# 当你在 master 下git pull# 等于 fetch origin,然后 merge origin/master# 当你在 develop 下git pull# 等于 fetch origin,然后 merge origin/develop
若你有多个 remote
git pull [remote name] 所做的事情是:
fetch [remote name] 的所有分支
寻找本地分支有没有 tracking 这些分支的,若有则 merge 这些分支,若没有则 merge 当前分支
另外,若只有一个 remote,假设叫 origin,那么 git pull 等价于 git pull origin
平时养成好习惯,没谱的时候都把 【来源】带上
是否有tracking
如果你曾经这么推过:git push -u origin master,那么你执行这条命令时所在的分支就已经 tracking to origin/master 了,-u 的用处就在这里
如果你记不清了:cat .git/config,给你一张截图,注意红色方框标示的地方(上半部分是 tracking 的,下半部分是 untracking 的),由此可见,tracking 的本质就是指明 pull 的 merge 动作来源
使用命令 git branch -vv 也可以查看分支关联
合并 origin/master 到 develop
# 当你在 master 下git checkout develop # 切换到 develop,这就是 【目标】git pull origin master # 合并 origin/master,这就是 【来源】
.gitignore
https://git-scm.com/docs/gitignore
https://www.barretlee.com/blog/2015/09/06/set-gitignore-after-add-file/
If the pattern does not contain a slash /, Git treats it as a shell glob pattern and checks for a match against the pathname relative to the location of the .gitignore file
不加斜杠 / 的写法, 栗如 foo , 被视为”glob pattern”, 对文件夹, 文件和链接都有效
可以前加 / 表路径 /foo
foo/ will match a directory foo and paths underneath it, but will not match a regular file or a symbolic link foo
加斜杠的写法 foo/ 匹配所有 foo 文件夹及文件夹下的内容(递归, 包括子路径里的) , 不匹配文件和符号链接
假设目录结构: /aaa/bbb/ccc/xxx.xx
写法 ccc 或 ccc/ 都可以成功ignore 这里的 ccc 目录
但是写法 bbb/ccc 不能, 这种需要写成 **/bbb/ccc
glob 匹配规则:
“*“ matches anything except “/“,
“?“ matches any one character except “/“
“[]“ matches one character in a selected range.** 如果一个 pattern 以 ** 开头,如 **/foo,最后会匹配所有文件夹下的 foo 文件(夹)
如果一个 pattern 以 /** 开头,如 abc/**,则表示匹配 abc 目录下的所有内容
如果一个 pattern 中间包含 **,如 a/**/b,则会匹配 a/b、a/x/b、a/x/y/b以及所有类似的内容
An optional prefix “!“ which negates the pattern; any matching file excluded by a previous pattern will become included again.
It is not possible to re-include a file if a parent directory of that file is excluded.
用 ! 可以取消ignore, 但如果父文件夹已经被ignore了的话, ! 也救不回其下面的文件
可以用如下栗子的方式, ignore /log/** , 不要直接ignore log/
# 栗子, ignore log下的任何东西但是保留log文件夹本身/log/**!/log/.gitkeep
Example to exclude everything except a specific directory foo/bar (note the /* - without the slash, the wildcard would also exclude everything within foo/bar):
$ cat .gitignore# exclude everything except directory foo/bar/*!/foo/foo/*!/foo/bar
修改提交历史
参考:
Git 工具 - 重写历史 @git-scm.com
代码合并:Merge、Rebase-的选择 @geeeeeeeeek
Rebase 代替合并 @git-tower.com
—amend
修改最近一次提交的用户名
git commit --amend --author="NewAuthor <NewEmail@address.com>"
http://i.dotidea.cn/2015/04/git-amend-author/
rebase
可以整理提交历史
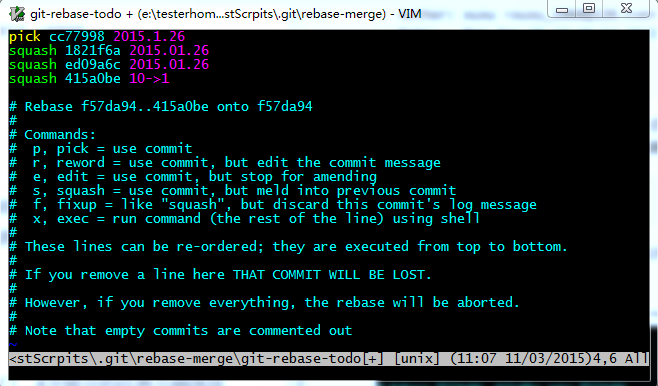
git checkout featuregit rebase -i master # -i 表示交互式rebase; 可以不加i
此操作重写了feature的提交历史, 把master的提交并入到了feature分支的提交历史中
注意不要在公共分支rebase
rebase可以用于: 将自己的feather分支并入公共分支前, 整理去掉杂乱的提交历史
利用rebase来压缩多次提交
git rebase -i HEAD~4
最后一个数字4代表压缩最后四次提交
git rebase -i commitID
整理该commit与其之后的提交.
filter-branch
https://git-scm.com/docs/git-filter-branch
从所有提交中删除一个文件
$ git filter-branch --tree-filter 'rm -f passwords.txt' HEADRewrite 6b9b3cf04e7c5686a9cb838c3f36a8cb6a0fc2bd (21/21)Ref 'refs/heads/master' was rewritten
全局更换邮件地址
git filter-branch --commit-filter 'if [ "$GIT_COMMITTER_EMAIL" = "foo@bar.com" ];thenGIT_AUTHOR_NAME="kami";GIT_AUTHOR_EMAIL=" ";GIT_COMMITTER_NAME="kami";GIT_COMMITTER_EMAIL=" ";git commit-tree "$@";elsegit commit-tree "$@";fi' HEAD
匹配条件及修改值根据情况修改
参考: Git Internals - Environment Variables
可能出现的异常
Cannot create a new backup.
A previous backup already exists in refs/original/
Force overwriting the backup with -f
解决:
git update-ref -d refs/original/refs/heads/master
git references
Git-内部原理-Git-References @git-scm.com
稀疏检出和浅克隆
https://www.worldhello.net/gotgit/08-git-misc/090-sparse-checkout-and-shallow-clone.html
https://git-scm.com/docs/git-read-tree
稀疏检出:
本地还是有完整版本库, 根据.git/info/sparse-checkout文件的配置决定只关注哪些文件
语法类型同 .gitnore 文件
浅克隆
执行 git clone 或者 git fetch 操作时用 --depth <depth> 参数设定要获取的历史提交的深度( <depth> 大于0),就会把源版本库分支上最近的 <depth> + 1 个历史提交作为新版本库的全部历史提交.
浅克隆一般用于对远程版本库的查看和研究,如果在浅克隆版本库中进行了提交,最好通过 git format-patch 命令导出为补丁文件再应用到远程版本库中
浅克隆的一个限制是,你不能从它推送到一个新的存储库
! [remote rejected] master -> master (shallow update not allowed)
git fetch --unshallow old-remote
然后再重新 push 到 new-remote
https://codeday.me/bug/20170703/33672.html
large file storage
Git LFS 操作指南 https://zzz.buzz/zh/2016/04/19/the-guide-to-git-lfs/
安装 https://git-lfs.github.com/
Git LFS 被主流的 Git 服务如 GitHub 和 GitLab 支持
使用 Git LFS,在默认情况下,只有当前签出的 commit 下的 LFS 对象的当前版本会被下载
通过 Git LFS 所管理的对象实际在本地的存储位置是在 .git/lfs/objects 目录下,该目录根据对象的 sha256 值来组织。
作为对比,Git 自身所管理的对象则是存储在 .git/objects 目录下,根据 commit, tree, blob, tag 的 sha1 值来组织。
Git LFS 对象在服务器上可以存储在 Git 仓库之外的任何地方,具体位置由 Git LFS Server 的配置决定,而与 Git 客户端无关。
# 查看当前使用 Git LFS 管理的匹配列表git lfs track# 使用 Git LFS 管理指定的文件git lfs track "*.psd"# 不再使用 Git LFS 管理指定的文件git lfs untrack "*.psd"# 类似 `git status`,查看当前 Git LFS 对象的状态git lfs status# 枚举目前所有被 Git LFS 管理的具体文件git lfs ls-files# 检查当前所用 Git LFS 的版本git lfs version# 针对使用了 LFS 的仓库进行了特别优化的 clone 命令,显著提升获取# LFS 对象的速度,接受和 `git clone` 一样的参数。 [1] [2]# 自 Git LFS 2.3.0 版本起,git lfs clone 已不再推荐使用, 最新版本的 git clone 已经能够提供与 git lfs clone 一致的性能git lfs clone https://github.com/user/repo.git# 获取当前 commit 下包含的 LFS 对象的当前版本git lfs fetchgit lfs checkout# 或git lfs pull# 操作定制文件夹git config lfs.fetchinclude 'images/**'git config lfs.fetchexclude 'videos/**'git config lfs.fetchinclude 'videos/**'git config lfs.fetchexclude 'videos/chameleon.mp4'
解决 Git Large File Storage 上传失败
https://help.github.com/cn/github/managing-large-files/resolving-git-large-file-storage-upload-failures
http://www.ruanyifeng.com/blog/2016/01/commit_message_change_log.html
优雅的提交你的 Git Commit Message https://juejin.im/post/5afc5242f265da0b7f44bee4
规范
<type>(<scope>): <subject>// 空一行<body>// 空一行<footer>
Header 是必需的, Body 和 Footer 可以省略
type 用于说明 commit 的类别,只允许使用下面7个标识
- feat:新功能(feature)
- fix:修补bug
- docs:文档(documentation)
- style: 格式(不影响代码运行的变动)
- refactor:重构(即不是新增功能,也不是修改bug的代码变动)
- test:增加测试
- chore:构建过程或辅助工具的变动
scope 用于说明 commit 影响的范围,比如数据层、控制层、视图层等等,视项目不同而不同
subject 是 commit 目的的简短描述,不超过50个字符
Body 部分是对本次 commit 的详细描述,可以分成多行
Footer 部分只用于两种情况
(1)不兼容变动
(2)关闭 Issue
还有一种特殊情况,如果当前 commit 用于撤销以前的 commit,则必须以 revert: 开头,后面跟着被撤销 Commit 的 Header
详见http://www.ruanyifeng.com/blog/2016/01/commit_message_change_log.html
工具Commitizen
https://github.com/commitizen/cz-cli
全局安装
Install commitizen globally, if you have not already.
npm install -g commitizen
Install your preferred commitizen adapter globally, for example cz-conventional-changelog
npm install -g cz-conventional-changelog
Create a .czrc file in your home directory, with path referring to the preferred, globally installed, commitizen adapter
echo '{ "path": "cz-conventional-changelog" }' > ~/.czrc
You are all set! Now cdinto any git repository and use git cz instead of git commit and you will find the commitizenprompt.
https://github.com/commitizen/cz-cli
本地安装
npm install -g commitizen
在项目目录里,运行下面的命令,使其支持 Angular 的 Commit message 格式。
commitizen init cz-conventional-changelog --save --save-exact
以后,凡是用到 git commit 命令,一律改为使用 git cz
也许 Angular 的那套规范我们不习惯, 那么可以通过指定 Adapter cz-customizable 指定一套符合自己团队的规范
全局 或 项目级别安装:
npm i -g cz-customizable# ornpm i -D cz-customizable
修改 .czrc 或 package.json 中的 config 为:
{ "path": "cz-customizable" }
or
"config": {"commitizen": {"path": "node_modules/cz-customizable"}}
同时在 ~/ 或项目目录下创建 .cz-config.js 文件, 维护你想要的格式:
比如一个配置文件: leohxj/.cz-config
https://juejin.im/post/5afc5242f265da0b7f44bee4
工具Commitlint
参考 https://juejin.im/post/5afc5242f265da0b7f44bee4
一般使用
commitlint: 可以帮助我们 lint commit messages, 如果我们提交的不符合指向的规范, 直接拒绝提交,
同样的, 它也需要一份校验的配置, 这里推荐 @commitlint/config-conventional (符合 Angular团队规范).
npm i -D @commitlint/config-conventional @commitlint/cli
同时需要在项目目录下创建配置文件 .commitlintrc.js, 写入:
module.exports = {extends: [''@commitlint/config-conventional''],rules: {}};
针对自定义Adapter
npm i -D commitlint-config-cz @commitlint/cli
module.exports = {extends: ['cz'],rules: {}};
结合husky
校验 commit message 的最佳方式是结合 git hook, 所以需要配合 Husky.
npm i husky@next
package.json 中添加:
"husky": {"hooks": {...,"commit-msg": "commitlint -e $GIT_PARAMS"}},
生成changelog
如果你的所有 Commit 都符合 Angular 格式,那么发布新版本时, Change log 就可以用脚本自动生成
$ npm install -g conventional-changelog$ cd my-project$ conventional-changelog -p angular -i CHANGELOG.md -w
http://www.ruanyifeng.com/blog/2016/01/commit_message_change_log.html
借助 standard-version 这样的工具, 自动生成 CHANGELOG, 甚至是 语义化的版本号(Semantic Version).
https://juejin.im/post/5afc5242f265da0b7f44bee4
github
pull request流程
- 从他人页面fork
- 从fork到的在自己名下的库 clone 到本地
- 本地修改完后commit、push到自己的远程库
- 在他人页面点pull request
同步原库 : fork之后, 在自己fork的库下关联原库, 然后fetch
git remote addupstream https:\\xxxxx.gitgit fetch upstream
ssh key
https://segmentfault.com/q/1010000003061640
生成key:
git config --global user.name "yourname"git config --global user.email "youremail"ssh-keygen -t rsa -C “youremail
在github添加公钥:
https://github.com/settings/ssh/new
本地添加私钥:
chmod 0600 id_rsaeval `ssh-agent -s`ssh-add id_rsa
测试是否成功:
ssh git@github.com
可能的问题及解决
permission for id_rsa is too open
Could not open a connection to your authentication agent
GitHub Pages
https://help.github.com/categories/github-pages-basics/
将项目web目录部署到gh-pages分支
git subtree 是一条git子命令,可以在多个git项目之间双向同步子项目,简单的说就是:可以在一个项目中引用另外一个项目仓库中的代码
- 切换到gh-pages分支
git checkout -b gh-pages # 创建gh-pages并切换到该分支git checkout gh-pages # 切换到gh-pages分支
- 构建代码
- 将build/dist目录下的所有文件夹推送至远程仓库的gh-pages分支,
# 强制添加build(react项目)/dist/_book(gitbook项目)文件夹,因为.gitignore文件中定义了忽略该文件git add -f dist# 提交到本地暂存区git commit -m 'update'# 部署dist目录下的代码git subtree push --prefix dist origin gh-pages
小技巧
保存密码
http://www.cnblogs.com/wish123/p/3937851.html
保存密码,避免每次push、pull都要输密码
git config --global credential.helper store
windows中修改保存的信息
- 进入控制面板
- 选择用户账户
- 选择管理你的凭据
- 选择Windows凭据
- 选择git保存的用户信息
- 选择编辑或者进行删除操作
快捷命令设置
git config --global alias.ck "checkout"git config --global alias.st "status"git config --global alias.lg "log --color --graph --pretty=format:'%Cred%h%Creset -%C(yellow)%d%Creset %s %Cgreen(%cr) %C(bold blue)<%an>%Creset' --abbrev-commit"
配置用户名邮箱
查看
git config user.namegit config user.email
设置
// 设置全局git config --global user.name "Author Name"git config --global user.email "Author Email"// 或者设置本地项目库配置git config user.name "Author Name"git config user.email "Author Email"
自动行尾
https://git-scm.com/book/zh/v2/自定义-Git-配置-Git
git config --global core.autocrlf input
- true: x -> LF -> CRLF
- input: x -> LF -> x
- false: x -> x -> x
where x is either CRLF (windows-style) or LF (unix-style) and arrows stand for
file to commit -> repository -> checked out file
提交空文件夹
在空文件夹中放一个 .gitkeep 文件
.gitignore中加上: !.gitkeep
详见.gitignore
代码统计
个人代码量
git log --author="username" --pretty=tformat: --numstat | awk '{ add += $1; subs += $2; loc += $1 - $2 } END { printf "added lines: %s, removed lines: %s, total lines: %s\n", add, subs, loc }' -
每个人代码量
git log --format='%aN' | sort -u | while read name; do echo -en "$name\t"; git log --author="$name" --pretty=tformat: --numstat | awk '{ add += $1; subs += $2; loc += $1 - $2 } END { printf "added lines: %s, removed lines: %s, total lines: %s\n", add, subs, loc }' -; done
仓库提交者排名前5
git log --pretty='%aN' | sort | uniq -c | sort -k1 -n -r | head -n 5
贡献者统计
git log --pretty='%aN' | sort -u | wc -l
提交数统计
git log --oneline | wc -l

